Embed Size (px)
Citation preview

8/2/2019 Máquina Cortar
http://slidepdf.com/reader/full/maquina-cortar 1/14
Eu rmmT h e C l e a n A i r C h o i c e
OPERATOR'S MANUALCordless Shear/Shrubber
This prod uct is covered by U.S. patents and other international patentsi
Copyright. Al l Rights Reserved.
Model #M1E-LD-200M/7.2l t em#PSS10172
242767
This product has been engineered and manufactured to our h igh s tandard for dependabi l i ty ,
eas e of opera t ion, and op erato r safety. Properly cared for, it wi l l give you yea rs of rugged,
t rouble-f ree per formance.
A WARNING: To reduce th e risk o f injury, th e user must read and understand th e operator 's manu al
. before us ing this product.
Thank you for your purchase.
SAVE THIS MANUAL FOR FUTURE REFERENCE
8/2/2019 Máquina Cortar
http://slidepdf.com/reader/full/maquina-cortar 2/14
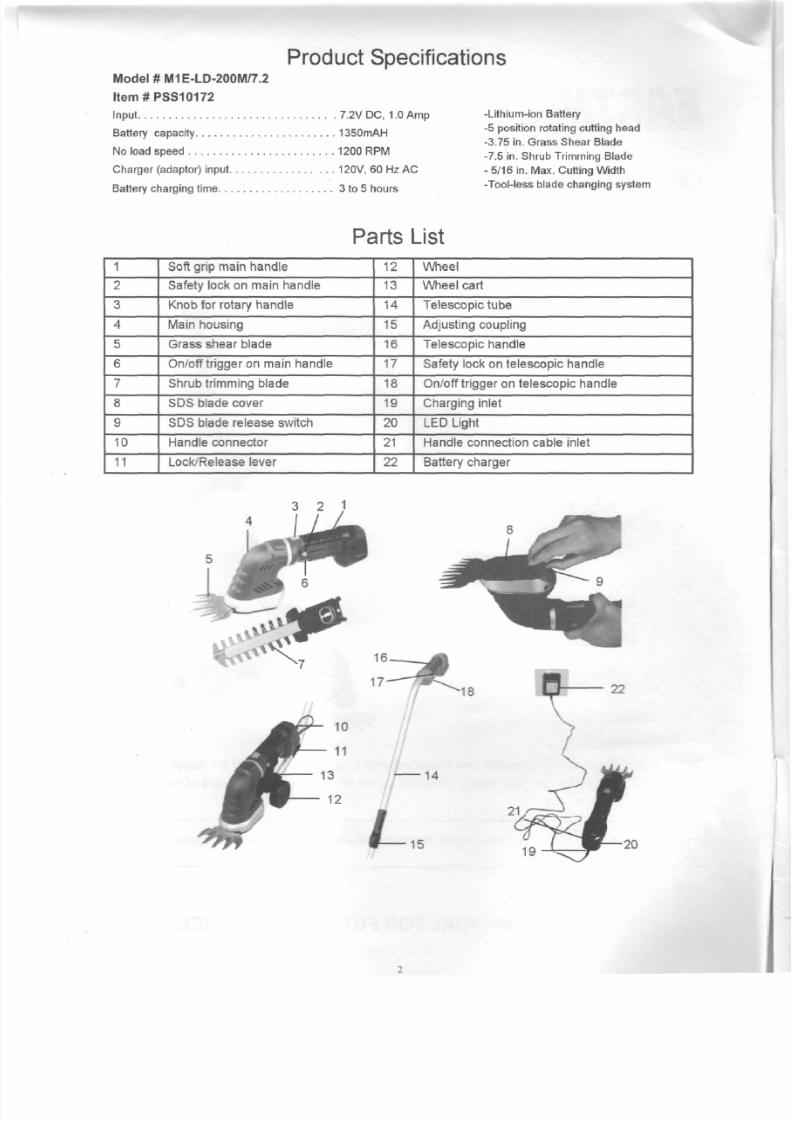
Product SpecificationsModel # M1E-LD-200M/7.2
l t e m # P S S 1 0 1 7 2
Input 7.2V DC, 1.0 Amp
Battery capacity 1350mAH
No load speed 1200 RPM
Ch arger (adaptor) input 120V, 60 Hz AC
Battery charging time 3 to 5 hours
-Lithium-ion Battery
-5 position rotating cutting head
-3.75 in. Grass Shear Blade
-7.5 in. Shrub Trimming Blade
- 5/16 in. Max. Cutting Width
-Tool-less blade changing system
Parts List
1
2
3
4
5
6
7
8
9
10
11
Soft grip main handle
Safety lock on main handle
Knob fo r rotary handle
Main housing
Grass shear blade
On/off t r igger on main handle
Shrub tr imming blade
SD S blade cover
SDS blade re leas e swi tch
Handle connec to r
Lock /Re lease lever
12
13
14
15
16
17
18
19
20
21
22
Wheel
Wheel car t
Telescopic tube
Adjust ing coupling
Telescopic handle
Safety lock on telescopic handle
On/off tr igger on telescopic handle
Charging inlet
LED Light
Handle connect ion cable in let
Battery charger
3 2 1
8/2/2019 Máquina Cortar
http://slidepdf.com/reader/full/maquina-cortar 3/14
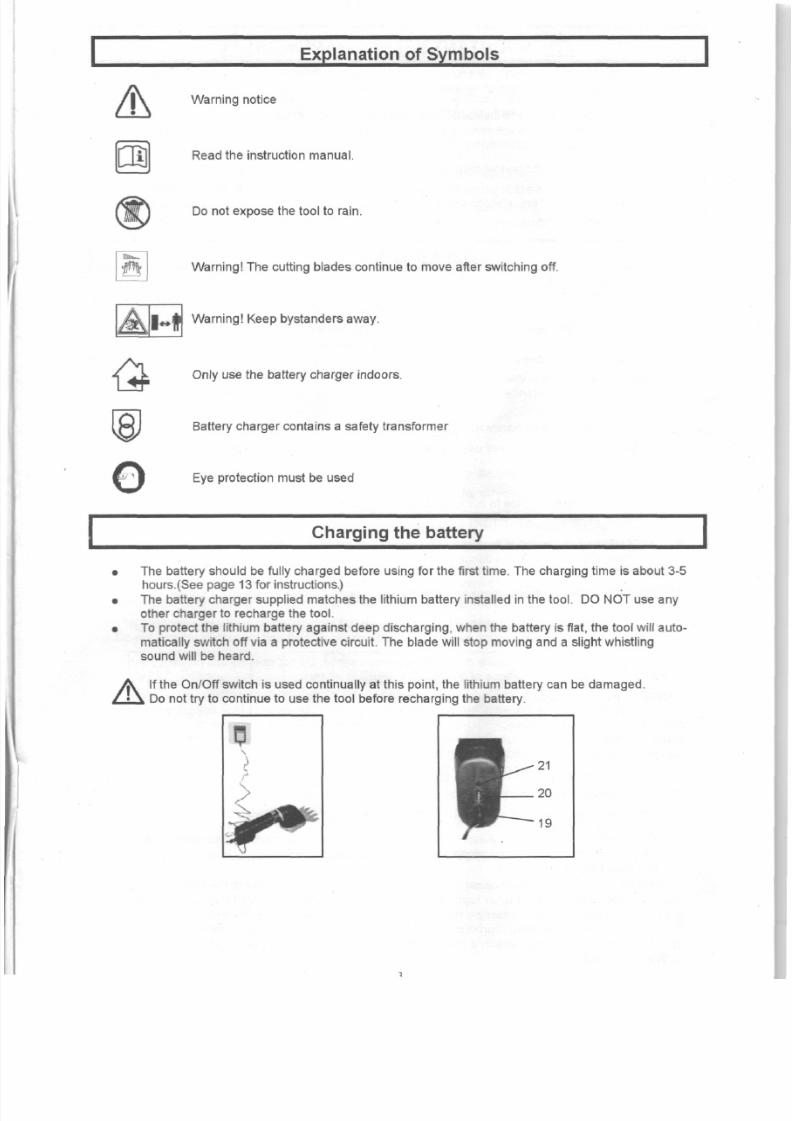
Explanation of Sym bols
Warning not ice
Read th e instruction manual.
Do no t expose the t oo l to rain.
Warning! The cutting blades continue to move after switching off.
Warning! Keep bystanders away.
Only use the battery charger indoors.
Battery charger contains a safety transformer
Eye protection must be used
Charging the battery
The battery should be fully charge d be fore using fo r the first time. The charging time is abou t 3-5hours.(See page 13 for instructions.)
The battery charger suppl ied matches th e l ithium battery installed in the tool . DO NOT use anyother charger to recharge th e tool.To protec t the lithium battery against deep discharging, when the battery is flat, the tool will auto-matical ly switch off via a protect ive ci rcuit . The blade wi ll stop m oving and a slight whistlingsound wi l l be heard .
If the On /Off swi tch is used cont inual ly at this point, the l i thium b attery can be damaged.Do not try to continue to use the tool be fore recharging the battery.
19
8/2/2019 Máquina Cortar
http://slidepdf.com/reader/full/maquina-cortar 4/14
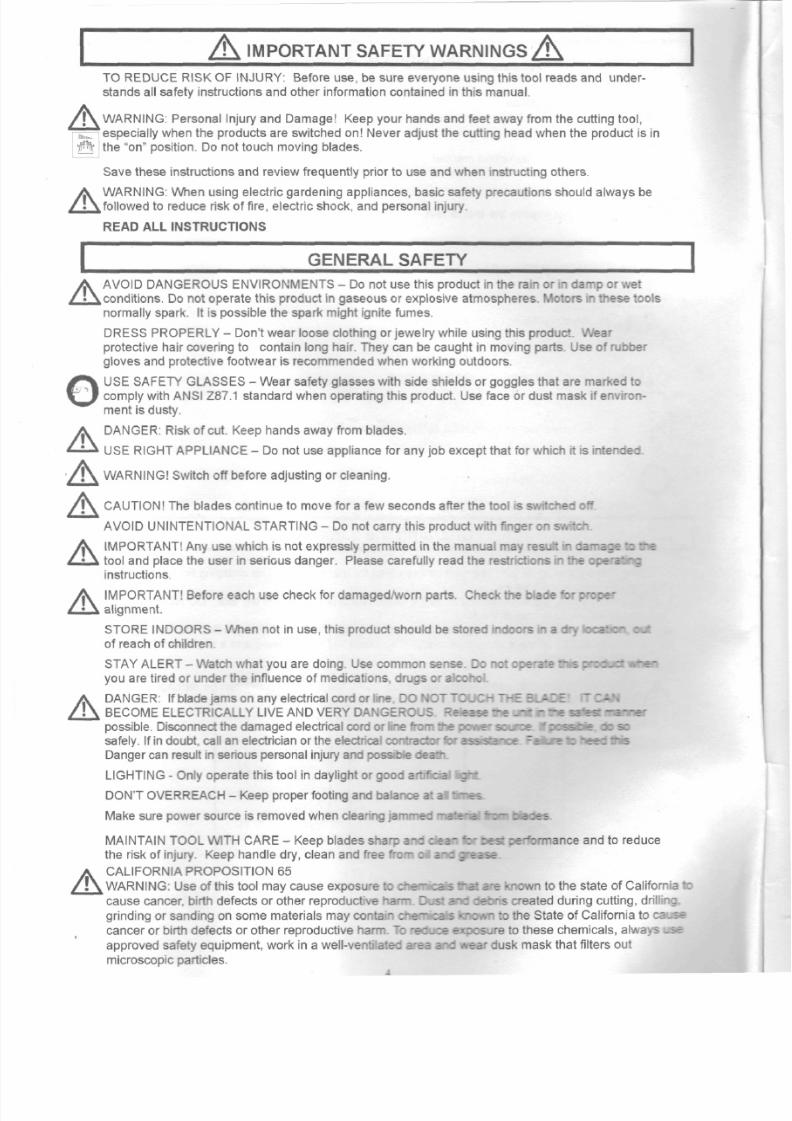
IMPORTANT SAFETY WARNINGS
TO REDUCE RISK OF INJURY : Before use, be sure everyone using this tool reads and under-
stands a l l safety inst ruct ions and other informat ion con tained in th is ma nua l .
WA RNIN G: Personal Injury and Dam age! Keep your hands and feet away f rom the cut ting tool ,especial ly w hen th e products are switched on! Never adjust th e cutting head when th e product is inthe "on" posit ion. Do not touch moving blades.
Save these instructions and review frequently prior to use and when instructing others.
WARNING: When using elect ric gardening appl iances, basic safety precaut ions should always bek fol lowed to reduce risk of f ire, electric shock, and personal injury.
READ ALL INSTRUCTIONS
GENERAL SAFETY
AV OID DANGEROUS ENV IRONM ENTS - Do not use th is product in the rain or in damp or wet
iconditions. Do not operate this product in gaseous or explosive atmospheres. Motors in these tools
norm ally spark. It is possible the spa rk might ignite fume s.
DRESS PROPERLY - Don't we ar loose clothing or jewe lry whi le using th is product . Wearprotective hair cove ring to contain long hair. They can be caug ht in mo ving parts. Use of rubber
gloves and protect ive footwear is recommended when working outdoors.
USE SAFETY GLASSES - Wear safety glasses w ith s ide shields or goggles tha t are marked tocomply with ANS I Z87.1 standard when o pera t ing th is product . Use face or dust mask if environ-
ment is dusty.
DANG ER: Risk o f cut. Keep hands a way f rom blades.
USE RIGHT APPL IANCE - Do not useappliance for any job except that for which it is intended.
WARNING! Switch of f before adjust ing or c leaning.
CAUTION! The blades continue to move for a few seconds after th e tool is switched off.
AVOID UNINTENTIONAL STARTING - Do not carry this product with finger on switch.
IMPORTANT! Any use which is not expressly permitted in the manual may result inda~ = - . - . : -•=
too l and place th e user in serious dange r. Please care ful ly read th e restrictions in the operating
instructions.
IMPORTANT! Before each use check fo r damage d/worn par ts . Check th e blade for proper
alignment.
S T O R E I N D O O R S -When not in use, this product should be stored indoors in a dry location out
of reach of children.
STAY ALERT-Watch wha t you aredoing. Use common sense. Do notoperate ttvs product
you are t ired or under th e influence of medicat ions, drugs or alcohol.
DANGER: If blade jam s on any electrical cord or line. DO NOT TOUCH THE BLADE' iTCAN
BECOME ELECT RIC ALLY L IVE AND VERY DANGEROUS.possible. Disconnect the dam age d electrical cord or line from the |
safely. If in doubt, call an electrician or the electrical contractor for;
Danger ca n result in serious perso nal injury and possible death.LIGHTING - Only opera te this too l in dayl ight or good artificial fight
DON'T OV ERREACH - Keep proper footing andbalance at aS fries
Make sure po wer source is remo ved when clearing jammed material tornMade
: .
MAINTAIN TOOL WITH C A R E - Keep b lade s s-3" a — : e = -
th e risk o f injury. Keep handle dry, clean and free from o =-:
CALIFORNIA PROPOSITION 65
DARNING: Use of this tool may cause exposure t: ;-e~ :a ^ 'cause cancer, birth defects or other reproductive harm. Oust ar
grinding or sanding on some materials may contain chemicals I
cancer or birth defects or other reproductive harm. To reduce e
approved safety equipment, w ork in a well-ventilated a-ea ^-~-microscopic particles.
:•=>• :r - : - ~ a n c e and to reduce
• = : a * e • ~:.'.n to the state of Califorr a ::: :e:-s cheated during cutting, drilling.
-:.-.- :o th e State o f Cal i fornia to -------iwsure to these chemicals, always -se
.ea- ~usk mask that f i l ters out
8/2/2019 Máquina Cortar
http://slidepdf.com/reader/full/maquina-cortar 5/14
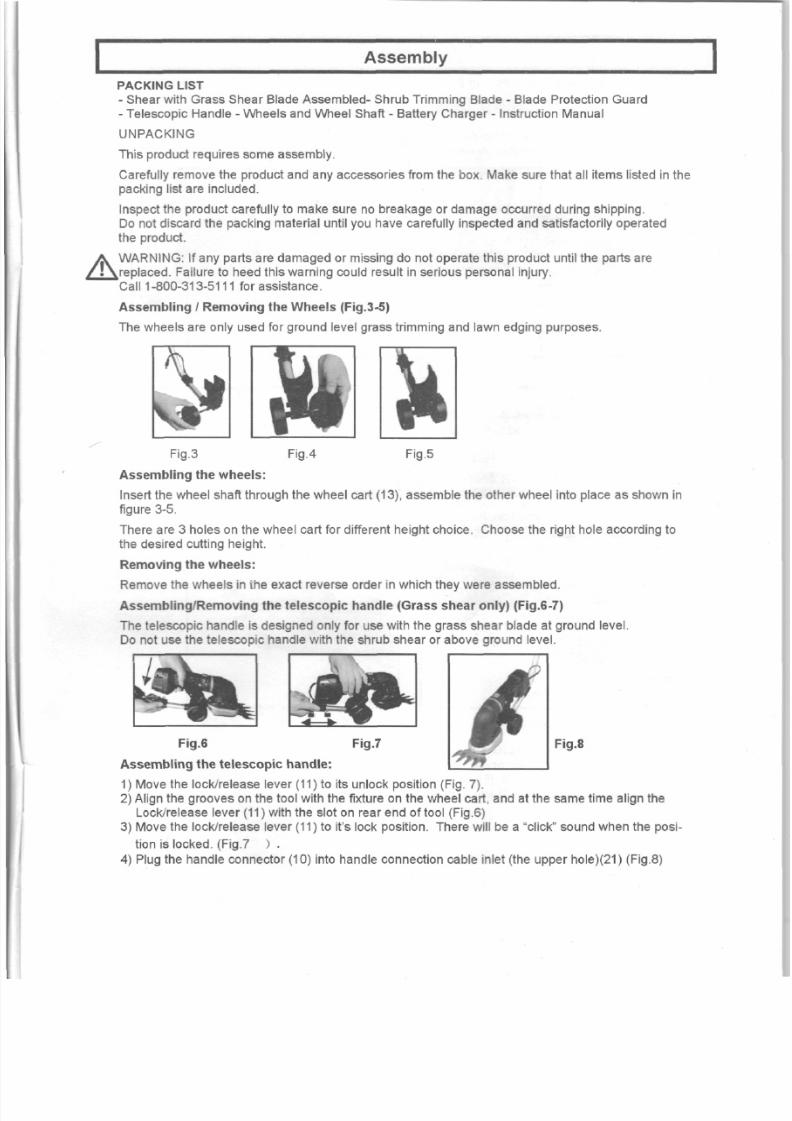
Assembly
PACKING LIST- Shear wi th Grass Shear Blade Assembled- Shrub Tr imming Blade - Blade Protect ion Guard- Telescopic Handle - Wheels and Wheel Shaft - Battery Cha rger - Instruction Manual
UNPACKING
This product requires some assembly.
Careful ly remove th e product and any accessor ies f rom th e box. Make sure that al l items listed in the
packing list are included.
Inspect the produc t carefully to make sure no breaka ge or dam age o ccu rred during shipping.Do not discard the packing material until you have ca reful ly inspected and sa t is factor i ly ope ratedthe product.
WARNING: I f any parts are damaged or missing do not operate this product until th e parts ar e^replaced. Fai lure to heed this warning could result in serious personal injury.Cal l 1-800-313-5111 fo r assistance.
Assembling / Removing the Wheels (F ig.3-5 )
The wheels are only used fo r ground level grass tr imming and lawn edging purposes.
Fig.4 Fig.5ig.3
Assem bling the wheels:
Insert th e wheel shaft through th e wheel cart (13), assemble th e other wheel into place as shown infigure 3-5.
There are 3 holes on the wheel car t fo r different height choice. Choose th e r ight hole according tothe desired cutting height.
Removing the wheels:R emov e th e whee ls in th e exact reverse order in which they were assembled.
Assembl ing/Removing the telescopic handle (Grass shear only) (Fig.6-7)
The telescopic handle is designed only for use with th e grass shear blade at ground level.Do not use the te le sco pic handle wi th the shrub shear or a bove gro und level .
Fig.6 Fig.7 Fig.8
Assembling the telescopic handle:
1) Move the lock/re lease leve r (11) to its unlock position (Fig. 7) .2) Align the grooves on the tool with the f ixture on the wheel cart, and at the same time align the
Lock/re lease lever (11) with the slot on rear end of tool (Fig.6)3) Move the lock/re leas e lever (11) to it's lock position. There will be a "click" sound when the posi-
tion is locked . (Fig.7 ) .
4) Plug the handle connector (10) into handle connection cable inlet (the upper hole)(21) (Fig.8)
8/2/2019 Máquina Cortar
http://slidepdf.com/reader/full/maquina-cortar 6/14
Assembly
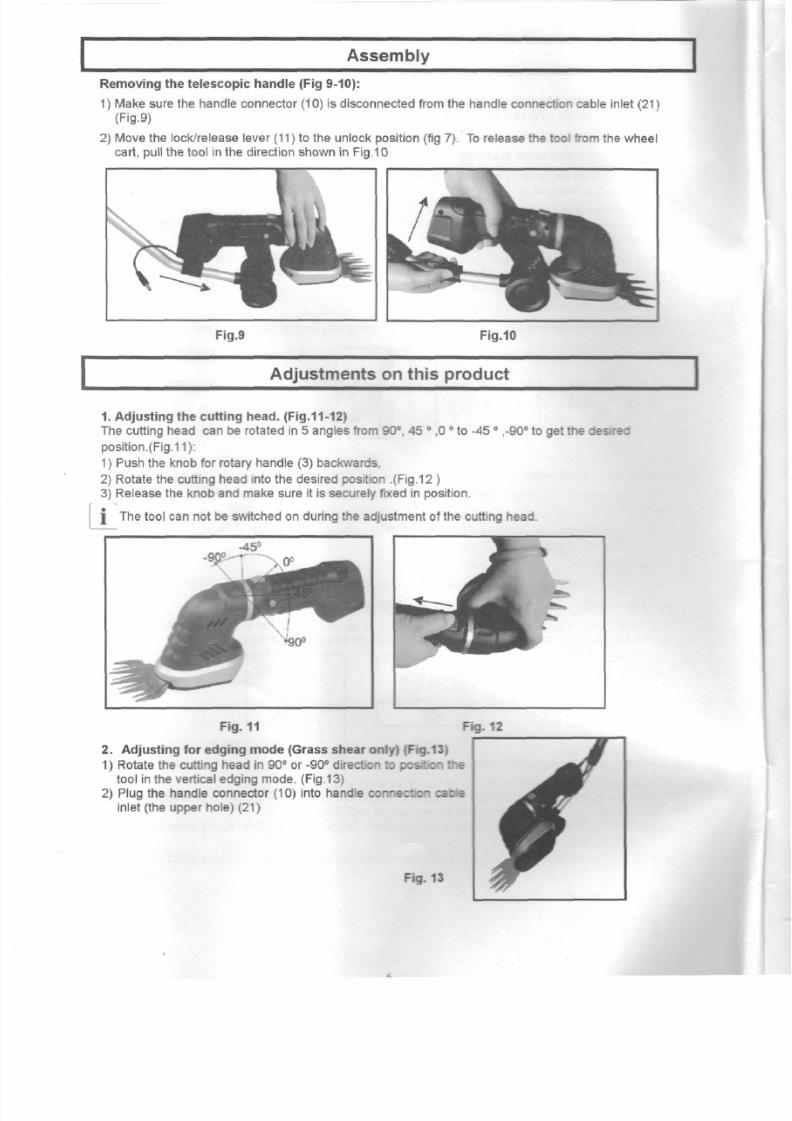
Rem oving the telescopic handle (Fig 9-10):
1) Make sure the handle connector (10) is disconnected from the handle connection cable inlet (21)
(Fig.9)
2) Move the lock/release lever (11) to the unlock po sit ion (fig 7). To release the tool from the whee lcart, pull the tool in the direction shown in Fig.10
Fig.9 Fig.10
Adjustments on this product
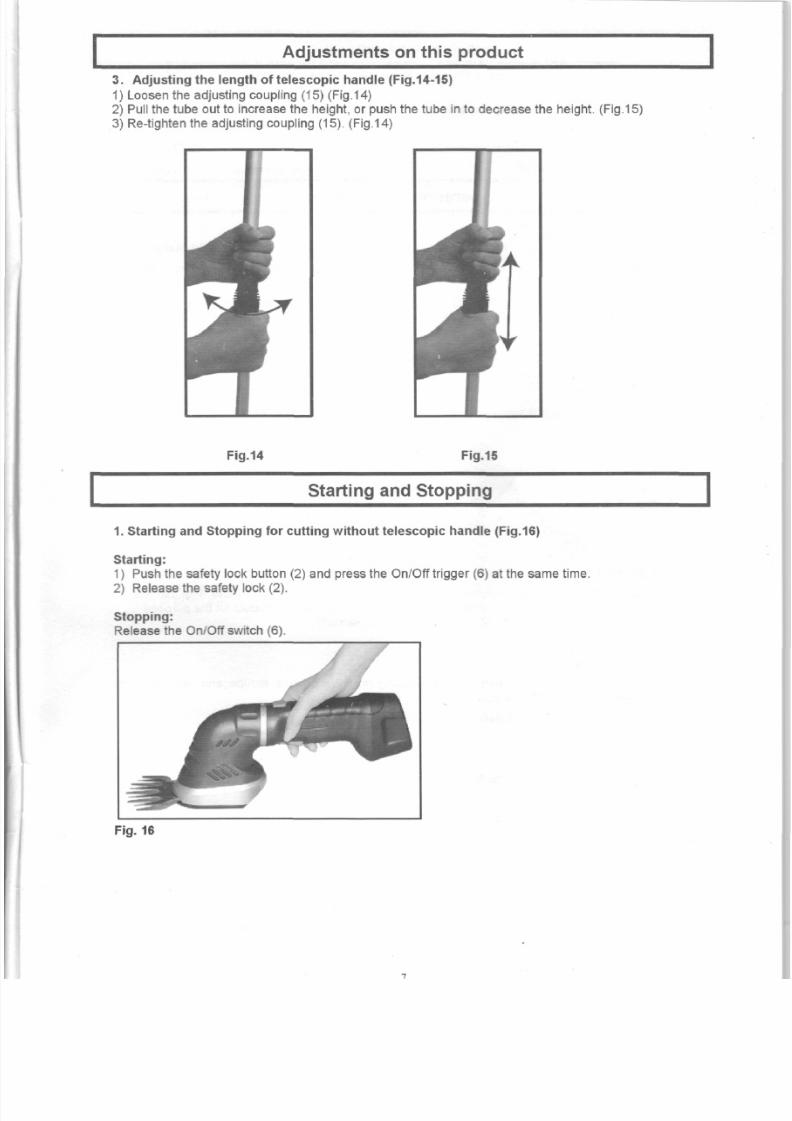
1. Adjusting the cutting head. (Fig.11-12)
The cutting h ead can be ro tate d in 5 angles fro m 90°. 45 ° ,0 ° to -45 ° ,-90° to get the desirec
position.(Fig.11):
1) Push the knob fo r rotary handle (3) backv/ards .
2) Rotate the cutting h ead into the des ired po sit ion .(Fig.12 )3) Release the knob and make sure i t is securely f ixed in position.
The tool can not be switched on during the adjustment of the cutting head.
Fig. 11 Fig. 12
2. Adjusting for edg ing mode (Grass shear only) (Fig.13)
1) Rotate the cutting head in 90° or -90° direction to postfon tne
too l in the vert ical edging m ode. (Fig.13)2) Plug the handle connector (10) into handle connection cable
inlet (the upper hole) (21)
Fig. 13
8/2/2019 Máquina Cortar
http://slidepdf.com/reader/full/maquina-cortar 7/14
Adjustments on this produc t
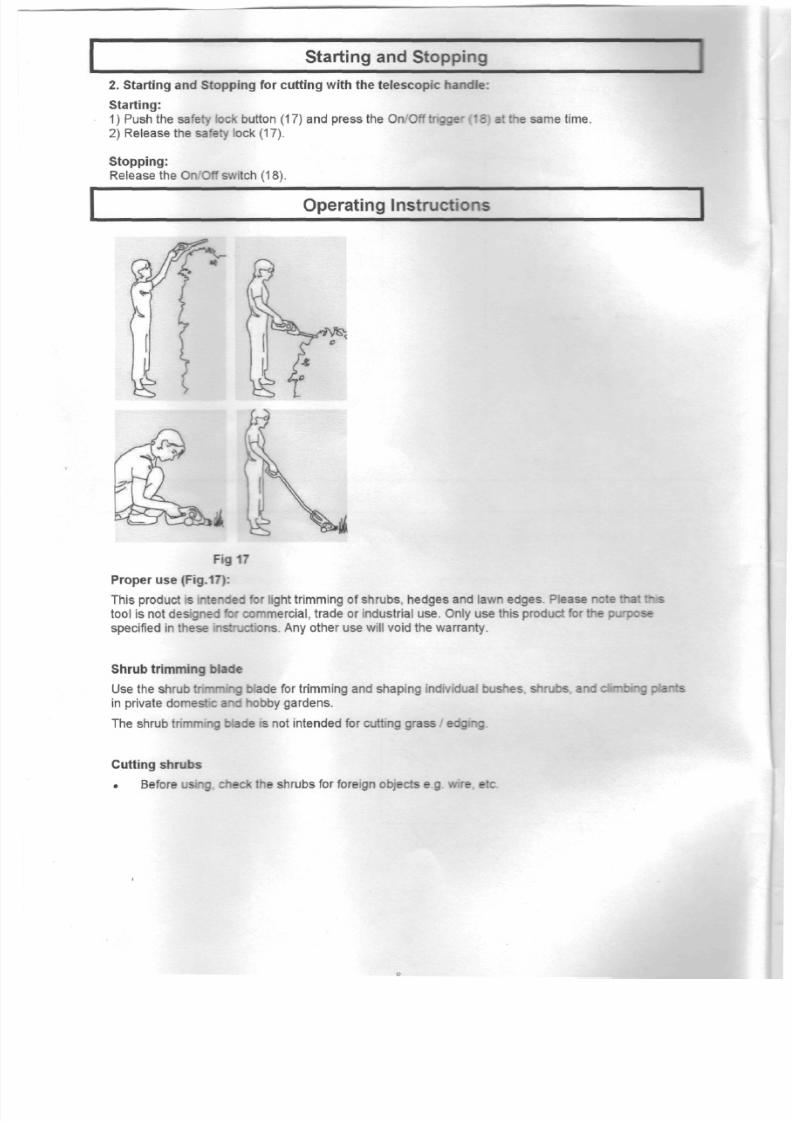
3. Adjusting the length of telescopic handle (Fig.14-15)
1) Loosen the adjusting coupling (15) (Fig.14)
2) Pull th e tube out to increase th e height, or push th e tube in to decrease th e height. (Fig.15)3) Re-t ighten th e adjusting coupling (15). (Fig.14)
Fig.14 Fig.15
Starting and Stopping
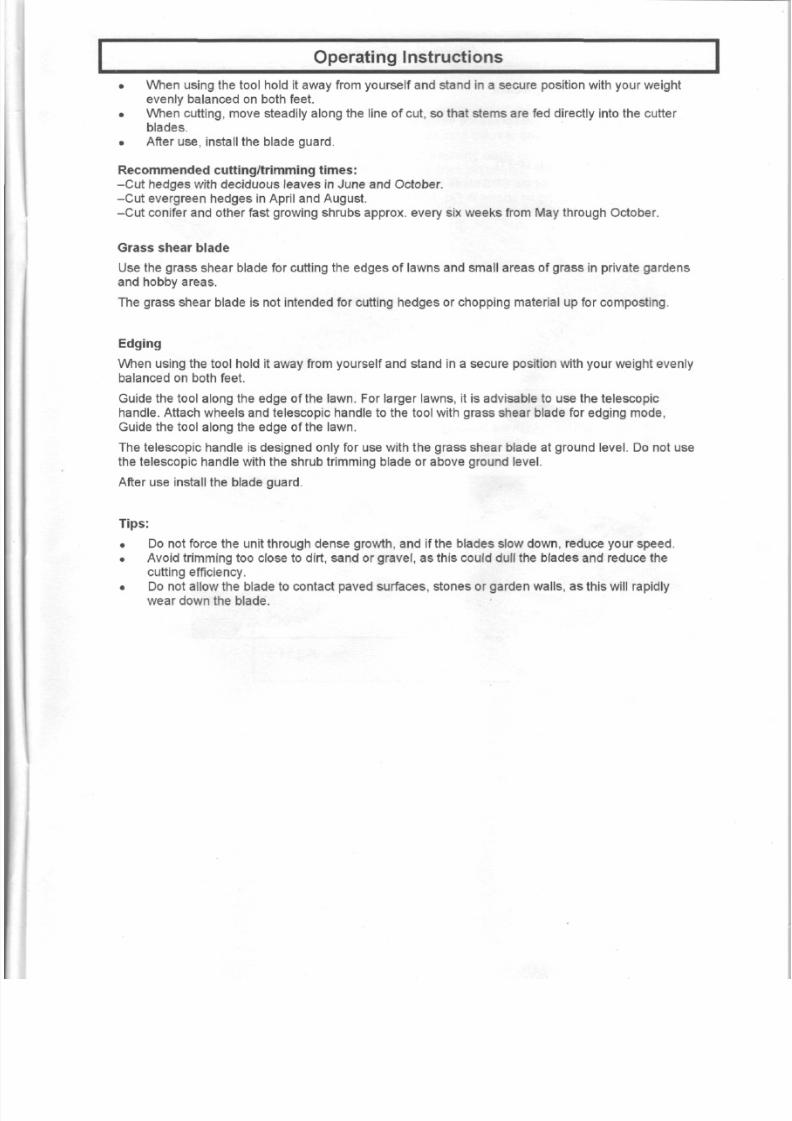
1. Starting and S topping for cutting w ithout telescopic handle (Fig.16)
Starting:1) Push the safety lock button (2) and press th e On/O ff t rigger (6) at the same t ime.2) Release the safety lock (2).
Stopping:Release th e On/Off sw itch (6).
Fig. 16
8/2/2019 Máquina Cortar
http://slidepdf.com/reader/full/maquina-cortar 8/14
Starting and Stopping
2. Startingand Stopping for cutting with the telescopic handle:
Starting:1) Push the safety lock button (17)and press the On/Off trigger (18) at the same time.2) Release the safety lock (17).
Stopping:
Release the On Off switch (18).
Operating Instruct ions
Fig 17
Proper use (Fig.17):
This product is intended fo r light trimming of shrubs, hedges and lawn edges. Please note that f- stool is not designed for commercial, trade or indu strial use. Only use this product for the purposespecified in these instructions. Any other use will void the warranty.
Shrub trimming blade
Use the shrub tr-r̂ goiade for trimming and shaping individual bushes, shrubs, andURiiiMig plantsin private domes t z 3 "c "obby gardens.
The shrub trimming blade is not intended for cutting grass edging.
Cutting shrubs
. Before using, check theshrubs for foreign objects e.g. wire. etc.
8/2/2019 Máquina Cortar
http://slidepdf.com/reader/full/maquina-cortar 9/14
Operating Instruc tions
• When using th e tool hold it away f rom yourse l f and stand in a secu re posi tion wi th you r weightevenly balanced o n both feet .
• When cutting, move steadi ly along th e line o f cut, so that s tems are fed directly into th e cutterblades.
• Afte r use, install the blade guard .
Recommended cutting/trimming times:
-Cut hedges with deciduous leaves in June and October.-Cut evergre en hedges in Apr i l and August.-Cut con ifer and other fast growing shrubs approx . every s ix wee ks f rom May through October .
Grass shear blade
Use the grass shear blade for cutt ing the edges of lawns and sma l l areas of grass in pr ivate garde nsand hobby areas .
The grass shear blade is not intended fo r cutting hedges or chopping mater ial up for compost ing .
Edging
When using the too l hold i t away from yourse l f and stand in a secure posi tion with you r weight evenly
balanced on both feet .
Guide the tool along the edge of the lawn. For larger lawns, i t is advisable to use the telescopichandle. Attach wh eels and te lescopic handle to the t oo l with grass shear blade for edging mode,Guide the tool along the edge of the lawn.
The te lescopic handle is designed only for use wi th the grass sh ea r blade at ground level . Do not usethe telescopic handle with the shrub tr imming blade or abov e groun d leve l.
After use install the blade guard.
Tips:
• Do not force th e unit through de nse growth, and if the blades s low down, reduce your speed.• Avoid trimming too close to dirt, sand or gravel, as this could dull the blades and reduce the
cutt ing ef f iciency.• Do not al low th e blade to contact paved sur faces , s tones or garde n wal ls , as this will rapidly
w e a r down th e b lade .
8/2/2019 Máquina Cortar
http://slidepdf.com/reader/full/maquina-cortar 10/14
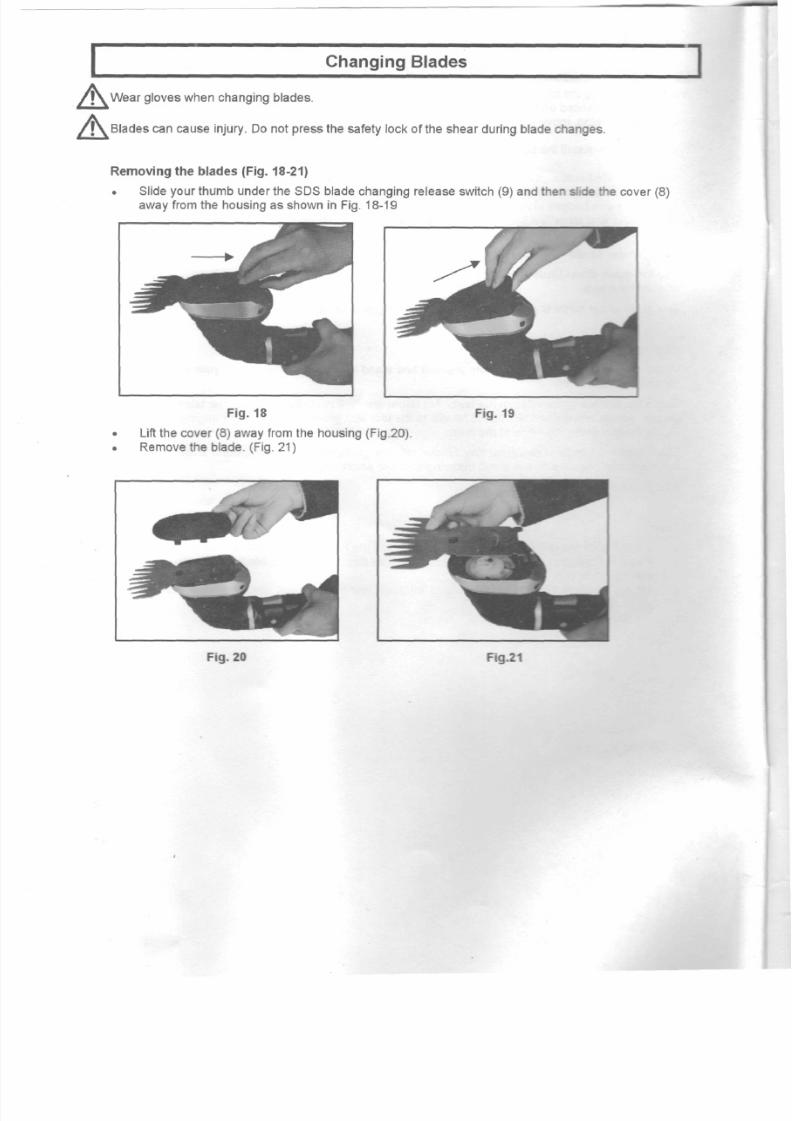
Changing Blades
!\ Wear gloves when changing blades.
|\Blades cancause injury. Do not press the safety lock of the shear during blade changes.
Removing the blades (Fig. 18-21)
• Slide your thumb under the SDS blade changing re leas e switch (9) and then slide the cover (8)away from the housing as shown in Fig. 18-19
Fig. 18
Lift the co ver (8) away from the housing (Fig.20).Remove the blade. (Fig. 21)
Fig. 19
Fig. 20 Fig.21
8/2/2019 Máquina Cortar
http://slidepdf.com/reader/full/maquina-cortar 11/14
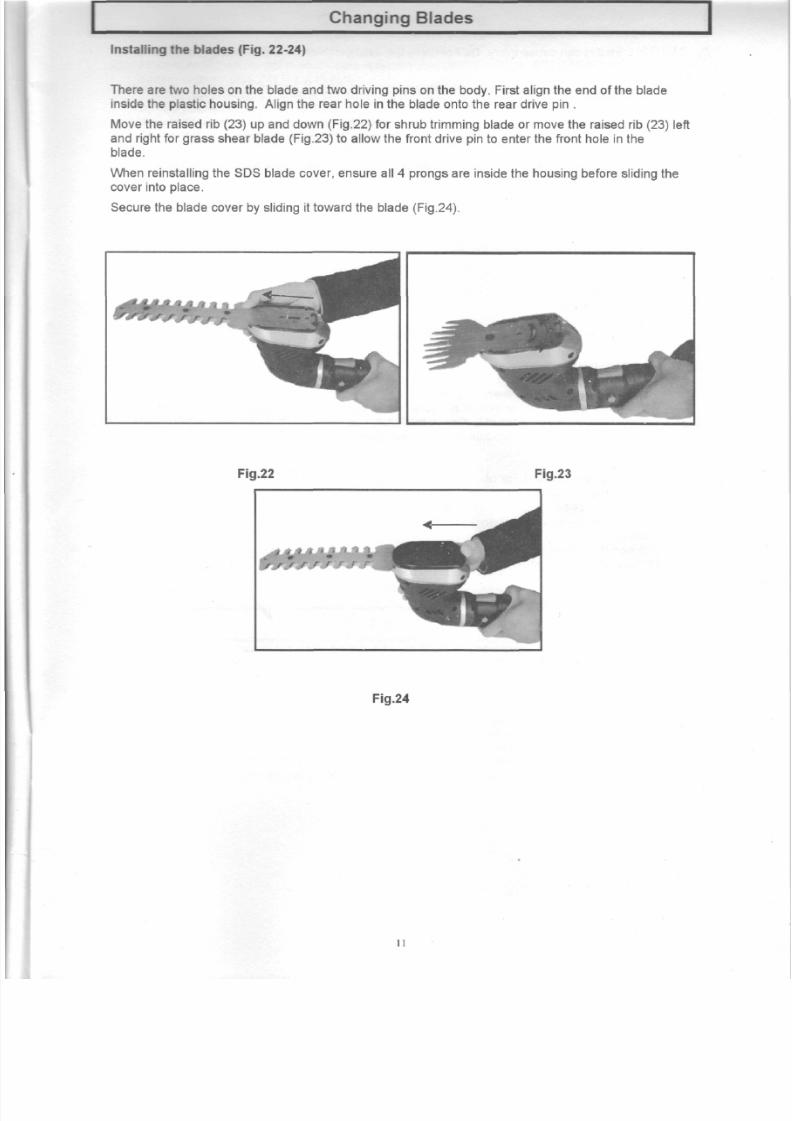
Changing Blades
Installing the blades (Fig. 22-24)
There are two holes on the blade and two driving pins on the body. First align the en d of the bladeinside the plastic hous ing. Align the rear hole in the blade onto the rear drive pin .
Move the raised rib (23) up and do wn (Fig.22) for shrub trimming blade or mo ve the raised rib (23) leftan d right fo r grass shear blade (Fig.23) to allow the front drive pin to enter the front hole in theblade.
When reinstall ing the SDS blade cover, ensure all 4 prongs are inside the housing before sliding th e
cover into place.Secure the blade cove r by sliding it toward the blade (Fig.24).
Fig.22 Fig.23
Fig.24
1 1
8/2/2019 Máquina Cortar
http://slidepdf.com/reader/full/maquina-cortar 12/14
Maintenance
CAUTION: B lades ca n cause injury. Do not press th e safe ty lock of the shear during maintenance^work.
Note: To ensure long and reliable service, regularly carry out the following maintenance:
• Check fo r obv ious defects such as a damaged/ loose blade,fixings or components.• If the tool should stop wo rking prope rly , repair should be earned out by your local hardw are
store.
ANever clean the trimming shears in water (especially running wate ras : ~ T ' 5 s a risk of personal
" injury and d a m a g e to the shears.
To obtain good cutt ing results, always make sure th e blades aret ime with a soft dry cloth.
a-: : e a " :nem f rom t ime to
For eas ier operat ion an d longer b lade l ife, us e light machine oil toshear b lades before and after each use.
Check th e condit ion of the cut t ing edges of the b lades , and a lways immediately remove notches andburrs caused by stones etc.
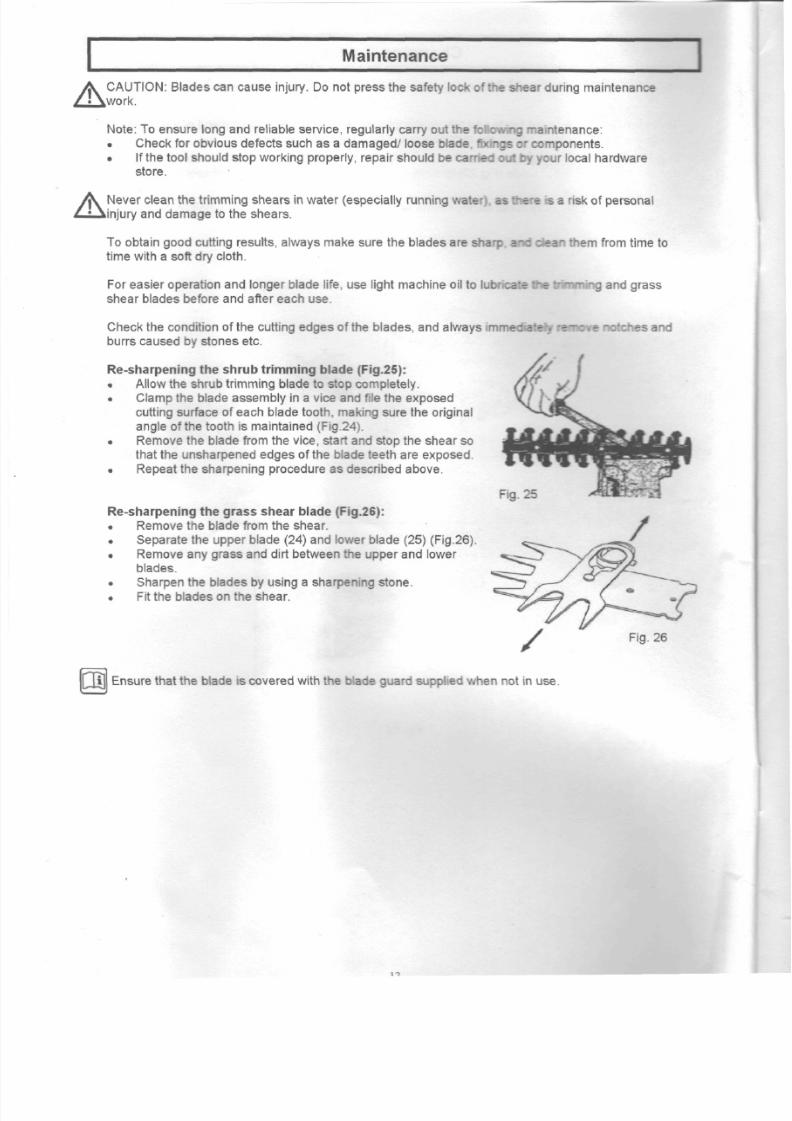
Re-sharpening th e shrub trimming blade (F ig .25) :• Allow the shrub trimming blade to stop comp letely.• Clamp th e blade assembly in a vice and file th e exposed
cutt ing surface of each blade too th, making sure the or iginalangle of the tooth is maintained (Fig.24).
• R e m o v e th e blade f rom th e vice, start and stop th e shear sothat the unsharpened edges of the blade teeth are exposed.
• Repea t the sharpe ning procedure as descr ibed above.
Re-sharpening th e grass shear blade (Fig.26):• Remove th e blade f rom th e shear .• Separa te th e upper b lade (24) and lower blade (25) (Fig.26).• R e m o v e any grass and dirt between th e upper and lower
blades.• Sharpen the b lades by using a sharpening stone.• Fit the b lades on the shear .
Fig. 26
Ensure that the blade is covered with the blade guard supplied when not in use.
8/2/2019 Máquina Cortar
http://slidepdf.com/reader/full/maquina-cortar 13/14
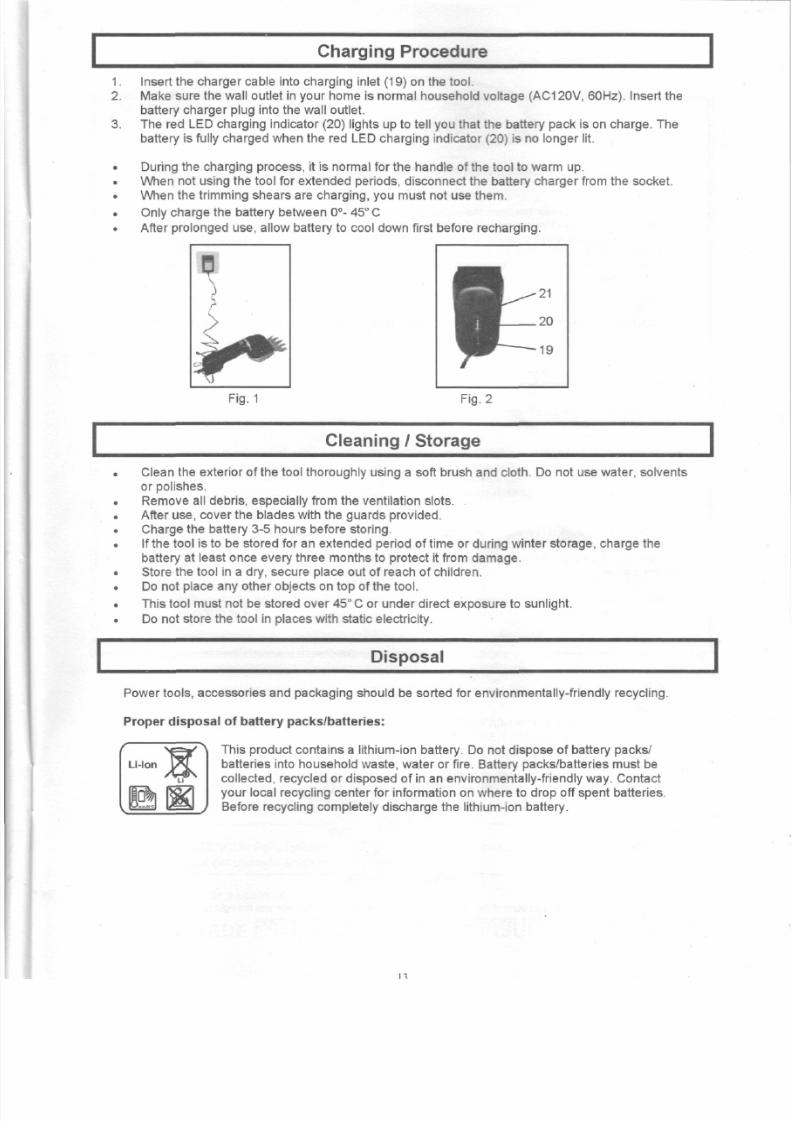
Charging Procedure
1. Insert the charger cable into charging inlet (19) on the too l .
2. Make sure the wal l out let in your home is normal househ old vo l tage (AC120V, 60Hz). Insert thebattery charger plug into th e wall outlet.
3. The red LED charging indicator (20) lights up to tell you that the battery pack is on charge. Thebattery is fully cha rged w hen the red LED ch arging indicator (20) is no longer l it .
During the charging process, it is normal for th e handle of the tool to warm up.When not us ing the tool for extende d per iods, d isconnect the b attery charger from the socket.When the t rimming shears are charging, you must no t use them.
Only charge the battery between 0°- 45°C
After prolonged use, al low battery to cool down first before recharging.
Fig. 1 Fig. 2
Cleaning / Storage
Clean the e xter ior of the tool thoroug hly using a soft brush and cloth. Do not use water , solventsor polishes.
Remove all debris, especially from the venti lation slots.After use, cover the blades with the guards provided.Charge th e battery 3-5 hours be fore stor ing.If the tool is to b e stored for an e xtende d per iod of time or dur ing winter s torage, cha rge thebattery at least once every three months to protect it f rom dama ge.Store the tool in a dry, secure place out of reach of chi ldren.Do not place any other objects on top of the tool.
This tool must not be stored over 45° C or und er direct expo sure to sunlight.
Do not store th e too l in places with static electr ici ty.
Disposal
Power tools , accessor ies and packaging should be sor ted for envi ronmental ly-fr iendly recycl ing.
Proper disposal of battery packs/batteries:
Li-Ion This product contains a lithium-ion battery. Do not dispose of battery packs/batteries into household waste, water or f i re. Battery packs/batteries must becol lected, recyc led or d isposed of in an envi ronme ntal ly-fr iendly way. Contactyour local recycling center for information on where to drop off spent batteries.Before recycling completely discharge the l i thium-ion battery.
8/2/2019 Máquina Cortar
http://slidepdf.com/reader/full/maquina-cortar 14/14
W A R R A N T Y
LIMITED WARRANTY FOR GRASS & SHRUB S H E A R
This product is manufac tured for The Great States Corporation/American Lawn Mower Company. The Great States
Corporat ion/American Lawn Mower Company. Shelbyville, Indiana, has been making lawn mowers for over 100 years and
it warrants to the original owner that each new product and service part is free from defects in material and workmanship
an d agrees to repair or replace under this warranty anydefective product or part from the original date of purchase for one
(1) year except for the conditions an d circumstances listed below. Proof of purchase (original dated sales receipt) must
accompany al l warranty claims.
THIS WARRANTY IS NOT TRANSFERABLE AND DOES NOT COVER:
Products sold dam aged or incomplete, sold "a s is", sold
reconditioned, or used as rental equipment.
Delivery, installation, or norma l adjustments explained
in the operator's manual.
Damage or liability caused by shipping, impro per han-
dling, improper installation, incorrect vol tage or improper
wiring, improper maintenance, improper modification, or
the use of accessories and/or attachme nts not specifi-
cally recommended.
Repairs necessary because of operator abuse or negli-
gence, or the failure to install, operate, m aintain, or
store the product according to the instructions in the
operator's manual.
Damage caused by cold, heat rain, excessive
humidity, corrosive environments and materials, or
other contaminants.
Expendable items that become worn during normal use.
Cosmetic defects that do not interfere with tool functionaly.
Freight costs from customer to vendor
Repair and transportation costs of products or parts
determined not to be defective.
ANY INCIDENTAL, INDIRECT, OR CONSEQUENTIAL
LOSS. DAMAGE OR EXPENSE THAT MAY RESULT
FROM ANY DEFECT. FAILURE. OR MALFUNCTION
OF THE PRODUCT Some states do not allow the
exclusion or limitation on how long an implied warranty
lasts, so the above limitations may not apply toyou.
AN Y NON-RESIDENTIAL USE OR COMMERCIAL
USE VOIDS ALL WARRANTIES.
C A L L U S F I R S T ! !
Cal l us f irs t wi th que st ions abou t operat ing or maintaining hisproduct at 1.800.313.5111 between 7:30 a.m. - 4:30 p.m.
Eastern Standard Time, or send emai ls to ear thw ise@ree l in .com.
The Great States Corporation
American Lawn Mower Company
830 Webster Street
Shelbyville, IN 46176
Phone 1-800-313-5111
www reelm com/earthwise
In a cont inued com mitment to improve quality, the Manufacturer reserves the right to
make component changes or design changes when necessary.