Embed Size (px)
Citation preview
Radio CD MP3 WMA
San Diego MP27 7 647 693 510
Operating and installation instructionsMode d’emploi et de montageInstrucciones de manejo e instalación Instruções de serviço e de montagem
www.blaupunkt.com
01SanDiegoMP27_US_gb.indd 1 11/21/06 9:35:01 AM
2
41 5 7
12
32
15 1013
6 8
91114
01SanDiegoMP27_US_gb.indd 2 11/21/06 9:35:02 AM
3
EN
GLI
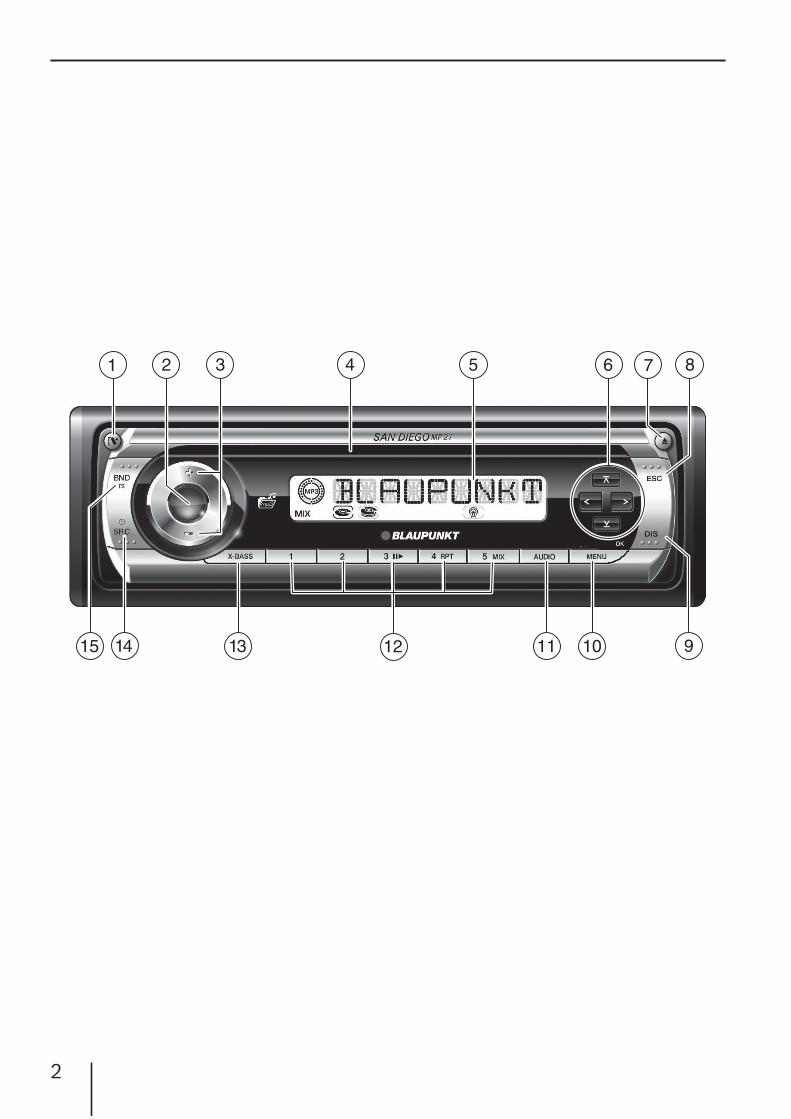
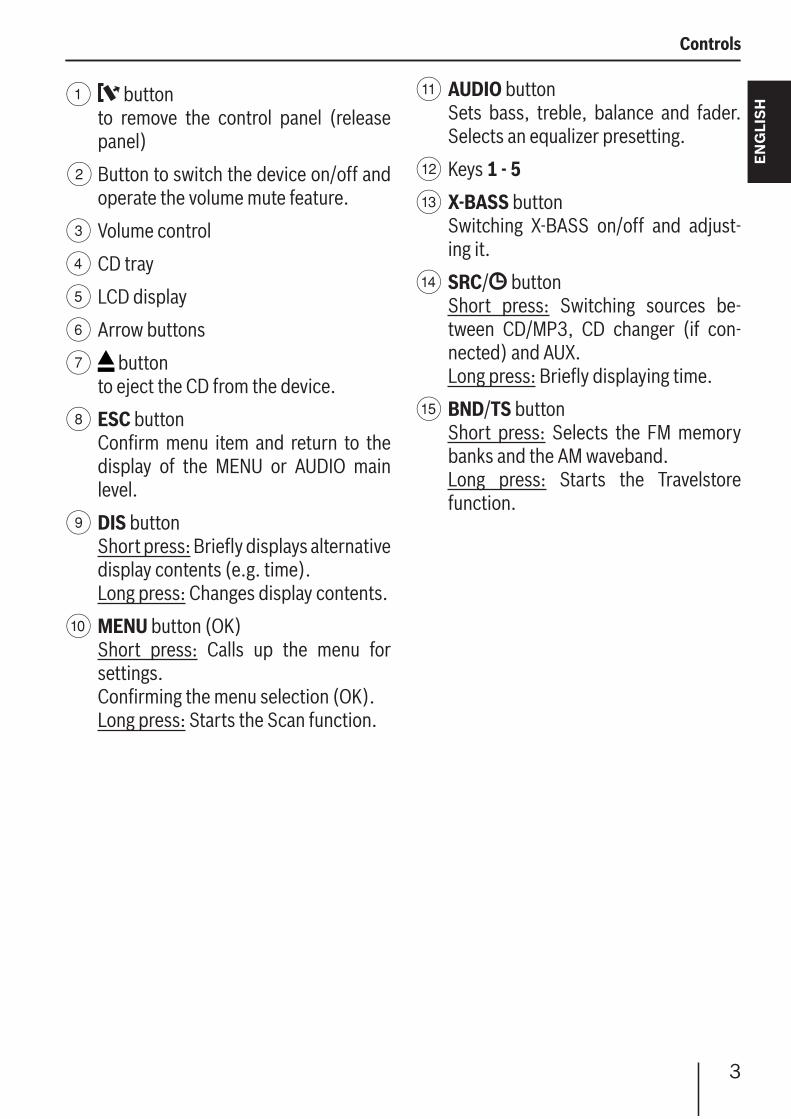
SH1 button
to remove the control panel (release panel)
2 Button to switch the device on/off and operate the volume mute feature.
3 Volume control
4 CD tray
5 LCD display
6 Arrow buttons
7 button to eject the CD from the device.
8 ESC buttonConfi rm menu item and return to the display of the MENU or AUDIO main level.
9 DIS buttonShort press: Briefl y displays alternative display contents (e.g. time).Long press: Changes display contents.
: MENU button (OK)Short press: Calls up the menu for settings.Confi rming the menu selection (OK).Long press: Starts the Scan function.
; AUDIO button Sets bass, treble, balance and fader. Selects an equalizer presetting.
< Keys 1 - 5
= X-BASS buttonSwitching X-BASS on/off and adjust-ing it.
> SRC/ buttonShort press: Switching sources be-tween CD/MP3, CD changer (if con-nected) and AUX.Long press: Briefl y displaying time.
? BND/TS buttonShort press: Selects the FM memory banks and the AM waveband.Long press: Starts the Travelstore function.
Controls
01SanDiegoMP27_US_gb.indd 3 11/21/06 9:35:02 AM
4
Contents
About these instructions .................... 5For your safety .................................. 6Scope of delivery ............................... 7Remote control .................................. 7Detachable control panel ................... 8Switching on/off ................................ 9Adjusting the volume ....................... 10Radio mode ..................................... 11
Adjusting the tuner......................... 11Switching to radio mode ................. 11Selecting the waveband/memory bank ................................ 12Tuning into a station ....................... 12Setting the sensitivity of station seek tuning ......................... 12Storing stations ............................. 12Storing stations automatically (Travelstore) ................................. 12Listening to stored stations ............. 13Scanning receivable stations (SCAN) .. 13Setting the scanning time ................ 13
CD mode ......................................... 14Switching to CD mode .................... 14Selecting tracks ............................. 14Fast track selection ........................ 15Fast searching (audible) .................. 15Random track play (MIX) ................. 15Scanning tracks (SCAN).................. 15Repeating tracks (REPEAT) ............. 15Interrupting playback (PAUSE) ......... 15Confi guring the display .................. 16Displaying CD text .......................... 16Ejecting a CD................................. 16
MP3/WMA mode ............................. 17Preparing an MP3/WMA CD ............. 17Switching to MP3 mode .................. 18Confi guring the display ................... 18
Selecting a directory ...................... 19Selecting Tracks/Files ..................... 19Fast search ................................... 19Random track play (MIX) ................. 19Scanning tracks (SCAN).................. 19Repeating individual tracks or whole directories (REPEAT) ............. 20Interrupting playback (PAUSE) ......... 20
CD-changer mode ............................ 20Switching to CD-changer mode ........ 20Selecting CDs ................................ 20Selecting tracks ............................. 20Fast searching (audible) .................. 21Confi guring the display ................... 21Repeating individual tracks or whole CDs (REPEAT) ...................... 21Random track play (MIX) ................. 21Scanning all tracks on all CDs (SCAN) .. 21Interrupting playback (PAUSE) ......... 22
CLOCK time ..................................... 22Displaying the time ........................ 22Setting the time ............................. 22Selecting 12/24-hour clock mode .... 22Displaying the time continuously when the device is off and the ignition is on ............................ 23
Sound ............................................. 23Adjusting the bass ......................... 23Adjusting the treble ........................ 23Setting the left/right volume distribution (balance) ..................... 24Adjusting the front/rear volume distribution (fader) ........................ 24Equalizer presettings (Presets) ........ 24
X-BASS ........................................... 25External audio sources ..................... 25Specifi cations ................................. 26Installation instructions ................. 152
01SanDiegoMP27_US_gb.indd 4 11/21/06 9:35:03 AM
5
EN
GLI
SH
About these instructions
About these instructionsThese instructions contain important infor-mation to easily and safely install and oper-ate the device.
Read these instructions carefully and completely before using the device.Keep the instructions at a location so that they are always accessible to all users.Always pass on the device to third par-ties together with these instructions.
In addition, observe the instructions of the devices used in conjunction with this de-vice.
Symbols usedThese instructions employ the following symbols:
CAUTION!Warns about laser beam
CAUTION!Warns about damaging the CD drive
The CE mark confi rms the compli-ance with EU directives.
Identifi es a sequencing stepIdentifi es a listing
•
•
•
•
Use as directedThis device is intended for installation and operation in a vehicle with 12 V vehicle sys-tem voltage and must be installed in a DIN slot. Observe the 'performance limits in the technical data. Repairs and installation, if necessary, should be performed by a spe-cialist.
Declaration of conformityThe Blaupunkt GmbH declares that this car sound system complies with the basic requirements and the other relevant regula-tions of the directive 1999/5/EG.
ServiceIn some countries, Blaupunkt offers a repair and pickup service. Under www.blaupunkt.com, you can obtain information whether this service is avail-able in your country. If you want to use this service, you may re-quest a pickup service for your device using the Internet.
WarrantyWe provide a manufacturer's warranty for products bought within the European Union. For devices purchased outside the European Union, the warranty terms issued by our respective responsible domestic agency are valid.The warranty terms can be called up under www.blaupunkt.com or requested directly from:
Blaupunkt GmbHHotlineRobert-Bosch-Str. 200D-31139 Hildesheim
01SanDiegoMP27_US_gb.indd 5 11/21/06 9:35:03 AM

6
For your safetyThe device was manufactured according to the state of the art and established safety guidelines. Even so, dangers may occur if you do not observe the safety notes in these instructions:
If you are installing device yourselfYou may only install the device yourself if you are experienced in installing car sound systems and are very familiar with the elec-trical system of the vehicle. For this pur-pose, observe the installation instructions at the end of these instructions.
Observe the following!
Danger!
The device contains a Class 1 laser that can cause injuries to your eyes.Do not open the device and do not perform any modifi cations.
In operationOperate the device only if traffi c situa-tion permits it! Stop at a suitable loca-tion to perform more extensive opera-tions.Remove or attach the control panel only while the vehicle is standing an.Always listen at a moderate volume so that you can hear acoustic warning signals (e.g. police sirens) and protect your hearing.Do not increase the vol-ume when selecting a different audio source or while the CD changer chang-es the CD. The device is briefl y muted.
•
•
•
After operationThe device is worthless to a thief with-out the control panel. Always remove the control panel whenever you leave the vehicle.Transport the control panel so that it is protected against impacts and the con-tacts cannot become dirty.
Cleaning notesSolvents, cleaning and scouring agents as well as dashboard spray and plastics care product may contain ingredients that will damage the surface of the device.
Use only a dry or slightly moistened cloth for cleaning the device.If necessary, clean the contacts of the control panel regularly using a soft cloth moistened with cleaning alcohol.
Disposal of old unit (EU countries only)
Do not dispose of your old device in the household trash!Use the return and collection sys-
tems available to dispose of the old device.
•
•
•
•
For your safety
01SanDiegoMP27_US_gb.indd 6 11/21/06 9:35:03 AM
7
EN
GLI
SHScope of delivery
The scope of delivery includes:1 Car sound system1 Support frame2 Disassembly bar1 Operating instructions1 Handheld remote control RC 12H
Optional equipment(not part of the scope of delivery)Use only accessories approved by Blaupunkt.
Steering wheel remote controlA steering wheel remote control allows for safely and conveniently operating the basic functions of your car sound system from the steering wheel.You cannot switch the device on/off using the remote control.You can fi nd out from your Blaupunkt dealer or on the Internet at www.blaupunkt.com which remote controls can be used with your car sound system.
Amplifi ersYou can use all Blaupunkt and Velocity am-plifi ers.
CD changersYou can connect the following Blaupunkt CD changers:CDC A 03, CDC A 08 and IDC A 09.
Remote controlYour car sound system is equipped with an RC 12H handheld remote control.Most of the functions can be operated con-veniently and safely with the remote con-trol.Note that a line of sight must exist between the remote control and the remote control receiver, which is located in the detachable control panel.You cannot switch the device on/off using the remote control.
Scope of delivery Remote control
01SanDiegoMP27_US_gb.indd 7 11/21/06 9:35:03 AM
8
Detachable control panel
Theft protectionThe device is equipped with a detachable control panel (fl ip-release panel) as a way of protecting your equipment against theft. The device is worthless to a thief without this control panel.Protect your device against theft by taking the control panel with you whenever you leave your vehicle. Do not leave the control panel inside your vehicle - not even in a hid-ing place.The control panel has been designed to be easy to use.
Notes:Never drop the control panel.Never expose the control panel to di-rect sunlight or other heat sources.Avoid direct skin contact with the control panel’s electrical contacts. If necessary, please clean the contacts with a lint-free cloth moistened with cleaning alcohol.
Detaching the control panel
1
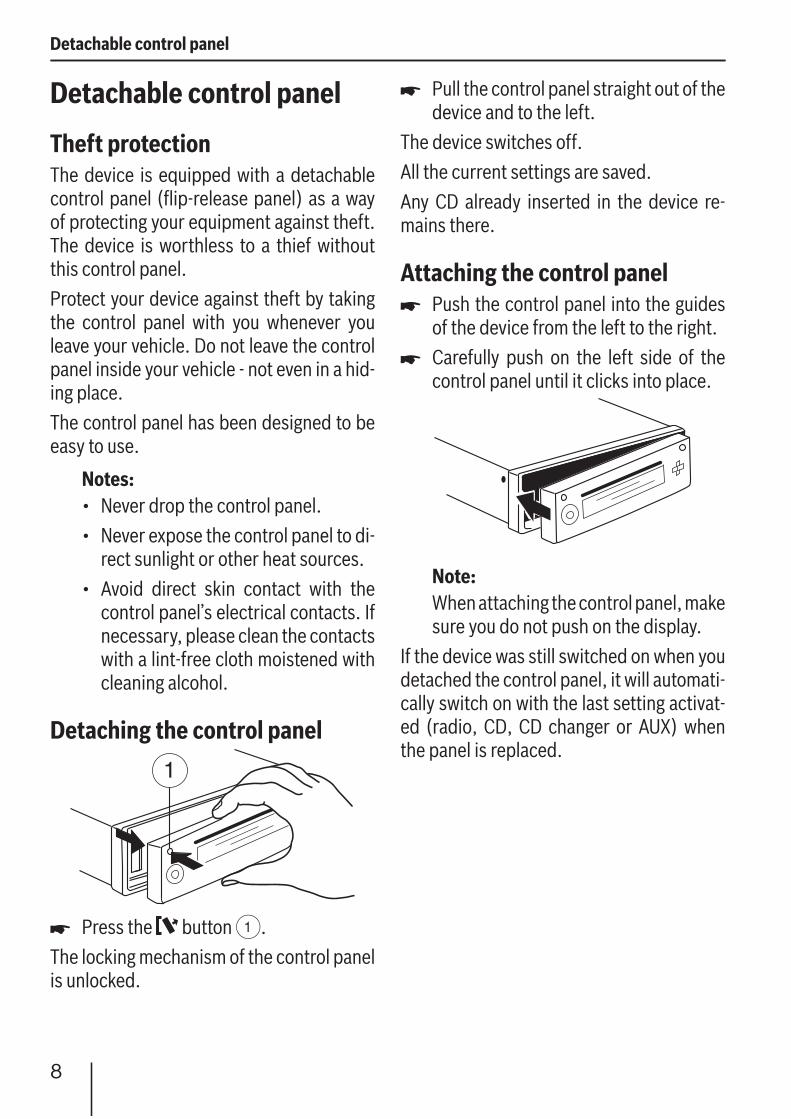
Press the button 1.The locking mechanism of the control panel is unlocked.
••
•
Pull the control panel straight out of the device and to the left.
The device switches off.All the current settings are saved.Any CD already inserted in the device re-mains there.
Attaching the control panelPush the control panel into the guides of the device from the left to the right.Carefully push on the left side of the control panel until it clicks into place.
Note:When attaching the control panel, make sure you do not push on the display.
If the device was still switched on when you detached the control panel, it will automati-cally switch on with the last setting activat-ed (radio, CD, CD changer or AUX) when the panel is replaced.
Detachable control panel
01SanDiegoMP27_US_gb.indd 8 11/21/06 9:35:03 AM
9
EN
GLI
SHSwitching on/off
There are various ways of switching the de-vice on/off:
Switching on/off using the vehicle ignitionThe device will switch on/off simultaneous-ly with the ignition if the device is correctly connected to the vehicle’s ignition and you did not switch the device off by pressing button 2.
Switching on/off using button 2To switch on the device, press button 2.To switch off the device, press and hold down button 2 for longer than two seconds.
The device switches off.
Note:To protect the vehicle battery, the de-vice will switch off automatically after one hour if the ignition is off.
Switching on with CD draw-inIf the device is switched off and no CD is in the drive,
gently insert the CD with its printed side uppermost into the drive 4 until you feel some resistance.
The drive draws in the CD automatically.You must not hinder or assist the drive as it draws in the CD.The device switches on and CD playback starts.
Note: If the vehicle ignition was switched off prior to inserting the CD, you must switch in on fi rst with the button 2 to start the playback.
Switching the device on/off using the detachable control panel
Detach the control panel. The device switches off.
Attach the control panel again.The device switches on. The last setting (radio, CD, CD changer or AUX) is reacti-vated.
Switching on/off
01SanDiegoMP27_US_gb.indd 9 11/21/06 9:35:03 AM
10
Adjusting the volumeYou can adjust the volume in increments from 0 (off) to 66 (maximum).To increase the volume,
press the + button 3. To decrease the volume,
press the – button 3.
Setting the power-on volume
Note:The device features a time-out function (time window).For example, if you press the MENU button : and select a menu item, the device switches back after ap-prox. 8 seconds after the last button activation. The settings performed are saved.
You can set the power-on volume.Press the MENU button :.Press the or button 6 repeat-edly until "ON VOLUME" appears on the display.Adjust the power-on volume using the
buttons 6. To help you adjust the setting more easily, the device will increase or decrease the vol-ume as you make your changes.If you enable "LAST VOL", the volume which was set the last time you switched off the device is re-enabled.
Note: To protect your hearing, the power-on volume is limited to the value "38". If the volume before switching off was higher and the "LAST VOL" setting was selected, the device switches on again with the value "38".
When you have fi nished making your chang-es,
press the MENU button : twice.
Quickly reducing the volume (Mute)You can quickly reduce the volume to a pre-set level (Mute).
Briefl y press the button 2."MUTE" appears on the display.
Cancelling muteTo return to your previously set volume level,
briefl y press the button 2 again.
Adjusting the mute levelYou can adjust the mute level.
Press the MENU button :.Press the or button 6 repeat-edly until "MUTE LVL" appears on the display. Adjust the mute level using the buttons 6.
When you have fi nished making your changes,
press the MENU button : twice.
Adjusting the volume
01SanDiegoMP27_US_gb.indd 10 11/21/06 9:35:03 AM
11
EN
GLI
SH
Switching the confi rmation beep on/offThe system will output a confi rmation beep for some functions if you keep a button pressed down for longer than two seconds, for instance, when assigning a radio station to a station preset button. You can switch the beep on or off.
Press the MENU button :.Press the or button 6 repeatedly until "BEEP ON" or "BEEP OFF" appears on the display.Switch the beep on or off using the
buttons 6. When you have fi nished making your chang-es,
press the MENU button :.
Muting during telephone mode If your device is connected to a cell phone, the car sound system is muted when you "pick up" the phone. For this purpose, the cell phone must be connected to the device as described in the installation instructions.The display shows "PHONE".
Radio mode
Adjusting the tunerTo ensure proper functioning of the tuner, the device must be set for the region in which it is being operated. You can select among Europe (EUROPE), America (USA), South America (S-AMERICA), and Thailand (THAI). The tuner is factory-set to the re-gion in which it was sold. If you experience problems with your radio reception, please check this setting.The radio functions described in these op-erating instructions refer to the tuner set-ting America (USA).
Switch off the device by pressing but-ton 2.Hold the buttons 1 and 5 < pressed at the same time and switch on the device again with the button 2.
"TUNER" is displayed.Select your tuner region with the or
button 6.To save the setting,
switch the device off and on again or wait approx. 8 seconds. The radio starts playing with the last setting se-lected (radio, CD, CD changer or AUX).
Switching to radio modeIf you are in CD, CD changer or AUX mode,
press the BND/TS ? button or
press the SRC/ button > repeated-ly until the memory bank, e.g. "FM1", appears on the display.
A border appears around the radio symbol.
Adjusting the volume Radio mode
01SanDiegoMP27_US_gb.indd 11 11/21/06 9:35:04 AM

12
Selecting the waveband/memory bankThis device can be used to receive stations in the FM and AM frequency bands. There are three memory banks available for the FM waveband (FM1, FM2 and FMT) and one for the AM waveband. Five stations can be stored in each memory bank. To switch between the memory banks FM1, FM2 and FMT or the AM waveband,
briefl y press the BND/TS ? button.
Tuning into a stationThere are various ways of tuning into a sta-tion.
Automatic station seek tuningPress the or button 6.
The radio tunes into the next receivable sta-tion.
Tuning into stations manuallyYou can also tune into stations manually.
Press the or button 6.
Setting the sensitivity of station seek tuningYou can choose whether the radio should only tune into stations providing good re-ception or whether it can also tune into those with a weak reception.
Press the MENU button :.Press the or button 6 repeatedly until "SENS" appears on the display with the current setting.
"SENS HI" means that the tuner is set to the highest sensitivity setting. "SENS LO" means it is set to the lowest sensitivity setting.
Set the desired sensitivity level using the buttons 6.
When you have fi nished making your chang-es,
press the MENU button :.
Note:You can adjust different sensitivities for FM and AM.
Storing stations
Storing stations manually Select the desired memory bank FM1, FM2, FMT or the AM waveband.Tune into the desired station.Press and hold down one of the station buttons 1 - 5 < for longer than two seconds to assign the station to that button.
Storing stations automatically (Travelstore) You can automatically store the fi ve strong-est stations in the region. The stations are stored in the FMT or AM memory bank.
Note:Any stations that were previously stored in this memory bank are deleted in the process.Press and hold down the BND/TS ? for longer than two seconds.
Radio mode
01SanDiegoMP27_US_gb.indd 12 11/21/06 9:35:04 AM
13
EN
GLI
SH
The storing procedure begins. The display shows "FM TSTORE" or "AM TSTORE". After the process has completed, the radio will play the station that is stored in memory lo-cation 1 of the FMT or AM memory bank.
Listening to stored stationsSelect the memory bank or waveband.Press the station button 1 - 5 < of the desired station.
Scanning receivable stations (SCAN)You can use the scan function to play all the receivable stations briefl y. You can set the scanning time from 5 to 30 seconds in the menu (in increments of 5 seconds).
Starting SCANPress and hold down the MENU button : for longer than two seconds.
Scanning begins. "SCAN" appears briefl y on the display followed by a fl ashing display of the current station name or frequency.
Cancelling SCAN and continuing listening to a station
Press the MENU button :.Scanning stops and the radio continues playing the station that it tuned into last.
Setting the scanning timePress the MENU button :.Press the or button 6 repeat-edly until "SCAN TIME" appears on the display. Set the desired scanning time using the
buttons 6.
When you have fi nished making your chang-es,
press the MENU button : twice.
Note:The defi ned scanning time is also ap-plied by the system to scanning carried out in CD and CD changer mode.
Radio mode
01SanDiegoMP27_US_gb.indd 13 11/21/06 9:35:04 AM
14
CD modeYou can use this device to play standard audio CDs, CD-Rs and CD-RWs with a dia-meter of 12 or 8 cm.
Caution!
Labelled or shaped CDs can dam-age the CD drive.
Do not insert any shape CDs.Do not attach labels to CDs since the la-bel may detach during operation.
Note:Label CDs only by using a marker since it does not contain any caustic materi-als. Permanent markers can damage CDs.
To ensure proper functioning, use only CDs with the Compact-Disc logo. Copy-pro-tected CDs can cause playback problems. Blaupunkt cannot guarantee the proper functioning of copy-protected CDs!Besides being able to play audio CDs on this device, you can also play CDs containing MP3/WMA music fi les. For further informa-tion, please read the chapter entitled "MP3/WMA mode".
••
Switching to CD modeIf there is no CD inserted in the drive,
gently insert the CD with its printed side up into the CD tray 4 until you feel some resistance.
The drive draws in the CD automatically.You must not assist or hinder the drive as it draws in the CD.The CD starts playing.The display shows the CD symbol.
Notes: The CD symbol indicates that a CD is located in the drive. A border surrounding the CD symbol indicates that CD is selected as au-dio source.If the vehicle ignition was switched off prior to inserting the CD, you must switch the device on fi rst with the button 2 to start the playback.
If a CD is already inserted in the drive,press the SRC/ button > repeated-ly until "CD" appears on the display.
Playback begins from the point at which it was last interrupted.
Selecting tracksPress one of the arrow buttons 6 to select the next or previous track.
If you press the or button 6 once, the player will play the current track again from the beginning.
•
•
CD mode
01SanDiegoMP27_US_gb.indd 14 11/21/06 9:35:04 AM
15
EN
GLI
SH
Fast track selectionTo quickly select tracks backwards or for-wards,
press and hold down one of the buttons 6 until fast-reverse / fast-for-ward track selection begins.
Fast searching (audible)To fast search backwards or forwards,
press and hold down one of the buttons 6 until fast searching back-wards / forwards begins.
Random track play (MIX)Press the 5 MIX button <.
"MIX CD" appears briefl y on the display and the MIX symbol lights up. The next ran-domly selected track will then be played.
Cancelling MIXPress the 5 MIX button < again.
"MIX OFF" appears briefl y on the display and the MIX symbol disappears.
Scanning tracks (SCAN)You can scan (briefl y play) all the tracks on the CD.
Press and hold down the MENU button : for longer than two seconds.
The next track will then be scanned.
Note:You can set the scanning time. For further information, please read the section entitled "Setting the scanning time" in the "Radio mode" chapter.
Cancelling SCAN and continuing listening to a track
To stop scanning, press the MENU but-ton :.
The currently scanned track will then con-tinue to be played normally.
Repeating tracks (REPEAT)If you want to repeat a track,
press the 4 RPT button <."RPT TRCK" appears briefl y on the display and the RPT symbol is displayed. The track is repeated continuously until you deacti-vate RPT.
Cancelling REPEATIf you want to cancel the repeat function,
press the 4 RPT button : again."RPT OFF" appears briefl y on the display and the RPT symbol disappears. Normal playback is then resumed.
Interrupting playback (PAUSE)Press the button 3 <.
"PAUSE" appears on the display.
Cancelling pauseDuring the pause, press the button 3
<. Playback is continued.
CD mode
01SanDiegoMP27_US_gb.indd 15 11/21/06 9:35:04 AM
16
Confi guring the display You can select from two display types for CD mode:
Track number and timeTrack number and playing time
To change the display,Press and hold down the DIS button 9 for longer than 2 seconds.
Displaying CD textSome CDs include CD text. The CD text might contain the names of the artist, al-bum and tracks.You can allow the CD text to be displayed as scrolling text every time you switch to another track. The default display will ap-pear again after the whole CD text has been shown once. For further information, please read the section entitled "Confi guring the display".
Switching CD text on/offPress the MENU button :.Press the or button 6 repeatedly until "CD TEXT" appears on the display.Switch the CD text function on ("TEXT ON") or off ("TEXT OFF") using the or
button 6. When you have fi nished making your chang-es,
press the MENU button : twice.
••
Ejecting a CDPress the button 7 next to the CD compartment.
The CD is ejected.Remove the CD.
Notes:If a CD is ejected, the drive will auto-matically draw it back in again after approx. 10 seconds.You can also eject CDs whilst the device is switched off or whilst an-other audio source is activated.
•
•
CD mode
01SanDiegoMP27_US_gb.indd 16 11/21/06 9:35:04 AM
17
EN
GLI
SHMP3/WMA mode
You can also use this car sound system to play CD-Rs and CD-RWs that contain MP3 music fi les. You can also play WMA fi les. The operation for playing MP3 and WMA fi les is identical.
Notes:WMA fi les with Digital Rights Management (DRM) from online mu-sic shops cannot be played with this device. WMA fi les can only be played back safely if they were created with Windows Media Player version 8.
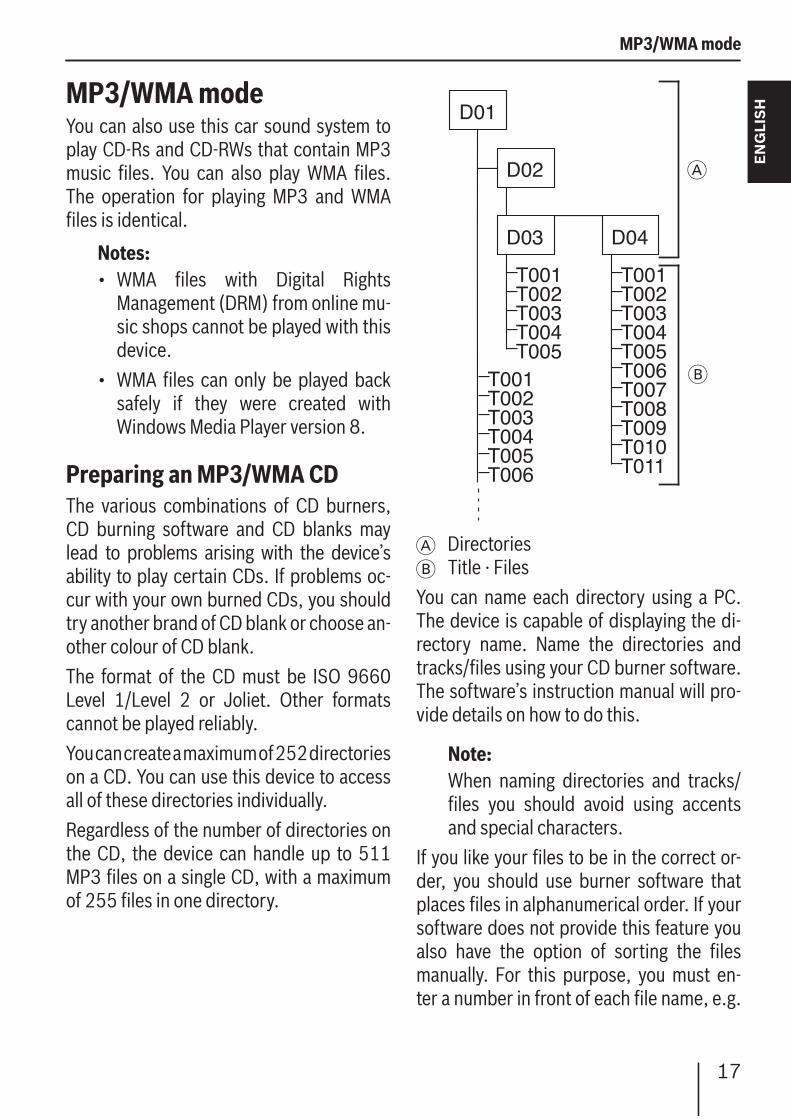
Preparing an MP3/WMA CDThe various combinations of CD burners, CD burning software and CD blanks may lead to problems arising with the device’s ability to play certain CDs. If problems oc-cur with your own burned CDs, you should try another brand of CD blank or choose an-other colour of CD blank.The format of the CD must be ISO 9660 Level 1/Level 2 or Joliet. Other formats cannot be played reliably.You can create a maximum of 252 directories on a CD. You can use this device to access all of these directories individually. Regardless of the number of directories on the CD, the device can handle up to 511 MP3 fi les on a single CD, with a maximum of 255 fi les in one directory.
•
•
D01
D02
T001
T005T004T003T002
D03
T001
T006T005T004T003T002
T011
T007T008T009T010
D04
T001
T006T005T004T003T002
A
B
A DirectoriesB Title · FilesYou can name each directory using a PC. The device is capable of displaying the di-rectory name. Name the directories and tracks/fi les using your CD burner software. The software’s instruction manual will pro-vide details on how to do this.
Note:When naming directories and tracks/fi les you should avoid using accents and special characters.
If you like your fi les to be in the correct or-der, you should use burner software that places fi les in alphanumerical order. If your software does not provide this feature you also have the option of sorting the fi les manually. For this purpose, you must en-ter a number in front of each fi le name, e.g.
MP3/WMA mode
01SanDiegoMP27_US_gb.indd 17 11/21/06 9:35:05 AM
18
"001", "002", etc. The leading zeros must also be entered.MP3 tracks can contain additional infor-mation such as the artist, album and track names (ID3 tags). This device can display ID3 tags (version 1).When creating (encoding) MP3 fi les from audio fi les, you should use bit rates up to a maximum of 256 Kbit/sec. This device can only play MP3 fi les that have the ".MP3" fi le extension.
Notes:To ensure uninterrupted playback,
do not try changing the fi le extension to ".MP3" of any fi les other than MP3 fi les and then attempt to play them! The device will ignore these invalid fi les during playback.Do not use "mixed" CDs containing both non-MP3 data and MP3 tracks (the device only reads MP3 fi les dur-ing MP3 playback).Do not use mix-mode CDs contain-ing both CD-audio tracks and MP3 tracks. If you try playing a mix-mode CD, the device will only play the CD-audio tracks.
Switching to MP3 modeMP3 mode is activated in the same way as normal CD mode. For further information, please read the section entitled "Switching to CD mode" in the "CD mode" chapter.
Confi guring the displayThe following settings require that an MP3 CD is in the device.
•
•
•
Confi guring the default displayYou can display various types of informa-tion on the current track:
Track number and playing time "TRCK-TIME"Track number and time "TRCK-CLK"Directory number and track number "DIR-TRCK"Directory number and time "DIR-CLK"Directory number and playing time "DIR-TIME"
Note:After the MP3 scrolling text was scrolled once after a track change, the information is permanently shown on the display.
To switch between the different display options,
press and hold down the DIS button 9 for longer than 2 seconds.For an additional selection, press and hold down the DIS button 9 for longer than 2 seconds.
Confi guring the MP3 scrolling textsOne of the following scrolling texts is shown once on the display with every track change. Afterwards, the confi gured stand-ard display is shown.The available scrolling texts are:
Directory name ("DIR NAME")Name of the track ("SONG NAME")Name of the album ("ALBM NAME")Name of the artist ("ARTIST")File name ("FILE NAME")
•
••
••
•••••
MP3/WMA mode
01SanDiegoMP27_US_gb.indd 18 11/21/06 9:35:05 AM
19
EN
GLI
SH
Note:Artist, track and album name are part of the MP3-ID tag of version 1 and can only be displayed if they have been saved with the MP3 fi les (for further in-formation, please read the instructions that came with your PC’s MP3 software or burner software).
To switch between the different display op-tions,
press the MENU button :.Press the or button 6 repeat-edly until "MP3 DISP" appears on the display.Select the desired MP3 scrolling text with the or button 6.
When you have fi nished making your changes, press the MENU button : twice.
Selecting a directoryTo move up or down to another directory,
press the or button 6 once or several times.
Selecting Tracks/Filesto move up or down to another track/fi le in the current directory,
press the or button 6 once or several times.
If you press the button 6 once, the cur-rent track will be played again from the be-ginning.
Fast searchTo fast search backwards or forwards,
press and hold down the or button 6 until fast searching backwards / for-wards begins.
Random track play (MIX)To play the tracks in the current directory in random order,
briefl y press the 5 MIX button <."MIX DIR" appears on the display and the MIX symbol lights up.To play all the tracks contained on the in-serted MP3 CD in random order,
press and hold down the 5 MIX button < for longer than two seconds.
"MIX CD" appears on the display and the MIX symbol lights up.
Cancelling MIXTo cancel MIX,
briefl y press the 5 MIX button <. "MIX OFF" appears on the display and the MIX symbol disappears.
Scanning tracks (SCAN)You can scan (briefl y play) all the tracks on the CD.
Press and hold down the MENU button : for longer than two seconds. The next track will then be scanned.
"TRK SCAN" appears on the display next to the fl ashing track numbers. The titles of the CD are scanned in ascending order.
Note:You can set the scanning time. For fur-ther information on setting the scan-ning time, please read the section en-titled "Setting the scanning time" in the "Radio mode" chapter.
MP3/WMA mode
01SanDiegoMP27_US_gb.indd 19 11/21/06 9:35:05 AM
20
Cancelling SCAN and continuing listening to a track
Briefl y press the MENU button :. The currently scanned track will then con-tinue to be played normally.
Repeating individual tracks or whole directories (REPEAT)To play the current track repeatedly,
briefl y press the 4 RPT button <."RPT TRCK" appears briefl y on the display and RPT lights up.To repeat the whole directory,
press and hold down the 4 RPT button < for longer than two seconds.
"RPT DIR" appears briefl y on the display.
Cancelling REPEATTo stop the current track or current direc-tory from being repeated,
briefl y press the 4 RPT button <."RPT OFF" appears briefl y on the display and RPT disappears.
Interrupting playback (PAUSE)Press the button 3 <.
"PAUSE" appears on the display.
Cancelling pauseDuring the pause, press the button 3 <.
Playback is continued.
CD-changer modeNote:Information on handling CDs, inserting CDs and operating the CD changer can be found in the operating instructions supplied with your CD changer.
Switching to CD-changer modePress the SRC/ button > repeat-edly until "CHANGER" appears on the display.
A border appears around the CD changer symbol.The device starts playing the fi rst CD that the CD changer detects.
Selecting CDsTo move up or down to another CD,
press the or button 6 once or several times.
Note:The device will ignore empty CD slots in the changer and slots containing invalid CDs.
Selecting tracksTo move up or down to another track on the current CD,
press the or button 6 once or several times.
MP3/WMA mode CD-changer mode
01SanDiegoMP27_US_gb.indd 20 11/21/06 9:35:05 AM
21
EN
GLI
SH
Fast searching (audible)To fast search backwards or forwards,
press and hold down one of the buttons 6 until fast searching back-wards / forwards begins.
Confi guring the displayFive options are available for the display in CD changer mode:
Track number and playing time ("TRCK-TIME")Track number and time ("TRCK-CLK")CD number and track number ("CD-TRCK")CD number and time ("CD-CLK")CD number and playing time ("CD-TIME")Press and hold down the DIS button 9 for longer than 2 seconds.For an additional selection, press and hold down the DIS button 9 for longer than 2 seconds.
Repeating individual tracks or whole CDs (REPEAT)To repeat the current track,
briefl y press the 4 RPT button <."RPT TRCK" appears briefl y and RPT lights up on the display.To repeat the current CD,
press and hold down the 4 RPT button < for longer than two seconds.
"RPT DISC" appears briefl y and RPT lights up on the display.
•
••
••
Cancelling REPEATTo stop the current track or current CD from being repeated,
briefl y press the 4 RPT button <. "RPT OFF" appears and RPT disappears on the display.
Random track play (MIX)To play the tracks on the current CD in random order,
briefl y press the 5 MIX button <."MIX CD" appears briefl y and MIX lights up on the display.To play the tracks on all inserted CDs in random order,
press and hold down the 5 MIX button < for longer than two seconds.
"MIX ALL" appears briefl y and MIX lights up on the display.
Cancelling MIXBriefl y press the 5 MIX button <.
"MIX OFF" appears and MIX on the display disappears.
Scanning all tracks on all CDs (SCAN)To scan (briefl y play) all the tracks on all the inserted CDs in ascending order,
press and hold down the MENU button : for longer than two seconds.
"TRK SCAN" appears on the display and the number of the current track fl ashes.
CD-changer mode
01SanDiegoMP27_US_gb.indd 21 11/21/06 9:35:05 AM
22
Stopping SCANTo stop scanning,
briefl y press the MENU button :.The currently scanned track will then con-tinue to be played normally.
Note:You can set the scanning time. For further information, please read the section entitled "Setting the scanning time" in the "Radio mode" chapter.
Interrupting playback (PAUSE)Press the button 3 <.
"PAUSE" appears on the display.
Cancelling pauseDuring the pause, press the button 3 <.
Playback is continued.
CLOCK time
Displaying the timeTo briefl y display the time,
press and hold the SRC/ button > until the time appears on the display.
Setting the timeTo set the time,
press the MENU button :.Press the or button 6 repeat-edly until "CLOCK SET" appears on the display. Press the button 6.
The time appears on the display. The hours fl ash and can be adjusted.
Adjust the hours with the buttons 6.
Once the hours are set, press the button 6.
The minutes fl ash.Adjusts the minutes with the but-tons 6. Press the MENU button : twice.
Selecting 12/24-hour clock mode
Press the MENU button :.The display shows "MENU".
Press the or button 6 repeated-ly until "24 H MODE" or "12 H MODE" appears on the display. Press the or button 6 to switch between the modes.
CD-changer mode CLOCK time
01SanDiegoMP27_US_gb.indd 22 11/21/06 9:35:05 AM
23
EN
GLI
SH
When you have fi nished making your chang-es,
press the MENU button :.
Displaying the time continuously when the device is off and the ignition is onTo display the time when the device is off and the vehicle ignition is on,
press the MENU button :.The display shows "MENU".
Press the or button 6 repeatedly until "CLOCK OFF" or "CLOCK ON" ap-pears on the display. Press the or button 6 to switch the display between ON and OFF.
When you have fi nished making your chang-es,
press the MENU button :.
SoundYou can adjust the sound settings (bass and treble) separately for each source (ra-dio, CD, CD changer or AUX). The volume distribution settings (balance and fader) apply to all the audio sources.
Note:If bass and treble allow only a limited adjustment, set the equaliser preset-ting to EQ OFF.For further details, please read the sec-tion "Equaliser presets".
Adjusting the bassPress the AUDIO button ;.
"BASS" appears on the display.Press the or button 6 to adjust the bass.
When you have fi nished making your chang-es,
press the AUDIO button ;.
Adjusting the treblePress the AUDIO button ;.
"BASS" appears on the display.Press the button 6 repeatedly until "TREBLE" appears on the display.Press the or button 6 to adjust the treble.
When you have fi nished making your chang-es,
press the AUDIO button ;.
CLOCK time Sound
01SanDiegoMP27_US_gb.indd 23 11/21/06 9:35:06 AM
24
Setting the left/right volume distribution (balance)To adjust the left/right volume distribution (balance),
press the AUDIO button ;."BASS" appears on the display.
Press the button 6 repeatedly until "BAL" appears on the display.Press the or button 6 to adjust the left/right volume distribution.
When you have fi nished making your chang-es,
press the AUDIO button ;.
Adjusting the front/rear volume distribution (fader)To adjust the front/rear volume distribution (fader),
press the AUDIO button ;."BASS" appears on the display.
Press the button 6 repeatedly until "FADER" appears on the display.Press the or button 6 to adjust the front/rear volume distribution.
When you have fi nished making your chang-es,
press the AUDIO button ;.
Equalizer presettings (Presets)This device features an equalizer in which the settings for the music genres "ROCK", "POP" and "CLASSIC" are already pro-grammed.To select an equalizer preset,
Press the AUDIO button ;."BASS" appears on the display.
Press the button 6 repeatedly until "POP", "ROCK", "CLASSIC" or "EQ OFF" appears on the display.Press the or button 6 to select one of the presets or select "EQ OFF" to switch off the equalizer.
When you have fi nished making your chang-es,
press the AUDIO button ;.
Note:By selecting an equaliser preset (POP, ROCK, CLASSIC), the adjustment range of the sound setting for bass and treble is restricted.
Sound
01SanDiegoMP27_US_gb.indd 24 11/21/06 9:35:06 AM
25
EN
GLI
SHX-BASS
X-Bass allows you to increase the bass at low volume. The selected X-Bass setting is effective for all audio sources (radio, CD, CD changer or AUX).The X-BASS increase can be set in incre-ments of 1 to 3. "XBASS OFF" means that the X-BASS func-tion is switched off.
Adjusting the X-BASS boostPress the X-BASS button =.
"X-BASS" appears on the display.Press the or button 6 repeatedly until the desired setting appears on the display.
When you have fi nished making your chang-es,
press the X-BASS button =.
External audio sourcesInstead of the CD changer, you can also connect another external audio source equipped with a line output. Audio sources can, for example, be portable CD players, MiniDisc players or MP3 players.If you want to connect an external audio source, you will need an adapter cable. You can obtain this cable (Blaupunkt no.: 7 607 897 093) from your authorised Blaupunkt dealer.
Note:If no CD changer is connected, the AUX input must be switched on in the menu.
Switching the AUX input on/offPress the MENU button :.
The display shows "MENU".Press the or button 6 repeated-ly until "AUX OFF" or "AUX ON" appears on the display. Press the or button 6 to switch AUX on or off.
When you have fi nished making your chang-es,
press the MENU button :.
Note:If the AUX input is switched on, you can select it by pressing the SRC/ button >. The display shows "AUX INPUT" and a border appears around the AUX symbol.
X-Bass External audio sources
01SanDiegoMP27_US_gb.indd 25 11/21/06 9:35:06 AM
26
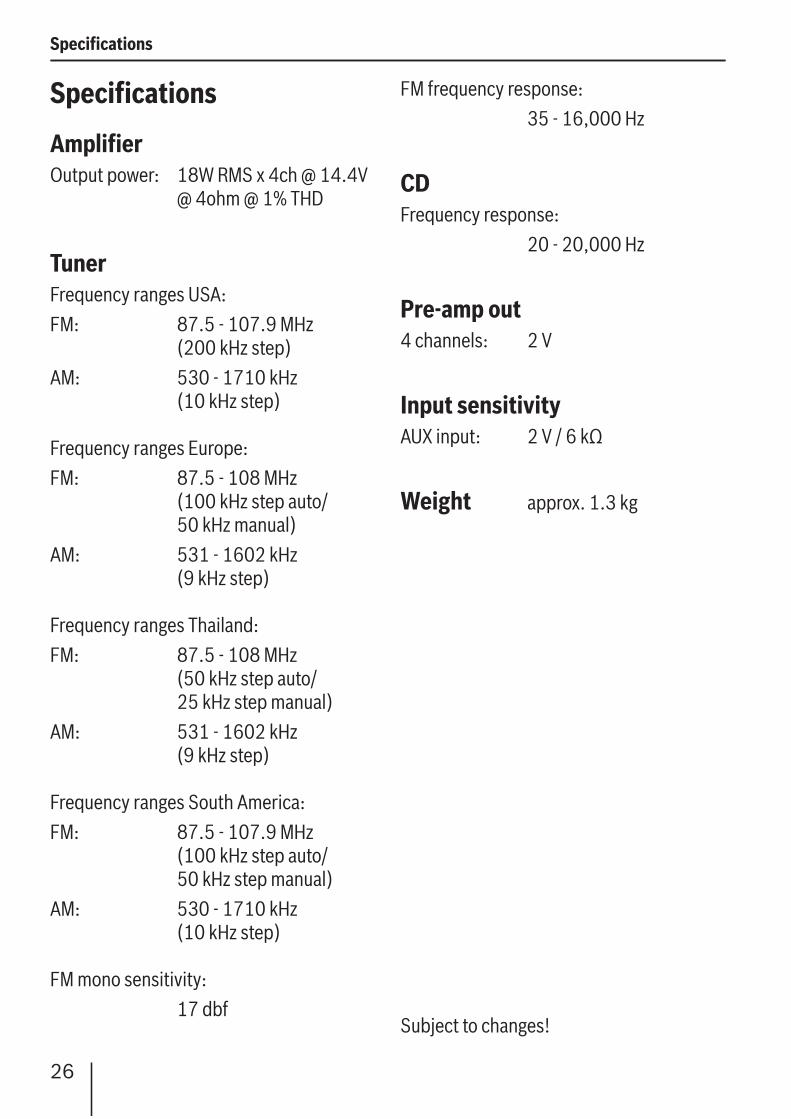
Specifi cations
Amplifi erOutput power: 18W RMS x 4ch @ 14.4V
@ 4ohm @ 1% THD
TunerFrequency ranges USA:FM: 87.5 - 107.9 MHz
(200 kHz step)AM: 530 - 1710 kHz
(10 kHz step)
Frequency ranges Europe:FM: 87.5 - 108 MHz
(100 kHz step auto/50 kHz manual)
AM: 531 - 1602 kHz (9 kHz step)
Frequency ranges Thailand:FM: 87.5 - 108 MHz
(50 kHz step auto/25 kHz step manual)
AM: 531 - 1602 kHz (9 kHz step)
Frequency ranges South America:FM: 87.5 - 107.9 MHz
(100 kHz step auto/50 kHz step manual)
AM: 530 - 1710 kHz (10 kHz step)
FM mono sensitivity: 17 dbf
Specifi cations
FM frequency response: 35 - 16,000 Hz
CDFrequency response: 20 - 20,000 Hz
Pre-amp out4 channels: 2 V
Input sensitivityAUX input: 2 V / 6 kΩ
Weight approx. 1.3 kg
Subject to changes!
01SanDiegoMP27_US_gb.indd 26 11/21/06 9:35:06 AM
152
Installation instructions • Notice de montage • Instrucciones de instalación • Instruções de montagem • •
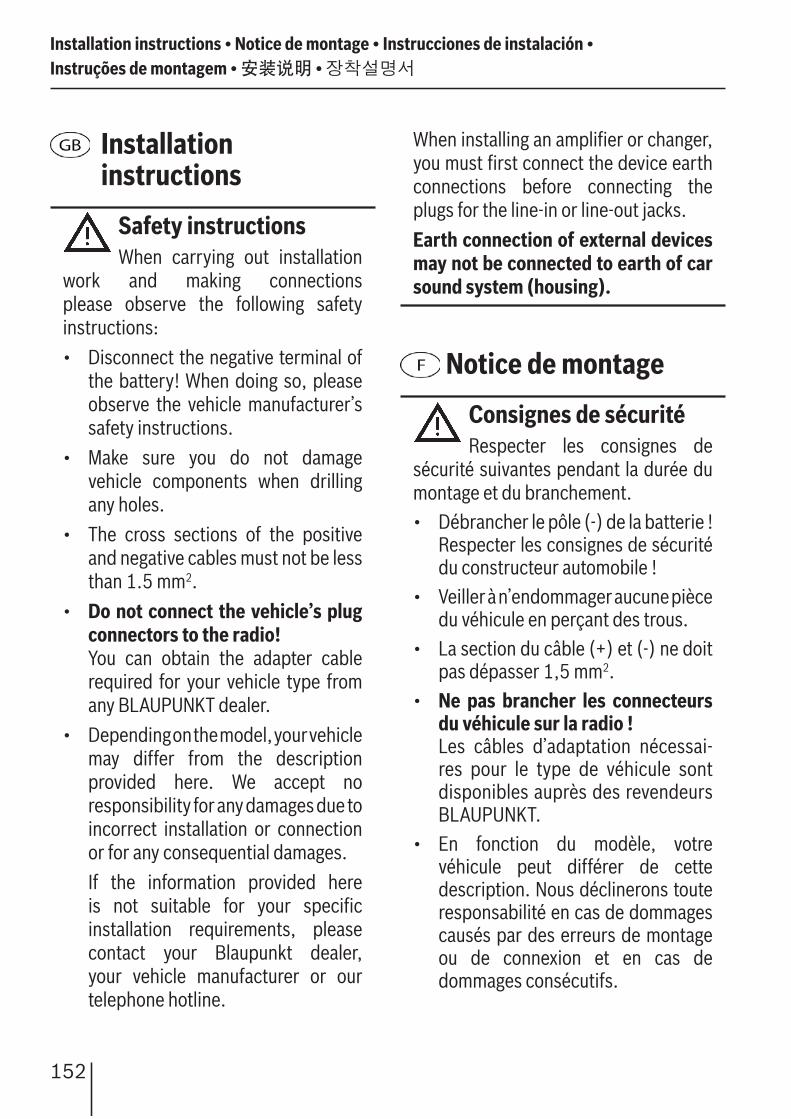
Installation instructions
Safety instructionsWhen carrying out installation
work and making connections please observe the following safety instructions:• Disconnect the negative terminal of
the battery! When doing so, please observe the vehicle manufacturer’s safety instructions.
• Make sure you do not damage vehicle components when drilling any holes.
• The cross sections of the positive and negative cables must not be less than 1.5 mm2.
• Do not connect the vehicle’s plug connectors to the radio!
You can obtain the adapter cable required for your vehicle type from any BLAUPUNKT dealer.
• Depending on the model, your vehicle may differ from the description provided here. We accept no responsibility for any damages due to incorrect installation or connection or for any consequential damages.
If the information provided here is not suitable for your specifi c installation requirements, please contact your Blaupunkt dealer, your vehicle manufacturer or our telephone hotline.
When installing an amplifi er or changer, you must fi rst connect the device earth connections before connecting the plugs for the line-in or line-out jacks.Earth connection of external devices may not be connected to earth of car sound system (housing).
Notice de montage
Consignes de sécuritéRespecter les consignes de
sécurité suivantes pendant la durée du montage et du branchement.• Débrancher le pôle (-) de la batterie !
Respecter les consignes de sécurité du constructeur automobile !
• Veiller à n’endommager aucune pièce du véhicule en perçant des trous.
• La section du câble (+) et (-) ne doit pas dépasser 1,5 mm2.
• Ne pas brancher les connecteurs du véhicule sur la radio !
Les câbles d’adaptation nécessai-res pour le type de véhicule sont disponibles auprès des revendeurs BLAUPUNKT.
• En fonction du modèle, votre véhicule peut différer de cette description. Nous déclinerons toute responsabilité en cas de dommages causés par des erreurs de montage ou de connexion et en cas de dommages consécutifs.
07EA_SanDiegoMP27_US.indd 152 11/21/06 9:45:52 AM
156
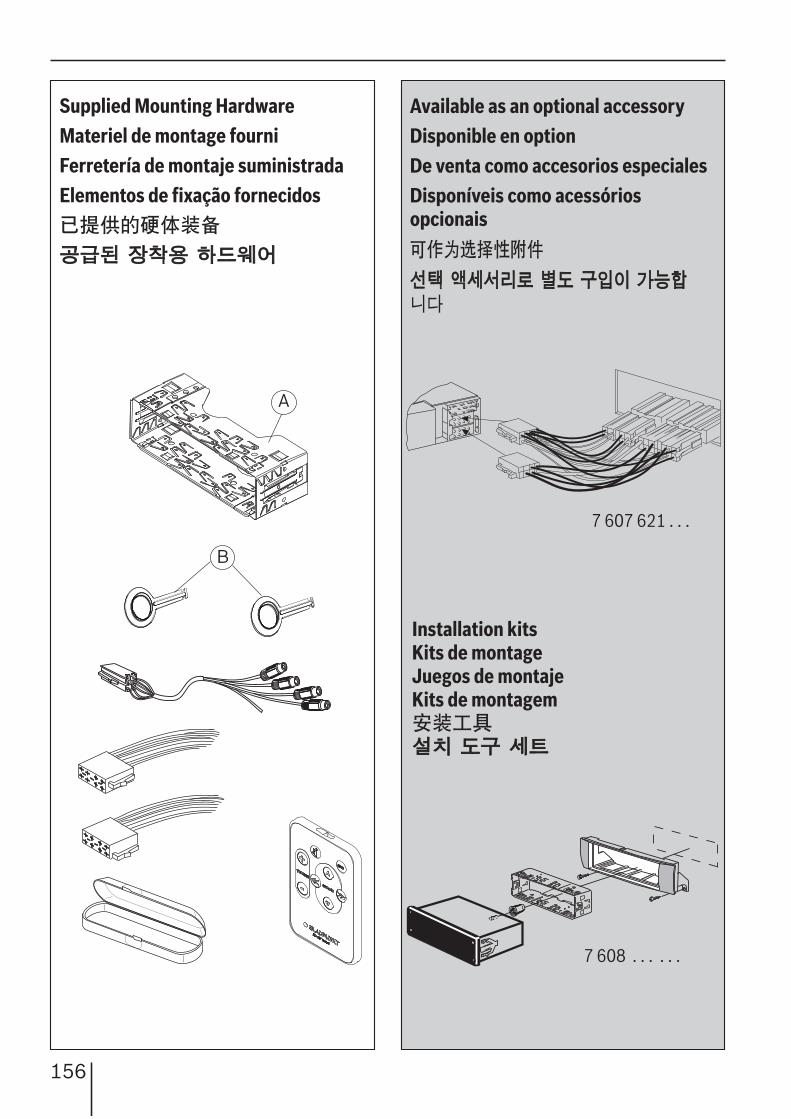
Supplied Mounting HardwareMateriel de montage fourniFerretería de montaje suministradaElementos de fi xação fornecidos
Available as an optional accessoryDisponible en optionDe venta como accesorios especialesDisponíveis como acessórios opcionais
!
A
B
A
7 607 621 . . .
Installation kitsKits de montageJuegos de montajeKits de montagem
"#"#
7 608 . . . . . .
07EA_SanDiegoMP27_US.indd 156 11/21/06 9:45:57 AM
157
FRA
NÇ
AIS
ES
PA
ÑO
LPO
RTU
GU
ÊSE
NG
LIS
H$%
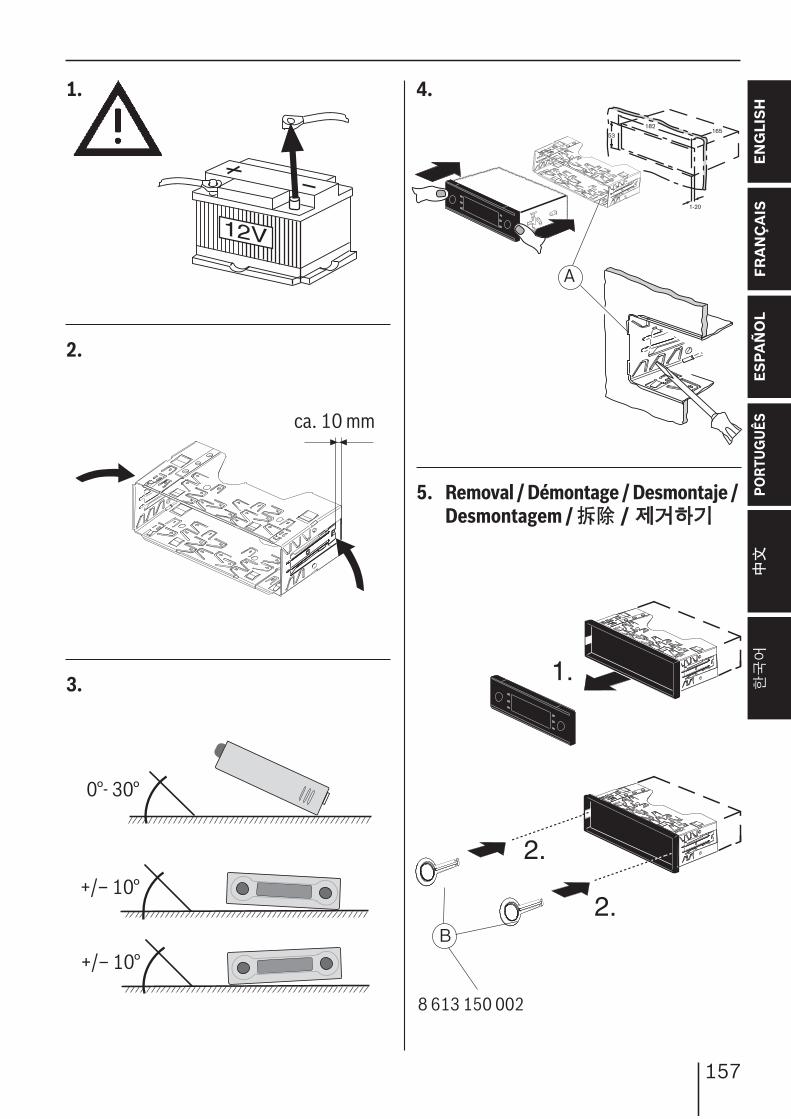
3.
12V
1.
2.
ca. 10 mm
0°- 30°
+/– 10°
+/– 10°
5.
8 613 150 002
B
1.
2.
2.
4.
53
182165
1-20
A
Removal / Démontage / Desmontaje / Desmontagem / / &'(&'(
07EA_SanDiegoMP27_US.indd 157 11/21/06 9:45:58 AM
158
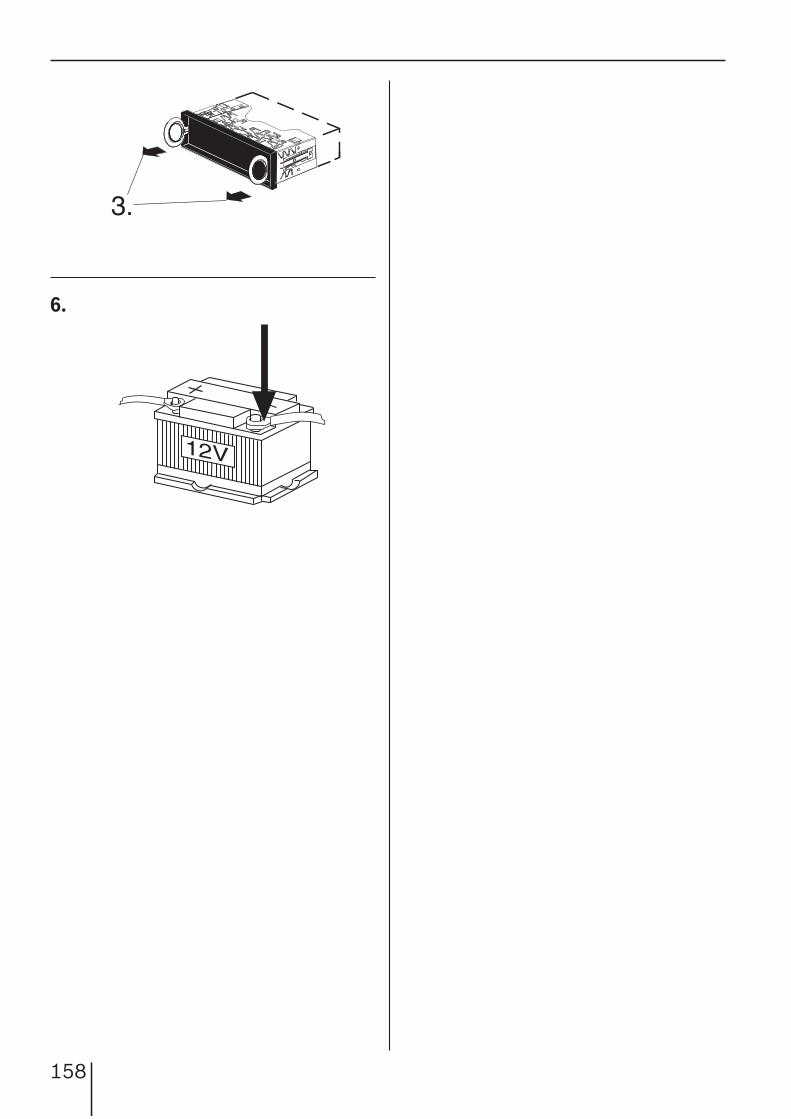
12V
6.
3.
07EA_SanDiegoMP27_US.indd 158 11/21/06 9:45:59 AM
159
FRA
NÇ
AIS
ES
PA
ÑO
LPO
RTU
GU
ÊSE
NG
LIS
H$%
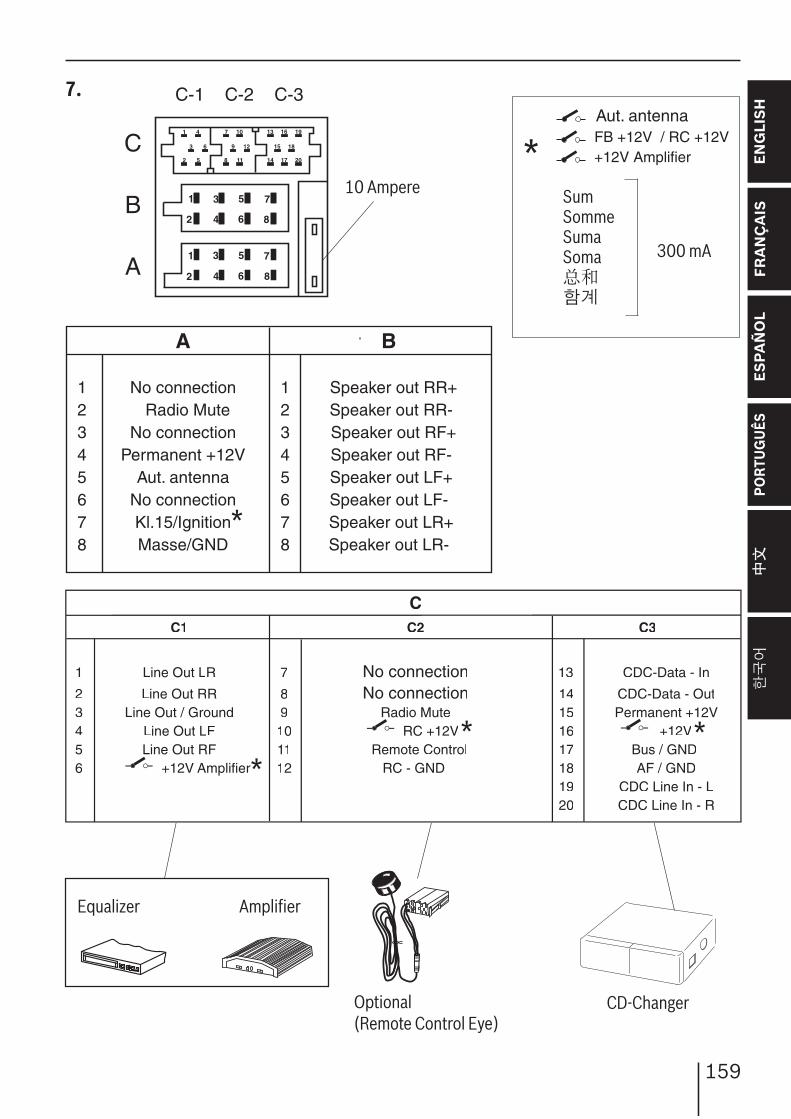
*
**
7.
Equalizer Amplifi er
CD-Changer
10 Ampere
300 mA
*SumSomme SumaSoma
)*
Aut. antenna FB +12V / RC +12V +12V Amplifier
Optional(Remote Control Eye)
A B
1 No connection 1 Speaker out RR+2 Radio Mute 2 Speaker out RR-3 No connection 3 Speaker out RF+4 Permanent +12V 4 Speaker out RF-5 Aut. antenna 5 Speaker out LF+6 No connection 6 Speaker out LF-7 Kl.15/Ignition 7 Speaker out LR+8 Masse/GND 8 Speaker out LR-
CC1 C2 C3
1 Line Out LR 7 No connection 13 CDC-Data - In
2 Line Out RR 8 No connection 14 CDC-Data - Out3 Line Out / Ground 9 Radio Mute 15 Permanent +12V4 Line Out LF 10 RC +12V 16 +12V
1 Remote Control 17 Bus / GND6 +12V Amplifier 12 RC - GND 18 AF / GND
19 CDC Line In - L20 CDC Line In - R
*
1
2
3
4
5
6
7
8
1
2
3
4
5
6
7
8
C
B
A
1 4 7 10 13 16 19
3 6 9 12 15 18
2 5 8 11 14 17 20
C-1 C-2 C-3
**
07EA_SanDiegoMP27_US.indd 159 11/21/06 9:45:59 AM
160
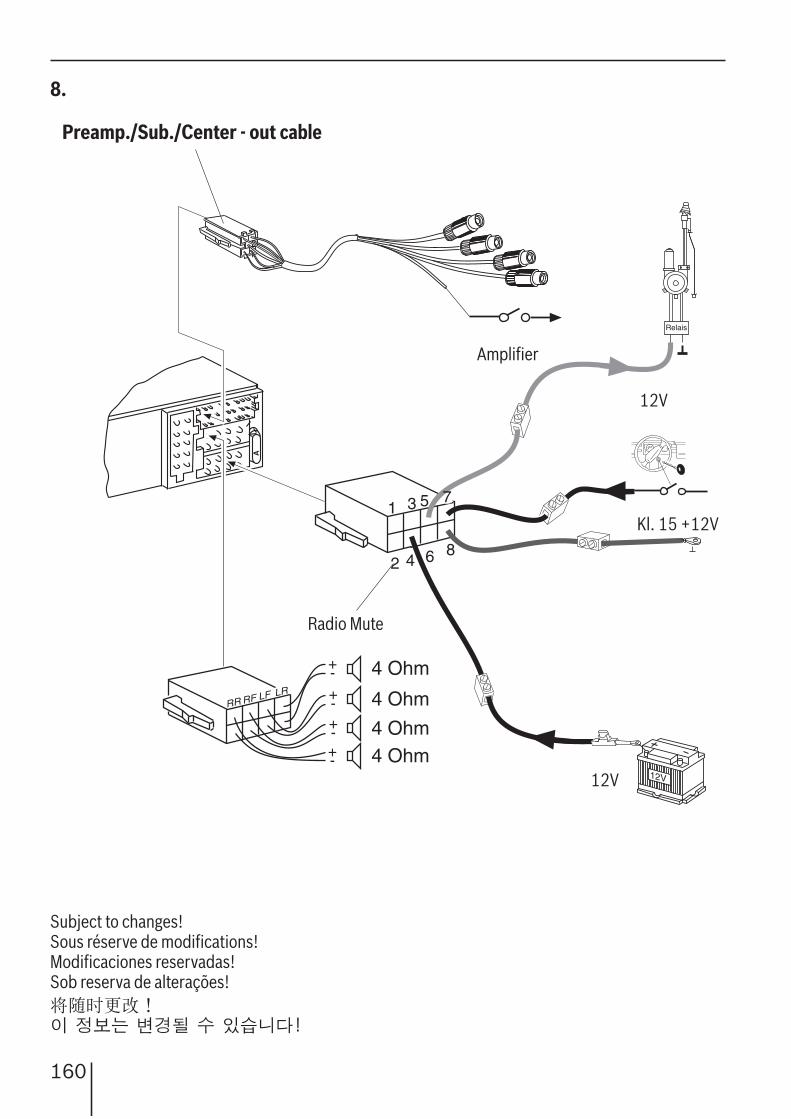
Preamp./Sub./Center - out cable
12V
8.
12V
1 3 5
2 4 6 8
A
Relais
7
RR RF LF LR
4 Ohm
4 Ohm4 Ohm
4 Ohm
+-+-+-+-
Subject to changes!Sous réserve de modifi cations!Modifi caciones reservadas!Sob reserva de alterações!
+,-./0123 !4
Kl. 15 +12V
Amplifi er
12V
12V
Radio Mute
07EA_SanDiegoMP27_US.indd 160 11/21/06 9:46:00 AM