Embed Size (px)
Citation preview

WLangage.book Page 1 Jeudi, 20. mars 2014 4:29 16
WinDev 19, WebDev 19, WinDev Mobile 19Documentation version 19(1) - 0314
Don’t forget to visit our site (www.windev.com) on a regular basis to find out whether upgraded versions areavailable.
Email address of Free Technical Support: [email protected]
This documentation is not contractually binding. Modifications may have been made to the software sincethis guide was published. See the online help.
All product names or other trademarks mentioned in this publication are registered trademarks of their respective owners. © PC SOFT 2014: This publication may not be reproduced in part or in full without the express consent of PC SOFT.
WLangage.book Page 2 Jeudi, 20. mars 2014 4:29 16

Table of Contents 3
TABLE OF CONTENTS
PART 1 : CODE EDITOR
1. OVERVIEW 291.1 The code editor ..................................................................................................................291.2 Features linked to the code input ......................................................................................31
1.2.1 Code coloring ........................................................................................................................ 311.2.2 Automatic completion............................................................................................................ 311.2.3 Code wizard........................................................................................................................... 311.2.4 Assisted input of functions ..................................................................................................... 311.2.5 Help ...................................................................................................................................... 311.2.6 Code history .......................................................................................................................... 321.2.7 Code check ........................................................................................................................... 321.2.8 Automatic indent ................................................................................................................... 321.2.9 Translating the messages....................................................................................................... 321.2.10 Managing the breakpoints ................................................................................................... 331.2.11 Inserting specific processes ................................................................................................. 331.2.12 Other features...................................................................................................................... 33
PART 2 : BASIC SYNTAX OF WLANGUAGE
1. INTRODUCTION 371.1 Some characteristics of WLanguage ................................................................................. 371.2 Programming in server code and in browser code ..........................................................38
2. THE VARIABLES 392.1 The simples types ..............................................................................................................39
2.1.1 Principle ................................................................................................................................ 392.1.2 Types of variables .................................................................................................................. 392.1.3 Declaring a simple type.......................................................................................................... 402.1.4 The different types of integer .................................................................................................. 402.1.5 The currency type................................................................................................................... 412.1.6 The numeric type ................................................................................................................... 412.1.7 The real type .......................................................................................................................... 412.1.8 The String type ....................................................................................................................... 412.1.9 The Buffer type....................................................................................................................... 422.1.10 The date type....................................................................................................................... 422.1.11 The time type ....................................................................................................................... 432.1.12 The DateTime type ............................................................................................................... 432.1.13 The Duration type................................................................................................................. 432.1.14 The Variant type................................................................................................................... 44
2.2 Operations available for the dates, times and durations, … ..........................................44
WLangage.book Page 3 Jeudi, 20. mars 2014 4:29 16

4 Table of Contents
2.3 Managing the NULL value ................................................................................................442.3.1 Null and the queries ...............................................................................................................452.3.2 Null and the variants ..............................................................................................................462.3.3 Null and the numeric values....................................................................................................462.3.4 Null and the WLanguage functions..........................................................................................462.3.5 Null and the dynamic objects..................................................................................................46
2.4 Constants ..........................................................................................................................462.5 The advanced types .........................................................................................................47
2.5.1 Simple Array ..........................................................................................................................472.5.2 Dynamic array........................................................................................................................482.5.3 Fixed array .............................................................................................................................492.5.4 Associative array ....................................................................................................................512.5.5 Composite variable ................................................................................................................512.5.6 Structure................................................................................................................................522.5.7 Dynamic structure ..................................................................................................................542.5.8 Automation object..................................................................................................................542.5.9 Dynamic Automation object....................................................................................................552.5.10 Data source .........................................................................................................................562.5.11 File description ....................................................................................................................572.5.12 Link description ...................................................................................................................582.5.13 Item description...................................................................................................................592.5.14 Font.....................................................................................................................................602.5.15 Connection ..........................................................................................................................602.5.16 Queue .................................................................................................................................612.5.17 List ......................................................................................................................................622.5.18 Stack...................................................................................................................................62
2.6 Local variables/global variables ......................................................................................642.6.1 Global variables .....................................................................................................................642.6.2 Local variables .......................................................................................................................65
2.7 Rule for variable scope .....................................................................................................65
3. OPERATORS 663.1 Overview ...........................................................................................................................663.2 Logical operators ..............................................................................................................66
3.2.1 Overview ................................................................................................................................663.2.2 Rules .....................................................................................................................................663.2.3 Notes.....................................................................................................................................66
3.3 Arithmetic operators .........................................................................................................673.3.1 Overview ................................................................................................................................673.3.2 Calculation rules ....................................................................................................................673.3.3 Notes.....................................................................................................................................67
3.4 Binary operators ...............................................................................................................673.4.1 Binary operators.....................................................................................................................673.4.2 Shift operators .......................................................................................................................683.4.3 Operator for direct access.......................................................................................................68
3.5 Comparison operators .....................................................................................................693.5.1 Overview ................................................................................................................................693.5.2 Details ...................................................................................................................................69
WLangage.book Page 4 Jeudi, 20. mars 2014 4:29 16

Table of Contents 5
3.6 Operators on character strings ........................................................................................ 703.6.1 Flexible equality and very flexible equality ............................................................................... 703.6.2 The [[ and ]] operator............................................................................................................. 713.6.3 Operators on the character strings and UNICODE .................................................................... 713.6.4 Position in a character string .................................................................................................. 713.6.5 Functions of WLanguage ........................................................................................................ 71
3.7 Operator on address ........................................................................................................ 723.8 Indirection operators ........................................................................................................ 723.9 Various operators ............................................................................................................. 73
3.9.1 The brackets .......................................................................................................................... 733.9.2 The square brackets............................................................................................................... 743.9.3 The comma............................................................................................................................ 743.9.4 The semicolon ....................................................................................................................... 743.9.5 Colon .................................................................................................................................... 743.9.6 The dot .................................................................................................................................. 743.9.7 The double dot....................................................................................................................... 743.9.8 Triple dot ............................................................................................................................... 743.9.9 The double slash.................................................................................................................... 74
4. WLANGUAGE STATEMENTS 754.1 Composite statements ...................................................................................................... 75
4.1.1 LOOP statement..................................................................................................................... 754.1.2 GOTO statement .................................................................................................................... 764.1.3 FOR statement....................................................................................................................... 764.1.4 FOR EACH/FOR ALL statement, file browsing of data ............................................................... 774.1.5 FOR EACH/FOR ALL statement, parsing strings ....................................................................... 794.1.6 FOR EACH/FOR ALL statement, control browsing..................................................................... 804.1.7 FOR EACH/FOR ALL statement, array browsing........................................................................ 814.1.8 FOR EACH/FOR ALL statement, browsing associative arrays .................................................... 824.1.9 SWITCH statement ................................................................................................................. 834.1.10 IF statement ........................................................................................................................ 834.1.11 WHILE statement ................................................................................................................. 84
4.2 Simple statements ............................................................................................................854.2.1 CONTINUE statement ............................................................................................................. 854.2.2 RETURN statement................................................................................................................. 864.2.3 RESULT statement ................................................................................................................. 874.2.4 BREAK statement................................................................................................................... 87
5. RESERVED WORDS 895.1 External .............................................................................................................................895.2 MyWindow .......................................................................................................................905.3 MyPage ............................................................................................................................905.4 MySource ..........................................................................................................................915.5 Modulo ..............................................................................................................................915.6 MySelf ................................................................................................................................915.7 MyPopupControl ..............................................................................................................925.8 MyReport ..........................................................................................................................93
WLangage.book Page 5 Jeudi, 20. mars 2014 4:29 16

6 Table of Contents
5.9 MyFile ...............................................................................................................................935.10 MyParent .........................................................................................................................935.11 STOP (calling the debugger) ............................................................................................94
6. PROCEDURE AND FUNCTION 956.1 Overview ...........................................................................................................................956.2 Global and local procedure/function ...............................................................................95
6.2.1 Definition...............................................................................................................................956.2.2 Global procedure ...................................................................................................................956.2.3 Local procedure .....................................................................................................................97
6.3 Set of procedures .............................................................................................................986.3.1 Definition...............................................................................................................................986.3.2 Creating a set of procedures ...................................................................................................986.3.3 Importing a set of procedures .................................................................................................98
6.4 Declaring a procedure/a function ....................................................................................986.4.1 Syntax ...................................................................................................................................986.4.2 Exiting from a procedure .........................................................................................................986.4.3 Returning a result ...................................................................................................................98
6.5 Calling a procedure/function ...........................................................................................996.6 Parameter of a procedure/function .................................................................................99
6.6.1 Type of the parameters ...........................................................................................................996.6.2 Passing parameters..............................................................................................................1006.6.3 Optional parameter ..............................................................................................................1016.6.4 Procedure with a variable number of parameters ...................................................................101
6.7 Overload a WLanguage function .................................................................................... 1016.7.1 Definition.............................................................................................................................1016.7.2 How do I proceed? ...............................................................................................................1016.7.3 Differentiating between the WLanguage function and the custom function .............................101
6.8 Prototype overload ......................................................................................................... 1026.8.1 Overview ..............................................................................................................................1026.8.2 How do I proceed? ...............................................................................................................1026.8.3 Managing the overload at run time........................................................................................102
7. MANAGING EXCEPTIONS 1047.1 Overview ......................................................................................................................... 104
7.1.1 Displaying a custom message...............................................................................................1047.1.2 Exception mechanism ..........................................................................................................104
7.2 Mechanism of general exceptions ................................................................................. 1047.2.1 Overview ..............................................................................................................................1047.2.2 Declaration syntaxes ............................................................................................................1057.2.3 Declaring several processes of general exceptions ................................................................1057.2.4 General notes ......................................................................................................................1057.2.5 Special case ........................................................................................................................106
7.3 Mechanism of specific exceptions ................................................................................. 1067.3.1 Overview ..............................................................................................................................1067.3.2 Declaration syntaxes ............................................................................................................106
WLangage.book Page 6 Jeudi, 20. mars 2014 4:29 16

Table of Contents 7
7.4 Mechanism of automated exceptions ............................................................................1067.4.1 Implementation ................................................................................................................... 1067.4.2 Running the error process ("CASE EXCEPTION:" in the code) ................................................ 1077.4.3 Running a procedure of exception process............................................................................ 107
7.5 Functions for managing the exceptions ..........................................................................107
8. OBJECT-ORIENTED PROGRAMMING (OOP) 1088.1 Overview of OOP (Object Oriented Programming) ..........................................................1088.2 OOP concepts ..................................................................................................................108
8.2.1 Class ................................................................................................................................... 1088.2.2 Object ................................................................................................................................. 1088.2.3 Constructor and destructor................................................................................................... 1098.2.4 Inheritance .......................................................................................................................... 1098.2.5 Data encapsulation ............................................................................................................. 109
8.3 Class, members and methods ........................................................................................1098.3.1 Declaration of the class........................................................................................................ 1098.3.2 Declaration of members....................................................................................................... 1108.3.3 Declare the constants .......................................................................................................... 1108.3.4 Declaring the methods ......................................................................................................... 1108.3.5 Creating and declaring properties......................................................................................... 111
8.4 Constructor and destructor ............................................................................................. 1128.4.1 Constructor of the class........................................................................................................ 1128.4.2 Constructor of the base classes and of the members............................................................. 1128.4.3 Destructor method .............................................................................................................. 112
8.5 Object .............................................................................................................................. 1138.5.1 Declaring an object .............................................................................................................. 1138.5.2 The members of an object .................................................................................................... 1138.5.3 The methods of an object ..................................................................................................... 1138.5.4 Lifespan of an object............................................................................................................ 113
8.6 Dynamic instantiation of an object ................................................................................. 1148.6.1 Declaring a dynamic object .................................................................................................. 1148.6.2 Instantiating a dynamic object ............................................................................................. 1148.6.3 Freeing a dynamic object ..................................................................................................... 114
8.7 Class inheritance ............................................................................................................. 1148.7.1 Syntax ................................................................................................................................. 1158.7.2 Redefining the methods ....................................................................................................... 115
PART 3 : MANAGING WINDOWS, PAGES AND CONTROLS
1. MANAGING THE WINDOWS 1191.1 Overview ........................................................................................................................... 1191.2 Functions for managing the windows ............................................................................. 1191.3 MDI functions ................................................................................................................... 1211.4 Functions for managing the menus ................................................................................. 121
WLangage.book Page 7 Jeudi, 20. mars 2014 4:29 16

8 Table of Contents
2. MANAGING THE PAGES 1232.1 Overview ......................................................................................................................... 1232.2 Functions for managing the pages ................................................................................ 1232.3 Functions for managing the menus ............................................................................... 124
3. MANAGING THE "BACK" BUTTON IN A PAGE 1253.1 Overview ......................................................................................................................... 125
3.1.1 Two methods can be used to manage the browser "Back" button..........................................1253.1.2 Example of desynchronization ..............................................................................................125
3.2 Preventing from using the "Back" button ...................................................................... 1263.2.1 Operating mode ...................................................................................................................1263.2.2 Implementation ...................................................................................................................126
3.3 Managing the synchronization ...................................................................................... 1263.3.1 Overview ..............................................................................................................................1263.3.2 Default synchronization ........................................................................................................126
3.4 Synchronization by programming ..................................................................................127
4. COMMUNICATING WITH THE USER 1284.1 Overview ......................................................................................................................... 1284.2 The standard dialog boxes ............................................................................................ 1284.3 The advanced dialog boxes ........................................................................................... 129
4.3.1 Overview ..............................................................................................................................1294.3.2 Directive questioning............................................................................................................1294.3.3 Immediate input...................................................................................................................1294.3.4 Message database...............................................................................................................129
4.4 Customizing the dialog boxes ........................................................................................ 1294.4.1 Customizing the system information windows........................................................................1304.4.2 Stop customizing the system information windows ................................................................1304.4.3 Multilingual dialog boxes ......................................................................................................130
4.5 Automatically close the dialog boxes ............................................................................ 1304.6 Advanced communication with the user ........................................................................ 131
4.6.1 Overview ..............................................................................................................................1314.6.2 The available WLanguage functions ......................................................................................1314.6.3 Managing a dialog via cells...................................................................................................1314.6.4 Managing a dialog with pages...............................................................................................1314.6.5 Managing a dialog via YesNo and OKCancel ..........................................................................132
4.7 Functions for managing the dialog boxes ..................................................................... 132
5. MANAGING DRAG AND DROP 1335.1 What is "Drag and Drop"? .............................................................................................. 1335.2 Automatic drag and drop .............................................................................................. 133
5.2.1 WinDev: The controls affected by the automatic drag and drop ..............................................1335.2.2 WebDev: The controls affected by the automatic drag and drop .............................................1335.2.3 Configuring the default "Drag and Drop" ..............................................................................134
WLangage.book Page 8 Jeudi, 20. mars 2014 4:29 16

Table of Contents 9
5.3 Programmed "Drag and Drop" .......................................................................................1345.3.1 Principle .............................................................................................................................. 1345.3.2 Programming ....................................................................................................................... 134
5.4 "Drag and Drop" from the explorer ................................................................................1355.4.1 Principle .............................................................................................................................. 1355.4.2 Functions specific to "Drag and Drop" from the explorer ....................................................... 1355.4.3 Programming ....................................................................................................................... 135
5.5 Functions for managing Drag and Drop .........................................................................136
6. MANAGING THE CONTROLS 1376.1 Overview ..........................................................................................................................1376.2 General functions for handling the controls ...................................................................137
7. PROPERTIES OF WINDOWS, PAGES AND CONTROLS 139
PART 4 : STANDARD FUNCTIONS
1. HANDLING THE NUMERIC VALUES 1511.1 Overview ........................................................................................................................... 1511.2 The matrices ..................................................................................................................... 151
1.2.1 Definition ............................................................................................................................ 1511.2.2 Handling the matrices .......................................................................................................... 151
1.3 The statistics ..................................................................................................................... 1511.4 Financial calculations .......................................................................................................1521.5 Functions for managing the numeric values ...................................................................152
1.5.1 Miscellaneous functions ...................................................................................................... 1521.5.2 Binary functions................................................................................................................... 1531.5.3 Matrix functions ................................................................................................................... 1531.5.4 Financial functions............................................................................................................... 1541.5.5 Statistical functions ............................................................................................................. 154
2. HANDLING THE CHARACTER STRINGS 1552.1 Handling the content of a string ......................................................................................1552.2 WinDev and the Unicode format ....................................................................................155
2.2.1 What is the UNICODE format ................................................................................................ 1552.2.2 WinDev and Unicode............................................................................................................ 155
2.3 Handling character strings in Pocket PC .........................................................................1562.4 Functions for managing the character strings ................................................................156
WLangage.book Page 9 Jeudi, 20. mars 2014 4:29 16

10 Table of Contents
3. HANDLING THE DATES AND TIMES 1593.1 Overview ......................................................................................................................... 1593.2 Different methods for handling the dates and times ..................................................... 1593.3 Handling dates/times found in each edit control .......................................................... 1593.4 Functions for managing the dates and times ................................................................ 159
4. HANDLING THE CHARTS 1614.1 Overview .......................................................................................................................... 1614.2 The different types of charts ............................................................................................ 161
4.2.1 The "Pie" charts ..................................................................................................................1614.2.2 The "Column" charts ...........................................................................................................1614.2.3 The "Line" charts.................................................................................................................1614.2.4 The "Scatter" charts ............................................................................................................1624.2.5 The "Stock" charts ..............................................................................................................1624.2.6 3D charts .............................................................................................................................162
4.3 How do I create charts? ................................................................................................. 1634.3.1 Creating the charts in the editors...........................................................................................1634.3.2 Creating the charts by programming......................................................................................1634.3.3 Charts and threads...............................................................................................................1634.3.4 Default values of a chart .......................................................................................................163
4.4 Functions for managing the charts ................................................................................ 164
5. HANDLING THE MEMORY ZONES 166
6. HANDLING THE EXTERNAL FILES 1676.1 Overview ..........................................................................................................................1676.2 Handling the content of external files .............................................................................1676.3 Handling files ..................................................................................................................1676.4 Handling disks and their directories ...............................................................................1676.5 Functions for managing the external files ...................................................................... 168
7. SHARED MEMORY ZONES 1717.1 Overview .......................................................................................................................... 1717.2 How do I proceed? .......................................................................................................... 171
7.2.1 Creating a shared memory zone ............................................................................................1717.2.2 Finding out whether a shared memory zone already exists......................................................1717.2.3 Handling the content of a shared memory zone by programming ............................................1717.2.4 WLanguage functions ...........................................................................................................172
7.3 Dialog between several applications ..............................................................................1727.3.1 Automatic notification of modifications .................................................................................1727.3.2 Manual synchronization........................................................................................................172
WLangage.book Page 10 Jeudi, 20. mars 2014 4:29 16

Table of Contents 11
7.4 Naming the shared memory zones ................................................................................1737.4.1 Managing the share mode.................................................................................................... 1737.4.2 Correspondence between the name provided to fMemOpen and the opening in C .................. 173
7.5 Functions for managing the shared memory zones .......................................................173
8. PRINTING IN WLANGUAGE 1748.1 Overview ..........................................................................................................................1748.2 Principle for printing in WLanguage ...............................................................................174
8.2.1 Step 1: Configuring the print parameters............................................................................... 1748.2.2 Step 2: Creating print fonts................................................................................................... 1758.2.3 Step 3: Printing.................................................................................................................... 175
8.3 Print functions ..................................................................................................................1778.4 PDF functions ...................................................................................................................179
9. MANAGING WINDOWS 1809.1 Overview ..........................................................................................................................1809.2 Functions for managing the registry ...............................................................................1809.3 Functions for managing the clipboard ............................................................................ 1819.4 Functions for managing the recycle bin ................................................................... 1819.5 Functions for managing the mouse ................................................................................ 1819.6 Functions for checking the spelling ................................................................................1829.7 Speech recognition functions ..........................................................................................1829.8 Functions for managing the serial and parallel ports .....................................................1829.9 Functions for managing Twain devices ..........................................................................1839.10 USB functions .................................................................................................................1839.11 MCI functions ..................................................................................................................1849.12 Service functions ............................................................................................................1849.13 System functions ............................................................................................................1859.14 Miscellaneous Windows functions .................................................................................1869.15 Windows event ..............................................................................................................1879.16 Java functions ................................................................................................................1889.17 Miscellaneous WinDev/WebDev functions ....................................................................1889.18 Functions for managing the executables ......................................................................1929.19 Hasp functions ...............................................................................................................1929.20 Functions for DDE management ...................................................................................1939.21 Functions for managing the applications with "live update" ........................................1939.22 Functions for managing the networks ..........................................................................1949.23 Functions for managing the SNMP protocol .................................................................1949.24 Functions for managing the projects ............................................................................1949.25 Functions for managing the scheduler .........................................................................195
WLangage.book Page 11 Jeudi, 20. mars 2014 4:29 16

12 Table of Contents
10. ENABLING AN APPLICATION 19610.1 Overview ........................................................................................................................ 19610.2 How do I proceed? ....................................................................................................... 196
10.2.1 Principle ............................................................................................................................19610.2.2 Implementation in the client application .............................................................................19610.2.3 Implementation in the application of the provider................................................................196
10.3 Functions for managing the activation keys ................................................................. 196
11. HANDLING YOUR XLS FILES 19711.1 Overview ..........................................................................................................................19711.2 Method 1: Dynamically handling the XLS and XLSX files ...............................................19711.3 Method 2: Reading the Excel files (kept for backward compatibility) ........................... 19811.4 WLanguage functions .................................................................................................... 19811.5 XLS functions .................................................................................................................. 199
12. THE ARCHIVES 20012.1 Overview ........................................................................................................................20012.2 Handling the archives ...................................................................................................20012.3 The single-part and multi-part archives ....................................................................... 201
12.3.1 Overview............................................................................................................................20112.3.2 Principle ............................................................................................................................20112.3.3 Examples...........................................................................................................................201
12.4 Archiving functions ........................................................................................................202
13. BURNING A CD OR A DVD 20313.1 Overview ........................................................................................................................20313.2 Burning a CD/DVD ........................................................................................................20313.3 Burn functions ...............................................................................................................203
14. FUNCTIONS FOR ACCESSING A POCKET PC 205
15. FUNCTIONS SPECIFIC TO WINDEV MOBILE 20715.1 WinDev Mobile and SIM cards ......................................................................................207
15.1.1 Overview............................................................................................................................20715.1.2 Required configuration.......................................................................................................20715.1.3 Operating mode in GO mode and at run time.......................................................................20715.1.4 WLanguage functions.........................................................................................................207
15.2 Pocket keyboard ...........................................................................................................20715.2.1 Overview............................................................................................................................20715.2.2 WLanguage functions.........................................................................................................208
WLangage.book Page 12 Jeudi, 20. mars 2014 4:29 16

Table of Contents 13
PART 5 : WEB SPECIFIC FEATURES
1. UPLOADING FILES 2111.1 Overview ........................................................................................................................... 2111.2 Implementing the upload in a WebDev site .................................................................... 211
1.2.1 Available elements .............................................................................................................. 2111.2.2 Uploading a file in a page..................................................................................................... 2121.2.3 Displaying the image to upload ............................................................................................ 212
2. DOWNLOADING FILES 2132.1 Overview ..........................................................................................................................2132.2 Implementing file download in a WebDev site ...............................................................213
2.2.1 Using the description window of controls (button, link,…)...................................................... 2132.2.2 Programming ....................................................................................................................... 2132.2.3 Forcing the file download ..................................................................................................... 213
3. COOKIES 2143.1 Overview ..........................................................................................................................2143.2 What is a cookie made of? .............................................................................................2143.3 WebDev and the management of cookies .....................................................................214
3.3.1 Available elements .............................................................................................................. 2143.3.2 Writing a cookie on the computer of the Web user ................................................................. 2143.3.3 Reading a cookie on the computer of the Web user (server code and browser code)............... 215
3.4 Checking the management of cookies in a WebDev site ...............................................215
4. VALIDITY OF THE SITE PAGES 2164.1 Overview ..........................................................................................................................2164.2 How do I proceed? ..........................................................................................................216
4.2.1 Defining the validity period of pages ..................................................................................... 2164.2.2 Deleting the validity period ................................................................................................... 2164.2.3 Configuring the Windows application server to manage the validity period ............................. 2164.2.4 Configuring the Linux application server to manage the validity period ................................... 217
5. INCLUDING JAVASCRIPT FILES OR A WEB RESOURCE 2185.1 Overview ..........................................................................................................................2185.2 How do I proceed? ..........................................................................................................218
5.2.1 Including Javascript files (.js) ............................................................................................... 2185.2.2 Including external resources in the site ................................................................................. 2185.2.3 Automatic detection of the encoding .................................................................................... 219
5.3 Handling external Javascript objects from WLanguage .................................................219
WLangage.book Page 13 Jeudi, 20. mars 2014 4:29 16
14 Table of Contents
6. AJAX 2206.1 Overview .........................................................................................................................2206.2 Automatic and immediate AJAX ....................................................................................220
6.2.1 Overview ..............................................................................................................................2206.2.2 Processes that can use AJAX automatically ...........................................................................2216.2.3 Elements and characteristics that can be automatically used by AJAX ....................................2216.2.4 Specific features ..................................................................................................................223
6.3 Programmed AJAX .........................................................................................................2236.3.1 Overview ..............................................................................................................................2236.3.2 Functions for AJAX management ...........................................................................................2236.3.3 Procedures that can be called by AJAX ..................................................................................2246.3.4 WLanguage functions useless in AJAX ...................................................................................224
7. VISTA GADGETS 2257.1 Overview .........................................................................................................................2257.2 Creating the gadget .......................................................................................................225
7.2.1 The steps .............................................................................................................................2257.2.2 Generating the gadget ..........................................................................................................225
7.3 Programming the Vista gadgets ....................................................................................2267.3.1 Overview ..............................................................................................................................2267.3.2 The different types of pages ..................................................................................................2267.3.3 The WLanguage functions.....................................................................................................227
8. USING OFFLINE SITES 2288.1 Overview .........................................................................................................................2288.2 Implementation ..............................................................................................................228
8.2.1 Defining the resources to cache ............................................................................................2288.2.2 Configuration of the server ....................................................................................................2288.2.3 Programming technique .......................................................................................................2288.2.4 Running the test of the site ...................................................................................................229
8.3 Access in local mode to a database (SQLite) .................................................................2298.3.1 How do I manage a local database? .....................................................................................2298.3.2 The SQL functions ................................................................................................................2308.3.3 Saving the data of an offline site locally.................................................................................230
9. LOCAL STORAGE 2329.1 Overview .........................................................................................................................2329.2 The WLanguage functions .............................................................................................232
WLangage.book Page 14 Jeudi, 20. mars 2014 4:29 16
Table of Contents 15
10. SSL: SECURED TRANSATIONS 23310.1 Overview ........................................................................................................................23310.2 Implementing the secured transactions with the SSL protocol ....................................23310.3 Obtaining an SSL certificate for IIS2 (2.0 or later) ........................................................233
10.3.1 Step 1: Creating a certificate .............................................................................................. 23310.3.2 Step 2: Requesting a certificate.......................................................................................... 23410.3.3 Step 3: Certification of the certificate on the server.............................................................. 234
10.4 Inserting secure transactions (SSL) into a WebDev site ................................................23510.4.1 Principle............................................................................................................................ 23510.4.2 Implementation ................................................................................................................. 23510.4.3 Going back to standard mode (non-secured transaction) in the current browser .................. 235
11. JSON 23611.1 Overview .........................................................................................................................23611.2 Getting information in JSON format ..............................................................................236
11.2.1 Operating mode................................................................................................................. 23611.2.2 Example for using the JSONExecute function....................................................................... 23611.2.3 Example for using the JSONExecuteExternal function........................................................... 237
11.3 Creating pages that return JSON data ..........................................................................23711.3.1 Case of a page called by JSONExecute............................................................................... 23711.3.2 Case of a page called by JSONExecuteExternal ................................................................... 237
PART 6 : COMMUNICATION
1. THE COMMUNICATION 2411.1 Communication with WinDev/WebDev ............................................................................2411.2 Communication with WinDev Mobile .............................................................................242
2. COMMUNICATE BY EMAILS 2432.1 Overview .........................................................................................................................2432.2 Managing the emails .....................................................................................................2432.3 Synchronous/Asynchronous mode (WebDev only) ........................................................2432.4 Manage the emails via the POP3/SMTP protocols ........................................................244
2.4.1 Overview of the POP3/SMTP protocols.................................................................................. 2442.4.2 Principle .............................................................................................................................. 244
2.5 Manage the emails with the IMAP protocol ..................................................................2472.5.1 Overview of the IMAP protocol .............................................................................................. 2472.5.2 Using the IMAP protocol ....................................................................................................... 247
2.6 Managing emails with "Simple MAPI" (WinDev and WebDev) .....................................2472.7 Manage the emails with CEMAPI (WinDev Mobile only) ................................................2502.8 Reading and writing an email .......................................................................................2502.9 Functions for managing the emails ...............................................................................250
WLangage.book Page 15 Jeudi, 20. mars 2014 4:29 16

16 Table of Contents
3. ACCESSING LOTUS NOTES AND OUTLOOK 2523.1 Access to Lotus Notes ......................................................................................................252
3.1.1 Overview ..............................................................................................................................2523.1.2 Method for accessing Lotus Notes ........................................................................................2523.1.3 Quick method if you do not want to access the documents ....................................................2523.1.4 Handling the data.................................................................................................................252
3.2 Access to Outlook ...........................................................................................................2523.2.1 Overview ..............................................................................................................................2523.2.2 Method for accessing Outlook...............................................................................................2523.2.3 Sending and receiving emails ...............................................................................................2533.2.4 Version of Outlook ................................................................................................................2533.2.5 Handling the data.................................................................................................................253
3.3 Lotus Notes and Outlook functions ................................................................................2533.3.1 Email functions for Lotus Notes.............................................................................................2533.3.2 Email functions for Outlook...................................................................................................2543.3.3 Task functions ......................................................................................................................2553.3.4 Appointment functions .........................................................................................................2553.3.5 Contact functions .................................................................................................................2563.3.6 Group functions ...................................................................................................................2563.3.7 Notes functions....................................................................................................................257
4. GOOGLE 2584.1 Managing the Google contacts ......................................................................................258
4.1.1 Overview ..............................................................................................................................2584.1.2 How do I manage the Google contacts? ................................................................................2584.1.3 How do I retrieve a Google contact? ......................................................................................2584.1.4 How do I modify or delete the Google contacts? ....................................................................2584.1.5 Functions for managing the Google contacts .........................................................................259
4.2 Managing the Google calendars ...................................................................................2594.2.1 Overview ..............................................................................................................................2594.2.2 How do I manage a Google calendar? ...................................................................................2594.2.3 How do I retrieve a Google calendar and its elements? ..........................................................2604.2.4 How do I add, modify or delete events in a Google calendar?.................................................2604.2.5 Functions for managing the Google calendars .......................................................................261
4.3 Using the service for managing the Google Picasa photo albums ...............................2624.3.1 Overview ..............................................................................................................................2624.3.2 How do I proceed? ...............................................................................................................2624.3.3 Functions for managing the Picasa albums ...........................................................................263
4.4 Managing the Google documents .................................................................................2644.4.1 Overview ..............................................................................................................................2644.4.2 How do I manage the Google documents? ............................................................................264
4.5 Using the Google Maps service .....................................................................................2644.5.1 Overview ..............................................................................................................................2644.5.2 How do I proceed? ...............................................................................................................2654.5.3 Other services ......................................................................................................................2654.5.4 Functions for managing the Google maps..............................................................................265
WLangage.book Page 16 Jeudi, 20. mars 2014 4:29 16

Table of Contents 17
5. SALESFORCE 2665.1 Use the Salesforce service ..............................................................................................266
5.1.1 Overview.............................................................................................................................. 2665.1.2 How do I proceed?............................................................................................................... 266
5.2 Salesforce functions .......................................................................................................266
6. RSS STREAM 2686.1 Overview .........................................................................................................................2686.2 How do I proceed? .........................................................................................................2686.3 Functions for managing the RSS streams ......................................................................268
7. LDAP SERVER 2697.1 Overview .........................................................................................................................269
8. WINDEV AND TELEPHONY 2708.1 Overview ........................................................................................................................2708.2 Managing the incoming calls .........................................................................................270
8.2.1 The different steps ............................................................................................................... 2708.2.2 Example .............................................................................................................................. 271
8.3 Managing the outgoing calls .........................................................................................2728.3.1 The different steps ............................................................................................................... 2728.3.2 Handling an outgoing call..................................................................................................... 273
8.4 Telephony functions .......................................................................................................273
9. MANAGING THE SMSS 2759.1 Overview .........................................................................................................................2759.2 The SMS structure ..........................................................................................................275
9.2.1 Overview.............................................................................................................................. 2759.2.2 The variables of the SMS structure........................................................................................ 2759.2.3 Reading and deleting the SMSs found on Smartphone.......................................................... 2759.2.4 Different types of numbers ................................................................................................... 2769.2.5 Operating mode in GO mode and at run time ........................................................................ 276
9.3 WLanguage functions ....................................................................................................276
10. SENDING FAXES 27710.1 Overview ........................................................................................................................ 27710.2 Configuring the "fax server" ......................................................................................... 277
10.2.1 Configuring the current computer ....................................................................................... 27710.2.2 Configuring the fax server in Windows 2000........................................................................ 27710.2.3 Configuring the fax server in Windows XP ............................................................................ 277
10.3 Application or site for sending faxes ............................................................................27810.3.1 Sending a fax from an application or from a site .................................................................. 27810.3.2 Sending a fax created with the report editor ........................................................................ 278
WLangage.book Page 17 Jeudi, 20. mars 2014 4:29 16

18 Table of Contents
10.4 Configuring the fax server by programming ................................................................27810.4.1 Options of the fax server .....................................................................................................27810.4.2 Tips ...................................................................................................................................279
10.5 Functions for managing the faxes ................................................................................279
11. RETRIEVING THE HTML PAGES 28011.1 Overview .........................................................................................................................28011.2 HTTP functions ...............................................................................................................280
12. MANAGING FILES ON INTERNET 28112.1 Overview ........................................................................................................................ 281
12.1.1 Uploading and downloading files via WinDev FTP or RPC: the rules to follow .........................28112.1.2 Other features....................................................................................................................281
12.2 Detailed use of WinDev FTP/RPC .................................................................................. 28112.2.1 Step 1: Establishing a connection to a WinDev RPC/FTP server............................................28112.2.2 Step 2: Transmitting a file to a WinDev FTP server ................................................................28112.2.3 Step 3: Retrieving a file from a WinDev FTP server................................................................28212.2.4 Step 4: Closing a connection to a WinDev RPC/FTP server ...................................................282
12.3 Net functions .................................................................................................................283
13. COMMUNICATING WITH AN FTP SERVER 28413.1 Handling files on a RPC server ......................................................................................284
13.1.1 Overview............................................................................................................................28413.1.2 FTP ....................................................................................................................................28413.1.3 Principle ............................................................................................................................28413.1.4 Relative path/Absolute path...............................................................................................28413.1.5 Example ............................................................................................................................285
13.2 FTP functions .................................................................................................................285
14. MANAGING THE SOCKETS 28614.1 Overview ........................................................................................................................286
14.1.1 Different possibilities .........................................................................................................28614.1.2 Example ............................................................................................................................286
14.2 Client WinDev application/Client WebDev site .............................................................28614.2.1 Principle of a client application or client site........................................................................28614.2.2 Transmission mode of information ......................................................................................287
14.3 WinDev "Simplified Server" application .......................................................................28714.3.1 The simplified server...........................................................................................................28714.3.2 Transmission mode of information ......................................................................................288
14.4 Standard socket server .................................................................................................28814.4.1 The standard socket server .................................................................................................28814.4.2 Transmission mode of information ......................................................................................289
14.5 Socket functions ............................................................................................................290
WLangage.book Page 18 Jeudi, 20. mars 2014 4:29 16

Table of Contents 19
15. MANAGING THE BLUETOOTH KEYS 29115.1 Overview .........................................................................................................................29115.2 How do I proceed? ........................................................................................................29115.3 Which keys should be used? .........................................................................................29115.4 The Bluetooth and OBEX functions ...............................................................................292
15.4.1 Bluetooth functions ........................................................................................................... 29215.4.2 OBEX functions.................................................................................................................. 292
16. MANAGING THE THREADS 29316.1 Overview ........................................................................................................................293
16.1.1 From simple management to advanced management of threads ......................................... 29316.1.2 Example ............................................................................................................................ 293
16.2 Principle for using the threads ......................................................................................29316.2.1 Simple management of threads ......................................................................................... 29316.2.2 Characteristics of the threads............................................................................................. 29316.2.3 Access to the existing elements and HFSQL context ............................................................ 29416.2.4 Limits of the processes performed by the thread ................................................................. 294
16.3 Managing the semaphores in the threads ...................................................................29416.3.1 Principle............................................................................................................................ 29416.3.2 Implementing a semaphore ............................................................................................... 29516.3.3 A limited semaphore: the critical section ............................................................................ 296
16.4 Managing the mutexes in the threads .........................................................................29616.4.1 Principle............................................................................................................................ 29616.4.2 How do I implement a mutex? ............................................................................................ 29616.4.3 The functions for managing the mutexes ............................................................................. 297
16.5 Synchronizing the threads via signals ..........................................................................29716.5.1 Simple management of signals .......................................................................................... 29716.5.2 Advanced management of signals...................................................................................... 298
16.6 Managing the opening of a WinDev window in a secondary thread ..........................29816.6.1 Opening a window from a secondary thread........................................................................ 29816.6.2 Example ............................................................................................................................ 298
16.7 Functions for managing the threads ............................................................................299
17. SOAP 30117.1 Overview .........................................................................................................................301
17.1.1 WinDev/WebDev and the SOAP protocol ............................................................................ 30117.1.2 Example ............................................................................................................................ 301
17.2 Running procedures on a SOAP server ..........................................................................30117.2.1 Principle............................................................................................................................ 30117.2.2 The SOAP structure ............................................................................................................ 302
17.3 Creating and installing a WinDev SOAP server application .........................................30217.3.1 Principle............................................................................................................................ 30217.3.2 How do I create an application SOAP server ........................................................................ 303
17.4 SOAP functions ..............................................................................................................304
WLangage.book Page 19 Jeudi, 20. mars 2014 4:29 16

20 Table of Contents
18. XML WEBSERVICES 30518.1 Importing XML Webservices ..........................................................................................305
18.1.1 Overview............................................................................................................................30518.1.2 Importing a Webservice into a project .................................................................................30518.1.3 Updating the description of a Webservice ...........................................................................30518.1.4 Properties of a Webservice .................................................................................................30518.1.5 Using a Webservice imported into the project......................................................................30618.1.6 Distributing a WinDev application that uses a Webservice ...................................................307
18.2 Generating an XML Web service ..................................................................................30718.2.1 Overview............................................................................................................................30718.2.2 How do I make a Webservice available?..............................................................................30818.2.3 Generating a Webservice....................................................................................................30818.2.4 Deploying a Webservice .....................................................................................................308
19. XML 31119.1 Managing XML documents ............................................................................................ 311
19.1.1 Overview............................................................................................................................31119.1.2 Definition...........................................................................................................................31119.1.3 Principle ............................................................................................................................31119.1.4 Using a string variable ........................................................................................................31119.1.5 Using an xmlDocument variable..........................................................................................312
19.2 Managing the XSD ........................................................................................................ 31219.2.1 Overview............................................................................................................................31219.2.2 Importing an XSD file into a project .....................................................................................31319.2.3 Using an imported description in the project .......................................................................313
19.3 Functions for managing the XML documents ............................................................... 313
20. .NET ASSEMBLIES 31520.1 Overview ....................................................................................................................... 315
20.1.1 Definition...........................................................................................................................31520.1.2 WinDev and .NET................................................................................................................315
20.2 Conditions for using a .NET assembly .......................................................................... 31520.2.1 Installing the .NET framework..............................................................................................31520.2.2 Defining the .NET security level ...........................................................................................31520.2.3 Making the DLLs required to run the .NET assembly accessible ............................................316
20.3 Creating a .NET assembly from WinDev ...................................................................... 31620.4 Creating a .NET assembly accessible by COM .............................................................317
20.4.1 Overview............................................................................................................................31720.4.2 Creating a .NET assembly accessible by COM from a WinDev project....................................317
20.5 Creating the setup program of a .NET assembly ..........................................................31720.6 Using .NET assemblies in a WinDev application ...........................................................317
WLangage.book Page 20 Jeudi, 20. mars 2014 4:29 16

Table of Contents 21
PART 7 : MANAGING THE DATA FILES
1. MANAGING DATA FILES 3211.1 HFSQL data file management ..........................................................................................321
1.1.1 Create a data file ................................................................................................................. 3211.1.2 Opening and closing data files ............................................................................................. 3211.1.3 Managing HFSQL files larger than 2GB.................................................................................. 3221.1.4 Managing the keys ............................................................................................................... 3221.1.5 Managing the composite keys ..............................................................................................3241.1.6 Accessing the data file items ................................................................................................ 3251.1.7 Schemas: the form mode and the table mode....................................................................... 3301.1.8 Moving and positioning in a data file..................................................................................... 330
1.2 The data files in FoxPro xBase format .............................................................................3311.2.1 Overview.............................................................................................................................. 3311.2.2 Using the native xBase/FoxPro access.................................................................................. 3311.2.3 Importing the structure of the files ........................................................................................ 3311.2.4 Important programming points .............................................................................................331
1.3 The data files found on a mobile device (Pocket PC, iOS, Android) ...............................3331.3.1 Handling a HFSQL database................................................................................................. 333
1.4 Data files specific to Windows Mobile ............................................................................3331.4.1 Handling a CEDB database (Pocket PC only)......................................................................... 3331.4.2 Functions for handling a CEDB database .............................................................................. 335
2. ADVANCED FEATURES 3362.1 Managing aliases ...........................................................................................................336
2.1.1 Several physical files with identical logical description .......................................................... 3362.1.2 Several logical files linked to a single physical file ................................................................. 3362.1.3 Functions for managing aliases ............................................................................................ 3362.1.4 Create an alias on what?...................................................................................................... 3372.1.5 Characteristics of an alias .................................................................................................... 3372.1.6 Handling the alias file and its items ...................................................................................... 337
2.2 Managing NULL in HFSQL ..............................................................................................3372.2.1 How to manage the Null value in one of your items?.............................................................. 3372.2.2 How can I use the NULL value in my applications? ................................................................ 338
2.3 Protecting and encrypting data files ..............................................................................3392.3.1 The protection methods ....................................................................................................... 3392.3.2 Managing encrypted files ..................................................................................................... 339
2.4 Managing an identifier ..................................................................................................3392.4.1 Automatic management....................................................................................................... 3392.4.2 Manual management........................................................................................................... 3402.4.3 Checking the uniqueness of a key......................................................................................... 340
2.5 Automatic check of referential integrity .........................................................................3402.5.1 Benefit of the check of referential integrity ............................................................................ 3402.5.2 Definitions........................................................................................................................... 3402.5.3 The different types of links .................................................................................................... 3412.5.4 Programming the automatic check of referential integrity....................................................... 341
WLangage.book Page 21 Jeudi, 20. mars 2014 4:29 16

22 Table of Contents
2.6 Managing the "memo" files ...........................................................................................3432.6.1 Text memo and binary memo ................................................................................................3432.6.2 Image, sound, OLE and other binary memos..........................................................................343
2.7 Reassigning data files ....................................................................................................3442.7.1 Benefit.................................................................................................................................3442.7.2 Modifying the storage directory .............................................................................................3442.7.3 Modifying the name of a data file ..........................................................................................3442.7.4 Keeping trace of reassignments ............................................................................................344
2.8 Full-text search and index ..............................................................................................3472.8.1 Overview ..............................................................................................................................3472.8.2 How do I perform a "full-text" search?..................................................................................3472.8.3 How do I create a full-text index? ..........................................................................................3472.8.4 How do I perform a full-text search? ......................................................................................3472.8.5 Analyzing the result of a "full-text" query ..............................................................................3492.8.6 Managing the full-text indexes by programming .....................................................................349
2.9 Transactions ...................................................................................................................3502.9.1 What is a transaction?..........................................................................................................3502.9.2 Knowing how to use the transactions according to your requirements.....................................3502.9.3 Principles.............................................................................................................................3512.9.4 Handling the transactions by programming ...........................................................................3512.9.5 Managing the special cases..................................................................................................3522.9.6 Advanced management .......................................................................................................353
2.10 Logs ...............................................................................................................................3532.10.1 General points ...................................................................................................................3532.10.2 Implementing the log process.............................................................................................3542.10.3 Files created when implementing the log process................................................................3552.10.4 WDLog: Tool for log management........................................................................................3552.10.5 Handling the logs by programming......................................................................................356
2.11 Automatic modification of data files .............................................................................3562.11.1 Principle ............................................................................................................................3562.11.2 When is the automatic data modification required?.............................................................3572.11.3 Performing the automatic data modification........................................................................3572.11.4 Notes ................................................................................................................................358
2.12 Creating dynamic (or temporary) files ..........................................................................3582.13 Retrieving the structure of the HFSQL files found in an analysis ..................................3592.14 Speeding up processes and optimizing an application or a site .................................359
2.14.1 Management of transactions ..............................................................................................3592.14.2 Managing the log ...............................................................................................................3592.14.3 Managing the memos.........................................................................................................3602.14.4 Managing the ".REP".........................................................................................................3602.14.5 Management of replication.................................................................................................3602.14.6 The management of triggers ...............................................................................................3602.14.7 The management of RPC ....................................................................................................360
2.15 ODBC driver on HFSQL ..................................................................................................3602.15.1 Overview............................................................................................................................3602.15.2 Configuration .....................................................................................................................360
WLangage.book Page 22 Jeudi, 20. mars 2014 4:29 16

Table of Contents 23
2.16 ODBC on HFSQL via J++ and JDBC ...............................................................................3612.16.1 Overview ........................................................................................................................... 3612.16.2 Setup ................................................................................................................................ 3612.16.3 Configuration..................................................................................................................... 3612.16.4 Use ................................................................................................................................... 361
2.17 OLE DB provider for HFSQL ...........................................................................................3622.17.1 Overview ........................................................................................................................... 3622.17.2 Setup ................................................................................................................................ 3622.17.3 Configuration..................................................................................................................... 362
3. SQL LANGUAGE 3643.1 Overview .........................................................................................................................3643.2 SQL language HFSQL .....................................................................................................364
3.2.1 Overview.............................................................................................................................. 3643.2.2 SQL commands that can be used with HFSQL ....................................................................... 3643.2.3 Functions for running queries ............................................................................................... 365
3.3 SQL language and other databases ..............................................................................3663.3.1 Overview.............................................................................................................................. 3663.3.2 Query created in the query editor .......................................................................................... 3663.3.3 Query created by programming............................................................................................. 366
4. MANAGING THE FILE LOCKS 3684.1 Overview of locks ............................................................................................................368
4.1.1 Locking files......................................................................................................................... 3684.1.2 What is a lock? .................................................................................................................... 3684.1.3 When should you lock and what should you lock? ................................................................. 3684.1.4 WLanguage and the locks .................................................................................................... 368
4.2 Managing locks ..............................................................................................................3694.2.1 Example illustrating the need for locks ..................................................................................3694.2.2 Structure of locks................................................................................................................. 3694.2.3 Dead lock (inter locking) ...................................................................................................... 369
4.3 The available lock modes ..............................................................................................3704.3.1 Single-user mode ................................................................................................................ 3704.3.2 Multi-user mode .................................................................................................................. 3724.3.3 The possible locks in multi-user mode .................................................................................. 372
4.4 Assisted management of HFSQL errors .........................................................................3734.4.1 Principle .............................................................................................................................. 3734.4.2 Standard operating mode .................................................................................................... 3734.4.3 Customization...................................................................................................................... 3754.4.4 Disabling the assisted management (WinDev and WebDev) .................................................. 376
5. THE HFSQL VIEWS 3775.1 Overview of HFSQL views ............................................................................................... 3775.2 Benefits of views ............................................................................................................ 3775.3 Handling views ............................................................................................................... 377
WLangage.book Page 23 Jeudi, 20. mars 2014 4:29 16
24 Table of Contents
5.4 Creating HFSQL views ....................................................................................................3785.4.1 Choosing the items of a view.................................................................................................3785.4.2 Choosing the initial sort item of the view................................................................................3785.4.3 Selecting records from the view ............................................................................................3795.4.4 Union operations between several views ...............................................................................379
6. HFSQL TRIGGERS 3806.1 Overview .........................................................................................................................380
6.1.1 Definition.............................................................................................................................3806.1.2 Benefits of triggers ...............................................................................................................380
6.2 How to create and handle triggers? ..............................................................................3806.2.1 Functions for handling the triggers ........................................................................................3806.2.2 Handling triggers ..................................................................................................................381
7. THE DATA REPLICATION 3827.1 Overview of the replication .............................................................................................382
7.1.1 Overview ..............................................................................................................................3827.1.2 Vocabulary specific to the replication....................................................................................3827.1.3 Note ....................................................................................................................................382
7.2 Implementing the universal replication ..........................................................................3837.2.1 Activation ............................................................................................................................3837.2.2 Declaring the master database .............................................................................................3837.2.3 Declaring the subscriber databases ......................................................................................383
7.3 Replication between heterogeneous databases ...........................................................3837.4 Limitations ......................................................................................................................384
8. MANAGING FILES IN "BACK OFFICE" 3858.1 Overview .........................................................................................................................3858.2 The update by email ......................................................................................................3858.3 The remote access to HFSQL ..........................................................................................385
8.3.1 Definition.............................................................................................................................3858.3.2 Details of the three use modes..............................................................................................385
8.4 The data replication .......................................................................................................3868.4.1 Overview ..............................................................................................................................3868.4.2 Implementing the replication ................................................................................................386
9. ACCESSING EXTERNAL DATABASES 3879.1 Overview .........................................................................................................................3879.2 Specific features .............................................................................................................3879.3 Functions for managing the external databases ...........................................................387
WLangage.book Page 24 Jeudi, 20. mars 2014 4:29 16

Table of Contents 25
10. HFSQL FUNCTIONS 388
11. HFSQL PROPERTIES 394
12. SQL FUNCTIONS 39812.1 Details of functions ........................................................................................................399
12.1.1 ELT .................................................................................................................................... 39912.1.2 EXTRACTVALUE .................................................................................................................. 39912.1.3 LEFT .................................................................................................................................. 39912.1.4 RIGHT ............................................................................................................................... 39912.1.5 SPLIT_PART ....................................................................................................................... 39912.1.6 MID, SUBSTR and SUBSTRING ........................................................................................... 40012.1.7 LTRIM ................................................................................................................................ 40012.1.8 RTRIM ............................................................................................................................... 40112.1.9 TRIM.................................................................................................................................. 40112.1.10 REPLACE ......................................................................................................................... 40112.1.11 REVERSE......................................................................................................................... 40212.1.12 TRANSLATE ..................................................................................................................... 40212.1.13 CONCAT .......................................................................................................................... 40212.1.14 STRING_AGG .................................................................................................................. 40212.1.15 LPAD............................................................................................................................... 40212.1.16 REPEAT ........................................................................................................................... 40212.1.17 RPAD .............................................................................................................................. 40212.1.18 SPACE............................................................................................................................. 40312.1.19 LOWER............................................................................................................................ 40312.1.20 LCASE............................................................................................................................. 40312.1.21 UCASE ............................................................................................................................ 40312.1.22 UPPER ............................................................................................................................ 40312.1.23 LEN and LENGTH ............................................................................................................. 40312.1.24 INSTR.............................................................................................................................. 40412.1.25 FIELD .............................................................................................................................. 40412.1.26 PATINDEX........................................................................................................................ 40412.1.27 POSITION ........................................................................................................................ 40412.1.28 COUNT ............................................................................................................................ 40412.1.29 AVG ................................................................................................................................ 40512.1.30 MAX ................................................................................................................................ 40512.1.31 MIN................................................................................................................................. 40512.1.32 SUM................................................................................................................................ 40512.1.33 BOTTOM .......................................................................................................................... 40512.1.34 TOP ................................................................................................................................. 40612.1.35 ASCII............................................................................................................................... 40612.1.36 SOUNDEX, SOUNDEX LIKE ............................................................................................... 40612.1.37 SOUNDEX2, SOUNDEX2 LIKE........................................................................................... 40612.1.38 ADD_MONTHS ................................................................................................................ 40612.1.39 LAST_DAY ....................................................................................................................... 40612.1.40 MONTHS_BETWEEN ........................................................................................................ 40712.1.41 NEW_TIME ...................................................................................................................... 40712.1.42 NEXT_DAY ....................................................................................................................... 407
WLangage.book Page 25 Jeudi, 20. mars 2014 4:29 16

26 Table of Contents
12.1.43 ROUND............................................................................................................................40712.1.44 SYSDATE .........................................................................................................................40712.1.45 TRUNC.............................................................................................................................40712.1.46 COALESCE.......................................................................................................................40712.1.47 GREATEST........................................................................................................................40712.1.48 LEAST..............................................................................................................................40712.1.49 NVL, IF_NULL, IS_NULL....................................................................................................40712.1.50 DECODE ..........................................................................................................................40712.1.51 CASE...............................................................................................................................40812.1.52 MATCH AGAINST ..............................................................................................................40812.1.53 MD5................................................................................................................................40912.1.54 SHA and SHA1.................................................................................................................409
13. HFSQL CLIENT/SERVER 41013.1 Overview ........................................................................................................................ 41013.2 Implementing a Client/Server application .................................................................... 410
14. HFSQL CLIENT/SERVER FUNCTIONS 411
WLangage.book Page 26 Jeudi, 20. mars 2014 4:29 16

PART 1
Code editor
WLangage.book Page 27 Jeudi, 20. mars 2014 4:29 16

WLangage.book Page 28 Jeudi, 20. mars 2014 4:29 16

Part 1: Code editor 29
1. OVERVIEW
WinDev, WebDev and WinDev Mobile are develop-ment tools that allow you to create projects and tomanage the elements created with the WinDev,WebDev and WinDev Mobile language: WLanguage.
WLanguage is an integrated 5GL. The WLanguagefunctions allow you to create processes for eachproject, window, page and control.
These processes are entered in a dedicated sourceeditor (also called code editor). This editor can bedirectly accessed from WinDev, WebDev or WinDevMobile. It enables you to access all the processesof an object.
1.1 The code editor
The code editor allows you to enter all the proces-ses in WLanguage (the programming languageincluded in WinDev, WebDev and WinDev Mobile). Itis used to enter the source code:• of controls,
• of windows,• of pages,• of reports• of local and global procedures,• of classes and methods, ...
WLangage.book Page 29 Jeudi, 20. mars 2014 4:29 16

30 Part 1: Code editor
The different processes displayed in the code editorare separated by an horizontal bar containing thecaption of the code. The corresponding WLanguagecode must be entered below the bar.
A Ribbon menuThe options of the code editor are grouped in amenu that is shaped like a ribbon.
1. WinDev/WebDev/WinDev Mobile button (top left). This button is used to display the "About" infor-mation for the current product.
2. Displaying toolbars from previous versions (compatibility mode).
3. Displaying drop-down menus from previous versions (compatibility mode).
4. Quick access buttons. These buttons correspond to the most often used options:•New, Open,•Save,•Go of project,•Go of window or page, ...
5. Ribbon panes. These panes are used to access the different options.
Several types of panes are visible:• the "current" pane. The name of the pane is displayed with an orange line.• the popup panes specific to the current element (the name of the pane is displayed in orange).• the available panes (name of the pane in white).
6. Group of options. A group gathers the different options of the ribbon by theme.
7. Group button. Button found at the extremity of a group used to perform a specific action (displaythe options of the current element, display the help, ...).
8. Ribbon options. Several types of options are available in the ribbon:•Buttons to click•Options to check.•Button with arrow used to expand the options.
2 types of buttons with arrow are available:- the buttons with arrow used to expand a menu.- the buttons with arrow used either to expand a menu (click on the arrow),or to perform a default action (click on the button icon).
WLangage.book Page 30 Jeudi, 20. mars 2014 4:29 16

Part 1: Code editor 31
1.2 Features linked to the code input
This paragraph presents some interesting featuresof the code editor. See the online help for moredetails.
1.2.1 Code coloringThe source code entered is automatically colored tomake the processes more readable. To modify thecolors and fonts, use the "Coloring" tab in theoptions of code editor. To display the options of thecode editor, on the "Home" pane, in the "Environ-ment" group, expand "Options" and select "Optionsof code editor".
1.2.2 Automatic completionThe automatic completion proposes an assistedinput of WLanguage code in your applications.This completion is available for the WLanguagecommands, the procedures, the variables, the datafiles, the items of data files, the windows, the con-trols, the type of variables, ...This completion reduces the risk of typos and savesa lot of time: no need to search for the exact nameof a global variable or control, it is automaticallyproposed!The completion is used to:• fill the current input by proposing a list of possi-
ble values (function name, property name, ...). Allthe values proposed in the list contain the wordcurrently typed. The content of the list is refreshed whenever amodification is performed.For example, when typing the characters "OKA",all the functions, controls and so on, starting withthese characters are suggested, ... containingthese characters are proposed.
• propose the value of the possible parametersaccording to the WLanguage function used.For example, when using the function namedHRead, the first expected parameter correspondsto the name of a data file. The automatic comple-tion will only propose the data files of the analy-sis associated with the current project.
• select the combination of constants for a para-meter. To do so, select the requested options (with thearrow keys) and press the SPACE key to validatethese options. All selected options are automatically included inthe code during the validation (ENTER key).
• start the code wizards. These wizards are used toenter the different parameters of the function via
simple questions. The <Wizard> option signals the presence of awizard. To start the wizard, select <Wizard>.
• start the existing resources for the functionused: example, code brick, ...To start a resource, all you have to do is select it.
1.2.3 Code wizardSeveral WLanguage functions include codewizards. These wizards help you type the differentparameters of the function. Simply follow the ins-tructions given by the different screens of thewizard to get the correct syntax. The use of thesecode wizards is optional.For each function that includes a wizard, a list isopened when typing the function name. All youhave to do is select <Wizard> from this list to startthe corresponding code wizard.
1.2.4 Assisted input of functionsThe following help mechanism simplifies the inputof WLanguage functions in the code editor:• A visualization of the syntax currently typed via
several tooltips. This help is displayed when thename of the function is entirely typed. If severalsyntaxes are available for the current function,arrows appear in the different tooltips. To modify the active syntax, press [Alt] + [RightArrow] or [Alt] + [Left Arrow].
• A tooltip displays the description of the currentparameter (parameter tooltip). This tooltipappears: - when the mouse cursor is located on the posi-tion of a parameter to type (the mouse cursorhovers the syntax in the tooltip).- if [Alt + F1] is used on a parameter that isalready typed.
• A tooltip displays the description of the result(result tooltip). This tooltip appears: - when the mouse cursor is located on the nameof the function (when typing a new function).- if [Alt + F1] is used on the name of a functionthat is already typed.
1.2.5 HelpThe help can be accessed from the code editor bypressing the [F1] key. If a function is selected, thecorresponding help is displayed. You have the abi-lity to perform "cut-paste" operations from the helpto the program.
WLangage.book Page 31 Jeudi, 20. mars 2014 4:29 16
32 Part 1: Code editor
This help is available:• on Internet: the help pages of the version cur-
rently sold are updated on a regular basis. Youbenefit from the comments from the WinDev,WebDev, WinDev Mobile developer community.
• locally: an updated help is available for each newversion or upgrade of the product.
1.2.6 Code historyThe management of the history is used to:• store the entire code of each modified process.• restore an existing code that was deleted or
modified thereafter.To manage the code history of your project:1. Display the code editor options: on the "Home"pane, in the "Environment" group, expand "Options"and select "Options of code editor".2. In the "Code" tab, check "Save the history ofcode modifications".This management of the history creates a "History"sub-directory in the directory of the project. Thisdirectory contains the following sub-directories:• WDP: history of project processes• WDW: history of window processes• WDC: history of class modifications• WDE: history of report processes• WDR: history of query processes• WDG: history of processes of set of procedures• ...In each sub-directory, ".FIC", ".NDX" and ".MMO"files corresponding to the name of windows,project, ... contain the history. These files can takea large amount of space after a little while. Theycan be:• deleted in the Windows explorer directly.• cleared. To do so, on the "Code" pane, in the
"Other actions" group, expand "History" andselect "Clear the history".
Caution: The code history cannot be displayed any-more if these files are deleted or cleared.
1.2.7 Code checkThe code is checked in real time. The errors andwarnings are immediately underlined when typing.The "Compilation errors" pane is used to find outthe type of problem that occurred.
Several types of messages can be displayed in thispane:• the warnings, displayed in orange, notify you of
potential code inconsistencies. These warningsdo not block the execution of the process.
• the errors, displayed in red, point out errors in thecode. These errors block the execution of thecode.
• the information, displayed in black, explains thecompiler choices or proposes potential advice forimproving the code.
• the GUI compilation errors, displayed in red, pre-sent the potential problems found in the interfa-ces whenever the window or the page is saved orwhenever the project is recompiled.
1.2.8 Automatic indentWhen typing conditional statements (such as"Switch", "For" and "While" for example), the code isautomatically indented to highlight the structure ofthe loops used in the program.As soon as the first statement is typed, the "END"keyword is automatically inserted and the cursor ispositioned in the conditional statement.To automatically indent a section of code (codecopy for example), on the "Code" pane, in the "Edit"group, click "Auto re-indent".
1.2.9 Translating the messagesWhen developing a multilingual application,WinDev gives you the ability to translate thedifferent messages displayed.The window for typing translated messages can becalled from any message to translate. To do so:• press [CTRL]+[T]• on the "Code" pane, in the "Languages" group,
expand "Translate the strings" and select "Trans-late the messages".
Each translated message corresponds to a"resource". The same "resource" can be used seve-ral times, in different processes.An icon and a number are displayed on the right ofthe translated message. The number specifies thenumber of translations typed for the current mes-sage.Note: The development of multilingual applicationsis presented in details in the online help.
WLangage.book Page 32 Jeudi, 20. mars 2014 4:29 16

Part 1: Code editor 33
1.2.10 Managing the breakpointsWhen running the application test in the editor, thebreakpoints are used to automatically start thedebugger from a given line. See the online help formore details.
1.2.11 Inserting specific processesFor each element of the project, WinDev proposes:• default processes (control initialization, button
click, ...).• specific processes (mouse hovering a control,
right click on a window, ...). These special proces-ses are displayed as icons in the element’s codewindow. To insert a process specific to the use ofthe mouse or keyboard, click one of the availableicons.
1.2.12 Other features
Programming charterA programming charter is used to automaticallyprefix the name of all the variables and the name ofall the project elements (window, report control,class, ...). This automatic prefixing is used to easilyidentify and/or find an element of a given type.See the online help for more details.
Highlighting the modified codeThe modified code lines are immediately identifiedby the presence of colored bars in front of the codelines.Only the code modifications performed since thecurrent element was opened are taken intoaccount:• the code lines preceded by a blue bar have been
saved.• the code lines preceded by an orange bar have
not been saved yet.When the element is closed, the colored barsdisappear automatically.
Correcting the entered codeThe code editor proposes several tools for correc-ting the code:• the automatic corrector of project elements:
when the name of a variable or project element isnot recognized, the popup menu of the code edi-tor now proposes a list of possible corrections.This list presents the name of the variables and/or project elements that may correspond.
• the spelling checker for the comments and thecharacter strings.
Positioning marksThe positioning marks are used to "tag" specificcode lines. These marks are used to quickly browsethe code from a positioning mark to another one.See the online help for more details.
WLangage.book Page 33 Jeudi, 20. mars 2014 4:29 16

34 Part 1: Code editor
WLangage.book Page 34 Jeudi, 20. mars 2014 4:29 16

PART 2
Basic syntax of WLanguage
WLangage.book Page 35 Jeudi, 20. mars 2014 4:29 16

WLangage.book Page 36 Jeudi, 20. mars 2014 4:29 16

Part 2: Basic syntax of WLanguage 37
1. INTRODUCTION
WLanguage is an integrated 5GL. The WLanguagefunctions allow you to create processes for eachproject, window, page and control.These processes are entered in a dedicated source
editor (also called code editor). This editor can bedirectly accessed from WinDev, WebDev or WinDevMobile. It allows you to access all the processes ofan object.
1.1 Some characteristics of WLanguage
• The WLanguage functions can be written in lower-case characters, in uppercase characters or inany combination of uppercase-lowercase charac-ters. The code editor recognizes both.The code editor displays the various WLanguagekeywords in different colors. This feature is veryuseful to check that no error was made whenentering the names of functions.
• With WLanguage, you can practice event-drivenprogramming without having to manage it. For each object created by WinDev, WebDev orWinDev Mobile, you have the ability to associateone or more processes that will be run on theaction of a given event. You do not have anythingto manage, you only have to enter each process.In WebDev, the processes can be entered:•in server code: the process will be run on the
server.•in browser code: the process will be run in the
browser displayed on the computer of the Webuser (the WLanguage code entered in browsercode is automatically translated into Javas-cript).
For the edit controls, you have the ability todefine:•a process that is run when initializing the con-
trol,•a process that is run when entering into the
control,
•a process that is run when exiting from the con-trol,
•a process that is run during the exit when thecontrol is modified,
•other processes linked to other events that youcan be directly added in the code editor.
• WLanguage is made of keywords that represent:•functions,•properties,•preset constants,•statements for declaring variables,•statements for declaring functions and proce-
dures,•keywords,•state variables, ...
• WLanguage supports the object paradigm.
• The WLanguage functions have a name that illus-trates the use of the function.
• All the WLanguage keywords (functions, presetconstants, properties, ...) also exist in French.
• A debugger is available for WLanguage. It can becalled from the beginning of the project, by pro-gramming or when running the test of an element(window, page, ...) or the test of a project.
WLangage.book Page 37 Jeudi, 20. mars 2014 4:29 16

38 Part 2: Basic syntax of WLanguage
1.2 Programming in server code and in browser code
This chapter presents the syntax of WLanguage.Each WLanguage feature is:• accessible in server code only: the feature will be
run by the server,• accessible in browser code only: the feature will
be run by the browser on the computer of theWeb user,
• accessible in server code and in browser code.
Notes:• To program in server code, you must use WLan-
guage.
• To program in browser code, you can use:•WLanguage that will be automatically transla-
ted into JavaScript,•JavaScript directly.
• In the code editor, bars of different color are usedto differentiate between the server code and thebrowser code. By default, the following colors areused:•yellow for the server code,•green for the browser code written in WLan-
guage,•blue for the browser code written in JavaScript.
• A process can be run on the server from a pro-cess performed in browser code.Example:
WB
// Browser code for modifying and exiting from a COMBO PageSubmit("", "BUTTON1")// Calls the server code of click on BUTTON1
WLangage.book Page 38 Jeudi, 20. mars 2014 4:29 16

Part 2: Basic syntax of WLanguage 39
2. THE VARIABLES
WLanguage proposes two types of variables:• the simple types, that can be declared directly• the advanced types, that include one or more
variables of simple type.
2.1 The simples types
2.1.1 PrincipleA variable is defined by its name and by its type.The type of the variable defines the values that canbe taken by the variable, its memory footprint andthe available operations.Reminder: Each type is identified by a WLanguagekeyword. These keywords are reserved words.
2.1.2 Types of variablesThe "simple" types of WLanguage are as follows:• Boolean: type recommended for all the logical
operations where only two alternatives are possi-ble:• True (value different from 0)•False (value equal to 0)Exemple: b is boolean
• Integer: type recommended for the calculationsperformed on integer values. For the advanced calculations, WLanguage pro-poses different types of integers.Exemple: b is int
• Currency: type recommended for the calculationsperformed on real values that require a high pre-cision on decimal places, such as currencyvalues.A currency manages 24 significant digits (up to18 digits for the integer part and up to 6 digits forthe decimal part). The precision is precise to 6decimals.See “The currency type”, page 41 for moredetails.Example: MyCurrency is currency
• Numeric: type recommended for the calculationsperformed on real values that require a high pre-cision on decimal places. A numeric manages 38significant digits (up to 32 digits for the integerpart and up to 6 digits for the decimal part). Example: MyCurrency is numeric
• Real: type recommended for the simple calcula-
tions performed on real values.A real manages 15 significant digits but the preci-sion of the decimals is not guaranteed. The preci-sion of the decimals is not guaranteed. Toperform precise calculations, use the "Currency"type.For advanced calculations, WLanguage proposesdifferent types of reals.See “The real type”, page 41 for more details. Example: VAT is real
• String: type recommended to manage the charac-ters and the character strings. With this type, there is no need to declare thelength of the string. This one can freely changewhen using the variable. For an advanced management of characterstrings (mainly for the Windows APIs), WLan-guage proposes different types of strings.See “The String type”, page 41 for more details
• Buffer: type recommended to write code that canbe shared between WinDev and WinDev Mobile.
• Date, Time, DateTime, Duration: types recom-mended to manage the dates and times.The "Date" type and the "Time" type allow you toeasily handle the dates and times, and tomanage the conversions almost automatically.See “The date type”, page 42 and ’“The timetype”, page 43 for more detailsThe "DateTime" type allows you to manage a dateand a time at once. See “The DateTime type”,page 43 for more details.The "Duration" type allows you to easily managethe differences between times or dates. See “TheDuration type”, page 43 for more details.
• Variant: type recommended to store any othersimple type of WLanguage. The Variant type allows you to manage the NULLvalue. See “The Variant type”, page 44 for moredetails.
WLangage.book Page 39 Jeudi, 20. mars 2014 4:29 16

40 Part 2: Basic syntax of WLanguage
2.1.3 Declaring a simple typeDeclaring one or more variables<Variable name> is <Variable type>
or<Name of variable 1>, <Name of variable 2> are <Variable type>.
Declaring and initializing a variable<Variable name> is <Variable type> = <Value>
OR<Variable name> is <Variable type><Variable name> = <Value>
Note: When several variables of the same type aredeclared and initialized on the same line, only thelast variable is initialized.
Limit values for the types of dataIf a variable is assigned with a value that exceedsthe limits of its type:• an error message is generated when running the
test of a window, page or project.• no error message signals the capacity overflow
when the program is run. The value of the varia-ble is incorrect.
To find out the limit values for the different types ofdata, see the "Limits.WL" file found in the "Perso-nal\Extern" directory of WinDev/WebDev. This filecan be opened by any text editor.To simplify your tests, the limit values for the diffe-rent data types have been assigned to constants inthe "Limits.WL" file. To include these constants inyour application, use the following code line in yourproject:
The "Limits.WL" file will be automatically sought inthe "Personal\Extern" directory of WinDev/WebDev.There is no need to copy the "Limits. WL" file intothe project directory.
Limitations: Declaring variables with the samenameSeveral variables with the same name cannot beused in the same process (regardless of the type ofthese variables).If variables with the same name are declared in dif-ferent processes of the project, the rule for variablescope applies (see page 65).
2.1.4 The different types of integerWLanguage proposes different types of integers:
Note: All the advanced types (different form the"Integer" type) are recommended when using theWindows APIs.Default valueAn "Integer" variable that is declared but not initiali-zed is equal to 0.
CustomerName is stringCounter is intPrice is reali,j,k are int
CustomerName is stringCustomerName = "Dupond"Counter is int = 7i,j,k are int = 21// Only k is initialized to 21
Extern "Limits.WL"
Value included between
Integer -2 x 10⁹ and 2 x 10⁹ (rou-ghly)
1-byte integer -128 and 127 (inclusive)
2-byte integer -32.768 and 32.767(inclusive)
4-byte integer -2 x 10⁹ and 2 x 10⁹ (rou-ghly)
8-byte integer -9 x 10¹⁸ and 9 x 10¹⁸(about)
Unsigned integer 0 and 4 x 10⁹
Byte 0 and 255 (inclusive)This type is equivalent tothe unsigned 1-byteinteger.
Unsigned 1-byteinteger
0 and 255 (inclusive)
Unsigned 2-byteinteger
0 and 65.535 (inclusive)
Unsigned 4-byteinteger
0 and 4 x 10⁹ (roughly)
Unsigned 8-byteinteger
0 and 18 x 1018
System integer automatically adapts tothe size generated by thesystem (4 bytes in 32 bits,8 bytes in 64 bits)
WLangage.book Page 40 Jeudi, 20. mars 2014 4:29 16

Part 2: Basic syntax of WLanguage 41
2.1.5 The currency typeA currency variable is a real coded on 10 bytes. Acurrency can have up to 23 significant digits (17digits for the integer part and 6 digits for the deci-mal part) and it can take a value included between-604 462 909 807 314 587.353 087 and +604462 909 807 314 587.353 087.The currency type uses a different coding systemthat does not trigger any rounding errors.For a better precision, we recommend that you usethe numeric type (38 significant digits).For other calculations, we recommend that you usereals, which are faster.
Default valueA "Currency" variable that is declared but not initiali-zed is equal to 0.
Binary coding of the realsAll the reals have the same number of significantdigits (15).If the result of a calculation performed on realsinvolves more than 15 significant digits, this resultwill be automatically rounded to 15 significantdigits. The precision of the result will be less thanthe precision of a calculation performed with thecurrency type.
Calculations on currenciesAll the calculations that use at least one currencywill be performed in currency format. For a betterprecision of the result, all the operands will be auto-matically converted into currency.
External languageThe currency type is not available in external lan-guage.
2.1.6 The numeric type
The numeric type is used to contain integer or deci-mal numbers by specifying if necessary:• the number of digits in the integer part.• the number of digits in the integer part and in the
decimal part.A numeric can be used:• to declare a simple variable,• as element of an array,• as element of a composite variable,• as element of a structure,• as element of a class,A variant can contain a numeric.
2.1.7 The real typeWLanguage proposes two types of reals:• Real (8-byte real): A real can include up to 15
significant digits. The precision of the decimals isnot guaranteed. To perform precise calculations,use the "Currency" type. Minimum value:1.7*10-308, Maximum value: 1.7*10+308
• 4-byte real: A 4-byte real can include up to 6 signi-ficant digits. The precision of the decimals is notguaranteed. To perform precise calculations, usethe "Currency" type. Minimum value: 3.4*10-38, Maximum value:3.4*10+38.
Default valueA "Real" variable that is declared but not initializedis equal to 0.Binary coding of the realsAll the reals contain the same number of significantdigits (15).If the result of a calculation performed on realsinvolves more than 15 significant digits, this resultwill be automatically rounded to 15 significantdigits. To get a better precision, use the currencytype.
2.1.8 The String typeWLanguage proposes different types of characterstrings.The mst common types of strings are as follows:• Character: Character coded on 1, 2 or 4 bytes
depending on the string management mode andthe runtime platform.
• Ansi string: Dynamic size string containing onlycharacters in ANSI format.
• Unicode string: dynamic size string containingonly characters in UNICODE format.
• String: Dynamic size string.The "string" type is specific to WLanguage. Withthis type, there is no need to declare the length ofthe string. This one can freely change when usingthe variable.
• Buffer: Binary memory zone. Used to write a codethat can be shared between WinDev and WinDevMobile regarding the operations performed onrough data. See “The Buffer type”, page 42 formore details.
WLangage.book Page 41 Jeudi, 20. mars 2014 4:29 16

42 Part 2: Basic syntax of WLanguage
Other types of strings are also available:• String on: Fixed-length string, ending with a
binary 0 (like in C). The specified size corres-ponds to the maximum number of characters inthe string. This type of string is used to create compatibleWinDev/WinDev Mobile code when calling APIsfound on the two platforms.
• ASCIIZ string on: String ending with a binary 0(like in C).The size of an ASCIIZ string cannot exceed 2 GB.The length given to the ASCIIZ string must beequal to its current length plus 1 (for the binaryzero).Type not available in WinDev Mobile.
• Fixed string on: Fixed-size string. The length of a fixed string cannot exceed 2 GB.The string is filled with:• 0 if the variable is not assigned yet•space characters if necessary if the variable is
assigned (similar to the "string" type of Basic). Type not available in WinDev Mobile.
• Pascal string on: String preceded by a byte that specifies thelength (like in Pascal). This byte is not accessible.For example, String[1] represents the first charac-ter of the string and not its length. The length of a Pascal string cannot exceed 255characters. The size given to the Pascal stringmust be equal to the size of the string.Type not available in WinDev Mobile.
• UNICODE string on: Fixed-size string containing characters in UNI-CODE format.
Notes:• The "String on" type must be used to send input/
output parameters to a Windows API.• All the advanced types (different from the "String"
type) are available for compatibility with the otherprogramming languages (Turbo Pascal Windows,C, Visual Basic Windows, ...) and for the WindowsAPIs.
Default value• A "String" or "String on" variable that is declared
but not initialized corresponds to an empty string("").
• A "Buffer" variable that is declared but not initiali-zed is empty.
• A "Buffer on" variable that is declared but not ini-tialized is filled with 0.
String typeWinDev Mobile and WinDev do not offer the sametypes of strings. See the online help for moredetails.
Passing a string in parameter to a procedureA "String" variable can be passed in parameter to aprocedure.Caution: If the string is a "Fixed String", the spacecharacters must be deleted. For example:
2.1.9 The Buffer typeThe buffer type corresponds to a binary memoryzone. This type allows you to develop code that han-dles the binary format and to share this codebetween a WinDev application and a WinDevMobile application.The buffer type manages no specific end markerand it is used to store the binary 0.
Two types of variables are available:• Buffer:
This type is used to handle a memory zone whosesize is dynamic: it is automatically adapted to thecontent of the buffer.
• Buffer on: This type is used to handle a memory zone whosesize (in bytes) is defined during the compilation.This is an advanced type used to perform specificoperations in memory, to use some WindowsAPIs.
2.1.10 The date typeThe Date type enables you to easily handle thedates. This type allows you to manage the conver-sions almost automatically (StringToDate, DateToS-tring, IntegerToDate, DateToInteger, ...).
This type can be used:• to retrieve and handle the HFSQL items in Date
format.• to retrieve and handle the Date edit controls.• in the WLanguage functions used to manage the
dates.• to perform calculations on dates.
MyString is fixed string of 30
MyString = "WinDev is great"// Delete the space charactersMyString = NoSpace(MyString)CountLetter(MyString)// CountLetter is procedure
WLangage.book Page 42 Jeudi, 20. mars 2014 4:29 16

Part 2: Basic syntax of WLanguage 43
Note: Several properties can be used with the Datetype, so you can retrieve a piece of the date for ins-tance.Default value By default, a Date variable is initialized with today’sdate (system date). To defined the default valueassigned to the Date variables, use DateTimeByDe-fault.
The properties that can be used on the datesSee the online help to find out the properties thatcan be used on the dates.
Range of datesThe Date type allows you to manage the datesincluded between 01/01/0001 and 12/31/9999.
2.1.11 The time type
The Time type is used to manage times. This typeallows you to manage the conversions almost auto-matically (TimeToString, TimeToInteger, ...)
This type can be used:• to retrieve and handle the HFSQL items in Time
format,• to retrieve and handle the edit controls in Time
format,• in the WLanguage functions used to manage
times,• to perform calculations on the times (difference,
addition, ...).
Properties that can be used on times:See the online help to find out the properties thatcan be used on the times.
Limits: The Time type can be used to manage the hoursfound between 00:00 and 23:59. The precision isup to the millisecond.
2.1.12 The DateTime typeThe DateTime type allows you to manage a dateand a time as a single object. The DateTime typecan be used to perform calculations (subtraction,addition, ...) on the dates, times and durations.
Properties that can be used on the DateTime varia-blesSee the online help to find out the properties thatcan be used on the DateTime variables.
Interval of dataThe DateTime type can be used to manage databetween 01/01/0001 at 00:00 and 12/31/9999at 23:59.
2.1.13 The Duration type
The Duration type allows you to easily handle inter-vals of dates and times. The Duration type can beused to perform calculations (difference,addition, ...).
Properties available for durationsSee the online help to find out the properties thatcan be used on the Durations.Supported valuesThe duration type is used to manage the durationsincluded between plus and minus 2 billion days.The precision is up to the millisecond.
StartDate is date = 1205EndDate is date = "20011231"
// 12/31/2001TodaysDate is date = Today()
StartDate is date = "20011201"StartDate..Year +=5 // Adds 5 years// Modifies the monthStartDate..Month = 5 // Calculates the end (30 days later)EndDate = StartDateEndDate..Month++EndDate..Day--
StartTime is Time="20011201"// Adds 5 hoursStartTime..Hour +=5// Modifies the number of minutesStartTime..Minutes = 5
StartDate is DateTimeStartDate = "200112311524"// 12/31/2001 at 15:24
StartDate is DateTimeStartDate = "200112011530"StartDate..Year +=5 //Adds 5 years// Modifies the month StartDate..Month = 5 // Displays the dateInfo("Date" + StartDate..Date)// Displays the timeInfo("Time "+ ... StartDate..Time)
StartTime is Time = "1330"EndTime is time = "1730" ConferenceDuration is Duration = ... EndTime - StartTime
WLangage.book Page 43 Jeudi, 20. mars 2014 4:29 16
44 Part 2: Basic syntax of WLanguage
2.1.14 The Variant type
The Variant type is used to:• store any value of simple type: boolean, numeric,
string, date, time, ... • manage the interactions with the ActiveX objects
and the OLE Automation programming• handle the NULL value in WLanguage
Assigning a Variant typeA Variant variable can be assigned with:• any literal value• the content of a variable• the content of a simple control• the content of an item
Variant type and NULLTo specify that a Variant variable contains no value,use the NULL constant.Note:• for a variant type, NULL means "Not assigned"
• for a numeric type, NULL means "equal to 0".
Type of a variantThe type of a variant is returned by ..Type. Type isused to find out the type of the value stored in thevariable.
Notes:• VariantConvert is used to convert the type of the
value stored in a Variant variable.• TypeVar is used to find out the type of a variable
(Variant type for a Variant variable).
2.2 Operations available for the dates, times and durations, …
The following operations are available for the fol-lowing types of variables: Date, Time, DateTime andDuration:• addition• subtraction
• comparisonSee the online help for more details.
Note: Several WLanguage functions are used tohandle the dates and times (see the functions formanaging dates and times in the online help).
2.3 Managing the NULL value
The Null keyword can be used in different ways inWLanguage:• to specify that a parameter must be ignored in a
query• to specify that a variant variable contains no
value
• to compare a value to 0• in some WLanguage functions, to specify that the
parameter must be ignored• to check whether a dynamic object is allocated or
not
nValue is variant = 10 nValue = Edit1 nValue = Customer.Name
vVal is variantIF vVal = Null THEN ... // returns True because not assignedvVal = 0IF vVal = Null THEN ...
// returns False because variant // assigned with an integer whose// value is 0vVal = 5IF vVal = Null THEN ... // returns False because variant // assigned// with an integer whose value is 5
nVal is intIF vVal = Null THEN ... // the test returns True because // nVal=0nVal = 5IF vVal = Null THEN ... // the test returns False because // nVal=5
WLangage.book Page 44 Jeudi, 20. mars 2014 4:29 16
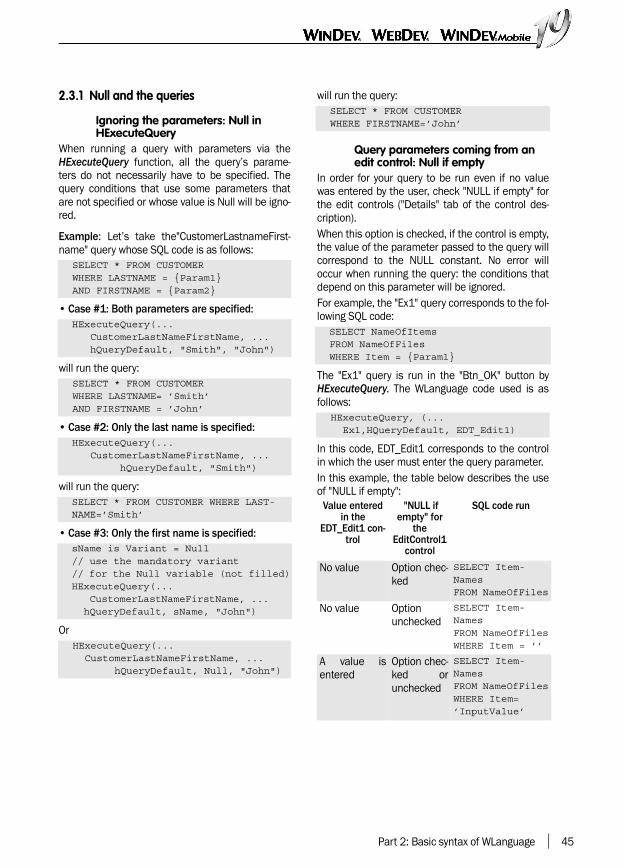
Part 2: Basic syntax of WLanguage 45
2.3.1 Null and the queries
Ignoring the parameters: Null in HExecuteQuery
When running a query with parameters via theHExecuteQuery function, all the query’s parame-ters do not necessarily have to be specified. Thequery conditions that use some parameters thatare not specified or whose value is Null will be igno-red.
Example: Let’s take the"CustomerLastnameFirst-name" query whose SQL code is as follows:
• Case #1: Both parameters are specified:
will run the query:
• Case #2: Only the last name is specified:
will run the query:
• Case #3: Only the first name is specified:
Or
will run the query:
Query parameters coming from an edit control: Null if empty
In order for your query to be run even if no valuewas entered by the user, check "NULL if empty" forthe edit controls ("Details" tab of the control des-cription).When this option is checked, if the control is empty,the value of the parameter passed to the query willcorrespond to the NULL constant. No error willoccur when running the query: the conditions thatdepend on this parameter will be ignored.For example, the "Ex1" query corresponds to the fol-lowing SQL code:
The "Ex1" query is run in the "Btn_OK" button byHExecuteQuery. The WLanguage code used is asfollows:
In this code, EDT_Edit1 corresponds to the controlin which the user must enter the query parameter.In this example, the table below describes the useof "NULL if empty":
SELECT * FROM CUSTOMER WHERE LASTNAME = {Param1} AND FIRSTNAME = {Param2}
HExecuteQuery(... CustomerLastNameFirstName, ... hQueryDefault, "Smith", "John")
SELECT * FROM CUSTOMER WHERE LASTNAME= ’Smith’ AND FIRSTNAME = ’John’
HExecuteQuery(... CustomerLastNameFirstName, ... hQueryDefault, "Smith")
SELECT * FROM CUSTOMER WHERE LAST-NAME=’Smith’
sName is Variant = Null // use the mandatory variant // for the Null variable (not filled)HExecuteQuery(... CustomerLastNameFirstName, ... hQueryDefault, sName, "John")
HExecuteQuery(... CustomerLastNameFirstName, ... hQueryDefault, Null, "John")
SELECT * FROM CUSTOMER WHERE FIRSTNAME=’John’
SELECT NameOfItemsFROM NameOfFilesWHERE Item = {Param1}
HExecuteQuery, (... Ex1,HQueryDefault, EDT_Edit1)
Value entered in the
EDT_Edit1 con-trol
"NULL if empty" for
the EditControl1
control
SQL code run
No value Option chec-ked
SELECT Item-Names FROM NameOfFiles
No value Optionunchecked
SELECT Item-Names FROM NameOfFilesWHERE Item = ’’
A value isentered
Option chec-ked orunchecked
SELECT Item-Names FROM NameOfFilesWHERE Item= ’InputValue’
WLangage.book Page 45 Jeudi, 20. mars 2014 4:29 16

46 Part 2: Basic syntax of WLanguage
2.3.2 Null and the variantsTo specify that a Variant variable contains no value,use the NULL constant.Notes:• for a variant type, NULL means "Not assigned"• for a numeric type, NULL means "equal to 0" (see
below)
2.3.3 Null and the numeric valuesUsed with numeric values, Null is used to comparea value to 0. The equality operators and the compa-rison operators can be used (= and <>). Notes:• for a variant type, NULL means "Not assigned"
(see above)• for a numeric type, NULL means "equal to 0"
2.3.4 Null and the WLanguage functionsSome WLanguage functions accept Null in parame-ter to specify that the parameter takes no value.Some examples:• TreeAdd, TreeInsert: Null is used to avoid dis-
playing the images for the different levels ofadded elements.
• TreeListItem: Null is used to list the child ele-ments from the root of the treeview.
• TreeModify: Null is used to avoid modifying theimages defined by TreeAdd
• InitWrite: Null is used to delete a keyword or asection from the INI file
2.3.5 Null and the dynamic objectsFor the dynamic objects (class, structure, array,automation object, ...), Null is used to find outwhether the object is allocated or not.For example:
2.4 Constants
The constants are language elements whose valueis defined once and for all. This value cannot bemodified during the execution of the program.
Syntax: Declaring one or more constantsCONSTANT <Name of constant 1> = <Value 1> <Name of constant 2> = <Value 2>END
The constants must be declared in:• the initialization code of the project to be used in
all the processes of the project (code of the pro-ject, code of the windows/pages, code of the con-trol, procedures, ...).
• the code for declaring the global variables of awindow/page to be used in all the processes ofthe window/page (code of the window/page,code of the controls found in the window/page,local procedures, ...).
vVal is variantIF vVal = Null THEN ... // returns True because the variant // is not assignedvVal = 0IF vVal = Null THEN ... // returns False because the variant // is assigned an integer with 0 for // valuevVal = 5IF vVal = Null THEN ... // returns False because the variant // is assigned an integer with 5 for // value
nVal is intIF vVal = Null THEN ... // the test returns True because // nVal=0
nVal = 5IF vVal = Null THEN ... // the test returns False because // nVal=5
// Declare a dynamic automation// objectMyDynamicObject is object ... dynamic automation ...IF MyDynamicObject = Null THEN // Create a dynamic automation // object MyDynamicObject = ... new object ... dynamic automation MyServerEND
CONSTANT VATRate = 19.6END
WLangage.book Page 46 Jeudi, 20. mars 2014 4:29 16

Part 2: Basic syntax of WLanguage 47
• the opening code of a report in order to be usedin all the processes of the report (code of thereport, code of controls found in the report, localprocedures, …).
• the declaration code of a class in order to beused in the class.•To access this constant from a method of the
class, use the syntax "::<Constant name>".•To access this constant from a code external to
the class, use the following syntax "<Classname>::<Constant name>".
Note: A constant is always global:• to a project.• to a window or to a page.• to a report.• to a class.
Declaring constants with the same nameSeveral elements (variables or constants) with thesame name cannot be declared in the same pro-cess.
If a constant and a variable have the same name inthe same project:• the variable will be used in the process where
this variable is declared and in all the linked pro-cesses. For example, the variable is declared inthe click code of a button. When a click is perfor-med on this button, this variable is passed inparameter to a local procedure. This variable willbe used in this local procedure.
• the constant will be used in all the other proces-ses.
If a constant "global" to the project and a constant"global" to a window have the same name:• the constant "global" to the window will be used
in all the processes of the window and windowcontrols, as well as in the "local" procedures ofthe window.
• the constant "global" to the project will be usedin all the other processes.
Declaring a constant memberA constant member cannot be declared in:• a structure.• a composite variable.
2.5 The advanced types
2.5.1 Simple ArrayAn array is a structured type that is used to group aset of elements of the same type. Each array ele-ment can be directly accessed by its subscript.An array can be resized during the program execu-tion by Dimension.
Note: The Array keyword is used to define a "simple"array. Other types of "advanced" arrays are availa-ble:• Dynamic array: Array allocated upon request.• Fixed array: Fixed-size array (recommended for
the Windows APIs).
SyntaxDeclaring a "simple" array<Array Name> is array of <Dimension 1> [by <Dimension 2>]...[by <Dimension 10>] <Type of Array Elements>
Or<Array name> is array of <Dimension 1> [,<Dimension 2>]...[,<Dimension 10>] <Type of Array Elements>
Referring to a "simple" array• Referring to an element in a one-dimensional
array: <Array name>[Subscript1]• Referring to an element in a two-dimensional
array:<Array name>[Subscript1, Subscript2]OR<Array name>[Subscript1][Subscript2]
• Referring to an element in an array with N dimen-sions: <Array name>[Subscript1,...,SubscriptN]OR<Array name>[Subscript1]…[SubscriptN]
CustomerArray is array ... of 5 by 7 by 3 int// Equivalent to : CustomerArray is array of 5,7,3 int // Resize the arrayDimension(CustomerArray,7,9,4)
WLangage.book Page 47 Jeudi, 20. mars 2014 4:29 16

48 Part 2: Basic syntax of WLanguage
• Passing an array in parameter to a procedure: <Procedure name>(<Array name>)
Note: An array cannot be handled as a whole. Forexample, an array cannot be assigned to anotherarray.
Passing a "simple" array in parameter to a proce-dureAn array can be passed in parameter to a proce-dure. To do so, use the following syntax:<Procedure name>(<Array name>)
Dimension of a "simple" arrayDimension is used to:• find out the total number of elements in an array.• resize an array.Caution: Dimension cannot be used to modify thenumber of dimensions in an array.
Elements of a "simple" arrayAn array can be made of classes only if these clas-ses have a constructor without parameter (or withoptional parameters).An array cannot include:• composite variables.• arrays.
Declaring variables with the same nameSeveral variables with the same name cannot beused in the same process (regardless of the type ofthese variables).If variables with the same name are declared in dif-ferent processes of the project, the rule for variablescope applies.
WLanguage functions and simple arraysSeveral WLanguage functions allow you to handlethe simple arrays. You have the ability to performsorts, searches, ... See the online help for moredetails.
Arrays in the classesWhen copying instances of classes, all the mem-bers of the class are copied into the new instanceexcept for the arrays. Therefore, if the value of an
array member is modified, this value is modified inall the instances.To get independent arrays in all the instances ofclasses, a local array must be declared as follows:
2.5.2 Dynamic array
A dynamic array is an "advanced" type of array: thedimension of this array are allocated upon request,during the program execution. In most cases, a"simple" array is sufficient.Reminder: An array is a structured type that is usedto group a set of elements of the same type. Eacharray element can be directly accessed by its subs-cript.We advise you to use:• A dynamic array or a "simple" array when the size
of the array must be modified during the programexecution.
• A fixed array for the Windows APIs.• An associative array to store elements indexed on
any type of information.
SyntaxDeclaring a dynamic array<Array name> is dynamic array
Allocating a dynamic array<Name of dynamic array> = new array dynamic of <Dimension 1> [by <Dimension 2> ... [by <Dimension 10>]] <Type of Array Elements>
OR<Name of dynamic array> = new array dynamic of <Dimension 1> [,<Dimension 2> ... [,<Dimension 10>]] <Type of Array Elements>
CustomerArray[2,5,3] = 47// Equivalent to : CustomerArray[2][5][3] = 47
SuppArray is array ... of 10 by 50 strings// Call the DisplayArray procedureDisplayArray(SuppArray)
SystemClass is class aDefaultArray is array ... local of 1 intEND
CustomerArray is array dynamic
CustomerArray is array dynamicCustomerArray = new ...dynamic array of 4 by 7 int// Equivalent to : CustomerArray = new ... dynamic array of 4, 7 int
WLangage.book Page 48 Jeudi, 20. mars 2014 4:29 16

Part 2: Basic syntax of WLanguage 49
Referring to a dynamic arrayTo refer to a dynamic array, this array must be allo-cated.• Referring to an element in a one-dimensional
array: <Array name>[Subscript1]• Referring to an element in a two-dimensional
array: <Array name>[Subscript1, Subscript2] OR<Array name>[Subscript1][Subscript2]
• Referring to an element in an array with N dimen-sions:<Array name>[Subscript1,...,SubscriptN]OR<Array name>[Subscript1]...[SubscriptN]
• Passing an array in parameter to a procedure:<Procedure name>(<Array name>)
Note: An array cannot be handled as a whole. Forexample, an array cannot be assigned to anotherarray.
Freeing a dynamic array (optional)A dynamic array is automatically freed at the end ofthe lifetime of the variable (when the window isclosed for example) or when allocating new dimen-sions.To explicitly free a dynamic array, use the followingsyntax:Delete <Name of dynamic array>
Passing a dynamic array in parameter to a proce-dureA dynamic array can be passed in parameter to aprocedure. To do so, use the following syntax: <Procedure name>(<Array name>)
Declaring a dynamic array memberA "dynamic array" member can be declared in:• a structure,• a composite variable,• a class.
The dynamic array must be allocated after thedeclaration of the structure, composite variable orclass.
Dimension of a dynamic arrayDimension is used to:• find out the number of elements in a dynamic
array.• resize a dynamic array.Caution: Dimension cannot be used to modify thenumber of dimensions in a dynamic array.
Elements of a dynamic arrayA dynamic array can include classes only if theseclasses have a constructor without parameter (orwith optional parameters).A dynamic array cannot include:• composite variables.• arrays.
Declaring variables with the same nameSeveral variables with the same name cannot beused in the same process (regardless of the type ofthese variables).If variables with the same name are declared in dif-ferent processes of the project, the rule for variablescope applies.
WLanguage functions and dynamic arraysSeveral WLanguage functions can be used to han-dle the dynamic arrays. You have the ability to per-form sorts, searches, ... See the online help formore details.
2.5.3 Fixed array
A fixed array is an "advanced" type of array: thedimensions of this array are defined during thecompilation and they cannot be modified.The dimensions of a fixed array are defined duringthe compilation, only if the dimensions of this arraycorrespond to:• an integer.• a constant that was created beforehand.
CustomerArray[2,5,3] = 47// Equivalent to : CustomerArray[2][5][3] = 47
SuppArray is array... dynamicSuppArray = new array... 10 by 50 strings// Call the DisplayArray procedureDisplayArray(SuppArray)
// Declare a structureStruct is structure x1 is int x2 is dynamic arrayEND// Declare a structure variableMyStruct is struct// Allocate the arrayx2 = new dynamic array ... of 4,7 int
WLangage.book Page 49 Jeudi, 20. mars 2014 4:29 16

50 Part 2: Basic syntax of WLanguage
Otherwise, a WLanguage error occurs during thecompilation of the project.Reminder: An array is a structured type that is usedto group a set of elements of the same type. Eacharray element can be directly accessed by its subs-cript.We advise you to use:• a fixed array to pass an array in parameter to
Windows API functions.• a dynamic array or a "simple" array when the
array must be resized during the program execu-tion.
• an associative array to store elements indexed onany type of information.
SyntaxDeclaring a fixed array<Array name> is fixed array of <Dimension 1> [by <Dimension 2> ... [by <Dimension 10>]] <Type of Array Elements>
OR<Array name> is fixed array of <Dimension 1> [,<Dimension 2> ... [,<Dimension 10>]] <Type of array elements>
Referring to a fixed array• Referring to an element in a one-dimensional
array: <Array name>[Subscript1]• Referring to an element in a two-dimensional
array:<Array name>[Subscript1, Subscript2]OR<Array name>[Subscript1][Subscript2]
• Referring to an element in an array with N dimen-sions:<Array name>[Subscript1, ... , SubscriptN]OR<Array name>[Subscript1]…[SubscriptN]
• Passing an array in parameter to a procedure:<Procedure name>(<Array name>)
Note: An array cannot be handle as a whole. Forexample, an array cannot be assigned to anotherarray.
Passing a fixed array in parameter to a procedureA fixed array can be passed in parameter to a pro-cedure. To do so, use the following syntax:<Procedure name>(<Array name>)
Declaring a fixed array memberA "fixed array" member can be declared in:• a class. This fixed array is directly allocated in the
memory zone of this class.• a composite variable. This fixed array is directly
allocated in the memory zone of this compositevariable.
• a structure <Structure name>. This fixed array isdirectly allocated in the memory zone of each<Structure name> variable.
Representing the memory zone of "MyStructure":
This memory representation is compatible with theWindows APIs. Therefore, a fixed-size array can betransmitted to a function of the Windows APIs.
Dimension of a fixed arrayDimension is used to find out the number of ele-ments in a fixed array.Reminder: A fixed array cannot be resized.
Elements of a fixed arrayA fixed array can include objects. An object repre-sents the instantiation of a class. If the class has aconstructor, this constructor must have no parame-ter (or optional parameters).A fixed array cannot include:• composite variables.• arrays.
CustomerArray is fixed array... of 5 by 7 by 3 int// Equivalent to : CustomerArray is fixed array... of 5,7,3 int
CustomerArray[2,5,3] = 47// Equivalent to : CustomerArray[2][5][3] = 47
SuppArray is fixed array ... of 10 by 50 strings// Call the DisplayArray procedureDisplayArray(SuppArray)
Struct is structure n1 is int nArray is fixed array of 2 int n2 is intENDMyStructure is Struct
WLangage.book Page 50 Jeudi, 20. mars 2014 4:29 16

Part 2: Basic syntax of WLanguage 51
Declaring variables with the same nameSeveral variables with the same name cannot beused in the same process (regardless of the type ofthese variables). If variables with the same nameare declared in different processes of the project,the rule for variable scope applies.
2.5.4 Associative array
An associative array is an "advanced" type of array:it is used to group a set of elements of the sametype. Each array element is indexed on any type ofinformation (and not only on a numeric subscriptlike in the other types of arrays).Note: This type of array provides quick access toany element, with some options for strings, but itcannot be used for sorting (especially, no sort onthe key).
SyntaxDeclaring an associative array<Array name> is array associative of <Type>
Note: An advanced syntax is also available. See theonline help (keyword: "Associative array") for moredetails.
2.5.5 Composite variable
A composite variable includes different types of ele-ments (members).Note: If you are using custom variables, we adviseyou to declare:• a composite variable if a single variable of this
type is used in your project.• a structure type, if several variables of this type
are used in different processes of the project.
SyntaxDeclaring a composite variable<Variable name> is composed of <Members of the composite variable>END
Handling a member of a composite variable<Variable name>.<Member name>
Handling a composite variableA composite variable can be used without referen-cing its members.
Type of the members in a composite variableThe members of a composite variable can have thefollowing types:• Integer (or selected among the advanced
integers).• Real (or selected among the advanced reals).• Currency.• Fixed string, ASCIIZ string or Pascal string.• Array ("simple" array, dynamic array or fixed
array).• Automation or Dynamic Automation.• Structure.• Variant.• Class. This class must have a constructor without
parameter (or with optional parameters).Any other type of data (string, constant, …) is forbid-den.
// Fills an associative array with the sizes of filesaaFileSize is array ... associative of intaaFileSize[... "File1.txt"] = ... fSize("File1.txt")aaFileSize["File2.txt"] =... fSize("File2.txt")// Retrieves the size of a fileTrace(aaFileSize["File2.txt";])
ProductRef is composed of SCode is int PdtCode is fixed string on 10END
ProductRef.SCode = 7ProductRef.PdtCode = "Screen"
CompositeVar is composed of Member1 is fixed string on 8 Member2 is fixed string on 12ENDStr = CompositeVar // Str is built by concatenating // all the members of the composite // key// CompositeVar = Str // Str is transferred to the // composite variable
WLangage.book Page 51 Jeudi, 20. mars 2014 4:29 16

52 Part 2: Basic syntax of WLanguage
Declaring an array member in a composite varia-bleDeclaring a "simple array" member:The array dimensions are fixed when the array isdeclared. The array dimensions can be modified byDimension.Declaring a dynamic array member:The array dimensions must be defined (whichmeans that the array must be allocated) beforeusing the array..
Limits of a composite variableYou cannot:• directly assign a composite variable to another
composite variable: each member must be assi-gned one by one.
• compare two composite variables.• pass a composite variable in parameter to a pro-
cedure.• define an inheritance in a composite variable.• restrict the access to a member of a composite
variable: all the members of a composite variablemust be public.
Which "advanced" types can be member?An "advanced" variable can be member of another"advanced" variable. The table below presents thedifferent combinations:
Declaring variables with the same nameYou cannot declare:• two variables with the same name (regardless
the type of these variables) in a process.• two members with the same name in the same
composite variable.If variables with the same name are declared in dif-ferent processes of the project, the rule for variablescope applies.
2.5.6 Structure
A structure is a custom type of data. A structuregroups different types of elements.
Note: If you are using custom variables, we adviseyou to declare:• a structure type, if several variables of this type
are used in different processes of the project.• a composite variable if a single variable of this
type is used in your project.
SyntaxDeclare a structure<Structure name> is structure <Structure members>
END
Declare a structure variable<Variable name> is <Structure>
Handling a member of a structure variable<Name of structure variable>:<Name of struc-ture member>
// Declare a composite variableMyCompVar is composed of x1 is int x2 is dynamic array END// Allocate the arrayMyCompVar.x2 = new array ... dynamic of 4,7 int// Initialize the arrayMyCompVar.x2[1,1] = 25
Can be amemberof
Compo-site varia-ble
Structure Class Array
Compo-site varia-ble
No No No No
Structure Yes Yes Yes Yes
Class Yes Yes Yes Yes
Array Yes Yes Yes No
ProductRef is structure SCode is int PdtCode is fixed string on 10END
ProductRef is structure SCode is int PdtCode is fixed string on 10ENDArmchair is ProductRef
ProductRef is structure SCode is int PdtCode is fixed string on 10ENDArmchair is ProductRefArmchair:SCode = 7Armchair:PdtCode = "Furniture"
WLangage.book Page 52 Jeudi, 20. mars 2014 4:29 16

Part 2: Basic syntax of WLanguage 53
Declaring the structuresIf a structure named <Structure name> is declared:• in the code of the project, you will be able to
declare a <Structure name> variable in the entireproject.
• in the declaration code of the global variables ofa window/page you will be able to declare a<Structure name> variable in this window/page,in the controls of this window/page and in theassociated local procedures.
• in the opening code of a report, you will be ableto declare a <Structure name> variable in thisreport, in the controls of this reports and in theassociated local procedures.
• in the code for class declaration, you will be ableto declare a <Structure name> variable in thisclass and in the methods of this class.
• in a process, you will be able to declare a <Struc-ture name> variable in this process.
Type of structure membersThe members of a structure can have the followingtypes:• Integer (or selected among the advanced
integers).• Real (or selected among the advanced reals).• Currency.• String (or selected among the advanced strings).• Array ("simple" array, dynamic array or fixed
array).• Automation or Dynamic Automation.• Object (class instantiation). The class can have a
constructor without parameter (or with optionalparameters).
• Variant.Any other type of data (composite variable, cons-tant, ...) is forbidden. Declaring an array member in a structureDeclaring a "simple array" member:The array dimensions are fixed when the array isdeclared. The array dimensions can be modified byDimension.Declaring a dynamic array member:The array dimensions must be defined (which
means that the array must be allocated) beforeusing the array.
Which "advanced" types can be member?An "advanced" variable can be member of another"advanced" variable.The table below presents the different combina-tions:
Passing a structure in parameter to a procedureA "structure" variable can be passed in parameterto a procedure.
To do so, use the following syntax:<Procedure name>(<Name of structure varia-ble>)
Limits of a structureThe inheritance of structure is not allowed: a struc-ture cannot inherit from another structure.The access to a structure member cannot be res-tricted: all the members of a structure are public.
// Declare a structureStruct is structure x1 is int x2 is dynamic array END// Declare a structure variableMyStruct is struct// Allocate the arrayMyStruct.x2 = new dynamic array of 4,7 int// Use the arrayMyStruct:x2[1,1] = 25
Can be amember of
Variable composite
Structure Class Array
Variable composite
No No No No
Structure Yes Yes Yes Yes
Class Yes Yes Yes Yes
Array Yes Yes Yes No
ProductRef is structure SCode is int PdtCode is fixed string on 10ENDArmchair is ProductRef// Call the DisplayProduct procedureDisplayProduct(Armchair)
WLangage.book Page 53 Jeudi, 20. mars 2014 4:29 16

54 Part 2: Basic syntax of WLanguage
Declaring variables with the same nameYou cannot declare:• two variables with the same name (regardless
the type of these variables) in a process.• two members with the same name in the same
structure.If variables with the same name are declared in dif-ferent processes of the project, the rule for variablescope applies.
2.5.7 Dynamic structure
A structure can be allocated dynamically: we talk ofdynamic instantiation of the structure.The dynamic instantiation of structure is used tocreate a structure at a given time and to free thisstructure when it is no longer used.To instantiate a structure, you must:1. declare a dynamic structure2. instantiate a structure
Note: the structure is automatically freed when it isno longer used. However, you can force the destruc-tion of the structure.
Declaring a dynamic structure
<VariableName> is <StructureName> dynamic
The important parameters of this syntax are as fol-lows: • <VariableName>: Name identifying the variable of
the structure.• <StructureName>: Name identifying the struc-
ture, defined when creating the structure.
Instantiating a dynamic structure <VariableName> = ... new <StructureName> [<Parameters>])
The important parameters of this syntax are as fol-lows:
• <VariableName>: Name identifying the variable ofthe structure.
• <StructureName>: Name identifying the struc-ture, defined when creating the structure
• <Parameters>: Optional parameters of the cons-tructor.
Freeing a dynamic structure
Delete <StructureName>
where
<StructureName>: Name identifying the instance ofthe structure.
2.5.8 Automation object
The Automation keyword is used to declare anautomation object. This object is allocated duringthe declaration.Note: You also have the ability to use a dynamicautomation object. It is allocated upon request,during the program execution. SyntaxDeclaring an automation object<Name of automation object> is automation object <Name of automation server>
Calling a method of automation object<Name of automation object>>><Method name>([<Parameters>])
Note: The list of methods that can be used dependson the server. See the documentation about theserver for more details.
Lifespan of an automation objectThe automation object is created during its declara-tion.The automation object is automatically destroyedat the end of the process containing its declaration.An automation object declared "global" in the code:• for window initialization will be destroyed at the
end of the closing process of the window.• for project initialization will be destroyed at the
end of the closing process of the first project win-dow.
File is structure Name is String Extension is String Directory is StringEndSourceFile is File dynamic//...SourceFile = New File // process on the object// ...// free the objectDelete SourceFile
MyAutomationObject ... is automation object MyServer
MyAutomationObject>>... OpenFile(DocName)
WLangage.book Page 54 Jeudi, 20. mars 2014 4:29 16

Part 2: Basic syntax of WLanguage 55
Allocating an automation objectWhen allocating an automation object, the automa-tion server is automatically started.To allocate an automation object with an existinginstance of an automation server, use GetActiveOb-ject.
Passing parameters to a methodThe methods of automation servers can accept oneor more parameters.When calling a method, the sequence of parame-ters must be respected (see the documentationabout the server for more details).For some automation servers, some parameters ofmethods are not valued: only the presence of theparameter is important, not its value.For example, the "EditReplace" method of WordBasic accepts 10 parameters, the last one (Repla-ceAll) being not valued.In WLanguage, any ordinary value can be passed tonon-valued parameters.The methods of some automation servers canaccept optional parameters located anywhere inthe list of parameters.In WLanguage, the optional parameters mustnecessarily be found after the mandatory parame-ters.To give any ordinary value to an optional parameter,assign the * character to the optional parameter.On the contrary, this character will not be requiredfor the optional parameters found after the lastmandatory parameter.
Declaring variables with the same nameSeveral variables with the same name cannot beused in the same process (regardless of the type ofthese variables).If variables with the same name are declared in dif-ferent processes of the project, the rule for variablescope applies.
2.5.9 Dynamic Automation object
A dynamic automation object is an automationobject allocated upon request, during the programexecution.
SyntaxDeclaring a dynamic automation object<Name of dynamic automation object> is dyna-mic automation object
Allocating a dynamic automation object<Name of dynamic automation object> = new dynamic automation object <Name of automation server>
Call a method of a dynamic automation object<Name of dynamic automation object>>><Method name>([<Parameters>])
Note: The list of methods that can be used dependson the automation server. See the documentationabout the server for more details.
Lifespan of a dynamic automation objectThe dynamic automation object is created whenallocating the object.The dynamic automation object is automaticallydestroyed at the end of the process containing itsdeclaration or when a new allocation is performedon the object.A dynamic automation object declared as "global"in the code:• for window initialization will be destroyed at the
end of the closing process of the window.• for project initialization will be destroyed at the
end of the closing process of the first project win-dow.
To explicitly free a dynamic automation object, usethe following syntax:Delete <Name of dynamic automation object>
Allocating a dynamic objectWhen allocating a dynamic automation object, theautomation server is automatically started.To allocate a dynamic automation object with anexisting instance of an automation server, useGetActiveObject.
// Declaration MyDynamicObject... is dynamic automation object
// Create a dynamic automation objectMyDynamicObject = new ... dynamic automation object ... MyServer
MyDynamicObject>>... OpenFile(DocName)
WLangage.book Page 55 Jeudi, 20. mars 2014 4:29 16

56 Part 2: Basic syntax of WLanguage
Passing parameters to a methodThe methods of automation servers can accept oneor more parameters.When calling a method, the sequence of parame-ters must be respected (see the documentation formore details).• With some automation servers, some method
parameters are not valued: only the presence ofthe parameter is important. The value taken bythis parameter has no importance.For example, the "EditReplace" method of WordBasic accepts 10 parameters, the last one(ReplaceAll) being not valued.In WLanguage, any ordinary value can be passedto non-valued parameters.
• The methods of some automation servers canaccept optional parameters located anywhere inthe list of parameters.In WLanguage, the optional parameters mustnecessarily be found after the mandatory para-meters.To give any ordinary value to an optional parame-ter, assign the * character to the optional para-meter. On the contrary, this character will not berequired for the optional parameters found afterthe last mandatory parameter.
Declaring variables with the same nameSeveral variables with the same name cannot beused in the same process (regardless of the type ofthese variables).If variables with the same name are declared in dif-ferent processes of the project, the rule for variablescope applies.
2.5.10 Data source
A Data source variable is used to describe a tempo-rary data source (query, view, alias, ...). All the ope-rations that can be performed on a view (or on aquery) can be performed on a Data source variableassociated with a view (or with a query).To describe a temporary data source, you must:1. Declare a "Data source" variable.2. Initialize the data source (hExecuteSQLQuery or
hCreateView).3. The data source is automatically freed at theend of the variable life.
Note: When closing the application (or the processwhere the data source was created), the datasource will be automatically deleted. SyntaxDeclaring a data source <Variable name> is data source
Declaring several data sources<Name of variable 1>, <Name of variable 2> are data sources
Initializing a "Data source" variable (query or view)To initialize a "Data source" variable, use:• HExecuteSQLQuery if the variable is associated
with a query.HCreateView if the variable is associated with aview.
Deleting the data source (query or view)When the same Data Source variable is used seve-ral times with different data sources, the first datasource must be freed. To free the memory space occupied by the datasource (query or view), use:• HCancelDeclaration if the variable is associated
with a query.
MyDataSource is data sourceMyDataSource1, MyDataSource2 ... are data sources
MyQuery is data source// MyQuery is associated // with a query. // Initialize the variable HExecuteSQLQuery(MyQuery,... "SELECT NAME FROM CUSTOMER")MyView is data source// MyView is associated with a view// Initialize the variable HCreateView(MyView, CUSTOMER, ... "*", "NAME,CITY", "NAME]=’A’",... hViewDefault)
WLangage.book Page 56 Jeudi, 20. mars 2014 4:29 16

Part 2: Basic syntax of WLanguage 57
• HDeleteView if the variable is associated with aview.
Handling a query or a view by programmingTo handle a query or a view by programming, werecommend that you use a "Data source" variable.However, you have the ability to give a logical namewhen initializing the query or the view. In this case,the Extern keyword must be used to directly handlethe view or query in the code editor. This methodcan slow down the execution of your processes.Note: When using a logical name, the query or theview is not automatically deleted: you must useHCancelDeclaration and HDeleteView.
Declaring variables with the same nameSeveral variables with the same name cannot beused in the same process (regardless of the type ofthese variables).If variables with the same name are declared in dif-ferent processes of the project, the rule for variablescope applies.
2.5.11 File description
A File description variable is used to describe oneor more temporary data files. The description ofeach data file is validated by HDescribeFile.After this validation:• this data file can be handled like any other data
file described in the analysis.
• the "File description" variable is reinitialized andit can be used to describe another temporarydata file.
SyntaxDeclaring a data file description<Variable name> is file description
Declaring several file descriptions<Name of variable 1>, <Name of variable 2> are file descriptions
Describing a "File description" variableTo describe a "File description" variable, use theWLanguage properties specific to the descriptionsof data files.To validate the description of a "File description"variable, use HDescribeFile.
Properties specific to the description of data filesThe properties specific to the description of datafiles are detailed in the online help.
How to describe temporary data files? To describe temporary data files, you must:1. Declare the "File description", "Item description"and "Link description" variables (if necessary).2. For each data file:• describe the characteristics of the data file via
the HFSQL properties.• describe the characteristics of the items via the
HFSQL properties.• validate the description of each item (HDescri-
beItem).• validate the description of the data file (HDescri-
beFile).3. Describe (if necessary) the characteristics of thelinks via the HFSQL properties.4. Validate (if necessary) the description of eachlink (HDescribeLink).
MyQuery is data sourceMyQuery = HExecuteSQLQuery(... MyQuery,"SELECT NAME FROM CUSTOMER")// Delete the data source // associated with the // MyQuery variableHCancelDeclaration(MyQuery)MyQuery = HExecuteSQLQuery(... MyQuery,... "SELECT NAME FROM SUPPLIER")MyView is data source// MyView is associated with a view// Initialize the variableHCreateView(MyView, CUSTOMER,... "*", "NAME,CITY", "NAME]=’A’",... hViewDefault)// Delete the data source // associated with MyViewHDeleteView(MyView)HCreateView(MyView, CUSTOMER, ... "*", "NAME,FIRTSNAME", ... "NAME]=’C’", hViewDefault)
MyFile is file descriptionMyFile1, MyFile2 are... file descriptions
// Describe the "CUSTOMER" fileMyFile..Name = "CUSTOMER"MyFile..Type = hFileNormalMyFile..FicCryptMethod = ... hCryptStandard// Describe the file items// Validate the description // of the "CUSTOMER" fileHDescribeFile(MyFile)
WLangage.book Page 57 Jeudi, 20. mars 2014 4:29 16

58 Part 2: Basic syntax of WLanguage
Handling the items of a temporary data fileWhen creating a data file in the data model editor,the names of the data files and items are automati-cally recognized by the compiler.When creating a data file via a "File description"variable, the names of the temporary data file andits items are defined by ..Name. These names arenot automatically recognized by the compiler. Acompilation error occurs if these names are used toidentify the temporary data file or its items.In order for the name of the temporary data file andits items to be recognized by the compiler, thename of this temporary data file must be declaredas a data source. This temporary data file can thenbe handled by its name in the code editor.
Note: You also have the ability to declare the nameof the temporary data file with the Extern keyword.However, the execution speed of the process will beslower.
Declaring variables with the same nameSeveral variables with the same name cannot beused in the same process (regardless of the type ofthese variables). If variables with the same nameare declared in different processes of the project,the rule for variable scope applies.
2.5.12 Link description
A Link description variable is used to describe alink between two temporary data files. The descrip-tion of each link is validated by HDescribeLink.
After this validation:• this link can be handled like any other link descri-
bed in the analysis.• the "Link description" variable is re-initialized and
it can be used to describe another link. SyntaxDeclaring a link description<Variable name> is link description
Declaring several link descriptions <Name of variable 1>, <Name of variable 2> are link descriptions
Describing a "Link description" variableTo describe a "Link description" variable, use theWLanguage properties specific to the link descrip-tions.To validate the description of a "Link Description"variable, use HDescribeLink.
Properties specific to the link descriptionThe properties specific to link descriptions aredetailed in the online help.
How to describe temporary data files? To describe temporary data files, you must:1. Declare the "File description", "Item description"and "Link description" variables (if necessary).2. For each data file:• describe the characteristics of the data file via
the HFSQL properties.• describe the characteristics of the items via the
HFSQL properties.• validate the description of each item (HDescri-
beItem).• validate the description of the data file (HDescri-
beFile).3. Describe (if necessary) the characteristics of thelinks via the HFSQL properties.4. Validate (if necessary) the description of eachlink (HDescribeLink). Handling the links of a temporary data fileWhen a link is created in the data model editor, thename of the link is automatically recognized by thecompiler.When creating a temporary link with a "Link Des-cription" variable, the name of this link is defined by..Name .
MyFile is description of file...MyFile..Name = "CUSTOMER"...HDescribeFile("CUSTOMER")...CUSTOMER is data source...HReadFirst(CUSTOMER, ... CUSTOMER.CUSTNAME)
MyLink is link descriptionMyLink1, MyLink2 are ... link descriptions
// Describe and validate the City // and Customer files...// Describe the "LIVES" linkMyLink..Name = "LIVES"MyLink..SourceFile = "CITY"MyLink..LinkedFile = "CUSTOMER"MyLink..SourceKey = "CITYNAME"MyLink..LinkedKey = "CUSTCITY"// Validate the description of // the "LIVES" linkHDescribeLink(MyLink)
WLangage.book Page 58 Jeudi, 20. mars 2014 4:29 16

Part 2: Basic syntax of WLanguage 59
This name is not automatically recognized by thecompiler. Using this name to define the temporarylink triggers a compilation error.In order for the name of the temporary link to berecognized by the compiler, this link name must bedeclared by the Extern keyword. Then, this tempo-rary link can be handled by its name in the codeeditor.
Declaring variables with the same nameSeveral variables with the same name cannot beused in the same process (regardless of the type ofthese variables).If variables with the same name are declared in dif-ferent processes of the project, the rule for variablescope applies.
2.5.13 Item description
An Item description variable is used to describeone or more items of a temporary data file. The des-cription of each item is validated by HDescribeItem.
After this validation:• this item can be handled like any other item des-
cribed in the analysis.• the "Item description" variable is re-initialized and
it can be used to describe another item of a tem-porary data file.
SyntaxDeclaring an item description<Variable Name> is item description
Declaring several item descriptions<Name of variable 1>, <Name of variable 2> are item descriptions
Describing an "Item description" variableTo describe an "Item Description" variable, use theWLanguage properties specific to the item descrip-
tions.To validate the description of an "Item description"variable, use HDescribeItem.
Properties specific to the item descriptionThe properties specific to the item descriptions arepresented in the online help.How to describe temporary data files? To describe temporary data files, you must:1. Declare the "File description", "Item description"and "Link description" variables (if necessary).2. For each data file:• describe the characteristics of the data file via
the HFSQL properties.• describe the characteristics of the items via the
HFSQL properties.• validate the description of each item (HDescri-
beItem).• validate the description of the data file (HDescri-
beFile).3. Describe (if necessary) the characteristics of thelinks via the HFSQL properties.4. Validate (if necessary) the description of eachlink (HDescribeLink). Handling the items of a temporary data fileWhen creating a data file in the data model editor,the names of the data files and items are automati-cally recognized by the compiler.When creating a data file via a "File description"variable, the names of the temporary data file andits items are defined by ..Name. These names are not automatically recognized bythe compiler. A compilation error occurs if thesenames are used to identify the temporary data fileor its items.In order for the name of the temporary data file andits items to be recognized by the compiler, thename of this temporary data file must be declaredas a data source.
MyLink is a description of links...MyLink..Name = "LIVES"...HDescribeLink("LIVE")...EXTERN LIVES...Cardinality = ... LIVE..MaxLinkedCardinality
MyItem is item descriptionMyItem1, MyItem2 are item descriptions
// Describe the MyFile file ...// Describe the "NAME" itemMyItem..Name = "NAME"MyItem..Type = hItemTextMyItem..Size = 40MyItem..KeyType = hUniqueKey// Validate description of // the "NAME" itemHDescribeItem(MyFile, MyItem)// Validate the description of// MyFile ...
WLangage.book Page 59 Jeudi, 20. mars 2014 4:29 16

60 Part 2: Basic syntax of WLanguage
Then, this temporary data file and its items can behandled by their name in the code editor.
Note: you can also declare the name of the tempo-rary data file with the keyword Extern. However, theexecution speed of the process will be slower.
Declaring variables with the same nameSeveral variables with the same name cannot beused in the same process (regardless of the type ofthese variables).If variables with the same name are declared in dif-ferent processes of the project, the rule for variablescope applies.
2.5.14 FontA Font variable is used to create a dynamic font.The properties of this font can be modified in theprogram.A dynamic font allows you to select the font used:• in the drawings (dFont).• in the charts (grLabelFont, grLegendFont, grTitle-
Font and grAxisTitleFont).• for the prints (iFont).• in the controls of a window (..Font property for the
window controls).• in the controls of a report (..Font property for the
report controls).
SyntaxDeclaring a font<Variable name> is font
Declaring several fonts<Name of variable 1>, <Name of variable 2> are fonts
Defining the characteristics of a fontThe default font is "Arial", size 12, black, withoutattribute.
To define the characteristics of a dynamic font, use:• FontCreate.• the following properties: ..Charset, ..Angle, ..Stri-
keout, ..Condensed, ..Color, ..Extended, ..Bold,..Italic, ..Large, ..Name, ..Underline and ..Size.
• FontSelect that opens the standard window forfont selection.
Declaring variables with the same nameSeveral variables with the same name cannot beused in the same process (regardless of the type ofthese variables).If variables with the same name are declared in dif-ferent processes of the project, the rule for variablescope applies.
2.5.15 ConnectionA Connection variable is used to describe one ormore connections to external databases (HFSQLClient/Server, Native Access, ...). The connection can be established by HOpenCon-nection.The Connection variable can also be used to:• describe a new connection (equivalent to HDes-
cribeConnection)• create a connection (that will be established by
HOpenConnection)• modify an existing connection.SyntaxDeclaring a connection<Variable name> is connection
Declaring several connections<Name of variable 1>, <Name of variable 2> are connections
Defining the characteristics of a connectionTo describe a "Connection" variable, use the WLan-guage properties specific to the connections.
MyFile ... is file description...MyFile..Name = "CUSTOMER"...HDescribeFile("CUSTOMER")...CUSTOMER is data source...HReadFirst(CUSTOMER, CUSTOMER.CUST-NAME)
MyFont is fontMyFont1, MyFont2 are fonts
MyFont = ... FontCreate("Arial",12, iBold)MyFont..Name = "Arial"MyFont..Size = 12MyFont..Bold = True
MyConnection is Connection
// Describe the connectionMyCtion..User = "USER"MyCtion..Password = "PASSWORD"MyCtion..Server = "MYSERVER" MyCtion..Database = "Database1"MyCtion..Provider = ... hAccessHFClientServerMyCtion..Password = "PASSWORD"
WLangage.book Page 60 Jeudi, 20. mars 2014 4:29 16

Part 2: Basic syntax of WLanguage 61
Declaring variables with the same nameSeveral variables with the same name cannot beused in the same process (regardless of the type ofthese variables).If variables with the same name are declared in dif-ferent processes of the project, the rule for variablescope applies.
2.5.16 QueueA queue is a structured type that is used to group aset of elements of the same type. The elements areadded at the end of the queue and they are retrie-ved in enqueue order.
SyntaxDeclaring and initializing a queue<Queue name> is Queue of <Type of elements inthe queue>
• For example, if the elements are added in the fol-lowing order: 1, 2, 3, they will be retrieved in thesame order 1, 2, 3
WLanguage properties that can be used with theQueue type
Note: These properties can be used with one of thefollowing syntaxes:• <Variable name>..<Property name>• <Variable name>.<Property name>
WLanguage functions for managing the queuesThe following functions can be used to handle aQueue variable.
The queues and the multithreadThe management of multithread is taken intoaccount when adding and deleting an element(Enqueue and Dequeue functions).• You also have the ability to use properties during
a multithread management but the result is notpermanent.
For example:
Browsing the queues:The FOR EACH syntax can be used to browse thequeues. The elements are browsed in enqueueorder that is similar to the dequeue order.The syntax used corresponds to the one used forarrays:
The elements can be modified during the browse. Ifthe queue is modified during a browse, the ele-ments browsed will be the ones found when thebrowse was initialized:• the elements enqueued after the initialization of
the browse will not be browsed.• the elements dequeued after the initialization of
the browse will still be browsed.
MyCtion..Access = hOReadWritemyCtion..ExtendedInfo = "Info"MyCtion..CursorOptions= ... hClientCursorHOpenConnection(MyConnection)
MyQueue is queue of int// Enqueue the values 1, 2 and 3Enqueue(MyQueue, 1)Enqueue(MyQueue, 2) Enqueue(MyQueue, 3)// Display the trace: 1, 2, 3x is intWHILE Dequeue(MyQueue, x) Trace(x)END
AdditionComple-ted
Returns and modifies theaddition mode of the ele-ments. This property is used for mul-tithread management
NbPen-dingThread
Returns the number of pen-ding threads.This property is used for mul-tithread management
Occurrence Returns the number of occur-rences of the queue
Empty True if the queue is empty,False otherwise
Dequeue Retrieves the element found at thebeginning of the queue.
Deserialize Deserializes a queue.
Enqueue Adds an element at the end of thequeue.
Serialize Serializes a queue.
Delete all Deletes all the elements from aqueue.
IF MyQueue..Occurrence>0 THEN// When the thread arrives here, ...// the queue may be emptyEND
FOR EACH [ELEMENT] <Variable> ... [, <Counter> [, <Counter>]] ... OF <Queue> ... END
WLangage.book Page 61 Jeudi, 20. mars 2014 4:29 16

62 Part 2: Basic syntax of WLanguage
Notes• In the debugger, the content of the queue is dis-
played in dequeue order.• A queue can be used to type a procedure para-
meter.• A queue can be copied with the operator =. You
also have the ability to copy an instance of classor structure containing a queue.
• A queue can be initialized by a list of elements inenqueue order.
2.5.17 ListA list is a structured type that is used to group a setof elements of the same type. The elements can beadded at the end of the list or they can be insertedinto the list.SyntaxDeclaring and initializing a list<List name> is List of <Type of elements inthe list>
WLanguage properties that can be used with theList typeThe following properties can be used to handle aList variable
Note:These properties can be handled by using one ofthe following syntaxes:
•<Variable name>..<Property name>•<Variable name>..<Property name>
WLanguage functions for list managementThe following functions can be used to handle aList variable.
The lists and the multithread.The management of multithread is taken intoaccount when adding, inserting and deleting anelement.• You also have the ability to use properties during
a multithread management but the result is notpermanent. For example:
Browsing the lists.The FOR EACH syntax can be used to browse thelists.• The syntax used corresponds to the one used for
arrays:
The elements can be modified during the browse. Ifthe list is modified during a browse, the browse isaffected by the additions and by the deletions. Thefunctions available during the browse are as fol-lows:• Syntax: Insert(<List Name>, BeforeCurrentEle-
ment, <Value>)Caution: the element will be browsed by the nextiteration if the loop is descending.
• Syntax: Insert(<List Name>, AfterCurrentEle-ment, <Value>)Caution: the element will be browsed by the nextiteration if the loop is ascending.
• Syntax: Delete(<List Name>, CurrentElement)Notes:• The content of the list can be displayed in the
debugger.• A list can be used to type a procedure parameter.• A list can be copied by the list operator.• A list can be initialized by a list of elements.
2.5.18 StackA stack is a structured type that is used to group aset of elements of the same type. The elements areadded at the end of the stack and they are retrie-ved from the most recent one.
Occurrence Returns the number ofoccurrences of the list.
Empty True if the list is empty,False otherwise.
Add Adds an element at the end of thelist.
Deserialize Deserializes a list.
Insert Inserts an element into a list.
Serialize Serializes a list.
Deletes Deleting an element from a thelist
DeleteAll Deletes all the elements from thelist.
IF MyList..Occurrence>0 THEN// When the thread arrives here, ...// the list may be emptyEND
FOR EACH [ELEMENT] <Variable> ...... [, <Counter> [, <Counter>]] ... OF <List> [<Direction>] ... END
WLangage.book Page 62 Jeudi, 20. mars 2014 4:29 16

Part 2: Basic syntax of WLanguage 63
SyntaxDeclaring and initializing a stack<Stack name> is stack of <Type of elements inthe stack>
• For example, if the elements are added in the fol-lowing order: 1, 2, 3, they will be retrieved in thefollowing order: 3, 2, 1.:
WLanguage properties that can be used with theStack typeThe following properties can be used to handle aStack variable.
Note: These properties can be used with one of thefollowing syntaxes:•<Variable name>..<Property name>•<Variable name>.<Property name>
WLanguage functions for managing the stacks.The following functions can be used to handle aStack variable.
The stacks and the multithreadThe management of multithread is taken intoaccount when adding and deleting an element(Push and Pop functions).You also have the ability to use properties during amultithread management but the result is not per-manent. For example:
Browsing the stacksThe FOR EACH syntax can be used to browse thestacks. The elements are browsed in pop order thatis the reverse order of the push order.The syntax used corresponds to the one used forarrays:
The elements can be modified during the browse. Ifthe stack is modified during a browse, the elementsbrowsed will be the ones found when the browsewas initialized:• the elements pushed after the initialization of the
browse will not be browsed.• the elements popped after the initialization of the
browse will still be browsed.
Notes:• In the debugger, the content of the stack is dis-
played in pop order.• A stack can be used to type a procedure parame-
ter.• A stack can be copied by the operator =. You also
have the ability to copy a class or structure ins-tance containing a stack.
• A stack can be initialized by a list of elements inpush order
MyStack is stack of int// Push the values 1, 2 and 3Push(MyStack, 1)Push(MyStack, 2) Push(MyStack, 3)// Display the trace: 3, 2, 1x is intWHILE Pop(MyStack, x) Trace(x)END
AdditionCompleted Returns and modifies theaddition mode of the ele-ments.This property is used formultithread management
NbPendingThread Returns the number of pen-ding threads.This property is used formultithread management
Occurrence Returns the number ofoccurrences of the stack.
Empty True if the stack is empty,False otherwise
Pop Retrieves the element at thebeginning of the stack.
Deserialize Deserializes a stack.
Push Adds an element into a stack.
Serialize Serializes a stack.
DeleteAll Deletes all the elements from astack.
IF MyStack..Occurrence>0 THEN// When the thread arrives here, ...// the stack may be emptyEND
FOR EACH [ELEMENT] <Variable> ... [, <Counter> [, <Counter>]] ... OF <Stack> ... END
WLangage.book Page 63 Jeudi, 20. mars 2014 4:29 16

64 Part 2: Basic syntax of WLanguage
2.6 Local variables/global variables
Two types of variables are available:• Local variable: can only be used in the process
where it was declared.• Global variable: can be used in all the processes
related to process where it was declared.Important: Two variables must not be declared withthe same name (especially a global variable and alocal variable).
2.6.1 Global variablesVariables global to a project
The global variables declared in the initializationprocess of a project can be used in all the proces-ses:• of the project.• of the windows/pages (processes of the window/
page, of its associated controls and local proce-dures).
• of the reports (processes of the report, its asso-ciated controls and local procedures).
Availability of the variables in WebDev Browsercode: the global server variables of the project areavailable in browser code only for the followingtypes: boolean, integer, real, string. Caution: themodifications performed on these global variablesin browser code are not applied to the server.
Tip: the global variables declared in a server codecan be used to transmit information to the browser.
Variables global to a window or to a page
The global variables declared in the declarationprocess of the global variables of a window/pagecan be used in all the processes:• of the window/page.• of the controls of the window/page.• of the local procedures associated with the win-
dow/page.Limits:• The global variables of a window cannot be used
by its sibling windows.• The global variables declared in a child window
cannot be used in its parent window.• When the window/page where the variable was
declared is closed, this variable cannot be used
anymore.
Availability of the variables in WebDev in Browsercode: the Server variables global to a page areavailable in the Browser codes of the page for thefollowing types: boolean, integer, real, string.
Caution: the modifications performed on these glo-bal variables in browser code are not applied to theserver.
Tip: the global variables declared in a server codecan be used to transmit information to the browser.
Browser variables that are global to a page
The global variables declared in the "Page Load(onLoad)" code can be used in all the browser pro-cesses:• of the page.• of the page controls.• of the local procedures associated with the page.
Availability of the variables in Server code: theBrowser variables global to a page are not availablein the Server codes of the page.
Tip: the global variables declared in a browser codecan be used to exchange information between dif-ferent processes run on the browser.
Notes:• The global browser variables cannot be initialized
on the declaration line.• The global browser variables can be initialized
with the value of a server global variable (only forthe boolean, integer, real and string types).
• We recommend that you disable the "cache" ofyour browser when developing the WebDev appli-cation. The global variables are translated intoJavaScript in ".JS" files. If the "cache" is enabled,the tests of your pages may reload files corres-ponding to former values of your variables. Seethe online help for more details.
Variables global to a reportThe global variables declared in the opening pro-cess of a report can be used in all the processes ofthe report, of the report controls and of the localprocedures associated with the report.
WLangage.book Page 64 Jeudi, 20. mars 2014 4:29 16
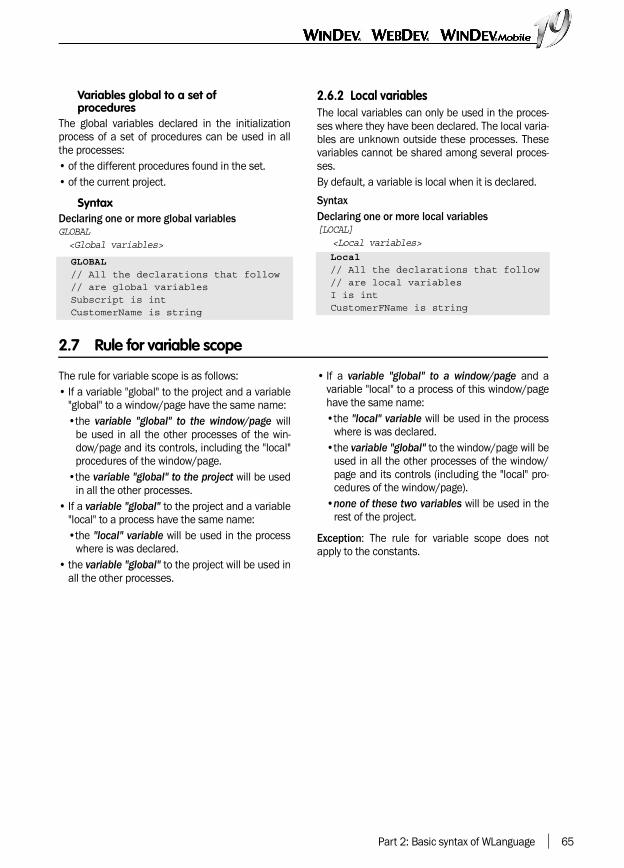
Part 2: Basic syntax of WLanguage 65
Variables global to a set of procedures
The global variables declared in the initializationprocess of a set of procedures can be used in allthe processes:• of the different procedures found in the set.• of the current project.
SyntaxDeclaring one or more global variablesGLOBAL <Global variables>
2.6.2 Local variablesThe local variables can only be used in the proces-ses where they have been declared. The local varia-bles are unknown outside these processes. Thesevariables cannot be shared among several proces-ses.By default, a variable is local when it is declared.
SyntaxDeclaring one or more local variables[LOCAL] <Local variables>
2.7 Rule for variable scope
The rule for variable scope is as follows:• If a variable "global" to the project and a variable
"global" to a window/page have the same name:•the variable "global" to the window/page will
be used in all the other processes of the win-dow/page and its controls, including the "local"procedures of the window/page.
•the variable "global" to the project will be usedin all the other processes.
• If a variable "global" to the project and a variable"local" to a process have the same name:•the "local" variable will be used in the process
where is was declared.• the variable "global" to the project will be used in
all the other processes.
• If a variable "global" to a window/page and avariable "local" to a process of this window/pagehave the same name:•the "local" variable will be used in the process
where is was declared.•the variable "global" to the window/page will be
used in all the other processes of the window/page and its controls (including the "local" pro-cedures of the window/page).
•none of these two variables will be used in therest of the project.
Exception: The rule for variable scope does notapply to the constants.
GLOBAL // All the declarations that follow // are global variablesSubscript is intCustomerName is string
Local // All the declarations that follow // are local variablesI is intCustomerFName is string
WLangage.book Page 65 Jeudi, 20. mars 2014 4:29 16

66 Part 2: Basic syntax of WLanguage
3. OPERATORS
3.1 Overview
The different operators are as follows:• Logical operators: Examples: AND, OR, NOT• Arithmetic operators: Examples: "+", "-", "*", "/",
"++", "--", "+=", "-="• Binary operators: Examples: BinaryAND, Bina-
ryOR, BinaryNOT and BinaryXOR• Comparison operators: Examples: "=", "~=", "<>",
"<=", ">=", "<", ">", "~~"• Operators on character strings: Examples: "+", "[["
et "]]"• Operator on address: &• Indirection operators for control and item: { and }• Punctuation operators: Examples: "(" and ")", "["
and "]", "," and "." and ":" and ";", "..", "…" and "//"
3.2 Logical operators
3.2.1 OverviewThe logical operators are:• AND and _AND_: Logical multiplication.• OR and _OR_: Logical addition.• NOT: Logical negation.The logical operators are used to perform logicaloperations and to build conditions.
3.2.2 Rules•True AND True: returns True•True AND False: returns False•True OR True: returns True•True OR False: returns True• NOT True: returns False
3.2.3 NotesNumeric variableIf a numeric variable is handled as a logical opera-tor (boolean), "0" is equivalent to False. Any othervalue is equivalent to True.
For example, the two following code lines are equi-valent:
The first syntax (IF TestNum THEN) should be pre-ferred to the second one.String variableA WLanguage error will occur if a string variable ishandled like a logical operator.For example, the following syntax, "IF ChTest THEN"will return an error at run time (but not when compi-ling the project).
PriorityThe operators AND and OR, _AND_ and _OR_ havethe same priority. To give priorities to these opera-tors, all you have to do is use brackets. For exam-ple:
Exceptions: In the SQL filters and in the SQL que-ries, the AND operator has priority over the OR ope-rator.
IF Customer.City = ... "Boston" AND ... Customer.Title = ... "Mister" THEN BostonMen ++ // Number of men living // in BostonENDIF Customer.City = ... "Boston" OR ... Customer.City = "New York" THEN BostonNewYork ++ // Number of customers living // either in Boston, or // in New YorkEND
IF TestNum THEN ...IF TestNum <> 0 THEN ...
IF (A = 2 AND B > 3) OR ... (A = 2 AND B < 0) THEN ...
WLangage.book Page 66 Jeudi, 20. mars 2014 4:29 16

Part 2: Basic syntax of WLanguage 67
For example: will be evaluated as follows:
3.3 Arithmetic operators
3.3.1 OverviewThe arithmetic operators are:• "+": Addition (numeric value or string).• "-": Subtraction (numeric value).• "*": Multiplication.• "/": Division.• "++": Incrementation (numeric value).• "--": Decrementation (numeric value).• "+=": Add a value to the variable or control (nume-
ric or text).• "-=": Subtract a value from the variable or control
(numeric).
3.3.2 Calculation rulesThe different calculations are performed withoutloss of precision and without being truncated. Theflow checks are performed when the result is assi-gned to a variable.
3.3.3 NotesDisplaying the resultThe result of the calculation cannot be directly dis-played by the following operators :• "++": Incrementation.
• "--": Decrementation.• "+=": Add a value to the variable or control (nume-
ric or text).• "-=": Subtract a value from the variable or control
(numeric).Therefore, this example generates an error duringthe compilation:
To display the result, perform the following modifi-cations:
Equivalence• j ++ is equivalent to j = j + 1• j - - is equivalent to j = j - 1• j += 3 is equivalent to j = j + 3• j - = 3 is equivalent to j = j - 3
We recommend that you use the following syn-taxes: "j ++", "j --", "j +=" and "j - =", which are fasterthan the usual syntaxes.
3.4 Binary operators
The operations on the binary values are performedonly:• with the WLanguage functions: BinaryAND, Bina-
ryOR, BinaryNOT, BinaryXOR• with specific operators: binary operators, offset
to the right or to the left operators, bit accessoperators.
3.4.1 Binary operatorsBinary AND, OR and exclusive ORThe following syntaxes can be used:• Binary AND: <Value 1> & <Value 2> • Binary OR: <Value 1> | <Value 2> • Exclusive binary OR: <Value 1> || <Value 2>
The type of result depends on the type of the ope-rands:
Condition1 AND Condition2 OR Condition3
(Condition1 AND Condition2) OR Condition3
n is int = 10Trace(n+=1)
n is int = 10n += 1Trace(n)
Value 2Value 1
4-byteinteger
8-byteinteger
Other
4-byteinteger
4-byteinteger
8-byteinteger
4-byteinteger
8-byteinteger
8-byteinteger
8-byteinteger
8-byteinteger
Other 4-byteinteger
8-byteinteger
8-byteinteger
WLangage.book Page 67 Jeudi, 20. mars 2014 4:29 16

68 Part 2: Basic syntax of WLanguage
Binary notThe syntax is as follows: ~ <Value> The type of result depends on the type of the ope-rand:
3.4.2 Shift operatorsOffset to the left:
Offset to the right:
Notes• The bits of < Value 1> are shifted from <Value 2>
bits to the right or to the left. For example:
Indeed, 4 in decimal corresponds to 0100 inbinary. Shifted from 1 bit to the left, we get 1000in binary that corresponds to 8 in decimal.Another example:
Indeed, 4 in decimal corresponds to 0100 inbinary. Shifted from 2 bits to the right, we get0001 in binary that corresponds to 1 in decimal.
• The bits that exceed the size of <Value 1> areignored. For example:
• If <Value 2> is greater than the size of <Value 1>(32 for a 4-byte integer and 64 for a 8-byteinteger), the result is always equal to 0. For exam-ple:
• The type of result depends on the type of the ope-rand:
3.4.3 Operator for direct accessAccess to a bitSyntax: <Value 1> [ <n> ] This syntax is used to read or modify the value ofthe <N> bit in the <Value 1> value.The counting of the bits starts from 1:• 1 to 32 for a 4-byte integer,• 1 to 64 for a 8-byte integer.If the value of <n> is incorrect, the operationreturns 0.Examples:
Access to a 1-byte, 2-byte or 4-byte integerSyntaxes:<Value 1> [ <n>, wlInt_1 ] <Value 1> [ <n>, wlInt_2 ]<Value 1> [ <n>, wlInt_4 ]These syntaxes are used to read or modify thevalue of the 1-byte, 2-byte or 4-byte integer in the<Value 1> value.Possible values for <n> depending on the type of <Value 1> :
If the value of <n> is incorrect, the operationreturns 0.
Operand Result
4-byte integer 4-byte integer
8-byte integer 8-byte integer
Other 8-byte integer
<Value 1> bitLeftShift <Value 2>bitLeftShift(<Value 1>, <Value 2>)
<Value 1> bitRightShift <Value 2>bitRightShift(<Value 1>, <Value 2>)
bitLeftShift(4,1) // Returns 8
bitRightShift(4,2) // Returns 1
bitLeftShift(4,30) // Returns 0bitLeftShift(4,4) // Returns 0
bitLeftShift(4,35) // Returns 0
Operand Value 1 Result
4-byte integer 4-byte integer
8-byte integer 8-byte integer
Other 8-byte integer
// Positions the fifth and // seventh bits to 1n is intn[5] = 1n[7] = True// Checks the value of bits 4, 5, 6 and 7IF n[4] THEN Trace(4) // not dis-playedIF n[5] THEN Trace(5) // displays 5IF n[6] THEN Trace(6) // not dis-playedIF n[7] THEN Trace(7) // displays 7
Value 1 wlInt_1 wlInt_2 wlInt_44-byteinteger
1 to 4 1 to 2 1
8-byteinteger
1 to 8 1 to 4 1 to 2
WLangage.book Page 68 Jeudi, 20. mars 2014 4:29 16

Part 2: Basic syntax of WLanguage 69
Access to the value of several bitsSyntaxes:<Value 1> [ TO <n> ] <Value 1> [ <n> TO ]
<Value 1> [ <n> TO <o> ]<Value 1> [ <n> ON <Number> ]These syntaxes are used to read or modify thevalue corresponding to the specified bits.
3.5 Comparison operators
3.5.1 OverviewThe comparison operators can be divided into seve-ral categories:
The comparison operators can be used with all thetypes of operands.The result of a comparison expression is a boolean.
3.5.2 DetailsFlexible equality and very flexible equalityThe flexible equality (~=) and the very flexible equa-lity (~~) operate on the character strings only(except for the fixed strings). These operators ena-ble you to:• make no difference between the uppercase cha-
racters and the lowercase characters,• ignore the space characters found before and
after the string whose test must be run,• ignore the lowercase accented characters,• ignore the space characters and the punctuation
characters inside the strings (very flexible equa-lity only)
HFSQL equivalence: To get a behavior equivalent tothe very flexible equality when performing a search
on a text key in a HFSQL file, you must configure thefollowing options when describing the item in theanalysis:
Equality and comparison: Real containing morethan 6 different decimal placesThe test of equality between two real numbers isrun according to the first 6 decimal places. Indeed,the rounding errors caused by the internal coding ofthe reals require a specific test.This test must be run by comparing the differencebetween the two values to test and a referencevalue. Depending on the type of your application,this value can be equal to 0.00001 or even less.This rounding management is not specific to Win-Dev.It is common to all the programming languages thathandle the reals in binary format.
Equality Strict equality: =Flexible equality: ~=Very flexible equality: ~~Starts with:
Comparison Different from: <>Less than or equal to: <=Greater than or equal to: >=Strictly less than: <Strictly greater than: >Starts with: [=
Interval for comparison
Strictly included between: Value1< x< Value2Included between: Value1 < x <= Value2 Value1 <= x < Value2Included between (including bounds) :Value1 <= x <= Value2Included between (including bounds) :Value1 TO Value2
"Dupond" = "DUPOND" // returns False"Dupond" ~= "DUPOND" // returns True" Dupond" ~= "DUPOND" // returns True" Dupond" ~= "Dupond" // returns True"Crème brûlée" ~= "Creme brulee" // returns True"Comp. S.A.R.L" ~~ "Ent SARL" // returns True
Diff, R1, R2 are realDiff = 0.00001IF Abs(1-(R1/R2)) < Diff THEN // R1 and R2 are equalELSE // R1 and R2 are differentEND
WLangage.book Page 69 Jeudi, 20. mars 2014 4:29 16
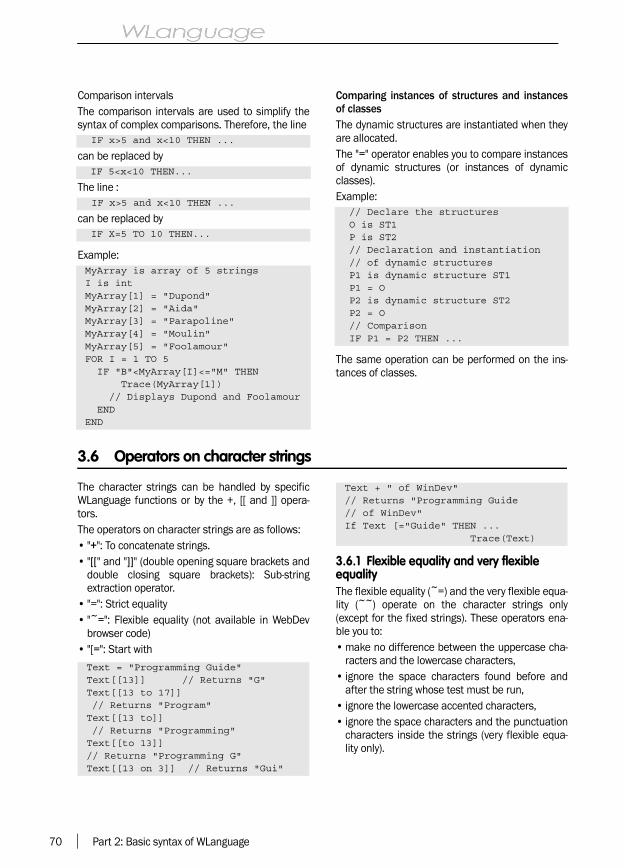
70 Part 2: Basic syntax of WLanguage
Comparison intervalsThe comparison intervals are used to simplify thesyntax of complex comparisons. Therefore, the line
can be replaced by
The line :
can be replaced by
Example:
Comparing instances of structures and instancesof classesThe dynamic structures are instantiated when theyare allocated.The "=" operator enables you to compare instancesof dynamic structures (or instances of dynamicclasses).Example:
The same operation can be performed on the ins-tances of classes.
3.6 Operators on character strings
The character strings can be handled by specificWLanguage functions or by the +, [[ and ]] opera-tors.The operators on character strings are as follows:• "+": To concatenate strings.• "[[" and "]]" (double opening square brackets and
double closing square brackets): Sub-stringextraction operator.
• "=": Strict equality• "~=": Flexible equality (not available in WebDev
browser code)• "[=": Start with
3.6.1 Flexible equality and very flexible equalityThe flexible equality (~=) and the very flexible equa-lity (~~) operate on the character strings only(except for the fixed strings). These operators ena-ble you to:• make no difference between the uppercase cha-
racters and the lowercase characters,• ignore the space characters found before and
after the string whose test must be run,• ignore the lowercase accented characters,• ignore the space characters and the punctuation
characters inside the strings (very flexible equa-lity only).
IF x>5 and x<10 THEN ...
IF 5<x<10 THEN...
IF x>5 and x<10 THEN ...
IF X=5 TO 10 THEN...
MyArray is array of 5 stringsI is intMyArray[1] = "Dupond"MyArray[2] = "Aida"MyArray[3] = "Parapoline"MyArray[4] = "Moulin"MyArray[5] = "Foolamour"FOR I = 1 TO 5 IF "B"<MyArray[I]<="M" THEN Trace(MyArray[1]) // Displays Dupond and Foolamour ENDEND
// Declare the structuresO is ST1P is ST2// Declaration and instantiation // of dynamic structuresP1 is dynamic structure ST1P1 = OP2 is dynamic structure ST2P2 = O// Comparison IF P1 = P2 THEN ...
Text = "Programming Guide"Text[[13]] // Returns "G"Text[[13 to 17]] // Returns "Program"Text[[13 to]] // Returns "Programming"Text[[to 13]]// Returns "Programming G"Text[[13 on 3]] // Returns "Gui"
Text + " of WinDev" // Returns "Programming Guide// of WinDev"If Text [="Guide" THEN ... Trace(Text)
WLangage.book Page 70 Jeudi, 20. mars 2014 4:29 16

Part 2: Basic syntax of WLanguage 71
HFSQL equivalence: To get a behavior equivalent tothe very flexible equality when performing a searchon a text key in a HFSQL file, you must configure thefollowing options when describing the item in theanalysis:
3.6.2 The [[ and ]] operatorThe [[ and ]] operator is used to extract and toreplace a sub-string.Some examples:• STRINGTOEXTRACT[[<Position>]]: Extracts a cha-
racter from a string according to its position.• EXTRACTSTRING[[<Position>]] = <New string>:
Replaces the character in the string by the newstring.
• STRINGTOEXTRACT[[<Start> to <End>]]: Extractsa character string from a string according to itsStart and End positions.
• STRINGTOEXTRACT[[<Start> to]]: Extracts a character string from the <Start> of thestring to the end of the string.
• STRINGTOEXTRACT[[to <End>]]: Extracts a character string from the beginning ofthe string to the <end> position in the string.
• STRINGTOEXTRACT[[<Start> on <Number>]]:Extracts a set number of characters based on thestart position and the specified number of cha-racters.
Caution: Be careful when you use the [[ and ]] ope-rators in procedures that handle character strings.You may modify your character strings withoutbeing aware of it.For example, the following procedure can modifypart of the string.
To avoid modifying the initial string, the parametermust be passed by value:• by using brackets around the parameter in the
call to the procedure
• by using the Local keyword in the header of theprocedure
3.6.3 Operators on the character strings and UNICODEThe available operators are as follows:• "+": To concatenate strings.• "[[" and "]]" (double opening square brackets and
double closing square brackets: Sub-stringextraction operator.
"+" operatorTwo UNICODE strings can be concatenated. A UNI-CODE string and an ANSI string cannot be concate-nated.Note: No compilation error is detected if the conca-tenation of two ANSI strings is assigned to a UNI-CODE string (and conversely). However, aWLanguage error will occur at run time.
"[[" and "]]" operatorAll the syntaxes of the [[ ]] operator are available forUNICODE strings.If the string passed in parameter is in ANSI format,the result returned by the [[ ]] operator will be inANSI format.If the string passed in parameter is in UNICODE for-mat, the result returned by the [[ ]] operator will bein UNICODE format.The position parameters and the length parame-ters are expressed in number of characters.Note: No compilation error occurs if the result ofthe [[ ]] operator on an ANSI string is assigned to aUnicode string (and conversely). However, a WLan-guage error will occur at run time.
3.6.4 Position in a character stringThe position of the first character is set to 1 (andnot to 0).Position returns the start position of a given cha-racter string inside another character string.
3.6.5 Functions of WLanguageThe character strings can also be handled by thefunctions:• Right.• Left.• Middle.
Procedure P(sString)IF sString then sString="5"//Call the procedure using the //following line: p(sVar[[3 to]])
WLangage.book Page 71 Jeudi, 20. mars 2014 4:29 16

72 Part 2: Basic syntax of WLanguage
3.7 Operator on address
The & operator returns the address of a variable ininteger format.
Syntax
<Result> = &<Variable name>
Notes• The & operator allows you to get the address of
all kinds of variables (simple of composite).• The & operator is mostly used to pass addresses
to CallDLL32.• The & operator does not return the address:
•of a control•of a HFSQL item
• The & operator displays an error when the projectis compiled then. Indeed, the addresses of thesetwo elements can change at any time.
• If a "Character string" must be passed by addressto CallDLL32, you must not use a String variable:the address of the string can change at any time.we recommend that you use the ASCIIZ Stringtype.
• If the variable is a local variable, the value retur-ned by the & operator must only be used in theprocess where the variable was declared.
• When the current process is ended, the addresswill be invalid and it must not be used anymore.
3.8 Indirection operators
The { and } operators allow you to access a control,a variable or a data file item by dynamically buildingthe name of the control, variable or file item.The { and } operators present several benefits:• pass a control name or an item name in parame-
ter• build the name of a control or item by program-
ming
Simple indirection
Indirection in a procedure
Indirection with variable
i is intz is ASCIIZ string on 50t is array of 10 realss is composed of Age is int Name is ASCIIZ string on 50ENDaddr is intaddr = &iaddr = &zaddr = &z + 2 //address of the 3rd //character of the stringaddr = &t //Start address of the //array (1st element)addr = &t[5] //address of 5th // elementaddr = &s //address of the //structure, therefore //address of s.ageaddr = &s.ageaddr = &s.name
{"NAME"} = CustName // is equivalent to NAME=CustName{"NAME"} = {"CU.CUSTNAMEI"} // is equivalent to NAME=CU.CUST-NAME{"WINCUST.NAME"} = CustName // is equivalent to // WINCUST.NAME=CustName{"WINCUST"+".NAME"} = CustName // is equivalent to // WINCUST.NAME=CustName
ControlName is stringControlName = "EDIT1" // EDIT1 is the name of the control// Call a procedure used to make // a control invisibleINVISIBLE(ControlName)PROCEDURE INVISIBLE(NControl){NControl} .. Visible = False
AliasName is stringAliasName = PreviousWin()// NAME is the name of the control// CustName is the value to assign{AliasName+".NAME"} = CustNameAbbrev is stringItemName is string{Abbrev+"+ItemName} = CustName{Abbrev+"."+ItemName} = {ControlName}
WLangage.book Page 72 Jeudi, 20. mars 2014 4:29 16

Part 2: Basic syntax of WLanguage 73
Indirection with a class
SyntaxSimple indirection{<Expression>}
<Expression>: is used to identify the control, varia-ble or item to handle. A WLanguage error occurs ifthis expression corresponds to an empty string ("").Indirection on a class member{<Expression>}<Expression>: is used to identify the member of theclass. If the member is:• global, use the following syntax: {"::Member-
Name"}• not global, use the following syntax: {":Member-
Name"}A WLanguage error occurs if this expression corres-ponds to an empty string ("").
Indirection by specifying the type of the element(optimizes the execution speed){<Expression>, <Type>}
<Expression>: is used to identify the control, varia-ble or item to handle. A WLanguage error occurs ifthis expression corresponds to an empty string ("").
<Type>: Constant used to specify the type of theelement sought:
When should I use the indirection?The indirection can be used for example:• To access the value of an element (control, varia-
ble, item ...)
• to use a property
Note: to designate the current object, use the fol-lowing keywords:
•Myself: the current control•MyWindow: the current window•MyPage: the current page•MyReport: the current report•MySource: the current data source•MyFile: the file that activated the current trigger.
3.9 Various operators
The various operators group the following opera-tors:• "(" and ")": The parentheses• "[" and "]": The brackets• ",": The comma• ".": The period• ":": The colon• ";": The semicolon
• "..": The double dot• "...": The triple dot• "//": The double bar
3.9.1 The bracketsThe brackets are used to:• group the different elements of an operation
while specifying the priority order. For example:
// Declare a class with // two membersMyClass is class Member1 is string Member2 is stringEND// Display the value of a memberGLOBAL PROCEDURE DisplayMember(... Number)// Retrieve the value of the // selected global memberValue is string = ... {"::Member"+Number}Info(Value)
indControl Element sought among the controls
indConnec-tion
Element sought among the connec-tions
indReport Element sought among the reports
indWindow Element sought among the windows
indFile Element sought among the data files
indGPW Element sought among the elementsof the user groupware
indLink Element sought among the links
indPage Element sought among the pages
indQueryPa-rameter
Element sought among the parametersof queries
IndItem Element sought among the items
IndVariable Element sought among the variables
{s_ControlName} = 10ControlValue = {s_ControlName}
{s_ControlName}..Height = 10
If (A-B)*5 THEN ....
WLangage.book Page 73 Jeudi, 20. mars 2014 4:29 16

74 Part 2: Basic syntax of WLanguage
• Specify the different parameters of a WLanguagefunction. For example:
3.9.2 The square bracketsThe square brackets are indexing operators. Theyare used to identify the indexed objects.Some examples:• Element of an Array HFSQL item. Exemple: Cus-
tomer.Address[1]• Element of an array defined in WLanguage.
Example: MyArray is array of 5 strings MyArray [1] = "Smith"• Window control (combo box, list box, array, radio
button, check box). Examples:•combo: MyCombo[1] = "Boston"•check box: checkbox[1] = True
3.9.3 The commaThe comma is used to separate:• different declarations of variables of the same
type performed on the same line. For example:
• The different parameters of a WLanguage func-tion. For example:
3.9.4 The semicolonThe semicolon is used to separate the different sta-tements written on the same line. For example:
3.9.5 ColonThe colon is used to access the members andmethods of the objects.A double colon is used to access the global mem-bers and the global methods of a class.
3.9.6 The dotThe dot is used to access a sub-element. Someexamples:• access to a window/page control: MyWin-
dow.DateEditControl• access to a global variable of a window/page:
MyWindow.gDuration• access to an item of a data file: Customer.Name• access to a table column: Table.Column1
3.9.7 The double dotThe double dot is used to access a property of acontrol, window, report, data file, item or variable.Some examples:
3.9.8 Triple dotThe "..." operator (triple dot) is used to continue alogical line over the next physical line. For example:
The "…" operator must necessarily be used at theend of a line (and not in the middle of a line).No character must be found after the "…" operator(apart from comments).From version 12, the "…" operator is no longerrequired to continue over the next line:• the parameters of functions or procedures• the right operands for the arithmetic and logical
operators.
3.9.9 The double slashThe double slash is used to comment out the textthat follows this sign. This text will be ignored whencompiling the code and when running the project.For example:
dCopyBlt(Image1, image2)
MyExample1, MyExample2 ... are strings
dCopyBlt(Image1, image2)
I is int;M is string
Scrollbar..MaxValue = 200ShippingCost..Title = ... "Shipping cost window"MyReport..BottomMargin = 20MyFont..Name = "Arial"
IF (FamilyCode="LV") AND ... (FamilyCode="MO") THEN ProcessENDCaption = "Enter the "+ ... "name of customer."
// Arithmetic operators // (+, -, /, *) and logical (AND, OR)n is int = 5 + 6
// Search in a stringMyString is string = ... "WinDev is great"IF Position(MyString, "W")<>0 THEN Info("Found") //ResultEND
WLangage.book Page 74 Jeudi, 20. mars 2014 4:29 16
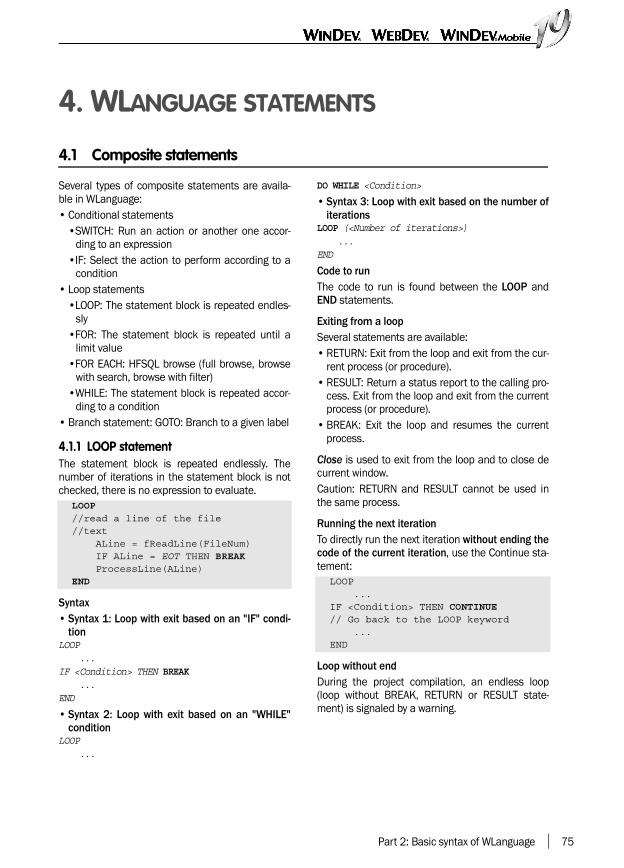
Part 2: Basic syntax of WLanguage 75
4. WLANGUAGE STATEMENTS
4.1 Composite statements
Several types of composite statements are availa-ble in WLanguage:• Conditional statements
•SWITCH: Run an action or another one accor-ding to an expression
•IF: Select the action to perform according to acondition
• Loop statements•LOOP: The statement block is repeated endles-
sly•FOR: The statement block is repeated until a
limit value•FOR EACH: HFSQL browse (full browse, browse
with search, browse with filter)•WHILE: The statement block is repeated accor-
ding to a condition• Branch statement: GOTO: Branch to a given label
4.1.1 LOOP statementThe statement block is repeated endlessly. Thenumber of iterations in the statement block is notchecked, there is no expression to evaluate.
Syntax• Syntax 1: Loop with exit based on an "IF" condi-
tionLOOP ...IF <Condition> THEN BREAK ...END
• Syntax 2: Loop with exit based on an "WHILE"condition
LOOP ...
DO WHILE <Condition>
• Syntax 3: Loop with exit based on the number ofiterations
LOOP (<Number of iterations>) ...END
Code to runThe code to run is found between the LOOP andEND statements.
Exiting from a loopSeveral statements are available:• RETURN: Exit from the loop and exit from the cur-
rent process (or procedure).• RESULT: Return a status report to the calling pro-
cess. Exit from the loop and exit from the currentprocess (or procedure).
• BREAK: Exit the loop and resumes the currentprocess.
Close is used to exit from the loop and to close decurrent window.Caution: RETURN and RESULT cannot be used inthe same process.
Running the next iterationTo directly run the next iteration without ending thecode of the current iteration, use the Continue sta-tement:
Loop without endDuring the project compilation, an endless loop(loop without BREAK, RETURN or RESULT state-ment) is signaled by a warning.
LOOP//read a line of the file//text ALine = fReadLine(FileNum) IF ALine = EOT THEN BREAK ProcessLine(ALine)END LOOP
...IF <Condition> THEN CONTINUE// Go back to the LOOP keyword ...END
WLangage.book Page 75 Jeudi, 20. mars 2014 4:29 16

76 Part 2: Basic syntax of WLanguage
4.1.2 GOTO statement
The GOTO statement is used to run a code identi-fied by a given label.Important: The label must be defined in the sameprocess as the GOTO statement.
Syntax...GOTO <Label name>... <Label name>: <Code of the label>
Code of the labelOnce the code of the label has been run, the pro-gram runs the code lines that directly follow thelabel.
Limits of labelsSeveral labels with the same name cannot be usedin the same process (or procedure).A warning is displayed during the compilation of theproject if a label is used by no GOTO statement.
Label and FOR and FOR EACH statementsThe GOTO statement does not allow you to access aFOR or FOR EACH statement block directly.This is why the following code triggers a compilationerror:
4.1.3 FOR statementThe statement block is repeated while a controlvariable is modified and compared to a limit value(before each beginning of the statement block).The statement block is run for each one of thevalues successively taken by the control variable.The initial value is assigned to the control variableduring the first entry in the FOR statement.
SyntaxFOR <Control variable> = <Initial value> TO <Final value> [STEP <x>] ...END
Code to runThe code to run is found between the FOR and ENDstatements.
Increment stepThe increment step of the FOR statement must beconstant. A warning is displayed during the projectcompilation if the increment step is likely to changeat each iteration.
Exiting from a FOR loopSeveral statements are available:• RETURN: Exit from the FOR loop and exits from
the current process (or procedure).• RESULT: Return a status report to the calling pro-
cess. Exit from the FOR loop and exit from thecurrent process (or procedure).
• BREAK: Exit the FOR loop and resume the currentprocess.
Close allows you to exit from the FOR loop and toclose the current window.Caution: RETURN and RESULT cannot be used inthe same process.
Running the next iterationTo directly run the next iteration without ending thecode of the current iteration, use the Continue sta-tement:
Res = fOpen(FileName, FOWriteIF Res = -1 THEN GOTO ERROPENRes = fWrite(Res,"Process OK")IF Res = -1 THEN GOTO ERRWRITE...RESULT TrueERROPEN : Info("File "+FileName+... " cannot be opened. "+... "Check its existence.")RESULT False ERRWRITE : Info("Unable to write"... "in + "+FileName)RESULT False
FOR Subscript = 1 TO 10 RestartLabel: Res ++ENDGOTO RestartLabel
FOR Subscript = 1 TO 10 Array[Subscript] = MyVariable + 10END
FOR<Control variable> = <Initial value> TO <Final value> [STEP <x>] ...IF <Condition> THEN CONTINUE // Go back to the FOR keyword ...END
WLangage.book Page 76 Jeudi, 20. mars 2014 4:29 16

Part 2: Basic syntax of WLanguage 77
In this case, the control variable is automaticallyincremented.
4.1.4 FOR EACH/FOR ALL statement, file browsing of data
The FOR EACH statement is used to perform diffe-rent types of HFSQL browse:• full browse,• full browse based on a specified key,• browse with filter,• browse with filter based on a specified key,• browse with filter on the search key.
Note: Both the FOR EACH and FOR ALL statementsare accepted. The FOR EACH statement will beused in this documentation but it can be replacedby FOR ALL.
SyntaxFull BrowseFOR ALL <File> [<Direction>] ...END
Note: The search key is automatically defined bythe HFSQL engine.
Full browse based on a specified keyFOR EACH <File> ON <Search item> [<Direc-tion>] ...END
Browse with filterFOR EACH <File> WHERE "<1st Condition> [AND/OR/NOT <2nd Condition> [AND/OR/NOT...<Nth Condition>]]" [<Direc-tion>] ...END
Note: The search key is automatically defined bythe HFSQL engine.
Browse with filter based on a specified keyFOR EACH <File> WHERE "<1st Condition> [AND/OR/NOT <2nd Condition> [AND/OR/NOT...<Nth Condition>]]" [<Direc-tion>] ON <Key Item> ...END
Browse with selection on the search key1. Comparison filter according to a valueFOR EACH <File> WITH ... <Key Item> [=][<=][>=] <Value> [<Direc-tion>] ...END
FOR EACH Customer // Add customers into the list ListAdd(CustomerList,... Customer.CustomerNum)END
FOR EACH Customer ON CustomerNum // Add customers into the list ListAdd(CustomerList,... Customer.CustomerNum)END
FOR EACH Customer WITH ... "CustomerCity = ’Boston’" ListAdd(CustomerList,... Customer.CustomerNum)ENDCity = "Paris"FOR EACH Customer WITH ... "CustomerCity = ’"+City+... "’ and CustomerAge >= 21" // Add the customers into the list ListAdd(CustomerList,... Customer.CustomerNum)END
FOR EACH Customer WITH ... "CustomerCity = "+... "’Boston’" ON CustomerNum // Add customers into the list ListAdd(CustomerList,... Customer.CustomerNum)ENDCity = "Paris"FOR EACH Customer WITH ... "CustomerCity = "+... "’"+City+"’ and CustomerAge >= 21"... ON CustomerNum // Add customers into the list ListAdd(CustomerList, ... Customer.CustomerNum)END
WLangage.book Page 77 Jeudi, 20. mars 2014 4:29 16

78 Part 2: Basic syntax of WLanguage
2. Comparison filter according to an interval ofvalues
FOR EACH <File> WITH <Key Item> = ... <Minimum Value> TO <Maximum Value> [<Direc-tion>] ...END
or
FOR EACH <File> WITH ... <Minimum Value> <= <Key Item> <= ... <Max Value> [<Direction>] ...END
Browse with "Start with" generic searchFOR EACH <File> WHERE <Key Item> [= ... <Beginning of sought value> [<Direction>] ...END
Code to runThe code to run is located between the FOR EACHand END statements.
Filter (syntaxes 2)The general syntax of a filter has the following for-mat:"<Item Name> <Operators> <Item Value>"
For example:
The supported operators depend on the type of theitems used in the condition:
Notes:• The constant strings must be enclosed in simple
quotes. For example: "CustomerName = ’"+Custo-mer+"’"
• <Item name> must only contain letters, digits andunderscore characters ("_"). If <Item name> con-tains other characters (quote, ...), the name of theitem must be enclosed in double quotes. Forexample: "e_mail@"]’fr’
// Comparison according to a// valueFOR EACH Customer WITH ... CustomerName = "Smith" // Add customers into the list ListAdd(CustomerList,... Customer.CustomerLastName)END// Comparison according to a// valueFOR EACH Order WITH ... OrderDate <= "12/31/2003" // Add orders into the list ListAdd(OrdList, Orders.OrderNum)END// Comparison according to a// list of valuesFOR EACH Order WITH OrdersDate = ... "01/01/2003" TO "12/31/2003" // Add orders into the list ListAdd(OrdList,Orders.OrderNum)END// Comparison according to an// interval of valuesFOR EACH Order WITH "01/01/2003" ... <= OrderDate <= "12/31/2003" // Add orders into the list ListAdd(OrdList, Orders.OrderNum)END
FOR EACH Customer WITH ... CustomerName [="From" // Add customers into the list ListAdd(CustomerList,... Customer.CustomerNum)END
"CustomerName > ’Smith’ and ... ZipCode = 34101 or CustomerAge >= 32"
<\> Different Valid for all the types
> Greater than Valid for all the types
>= Greater than orequal to
Valid for all the types
< Less than Valid for all the types
<= Less than orequal to
Valid for all the types
= Strictly equal to Valid for all the types
~= Almost equal to Valid for the "string" typesonly
] Contains Valid for the "string" typesonly
]= Starts with Valid for the "string" typesonly
WLangage.book Page 78 Jeudi, 20. mars 2014 4:29 16

Part 2: Basic syntax of WLanguage 79
• The comparisons between strings are performedaccording to the ASCII value of the charactersand not according to the lexicographic value (’a’ >’Z’).
• The binary memos and the composite keys can-not be part of an <Item Value>.
• If <Item value> contains a simple quote (or a dou-ble quote), this simple quote (or double quote)must be preceded by a backslash character.
Exiting from FOR EACH loopSeveral statements are available:• RETURN: Exits from the FOR EACH loop and exits
from the current process (or procedure).• RESULT: Return a status report to the calling pro-
cess. Exit from the FOR EACH loop and exit fromthe current process (or procedure).
• BREAK: Exit the FOR EACH loop and resume thecurrent process.
Close is used to exit from the FOR EACH loop and toclose the current window.Caution: RETURN and RESULT cannot be used inthe same process.
Behavior of the automatic file browse according tothe mode used to exit from the loopThe automatic data file browse operation behavesdifferently whether the operation ends automati-cally or is triggered by the EXIT, RETURN or Closecommands, ...
If the browse ends automatically:• the position in the data file before the browse
operation is restored.• the possible filter required for the browse is disa-
bled.
If the browse operation is stopped (BREAK,RETURN, RESULT, Close, ...) : • the position in the data file before the browse
operation is not restored.• the possible filter required for the browse is not
disabled. It must be disabled manually (HDeacti-vateFilter.
Running the next iterationTo directly run the next iteration without ending thecode of the current iteration, use the CONTINUE
statement:
4.1.5 FOR EACH/FOR ALL statement, parsing strings
The FOR EACH statement is used to browse thestrings according to different methods:• browsing sub-strings separated by a separator.• Browsing the occurrences of a string inside ano-
ther one
Note: Both FOR EACH and FOR ALL are accepted.The FOR EACH statement will be used in this docu-mentation but it can be replaced by FOR ALL.
SyntaxBrowse the sub-strings separated by a separatorFOR EACH STRING <Sub-string> OF ... <Initial String> ... [SEPARATED BY <Separator>] [<Direction>] ...END
This syntax is used to browse all the sub-strings ofthe <Initial string> separated by <Separator>. Thebrowse is not performed if <Initial string> is anempty string.For each iteration, the <Sub-string> variable is assi-gned with the current sub-string.The behavior is undefined if the initial string or theseparator is modified during the browse.Note: If <Initial string> ends with the separator,<Sub-string> returns a string empty at the end.Otherwise, <Sub-string> corresponds to the lastchecked-out element.
FOR EACH <File> ON <Key Item> ... IF <Condition> THEN CONTINUE // Go back to the FOR EACH keyword // Go to next record ...END
// Retrieves the list of libraries loaded in memoryLibraryList is string LibraryList = ListDLL()ALibrary is string// For each libraryFOR EACH STR\xeb NE ALibrary ... OF LibraryList SEPARATED BY CR
WLangage.book Page 79 Jeudi, 20. mars 2014 4:29 16

80 Part 2: Basic syntax of WLanguage
Browsing the occurrences of a string inside ano-ther string1. Without optionFOR EACH POSITION <Position> OF <Sought>... IN <Initial String> [<Direction>] ...END
This syntax will parse all the positions of the<Search> substring in <Initial String>. For each iteration, the <Position> variable is assi-gned with the position of the current sub-string.The behavior is undefined if the initial string or thesought string is modified during the browse.
2. With optionFOR EACH POSITION <Position> OF <Sought>... IN <Initial String> WITH <Options> ...END
This syntax parses all the positions of the <Search>substring in <Initial String>. For each iteration, the <Position> variable is assi-gned with the position of the current sub-string.The behavior is undefined if the initial string or thesought string is modified during the browse.
Code to runThe code to run is located between the FOR EACHand END statements.
Parsing Unicode strings<Sub-string>, <Initial string>, <Separator> and<Search> can correspond to:• ANSI strings.• UNICODE strings.However, the ANSI strings and the UNICODE stringscannot be used in the same syntax.
4.1.6 FOR EACH/FOR ALL statement, control browsing
FOR EACH is used to perform different types ofbrowse operations on controls (list boxes, tables,loopers):• Browsing the control elements.• Browsing the values of the selected elements.• Browsing the subscripts of the selected ele-
ments.
Note: Both FOR EACH and FOR ALL are accepted.The FOR EACH statement will be used in this docu-mentation but it can be replaced by FOR ALL.
SyntaxBrowsing the control elementsFOR EACH ROW OF <Control> ...END
This syntax is used to browse all the rows found in alist box, table or looper.For each row browsed:• <Control name> returns the subscript of the cur-
rent row.• <Control name>[<Control name>] returns all the
columns separated by TAB characters.• <Column name> returns the value of the column
for the row currently browsed.The browse operation has no effect on the currentselection.The behavior is undefined if the number of controlelements is modified during the browse.Note: When browsing the table rows, the display ofthis table is locked. MultitaskRedraw is ignored.
// The "C:Exports.TXT" file con-tains the list of exported products separated by ";"// Retrieve each productExportedProduct is string ExportedProduct = fLoadText(... "C:\Exports.TXT")FormerPos is intCurrentPos is int// For each productFOR EACH POSITION CurrentPos ... OF ";" IN ExportedProduct // Adds the product into ProductList ListAdd(ProductList, ... ExportedProduct[[FormerPos ... + 1 TO CurrentPos - 1]] // Store the position // FormerPos = CurrentPos END
// For each user listed in UserListFOR EACH ROW OF UserList // Send an email // SendMessage(ColName, ... // ColIDmail)END
WLangage.book Page 80 Jeudi, 20. mars 2014 4:29 16
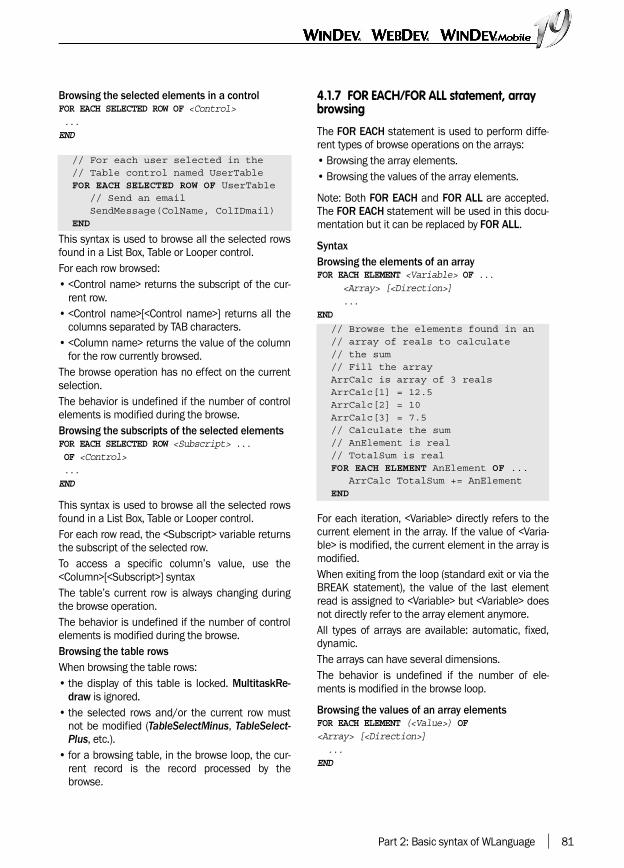
Part 2: Basic syntax of WLanguage 81
Browsing the selected elements in a controlFOR EACH SELECTED ROW OF <Control> ...END
This syntax is used to browse all the selected rowsfound in a List Box, Table or Looper control.For each row browsed:• <Control name> returns the subscript of the cur-
rent row.• <Control name>[<Control name>] returns all the
columns separated by TAB characters.• <Column name> returns the value of the column
for the row currently browsed.The browse operation has no effect on the currentselection.The behavior is undefined if the number of controlelements is modified during the browse.Browsing the subscripts of the selected elementsFOR EACH SELECTED ROW <Subscript> ... OF <Control> ...END
This syntax is used to browse all the selected rowsfound in a List Box, Table or Looper control.For each row read, the <Subscript> variable returnsthe subscript of the selected row.To access a specific column’s value, use the<Column>[<Subscript>] syntaxThe table’s current row is always changing duringthe browse operation.The behavior is undefined if the number of controlelements is modified during the browse.Browsing the table rowsWhen browsing the table rows:• the display of this table is locked. MultitaskRe-
draw is ignored.• the selected rows and/or the current row must
not be modified (TableSelectMinus, TableSelect-Plus, etc.).
• for a browsing table, in the browse loop, the cur-rent record is the record processed by thebrowse.
4.1.7 FOR EACH/FOR ALL statement, array browsing
The FOR EACH statement is used to perform diffe-rent types of browse operations on the arrays:• Browsing the array elements.• Browsing the values of the array elements.
Note: Both FOR EACH and FOR ALL are accepted.The FOR EACH statement will be used in this docu-mentation but it can be replaced by FOR ALL.
SyntaxBrowsing the elements of an arrayFOR EACH ELEMENT <Variable> OF ... <Array> [<Direction>] ...END
For each iteration, <Variable> directly refers to thecurrent element in the array. If the value of <Varia-ble> is modified, the current element in the array ismodified.When exiting from the loop (standard exit or via theBREAK statement), the value of the last elementread is assigned to <Variable> but <Variable> doesnot directly refer to the array element anymore.All types of arrays are available: automatic, fixed,dynamic.The arrays can have several dimensions.The behavior is undefined if the number of ele-ments is modified in the browse loop.
Browsing the values of an array elementsFOR EACH ELEMENT (<Value>) OF<Array> [<Direction>] ...END
// For each user selected in the // Table control named UserTableFOR EACH SELECTED ROW OF UserTable // Send an email SendMessage(ColName, ColIDmail)END
// Browse the elements found in an// array of reals to calculate// the sum// Fill the arrayArrCalc is array of 3 realsArrCalc[1] = 12.5ArrCalc[2] = 10ArrCalc[3] = 7.5// Calculate the sum// AnElement is real// TotalSum is realFOR EACH ELEMENT AnElement OF ... ArrCalc TotalSum += AnElementEND
WLangage.book Page 81 Jeudi, 20. mars 2014 4:29 16

82 Part 2: Basic syntax of WLanguage
For each iteration, the value of the elementbrowsed is assigned to the <Value> variable. If thevalue of <Value> is modified, the current element inthe array is not modified.All types of arrays are available: automatic, fixed,dynamic.The arrays can have several dimensions.The behavior is undefined if the number of ele-ments is modified in the browse loop.
4.1.8 FOR EACH/FOR ALL statement, brow-sing associative arrays
FOR EACH is used to perform different types ofbrowse operations on the associative arrays:• Browsing the elements of the associative array.• Browsing the values of the elements found in the
associative array.• Browse the "key" elements of the associative
array.
Note: Both FOR EACH and FOR ALL are accepted.The FOR EACH statement will be used in this docu-mentation but it can be replaced by FOR ALL.
SyntaxBrowsing the elements of an arrayFOR EACH ELEMENT <Variable> OF ... <Array> [<Direction>] ...END
For each iteration, <Variable> directly refers to thecurrent element in the array. If the value of <Varia-ble> is modified, the current element in the array ismodified.When exiting from the loop (standard exit or via theBREAK statement), the value of the last elementread is assigned to <Variable> but <Variable> doesnot directly refer to the array element anymore.
Browsing the elements of an array according tothe index keyFOR EACH ELEMENT <Variable>, <KeyVariable> OF<Array> [<Direction>] ...END
For each iteration:• <Variable> directly refers to the current element
in the array. If the value of <Variable> is modified,the current element in the array is modified.
• <KeyVariable> contains the value of the elementkey. This value is read-only and it cannot be modi-fied.
When exiting from the loop (standard exit or via theBREAK statement), the value of the last elementread is assigned to <Variable> but <Variable> doesnot directly refer to the array element anymore.
Browsing the <key> elements of the arrayFOR EACH ELEMENT <Variable> OF <Array> = <Key> [<Direction>] ...END
This syntax browses through all the array elementswith the specified <Key> value. For each iteration,<Variable> directly refers to the current element inthe array. If the value of <Variable> is modified, thecurrent element in the array is modified.This syntax is useful when browsing associativearrays with duplicates. In an associative arraywithout duplicates, the number of elementsbrowsed can be 0 or 1. In an associative array withduplicates, the number of elements browsed canbe 0 or N.The array elements are browsed in the order theywere added (no direction option).When exiting from the loop (standard exit or via theBREAK statement), the value of the last elementread is assigned to <Variable> but <Variable> doesnot directly refer to the array element anymore.
// Declare an // associative array of integers // Array indexed on strings // and without duplicatesaaIDPerCust is array ... associative of intaaIDPerCust["A"] = 55 // add the ID of customer "A"aaIDPerCust["B"] = 321 // add the ID of customer "B"aaIDPerCust["A"] = 56 // modify the ID of customer "A"// nIdentifier is int// browse all the identifiers// 56// 321FOR EACH ELEMENT nIdentifier ... OF aaIDPerCust ... Trace(nIdentifier)END
WLangage.book Page 82 Jeudi, 20. mars 2014 4:29 16

Part 2: Basic syntax of WLanguage 83
Browsing the values of the array’s key elementsaccording to the index keyFOR EACH ELEMENT <Variable> <KeyVariable> OF <Array> = <Key> [<Direction>] ...END
This syntax browses through all the array elementswith the specified <Key> value.For each iteration :• <Variable> directly refers to the current element
in the array. If the value of <Variable> is modified,the current element in the array is modified.
• <KeyVariable> contains the value of the elementkey. This value is read-only and it cannot be modi-fied.
This syntax is useful when browsing associativearrays with duplicates. In an associative arraywithout duplicates, the number of elementsbrowsed can be 0 or 1. In an associative array withduplicates, the number of elements browsed canbe 0 or N.The array elements are browsed in the order theywere added (no direction option).When exiting from the loop (standard exit or via theBREAK statement), the value of the last elementread is assigned to <Variable> but <Variable> doesnot directly refer to the array element anymore.
4.1.9 SWITCH statementThe SWITCH conditional statement is used tochoose the action that will be run according to thevalue of an expression.
Syntax
SWITCH <Comparison Variable> Case <Expression1> : <Action1> Case <Expression2> : <Action2.1> <Action2.2> Case <Expression3> <Action3> Case <Expression4>, <Expression5> : <Action4> Case <Expression6>, <Expression7> : <Action5> Case <Expression8>, <Expression9> <Action6>
Case <Min Expression> TO : <Action7> Case TO <Max Expression> : <Action8> Case <Min Expression> TO <Max Expression> : <Action9> Case = <Expression> : <Action10> Case ~ = <Expression> : <Action11> Case ~~ <Expression> : <Action12> Case [= <Expression> : <Action13> Case > <Expression> : <Action14> Case >= <Expression> : <Action15> Case < <Expression> : <Action16> Case <= <Expression> : <Action17> Case <Min Expression> <= * <= <Max Expres-sion> : <Action18> Case <Min Expression> < * <= <Max Expres-sion> : <Action19> Case <Min Expression> <= * < <Max Expres-sion> : <Action20> Case <Min Expression> < * < <Max Expression> : <Action21> ...[ CASE ELSE: <Action Case Else>OR OTHER CASE: <Action Other Case>OR OTHER CASE <Action Case Else> ]END
OTHER CASE keywordOTHER CASE must be the last statement used inSWITCH.BREAK SWITCH statementThe BREAK SWITCH statement allows you to exitfrom a SWITCH statement and to resume the cur-rent process.
4.1.10 IF statementThe conditional IF statement allows you to choosethe action to run according to a condition.
SWITCH Quantity CASE 1: Comment = "Promotions" CASE 2: Comment = "Buy"+ "two"+... "the second one is free" OTHER CASE: Comment = ""END
IF CustomerAge > 60 THEN... Elderly += 1ELSE IF Customer.Age > 18 THEN... Adult += 1 ELSE IF Customer.Age > 4 THEN... Child += 1 ELSE Baby += 1END
WLangage.book Page 83 Jeudi, 20. mars 2014 4:29 16

84 Part 2: Basic syntax of WLanguage
Syntax• Syntax 1 IF <Condition> THEN <Action if condition is True>[ELSE <Action if condition is False> ]END
• Syntax 2IF <Condition> THEN <Action if condition is True>[ELSE <Action if condition False> ]
• Syntax 3IF <Condition> THEN <Action if condition True>[ELSE <Action if condition is False> ]END
• Syntax 4IF <Condition> THEN <Action if condition is True> [ELSE <Action if condition is False>]
• Syntax 5IF <Condition 1> THEN <Action if condition 1 is True>[ELSE IF <Condition 2> THEN <Action if condition 2 is True> [ELSE IF <Condition 3> THEN <Action if condition 3 is True>[...]]]END
Condition<Condition> can take the following format:
•<Value> = <Expression>•<Value> < <Expression>•<Value> <= <Expression>•<Value> > <Expression>•<Value> >= <Expression>•<Value> = <Min Expression> TO <Max Expres-
sion>•<Min Expression> <= <Value> <= <Max Expres-
sion>•<Value> IN (<Expression 1>, <Expression 2>, ... ,
<Expression N>)Note: in this case, all the expressions are chec-ked.
•<Value> _IN_ (<Expression 1>, <Expression 2>,... , <Expression N>)
Note: In this case, as soon as an expression isFalse, none of the following expressions areevaluated.
Composite conditionThe AND and OR keywords are used to perform logi-cal operations and to create composite conditions.
The conditions made of AND and OR are entirelyevaluated. For example:
A > 10 AND B < 20
Even if the first condition (A > 10) is false, thesecond condition (B < 20) will be checked.
To optimize the evaluation of composed conditions,use the _AND_ and _OR_ keywords. Therefore, ifthe first condition (A > 10) is False, the second con-dition (B < 20) will not be evaluated.
ELSE without IFELSE cannot be used without the corresponding IFstatement.
4.1.11 WHILE statementIn a WHILE statement, the expression is evaluatedat each beginning of the statement block.The process loops as long as the condition expres-sion is True.The program will exit from the statement blockwhen the condition is False.
IF Customer.City = "Boston" ... AND Customer.Title = "Mister" THEN BostonMen ++ // Number of men living // in BostonENDIF Customer.City = "Boston"... OR Customer.City = "Miami" THEN BostonMiami ++ // Number of customers living // either // in Boston, or in MiamiEND
List = INIRead("Examples",... "","",IniFile)Keyword = ExtractString(List,Num,CR)WHILE Keyword <> "" nb = nb + 1 ExplName = INIRead(... "Projects installed",... Keyword,"",IniFile) Keyword = ExtractString(List,... Nb+1,CR)END
WLangage.book Page 84 Jeudi, 20. mars 2014 4:29 16

Part 2: Basic syntax of WLanguage 85
SyntaxWHILE <Condition> <Action if condition is True>END
Code to runThe code to run is located between the WHILE andEND statements.
Exiting from a WHILE loopSeveral statements are available:• RETURN: Exit from the WHILE loop and exit from
the current process (or procedure).• RESULT: Return a status report to the calling pro-
cess. Exit from the WHILE loop and exit from thecurrent process (or procedure).
• BREAK: Exit from the WHILE loop and resume thecurrent process.
Close is used to exit from the WHILE loop and toclose the current window.Caution: RETURN and RESULT cannot be used inthe same process.
Loop without endDuring the compilation of the project, a WHILE loopwithout an obvious end (loop without BREAK,RETURN or RESULT statement) is signaled by a war-ning.Running the next iterationTo directly run the next iteration without ending thecode of the current iteration, use the Continue sta-
tement:
Composite conditionThe AND and OR keywords are used to perform logi-cal operations and to create composite conditions.For example:
The conditions made of AND and OR are entirelyevaluated. For example:
A > 10 AND B < 20Even if the first condition (A > 10) is false, thesecond condition (B < 20) will be checked.
To optimize the evaluation of composed conditions,use the _AND_ and _OR_ keywords. Therefore, ifthe first condition (A > 10) is False, the second con-dition (B < 20) will not be evaluated.
4.2 Simple statements
The simple statements are as follows:• CONTINUE: Go to the beginning of the next itera-
tion without ending the code of the current itera-tion
• RESULT: Exit from the current process (or proce-dure) and return a status report
• RETURN: Exit from the statement block and exitfrom the current process (or procedure)
• BREAK: Exit from the statement block andresume the current process
4.2.1 CONTINUE statementThe CONTINUE statement is used to directly goback to the beginning of the next iteration withoutending the code of the current iteration.CONTINUE can be used in the following types ofloops:• FOR.• FOR EACH.• LOOP.• WHILE.
WHILE <Condition> ...IF <Condition> THEN CONTINUE // Go back to the WHILE keyword ...END
WHILE Price < 100 AND ... ProductType = "AA" ... NbProduct ++ // Number of products whose price // is less than // $100 and whose type is "AA"ENDWHILE Price < 100 OR Price > 500 NbProduct ++ // Number of products whose price // is included between 100 // and 500 €END
WLangage.book Page 85 Jeudi, 20. mars 2014 4:29 16

86 Part 2: Basic syntax of WLanguage
SyntaxFOR statementFOR <Control variable> = <Initial value> TO <Final value> [STEP <x>] ... IF <Condition> THEN CONTINUE ... END
If <Condition> is True:• The code found after the CONTINUE statement is
not run.• The loop is run from the beginning of the FOR sta-
tement.• The <Control variable> is incremented.FOR EACH statementFOR EACH <File> ON <Key Item> ...IF <Condition> THEN CONTINUE ...END
If <Condition> is True:• The code found after the CONTINUE statement is
not run.• The loop is run from the beginning of the FOR
EACH statement.• The move to the next record is automatically per-
formed.
LOOP statementLOOP ...IF <Condition> THEN CONTINUE ...END
If <Condition> is True:• The code found after the CONTINUE statement is
not run.• The loop is run from the beginning of the LOOP
statement.
WHILE statementWHILE <Condition 1> ...IF <Condition 2> THEN CONTINUE ...END
If <Condition 2> is True:• The code found after the CONTINUE statement is
not run.
• The loop is run from the beginning of the WHILEstatement.
4.2.2 RETURN statementThe RETURN statement is used to exit from a state-ment block and to exit from the current process (orprocedure).The RETURN statement can be used in:• a procedure.• a FOR loop.• a FOR EACH loop.• a LOOP loop.• a WHILE loop.
SyntaxProcedureProcedure <Procedure name> ([<Parameter>]) IF <Condition> THEN RETURN ... END
FOR statementFOR <Control variable> = <Initial value> TO <Final value> [STEP <x>] IF <Condition> THEN RETURNEND
FOR EACH statementFOR EACH <File> ON <Key Item> IF <Condition> THEN RETURNEND
LOOP statementLOOP ...IF <Condition> THEN RETURN ...END
WHILE statementWHILE <Condition 1> ...IF <Condition> THEN RETURN ...END
The following operations are performed if <Condi-tion> is True:• Exit from the statement block.• Exit from the current process (or procedure).
Other statements used to exit from a loop or from aprocedure
WLangage.book Page 86 Jeudi, 20. mars 2014 4:29 16

Part 2: Basic syntax of WLanguage 87
Several statements are available:• RESULT: Return a status report to the calling pro-
cess. Exit from the loop and exit from the currentprocess (or procedure).
• BREAK: Exit from the loop and resume the cur-rent process (or procedure).
Close is used to exit from the loop (or from the pro-cedure) and to close the current window.Caution: RETURN and RESULT cannot be used inthe same process.
4.2.3 RESULT statementThe RESULT statement is used to exit from the cur-rent process (or procedure) and to return a statusreport.The RESULT statement can be used in:• a procedure.• a FOR loop.• a FOR EACH loop.• a LOOP loop.• a WHILE loop.
SyntaxProcedureProcedure <Procedure name> ([<Parameter>]) IF <Condition> THEN RESULT <Value to return> ELSE RESULT <Value to return> END
FOR statementFOR <Control variable> = <Initial value> TO <Final value> [STEP <x>] IF <Condition> THEN RESULT <Value>END
FOR EACH statementFOR EACH <File> ON <Key Item> ... IF <Condition> THEN RESULT <Value>END
LOOP statementLOOP ...IF <Condition> THEN RESULT <Value to Return> ...END
WHILE statementWHILE <Condition 1> ... IF <Condition> THEN RESULT <Value> ...END
The following operations are performed if <Condi-tion> is True:• Return a status report to the calling process.• Exit from the statement block.• Exit from the current process (or procedure).Other statements used to exit from a loop or from aprocedureSeveral statements are available:• RETURN: Exit from the loop and exit from the cur-
rent process (or procedure).• BREAK: Exit from the loop and resume the cur-
rent process (or procedure).
Close is used to exit from the loop (or procedure)and to close de current window or page.Caution: RETURN and RESULT cannot be used inthe same process.
4.2.4 BREAK statementBREAK is used to exit from a statement block andto run the rest of the current process.The BREAK statement can be used in the followingtypes of loops:• FOR.• FOR EACH.• LOOP.• WHILE.
Note: The BREAK statement cannot be used to exitfrom a procedure. Use the RETURN and RESULTkeywords.
SyntaxFOR statement
FOR <Control variable> = <Initial value> TO <Final value> [STEP <x>] ... IF <Condition> THEN BREAK ...END<Rest of the process>
WLangage.book Page 87 Jeudi, 20. mars 2014 4:29 16

88 Part 2: Basic syntax of WLanguage
FOR EACH statement
FOR EACH <File> ON <Key Item> ... IF <Condition> THEN BREAK ...END<Rest of the process>
LOOP statement LOOP ...IF <Condition> THEN BREAK ...END<Rest of the process>
WHILE statementWHILE <Condition> ...IF <Condition> THEN BREAK ...
END<Rest of the process>
The following operations are performed if <Condi-tion> is True:• Exit from the statement block.• Runs the rest of the current process.
Other statements used to exit from a loopSeveral statements are available:• RETURN: Exit from the loop and exit from the cur-
rent process (or procedure).• RESULT: Return a status report to the calling pro-
cess. Exit from the loop and exit from the currentprocess (or procedure).
Close is used to exit from the loop and to close decurrent window.Caution: RETURN and RESULT cannot be used inthe same process.
WLangage.book Page 88 Jeudi, 20. mars 2014 4:29 16

Part 2: Basic syntax of WLanguage 89
5. RESERVED WORDS
Several WLanguage words are keywords, used toperform some specific actions:
5.1 External
The EXTERN keyword is used to:• include a text file containing WLanguage com-
mands in an application (see use 1).• declare an external object (see use 2).
Use 1: including a text file in an application/siteIncluding a text file with EXTERN has the sameeffect than copying a text file in the code editor.
SyntaxEXTERN <File Name>
The file name corresponds to the name of the textfile containing WLanguage code that must be inclu-ded in the application/site. This is a standard textfile, created by any text editor.A full path can be specified ("C:\WDPro-ject\MyConst.wl" for instance). If the path is notspecified, the file will be sought:• in the directory of the project.• in the "Personal\Extern" directory of
WinDev/WebDev. Including constantsThe inclusion of files is very useful to describesome constants common to several projects orused by the operating system. Use EXTERN toinclude in the code a file containing the commonconstants.
Several files defining the constants are suppliedwith WinDev/WebDev:• WinConst.wl: Standard constants of Windows.• Limits.wl: Constants corresponding to the limits
of the WinDev/WebDev data types.• ListeDefinitionHF.wl: HFSQL constants used for
the log process.• Except.wl: Constants used for managing the
exceptions• KeyConst.wl: Standard constants of Windows
used for the keyboard keys.These constants can be used by KeyPressed, inthe "Key Down" or "Key Up" optional processeswith the _EVE.wParam variable.
Use 2: Declaring an external objectEXTERN is used to declare a variable that will existonly when the application/site is run.For example, EXTERN can be used to handle a win-dow/page found in an external library (loaded byLoadWDL).
SyntaxEXTERN <Name of External Object>
<Name of External Object> corresponds to thename of the external object (file, variable,constant, ...) to declare.
• External • MyWindow• MyPage • MySource• Modulo • MySelf
• MyPopupControl • MyReport• MyFile • MyParent• STOP
// Include the file named // "WinConst.wl" // Standard constants of Windows EXTERN "WinConst.wl"
EXTERNMyWindowLoadWDL("User1.WDL")Open(MyWindow)
WLangage.book Page 89 Jeudi, 20. mars 2014 4:29 16

90 Part 2: Basic syntax of WLanguage
5.2 MyWindow
MyWindow is used to handle the current window.When the window is run, MyWindow is replaced bythe window (and not by the name of the window).Therefore, MyWindow can be used like a window.Benefit: MyWindow enables you to write local code(control, button, ...) or global code (global proce-dure, class, ...) that is independent of the currentwindow.
SyntaxMyWindow
Handling the current windowMyWindow is always replaced by the current win-dow. For example:• Using the ..Title property
• Passing a parameter:
MyWindow can only be used in the processes thathandle the current window (in the processes asso-ciated with a control, a window, ...). MyWindow can-not be used in a report. Using MyWindow in a procedureMyWindow can be used in a local procedure or in aglobal procedure only if the procedure handles thecurrent window. In this case, MyWindow refers tothe current window.For a local procedure, MyWindow corresponds tothe window to which the procedure belongs.
WLanguage functions and current windowTo specify the current window in the WLanguagefunctions that accept a window name in parameter,use:• an empty string.• the MyWindow keyword directly.
5.3 MyPage
MyPage is used to handle the current page. Whenthe page is run, MyPage is replaced by the page(and not by the name of the page). Then, MyPagecan be used like any page.Benefit: MyPage enables you to write local code(control, button, ...) or global code (global proce-dure, class, ...) that is independent of the currentpage.
SyntaxMyPage
Handling the current pageMyPage is always replaced by the current page. Forexample:• Using the ..Title property
• Passing a parameter:
MyPage can only be used in the processes thathandle the current page (processes associated witha control, with a page, ...). MyPage cannot be usedin a report.Using MyPage in a procedureMyPage can be used in a (local or global) procedureonly if the procedure handles the current page. Inthis case, MyPage refers to the current page.For a local procedure, MyPage corresponds to thepage to which the procedure belongs.WLanguage functions and current pageTo specify the current page in the WLanguage func-tions that accept a page name in parameter, use:• an empty string.• MyPage directly.
// Retrieve the title of the current windowWindowTitle = MyWindow..Title
MyWindow..Title = ... "Enter your data"CurrentTitle = MyWindow..Title
CallProcedure(MyWindow)
// Retrieve the title of the current pagePageTitle = MyPage..Title
MyPage..Title = ... "Enter your data"CurrentTitle = MyPage..Title
CallProcedure(MyPage)
WLangage.book Page 90 Jeudi, 20. mars 2014 4:29 16

Part 2: Basic syntax of WLanguage 91
5.4 MySource
The MySource keyword is used to handle the cur-rent data source (file, view or query). When the pro-ject is run, this keyword is automatically replaced bythe current data source.Benefit: MySource enables you to:• make the code independent of the current data
source.• access the value of an item of the current record
in the current data source.• retrieve the name of the data source to perform a
HFSQL process.
SyntaxMySource
LimitMySource can only be used in the processes asso-ciated with:• a report.• a browsing table.
5.5 Modulo
Returns the remainder of a division.Note: Modulo can be used as a keyword or as aWLanguage function.
SyntaxModulo function<Division Remainder> = Modulo ... (<<Dividend>,<Divisor>>)
Modulo keyword<Division Remainder> = <Dividend> ... Modulo <Divisor>
5.6 MySelf
MySelf is used to handle the current control. Whenthe project is run, MySelf is replaced by the control(and not by the name of the control). Then, MySelfis used like a control.
Benefit: MySelf enables you to write local code(control, button, ...) or global code (global proce-dure, class, ...) that is independent of the currentcontrol.
SyntaxMySelf
Handling the current controlMySelf is always replaced by the current control.For example:• Retrieving the value of the current control:
• Modifying the value of the current control:
• Using a property (Caption property for example):
// Retrieve the name of the current data source for the report DataSource = MySource..Name
// Retrieve the name of the customer currently printedIF MySource.CustName = "Martin" THEN TotalBT..BrushColor = iLightRedEND
// Retrieve the remainder of the division// DivisionReminder = Modulo(21,4) // DivisionRemainder is equal to 1// Equivalent: DivisionReminder = 21 Modulo 4
-- whenever a combo box is modified// Call the UpperMask procedureUpperMask() --UpperMask procedure// Mask: 1st letter uppercase // (editable combo box)Procedure UpperMask ()Value = MySelfIF Size(Value) > 1 THEN CursorPos = MySelf..Cursor MySelf = ...
Upper(Value[[1]])+... Lower(Value [[2 to Length(... Value)]]) MySelf..Cursor = CursorPosEND
ControlValue = MySelf
MySelf = "Smith"
MySelf..Caption = "Name of custo-mers"ControlCaption = MySelf..Caption
WLangage.book Page 91 Jeudi, 20. mars 2014 4:29 16

92 Part 2: Basic syntax of WLanguage
• Passing a parameter:
A WLanguage error occurs if there is no currentcontrol.
Using MySelf in a procedureMySelf can be used in a local procedure or in a glo-bal procedure only if the procedure is called in aprocess associated with a control. In this case,MySelf refers to the current control.
Myself is used to make a procedure "generic": thename of the control is not spelled out. This proce-dure can be called by several controls.
WLanguage functions and current controlTo specify the current control in the WLanguagefunctions that accept a control name in parameter,use:• an empty string.• Myself directly.
5.7 MyPopupControl
MyPopupControl is used to handle the control thatopened a popup window. At run time, MyPopupCon-trol is replaced by:• the control that opened the popup window (which
means the control from which OpenPopup orOpenPopupPosition was called)
• the control specified in OpenPopupPosition if thedisplay mode was set to poAccordingToControl.
In any case, MyPopupControl is replaced at runtime by the corresponding control (and not by thename of the control). Then, MyPopupControl isused like a control.Benefit: MyPopupControl enables you to write localcode (control, button, ...) or global code (global pro-cedure, class, ...) that is independent of the currentpopup window.
SyntaxMyPopupControl
Handling the control that opened the popup win-dowMyPopupControl is always replaced by the controlthat opened the popup window. Therefore, it can behandled from the code of the popup window.
For example:
Passing a parameter
MyPopupControl can only be used in the processesthat handle the current popup window (in the pro-cesses associated with a control for example).MyPopupControl cannot be used in a report or in awindow that is not a popup report or a popup win-dow.Using MyPopupControl in a procedureMyPopupControl can be used in a local or globalprocedure only if the procedure is called in a pro-cess associated with a control of the popup windowor in a process of the popup window. In this case,MyPopupControl refers to the control that openedthe popup window.MyPopupControl is used to make a procedure"generic": the name of the control is not spelled out.This procedure can be called by several controls.WLanguage functions and current windowTo specify the control that opened the currentpopup window in the WLanguage functions thataccept a control name in parameter, use MyPopup-Control directly.
CallProcedure(MySelf)
If MyPopupControl..Type = ... typButton THEN MyPopupControl..Caption = ... "Selection in progress"END
CallProcedure(MyPopupControl)
WLangage.book Page 92 Jeudi, 20. mars 2014 4:29 16

Part 2: Basic syntax of WLanguage 93
5.8 MyReport
MyReport is used to handle the current report.When running the project, MyReport is replaced bythe report and not by the name of the report. MyRe-port is then used like a report.Benefit: MyReport enables you to write some localcode (control, item, ...) or some global code (globalprocedure, class, ...) that is independent of the cur-rent report.
SyntaxMyReport
Handling the current reportMyReport is always replaced by the current report.
For example:• Using a property (BottomMargin for example):
• Passing a parameter:
MyReport can only be used in the processes thathandle the current report (processes associatedwith a control, an item, ...). MyReport cannot beused in a window.
Using MyReport in a procedureMyReport can be used in a local or global proce-dure only if the procedure handles the currentreport. In this case, MyReport refers to the currentreport.For a local procedure, MyReport corresponds to thereport to which the procedure belongs.
5.9 MyFile
In a trigger, MyFile is used to identify the data filethat releases the trigger. At run time, this keyword isautomatically replaced by the current data file.
Benefit: MyFile enables you to create some generictriggers, without having to make indirections on theH.FileName variable. This allows you to handle thedata file, its properties or its items.
5.10 MyParent
MyParent is used to handle:• the current supercontrol from an element of the
supercontrol. When running the window or the page, MyParentis replaced by the supercontrol (and not by thename of the supercontrol). Then, MyParent isused like a supercontrol.Benefit: MyParent enables you to make the codeof the supercontrol controls (control, button, ...) orthe code of the functions associated with thesupercontrol independent of the supercontrolname.
• the current report from one of the report controls.
• the current window/page from one of the con-trols of this window/page.
// Retrieve the name of the current report MyReport = MyReport..Name
MyReport..BottomMargin = 15ResMargin = MyReport..BottomMargin
CallProcedure(MyReport)
// Code of selection buttonMyFile=fSelect(... fExtractPath(... FileName, fDirectory), ... fExtractPtah(FileName, ... fFileName+fExtension), ... "Select a file", ... "All files (*.*)"+TAB+... "*.*", "")// The value of the supercontrol // corresponds // to the selected fileMyParent..Value = FileName
WLangage.book Page 93 Jeudi, 20. mars 2014 4:29 16

94 Part 2: Basic syntax of WLanguage
SyntaxMyParent
Handling the current supercontrolMyParent is always replaced by the current super-control. For example, passing a parameter:
MyParent can only be used in the processes that
handle the current supercontrol (processes asso-ciated with a control found in the supercontrol, withthe procedures associated with the supercontrol).Using MyParent in a procedureMyParent can be used in a procedure associatedwith the current supercontrol. In this case, MyPa-rent refers to the current supercontrol.
5.11 STOP (calling the debugger)
STOP is used to call the WLanguage debuggerwhen running a test in the editor (see the onlinehelp for more details). Once this keyword has beencalled, the current test is run in the debugger.
SyntaxStart the debuggerSTOP
Starting the debugger with conditionSTOP IF <Condition>
Start mode of the debuggerTo start the debugger during a test, you can use:• STOP in the code editor.
• a breakpoint in the code editor ("Edit .. Break-point" or [Ctrl] [B] shortcut, mouse click inside themargin).
• the [Ctrl][Break] key combination when runningthe test (except in WebDev).
Tracing and debugging a projectTo trace a project from the beginning of its execu-tion, on the "Project" pane, in the "Test mode"group, click "Test mode" and select "Trace the pro-ject" ([Alt][F9] shortcut).
ExecutableSTOP has no action in the code of an executable.
CallProcedure(MyParent)
// Window openingOpen(EditWindow)STOP // Start the debugger
WLangage.book Page 94 Jeudi, 20. mars 2014 4:29 16

Part 2: Basic syntax of WLanguage 95
6. PROCEDURE AND FUNCTION
6.1 Overview
A procedure is used to associate an identifier witha statement block. Then, the procedure can be cal-led in a process.A function is used to define a sub-program that per-forms several statements before returning a valueto the calling program.
Difference between a procedure and a function:• a procedure returns no result.• a function returns a result.
In WLanguage, there is no distinction between theprocedures and the functions. The procedures andthe functions are managed in the same way. A pro-cedure, like a function, may (or may not) return aresult.
The procedures and the functions can have a fixedor variable number of parameters.The declaration syntax is the same for the procedu-res and for the functions. See “Declaring a proce-dure/a function”, page 98 for more details.The calling syntax is the same for the proceduresand for the functions. See “Calling a procedure/function”, page 99 for more details.You have the ability to create overloaded procedu-res. See “Overload a WLanguage function”,page 101 for more details.
A procedure (or a function) can be global or local.See the next paragraph for more details.
6.2 Global and local procedure/function
6.2.1 DefinitionTwo types of procedures are available :• Global procedure: can be used in all the proces-
ses of the project. This global procedure is storedin the project.
• Local procedure: can be used in all the proces-ses related to the object (window, page or report)where the procedure was declared. This local pro-cedure is stored in the object.
Important: Do not declare two procedures with thesame name (especially a global procedure and alocal procedure).Reminder: WLanguage does not differentiatebetween procedures and functions. The syntaxesfor declaring and using the procedures also applyto the functions.
6.2.2 Global procedureGlobal procedures and sets of proce-dures
The global procedures are stored in sets of proce-dures, associated with the project.The global procedures declared in the project ini-tialization process can be called from any process:• of the project.
• of the windows/pages (processes of the window/page, of its controls and associated local proce-dures).
• of the reports (processes of the report, its asso-ciated controls and associated local procedures).
Advice: If a procedure is used by only one window/page, it is better to declare this procedure as localto the window/page. The window/page is then"independent".
Global server and browser procedu-res
In WebDev, a project corresponding to a dynamicsite contains at least two sets of procedures (a "ser-ver" one and a "browser" one).During the project creation:• the set of server procedures is named "Global
procedures of <Project Name>" (".WDG: file) bydefault
• the set of default browser procedures is named"Global procedures of <Project Name>_Browser"(".WDWN" file)
Note: a set of global browser procedures is conver-ted into a JavaScript set of procedures. This set ofJavascript procedures is saved in the "<ProjectName>_WEB" directory and it is named "<ProjectName>.JS".
WLangage.book Page 95 Jeudi, 20. mars 2014 4:29 16
96 Part 2: Basic syntax of WLanguage
Limit: The global server procedures cannot call theglobal browser procedures (and conversely).
Creating a global procedure1. From the code editorTo create a global procedure from the code editor:• Method 1: On the "Code" pane, in the "Procedure"
group, expand "New" and select the "New globalprocedure" option ([Shift] [F4] keyboard shortcut).
• Method 2: Select "Create a procedure .. Create anempty global procedure" in the popup menu.
In WebDev:• If the current code is a server code, the global
procedure is created in the set of server procedu-res. If the current code is a browser code, the glo-bal procedure is created in the set of browserprocedures.
• To directly create a global server procedure, onthe "Code" pane, in the "Procedure" group,expand "New" and select "New global (server) pro-cedure".
• To directly create a global browser procedure, onthe "Code" pane, in the "Procedure" group,expand "New" and select "New global (browser)procedure".
Note: To transform a section of code already ente-red into a global procedure:1. Select the corresponding code.2. Select "Create a procedure .. Create a global pro-cedure containing the selected code" from thepopup menu.3. Specify the name of the procedure. The proce-dure is created, the corresponding code is replacedby the call to the procedure with the necessaryparameters.
2. From the "Project explorer" paneTo create a global procedure from the "Projectexplorer" pane:1. Select the "Procedures" folder.2. Select the requested set of procedures.3. Display the popup menu of the set of proceduresand select "New global procedure".4. Enter the name of the new global procedure andvalidate.
Note: you can display the global procedure list inthe project explorer by double-clicking the "Proce-dure" folder ([Ctrl] [F8] keyboard shortcut) in thecode editor.
Deleting a global procedure1. From the code editorTo delete a global procedure from the code editor:1. Click the procedure bar in the code editor.2. Select "Delete" from the popup menu.
2. From the "Project explorer" paneTo delete a global procedure from the "Projectexplorer" pane:1. Select the "Procedures" folder.2. Select the requested set of procedures.3. Display the popup menu of the set of proceduresand select "Delete".
Test of a global procedure1. From the code editorTo run the test of a global procedure:1. Display the global procedure in the editor.2. Click the [GO] button.3. The description window of the test of the proce-dure is displayed. This window is used to:
•Enter the different parameters of the proce-dure.
•Run the test of the procedure ([Run the proce-dure test] button).
•Check the return value.2. From the "Project explorer" paneTo run the test of a global procedure:1. Select the "Procedures" folder in the projectexplorer.2. Select the name of the global procedure whosetest must be run.3. Select "Run the procedure test" from the popupmenu.4. The description window of the test of the proce-dure is displayed. This window is used to:
•Enter the parameters of the procedure.•Run the test of the procedure ([Run the proce-
dure test] button).•Check the return value.
Public or private global procedureBy default, a global procedure is public: it can beaccessed from any piece of code.In some cases, it may be useful to restrict theaccess to a global procedure by making it "Private".In this case, the global procedure can only beaccessed from another global procedure found inthe set of procedures.
WLangage.book Page 96 Jeudi, 20. mars 2014 4:29 16

Part 2: Basic syntax of WLanguage 97
To modify the access mode to a global procedure:1. Select the global procedure in the "Project Explo-rer" pane.2. In the popup menu of the procedure, select thenew access mode:• public.• private.The color of the procedure bar changes accordingto its access mode:• bar start is red: private procedure.• bar start is normal: public procedure.
6.2.3 Local procedure
Procedures local to a window/pageThe local procedures declared in a window/pagecan be called from all the processes:• of the window/page.• of the controls of the window/page.• of the local procedures associated with the win-
dow/page.These procedures are stored in the window/page.
Caution:• The local procedures of a window cannot be used
by its sibling windows.• The local procedures declared in a child window
cannot be used in its parent window.
Procedures local to a reportThe local procedures declared in a report can becalled from all the processes:• of the report.• of the report controls.• of the local procedures associated with the
report.
These procedures are stored in the report.
Creating a local procedure1. From the code editor:To create a procedure local to the current elementfrom the code editor:• Method 1: On the "Code" pane, in the "Procedure"
group, expand "New" and select "New local proce-dure" ([F4).
In WebDev: - To create a local server procedure, on the "Code"pane, in the "Procedures" group, expand "New"and select "New local procedure (Server)". - To create a local browser procedure, on the"Code" pane, in the "Procedures" group, expand"New" and select the "New local procedure (Brow-ser)" option.
• Method 2: Select "Create a procedure .. Createan empty local procedure" in the popup menu.In WebDev: - To create a local server procedure, select"Create a procedure .. Create a local procedure(Server)". - To create a local browser procedure, select"Create a procedure .. Create a local procedure(Browser)".
Note: to transform a section of code that is alreadyentered in a local procedure:1. Select the corresponding code.2. Select "Create a procedure .. Create a procedurecontaining the selected code" from the popupmenu.3. Specify the name of the procedure. The proce-dure is created, the corresponding code is replacedby the call to the procedure with the necessaryparameters.If the selected code is a server code, the createdprocedure will be a server procedure. If the selec-ted code is a browser code, the created procedurewill be a browser procedure.
2. From the project explorer:To create a local procedure from the "Project explo-rer" pane:1. Select the element associated with the local pro-cedure (window, page, report, ...).2. Expand the options of the element and select"Local procedures".3. Display the popup menu and select "New localprocedure".4. Enter the name of the new local procedure andvalidate.
Note: you can display the local procedure list in theproject explorer by double-clicking the "Local Proce-dures" folder of the element ([Ctrl] [F8] keyboardshortcut) in the code editor.
WLangage.book Page 97 Jeudi, 20. mars 2014 4:29 16
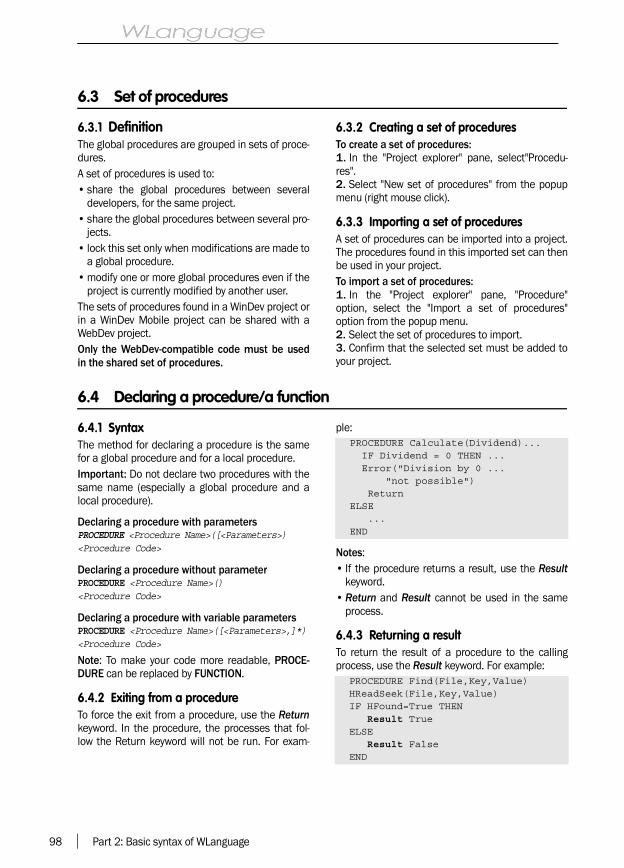
98 Part 2: Basic syntax of WLanguage
6.3 Set of procedures
6.3.1 DefinitionThe global procedures are grouped in sets of proce-dures.A set of procedures is used to:• share the global procedures between several
developers, for the same project.• share the global procedures between several pro-
jects.• lock this set only when modifications are made to
a global procedure.• modify one or more global procedures even if the
project is currently modified by another user.The sets of procedures found in a WinDev project orin a WinDev Mobile project can be shared with aWebDev project.Only the WebDev-compatible code must be usedin the shared set of procedures.
6.3.2 Creating a set of proceduresTo create a set of procedures:1. In the "Project explorer" pane, select"Procedu-res".2. Select "New set of procedures" from the popupmenu (right mouse click).
6.3.3 Importing a set of proceduresA set of procedures can be imported into a project.The procedures found in this imported set can thenbe used in your project.To import a set of procedures:1. In the "Project explorer" pane, "Procedure"option, select the "Import a set of procedures"option from the popup menu.2. Select the set of procedures to import.3. Confirm that the selected set must be added toyour project.
6.4 Declaring a procedure/a function
6.4.1 SyntaxThe method for declaring a procedure is the samefor a global procedure and for a local procedure.Important: Do not declare two procedures with thesame name (especially a global procedure and alocal procedure).
Declaring a procedure with parametersPROCEDURE <Procedure Name>([<Parameters>)<Procedure Code>
Declaring a procedure without parameterPROCEDURE <Procedure Name>()<Procedure Code>
Declaring a procedure with variable parametersPROCEDURE <Procedure Name>([<Parameters>,]*)<Procedure Code>
Note: To make your code more readable, PROCE-DURE can be replaced by FUNCTION.
6.4.2 Exiting from a procedureTo force the exit from a procedure, use the Returnkeyword. In the procedure, the processes that fol-low the Return keyword will not be run. For exam-
ple:
Notes:• If the procedure returns a result, use the Result
keyword.• Return and Result cannot be used in the same
process.
6.4.3 Returning a resultTo return the result of a procedure to the callingprocess, use the Result keyword. For example:
PROCEDURE Calculate(Dividend)... IF Dividend = 0 THEN ... Error("Division by 0 ... "not possible") ReturnELSE ...END
PROCEDURE Find(File,Key,Value)HReadSeek(File,Key,Value)IF HFound=True THEN Result TrueELSE Result FalseEND
WLangage.book Page 98 Jeudi, 20. mars 2014 4:29 16

Part 2: Basic syntax of WLanguage 99
Advice: For procedures that return a result, werecommend that you use the FUNCTION keywordinstead of PROCEDURE to make the code easier toread.
Important: Do not force the exit from a procedurethat returns a result with the Result keyword.Indeed, the call to the procedure expects a statusreport that will not be returned if the exit from theprocedure is forced.
6.5 Calling a procedure/function
The method for calling a procedure is the same fora global procedure or for a local procedure.Reminder:• In WLanguage, there is no distinction between
the procedures and the functions. The syntaxesfor declaring and using the procedures also applyto the functions.
• For a multi-syntax procedure, the call to the pro-per syntax is resolved at run time. See “Overloada WLanguage function”, page 101 for moredetails.
Syntax: calling a procedure[<Returned Value> = ] <Procedure Name>([<Parameters>])
Notes:• In order to make your code more readable, the
PROCEDURE keyword can be replaced by theFUNCTION keyword
• To run a procedure of an open window, use Exe-cuteProcess.
6.6 Parameter of a procedure/function
You have the ability to pass parameters to a proce-dure. This paragraph presents the following topics:• the type of the parameters.• passing parameters.• the local parameters.• the optional parameters.• The variable parameters (procedure with a varia-
ble number of parameters).
Reminder: WLanguage does not differentiatebetween procedures and functions. The proceduresand the functions are managed in the same way.
6.6.1 Type of the parameters
Default type of the parametersThe description of the parameter type is optional.By default, the type of the variable passed in para-meter during the call to the procedure is used in theprocedure.
For example:
Therefore, the same procedure can be used forseveral types of variables.
Forcing the type of the parametersTo force the type of the parameters, use the fol-lowing syntax:PROCEDURE <Procedure Name>(... <Parameter 1> is <Type>,... <Parameter 2> is <Type> ,... <Parameter N> is <Type> )
The type of the variable passed in parameter(during the call to the procedure) must be identicalto the type described in the declaration of the pro-cedure. Otherwise, an error occurs when compilingthe project, the window or the report.
// Call to the Find procedure that returns a booleanIF Find(Customer,CustNum,Number) THEN Info("Customer number found")ELSE Info("Customer number" ... "not found")END
Subscript is int// Call to MyProc procedureMyProc(Subscript)-- Declare procedure MyProcPROCEDURE MyProc(Counter)// Counter is an integerCounter += 1
WLangage.book Page 99 Jeudi, 20. mars 2014 4:29 16

100 Part 2: Basic syntax of WLanguage
In the following example, the "Subscript" variable isnot a real: an error will occur when compiling theproject, the window or the report.
6.6.2 Passing parametersDuring the call to a procedure, the parameters canbe:• passed by address• passed by value.
Passing parameters by addressBy default, when calling a procedure, the parame-ters are passed by variable (by address). If theparameter is modified in the procedure, the pro-cess calling the procedure will retrieve the parame-ter with its modified value.To pass a parameter by variable to a procedure, usethe following syntax: <Procedure Name>(<Name of Variable passed as parameter>)
For example:
Passing parameters by valueWhen calling a procedure, the parameters can bepassed by value. If the parameter is modified in theprocedure, the process calling the procedure willretrieve the parameter with its unmodified value.
Solution 1: to pass a parameter by value to a pro-cedure, use the following syntax: <Procedure Name>((<Name of the variable passed as parameter>))
For example:
Solution 2: Using some "local" parameters in theprocedureWhen declaring a procedure, the variables passedin parameter can become local to this procedure.To do so, the local parameter must be preceded bythe LOCAL keyword. For example: PROCEDURE MyProc(LOCAL Subscript, LOCAL Counter, Number)
If this parameter is modified in the procedure, theprocess calling the procedure will retrieve the para-meter with its unmodified value.
Passing a control, a window or a report
This element (control, window, page or report) ishandled like any "standard" object. To pass an ele-ment in parameter to a procedure, use the fol-lowing syntax: <Procedure Name>(<Element Name>)
For example:
Notes:• Myself is used to handle the current control.• MyWindow is used to handle the current window.• MyPage enables you to handle the current page• MyReport is used to handle the current report.
Subscript is int = 7// Call to MyProc procedureMyProc(Subscript) -- Declaration of MyProc procedurePROCEDURE MyProc(Subscript is real)...
Subscript is int = 1// Before the call to the procedure, Subscript is set to 1AddOne(Subscript)// After the call to the procedure, Subscript is set to 2 -- Declaration of the procedurePROCEDURE AddOne(Counter)Counter += 1
Subscript is int = 1// Before the call to the procedure, Subscript is set to 1AddOne((Subscript))// After the call to the procedure, Subscript is still set to 1-- Declaration of the procedurePROCEDURE AddOne(Counter)Counter += 1
// Call the ControlVisible procedureControlVisible(ControlAddress)
-- Declaration of the procedurePROCEDURE VisibleControl(ControlAd-dress)ControlAddress..Visible = False
WLangage.book Page 100 Jeudi, 20. mars 2014 4:29 16

Part 2: Basic syntax of WLanguage 101
6.6.3 Optional parameterSome of the parameters passed to a procedure canbe optional parameters. When declaring the proce-dure, the optional parameters must be described inlast position (to the right), with a default value pre-ceded by "=" : PROCEDURE <Procedure Name>(... <Mandatory parameters>,... <Optional Parameter 1> = <Value>,... <Optional Parameter 2> = <Value>,...)
For example :
To keep the default value of an optional parameter,use the "*" character during the call to the proce-dure. For example:
6.6.4 Procedure with a variable number of parametersIf the procedure uses a variable number of parame-ters, you must be able to handle the different para-meters passed to the function in the code of theprocedure. These operations are performed via theMyParameters keyword.Example: Procedure for shifting the controls: Thecontrols passed in parameters are shifted by 10pixels.
The parameters are always indexed from 1 regar-dless the number of mandatory parameters or thenumber of optional parameters.
A variable number of parameters can be used with:• the procedures,• the class methods,• the declaration code of global variables of win-
dows, pages or reports.
6.7 Overload a WLanguage function
6.7.1 DefinitionOverloading a WLanguage function enables you touse a custom function with the same name as theWLanguage function.For example, instead of using the standard WLan-guage function named Info, you can use a customprocedure named Info. The custom procedure willbe run whenever Info is called.
6.7.2 How do I proceed?To overload a WLanguage function:1. Create a new procedure in your project (local orglobal procedure). This procedure must have thefollowing characteristics:• The same name as the WLanguage function to
overload.• The same number of parameters as the WLan-
guage function to overload. These parametersmust have the same type as the parameters of
the WLanguage function.2. The custom procedure will be used instead ofthe WLanguage function whenever the name of thefunction/procedure is used in the project (or in thewindow/page if the created procedure is a localprocedure).
6.7.3 Differentiating between the WLan-guage function and the custom functionIf a WLanguage function was overloaded and if youwant to use the initial function, the name of thefunction must be prefixed by WL. The following syn-tax must be used:WL.<Function Name>
For example, to overload the Trace function ofWLanguage, you can use the following code:
-- Declaration of the procedurePROCEDURE Drawing(Row, Column,... BckgrdColor = Black, LineCol = ... iLightYellow)...-- call the procedureDrawing(10,15)
-- Declaration of the procedurePROCEDURE Drawing(Row, Column,... BckgrdColor = Black, ... LineCol = iLightYellow)...-- Process for calling the procedureDrawing(10,15, *, iLightGreen)
// Procedure used to shift the con-trolsPROCEDURE ShiftControl(*)FOR I = 1 TO ... MyParameters..Occurrence MyParameters[I]..X +=10END
PROCEDURE Trace(Information1)Message("Start a trace")WL.Trace(Information1)
WLangage.book Page 101 Jeudi, 20. mars 2014 4:29 16

102 Part 2: Basic syntax of WLanguage
6.8 Prototype overload
6.8.1 OverviewThe procedures and the methods of classes canhave several syntaxes.For example, a procedure can have:• a syntax that takes a string in parameter.• a syntax that takes an integer in parameter.Therefore, several syntaxes can exist for the sameprocedure or for the same method with differentparameters and code. At run time, the engine auto-matically defines the syntax to call according to thenumber and to the type of the parameters passed.This technology is presented under several namesand it includes different purposes. The followingterms can be used:• Overload,• Prototype overload,• Overload,• Dynamic dispatch,• Parametric polymorphism,• etc.This feature is available for:• The global procedures.• The local procedures.• The class methods including the Constructors.In the rest of this document:• the term of multi-syntax will be used.• the "Procedure" keyword will be used to identify a
global procedure, a local procedure or a method.
6.8.2 How do I proceed?Adding syntaxes to a procedure
To add a syntax to an existing procedure:1. In the project explorer, select the procedure.2. Display the popup menu of the procedure andselect "Add a syntax".3. A new syntax is automatically created in thecode editor.Notes:• The creation of a procedure with the same name
automatically proposes to add a new syntax tothe existing procedure.
• If a procedure has several syntaxes, the numberof syntaxes is displayed in the project explorer(beside the name of the procedure).
Delete a syntax of a procedureTo delete a syntax:1. Display the code of the procedure in the codeeditor.2. In the syntax bar, select "Delete" from the popupmenu.3. You can:• delete the current syntax.• delete all the syntaxes (in this case, the proce-
dure is deleted).
6.8.3 Managing the overload at run timeBasic mechanism
The basic mechanism is as follows: dynamic deter-mination of the syntax according to the number andtype of parametersThe runtime engine searches for the syntax:• that has the same number of parameters.• that has the minimum number of conversions.If two syntaxes are equivalent, the first one in theorder of the code editor is run.
Dynamic dispatchIn the case of a multi-syntax procedure whose para-meters expect some class instances, the runtimeengine uses the "Dynamic Dispatch" method todefine the syntax that must be called.Let’s take a look at the following example:• a "BaseClass" class• two classes, "DerivedClass1" and
"DerivedClass2", that inherit from "BaseClass".// First syntaxPROCEDURE p(LOCAL p is BaseClass)
// Second syntaxPROCEDURE p(LOCAL p is DerivedClass1)
// CallspBase is Dynamic BaseClass// Initialization pBase = New BaseClassp(pBase)// first syntax
// InitializationpBase = New DerivedClass1p(pBase)// second syntax
// InitializationpBase = New DerivedClass2p(pBase) // first syntax
WLangage.book Page 102 Jeudi, 20. mars 2014 4:29 16

Part 2: Basic syntax of WLanguage 103
Virtual methodsTo manage virtual methods, several aspects can betaken into account:• 1st aspect: a syntax of the method of the derived
class redefines a syntax of the method of thebase class:
• 2nd aspect: an additional syntax in the method ofthe derived class:
• 3rd aspect: special case when the method of thebase class and the method of the derived classhave a single syntax with different prototypes:
The compiler cannot decide whether the methodof the derived class is an override of the methodof the base class or a new syntax.To trigger an override, the attribute with the <over-ride> extension must be added to the method ofthe derived class: .
To trigger an overload, the attribute with the<overload> extension must be added to themethod of the derived class.
BaseClassPROCEDURE meth(s is string)PROCEDURE meth(n is int)
DerivedClassPROCEDURE meth(n is int)
// calloBase is BaseClassoBase.meth("A") // calls the 1st syntax // in the BaseClass classoBase.meth(1) // calls the 2nd syntax // in the BaseClass classoDerived is DerivedClassoDerived.meth("A") // calls the 1st syntax // in the BaseClass classoDerived.meth(1) // calls the 1st syntax // in the DerivedClass class
BaseClassPROCEDURE meth(p)PROCEDURE meth(s is string)
DerivedClassPROCEDURE meth(n is int)
// calloBase is BaseClass
oBase.meth("A")// calls the 2nd syntax // in the BaseClass classoBase.met (1)// calls the 1st syntax // in the BaseClass class
oDerived is DerivedClassoDerived.meth("A") // calls the 2nd syntax // in the BaseClass classoDerived.met (1)// calls the 1st syntax // in the DerivedClass class
BaseClassPROCEDURE meth(s is string)
DerivedClassPROCEDURE meth(n is int)
PROCEDURE method(...) <override>
PROCEDURE method(...) <overload>
WLangage.book Page 103 Jeudi, 20. mars 2014 4:29 16

104 Part 2: Basic syntax of WLanguage
7. MANAGING EXCEPTIONS
7.1 Overview
When a programming error occurs in an applicationor in a site, the security mechanism of WLanguageis enabled. An error message is displayed on theend-user computer and the program execution isended.To lessen the consequences of programmingerrors, WinDev and WebDev propose several solu-tions:• the display of a custom error message (not availa-
ble in WebDev).• the mechanism of exceptions. This enables you
to customize the management of the error.
Caution: these solutions can only be used tomanage the programing errors. These solutionscannot be used to manage the runtime errors (suchas "unable to write into a read-only file").
7.1.1 Displaying a custom message
To display a custom message when a programmingerror occurs, all you have to do is enter the text ofthe error when creating the executable.This enables you to display, without any program-ming, a message such as:"Problem in the XXX application: Write down the text
of the error and contact our technical support atxx.xx.xx.xx.xx".
7.1.2 Exception mechanismThe exception mechanism is used to process theerror cases by programming. If an exception pro-cess is triggered, no error message is displayed andthe exception code is run. This code enables you toperform all the necessary operations:• to exit from the current application/site "properly"
if the error is a fatal error• to give control back to the user if the error can be
fixed.
WinDev/WebDev proposes two types of exceptionprocesses:• general exceptions: the exception process is
valid for an entire object (project, window, page,report, ...)
• specific exceptions: the exception process isvalid for a specific section of code.
• the automated exceptions: the management ofexceptions is implemented from the interface ofWinDev, WebDev and WinDev Mobile.
7.2 Mechanism of general exceptions
7.2.1 OverviewA process of general exception is available for allthe components of the object with which it is asso-ciated. This exception process can be used as longas the object is available.A process of general exception can be declared inany process.Some examples:• if the exception process is declared in the initiali-
zation code of the project, it is valid for any errorthat occurs in the project.
• If the exception process is declared in a windowinitialization code (global declaration code of a
page or opening code of a report), it is valid forany error that occurs in the window/page, in awindow/page control or in an procedure local tothe window/page. This exception process is nolonger valid when the window/page is closed.
• if the exception process is declared in any pro-cess, it is valid for any error that occurs in thisprocess. This exception process will not be validanymore once the process is completed. There-fore, an exception process declared in the clickcode of a button will only be valid in this processand in all the procedures called from this pro-cess.
WLangage.book Page 104 Jeudi, 20. mars 2014 4:29 16

Part 2: Basic syntax of WLanguage 105
7.2.2 Declaration syntaxesProcessing the exception on one lineWHEN EXCEPTION <Exception process on 1 line><Rest of code> Processing the exception on several linesWHEN EXCEPTION <Code for processing the exception>END<Rest of code>
7.2.3 Declaring several processes of general exceptionsDeclaring the processes of general exceptions inthe same processThe second exception process will replace the firstexception process from the declaration of thesecond exception process.Example: In the Example procedure, if an erroroccurs:• in <Code1>: no management of exceptions is
enabled except if an exception procedure wasdefined in the calling code (in the current windowor in the project)
• in <Code 2>: the active exception process is<Exception Process 1>
• in <Code 3>> the active exception process is<Exception Process 2>
Declaring the exception processes in different pro-cessesIf exception processes are declared in embeddedobjects (project and window/page, or window/pageand control, for instance), the exception process ofthe smallest object masks the main exception pro-cess during the lifetime of this object.Example, if the following two exception processesare declared:• exception process A declared in the initialization
code of a project• exception process B declared in the initialization
code of a window/page.For all the errors that occur in the window/page,the exception process B will be used and it will hidethe exception process A.
Nesting exception processes in different proces-ses: managing the exception via a higher levelIf exception processes are declared in embeddedobjects (project and window/page or window/pageand control for instance), the error can be managedin the higher level exception process.Use the EXCEPTION keyword in the exception pro-cess. Example:
7.2.4 General notesAn exception process can only be used onceAn exception process can only be used once. If asecond exception occurs, the exception process willnot be run. If an exception process of higher levelexists, this exception process will be run.To re-enable an exception process once it has beenused, call ExceptionEnable. Caution, this functionshould be used carefully.For instance: a general exception process wasdeclared at window level and at project level.A first programming error occurs in the window/page. This error is processed by the exception pro-cess of the window/page. A second error occurs in the window/page. Thiserror is processed by the exception process of theproject.
PROCEDURE Example()<Code 1>WHEN EXCEPTION <Exception Process 1>END<Code 2>WHEN EXCEPTION <Exception Process 2>END<Code 3>
// Initialization code of projectWHEN EXCEPTION // stop the application EndProgramEND // Global procedure ControlValue// returns the value of the control// returns "" if it does not existPROCEDURE Value(sControlName)WHEN EXCEPTION // for the UnknownControl error, // "" is returned IF ExceptionInfo(errCODE) = ... UnknownControl THEN RESULT "" // if it is another error, // call the project error manager EXCEPTIONEND
WLangage.book Page 105 Jeudi, 20. mars 2014 4:29 16

106 Part 2: Basic syntax of WLanguage
Quality of WLanguage exception process codeAn exception process cannot be declared insideanother exception process. We recommend thatyou check the quality of the code in the exceptionprocesses because any error will trigger the displayof the standard window/page of the securitymechanism of WLanguage.
Quality of the code following an exception processAfter the execution of an exception process, theWLanguage code following the process is run. Werecommend that you pay attention to the quality ofthis code (to avoid displaying an error message).
Example: in the following code, the{"Control1"}..Value = 5 line triggers an exceptionprocess. At the end of the exception process, thesame code line is run again: the exception hasalready been processed and the WLanguage secu-rity mechanism is triggered.
To avoid this problem, at the end of the exceptionprocess, we advise you to:• make sure that the problem is corrected and that
it will not happen again.• use RETURN and RESULT to exit from the current
process• use ReturnToCapture to give control back to the
user.• use EndProgram to close the application.
7.2.5 Special caseA general exception process cannot be declared inthe composite statements such as:• FOR• LOOP• WHILEIn this type of statement, use the specific exceptionprocess.
7.3 Mechanism of specific exceptions
7.3.1 OverviewA process of specific exception is used to process arisky code (which means a code that could triggeran exception). The exception will be triggered if aprogramming error occurs in the specified code.This specific exception process will only be availa-ble in the process in which it was declared.
Notes• A specific exception process can be declared in
any process.• A specific exception process has priority over a
general exception process.
7.3.2 Declaration syntaxesProcessing the simple exceptionWHEN EXCEPTION IN <Code that can trigger an exception> DO <Code used to process the exception>END<Rest of code> Processing the advanced exceptionWHEN EXCEPTION IN <Code that can trigger an exception> DO <Code used to process the exception>ELSE <Code used if the exception is not trigge-red>END<Rest of code>
7.4 Mechanism of automated exceptions
The management of exceptions can be customizedby process.You can choose an automatic exception process oran advanced management of exceptions via to thedifferent WLanguage functions.Important: The automatic management of errorsand exceptions only operates for the process forwhich it is defined.
7.4.1 ImplementationTo implement the automatic management of excep-tions:1. In the code editor, display the process where theexceptions must be managed: initialization code,click code, procedure, ...2. In the code header, click "When exception by pro-gramming".
WLangage.book Page 106 Jeudi, 20. mars 2014 4:29 16

Part 2: Basic syntax of WLanguage 107
3. The window that is displayed allows you to spe-cify the type of automatic process to perform:• Running the error process ("CASE EXCEPTION:" in
the code)• Running a procedure of exception process.
7.4.2 Running the error process ("CASE EXCEPTION:" in the code)If this option is selected, a code line is added to thecurrent code "CASE EXCEPTION:". The code linesfollowing this statement will be run when an excep-tion occurs in the previous code lines (or in a pro-cess called by these code lines).
This option is recommended to group all the excep-tion processes that may occur.
7.4.3 Running a procedure of exception processIf this option is selected, the specified procedurewill be automatically run to process the error whenan exception occurs in the current process (or inthe processes called by the current process). This
option is recommended if a procedure used to pro-cess the exceptions is already found in your appli-cation. This procedure will be automatically calledwhen an exception occurs. No test to run.This procedure can return one of the constantsfound in the table below.Depending on the constant returned, WinDev orWebDev will run the corresponding process.
7.5 Functions for managing the exceptions
The following functions are used to manage theexceptions:
These functions are presented in details in theonline help.
OpCancel Restarts the exception
OpEndProcess The function that triggered theerror returns an error and thecurrent process stops. Equiva-lent to ReturnToCapture
OpEndProgram The function that triggered theerror returns an error and theprogram stops. Equivalent toEndProgram
opRelaunch-Program
Ends the application and auto-matically restarts the applica-tion.
ExceptionEnable Re-enables the current exception process if the exception was corrected. ExceptionDisplay Displays the standard window of exceptions with the content of the current excep-
tion.ExceptionChangePara-meter
Configures the automatic behavior that will be implemented if an exception occursin the current process.
ExceptionThrow Artificially triggers the security mechanism of WLanguage by throwing an exception.Then, this exception can be processed by an exception code written for thispurpose.
ExceptionInfo Retrieves information about the current exception.ExceptionPropagate Propagates an exception. This function must be run in an exception process and it
is used to restart the mechanism of exception process. ExceptionRestorePara-meter
Restores the exception process of a process. This exception process was modifiedin the current process by a call to ExceptionChangeParameter.
WLangage.book Page 107 Jeudi, 20. mars 2014 4:29 16

108 Part 2: Basic syntax of WLanguage
8. OBJECT-ORIENTED PROGRAMMING (OOP)
8.1 Overview of OOP (Object Oriented Programming)
The object-oriented programming (called "OOP") is aprogramming paradigm in which the programs areorganized as sets of objects. Each object repre-sents an instance of a given class, all the classesbeing members of a class hierarchy unified by inhe-ritance releationships.
Therefore, objects are used by the OOP.• Each object is an instance of a given class.• The classes are linked between themselves by
the inheritance relationships
WLanguage and OOPWLanguage is an object-oriented language, indeed:• it supports the objects
• the objects have an associated class• the classes can inherit from attributes coming
from "super classes"
Important: The purpose of this chapter is not todescribe the concepts of object-oriented program-ming but only to describe how to declare the clas-ses, methods and objects in WLanguage. Thischapter presents the OOP syntax of WLanguageand the principle for creating an object-orientedprogram in WLanguage.We assume that readers are familiar with the con-cept of classes, objects and inheritances, ...If you are not familiar with the OOP, we recommendthat you read an OOP guide before you continuewith this chapter.
8.2 OOP concepts
8.2.1 ClassA class contains the description of a data structure(members) and the processes (methods) used tohandle this structure.Therefore, a class defines a type of data and itsbehavior.See “Class, members and methods”, page 109 formore details.
8.2.2 ObjectA class is used to create objects. Each createdobject owns the members described in its classand it can be handled via the methods of its class.An object is known as "an instance of the class".A class can be considered as being a model thatdefines the members and the methods common toseveral objects.A member is a parameter of the object. A method isused to act on the object, to modify its members forexample.
See “Object”, page 113.
WLangage.book Page 108 Jeudi, 20. mars 2014 4:29 16

Part 2: Basic syntax of WLanguage 109
8.2.3 Constructor and destructorThe notion of Constructor and Destructor is impor-tant because it involves an automatic method callwhen creating or destroying an object.The Constructor method associated with a class isautomatically called when declaring an object ofthe class. This ensures that the initialization pro-cesses of the object (assigning members for exam-ple) will not be forgotten by the developer.The Destructor method associated with a class isautomatically called when deleting the object (exitfrom the procedure where the object was declared).This allows you to free the resources used by theobject without fear of oversight (memory zone forexample). It can also be used to update a file rela-ted to the object.See “Constructor and destructor”, page 112 formore details.
8.2.4 InheritanceThe inheritance is used to include the characteris-tics of an existing class (base class) into a newclass (derived class). This enables you to create a
new type of data from a known type, in order to addfeatures to it or to modify its behavior. Therefore,the base class will not be modified. A class caninherit from one or more classes; it becomes a sub-class of this class.A derived class inherits the members and methodsof its parent classes, in addition to its own mem-bers and methods. There is no need to duplicatethe members and methods of the parent classes.See “Class inheritance” on page 114 for moredetails.
8.2.5 Data encapsulationThe data encapsulation is probably the most impor-tant notion in OOP. This technique ensures that theobject data will not be wrongly modified by func-tions (methods) external to the object. It is possibleto prevent a user from accessing some or all objectmembers. The members whose access is notallowed are called private members.They can only be accessed from the methods desi-gned for this purpose in the class.
8.3 Class, members and methods
A class includes:• data, called members• constants• procedures, called methods. A method is a proce-
dure specifically written to handle the objectsfound in the class.
To use a class, you must declare one or moreobjects. All the objects of a given class have thesame attributes and behavior, but their memberscontain different data.By default, the members of a class are public, theycan be accessed by a method of the class as wellas by a process of the project or by one of its ele-ments (window, page, control, etc.)Example of class:The "File" class includes the following members:Name, Extension, DirectoryThe "File" class has the following methods:• FileSelection() to select a file and assign the
members of the File object with the selected file
• FileSize() to find out the size of the file of the Fileobject
8.3.1 Declaration of the class
<ClassName> is class <Declaration of members>END
SystemClass is class Name is stringEND
Member
Method
WLangage.book Page 109 Jeudi, 20. mars 2014 4:29 16

110 Part 2: Basic syntax of WLanguage
8.3.2 Declaration of members[<Access>] [CONSTANT] [GLOBAL] <Member Name> is <Member Type>
The important parameters of this syntax are as fol-lows:
<Access>: OptionalUsed to restrict the access to this class mem-ber. 3 levels are available:
•Private: access allowed from the code of theclass•Protected: access allowed from the code of
the class or from the code of a derived class•Public (default): access allowed from any
code of the class or project.
CONSTANT: OptionalModifies the access constraints by allowing anaccess in read-only.•Protected CONSTANT: The value of the mem-
ber can be read and modified from the codeof the class; it can only be read from thecode of a derived class; it cannot beaccessed from any other code of the applica-tion.
•Public CONSTANT: The value of the membercan be read and modified from the code ofthe class or derived class; it can only be readfrom another code of the application.
GLOBAL: OptionalDefines a global member. This member willexist outside the objects. It can be usedwithout instantiating an object. If severalobjects are declared, a global member is com-mon to all the objects.
<Name of the member>Name identifying the member.
<Type of Member> Type of the member chosen among the availa-ble WLanguage types.
8.3.3 Declare the constantsCONSTANT <Constant Name> = ... <Value of the constant>
or
CONSTANT <Constant Name> = <Constant Value> <Constant Name> = <Constant Value>END
The important parameters of this syntax are as fol-lows:
<Constant Name>Constant Name. A constant is public.
<Value of the constant> Value associated with the constant. This valuewill not change during the execution of the pro-gram.
8.3.4 Declaring the methodsFunction [<Access>] [Global] [VIRTUAL] <Class Name>::<Method Name> ([<Parameter1>, ... [<ParameterN>]])
or
Procedure [<Access>] [Global] [VIRTUAL] <Class Name>::<Method Name> ([<Parameter1>, ... [<ParameterN>]])
SystemClass is class Name is Private string Size is intEND
CONSTANT K=5 CONSTANT K=5 J=10 END
Global Procedure ... SystemClass::SeeObject(obj)// The private member Size is // accessible from the code of // the classInfo("Name: "+Obj:Name + ... "Size: "+Obj:Size)
Global Function ... SystemClass::Attempt(a,b)Result a+b
WLangage.book Page 110 Jeudi, 20. mars 2014 4:29 16

Part 2: Basic syntax of WLanguage 111
The important parameters of this syntax are as fol-lows:
<Access>: OptionalUsed to restrict the access to this method. 3levels are available:•Private: the method can be called from a
code of the class only•Protected: the method can only be called
from a code of the class or from a code ofthe subclass
•Public (default): the method can be calledfrom any code of the class or the project.
Global: OptionalDefines a global method. This method will notoperate on a specific object: no class object isrequired to call this method.This class can also be used to handle the glo-bal members.
Virtual: OptionalDefines a virtual method. By default, an over-ridden method is virtual.
<Class Name>
Name identifying the class. <Name of the method>
Name identifying the method. <Parameter 1 …. Parameter N>
Optional parameters that must be passed tothe method.
Scope identified by the color of the bar
A method of a class can be public, private or protec-ted.The start color of the event bar changes accordingto the scope of the method:• bar start is red: private method.• bar start is orange: protected method.• bar start is normal: public method.
Deleting a methodA method can be deleted:• from the "Project explorer" pane ("Delete" from
the popup menu)• from the code editor, via the popup menu of the
method bar ("Delete").
8.3.5 Creating and declaring propertiesA property is a code element with two processes: aprocess for retrieving a value and a process forassigning a value.A property can be used like a variable or like amember (direct retrieval of the value, assignmentvia the ’=’ symbol, …). At run time:• Any operation that requires to read the property
runs the process for retrieving the value. This pro-cess must return a value.
• Any operation that requires to read the propertyruns the process for assigning the value thatmust process a parameter.
Creating a class propertyTo create a class property:1. In the project explorer, display the available clas-ses (expand the "Classes" folder).2. Select the requested class. Display the popupmenu of the class and select "New property".3. In the window that opens, enter the name of theproperty and validate.4. The code editor displays the processes linked tothe property:• Process for retrieving the property. This process
contains:•the "RESULT" keyword that is used to get the
value of the property.•the "RETURN =" keyword to return the value of
the property.• Process for assigning the property. This process
is used to give a value to the property. This valueis passed in parameter. This process must returnno result.
Note: A new property can also be created from thepopup menu of a member. In this case, the proce-dures automatically handle the specified member.See the online help for more details.
Access rights to a propertyThe property cannot be read if the retrieval processis empty. A compilation error will be displayed in theeditor and an error will occur at run time.The property cannot be written if the assignmentprocess is empty. A compilation error will be dis-played in the editor and an error will occur at runtime.The retrieval and assignment processes can bepublic, private or protected. The access rights of theproperty correspond to the less restrictive rights ofthe two processes.
WLangage.book Page 111 Jeudi, 20. mars 2014 4:29 16

112 Part 2: Basic syntax of WLanguage
The properties can be global. A property is global tothe class when the retrieval and assignment pro-cesses are global. If one of the processes is global,all the processes must be global otherwise a compi-
lation error is displayed.See the online help for more details.
8.4 Constructor and destructor
When creating a class in the code editor, the Cons-tructor and Destructor methods are automaticallycreated by default.
The Constructor method, if defined by the develo-per, is automatically called when instantiating anobject. It is used to perform the initialization stepsfor the object or related to the object (assigningmembers, checks, …)
The Destructor method, if it is defined by the deve-loper, is automatically called when deleting theobject (exit from the procedure in which the objectwas instantiated). It can be used to free resourcesfor example…
The Constructor and Destructor methods cannotcontain the following functions: Event, Timer, Multi-task, DnDEvent, DDEEvent, CallDLL32, …
8.4.1 Constructor of the classDeclaration of the constructor
Syntax:PROCEDURE [<Access>] Constructor([<Parame-ters>])
The important parameters of this syntax are as fol-lows: <Access>
3 access levels are available:•PUBLIC (default): the constructor is accessi-
ble outside of the class.•PROTECTED: the constructor can be accessed
inside the class and the derived classes.•PRIVATE: the constructor is only accessible
inside the class.<Parameters>
Optional parameters of the constructor.
8.4.2 Constructor of the base classes and of the membersIf a base class or a class type member has a cons-tructor, this constructor is automatically calledwithout parameter. You must:• assign default values to the parameters of the
constructor (or to the parameters of the baseclass or member)
• explicitly call the constructor by passing the para-meters.
Calling the constructor method to build a class
Syntax:Constructor <ClassName>(<Parameters>)
where<ClassName>
Name identifying the class<Parameters>
Parameters of the constructor.Calling the constructor method to build a member
Syntax:Constructor <Membername>(<Parameters>)
where<Membername>
Name identifying the member of the class<Parameters>
Parameters of the constructor.
8.4.3 Destructor method
Declaration of the method
Procedure <ClassName>::Destructor()
The destructor accepts no parameter. SystemClass is class Name is stringEND
WLangage.book Page 112 Jeudi, 20. mars 2014 4:29 16

Part 2: Basic syntax of WLanguage 113
8.5 Object
To access a class, the object must be declared asbeing part of the class to handle, this is called ins-tantiation of an object.An instance is an object that belongs to a givenclass.
To handle an object, you must1. describe its class,2. declare the object as being part of the class.
An object can be passed in parameter to a functionor to a procedure.
Note: You have the ability to dynamically instantiatean object to a class. See dynamic instantiation formore details.Object example: "SourceFile" is object of class"File". For this object, you can handle the membersnamed "Name", "Extension"…
8.5.1 Declaring an object <ObjectName> is [object] <ClassName> ([<Parameters>])
The important parameters of this syntax are as fol-lows: <ObjectName>
Name identifying the instance of the class.<Class name>
Name identifying the class, defined when theclass is created in the code editor.
<Parameters>Optional parameters of the constructor.
8.5.2 The members of an objectA member of an object is a data associated withthe object. An object necessarily owns all the mem-bers described in the class. A member is also cal-led property of the object.The members of an object correspond to all themembers defined for the source class of the object.Reminder: a member is declared in the class.
8.5.3 The methods of an objectThe methods of an object are features associatedwith the object. An object necessarily owns all themethods described in the class. These methodscan be called in different ways according to the
location of the call. 1. Call a method belonging to an object other thanthe current object
<Object Name> : <Method Name> ([<Parame-ters>]) The member is sought among the methods of theobject class. If the method is not found, it is soughtamong the methods of the ancestor classes of theobject class.
2. Calling a method of the current object : <Method Name> ([<Parameters>]) 3. Call a method of an ancestor class that wasredefined <Object Name> : <Class Name> :: <Method Name> ([<Parameters>]) 4. Call a method of general class <Class Name>::<Method Name>([<Parameters>])
8.5.4 Lifespan of an objectThe object is created during its declaration. Theobject is local by default. The object is automati-cally destroyed at the end of the process containingits declaration:• An object declared as global in the global decla-
ration code of a window/page will be destroyed atthe end of the closing process of the window/page.
SourceFile is File objectSourceFile is File
SFile is FileFileD is Filestr1,str2 are strings// Method for file selectionSFile:FileSelection()FileD:FileSelection()// Call the method for checking the available spaceIf SFile:RemainingSpace(... DFile:Directory[[1]]) then ch1= SFile:Directory+"\"+... SFile:Name+"."+ ... SFile Extension str1= DFile:Directory+"\"+... FileD :Name+"."+ ... FileD :Extension fCopyFile(SFile,DFile)ELSE Error("Insufficient space")END
WLangage.book Page 113 Jeudi, 20. mars 2014 4:29 16

114 Part 2: Basic syntax of WLanguage
• An object declared as global in the initializationcode of a project will be destroyed when closingthe project.
8.6 Dynamic instantiation of an object
An object can be dynamically associated with aclass, we talk of dynamic instantiation of theobject.The dynamic instantiation of an object enables youto create an object at a given time and to free thisobject when it is no longer used.To instantiate an object, you must:1. declare a dynamic object2. instantiate the object
Note: the object is automatically freed when it isnot used anymore. However, you can force the des-truction of the object (to provoke the execution ofthe destructor for example).
8.6.1 Declaring a dynamic object
<ObjectName> is dynamic <ClassName>
The parameters of this syntax are as follows :• <ObjectName>: Name identifying the instance of
the class.• <Class Name>: Name identifying the class, defi-
ned when creating the class in the code editor.
8.6.2 Instantiating a dynamic object <ObjectName> = ... new <Class Name> [<Parameters>]) The parameters of this syntax are as follows:
• <ObjectName>: Name identifying the instance ofthe class.
• <Class Name>: Name identifying the class, defi-ned when creating the class in the code editor.
• <Parameters>: Optional parameters of the cons-tructor.
8.6.3 Freeing a dynamic objectDelete <ObjectName>
8.7 Class inheritance
The hierarchical organization in class and sub-classhas allowed to create the notion of inheritance. In other words, an object of the sub-class A (derivedclass) that has the same characteristics as theclass B (ancestor class) as well as its own characte-ristics inherits from all the characteristics of class Bwithout having to duplicate the programs in theobject of the sub-class A. The number of code linesis reduced.
The inheritance is the mechanism by which theclass currently described uses the methods andmembers defined in existing classes.• The existing class is called Ancestor Class or
Base Class.• The new class is called Derived class. The deri-
ved class incorporates the ancestor class andadds new methods and new members to it.
File is class Name is String Extension is String Directory is StringEnd SourceFile is object Dynamic file//...//create the object//SourceFile = New File //process on the object ...//...//free the object//Delete SourceFile
WLangage.book Page 114 Jeudi, 20. mars 2014 4:29 16

Part 2: Basic syntax of WLanguage 115
The purpose of the inheritance is to retrieve, for aclass, the methods developed for another class, byadding the specific features of the new class.The objects found in a sub-class can access all themethods and all the members of the ancestor clas-ses; it is as if the methods and the members of theancestor classes were part of the sub-class.
Characteristics of an inheritance:• An inheritance can be multiple. In this case, the
derived class can derive from several ancestorclasses.
• An inheritance can be private or public (bydefault). If the inheritance is public, you have the ability toaccess the methods and the members inheritedfrom the outside of the class.If the inheritance is private, only the methods ofthe derived class can access the inherited mem-bers and methods.
8.7.1 Syntax<NameDerivedClass> is class [PRIVATE, PROTECTED, PUBLIC] Object <NameAncestorClass> <Name of Derived Class Member> <Member type> ...END
The important parameters of this syntax are as fol-lows:
• <NameDerivedClass>: Name identifying the deri-ved class currently declared.
• PRIVATE: Optional keyword. Indicates whetherthe inheritance is private or not. If this keyword isnot specified, the inheritance is public.
• <NameAncestorClass>: Name of the ancestorclass.
• <Name of Derived Class Member>: Name of themember of the derived class. This member canonly be used in an object of the derived class.
• <Member Type>: Type of the member, chosenamong the available types.
8.7.2 Redefining the methodsIn a derived class, a method of the base class canbe redefined by creating in the derived class amethod with the same name as the one of the baseclass.The redefinition of methods is used to modify thebehavior of the method defined in the base class ;the derived class can eventually redefine themethod according to its requirements.The redefined method is a virtual method bydefault.
Note: overloading a method (using two methodswith the same name in the same class) is not sup-ported by WLanguage.Note: the Object keyword is used to access the cur-rent object inside a method.
File is Class Name is String Extension is String Directory is StringEnd FileInfo is class a File object FSize is int FDate is String FTime is StringEnd
WLangage.book Page 115 Jeudi, 20. mars 2014 4:29 16

116 Part 2: Basic syntax of WLanguage
WLangage.book Page 116 Jeudi, 20. mars 2014 4:29 16

PART 3
Windows, pagesand controls
WLangage.book Page 117 Jeudi, 20. mars 2014 4:29 16

WLangage.book Page 118 Jeudi, 20. mars 2014 4:29 16

Part 3: Managing the windows, the pages and the controls 119
1. MANAGING THE WINDOWS
1.1 Overview
The windows represent the main interface of a Win-Dev application. Indeed, windows allow users toview and handle information. This information canbe dynamic information (coming from data files orqueries) or static information (entered in the win-dow controls directly).
WinDev and WinDev Mobile propose several func-tions for managing the windows.This chapter presents:• the functions for window management.• the MDI functions.• the functions for menu management.
1.2 Functions for managing the windows
The following functions are used to manage the windows:
WD WDMobile
Abandon Closes the window and possibly runs the code of the "ABORT" buttonChangeSkinTem-plate
Changes the skin template of a window.
ChangeSourceWin-dow
Dynamically changes the window displayed in an Internal Window control
Close Closes a WinDev window (and returns a value if necessary)CurrentTitle Modifies the title of the current window and the title barCurrentWin Identifies the window currently in editDelayBeforeClosing Limits the display time of a window (when the specified time is over, the code of one of
the window buttons is run)DisableAAF Disables an Automatic Application Feature (AAF) for a control, for a window or for the
current application.DrawingStyle Allows you to find out and modify the display mode of grayed buttons as well as the dis-
play mode of the translucent border for the application windows.EnumElement Enumerates the windows of a projectEnumSubElement Enumerates the groups or the menus of a window. ExecuteAAF Runs an Automatic Application Feature (AAF) on a control or on a window.Iconize Minimizes a WinDev windowInitWindow Initializes (or not) the controls to zero and runs the initialization processes of the con-
trols and windowIWListAdd Adds a new internal window to the list of internal windows browsed by an Internal Win-
dow controlIWListCount Returns the number of internal windows currently found in the list of internal windows
browsed by an Internal Window controlIWListDelete Deletes an internal window found in the list of internal windows browsed by an Internal
Window controlIWListDeleteAll Deletes all the internal windows from the list of internal windows browsed by an Inter-
nal Window controlIWListDisplay Refreshes the display of an "Internal window" control with automatic browse on a data
file or query.IWListNext Displays the next internal window in the list of internal windows browsed by an Internal
Window controlIWListPosition Displays the internal window corresponding to the specified position or returns the
position of the internal window currently displayed
WLangage.book Page 119 Jeudi, 20. mars 2014 4:29 16

120 Part 3: Managing the windows, the pages and the controls
IWListPrevious Displays the previous internal window in the list of internal windows browsed by anInternal Window control
Maximize Displays a WinDev window in its maximum sizeMultitaskRedraw Immediately redraws the window controls that must be graphically refreshedNextTitle Modifies the title of the next window to openOpen Opens a modal WinDev windowOpenChild Opens a non-modal child windowOpenMainMenu Opens the main menu of the current windowOpenPopup Opens a popup windowOpenPopupPosition Opens a popup window at the specified locationOpenSister Opens a non-modal sibling windowPreviousWin Identifies the window that was in edit before the window that is currently in editRESET Re-initializes the controls of the current window.Restores Displays a WinDev window to its initial sizeUse Opens a WinDev window and closes all the other windows that were opened before-
handWinActivateDDW Enables or disables the DDW featureWinAdaptHeight Adapts the window height to the content of controls.WinAdaptSize Adapts the size of the window to the content of the controls. The window is resized in
order for the controls to be displayed in the best possible way (no empty row and noscrollbar)
WinAdaptWidth Adapts the window width to the content of the controls.WinAnimationClo-sing
Modifies the type and duration of the animation used when closing the windows.
WinAnimationNext Modifies the type and duration of the next window animationWinAnimationOpe-ning
Modifies the type and duration of the animation used when opening the windows.
WinBackgroundI-mage
Modifies the background image of a window and specifies the display mode of thisimage
WinChangeAlias Modifies the alias of a windowWinCopyForm Copies the content of a form into the clipboard.WinDisableEffect Disables the visual effects of the graphic engine of WinDev. WindowBitmap Creates the image of the specified window in a BMP fileWindowCount Calculates the number of windows currently opened in the current applicationWinForceDDW Forces the DDW feature (Dim Disabled Windows) on a window.WinGiveSuitableHei-ght
Returns the height of a window, adapted to the content of controls.
WinGiveSuita-bleWidth
Returns the width of a window, adapted to the content of the controls.
WinIconBarHeight Returns or modifies the current height of the "Icon Bar" area in the current MDI parentwindow
WinInactiveEffect Enables or disables the DDW featureWinInHeight Returns the internal height of a windowWinInitialized Allows you to find out whether the "end of initialization" code was run for a window.WinInput Identifies the window containing the WLanguage code currently runWinInWidth Returns the internal width of a windowWinInXPos Returns the horizontal position of the inside area of a window in relation to the top left
corner of the screenWinInYPos Returns the vertical position of the inside area of a window in relation to the top left
corner of the screenWinOrientation Modifies or retrieves the display orientation of the current window.
WLangage.book Page 120 Jeudi, 20. mars 2014 4:29 16

Part 3: Managing the windows, the pages and the controls 121
1.3 MDI functions
The following functions are used to manage the MDI windows:
1.4 Functions for managing the menus
WinDev and WinDev Mobile propose several WLan-guage functions specific to the menu options:
WinOutHeight Returns the full height of a windowWinOutWidth Returns the full width of a windowWinOutXPos Returns the horizontal position of a window in relation to the top left corner of the
screenWinOutYPos Returns the vertical position of a window in relation to the top left corner of the screenWinPasteForm Pastes the content of a form stored in the clipboard.WinRateDDW Allows you to find out and modify the level of gray for the windows to which the DDW
feature is appliedWinRedraw Immediately redraws the window controls that must be graphically refreshedWinScreenRectan-gle
Returns the coordinates of the screen that contains a window.
WinSize Returns or modifies the display mode of a window, modifies the height and/or thewidth of a window, moves a window and modifies its height and/or width
WinStatus Identifies or modifies the status of a windowWinUsefulSize Dynamically changes the useful size of the internal window displayed in an Internal
Window control.
See the online help for more details about these functions and for the availability of these functions in thedifferent products (WinDev, WinDev Mobile).
MDIActive Identifies or enables an MDI child window in the foregroundMDIEnumChild Returns the alias of the specified MDI child windowMDIMother Identifies the name of the MDI parent windowMDIOpen Opens an MDI child windowMDIWindowMenu Modifies the layout of the MDI child windows
See the online help for more details.These functions are available in WinDev only.
ControlPopupOwner Identifies the control on which the popup menu was opened
EmulateMenu Emulates the next menu that will be opened and automatically runs the menuoption passed in parameter.
EnumMenu Returns the name of the nth menu option
EnumSubElement Enumerates the drop-down or popup menus found in a window or control.
grMenu Enables or disables the popup menu of a chart.
MenuAdd Adds a popup menu into a menu
MenuAddMenu Adds a new menu into a window.
MenuAddOption Adds a new menu option at the end of a menu.
MenuAddPopup Transforms a menu option of a page in order for this option to open a popup.
WLangage.book Page 121 Jeudi, 20. mars 2014 4:29 16

122 Part 3: Managing the windows, the pages and the controls
MenuAddSeparator Adds a new separator into a menu.
MenuAddURLOption Adds a new menu option at the end of a menu found in a page. This menuoption runs an URL passed in parameter and displays the correspondingpage.
MenuClone Clones a menu or a menu option as well as the associated code.
MenuDelete Deletes a menu or a menu option
MenuExist Indicates whether a menu option exists in a menu.
MenuInsertMenu Inserts a menu before another menu in a window.
MenuInsertOption Inserts a new option at a specific position. This menu option runs a procedurepassed in parameter.
MenuInsertSeparator Inserts a separator into a menu.
MenuInvisible Makes a menu option invisible
MenuIsMarked Allows you to find out whether a checkmark is displayed in front of themenu option
MenuLabel Identifies or modifies the caption of a menu option
MenuMark Positions the checkmark in front of the menu option
MenuSelectMinus Disables (grays) a menu option
MenuSelectPlus Enables a menu option
MenuState Identifies the status of a menu option: enabled, disabled or hidden
MenuUnmark Removes the checkmark in front of the menu option
OpenPopupMenu Opens a popup menu for the current control or window
See the online help for more details.These functions are available in WinDev only.
WLangage.book Page 122 Jeudi, 20. mars 2014 4:29 16
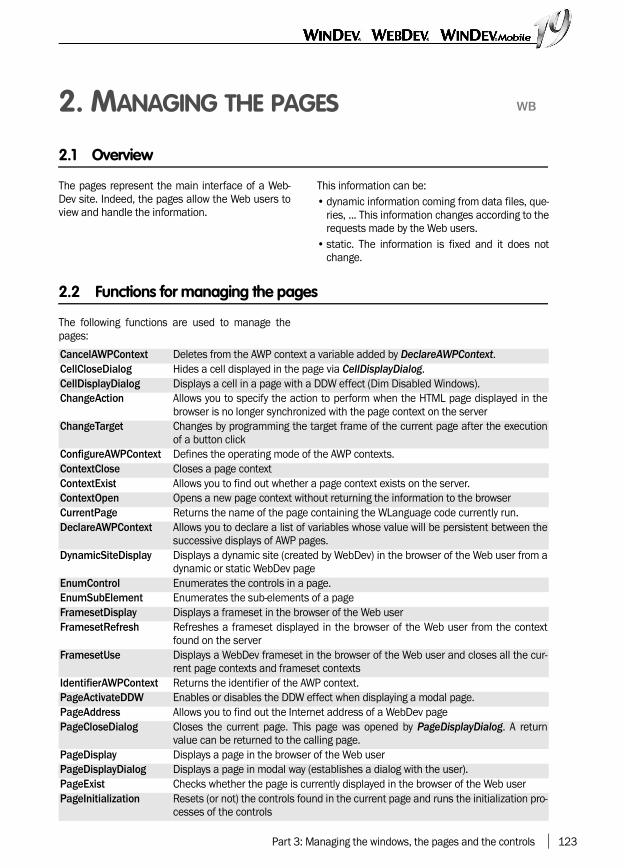
Part 3: Managing the windows, the pages and the controls 123
2. MANAGING THE PAGES
2.1 Overview
The pages represent the main interface of a Web-Dev site. Indeed, the pages allow the Web users toview and handle the information.
This information can be:• dynamic information coming from data files, que-
ries, ... This information changes according to therequests made by the Web users.
• static. The information is fixed and it does notchange.
2.2 Functions for managing the pages
The following functions are used to manage thepages:
WB
CancelAWPContext Deletes from the AWP context a variable added by DeclareAWPContext. CellCloseDialog Hides a cell displayed in the page via CellDisplayDialog.CellDisplayDialog Displays a cell in a page with a DDW effect (Dim Disabled Windows). ChangeAction Allows you to specify the action to perform when the HTML page displayed in the
browser is no longer synchronized with the page context on the serverChangeTarget Changes by programming the target frame of the current page after the execution
of a button clickConfigureAWPContext Defines the operating mode of the AWP contexts.ContextClose Closes a page contextContextExist Allows you to find out whether a page context exists on the server.ContextOpen Opens a new page context without returning the information to the browserCurrentPage Returns the name of the page containing the WLanguage code currently run.DeclareAWPContext Allows you to declare a list of variables whose value will be persistent between the
successive displays of AWP pages.DynamicSiteDisplay Displays a dynamic site (created by WebDev) in the browser of the Web user from a
dynamic or static WebDev pageEnumControl Enumerates the controls in a page.EnumSubElement Enumerates the sub-elements of a pageFramesetDisplay Displays a frameset in the browser of the Web userFramesetRefresh Refreshes a frameset displayed in the browser of the Web user from the context
found on the serverFramesetUse Displays a WebDev frameset in the browser of the Web user and closes all the cur-
rent page contexts and frameset contextsIdentifierAWPContext Returns the identifier of the AWP context. PageActivateDDW Enables or disables the DDW effect when displaying a modal page.PageAddress Allows you to find out the Internet address of a WebDev pagePageCloseDialog Closes the current page. This page was opened by PageDisplayDialog. A return
value can be returned to the calling page.PageDisplay Displays a page in the browser of the Web userPageDisplayDialog Displays a page in modal way (establishes a dialog with the user).PageExist Checks whether the page is currently displayed in the browser of the Web userPageInitialization Resets (or not) the controls found in the current page and runs the initialization pro-
cesses of the controls
WLangage.book Page 123 Jeudi, 20. mars 2014 4:29 16

124 Part 3: Managing the windows, the pages and the controls
2.3 Functions for managing the menus
WebDev proposes several WLanguage functionsspecific to the menu options:
PageParameter Returns the value of a parameter passed to the current pagePagePosition Scrolls a page up to position a control in the visible part of the page (top) in the
browserPageRateDDW Defines and returns the rate of gray used by the DDW.PageRefresh Refreshes a page displayed in the browser of the Web user from the context found
on the serverPageSubmit Validates the specified page and starts the execution of a buttonPageToASP Sends the data found in a page displayed in the browser to an ASP serverPageToEmail Sends the data found in a page displayed in the browser in an emailPageToJSP Sends the data found in a page displayed in the browser to a JSP serverPageToPHP Sends the data found in a page displayed in the browser to a PHP serverPageUse Displays a WebDev page in the browser of the Web user and closes all the current
page contextsPopupAnimate Displays a popup in a cell of the page.PopupClose Hides a popup displayed in the page via PopupDisplay.PopupDisplay Displays a popup in a page with a DDW effect (Dim Disabled Windows).PreviousPage Returns the name of the previous pageSemiDynamicPageDis-play
Displays a semi-dynamic page in the browser of the Web user from a dynamic orstatic WebDev page.
SiteAddress Returns the Internet address for connecting to a dynamic WebDev site found on thesame server
See the online help for more details.See the online help to check the availability of these functions in the different types of code (server code andbrowser code).
ControlPopupOwner Identifies the control on which the popup menu was opened
EnumMenu Returns the name of the nth menu option
MenuAddMenu Adds a new menu into a window.
MenuAddOption Adds a new menu option at the end of a menu. This menu option runs a proce-dure passed in parameter.
MenuAddSeparator Adds a new separator into a menu.
MenuAddURLOption Adds a new menu option at the end of a menu found in a page. This menuoption runs an URL passed in parameter and displays the corresponding page.
MenuDelete Deletes a menu or a menu option
MenuInsertSeparator Inserts a separator into a menu.
See the online help for more details.
WLangage.book Page 124 Jeudi, 20. mars 2014 4:29 16

Part 3: Managing the windows, the pages and the controls 125
3. MANAGING THE "BACK" BUTTON IN A PAGE
3.1 Overview
The browser "Back" button allows Web users to goback to the pages that were already visited.In a WebDev site, each HTML page displayed on thebrowser is associated with a page context, found onthe server. Each action performed in a page dis-played by the browser must trigger an identicalaction on the corresponding page context found onthe server.However, the browser "Back" button is used to per-form an action on the browser only: the page dis-played in the browser and its context on the servercan become "out-of-synch" if the browser "Back"button is used.
3.1.1 Two methods can be used to manage the browser "Back" buttonTo avoid any out-of-sync problems between thepages displayed on the browser and the correspon-ding contexts found on the server, WebDev propo-ses two modes for managing the browser "Back"button:• Solution 1: Preventing from going back to this
page with the browser "Back" button.If the browser "Back" button is used to display theprevious page, this action will have no effect.
• Solution 2: Managing the synchronization(default solution)For each action performed in a page from thebrowser, a synchronization test is automaticallyrun between the HTML page and its context. Two modes are available for managing the syn-chronization:•default synchronization (mode used by default
when creating a new page).•programmed synchronization.
3.1.2 Example of desynchronizationLet’s see a site example:• A browser page contains a file table linked to the
ITEM data file and a "Next" link.• The ITEM data file contains a single item, each
record is made of a letter in the alphabet.• The page is used to display 6 table rows, the
"Next" link is used to display the next 6 rows.
When opening the page, the table displays the 6first records of the data file (from ’A’ to ’F’). Let’ssee the sequence of actions performed by theuser :1. click the "Next" linkResult: the server is positioned on the next 6records of ITEM and returns their content to thebrowser. The browser displays the next page of thetable with the 6 new contents (’G’ to ’L’).2. click the browser "Back" keyResult: the browser displays the page that prece-des the first action. The table displayed containsthe letters ’A’ to ’F’. The server was not contacted,therefore it is still positioned on the records ’G’ to’L’.3. click "Next"Result: the server is positioned on the next 6records of ITEM (from ’M’ to ’R’). The browser syn-chronizes with the server and displays the sameelements: the Web user has the feeling that someinformation is not displayed.
This behavior can have unexpected consequenceswhen modifying a data file record (modification of arecord other than the one viewed by the Web userfor example).Reminder: each action performed on the browsermust trigger an action on the server: then, the ser-ver sends a response to the browser. The click onthe browser "Back" button being an action indepen-dent of your WebDev site, the second conditionmay not be performed.
WB
WLangage.book Page 125 Jeudi, 20. mars 2014 4:29 16

126 Part 3: Managing the windows, the pages and the controls
3.2 Preventing from using the "Back" button
If the browser "Back" button is used to display theprevious page, this action will have no effect.
3.2.1 Operating modeDisabling the "Previous page" feature of the brow-ser triggers the insertion of the following Javascriptcode into the generated HTML page:
When the page is run in a browser, it will not be pos-sible to go back to this page via the browser "Back"button.
Notes:• Clicking the browser "Back" button can make the
page blink.• This mechanism can fail if the [STOP] button of
the browser is clicked before the forward() state-ment is run by the browser.
3.2.2 ImplementationTo disable the browser "Back" button for a specificpage:1. Display the description window of the page. Todo so, on the "Page" pane, click in the "Edit"group.2. In the "Details" tab, check "Forbid from using thebrowser "Back" button to go back to this page".3. Validate.
To disable the browser "Back" button for a frame-set:1. Display the "Details" tab found in the descriptionwindow of the frameset ("Description" from thepopup menu of the frame).2. Check "Forbid from using the browser "Back"button to go back to this frameset".3. Validate.
To disable the browser "Back" button for all theproject pages:1. Display the project description (on the "Project"pane, in the "Project" group, click"Description").2. Click the "Options" tab.3. Check "Forbid from using the browser "Back"button to go back to this page".4. Validate. This option will be automatically takeninto account for all the new pages of the site.
3.3 Managing the synchronization
3.3.1 OverviewFor each action performed in a page, the mecha-nism for page synchronization automatically checksthe synchronization. This check consists in verifyingwhether the page displayed in the browser corres-ponds to the page context found on the server.Two modes are available for managing the synchro-nization:1. Default management of synchronization.2. Management of synchronization by program-ming, in the synchronization code of the page.
3.3.2 Default synchronizationThe default synchronization mechanism is triggeredonly if the "Use the mechanism for page synchroni-zation" option is selected for the page.If a desynchronization occurs, a warning messageinforms the Web user that the requested action hasnot been performed. The page corresponding to thecontext found on the server is redisplayed. The site
can continue to operate.
To implement the management of synchronizationin a page:1. Display the description window of the page. Todo so, on the "Page" pane, click in the "Edit"group.2. In the "Details" tab, check "Use the mechanismfor page synchronization".3. Validate. This page will be automatically inclu-ded in the history of browser pages: you will be ableto go back to this page via the browser "Back" key.
To implement the management of synchronizationin all the project pages:1. Display the project description. To do so, on the"Page" pane, click in the "Edit" group.2. In the "Options" tab, check "Use the mechanismfor page synchronization".3. Validate. The project pages will be included auto-matically in the history of browser pages: the brow-ser "Back" key will allow you to go back to thesepages.
<SCRIPT LANGUAGE="JavaScript">history.forward()</SCRIPT>
WLangage.book Page 126 Jeudi, 20. mars 2014 4:29 16

Part 3: Managing the windows, the pages and the controls 127
Notes:• This management mode requires no specific
WLanguage code.• The synchronization mechanism can be disabled
for the page controls that do not require any syn-chronization management ("Close" button for
example): to do so, check "Disable the mecha-nism for page synchronization for this control" inthe "Advanced" tab of the control description.
• The warning message can be customized (seethe next paragraph).
3.4 Synchronization by programming
To manage the synchronization by programming:1. Display the description window of the page. Todo so, on the "Page" pane, click in the "Edit"group.2. In the "Details" tab, check "Use the mechanismfor page synchronization".3. Configure (if necessary) the page controls forwhich the synchronization must not be managed. For each control that triggers an action on the ser-ver, you can specify whether the page synchroniza-tion must be managed (default option) or ignoredduring this action. To ignore the management of synchronization,check "Disable the mechanism for page synchroni-zation for this control" in the "Advanced" tab of thecontrol description.4. Enter the code required for custom managementof the synchronization in the synchronization codeof the page. Use ChangeAction in the synchroniza-tion code of the page. This function is used todefine the action that will be performed in case ofpage desynchronization.
Notes:• ChangeAction is initialized with "No action" if a
WLanguage function used to display or refresh apage is used in the synchronization code of thepage.
• To customize the desynchronization message, allyou have to do is enter in the synchronizationcode of the page:1. the custom message.2. Redisplaying the current page on the server(with PageRefresh for example).
• To perform a synchronization from the informa-tion found on the computer of the Web user, werecommend that you:1. Use a hidden control containing the identifierof the record displayed and selected.2. In the synchronization code, find the currentrecord on the browser. This search is performedfrom its identifier found in the hidden control.3. Refresh the page.
WLangage.book Page 127 Jeudi, 20. mars 2014 4:29 16

128 Part 3: Managing the windows, the pages and the controls
4. COMMUNICATING WITH THE USER
4.1 Overview
WinDev, WebDev and WinDev Mobile enable you tocommunicate with the user of with the Web user viadialog boxes.You have the ability to use standard dialog boxes(made of images, text and one or more buttons: OK,Cancel, Yes or No).
WinDev also enables you to use advanced dialogboxes that:• display a specific text in the buttons, for better
understanding.• the user to perform an input.
4.2 The standard dialog boxes
The dialog boxes are standard windows that allowyou to communicate with the user. They can beused to notify of an error, to ask for confirmation,etc.The dialog boxes always contain the same ele-ments:• An icon used to quickly identify the type of mes-
sage displayed: Information, Question or Error.• A title displayed in the title bar.• One or more buttons allowing the user to choose
an answer. The number and the type of these but-tons depend on the type of dialog box used.
• A text on one or more lines corresponding to themessage intended for the user.
Several types of dialog boxes are available:• The information or error boxes (WLanguage func-
tion named Warning, Info or Error). For example:
• The question boxes (WLanguage function namedYesNo).
• The confirmation boxes (WLanguage functionnamed Confirm).
By default, the dialog boxes are closed after theaction performed by the user or by the Web user onone of the buttons. If no button is pressed, theapplication of the site is locked.To avoid any risk of lock, use DelayBeforeClosingand specify the amount of time after which the dia-log box is automatically closed.
WLangage.book Page 128 Jeudi, 20. mars 2014 4:29 16

Part 3: Managing the windows, the pages and the controls 129
4.3 The advanced dialog boxes
4.3.1 OverviewThe advanced dialog boxes are windows allowingyou to communicate with the user. These windowsare used to manage:• the directive questioning: the user answers a
question via buttons containing the text of theaction to perform.
• the immediate input: the user enters the reques-ted value in the dialog box.
4.3.2 Directive questioningThe security of the application data depends on theanswers given by the end users to the questionsasked in messages. In most cases, these questionsare more or less clear. For example, "Do you want tocancel the current deletion? " with "Yes" or "No" but-tons.Whenever a function used to dialog with the user iscalled, WinDev proposes to:• select an existing message
• create a new message via a simple window.The corresponding code is automatically generatedwhen the different message characteristics areentered.Note: The generated code uses Dialog.
4.3.3 Immediate inputWhen developing an application, you may not wantto spend a lot of time creating an edit window withtwo buttons ("OK" and "Cancel").The function named Input simplifies this task. Thisfunction enables you to create a window used toenter data (edit control or check box) and to vali-date or cancel the input.
4.3.4 Message databaseWinDev proposes a list of messages. These messa-ges cannot be deleted.All the new messages are automatically added tothe message database. By default, the messagedatabase is found in the "Personal\Messages"directory of WinDev.To modify this directory:1. Display the product options: on the "Home"pane, in the "Environment" group, expand "Options"and select "General options of WinDev".2. In the "Directories" tab, modify the messagedirectory.
To delete a message from the database of messa-ges:1. Display the code editor.2. On the "Code" pane, in the "Languages" group,expand the "Translate strings" options and select"Direct interrogation".3. In the window that is displayed, select the mes-sage to delete and click the "-" icon.
4.4 Customizing the dialog boxes
Your applications use a lot of system dialog boxes?Why not customize these windows and give themthe "style" of your application?WinDev enables you to easily include the "WinDev-MessageBox" window in your applications. This win-dow is a system information window (dialog box)fully customizable and that can be used in all yourapplications.
No code is required. When this window is includedin your project, Info, YesNo, Confirm and Error auto-matically display the "WinDevMessageBox" window.
WD
WD
WLangage.book Page 129 Jeudi, 20. mars 2014 4:29 16

130 Part 3: Managing the windows, the pages and the controls
Reminder: By default, the dialog boxes displayedare standard dialog boxes that have the followingcharacteristics:• gray background.• icon indicating the type of information displayed.• standard WinDev buttons.
Note: The use of this window enables you to getmultilingual dialog boxes (images, caption of but-tons, …). By default, this window supports French,English, German, Spanish, Italian, Dutch and Portu-guese. See "Multilingual dialog boxes" for moredetails.
4.4.1 Customizing the system information windowsTo customize the system information windows:1. In WinDev, display the project description (on the"Project", in the "Project" group, click "Description").2. In the "Style" tab, select the "Apply the theme ofskin template to the system windows" option andvalidate. The "WinDevMessageBox" and "WinDe-vDialogBox" windows are automatically included inyour application. The skin template of your projectis applied to these windows.The "WinDevMessageBox" window replaces thestandard system information window (displayed bythe functions named Warning, Info, YesNo, OKCan-cel, Confirm and Error).The "WinDevDialogBox" window replaces the win-dow displayed by the function named Dialog.
Tips• Do not modify the code of the "WinDevMessage-
Box" and "WinDevDialogBox" windows, nor thecode of their controls.
• Don’t delete any control.• If controls are added to the "WinDevMessageBox"
and "WinDevDialogBox" windows, no code mustbe associated with these controls.
• Limit the style modifications applied to these win-dows and their controls, and test all these modifi-cations.
4.4.2 Stop customizing the system informa-tion windowsTo cancel the customization of the system informa-tion windows:1. In WinDev, display the project description (on the"Project", in the "Project" group, click "Description").2. In the "Style" tab, clear the "Apply the theme ofskin template to the system windows" option andvalidate.3. Delete the "WinDevMessageBox" and "WinDe-vDialogBox" windows from your project:• from the graph of the project• from the "Project explorer" pane.4. If necessary, delete the file corresponding to the"WinDevMessageBox" and "WinDevDialogBox" win-dows from the project directory.
4.4.3 Multilingual dialog boxesTo display multilingual dialog boxes:1. Customize the system information windows (seethe previous paragraph).2. Enter the multilingual captions of the variousbuttons ("Description" option in the popup menu).3. Select the multilingual images of the variousimage controls ("Description" in the popup menu).4. Use multilingual character strings ([Ctrl]+[T])shortcut in the syntax of the functions named Info,YesNo, Confirm, Error, …
4.5 Automatically close the dialog boxes
WinDev enables you to automatically close thesedialog boxes to avoid locking the application. Bydefault, the dialog boxes are closed only when theuser clicks one of their buttons. If no button ispressed, the application is locked.
To avoid any risk of lock, use DelayBeforeClosingand specify the amount of time after which the dia-log box is automatically closed.
WD WDMobile
WLangage.book Page 130 Jeudi, 20. mars 2014 4:29 16
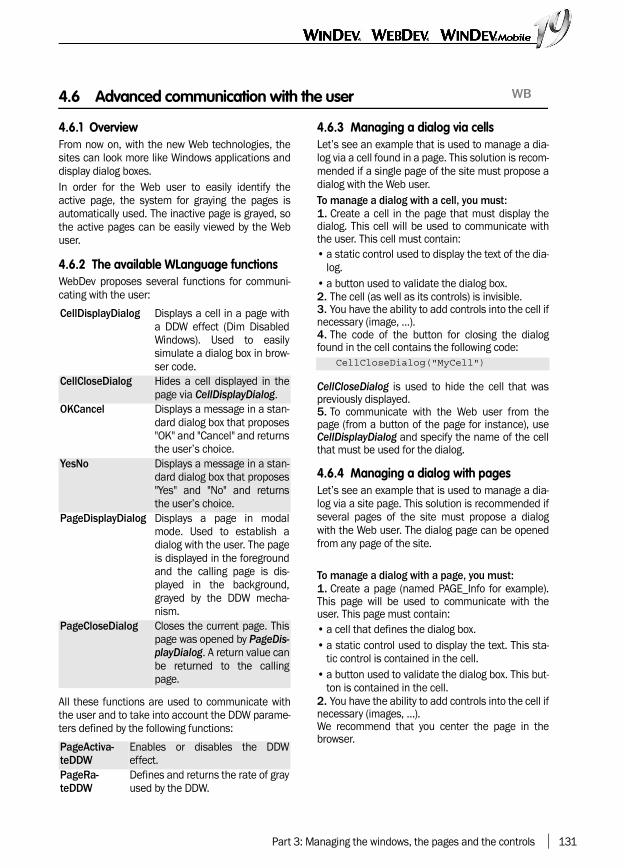
Part 3: Managing the windows, the pages and the controls 131
4.6 Advanced communication with the user
4.6.1 OverviewFrom now on, with the new Web technologies, thesites can look more like Windows applications anddisplay dialog boxes.In order for the Web user to easily identify theactive page, the system for graying the pages isautomatically used. The inactive page is grayed, sothe active pages can be easily viewed by the Webuser.
4.6.2 The available WLanguage functionsWebDev proposes several functions for communi-cating with the user:
All these functions are used to communicate withthe user and to take into account the DDW parame-ters defined by the following functions:
4.6.3 Managing a dialog via cellsLet’s see an example that is used to manage a dia-log via a cell found in a page. This solution is recom-mended if a single page of the site must propose adialog with the Web user.To manage a dialog with a cell, you must:1. Create a cell in the page that must display thedialog. This cell will be used to communicate withthe user. This cell must contain:• a static control used to display the text of the dia-
log.• a button used to validate the dialog box.2. The cell (as well as its controls) is invisible.3. You have the ability to add controls into the cell ifnecessary (image, …). 4. The code of the button for closing the dialogfound in the cell contains the following code:
CellCloseDialog is used to hide the cell that waspreviously displayed.5. To communicate with the Web user from thepage (from a button of the page for instance), useCellDisplayDialog and specify the name of the cellthat must be used for the dialog.
4.6.4 Managing a dialog with pagesLet’s see an example that is used to manage a dia-log via a site page. This solution is recommended ifseveral pages of the site must propose a dialogwith the Web user. The dialog page can be openedfrom any page of the site.
To manage a dialog with a page, you must:1. Create a page (named PAGE_Info for example).This page will be used to communicate with theuser. This page must contain:• a cell that defines the dialog box.• a static control used to display the text. This sta-
tic control is contained in the cell.• a button used to validate the dialog box. This but-
ton is contained in the cell.2. You have the ability to add controls into the cell ifnecessary (images, …). We recommend that you center the page in thebrowser.
WB
CellDisplayDialog Displays a cell in a page witha DDW effect (Dim DisabledWindows). Used to easilysimulate a dialog box in brow-ser code.
CellCloseDialog Hides a cell displayed in thepage via CellDisplayDialog.
OKCancel Displays a message in a stan-dard dialog box that proposes"OK" and "Cancel" and returnsthe user’s choice.
YesNo Displays a message in a stan-dard dialog box that proposes"Yes" and "No" and returnsthe user’s choice.
PageDisplayDialog Displays a page in modalmode. Used to establish adialog with the user. The pageis displayed in the foregroundand the calling page is dis-played in the background,grayed by the DDW mecha-nism.
PageCloseDialog Closes the current page. Thispage was opened by PageDis-playDialog. A return value canbe returned to the callingpage.
PageActiva-teDDW
Enables or disables the DDWeffect.
PageRa-teDDW
Defines and returns the rate of grayused by the DDW.
CellCloseDialog("MyCell")
WLangage.book Page 131 Jeudi, 20. mars 2014 4:29 16

132 Part 3: Managing the windows, the pages and the controls
3. The code of the button for closing the dialogfound in the page contains the following code:
PageCloseDialog is used to return a value to thepage that opened the dialog.4. To call the dialog page from another page, usePageDisplayDialog and specify the name of thepage that must be opened as well as its parame-ters if necessary. These parameters can be used todynamically fill the text displayed in the static forexample.
4.6.5 Managing a dialog via YesNo and OKCancelYesNo and OKCancel can also be used to manage a
simple dialog with the Web user. These functionsare used to ask a question to the Web user who willanswer by either "Yes" or "No", or "OK" or "Cancel".To manage a dialog with YesNo and OKCancel, youmust:1. Include specific internal pages in your project.These internal pages contain the dialog box:• WebDevOKCancel for OKCancel.• WebDevYesNo for YesNo
These page are included via the page creationwizard. These pages must be saved in your pro-ject with the name proposed by default.
2. Use YesNo and OKCancel in the code of theapplication.
4.7 Functions for managing the dialog boxes
The following functions are used to manage the messages and the dialog boxes:
PageCloseDialog()
Confirm Displays a message in a window that proposes the "Yes", "No" or "Cancel" answersand returns the user’s choice
DelayBeforeClosing Limits the display duration of an information, question or confirmation dialog boxDialog Displays a message box and returns the value of the button that was clickedEdit Displays a message allowing the user to enter an informationError Displays a custom error message in a system error windowErrorBuild Displays a custom error message in a system error window.ErrorWithTimeout Displays a custom error message in a system error window for a set amount of timeInfo Displays a custom message in a system information windowInfoBuild Displays a custom message in a system information windowInfoWithTimeout Displays an information message inside a system info box for a specified amount
of timeMessage Displays (or erases) a message in the status bar of the current windowMessageAddCell Adds a new cell into the status bar of the current windowMessageDeleteCell Deletes a cell from the status bar of the current windowOKCancel Displays a message in a standard dialog box that proposes "OK" and "Cancel" and
returns the user’s choiceProgress Bar Displays a progress bar in the status bar of the current windowShowToolTip Enables (or not) the display of tooltipsToastDeleteAll Deletes all the toasts displayed by ToastDisplay.ToastDisplay Displays a "Toast" message.ToastDisplayPopup Displays a popup page during a given duration in order to display a "Toast" mes-
sage.Warning Displays a custom message in a system warning windowYesNo Displays a message in a standard dialog box that proposes "Yes" and "No" and
returns the user’s choice
See the online help for more details.See the online help to check the availability of these functions in the different products (WinDev, WebDev,WinDev Mobile).
WLangage.book Page 132 Jeudi, 20. mars 2014 4:29 16

Part 3: Managing the windows, the pages and the controls 133
5. MANAGING DRAG AND DROP
5.1 What is "Drag and Drop"?
The "Drag and Drop" is used to transfer databetween several controls via the mouse. This datacan be moved between several controls found inthe same application or in different applications.You must distinguish between:• The source, object containing the data to copy or
to cut.• The target, object into which the data must be
copied.
The "Drag and Drop" consists in:1. Selecting the data in the source with the mouse.2. Pressing the left mouse button and keeping itdown while moving the data to the destination3. Releasing the mouse button to validate thetransfer of dataTo copy the data, keep the CTRL key down duringthe operation.
WinDev supports several types of Drag and Dropoperations in your applications:• Automatic Drag and Drop for edit controls, list
boxes, listviews, treeviews and treeview tables.• Programmed Drag and Drop for a large number
of controls.• Programmed Drag and Drop between Windows
explorer and a WinDev application.
WebDev manages the Drag and Drop via HTML 5.You have the ability to implement:• Automatic Drag and Drop for the edit controls,
the list boxes, …• Programmed Drag and Drop for a large number
of controls.
5.2 Automatic drag and drop
For some types of controls, WinDev and WebDevpropose an automatic management of Drag andDrop.No specific programming is required. To do so, spe-cify in the control description that "Drag and Drop"must be managed.
You must not:
• call the functions for managing the Drag andDrop by programming,
• enable the codes for managing the Drag andDrop in the processes of the controls
Otherwise, the automatic management will be disa-bled: the Drag and Drop will need to be managed byprogramming.
5.2.1 WinDev: The controls affected by the automatic drag and dropIn WinDev, the automatic Drag and Drop is availa-ble for the following controls:• the edit controls,• the list boxes,• the listviews,• the tables,
• the treeviews.Special cases: Drag and Drop between two tables: To perform an automatic "Drag and Drop" betweentwo tables:• The number of columns must be identical. The
content of column 1 of the source table will becopied into column 1 of the target table, idem forcolumn 2, ...
• The columns can have different names.• The type of the columns can be different.
CAUTION: In this case, the data can be altered orlost during the transfer (automatic conversions).We recommend that you use the programmedDrag and Drop.
5.2.2 WebDev: The controls affected by the automatic drag and dropIn WebDev, the automatic Drag and Drop is availa-ble for the following controls:• Upload control,• Static control,• Button control,• Link control,• Image control,
WLangage.book Page 133 Jeudi, 20. mars 2014 4:29 16

134 Part 3: Managing the windows, the pages and the controls
• Formatted Static control,• Edit control,• List Box control,• Combo Box control.Note: At this time, only Firefox and Chrome fullysupport Drag and Drop via HTML 5. If the new ver-sions of the different browsers include the manage-ment of Drag and Drop via HTML 5, this feature willbe automatically supported by WebDev.
5.2.3 Configuring the default "Drag and Drop"The default "Drag/Drop" can be configured in the"Details" tab of the description window of the con-trol.
"Is source" is used to definethe control as "Source" for"Drag and Drop". The userwill be able to select thecontent of the control and
to move it to another control for example.
"Is target" is used to define the control as "Target"for "Drag and Drop". This control will be able toreceive any object "dropped" by the user.The two options can be selected at the same time.
5.3 Programmed "Drag and Drop"
The programmed "Drag and Drop" enables you toentirely manage the "Drag/Drop" between the diffe-rent types of controls. Depending on its type, thecontrol can be source or target of "Drag and Drop". In WinDev, the following controls are supported:• Source of Drag and Drop:
Only the following controls: edit control, list box,listview, treeview, table, image and bar codes.
• Target of Drag and Drop:Any type of control except: progress bar, ActiveX,OLE, shape, toolbar, HTML, Web camera and con-ference control.
In WebDev, the following controls can be sourceand target of a programmed Drag and Drop:• Edit control• Static control• Button• List• Image• Formatted display control• Combo box• Link• Cell• Supercontrol• Control template
5.3.1 PrincipleTo perform a programmed "Drag and Drop"between several controls of a WinDev application,you must perform the following operations:1. In the initialization code of the source control:• Define that a programmed "Drag and Drop" will
be performed (..DnDSource).• Define the procedure run at the beginning of the
"Drag" action (DndEvent for the dndBeginDragevent).
2. In the initialization code of the target control:• Define that a programmed "Drag and Drop" will
be performed (..DndTarget).• Define the procedure run when the control is
hovered (DndEvent for the dndDragOver event).• Define the procedure run when the "Drop" action
is performed on the control (DnDEvent for thedndDrop event).
3. In each one of the WLanguage procedures cal-led, define the action to run via the "Drag and Drop"functions of WLanguage.
5.3.2 ProgrammingSeveral examples of programmed "Drag and Drop"are supplied with WinDev:• WD Puzzle: Programmed Drag and Drop between
images.• Unit example of Drag and Drop (WinDev): progra-
med Drag and Drop between list boxes, tablesand treeviews.
• Educational example of Drag and Drop operationin HTML5 (WebDev): programmed Drag and Dropin a WebDev site.
WLangage.book Page 134 Jeudi, 20. mars 2014 4:29 16

Part 3: Managing the windows, the pages and the controls 135
5.4 "Drag and Drop" from the explorer
The "Drag and Drop" from the explorer consists inselecting one or more files in the Windows explorerand in transferring them into a control in a WinDevwindow.For example, the "WD Drag and Drop" example ena-bles you to display the image files "dropped" fromthe explorer.
5.4.1 PrincipleTo enable "Drag and Drop" from the explorer to aWinDev application, the following steps must beperformed:1. Enable the ability to perform "Drag and Drop"from explorer (ExplorerAccept).2. To process the action performed by the user,associate a WLangage procedure with the drop ofthe file in the window (Event).3. In the procedure called whenever a file is drop-ped in the window, retrieve the characteristics ofthe "dropped" files via the function named Explorer-Retrieve.
5.4.2 Functions specific to "Drag and Drop" from the explorerThe following functions are used to manage Dragand Drop from the Windows explorer to a window ina WinDev application:• ExplorerAccept: Enables or disables the ability to
perform "Drag and Drop" from Windows explorerto a WinDev window.
• ExplorerRetrieve: Retrieves the number of "drop-ped" files and their name.
5.4.3 ProgrammingEnabling the management of "Drag and Drop"from the explorer to the windowTo enable the ability to perform "Drag and Drop"from the explorer to a window, you must declare inthe initialization code of the window:• The implementation of "Drag and Drop".• The event used to link a specific WLanguage pro-
cedure (GetFiles in our example) to the dropaction (Windows event 563). This procedure is aprocedure local to the window.
Processing the "dropped" filesIn the procedure called whenever files are "drop-ped" in the window, you have the ability to get infor-mation and to process the relevant files.In our example, the function named ExplorerRe-trieve enables you to:• find out the number of files "dropped" from the
explorer,• retrieve the name and the path of each file and
display them in a new window.
ExplorerAccept(True, "")Event("GetFiles", ... "*.", 563)
// Number of files dropped into// the application by Drag and DropnbFiles is int nbFiles =... ExplorerRetrieve(_EVE.wparam)sFileName is string// Retrieve all the filesi is int FOR i = 1 to NbFile sFileName = ExplorerRetrieve(... _EVE.wparam, i) OpenImage(sFileName)END
WLangage.book Page 135 Jeudi, 20. mars 2014 4:29 16

136 Part 3: Managing the windows, the pages and the controls
5.5 Functions for managing Drag and Drop
The following functions are used to manage Drag and Drop:
DnDAccept Indicates the action accepted by the target of Drag/Drop and manages the mousecursor during Drag/Drop
DnDCacheData Indicates the type of data and the data to copy/move during Drag/DropDnDCursor Manages the mouse cursor during Drag and DropDnDEvent Indicates the procedure to run during an event of Drag/DropDnDGetData Retrieves a specific type of data during Drag/DropDnDIsDataAvailable Checks whether a specific type of data is available during Drag/DropExplorerAccept Enables or disables the ability to perform "Drag and Drop" from the Windows explo-
rer to a WinDev windowExplorerRetrieve Retrieves the number and the name of "dropped" files
See the online help for more details.These functions are available in WinDev only.
WLangage.book Page 136 Jeudi, 20. mars 2014 4:29 16

Part 3: Managing the windows, the pages and the controls 137
6. MANAGING THE CONTROLS
6.1 Overview
WinDev, WebDev and WinDev Mobile propose seve-ral types of controls that can be easily included inyour windows or in your pages.Several WLanguage functions can be used to han-dle these controls by programming. There are:• functions for managing all the types of controls.• functions for managing a specific type of con-
trols. In this case, the control is associated with a
family of functions easily identifiable by a simpleprefix. For example, the functions with the "Tree"prefix manage the "Treeview" controls, the "Table"prefix is used to manage the "Table" controls, ...
This chapter presents all the WLanguage functionsthat can be used with the various types of controls.
See the online help for more details.
6.2 General functions for handling the controls
The following functions are used to handle the con-trols. These are general functions that can be usedwill all the types of controls.
ActiveXEvent Associates a procedure written in WLanguage with an event of an ActiveX controlAddLink Adds a link onto a section of text in an edit controlAssistedInputAdd Adds a row into the list of values available for the assisted input of an edit control.AssistedInputClose Closes the list of values proposed by the assisted input for an edit control.AssistedInputDele-teAll
Clears the list of values proposed for the assisted input of an edit control.
AssistedInputOpen Opens the list of values proposed by the assisted input for an edit control.ChangeStyle Modifies the style of a control dynamicallyConfigureSpellCheck Allows you to configure the spelling checker of OpenOffice for all the edit controls
found in the applicationControlAlias Identifies, modifies or restores the file link of a control. ControlClone Creates a new control from an existing control. ControlCurrent Returns the name of the control currently in editControlDelete Permanently deletes a control or a table columnControlEnabled Ungrays a control or a group of controls found in a window. ControlError Customizes the error message displayed in the controls when the value cannot be dis-
playedControlExist Checks the existence of a control in a window or in a pageControlFirst Returns the name of the first control in edit in the specified windowControlGrayed Grays a control or a group of controls. During this operation, an animation can be per-
formed on the controls.ControlInfoXY Returns the name of the control located at a given positionControlI-nOutReason
Indicates the origin of the modification in the control currently in edit
ControlInvisible Makes a control (or a group of controls) invisible in a window. ControlNext Identifies the next control in editControlNoSpace Specifies whether the space characters on the right of the value found in the control
are deletedControlOver Identifies the control hovered by the mouse cursor
WLangage.book Page 137 Jeudi, 20. mars 2014 4:29 16

138 Part 3: Managing the windows, the pages and the controls
ControlPopu-pOwner
Identifies the control on which the popup menu was opened
ControlPrevious Returns the name of the control that was previously in edit in the current windowControlTab Returns the name of the Tab control that contains the specified controlControlTypeInfo Returns the icon corresponding to the specified type of controlControlVisible Makes a control (or a group of controls) visible in a window. During this operation, an
animation can be performed on the controls.CurrentColumn Returns the subscript of the current subscripted column in a browsing or memory
tableCurrentSubscript Returns the subscript for the current controlDeleteParameter Deletes a parameter (or set of parameters) that was saved.EnumControl Lists the controls in a window, page, group, tab or supercontrolHTMLNavigate Starts a navigation operation in an HTML controlInitParameter Initializes the management of persistent values in the registryLoadParameter Reads a persistent value. NextSubscript Returns the number of the next row displayed in the current table.Occurrence Returns the number of occurrences of a control in a window/pageOpenPopupMenu Automatically opens a popup menu for the current control or windowParentObject Identifies the "Parent" of a graphic object: control, column, window, page, etc.Reset Re-initializes all the controls found in the current window or pageReturnToCapture Resumes the input in the control or in the specified window/pageRTFAdd Adds a character string at the end of the content of an RTF edit controlRTFInsert Inserts a character string in RTF format into the content of an RTF edit controlRTFLoad Loads a file in RTF format in an RTF edit controlRTFReplace Replaces or inserts a character string in an RTF edit controlRTFSearch Finds a character string in an RTF edit controlRTFSelection Changes or lists the attributes of the text selected in an RTF edit controlRTFToText Returns the text found in an edit control in RTF format without the RTF formattingSaveParameter Saves a persistent value in the registryScreenFirst Defines the next control that will be in edit in the current windowScrollBarShow Displays (or not) a scrollbar in a control (edit control or list box)SelectionColor Changes the characteristics of the selection bar. SetFocus Gives focus to the specified controlShowToolTip Enables or disables the mechanism for displaying the control tooltipsTextHeight Calculates the height (in pixels) of a text displayed in an edit control, in a static control
or in a combo boxTextToHTML Converts a text into HTMLTextWidth Calculates the width (in pixels) of a text displayed in an edit control, in a combo box or
in a static controlToolTipColor Modifies the colors of the tooltips for the current windowToolTipDelay Allows you to modify the time-out before the tooltips are displayed as well as the dis-
play duration of the tooltipsSee the online help to check the availability of these functions in the different products (WinDev, WebDev,WinDev Mobile)
WLangage.book Page 138 Jeudi, 20. mars 2014 4:29 16

Part 3: Managing the windows, the pages and the controls 139
7. PROPERTIES OF WINDOWS, PAGES AND CONTROLS
The following properties are used to manage the windows, the pages and their controls:
Address Allows you to connect the stream with a recipient and to find out the address of the lastconnection request
AdLoaded Allows you to find out whether an ad is currently loaded in the Ad control.Alias WinDev: Used to find out and modify the alias of a window
WebDev: Returns the internal HTML/JavaScript name of a control or pageAnchor Allows you to find out the current anchor of a control and to modify the characteristics of
the anchor applied to a controlAnchorRateBottom Allows you to find out and modify the anchor rate when a control moves on the vertical
axisAnchorRateHeight Allows you to find out and modify the anchor rate in height of a controlAnchorRateRight Allows you to find out and modify the anchor rate when a control moves on the horizon-
tal axisAnchorRateWidth Allows you to find out and modify the anchor rate when a control stretches on the verti-
cal axisAnimation Allows you to find out the current status of the animated image and to start or stop the
animation of an image or animated captionAnimationPeriod Allows you to find out and modify the rotation period for the Cube and Carousel controlsAutoBrowse Allows you to find out whether a browse performed in a browsing looper, table, list box or
combo box is managed automatically or by programmingAutomaticErase Allows you to manage the "Automatic erase" mode of an edit control.AutomaticLink Allows you to find out the mode for automatic detection of links in the multi-line edit con-
trols and to enable or disable this mode.AutomaticTooltip Used to allow (or not) the display of automatic tooltips on the list boxes, the tables and
the treeview tables.BackgroundImage Allows you to find out and modify the background image of a window, the image associa-
ted with a button border, the background image of a progress bar or sliderBackgroundIma-geState
Allows you to find out and modify the number of drawings found in the image associatedwith the border of a button
BarVisible Allows you to find out whether the selection bar is visible on a column found in a table(or in a treeview table) and to make the selection bar visible or invisible on a tablecolumn.
BrowsedFile Allows you to find out and modify the file or query used to display records in the browsingloopers, browsing tables, browsing list boxes or browsing combo boxes
BrowsedItem Allows you to find out and modify the item used to automatically browse the tables, loo-per controls, list boxes or combo boxes
BrushColor Allows you to find out and modify the background color of a controlBrushStyle Allows you to modify the display style of the background for the cells found in the tables
and/or in the treeview tables.CalculatorButton Allows you to find out and specify whether a Numeric or Currency edit control proposes a
button to display a popup calculator.CalendarButton Allows you to find out and specify whether a Date edit control proposes a button used to
display a calendar in popup.Caption Allows you to find out and modify the caption of a control, the title of a window or the
title of a page
WLangage.book Page 139 Jeudi, 20. mars 2014 4:29 16
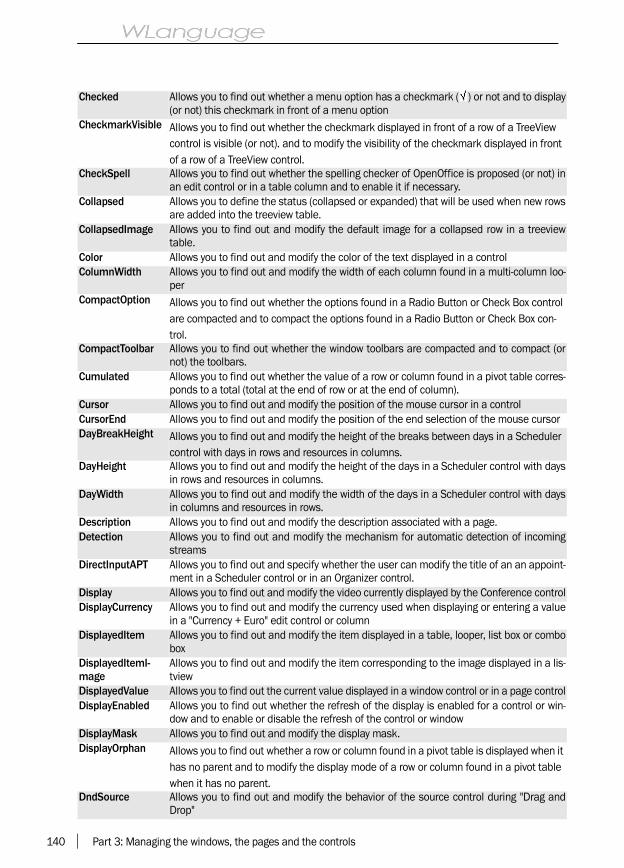
140 Part 3: Managing the windows, the pages and the controls
Checked Allows you to find out whether a menu option has a checkmark ( ) or not and to display(or not) this checkmark in front of a menu option
CheckmarkVisible Allows you to find out whether the checkmark displayed in front of a row of a TreeView control is visible (or not). and to modify the visibility of the checkmark displayed in front of a row of a TreeView control.
CheckSpell Allows you to find out whether the spelling checker of OpenOffice is proposed (or not) inan edit control or in a table column and to enable it if necessary.
Collapsed Allows you to define the status (collapsed or expanded) that will be used when new rowsare added into the treeview table.
CollapsedImage Allows you to find out and modify the default image for a collapsed row in a treeviewtable.
Color Allows you to find out and modify the color of the text displayed in a controlColumnWidth Allows you to find out and modify the width of each column found in a multi-column loo-
perCompactOption Allows you to find out whether the options found in a Radio Button or Check Box control
are compacted and to compact the options found in a Radio Button or Check Box con-trol.
CompactToolbar Allows you to find out whether the window toolbars are compacted and to compact (ornot) the toolbars.
Cumulated Allows you to find out whether the value of a row or column found in a pivot table corres-ponds to a total (total at the end of row or at the end of column).
Cursor Allows you to find out and modify the position of the mouse cursor in a controlCursorEnd Allows you to find out and modify the position of the end selection of the mouse cursorDayBreakHeight Allows you to find out and modify the height of the breaks between days in a Scheduler
control with days in rows and resources in columns.DayHeight Allows you to find out and modify the height of the days in a Scheduler control with days
in rows and resources in columns.DayWidth Allows you to find out and modify the width of the days in a Scheduler control with days
in columns and resources in rows.Description Allows you to find out and modify the description associated with a page.Detection Allows you to find out and modify the mechanism for automatic detection of incoming
streamsDirectInputAPT Allows you to find out and specify whether the user can modify the title of an an appoint-
ment in a Scheduler control or in an Organizer control.Display Allows you to find out and modify the video currently displayed by the Conference controlDisplayCurrency Allows you to find out and modify the currency used when displaying or entering a value
in a "Currency + Euro" edit control or columnDisplayedItem Allows you to find out and modify the item displayed in a table, looper, list box or combo
boxDisplayedItemI-mage
Allows you to find out and modify the item corresponding to the image displayed in a lis-tview
DisplayedValue Allows you to find out the current value displayed in a window control or in a page controlDisplayEnabled Allows you to find out whether the refresh of the display is enabled for a control or win-
dow and to enable or disable the refresh of the control or windowDisplayMask Allows you to find out and modify the display mask.DisplayOrphan Allows you to find out whether a row or column found in a pivot table is displayed when it
has no parent and to modify the display mode of a row or column found in a pivot table when it has no parent.
DndSource Allows you to find out and modify the behavior of the source control during "Drag andDrop"
WLangage.book Page 140 Jeudi, 20. mars 2014 4:29 16
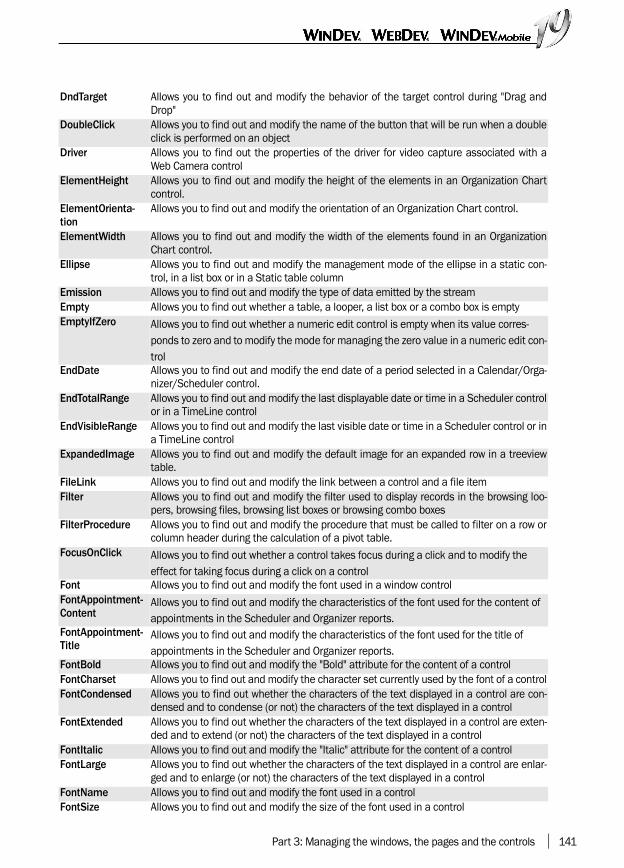
Part 3: Managing the windows, the pages and the controls 141
DndTarget Allows you to find out and modify the behavior of the target control during "Drag andDrop"
DoubleClick Allows you to find out and modify the name of the button that will be run when a doubleclick is performed on an object
Driver Allows you to find out the properties of the driver for video capture associated with aWeb Camera control
ElementHeight Allows you to find out and modify the height of the elements in an Organization Chartcontrol.
ElementOrienta-tion
Allows you to find out and modify the orientation of an Organization Chart control.
ElementWidth Allows you to find out and modify the width of the elements found in an OrganizationChart control.
Ellipse Allows you to find out and modify the management mode of the ellipse in a static con-trol, in a list box or in a Static table column
Emission Allows you to find out and modify the type of data emitted by the streamEmpty Allows you to find out whether a table, a looper, a list box or a combo box is emptyEmptyIfZero Allows you to find out whether a numeric edit control is empty when its value corres-
ponds to zero and to modify the mode for managing the zero value in a numeric edit con-trol
EndDate Allows you to find out and modify the end date of a period selected in a Calendar/Orga-nizer/Scheduler control.
EndTotalRange Allows you to find out and modify the last displayable date or time in a Scheduler controlor in a TimeLine control
EndVisibleRange Allows you to find out and modify the last visible date or time in a Scheduler control or ina TimeLine control
ExpandedImage Allows you to find out and modify the default image for an expanded row in a treeviewtable.
FileLink Allows you to find out and modify the link between a control and a file itemFilter Allows you to find out and modify the filter used to display records in the browsing loo-
pers, browsing files, browsing list boxes or browsing combo boxesFilterProcedure Allows you to find out and modify the procedure that must be called to filter on a row or
column header during the calculation of a pivot table.FocusOnClick Allows you to find out whether a control takes focus during a click and to modify the
effect for taking focus during a click on a controlFont Allows you to find out and modify the font used in a window controlFontAppointment-Content
Allows you to find out and modify the characteristics of the font used for the content of appointments in the Scheduler and Organizer reports.
FontAppointment-Title
Allows you to find out and modify the characteristics of the font used for the title of appointments in the Scheduler and Organizer reports.
FontBold Allows you to find out and modify the "Bold" attribute for the content of a controlFontCharset Allows you to find out and modify the character set currently used by the font of a controlFontCondensed Allows you to find out whether the characters of the text displayed in a control are con-
densed and to condense (or not) the characters of the text displayed in a controlFontExtended Allows you to find out whether the characters of the text displayed in a control are exten-
ded and to extend (or not) the characters of the text displayed in a controlFontItalic Allows you to find out and modify the "Italic" attribute for the content of a controlFontLarge Allows you to find out whether the characters of the text displayed in a control are enlar-
ged and to enlarge (or not) the characters of the text displayed in a controlFontName Allows you to find out and modify the font used in a controlFontSize Allows you to find out and modify the size of the font used in a control
WLangage.book Page 141 Jeudi, 20. mars 2014 4:29 16
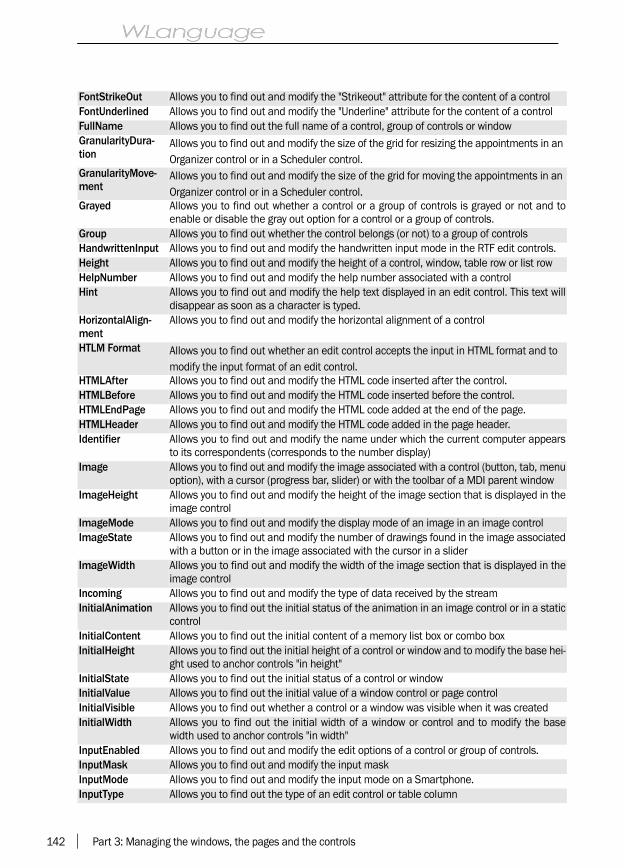
142 Part 3: Managing the windows, the pages and the controls
FontStrikeOut Allows you to find out and modify the "Strikeout" attribute for the content of a controlFontUnderlined Allows you to find out and modify the "Underline" attribute for the content of a controlFullName Allows you to find out the full name of a control, group of controls or windowGranularityDura-tion
Allows you to find out and modify the size of the grid for resizing the appointments in an Organizer control or in a Scheduler control.
GranularityMove-ment
Allows you to find out and modify the size of the grid for moving the appointments in an Organizer control or in a Scheduler control.
Grayed Allows you to find out whether a control or a group of controls is grayed or not and toenable or disable the gray out option for a control or a group of controls.
Group Allows you to find out whether the control belongs (or not) to a group of controlsHandwrittenInput Allows you to find out and modify the handwritten input mode in the RTF edit controls.Height Allows you to find out and modify the height of a control, window, table row or list rowHelpNumber Allows you to find out and modify the help number associated with a controlHint Allows you to find out and modify the help text displayed in an edit control. This text will
disappear as soon as a character is typed.HorizontalAlign-ment
Allows you to find out and modify the horizontal alignment of a control
HTLM Format Allows you to find out whether an edit control accepts the input in HTML format and to modify the input format of an edit control.
HTMLAfter Allows you to find out and modify the HTML code inserted after the control.HTMLBefore Allows you to find out and modify the HTML code inserted before the control.HTMLEndPage Allows you to find out and modify the HTML code added at the end of the page.HTMLHeader Allows you to find out and modify the HTML code added in the page header.Identifier Allows you to find out and modify the name under which the current computer appears
to its correspondents (corresponds to the number display)Image Allows you to find out and modify the image associated with a control (button, tab, menu
option), with a cursor (progress bar, slider) or with the toolbar of a MDI parent windowImageHeight Allows you to find out and modify the height of the image section that is displayed in the
image controlImageMode Allows you to find out and modify the display mode of an image in an image controlImageState Allows you to find out and modify the number of drawings found in the image associated
with a button or in the image associated with the cursor in a sliderImageWidth Allows you to find out and modify the width of the image section that is displayed in the
image controlIncoming Allows you to find out and modify the type of data received by the streamInitialAnimation Allows you to find out the initial status of the animation in an image control or in a static
controlInitialContent Allows you to find out the initial content of a memory list box or combo boxInitialHeight Allows you to find out the initial height of a control or window and to modify the base hei-
ght used to anchor controls "in height"InitialState Allows you to find out the initial status of a control or windowInitialValue Allows you to find out the initial value of a window control or page controlInitialVisible Allows you to find out whether a control or a window was visible when it was createdInitialWidth Allows you to find out the initial width of a window or control and to modify the base
width used to anchor controls "in width"InputEnabled Allows you to find out and modify the edit options of a control or group of controls.InputMask Allows you to find out and modify the input maskInputMode Allows you to find out and modify the input mode on a Smartphone.InputType Allows you to find out the type of an edit control or table column
WLangage.book Page 142 Jeudi, 20. mars 2014 4:29 16
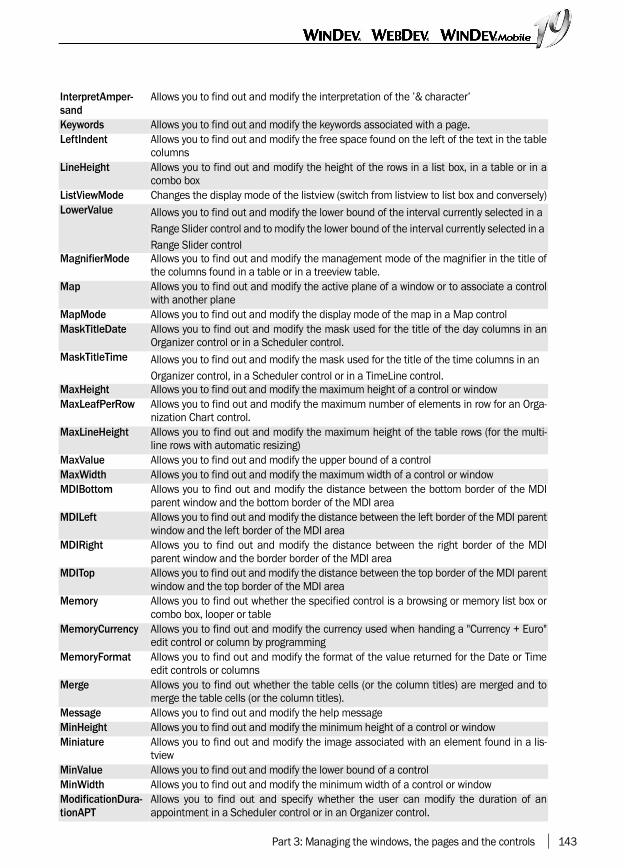
Part 3: Managing the windows, the pages and the controls 143
InterpretAmper-sand
Allows you to find out and modify the interpretation of the ’& character’
Keywords Allows you to find out and modify the keywords associated with a page.LeftIndent Allows you to find out and modify the free space found on the left of the text in the table
columns LineHeight Allows you to find out and modify the height of the rows in a list box, in a table or in a
combo boxListViewMode Changes the display mode of the listview (switch from listview to list box and conversely)LowerValue Allows you to find out and modify the lower bound of the interval currently selected in a
Range Slider control and to modify the lower bound of the interval currently selected in a Range Slider control
MagnifierMode Allows you to find out and modify the management mode of the magnifier in the title ofthe columns found in a table or in a treeview table.
Map Allows you to find out and modify the active plane of a window or to associate a controlwith another plane
MapMode Allows you to find out and modify the display mode of the map in a Map controlMaskTitleDate Allows you to find out and modify the mask used for the title of the day columns in an
Organizer control or in a Scheduler control.MaskTitleTime Allows you to find out and modify the mask used for the title of the time columns in an
Organizer control, in a Scheduler control or in a TimeLine control.MaxHeight Allows you to find out and modify the maximum height of a control or windowMaxLeafPerRow Allows you to find out and modify the maximum number of elements in row for an Orga-
nization Chart control.MaxLineHeight Allows you to find out and modify the maximum height of the table rows (for the multi-
line rows with automatic resizing)MaxValue Allows you to find out and modify the upper bound of a controlMaxWidth Allows you to find out and modify the maximum width of a control or windowMDIBottom Allows you to find out and modify the distance between the bottom border of the MDI
parent window and the bottom border of the MDI areaMDILeft Allows you to find out and modify the distance between the left border of the MDI parent
window and the left border of the MDI areaMDIRight Allows you to find out and modify the distance between the right border of the MDI
parent window and the border border of the MDI areaMDITop Allows you to find out and modify the distance between the top border of the MDI parent
window and the top border of the MDI areaMemory Allows you to find out whether the specified control is a browsing or memory list box or
combo box, looper or tableMemoryCurrency Allows you to find out and modify the currency used when handing a "Currency + Euro"
edit control or column by programmingMemoryFormat Allows you to find out and modify the format of the value returned for the Date or Time
edit controls or columnsMerge Allows you to find out whether the table cells (or the column titles) are merged and to
merge the table cells (or the column titles).Message Allows you to find out and modify the help messageMinHeight Allows you to find out and modify the minimum height of a control or windowMiniature Allows you to find out and modify the image associated with an element found in a lis-
tviewMinValue Allows you to find out and modify the lower bound of a controlMinWidth Allows you to find out and modify the minimum width of a control or windowModificationDura-tionAPT
Allows you to find out and specify whether the user can modify the duration of anappointment in a Scheduler control or in an Organizer control.
WLangage.book Page 143 Jeudi, 20. mars 2014 4:29 16

144 Part 3: Managing the windows, the pages and the controls
Modified Allows you to find out whether a control was modified by the user (with the keyboard orwith the mouse)
MouseCursor Allows you to find out and modify the rollover cursor defined for a control or for a windowMoveable Allows you to find out whether a table column can be moved by the user and to allow/
forbid the user to move a table columnMoveableByBac-kground
Allows you to find out whether a window can be moved by its background and to makethe window movable (or not) by its background
MovementAPT Allows you to find out and indicate whether the user can move a meeting in a Schedulercontrol or in an Organizer control.
Multiline Allows you to find out whether an edit control or a table column is multilineMultimediaReader Allows you to find out and modify the multimedia reader currently used by a video con-
trol to read the multimedia files.Multiselection Allows you to find out and modify the selection mode of a table, list box, looperName Allows you to find out the name of a control, group of controls, window or pageNameBrowserFile Allows you to find out the initial name of the file to upload found on the computer of the
Web user.NameServerFile Allows you to find out the name of the uploaded file found on the server.NbDayDisplayed Allows you to find out and modify the number of days displayed in an Organizer control.NbLinesPerPage Allows you to find out and modify the number of rows in a table or in a looper displayed
in a pageNew Allows you to find out whether the current row in a table or a in looper was created by
TableAdd, TableAddLine, TableInsert and TableInsertLineNote Allows you to find out and modify the notes associated with a control, a window or a
pageNoteTitle Allows you to find out and modify the caption used in the program documentation of a
control, window or pageNum1stDayOfTheWeek
Allows you to find out and modify the 1st day of the week displayed in a Calendar con-trol, in an Organizer control or in an edit control in Date with Calendar format.
NumberColumn Allows you to find out the number of columns in a multi-column list box or in table and tomodify the number of columns found in a multi-column list box
NumberPage Allows you to find out the number of pages in a "multi-page" image fileObserverOrienta-tion
Allows you to find out and modify the secondary angle of a carousel control. Used tomake the control "turn around".
Occurrence Allows you to find out the number of elementsOrientationTitle Allows you to find out whether the titles of the table columns are sloped and to slope (or
not) the titles of the table columns (by 45% for example).PageNumber Allows you to find out and modify the page number displayed in an image control (for the
"multi-page" image files)Password Allows you to find out whether an edit control is a "Password" controlPeriodSelection Allows you to find out and specify whether the user can select a period in a Scheduler
control or in an Organizer control.PopupMenu Allows you to find out and modify the popup menu associated with a controlProgress Bar Allows you to find out and modify the Progress Bar control used during the calculation of
a pivot tableProgressBarColor Allows you to find out the color of the bar (which means the color of the area that moves)
in a Progress Bar control, a Progress bar column or a Progress Bar cellProgressBarSys-tem
Allows you to find out and modify the progress bar used as system progress bar (in thetaskbar) with Windows 7 (and later).
Pushed Allows you to find out and modify the status of an on/off button (pressed or not)Report Allows you to find out and modify the display status of a control, group of controls or win-
dow
WLangage.book Page 144 Jeudi, 20. mars 2014 4:29 16

Part 3: Managing the windows, the pages and the controls 145
Resource Allows you to identify the visible resources in a Scheduler control and to find out the resource corresponding to the specified subscript in a Scheduler control
ResourceHeight Allows you to find out and modify the height of the resources in a Scheduler control with the resources in rows and the days in columns.
ResourceWidth Allows you to find out and modify the width of the resources found in a Scheduler controlwith resources in columns.
ReturnedValue Allows you to find out and modify the value returned by a windowRichEdit Allows you to find out whether a window control is in RTF format (Rich Text Format)RightClick Allows you to find out and modify the name of the button that will be run during a right
click on an objectRightToLeft Allows you to find out the text direction currently used in a control or in a column found
in a window.RulerModifiable Allows you to find out whether the ruler of a TimeLine control can be moved by the user
and to allow the user to move (or not) the ruler of a TimeLine controlRulerValue Allows you to find out and modify the position of a ruler in a TimeLine control.RulerVisible Allows you to manage the visibility of a ruler in a TimeLine control. ScrollValue Allows you to find out and modify the scroll value of a scrollbarScrollWithFinger Allows you to find out whether the content of a control can be moved with the finger
("scroll with finger") and to allow a control to be handled (or not) with the fingerSecurityHtml Allows you to find out and modify the status of the security mechanism for the edit con-
trols in HTML formatSelected Allows you to find out whether a row found in a list box or in a table is selected and to
select a row in a list box or in a tableSelectedResource Returns the name of the resource corresponding to the selection made by the user in a
Scheduler controlSelectedText Allows you to find out and modify the text selected in an edit control, in an editable
combo box or in an editable table column.Size Allows you to find out and modify the maximum number of characters found in a control
of a window or pageSortable Allows you to find out whether a column can be chosen by the user as sort criterion for
the table and to allow/forbid the user from choosing a column as sort criterion for thetable
Sorted Allows you to find out whether a memory list box or combo box is sorted and to make amemory list box or combo box sortable
StartDate Allows you to find out and modify the start date of a period selected in a Calendar/Orga-nizer/Scheduler control.
StartTotalRange Allows you to find out and modify the first displayable date or time in a Scheduler controlor in a TimeLine control
StartVisibleRange Allows you to find out and modify the first visible date or time in a Scheduler control or ina TimeLine control
StatusBar Allows you to find out whether a window status bar is visible and to make the status barof a window visible/invisible
StoredItem Allows you to find out or modify the item stored in a table, looper, list box or combo boxStoredValue Allows you to find out the value that will be stored when selecting an element in the list
boxStoreFilterAAF Allows you to find out and specify whether the filters set by the user on a Table or Tree-
view table control are stored between 2 startups of the application.StoreSortAAF Allows you to find out and specify whether the sort performed by the user on a Table
control or a Treeview Table control is stored between 2 startups of the application.
WLangage.book Page 145 Jeudi, 20. mars 2014 4:29 16

146 Part 3: Managing the windows, the pages and the controls
SubCaption Allows you to find out and modify the secondary caption of an option found in a radiobutton.
TABOrder Allows you to find out the position of a control in the navigation order of a windowTestMode Allows you to find out whether the ad displayed in the Ad control is a test ad.TextDirection Allows you to find out and modify the writing direction used in a window or in a control
(useful for managing the languages such as Arabic or Hebrew).Timeout Allows you to find out and modify the time-out after which the connection is considered
as "having failed"Title Allows you to find out and modify the title of a table column, the title of a window or the
title of a pageTitleImage Allows you to find out and modify the image displayed beside the title of a column found
in a table or in a treeview table.ToolTip Allows you to find out and modify the text displayed in the tooltip associated with a con-
trolToolTipTitle Allows you to find out and modify the text displayed in the tooltip associated with the title
of a table columnTotalsEnabled Allows you to find out the operating mode of automatic calculations performed in a table
and to forbid (or force) the automatic calculations in a tableTriState Allows you to find out and modify the management mode for an option of a check boxType Allows you to find out the type of an objectTypeFiles Allows you to find out and modify the filter on the files proposed in the file picker of the
Upload control.Unicode Allows you to find out whether a control has a Unicode value and to indicate whether a
control has a Unicode valueUpperValue Allows you to find out and modify the upper bound of the interval currently selected in a
Range Slider control and to modify the upper bound of the interval currently selected in a Range Slider control
URL Allows you to find out the address associated with a link, a button or a clickable imageValue Allows you to find out and modify the value of a control, window or pageVertical Allows you to find out whether a control is oriented horizontally or verticallyVerticalAlignment Allows you to find out and modify the vertical alignment of a controlVerticalOrientation Allows you to find out and modify the orientation of a listview controlVisible Allows you to find out whether an element (control, group of controls, window or page) is
visible and to make an element (control, group of controls, window or page) visible/invi-sible
VisibleOutsideWin-dow
allows you to find out whether a button is visible even if its position (X,Y) places it outside the border of the window (entirely or partially) and modify the visibility of a button posi-tioned "outside the window"
VisualEffect Allows you to manage a visual effect on a control or on a group of controls found in awindow.
Width Allows you to find out and modify the width of a control, window or table columnWithInput Allows you to find out whether a Combo Box control is editable (or not) and to modify this
status.WithZoom Allows you to find out whether the user can perform a zoom in an HTML control found in
an Android, iPhone or iPad application.WorkingHourEnd Allows you to find out and modify the end time of the working hours used by an Organi-
zer control or by a Scheduler controlWorkingHourStart Allows you find out and modify the start time of the working hours used by an Organizer
control or by a Scheduler control.
WLangage.book Page 146 Jeudi, 20. mars 2014 4:29 16

Part 3: Managing the windows, the pages and the controls 147
X Allows you to find out and modify the X coordinate of a control, table column or window(position on the X axis)
XAxisMax Allows you to find out the upper bound on the X axis for a chart control.XAxisMin Allows you to find out the lower bound on the X axis for a chart control.XImage Allows you to find out and modify the initial X coordinate of the image in an image con-
trolXInitial Allows you to find out and modify the initial X coordinate of a control or windowY Allows you to find out and modify the Y coordinate of a control or windowYAxisMax Allows you to find out the upper bound on the Y axis for a chart control.YAxisMin Allows you to find out the lower bound on the Y axis for a chart control.YImage Enables you to find out and modify the initial Y coordinate of the image in an image con-
trolYInitial Allows you to find out and modify the initial Y coordinate of a control anchored "at the
bottom"ZAxisMax Allows you to find out the upper bound of altitudes (Z axis) for a Chart control (Surface
chart).ZAxisMin Allows you to find out the lower bound of altitudes (Z axis) for a Chart control (Surface
chart).Zoom Allows you to find out and modify the value of the zoom performed in an image controlZOrder Allows you to find out and modify the z-order position of a control
See the online help for more details.See the online help to check the availability of these properties in the different products (WinDev, WebDev,WinDev Mobile).
WLangage.book Page 147 Jeudi, 20. mars 2014 4:29 16

148 Part 3: Managing the windows, the pages and the controls
WLangage.book Page 148 Jeudi, 20. mars 2014 4:29 16

PART 4
Standardfunctions
WLangage.book Page 149 Jeudi, 20. mars 2014 4:29 16

WLangage.book Page 150 Jeudi, 20. mars 2014 4:29 16

Part 4: Standard functions 151
1. HANDLING THE NUMERIC VALUES
1.1 Overview
Several programming functions are used to:• managing the numeric values,• performing trigonometric calculations,
• handling the binary values,• using the matrices,• performing financial and statistical calculations.
1.2 The matrices
Several WLanguage functions are used to handlethe matrices.The matrices are mathematical tools used to sim-plify and solve many problems. The calculations onmatrices are used in many fields: economy, phy-sics, etc.In these fields, the problems can often be formula-ted as a set of equations. The result of this set ofequations can be calculated via the matrices.
1.2.1 DefinitionA matrix is an organized set of "n p" numbers, dis-played in an array of n rows and p columns.The numbers found in the matrix are the matrix ele-ments. Each element is identified by its row and byits column. A value is associated with each ele-ment.
In this matrix, n = 2 rows and p = 4 columns. The value of the element (row 2, column 3) is 7.
The dimension (or size) of the matrix correspondsto the number of rows and columns of the matrix.
The size of your matrices can be managed dynami-cally. Indeed, a matrix is empty when it is created: itcontains 0 row and 0 column. The dimension ofthis matrix is 0 x 0. As soon as an element is initiali-zed in row n and column p, the size of the matrixbecomes n x p. For example, once an element is ini-tialized in row 6 and column 12, the size of thematrix becomes 6 x 12.
1.2.2 Handling the matricesSeveral WLanguage functions allow you to manageyour matrices. These functions start with "MAT".These functions allow you to:• handle the matrices (creation, copy, inversion,
compression, deletion),• initialize the elements of the matrices,• read the value of the elements found in the matri-
ces,• perform various calculations on the matrices
(addition, multiplication, transposition, determi-nant, etc.),
• get various information about the matrices (num-ber of rows, number of columns, etc.).
ExampleTo perform financial calculations, your programcreates several matrices. The matrix elements canbe initialized. Several calculations can be perfor-med on these matrices.
1.3 The statistics
Several WLanguage functions are used to performstatistical calculations.The statistics are calculated from matrices. Thevalues taken into account for calculating the statis-
tics are the values of the elements found in amatrix. The series of values correspond to a row (ora column) of the matrix.
WLangage.book Page 151 Jeudi, 20. mars 2014 4:29 16

152 Part 4: Standard functions
For example, the values of row 1 for this matrix are3, 2, 4, 5 and 6.
The functions used to perform statistical calcula-
tions start with "Stat". These functions allow you to:• calculate the variance and the covariance,• calculate the standard deviation, etc.
1.4 Financial calculations
Several WLanguage functions are used to performfinancial calculations. These calculations are per-formed from matrices. The values taken intoaccount for these calculations are the values of theelements found in a matrix. The series of valuescorrespond to a row (or a column) of the matrix.
The functions used to perform the financial calcula-tions start with "Fin". These functions allow you to:• calculate the amortization of a good according to
different methods,• calculate the standard deviation, etc.
1.5 Functions for managing the numeric values
1.5.1 Miscellaneous functionsThe following functions are used to manage the numeric values:
Abs Calculates the absolute value of a numeric expression (integer or real)ArcCos Calculates the arc cosine of a numeric value (integer or real)ArcSin Calculates the arc sine of a numeric value (integer or real)ArcTan Calculates the arc tangent of a numeric value (integer or real)ArcTan2 Returns the arc tangent 2 of the values passed in parameterAverage Calculates the mean of several elementsConversion Converts a value from a unit to another oneCos Calculates the cosine of an angleCoTan Calculates the cotangent of an angleDecimalPart Returns the decimal part of a numberDecimalToSexagesimal Returns the sexagesimal angle (in base 60) corresponding to a decimal angleExp Calculates the exponential of a numeric valueFactorial Returns the factorial of an integer numberInitRandom Initializes the generator of random numbersIntegerPart Returns the integer part of a numberIsEven Identifies an even numberIsOdd Identifies an odd numberLn Calculates the Napierian logarithm of a numeric valueLog Calculates the logarithm of a numeric valueMax Returns the greatest of the values passed in parameterMin Returns the lowest of the values passed in parameterNumToString Returns a character string corresponding to the number passed in parameterPower Raises a number to a powerRandom Returns a random numberRoot Calculates the root of a numberRoundDown Returns the rounded value of a value rounded to the nearest lower integer
WLangage.book Page 152 Jeudi, 20. mars 2014 4:29 16

Part 4: Standard functions 153
1.5.2 Binary functionsThe following functions are used to manage the binary values:
1.5.3 Matrix functionsThe following functions are used to manage the matrices:
Rounded Calculates the rounded value of a value according to the specified number ofdecimals
RoundUp Returns the rounded value of a value rounded to the nearest greater integerSexagesimalToDecimal Returns the decimal angle corresponding to a sexagesimal angleSin Calculates the sine of an angleSum Calculates the sum of the array elements.Tangent Calculates the tangent of an angleSee the online help for more details about the availability of these functions in the different products (Win-Dev, WebDev, WinDev Mobile).
BinaryAND Returns the result of a logical AND (bit by bit) between two valuesBinaryNOT Returns the result of a logical NOT (bit by bit) performed on a valueBinaryOR Returns the result of a logical OR (bit by bit) between two valuesBinaryXOR Returns the result of a logical exclusive OR (bit by bit) between two values
See the online help for more details.See the online help to check the availability of these functions in the different products (WinDev, WebDev,WinDev Mobile).
MatAdd Adds two matrices of the same dimensionMatCopy Creates the copy of a matrixMatCreate Creates a matrixMatDelete Deletes an existing matrixMatDeterminant Calculates the determinant of a square matrixMatError Identifies the type of the last error caused by a function for matrix managementMatExist Checks the existence of a matrix in memoryMatFill Initializes all the elements found in a matrix of a given sizeMatFloatAdd Adds a value to each matrix elementMatFloatMultiply Multiplies each matrix element by a valueMatInvert Reverses a square matrixMatMultiply Multiplies two matricesMatNbColumn Returns the number of columns found in a matrixMatNbLine Returns the number of rows found in a matrixMatRead Reads the value of a matrix elementMatReadColumn Reads the value of all the elements found in a matrix columnMatReadLine Reads the value of all elements found in a matrix rowMatStack Compresses the memory footprint occupied by a matrixMatTranspose Calculates the transposed matrixMatWrite Writes an element into a matrix
See the online help for more details.See the online help to check the availability of these functions in the different products (WinDev, WebDev,WinDev Mobile).
WLangage.book Page 153 Jeudi, 20. mars 2014 4:29 16

154 Part 4: Standard functions
1.5.4 Financial functionsThe financial functions are as follows:
1.5.5 Statistical functionsThe statistical functions are as follows:
FinCurrentVal Returns the current value of an investmentFinDecreasingRedemption Calculates the amortization value of a good over a specific period of time,
via the formula for fixed-rate decreasing amortizationFinError Returns the number of the last error caused by a financial functionFinFutureVal Returns the future value of an investment (regular fixed payments with
fixed interest rate)FinInterestRate Calculates the interest rate for a loan over a given period of time with fixed
paymentsFinLinearRedemption Calculates the value of linear amortization of a good over a specific period
of timeFinNetCurrentVal Returns the net current value of an investment according to variable finan-
cial flowsFinPaymentNb Returns the number of payments required to pay off a capital according to
a given rateFinPeriodInterest Calculates for a given period the amount of interests due for a loan paid off
by fixed periodic payments with a fixed interest rateFinRedemption Creates an amortization matrix for a fixed-rate loan over a defined period of
timeFinRepayVal Returns the amount of each regular payment of an investment with fixed
interest rate and fixed payment
See the online help for more details.See the online help to check the availability of these functions in the different products (WinDev, WebDev,WinDev Mobile).
StatAverage Calculates the arithmetic, geometric or harmonic mean for a seriesStatAverageDe-viation
Calculates the average deviation of values in relation to their arithmetic mean
StatCorrelation Calculates the coefficient of correlation between two series of valuesStatCovariance Calculates the covariance between two series of valuesStatError Returns the number for the last error caused by a statistical functionStatMax Calculates the maximum value for a series of valuesStatMin Calculates the minimum value for a series of valuesStatStandardDe-viation
Calculates the standard deviation for a series of values
StatStandardDe-viationP
Calculates the standard deviation for a full series of values
StatSum Calculates the sum for a series of valuesStatVariance Calculates the variance for a series of valuesStatVarianceP Calculates the variance for a full series of values
See the online help for more details.See the online help to check the availability of these functions in the different products (WinDev, WebDev,WinDev Mobile).
WLangage.book Page 154 Jeudi, 20. mars 2014 4:29 16

Part 4: Standard functions 155
2. HANDLING THE CHARACTER STRINGS
The WLanguage functions are used to performseveral types of operations on the characterstrings.
You can:• handle the content of the string,• perform conversions and encryptions.
2.1 Handling the content of a string
The WLanguage functions allow you to extract partof a character string (Left, Right or Middle for exam-ple) as well as perform searches in a string (Posi-tion or Replace for example).Some features proposed by the WLanguage func-tions can also be performed via the WLanguageoperators on characters strings.Several WLanguage functions are used to easilyconvert and encrypt the character strings.You can for example:• convert a string into ANSI or OEM format (Ansi-
ToOem or OemToAnsi),
• convert a string into ANSI or UNICODE format(AnsiToUnicode and UnicodeToAnsi),
• encrypt or decrypt a character string (Crypt andUncrypt),
• convert a character string into phonetics (Phone-tics).
Note: For the String/Date or String/Time conver-sions, see “Handling the dates and times”,page 159.
See “Operators on character strings”, page 70 formore details.
2.2 WinDev and the Unicode format
2.2.1 What is the UNICODE formatThe Unicode format is an encoding system thatassigns a unique number to each character. Thisencoding is performed on 16 bits. This number canbe read regardless of the platform, software or lan-guage used.The Unicode format can support all the charactersets of the planet.
2.2.2 WinDev and UnicodeTo manage the UNICODE format, WinDev proposes:• the UNICODE String type• two conversion functions:
• the use of functions for handling characterstrings (Right, Left, Middle, Length, VarType, …)
• Adding a constant used to find out whether astring is an ANSI string or a Unicode string
• the use of operators for handling the characterstrings•the concatenation operator (+)•the comparison operator (=)•the extraction operator ([[ ]])•the comparison operator (<>)
• the use of functions for handling text files (fWrite,fWriteLine, fRead, fReadLine, fOpen).
AnsiToUnicode Converts a character string inANSI format (Windows) into acharacter string in UNICODE for-mat.
UnicodeToAnsi Converts a character string inUnicode format into a characterstring in ANSI format (Windows).
WLangage.book Page 155 Jeudi, 20. mars 2014 4:29 16

156 Part 4: Standard functions
2.3 Handling character strings in Pocket PC
The default format of character strings on PC dif-fers from the default format of character strings onPocket PC.In most cases, on the PCs, the Windows applica-tions handle character strings in ANSI format. Whileon Pocket PCs, Windows applications for Pocket PChandle character strings in UNICODE format bydefault.
Character stringIn most cases, the character strings are handledthe same way by the WLanguage functions in Win-Dev Mobile and in standard WinDev. WinDev
Mobile automatically supports the different formatsof character strings in a way that is completelytransparent for the developer and for the user.
Text filesIn pocket PC, when using text files containing cha-racter string in ANSI format, WinDev automaticallyconverts these character strings into the UNICODEformat. This conversion is performed even if theopening of this file in ANSI format is explicitlyrequested. This conversion is completely transpa-rent.
2.4 Functions for managing the character strings
The following functions are used to manage the character strings:
AnsiToOem Transforms a character string in ANSI format (Windows) into a character string in OEMformat (DOS)
AnsiToUnicode Converts a character string in ANSI format (Windows) into a character string in UNI-CODE format
ArrayToString Converts a one-dimensional array or a two-dimensional array into a character string.Asc Calculates the ASCII code of the specified character (the ASCII code used corresponds
to the ANSI standard used by Windows)BufferToHexa Converts a buffer into a displayable hexadecimal string (for example: "4A 5B 00").BufferToInteger Extracts an integer found in a binary buffer at a given positionBufferToReal Extracts a real found in a binary buffer at a given position.Charact Returns the character corresponding to the specified ASCII code (the ASCII code used
corresponds to the ANSI standard used by Windows)CharactType Returns information about the type of a character.CharactTypeOc-currence
Returns the number of characters matching the information of a given type.
CharactUnicode Returns the Unicode character corresponding to the specified ASCII codeCommonLength Returns the number of characters common to two character stringsComplete Returns a specific character string of a given length.CompleteDir Adds (if necessary) the "\" character at the end of a character stringCompress Compresses a string or a memory block (buffer) in binary formatContains Allows you to find out whether a sub-string is included in a string.Crypt Encrypts a character string in binary format or in ASCII formatDeserialize Transforms a string or a buffer into structure, class, arrayExtractLine Extracts a specific line from a character stringExtractString Extracts a sub-string from a character string, according to a given string separatorHexaToBuffer Converts a string representing bytes in hexadecimal into a binary buffer.HexaToInt Returns the numeric value of an hexadecimal stringHTMLToRTF Transforms a character string or a buffer in HTML format into a text in RTF format.HTMLToText Converts a character string or a buffer in HTML format into a text.IntToHexa Returns the hexadecimal string of a numeric valueLeft Extracts the left part of a character string (the first characters)
WLangage.book Page 156 Jeudi, 20. mars 2014 4:29 16
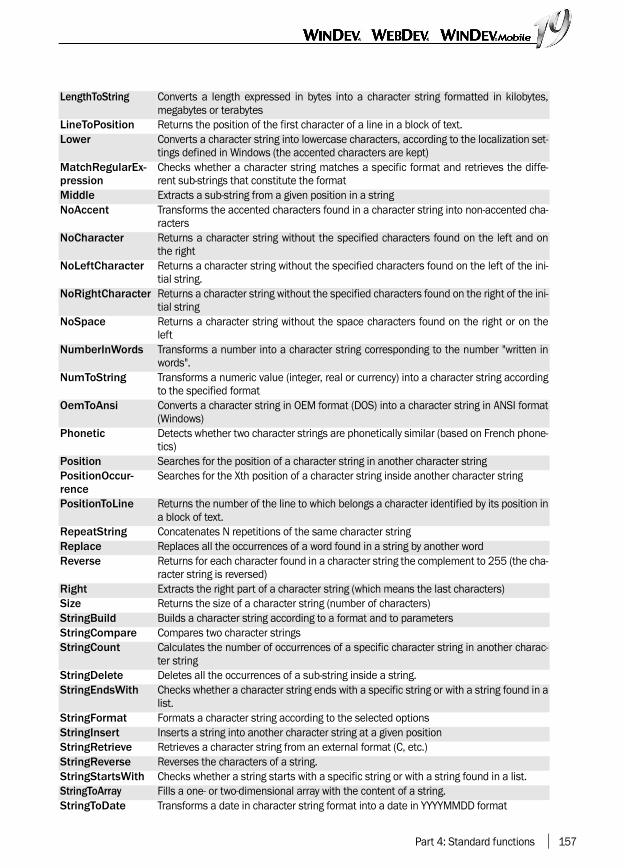
Part 4: Standard functions 157
LengthToString Converts a length expressed in bytes into a character string formatted in kilobytes,megabytes or terabytes
LineToPosition Returns the position of the first character of a line in a block of text.Lower Converts a character string into lowercase characters, according to the localization set-
tings defined in Windows (the accented characters are kept)MatchRegularEx-pression
Checks whether a character string matches a specific format and retrieves the diffe-rent sub-strings that constitute the format
Middle Extracts a sub-string from a given position in a stringNoAccent Transforms the accented characters found in a character string into non-accented cha-
ractersNoCharacter Returns a character string without the specified characters found on the left and on
the rightNoLeftCharacter Returns a character string without the specified characters found on the left of the ini-
tial string.NoRightCharacter Returns a character string without the specified characters found on the right of the ini-
tial stringNoSpace Returns a character string without the space characters found on the right or on the
leftNumberInWords Transforms a number into a character string corresponding to the number "written in
words".NumToString Transforms a numeric value (integer, real or currency) into a character string according
to the specified formatOemToAnsi Converts a character string in OEM format (DOS) into a character string in ANSI format
(Windows)Phonetic Detects whether two character strings are phonetically similar (based on French phone-
tics)Position Searches for the position of a character string in another character stringPositionOccur-rence
Searches for the Xth position of a character string inside another character string
PositionToLine Returns the number of the line to which belongs a character identified by its position ina block of text.
RepeatString Concatenates N repetitions of the same character stringReplace Replaces all the occurrences of a word found in a string by another wordReverse Returns for each character found in a character string the complement to 255 (the cha-
racter string is reversed)Right Extracts the right part of a character string (which means the last characters)Size Returns the size of a character string (number of characters)StringBuild Builds a character string according to a format and to parametersStringCompare Compares two character stringsStringCount Calculates the number of occurrences of a specific character string in another charac-
ter stringStringDelete Deletes all the occurrences of a sub-string inside a string.StringEndsWith Checks whether a character string ends with a specific string or with a string found in a
list.StringFormat Formats a character string according to the selected optionsStringInsert Inserts a string into another character string at a given positionStringRetrieve Retrieves a character string from an external format (C, etc.)StringReverse Reverses the characters of a string.StringStartsWith Checks whether a string starts with a specific string or with a string found in a list.StringToArray Fills a one- or two-dimensional array with the content of a string.StringToDate Transforms a date in character string format into a date in YYYYMMDD format
WLangage.book Page 157 Jeudi, 20. mars 2014 4:29 16
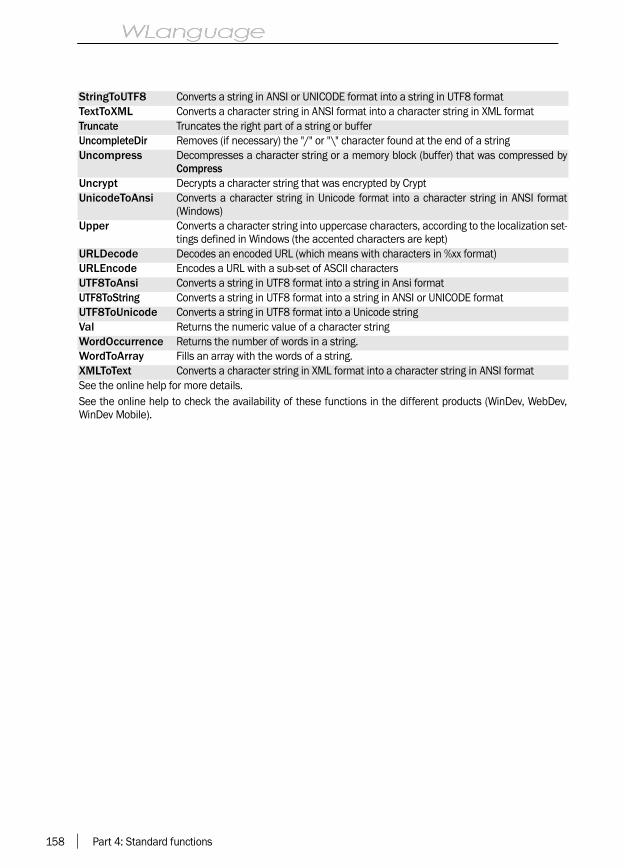
158 Part 4: Standard functions
StringToUTF8 Converts a string in ANSI or UNICODE format into a string in UTF8 formatTextToXML Converts a character string in ANSI format into a character string in XML formatTruncate Truncates the right part of a string or bufferUncompleteDir Removes (if necessary) the "/" or "\" character found at the end of a stringUncompress Decompresses a character string or a memory block (buffer) that was compressed by
CompressUncrypt Decrypts a character string that was encrypted by CryptUnicodeToAnsi Converts a character string in Unicode format into a character string in ANSI format
(Windows)Upper Converts a character string into uppercase characters, according to the localization set-
tings defined in Windows (the accented characters are kept)URLDecode Decodes an encoded URL (which means with characters in %xx format)URLEncode Encodes a URL with a sub-set of ASCII charactersUTF8ToAnsi Converts a string in UTF8 format into a string in Ansi formatUTF8ToString Converts a string in UTF8 format into a string in ANSI or UNICODE formatUTF8ToUnicode Converts a string in UTF8 format into a Unicode stringVal Returns the numeric value of a character string WordOccurrence Returns the number of words in a string.WordToArray Fills an array with the words of a string.XMLToText Converts a character string in XML format into a character string in ANSI formatSee the online help for more details.See the online help to check the availability of these functions in the different products (WinDev, WebDev,WinDev Mobile).
WLangage.book Page 158 Jeudi, 20. mars 2014 4:29 16

Part 4: Standard functions 159
3. HANDLING THE DATES AND TIMES
3.1 Overview
Several methods can be used to handle the datesand times in your applications:• the Date or Time edit controls,• the Date or Time items found in the data files,• The Date, Time, DateTime and Duration varia-
bles,• The properties associated with Date, Time, Date-
Time and Duration variables,• The WLanguage functions for managing the
dates and times.
3.2 Different methods for handling the dates and times
Depending on the type of operation performed onthe dates and times, it may be more efficient to usethe variables or the WLanguage functions.The WLanguage functions are recommended:• to format the dates and times and to perform
conversion operations (convert a date into aninteger, etc.),
• to get information about the dates and times
(validity of the date or time, spell out the day,etc.).
The use of variables is recommended:• for all the calculations performed on the dates
and times (interval, calculation of duration, etc.),• for extracting part of a date or time (day, month,
year).
3.3 Handling dates/times found in each edit control
The values found in the edit controls can be han-dled by the date or time variables.To do so, assign the content of the control to thevariable.
See the Date type (page 42), the Time type(page 43), the DateTime type (page 43) and theDuration type (page 43) for more details.
3.4 Functions for managing the dates and times
The following functions are used to manage the dates and times:
Age Returns the age according to the date of birthCurrentYear Returns the current year in integer formatStringToDate Transforms a date (character string) into a date in YYYYMMDD formatStringToDuration Transforms a duration in character string format into a duration that can be
used by a Duration variableChronoStart Starts a stopwatch to find out the duration of a process (in milliseconds) and
resets an existing stopwatchChronoEnd Stops a stopwatch and returns the time passed (in milliseconds) since the
start of timing (call ChronoStart). ChronoPause Pauses a stopwatch in order to measure the time spent on a process. ChronoReset Stops and resets an existing stopwatch to zero.ChronoResume Restarts a stopwatch that was previously stopped ChronoValue Indicates the time passed since the call to ChronoStartDateDifference Calculates the number of days between two datesToday Returns or modifies the system date
WLangage.book Page 159 Jeudi, 20. mars 2014 4:29 16

160 Part 4: Standard functions
DateTimeDifference Calculates the difference between two dates and timesDateTimeLocalToUTC Converts a date and a time expressed in local time (time zone, summer time,
winter time) into a date and time expressed in universal time (UTC)DateTimeByDefault Define the default value of Date, Time and DateTime variablesSysDateTime Returns or modifies the system date and timeDateTimeUTCToLocal Converts a date and a time expressed in universal time (UTC) into a date and
time expressed in local time (time zone, summer time, winter time).DateSys Returns or modifies the system dateDateValid Checks the validity of a date (between January 01 0001 and December 31
9999)DateToString Formats the specified date into the specified formatDateToInteger Transforms a date into an integerDateToDay Returns the day corresponding to a given dateDateToDayInAlpha Spells out the day of the week corresponding to the specified dateDateToMonthInAlpha Spells out the month corresponding to the specified dateDateToWeekNumber Returns the week number corresponding to the specified dateLastDayOfWeek Returns the date of the last day of the week for a given date.LastDayOfMonth Returns the date of the last day for the specified monthDurationToString Formats the specified duration into the specified formatIntegerToDate Transforms an integer into a date in "YYYYMMDD" formatIntegerToTime Transforms an integer into a time in "HHMMSSCC" formatIntegerToDay Returns the day of the week corresponding to the specified dateIntegerToDayInAlpha Spells out the day of the week corresponding to the specified dateIntegerToMonthInAlpha Spells out the month corresponding to the specified dateIntegerToWeekNumber Returns the week number in the year corresponding to the dateTimeDifference Calculates the difference between two times in hundredths of a secondTimeSys Returns or modifies the system timeTimeValid Checks the validity of a timeTimeToString Formats the time passed as parameter according to the "HH:MM:SS:CC" for-
matTimeToInteger Transforms a time into an integerBankHoliday Indicates whether a day is a bank holiday or not.BankHolidayAdd Indicates that a day (or a list of days) is a bank holiday.BankHolidayDeleteAll Clears the list of all bank holidays.Now Returns or modifies the system timeDayNumberInAlpha Returns the name of the day of the week according to its number.MonthNumberInAlpha Returns the name of the month according to its number.CurrentMonth Returns the current monthWeekNumber Returns the week number in the year corresponding to the dateEaster Returns the date for Easter for a given yearFirstDayOfWeek Returns the date of the first day of the week (which means Monday).FirstDayOfMonth Returns the first day of the monthWeekToDate Returns the date of the Monday for the specified week and year
See the online help for more details. See the online help to check the availability of these functions in the dif-ferent products (WinDev, WebDev, WinDev Mobile).
WLangage.book Page 160 Jeudi, 20. mars 2014 4:29 16

Part 4: Standard functions 161
4. HANDLING THE CHARTS
4.1 Overview
WinDev, WebDev and WinDev Mobile propose achart control (that can be used in the window edi-tor, page editor and report editor) as well as func-tions for creating and handling charts.Most of the applications and sites handle an impor-tant number of numeric data. The charts are used
to efficiently view this type of data.Several types of charts can be created: Pie, Bar,Line and Scatter charts. The display options areused to produce different visual effects for eachtype of chart.
4.2 The different types of charts
The different types of charts are as follows:• pie chart,• column chart,• line chart,• scatter chart,• stock chart,• 3D chart.
4.2.1 The "Pie" chartsA pie chart represents a circle divided into sections.The size of each section is proportional to the datafound in the series.A pie chart displays a single series of data. It isused to highlight a particularly important element.
1. Start angle. 2. Title of the chart. 3. Legend. 4.Section Label. 5. Color of section. 6. Raised. 7. Cap-tion of section.
4.2.2 The "Column" chartsThe data points are interpreted as "bars" whose hei-ght is proportional to the value of the data point.The column charts are used to represent the datatrend over a given time period. They are also usedto perform comparisons between elements.The categories are organized horizontally and thevalues are organized vertically in order to highlighttheir variation in time.
1. Caption of data. 2. Title of vertical axis. 3. Mark.4. Title of the chart. 5. Legend. 6. Series label. 7.Color of series. 8. Caption of category. 9 Spacing.10. Raised. 11. Gridlines.
4.2.3 The "Line" chartsIn the Line charts, the data is interpreted as suc-cessive Y coordinates of points. Then, the dotsfound in each series are linked by a line.
WD WM WebDev
WLangage.book Page 161 Jeudi, 20. mars 2014 4:29 16

162 Part 4: Standard functions
1. Title of the chart. 2. Title of vertical axis. 3. Mark.4. Legend. 5. Series label. 6. Color of series. 7. Cap-tion of category. 8. Title of horizontal axis. 9. Gridli-nes.The line charts are mainly used to represent thedata trend.
4.2.4 The "Scatter" chartsA scatter chart (XY) represents the relationshipbetween two numeric values in two series of data.The odd series are used to identify the X coordina-tes of the points while the even series are used toidentify the Y coordinates of the same points. Thescatter charts highlight regular intervals and theyare also used to group the data.The "scatter" charts are often used to representscientific data.
1. Title of vertical axis. 2. Y value. 3. Mark. 4. Titleof the chart. 5. Legend. 6. Series label. 7. Color ofseries. 8. X value. 9. Title of horizontal axis.
4.2.5 The "Stock" chartsThe Stock charts are used to represent the varia-tions in the values of shares. Three types of stockcharts are available:• Candlestick
• Barcharts
• Minmax
4.2.6 3D chartsAll types of charts can be displayed in 3D.
WLangage.book Page 162 Jeudi, 20. mars 2014 4:29 16

Part 4: Standard functions 163
4.3 How do I create charts?
4.3.1 Creating the charts in the editorsA chart control is available in the window editor,page editor and report editor. When creating thiscontrol, the wizards ask you questions to define thetype of chart to create.The description window of the control enables youto modify these options at any time.The WLanguage functions can also be used tomodify the charts displayed in the Chart controls.To do so, specify the name of the Chart control inthe different functions.
4.3.2 Creating the charts by programmingSeveral WLanguage functions can be used tomanage the charts. These functions enable you tocreate the charts, to modify them, to change thedisplay options, etc.
The following operations are used to create thecharts:1. Create the chart with the function namedgrCreate.2. Initialize the chart data with the following func-tions:• grAddData for line and pie charts, …• grScatterAddDataXY for the scatter charts,• grStockAddData for the stock charts.3. Choose the display destination of the chart with:• grDestinationControl to display the chart in an
image control,• grDestinationWnd to display the chart in an inde-
pendent WinDev window,• grDestinationBmp, grDestinationEmf or grDesti-
nationWMF to save the chart directly in files inBMP, EMF or WMF format respectively.
4. Draw the chart with grDraw.Several functions are used to configure and modifythe appearance of the chart. You have the ability todisplay a legend, the title of axes, etc.
4.3.3 Charts and threadsA single chart can be handled in a thread.Consequences:• Two threads cannot handle the same chart.• A chart created in a thread is automatically des-
troyed at the end of this thread. The chart exists
in the thread that contains the call to grCreate.
4.3.4 Default values of a chartThe default values of a chart are as follows:• WinDev popup menu enabled (can be configured
by grMenu and grMenuOption).• Automatic marks on the axes (can be configured
by grGraduate).• The colors are selected according to a preset
order among a set of 13 colors (can be configu-red by grSeriesColor).
• Gradient colors (can be configured by grGra-dient).
• Size of WinDev file (can be configured by grWnd-Size).
• Size of WinDev window (can be configured bygrWndSize).
• Size of WebDev image (can be configured by grI-mageSize).
• No label for the series (can be configured bygrSeriesLabel).
• No caption for the elements (can be configuredby grCategoryLabel and grLabel).
• No legend (can be configured by grLegend).• No title for the chart (can be configured by
grTitle).• No title for the axes (can be configured by grAxis-
Title).• No gridlines (can be configured by grGridLines).• No data (elements can be added by grAddData).• No destination (can be configured by grDestina-
tionControl, grDestinationWnd and grDestina-tionWMF).
• No display of the chart (the chart can be drawn bygrDraw).
• No raised effect (can be configured by grRaised).• For the pie charts, the start angle is equal to 0
(can be configured by grPieStartAngle).• For the bar charts and the MinMax charts, the
spacing between two categories is equal to 10pixels (can be configured by grColumnSpacing).
• For the scatter charts, the points are linked andtheir size is equal to 1 (can be configured by grS-catterLinkPoint and grScatterPointSize).
WLangage.book Page 163 Jeudi, 20. mars 2014 4:29 16

164 Part 4: Standard functions
4.4 Functions for managing the charts
The following functions are used to manage the charts:
gr3DSParameter Retrieves or modifies a parameter for drawing a 3D spatial chartgrAddData Adds a data into a chartgrAutoRefreshCategoryLabel Identifies or defines whether the category labels are updated whenever the
chart is drawngrAutoRefreshSeries Defines whether a series is refreshed whenever the chart is drawngrAxisTitle Defines the title for one of the chart axesgrAxisTitleFont Modifies the font used for the titles of the chart axesgrCategoryLabel Initializes the label of a data category (or section) in a chartgrClearPict Erases the drawing of a chartgrColor Returns and initializes the color of the different chart elements.grColumnSpacing Indicates the spacing between each data category in a bar chartgrCreate Creates a chart of a specific typegrCreateFont Creates a font for the chartsgrDeleteAll Erases a chart and destroys this chartgrDeleteSeries Deletes a data series from a chartgrDestinationBMP Defines a file in BMP format as destination of the chartgrDestinationControl Defines an image control as destination of the chartgrDestinationEMF Defines a file in EMF format as destination of the chartgrDestinationWMF Defines a meta file as destination of a chartgrDestinationWnd Defines a window as destination of a chartgrDonutHolePercentage Modifies the percentage corresponding to the radius of the hole in a donut
chart.grDraw Draws a chart according to the specified parametersgrExist Checks the existence of a chart in memorygrGradient Displays the colors in gradient mode or notgrGraduate Indicates the frequency of the marks on the vertical/horizontal axis of a
chartgrGridlines Displays or hides the gridlines of a chartgrImageSize Modifies the size of the image containing the chartgrIncreaseData Adds a value to a data in a chartgrInfoPoint Returns the screen coordinates of a point or the screen coordinates of a
value found in a chart.grInfoXY Returns information about the series found at a specific point of the chartgrLabel Indicates various parameters for the additional legend in a chartgrLabelFont Modifies the font used for the labels of a chartgrLegend Indicates the presence and position of the legend in a chartgrLegendFont Modifies the font used for the legend of a chartgrLineThickness Changes the value of the line thickness in a line chartgrLoadParameter Restores the parameters used to draw a chart.grMask Defines a display mask for the values of the additional legendgrMenu Enables or disables the popup menu of a chartgrMenuOption Modifies the text of an option in the popup menu of a chartgrOrientation Modifies the orientation of the chart axesgrOrigin Modifies the start and end marks on the horizontal/vertical axisgrOverlayChart Allows you to display two different types of charts in the same chartgrParameter Retrieves or modifies a parameter of a chart.grPiePullOut Pulls out a section in a pie chart
WLangage.book Page 164 Jeudi, 20. mars 2014 4:29 16

Part 4: Standard functions 165
grPieStartAngle Indicates the start angle of the first section in a pie chartgrPrint Prints a chartgrRaised Indicates the depth of the raised sections for the 3D chartsgrRotation Allows you to turn a surface chart around one of its axesgrSaveBMP Saves a chart that was drawn beforehand in BMP formatgrSaveEMF Saves a chart that was drawn beforehand in EMF vectorial formatgrSaveParameter Saves the parameters of a chart as a compressed stringgrSaveWMF Saves a chart that was drawn beforehand in EMF vectorial formatgrScatterAddDataXY Adds a data into a "Scatter" chartgrScatterLinkPoint Links (or not) the points found in a "Scatter" chartgrScatterPointSize Defines the size of the points found in a "Scatter" chartgrScatterSeriesColor Initializes the color of a series for a "Scatter" chartgrScatterSeriesLabel Initializes the series label in a "Scatter" chartgrSeriesColor Initializes the color of a series or the color of a sectiongrSeriesLabel Initializes the label of a data series in a chartgrSeriesSecondaryAxis Defines whether a series will be drawn on the secondary axisgrSmoothing Smoothes a chart with the "cubic splines" algorithmgrSourceCategoryLabel Defines the source of the category labelsgrSourceSeries Defines the source of a seriesgrStockAddData Adds a data into a stock chartgrSurfaceAddData Adds a data into a Surface chartgrSurfaceAltitudeColor Defines the color used for the altitude (Z axis) of a surface chartgrSurfaceDeleteAltitudeCo-lor
Deletes the altitude colors.
grSurfaceDeleteMarkCap-tion
Deletes the captions of the marks found in a Surface chart.
grSurfaceGridlines Displays the gridlines for the different planes of a surface chartgrSurfaceMarkCaption Allows you to specify the caption of a mark for a Surface chartgrSurfaceMesh Enables or disables the mesh on a surface chartgrTitle Modifies the caption and/or the position of the chart titlegrTitleFont Modifies the font used for the title of a chartgrTooltip Displays and formats the tooltip associated with a chartgrType Modifies or returns the type of a chartgrWndSize Defines the size of the window containing the chart
See the online help for more details.See the online help to check the availability of these functions in the different products (WinDev, WebDev,WinDev Mobile).
WLangage.book Page 165 Jeudi, 20. mars 2014 4:29 16

166 Part 4: Standard functions
5. HANDLING THE MEMORY ZONES
The following functions are used to manage the memory zones:
MemAdd Adds an element into a memory zoneMemCount Returns the number of elements found in a memory zoneMemCreate Creates a memory zoneMemCurrent Returns the subscript of the current elementMemDelete Deletes an element from a memory zoneMemDeleteAll Clears and deletes a memory zoneMemExist Checks the existence of a memory zoneMemFirst Positions on the first element of a memory zone and returns the value of this elementMemFound Checks whether the sought element was foundMemKeyVal Returns the value (added or modified by MemAdd or MemModify) of the current element
in a memory zoneMemLast Positions on the last element of a memory zone and returns the value of this elementMemModify Modifies an element in a memory zoneMemNext Positions on the next element of a memory zone and returns the value of this elementMemOut Allows you to find out whether the browse performed on the memory zone is outside the
memory zoneMemPrevious Positions on the previous element of a memory zone and returns the value of this ele-
mentMemRetrieve Retrieves the value of an element in a memory zoneMemSeek Seeks an element in a memory zoneMemSetPosition Positions the memory zone on an elementMemSort Sorts the elements found in a memory zone
See the online help for more details.See the online help to check the availability of these functions in the different products (WinDev, WebDev,WinDev Mobile).
WD WebDev
WLangage.book Page 166 Jeudi, 20. mars 2014 4:29 16

Part 4: Standard functions 167
6. HANDLING THE EXTERNAL FILES
6.1 Overview
Several WLanguage functions are used to managethe external files.An external file is a file with direct access, also cal-led "text file". The external files can have any type(".TXT", ".INI", etc.). The external files can contain:• readable characters (in character string format),• non-readable characters (in binary format).
Caution: Do not confuse external files with HFSQLfiles. The HFSQL files are data files in a WinDev/
WebDev format and they must be handled by theHFSQL functions.
Three groups of functions are used to handle:• the content of your external files,• the files found on your disks (file copy for exam-
ple),• the directories of your disks (directory creation for
example).
6.2 Handling the content of external files
You have the ability to:• create, open and close your external files,• manage the lock for your external files,• read the content of your external files: read a line
or a block of bytes (characters),• write into your external files: write a line, a cha-
racter string ot a section of memory,• move inside your external files.
ExampleYour program manages a ".INI" file whose size
exceeds 64KB. This ".INI" file is too large to be han-dled by the INI functions. The functions for mana-ging the external files enable you to handle this file.To retrieve the content of this file: read the contentof the file and assign the information read into asection of memory.To modify the content of this file: add various infor-mation into this file at a given position.This file must be partially locked in order to beupdated: lock the file. This file will only be accessi-ble by the application or the site that locks it.
6.3 Handling files
You have the ability to:• compress and encrypt the files,• find out the characteristics of a file,• find out and modify the name and path of the
files,• compare the content of several files,• list the files found in a directory by running a pro-
cedure that performs a process on each file.ExampleYour program manages large files containing confi-dential information. Encrypt and compress thesefiles before transferring them by network.Perform a search on your files and run a specificprocedure on the files found.
6.4 Handling disks and their directories
You have the ability to:• get information about the accessible directories
and disks,
• handle the directories.
WLangage.book Page 167 Jeudi, 20. mars 2014 4:29 16

168 Part 4: Standard functions
6.5 Functions for managing the external files
The following functions are used to manage the external files:
CompleteDir Adds (if necessary) the "\" character at the end of a character string. This functionis useful for building full file names when the format of the path is unknown (if theuser enters a file path for example)
fAddBuffer Adds the content of a buffer at the end of a filefAddText Adds the content of a character string at the end of a filefAttribute Identifies or modifies the attributes of a filefAttributeReadOnly Identifies or modifies the "Read-only" attribute of a filefChangeSize Resizes a filefClose Closes an external filefCompare Compares the content of two files bit by bitfCompress Compresses a filefCopyDir Copies a directory and its contentfCopyFile Copies a filefCopyFileWebFolder Copies an image file from the data directory of the application (or from one of its
sub-directories) to the "_WEB" directory of the application (or to one of its sub-direc-tories).
fCreate Creates a new external filefCreateLink Creates a link on a file at the specified location.fCrypt Encrypts a file in binary format or in ASCII formatfCurrentDir Identifies or modifies the current directoryfCurrentDrive Returns or modifies the current diskfDataDir Returns the full path of the directory for the HFSQL data filesfDataDirCommon Returns a directory path for the shared data of the current application. This data is
shared among all the users of the computer.fDataDirUser Returns a directory path for the data of the current application. This data is specific
to the current user for the current application.fDate Returns or modifies the different dates associated with a file (creation, modifica-
tion or access)fDateTime Returns or modifies the different dates and times associated with a file or a direc-
tory (creation, modification or access).fDelete Deletes a file accessible from the current computerfDeleteFileWebFolder Deletes an image file from the "_WEB" directory of the application (or from one of
its sub-directories).fDetectRemovableSto-rage
Detects whether a removable storage unit (CD, USB key, USB camera, …) wasadded or removed
fDir Finds a file or a directoryfDirAttrib Identifies the access rights granted to a user for a specified directoryfDirAttribute Returns the attributes of a directoryfDirectoryExist Checks the existence of a directoryfDirSize Returns the size (in bytes) of a directory.fDriveInfo Returns information about a diskfDriveReady Allows you to find out whether the floppy drive is available or whether the disk
existsfExeDir Returns the full path of the runtime directory of the projectfExtractPath Returns the different elements of a path: drive, directories, name and extension of
the filefExtractResource Extracts a resource from the application into a physical location of the device
WLangage.book Page 168 Jeudi, 20. mars 2014 4:29 16
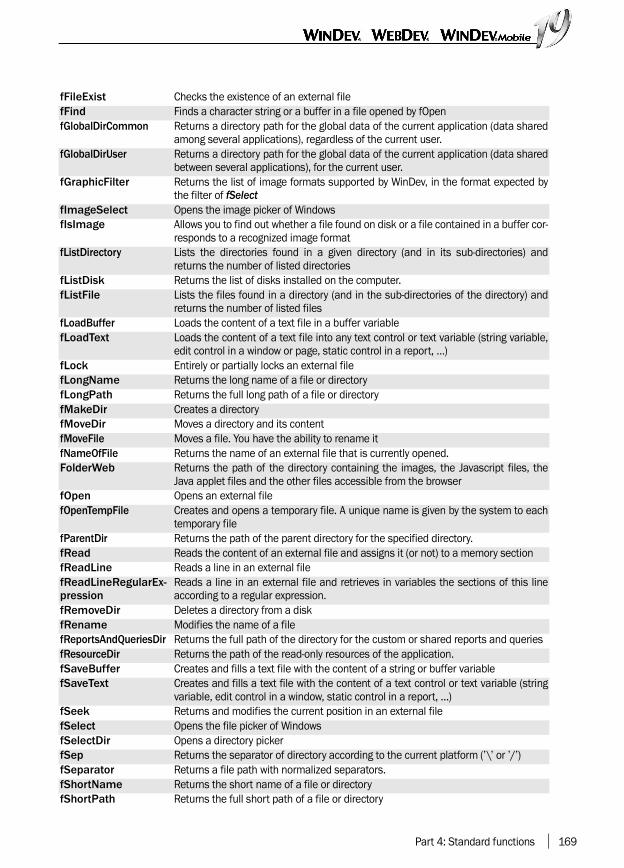
Part 4: Standard functions 169
fFileExist Checks the existence of an external filefFind Finds a character string or a buffer in a file opened by fOpenfGlobalDirCommon Returns a directory path for the global data of the current application (data shared
among several applications), regardless of the current user.fGlobalDirUser Returns a directory path for the global data of the current application (data shared
between several applications), for the current user.fGraphicFilter Returns the list of image formats supported by WinDev, in the format expected by
the filter of fSelectfImageSelect Opens the image picker of WindowsfIsImage Allows you to find out whether a file found on disk or a file contained in a buffer cor-
responds to a recognized image formatfListDirectory Lists the directories found in a given directory (and in its sub-directories) and
returns the number of listed directoriesfListDisk Returns the list of disks installed on the computer.fListFile Lists the files found in a directory (and in the sub-directories of the directory) and
returns the number of listed filesfLoadBuffer Loads the content of a text file in a buffer variablefLoadText Loads the content of a text file into any text control or text variable (string variable,
edit control in a window or page, static control in a report, …)fLock Entirely or partially locks an external filefLongName Returns the long name of a file or directoryfLongPath Returns the full long path of a file or directoryfMakeDir Creates a directoryfMoveDir Moves a directory and its contentfMoveFile Moves a file. You have the ability to rename itfNameOfFile Returns the name of an external file that is currently opened.FolderWeb Returns the path of the directory containing the images, the Javascript files, the
Java applet files and the other files accessible from the browserfOpen Opens an external filefOpenTempFile Creates and opens a temporary file. A unique name is given by the system to each
temporary filefParentDir Returns the path of the parent directory for the specified directory.fRead Reads the content of an external file and assigns it (or not) to a memory sectionfReadLine Reads a line in an external filefReadLineRegularEx-pression
Reads a line in an external file and retrieves in variables the sections of this lineaccording to a regular expression.
fRemoveDir Deletes a directory from a diskfRename Modifies the name of a filefReportsAndQueriesDir Returns the full path of the directory for the custom or shared reports and queriesfResourceDir Returns the path of the read-only resources of the application.fSaveBuffer Creates and fills a text file with the content of a string or buffer variablefSaveText Creates and fills a text file with the content of a text control or text variable (string
variable, edit control in a window, static control in a report, …)fSeek Returns and modifies the current position in an external filefSelect Opens the file picker of WindowsfSelectDir Opens a directory pickerfSep Returns the separator of directory according to the current platform (’\’ or ’/’)fSeparator Returns a file path with normalized separators.fShortName Returns the short name of a file or directoryfShortPath Returns the full short path of a file or directory
WLangage.book Page 169 Jeudi, 20. mars 2014 4:29 16

170 Part 4: Standard functions
fSize Returns the size of a file (in bytes)fSizeUncompressed Returns the size of a file before compressionfStopCompress Stops the operation for compressing or decompressing a file. The compressed or
decompressed file is not createdfTempFile Returns the name of a unique temporary filefTempPath Returns the name of the directory where the system stores the temporary filesfTime Returns or modifies the different times associated with a file: creation, modification
or accessfTrackDirectory Detects the modifications performed on the content of a directoryfTrackFile Detects the modification of a file.fTrackStop Stops all current tracking of a file or directoryfTrackStopAll Stops all the current tracks performed on the files and directoriesfUncompress Decompresses a filefUncrypt Decrypts a file that was encrypted by fCryptfUnlock Entirely or partially unlocks an external filefWebDir Returns the full path of the directory of Web objects (image, flash, …)fWrite Writes a character string or a memory section into an external filefWriteLine Writes a line into an external fileUncompleteDir Removes the "/"’ or "\"’ character found at the end of a string. This function is use-
ful for building full file names when the format of the path is unknown (if the userenters a file path for example)
See the online help for more details.See the online help to check the availability of these functions in the different products (WinDev, WebDev,WinDev Mobile).
WLangage.book Page 170 Jeudi, 20. mars 2014 4:29 16

Part 4: Standard functions 171
7. SHARED MEMORY ZONES
7.1 Overview
WinDev, WebDev and WinDev Mobile propose tohandle the shared memory zones.The shared memory zones are a communicationmechanism between several applications on agiven computer. They are used to easily exchangedata between a service and the setting applicationfor example.
The functions for managing the shared memoryzones use the standard APIs of the different opera-ting systems (Windows or Linux) and they facilitatethe interoperability between the WinDev/WebDev/WinDev Mobile applications and the applicationsdeveloped in other languages.
7.2 How do I proceed?
7.2.1 Creating a shared memory zoneThe shared memory zones are created and openedby fMemOpen.The first application that accesses the zone will pro-voke its creation while the other applications willperform a simple opening.The application that creates the zone defines itssize by supplying a minimum size. The operatingsystem will create a zone whose size is a multiple ofthe size of the memory pages (4 KB sous in Win-dows 32 bits for example). The actual size of thememory zone is returned by fSize.
7.2.2 Finding out whether a shared memory zone already existsIn some cases, it may be useful to find out whethera shared memory zone already exists.
For example, an application used to configure a ser-vice can check whether the service is properly star-ted by doing the following: simply check that theservice created a specific shared memory zone. Ifthe zone does not exist, an error message can bedisplayed by the application.fMemExist allows you to find out whether a sharedmemory zone was already created by another appli-cation.
7.2.3 Handling the content of a shared memory zone by programmingTo handle the content of a shared memory zone,you can:• use the functions for reading and writing in the
external files. This solution is recommended forthe simple cases (transmission of a string forexample).
• use the automatic serialization of WLanguage(Serialize and Deserialize), then use the functionsfor reading and writing in the external files totransmit the elements. This solution is recom-mended when transmitting classes whose mem-bers correspond to the elements to transmit
// Open shared memory zoneZoneID is intZoneID = fMemOpen("MyZone"+ ... "Shared",50,shareGlobal)IF ZoneID>0 THEN ZoneSize is int ZoneSize = fSize(ZoneID) Info(StringBuild(... "The %1 memory zone " +... "was opened."+ ... "Its size is %2"+... " bytes.",ZoneID,ZoneSize))END...// Close the shared memory zonefClose(ZoneID)
// Check the existence of the// shared memory zoneIF fMemExist("MySharedZone",... shareGlobal)=False THEN Error("Check that the XXX " +... service was properly started.") RETURNEND
WLangage.book Page 171 Jeudi, 20. mars 2014 4:29 16
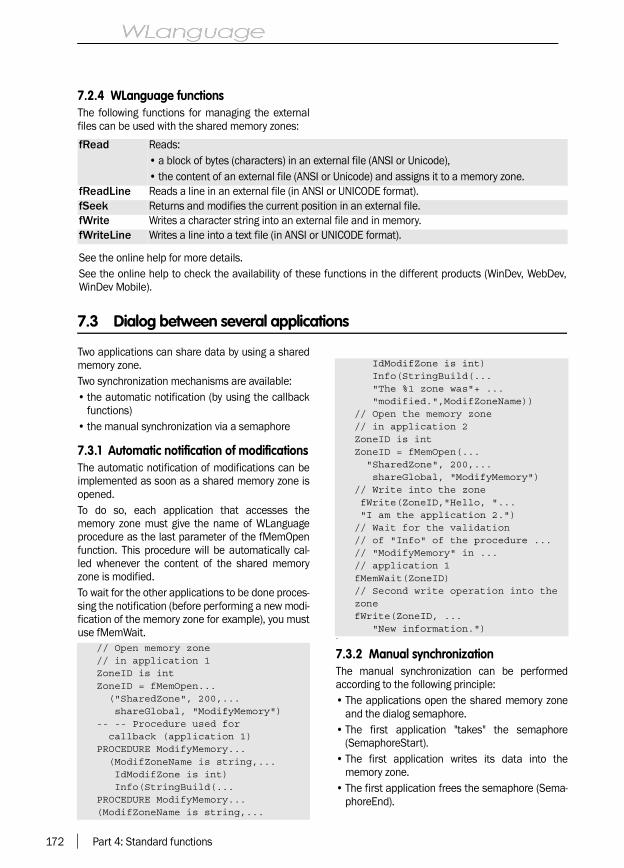
172 Part 4: Standard functions
7.2.4 WLanguage functionsThe following functions for managing the externalfiles can be used with the shared memory zones:
7.3 Dialog between several applications
Two applications can share data by using a sharedmemory zone.Two synchronization mechanisms are available:• the automatic notification (by using the callback
functions)• the manual synchronization via a semaphore
7.3.1 Automatic notification of modificationsThe automatic notification of modifications can beimplemented as soon as a shared memory zone isopened.To do so, each application that accesses thememory zone must give the name of WLanguageprocedure as the last parameter of the fMemOpenfunction. This procedure will be automatically cal-led whenever the content of the shared memoryzone is modified.To wait for the other applications to be done proces-sing the notification (before performing a new modi-fication of the memory zone for example), you mustuse fMemWait. .
7.3.2 Manual synchronizationThe manual synchronization can be performedaccording to the following principle:• The applications open the shared memory zone
and the dialog semaphore.• The first application "takes" the semaphore
(SemaphoreStart).• The first application writes its data into the
memory zone.• The first application frees the semaphore (Sema-
phoreEnd).
fRead Reads:• a block of bytes (characters) in an external file (ANSI or Unicode),• the content of an external file (ANSI or Unicode) and assigns it to a memory zone.
fReadLine Reads a line in an external file (in ANSI or UNICODE format).fSeek Returns and modifies the current position in an external file.fWrite Writes a character string into an external file and in memory.fWriteLine Writes a line into a text file (in ANSI or UNICODE format).
See the online help for more details.See the online help to check the availability of these functions in the different products (WinDev, WebDev,WinDev Mobile).
// Open memory zone // in application 1ZoneID is intZoneID = fMemOpen... ("SharedZone", 200,... shareGlobal, "ModifyMemory")-- -- Procedure used for callback (application 1)PROCEDURE ModifyMemory... (ModifZoneName is string,... IdModifZone is int) Info(StringBuild(...PROCEDURE ModifyMemory...(ModifZoneName is string,...
IdModifZone is int) Info(StringBuild(... "The %1 zone was"+ ... "modified.",ModifZoneName))// Open the memory zone // in application 2ZoneID is intZoneID = fMemOpen(... "SharedZone", 200,... shareGlobal, "ModifyMemory")// Write into the zone fWrite(ZoneID,"Hello, "... "I am the application 2.")// Wait for the validation// of "Info" of the procedure ...// "ModifyMemory" in ...// application 1 fMemWait(ZoneID)// Second write operation into the zonefWrite(ZoneID, ... "New information.")
WLangage.book Page 172 Jeudi, 20. mars 2014 4:29 16

Part 4: Standard functions 173
• The second application "takes" the semaphorethen.
• The second application reads the data written bythe first application.
• The second application frees the semaphore.Note: if the two applications want to exchange data,you need to use semaphores to regulate the
exchange.Advice: The manual synchronization will be usedpreferably when:• one of the two applications is not written in
WLanguage.• the mechanism for notification of modifications
is not available.
7.4 Naming the shared memory zones
The shared memory zones are identified by theirname.
7.4.1 Managing the share modeThe share mode differs according to the versions ofthe operating systems:• Linux, Windows 2000 and earlier: there is only
one memory zone creation space. The <Share>parameter of the fMemOpen function is ignored.
• Windows XP: the <Share> parameter of the fMe-mOpen function is effective if the quick userchange service is enabled, otherwise it is igno-red.
• Windows Vista and later: the <Share> parameterof the fMemOpen function is ignored. The servi-ces and the users are located in a differentspace. To share a memory zone between a ser-vice and an application in the session of a user,you must use the shareGlobal constant.
• In Terminal Server: the <Share> parameter of thefMemOpen function is supported. Each sessionopened on the Terminal Server has a differentmemory space. Applications running in the sameTSE session can share a memory zone createdwith the shareUser constant. Applications located
in different sessions can share a shared memoryzone created with the shareGlobal constant.
7.4.2 Correspondence between the name provided to fMemOpen and the opening in CThe two following code examples present the ope-ning of a memory zone (named "myzone" in WLan-guage and in C).
7.5 Functions for managing the shared memory zones
The following functions are used to manage the memory zones:
// Code in WLanguage// ZoneID is intZoneID = fMemOpen("myzone",1024,... shareGlobal)
// Equivalent code in Cchar * szZoneName = "myzone";int nSize;int nMem;key_t nKey;int nAccess = 0666;// Opening in read/write
nSize = 1024;nKey = ftok(szZone-Name+sizeof(char),... (int) szZoneName[0]);nMem = shmget(nKey, nSize ,... nAccess);
fMemExist Checks the existence of a shared memory zonefMemOpen Opens a memory zone shared between several applicationsfMemWait Waits for the end of process about the notifications of modification of a shared memory
zone
See the online help for more details.See the online help to check the availability of these functions in the different products (WinDev, WebDev,WinDev Mobile).
WLangage.book Page 173 Jeudi, 20. mars 2014 4:29 16

174 Part 4: Standard functions
8. PRINTING IN WLANGUAGE
8.1 Overview
Several methods can be used for printing:• The report editor, used to create "Preset reports".• The print functions in WLanguage.
The report editorThe report editor is used to create printed reports(in report or label format) containing informationcoming from data files.
The print functions in WLanguageFor special printing, the report editor may not beable to create the requested reports. In this case,you must use the print functions of WLanguage.
Furthermore, for very simple prints (text or images),you don’t even need to use the report editor.
Notes:• The print functions are not available in external
language.• This chapter describes the principle for printing in
WLanguage.
8.2 Principle for printing in WLanguage
The steps for printing in WLanguage as are follows:• Step 1 (optional): Configuring the print parame-
ters.• Step 2 (optional): Creating the print fonts.• Step 3: Printing the characters, lines or images
and ending the print.• Step 4: Starting the print (iEndPrinting).Tip: To speed up your prints, limit the graphicoptions (frame box, etc.) that really slow down yourprints and that are memory intensive.
8.2.1 Step 1: Configuring the print parame-tersThis step allows you to choose:• The print settings of the document (quality, num-
ber of copies, etc.).• The settings for printer configuration (printer dri-
ver, orientation, etc.).This step is optional and it should be performedonly if the default parameters (parameter definedin the control panel of Windows) are not suitable forthe print.
The different operations possible
The possible operations are as follows:1. Selecting the print settings of the document(iParameter). You can:• open the standard window for configuring the
print (WinDev and WinDev Mobile),
• configure the print parameters one by one (orien-tation, paper format, height and width of thepage, number of copies, etc.).
2. Choosing the printer used for printing (iConfi-gure). You can:• open the standard window for printer selection
(WinDev and WinDev Mobile),• modify the printer used for the current print. This
modification can be temporary (for the currentprogram only) or permanent (modification of thedefault printer in the control panel of Windows).
3. Redefining the print margins (iMargin). The top,bottom, left and right margins can be modified. Ifthis function is not called, the default margins (dif-ferent depending on the printer) will be used.Caution: The order of these operations must be res-pected. If a print is in progress, iParameter andiConfigure cancel the current print.
Functions used to configure the desti-nation of the print
The following functions are used to configure theprint destination and to find out the current confi-guration:• iPreview/iDestination: Configures the destina-
tion of the print.• iConfigure: Configures the printer.• iInfoPrinter: Retrieves the characteristics of the
current printer or the characteristics of thedefault printer.
WB Important: Using the print functions ofWLanguage requires a specific configura-tion of your server. See the online help formore details.
WLangage.book Page 174 Jeudi, 20. mars 2014 4:29 16

Part 4: Standard functions 175
• iListPrinter: Returns the list of printers installedon the computer.
• iParameter: Configures the print.
The configuration and the setting performed byiConfigure and iParameter re-initialize the printmodule. Therefore, these functions must be thefirst print functions called. All the print functionscalled before these two functions will be ignored.
8.2.2 Step 2: Creating print fontsThis step allows you to define and choose the diffe-rent fonts that will be used in the printed docu-ment. You can choose and define:• specific print fonts: these fonts can be used
when printing with the WLanguage functions.• dynamic fonts that can be used for display (in the
windows, drawings, etc.) and when printing inWLanguage.
This step is optional.
The default font is used if no font is specified forthe print. This font has the following characteristics:• Font: Don’t care• Font #0• Size: 12 pica points• Normal style• Color: Black
Print fontThe print fonts are created by iCreateFont. Thisfunction enables you to choose:• the typeface (name and family),• the size (of the characters),• the attributes (bold, italic, underlined, etc.),• the color.
The different parameters of the font are defined viaseveral constants.
Each font is associated with a number. To choosethe print font, all you have to do is use iFont.
Dynamic fontA "Font" variable allows you to create a dynamicfont that can be used in all the project objects: win-dows, pages, reports, prints, charts, drawings, etc.To define a dynamic font:1. Create a Font variable.2. Define the characteristics of the font:
•by using FontCreate,•via the font properties: …Orientation, ..Stri-
keOut, ..Condensed, ..Color, ..Extended, ..Bold,
..Italic, ..Large, ..Name, ..Underline and ..Size.
To choose a print font, all you have to do is useiFont.
Printer fontThe printer manufacturers install fonts on theirprinters. These fonts are called "printer" fonts.Unlike the software fonts (such as "TrueType"),these fonts are directly accessible by the printer,they do not have to be downloaded.In the lists of fonts, the printer fonts are identifiedby a "printer" icon displayed in front of the name ofthe font.Caution: using printer fonts may produce unexpec-ted display effects in the print preview.If you are using printer fonts, these fonts will beinterpreted by the printer only. During the print pre-view, the display of the fonts is managed by Win-dows. As it does not support these specific fonts,Windows uses the nearest display font.
8.2.3 Step 3: PrintingThis step consists in "sending to the printer" the dif-ferent elements to print: text, images, drawings,etc.The print on the requested support (configured byiPreview) will be effective at the end of print (iEnd-Printing).
Printing textThe main WLanguage functions used to print textsare as follows:• iTextHeight: Calculates the height of the font for
the text to print (in millimeters.• iZoneHeight: Calculates the necessary height of
a fixed-width area in order for the entire text to beprinted in this area.
• iPrint: Sends the character string passed in para-meter to the print "buffer".
• iPrintBarCode: Prints a bar code inside a rectan-gle.
• iPrintWord: Sends the character string passed inparameter to the print "buffer".
• iPrintZone: Prints a text in a rectangular area.• iPrintZoneRTF: Prints a text in RTF format in a
rectangular area.• iTextWidth: Calculates the width of the text to
print in millimeters, according to the specifiedfont.
• iLink: Prints a link to a URL when printing anHTML page.
WLangage.book Page 175 Jeudi, 20. mars 2014 4:29 16

176 Part 4: Standard functions
• iFont: Selects the default font.• iDidotFont: Selects the unit that must be used for
the height of fonts (created by iCreateFont):DIDOT point or PICA point.
• iXPos: Used to manage the horizontal position (xcoordinate) of the print cursor in the page.
• iYPos: Used to manage the vertical position (ycoordinate) of the print cursor in the page.
Notes:• The texts can be entered in different fonts: the
font is selected by iFont.• The texts can be printed at specific positions:
iXPos and iYPos.
Printing imagesSeveral WLanguage functions are used to print ima-ges while respecting their size.• iImageHeight: Calculates the height of the image
to print (in millimeters).• iPrintBarCode: Prints a bar code inside a rectan-
gle.• iPrintImage: Sends the image file to print to the
print "buffer".• iImageWidth: Calculates the width of the image
to print (in millimeters).• iTransparentMagenta: Modifies the management
of the Magenta color so that is is considered asbeing transparent or not during the next prints.
• iXPos: Used to manage the horizontal position (xcoordinate) of the print cursor in the page.
• iYPos: Used to manage the vertical position (ycoordinate) of the print cursor in the page.
Printing drawingsThe following WLanguage functions are used toeasily print different shapes:• iBorder: Prints a border at the specified coordina-
tes.• iEllipse: Prints an ellipse inside a rectangle.• iPrintBarCode: Prints a bar code inside a rectan-
gle.• iNewLine: Prints a line (in Windows standard,
with a rounded end) at the specified coordinates.• iTransparentMagenta: Modifies the management
of the Magenta color so that is is considered asbeing transparent or not during the next prints.
• iMMToPica: Converts the coordinates of a point
(expressed in millimeters) into system coordina-tes.
• iXPos: Used to manage the horizontal position (xcoordinate) of the print cursor in the page.
• iYPos: Used to manage the vertical position (ycoordinate) of the print cursor in the page.
• iLine: Prints a line at the specified coordinates.• iHLine: Prints an horizontal line at the specified
coordinates.• iVLine: Prints a vertical line at the specified coor-
dinates.Other functions
Several WLanguage functions are used to optimizethe prints performed in WLanguage. You have theability to manage:
•the page break,•the print cancelation by the user,•the size of the page.
• iWindowCancel: Configures the display of thewindow used to cancel the current print (WinDevonly).
• iEndPrinting: Signals the end of the document toprint and actually starts printing the data storedin the printer spooler.
• iPageHeight: Calculates the printable height ofthe page while taking the margins into account.
• iPageHeightLeft: Calculates the remaining availa-ble height on the current page while taking thetop and bottom margins into account.
• iDocumentCanceled: Used to find out whetherthe user has requested to cancel the print of thecurrent document (WinDev only).
• iDocumentPrinted: Used to find out whether theuser has requested to print the document fromthe print preview (WinDev only).
• iPageWidth: Calculates the width of the printablepage while taking the margins into account.
• iPageNum: Returns or reinitializes the number ofthe page currently printed.
• iReset: Re-initializes the print parameters storedin the print library.
• iSkipLine: Forces a line break.• iSkipPage: Generates a page break.• iReportPrintingStatus: Returns the status of the
current print.
WLangage.book Page 176 Jeudi, 20. mars 2014 4:29 16

Part 4: Standard functions 177
8.3 Print functions
The print functions are as follows:
iAddBookmark Adds a bookmark into the print preview or dufing the export in PDF.iBorder Prints a border at the specified coordinatesiChangeSubReport-Source
Modifies by programming the report associated with a sub-report in a compositereport
iCloseReport Stops printing the current report immediatelyiColumnEnd Forces a column break in a multicolumn reportIColumnNum Returns the number of the current column in the multi-column reports.iConfigure Configures the printeriConfigureReport Configures the printer by opening the configuration windowiCreateFont Creates a new print fontiDestination Configures the destination of the printiDidotFont Selects the unit that will be used for the height of the fonts (created by iCreate-
Font): DIDOT point or PICA pointiDirImageHTML Used to select the directory of generated images when printing in HTML formatiDocumentCanceled Allows you to find out whether the current print was canceled by the useriDocumentPrinted Allows you to find out whether the user has requested to print the document from
the print previewiEllipse Prints an ellipse inside a rectangleiEndPrinting Indicates the end of the document to print and actually starts printing the data
stored in the printer spooleriEndReport Forces a report created in the report editor to stop from being printediEscape Sends an ESCAPE command to a printeriFont Selects the default fontiForceComplement Forces a body complement block to printiGroupAdd Adds a report to a group of reports.iGroupConfigure Modifies the parameters of a report found in a group of reports.iGroupPrint Starts printing a report found in a group of reportsiHLine Prints an horizontal line at the specified coordinatesiImageHeight Calculates the height of the image to print (in millimeters)iImageWidth Calculates the width of the image to print (in millimeters)iInfoPrinter Retrieves the characteristics of the current or default printeriInitReportQuery Initializes the query linked to the report (for a query with parameters)iInitReportQueryCon-nection
Initializes the query linked to the report (query based on a specific connection)
iInitSubReport Initializes the parameters of a sub-report of a composite reportiLastFile Returns the full name of the last file generated during the print (PDF, RTF, XML, …)iLine Prints a line at the specified coordinatesiLink Prints a link toward a URL when printing an HTML pageiListNestedReports Returns the list of nested reports currently printediListPrinter Returns the list of printers installed on the current computeriMargin Defines the "logical" print marginsiMMToPica Converts the coordinates of a point (expressed in millimeters) into system coordi-
natesiNestedHeaderFooter Prints (or not) the page headers and footers of the nested reportiNewLine Prints a line (in Windows standard, with a rounded end) at the specified coordina-
tesiPageEnd Forces the move to the next page when printing a report
WLangage.book Page 177 Jeudi, 20. mars 2014 4:29 16

178 Part 4: Standard functions
iPageHeight Calculates the height of the printable page (in millimeters) while taking the mar-gins (top or bottom) into account
iPageHeightLeft Calculates the available height (in millimeters) left on the current page whiletaking the margins (top or bottom) into account
iPageNum Returns or initializes the number of the page currently printediPageWidth Calculates the width (in millimeters) of the printable page while taking the margins
(left or right) into accountiParameter Configures the printiParameterDuplicate Configures the automatic creation of the duplicate copy generated during the next
print.iParameterExport Configures the export options from the print preview (options for sending emails
for example).iParameterPDF Defines the protection options for the generated PDF fileiParameterPreview Configures the display of each button found in the print previewiParameterReport Configures the printer by opening the configuration windowiParameterWatermark Adds a watermark into a report (report created in the report editor or printed
report).iParameterXLS Defines the options for the XLS file generated during the print. The current layout
(color and font) can be taken into account or not.iPicaToMM Converts the coordinates of a point (expressed in system coordinates) into milli-
metersiPreview Configures the destination of the printiPrint Sends the character string passed in parameter to the print "buffer"iPrintBarCode Prints a bar code inside a rectangleiPrintBlock Forces a report block to printiPrintBodyComple-ment
Forces a body complement block to print while specifying the height of the com-plement block
iPrintDuplicate Prints a duplicate copy.iPrintImage Sends the image file to the print bufferIPrintPDF Prints the content of a PDF file from an iPhone/iPad application. When this func-
tion is called, a system window is displayed, allowing the user to select the printerto use, the number of copies, …
iPrintReport Prints a report created in the report editoriPrintWord Sends the character string passed in parameter to the print "buffer"iPrintZone Prints a text in a rectangular areaIPrintZoneHTML Pritns a text in HTML format in a rectangular areaiPrintZoneRTF Prints a text in RTF format in a rectangular areaiReportPrintingStatus Returns the status of the current printiReset Reinitializes the print parameters stored in the print libraryiRoundBorder Prints a round border at the specified coordinatesiSelectFont Creates a new print font from the standard window for font selection of WindowsiSequencingAdd Adds a report into a sequencing of reports.iSequencingPrint Prints a sequencing of reports.iSkipLine Forces a line break.iSkipPage Generates a page breakiSubstBlock Substitutes a report block for another one when printing the reportiTextHeight Calculates the height of the font for the text to print (in millimeters)iTextWidth Calculates the width (in millimeters) of the text to print according to the specified
fontiTransparentMagenta Specifies whether the Magenta color will be considered as being transparent (or
not) in the future prints
WLangage.book Page 178 Jeudi, 20. mars 2014 4:29 16

Part 4: Standard functions 179
8.4 PDF functions
WinDev allows you to print PDF files with the printfunctions. These PDF files can be handled by pro-gramming via the PDF functions:
iVLine Prints a vertical line at the specified coordinatesiWindowCancel Configures the display of the window used to cancel the current printiXPos Used to manage the horizontal position (X coordinate) of the print cursor in the
pageiYPos Used to manage the vertical position (Y coordinate) of the print cursor in the pageiZoneHeight Calculates the necessary height of a fixed-width area in order for the entire text to
be printed in this area
See the online help for more details.See the online help to check the availability of these functions in the different products (WinDev, WebDev,WinDev Mobile).
PDFIsProtected Checks whether the PDF file requires a password in order to be read.PDFMerge Merges several existing PDF files into a single PDF filePDFMergeWithPassword Merges several existing and password-protected PDF files into a single PDF filePDFNumberOfPages Returns the total number of pages found in a PDF file.PDFToText Extracts the text found in a PDF file.
See the online help for more details.See the online help to check the availability of these functions in the different products (WinDev, WebDev,WinDev Mobile).
WLangage.book Page 179 Jeudi, 20. mars 2014 4:29 16

180 Part 4: Standard functions
9. MANAGING WINDOWS
9.1 Overview
Several WLanguage functions are used to manageWindows.You have the ability to manage:• the registry with the registry functions,• the Windows clipboard,• the Windows recycle bin,• the mouse,• the serial and parallel ports,• Twain devices,• USB devices,• the system,
• the services,• Windows,• Windows events,• Java applications,• the executables,• the DDE dialog,• the agents,• the network,• the SNMP protocol,• the project,• the scheduler.
9.2 Functions for managing the registry
The following functions are used to manage the registry:
RegistryCopyKey Copies a registry key with all its sub-keys and valuesRegistryCreateKey Creates a key in the Windows registryRegistryDeleteKey Deletes a key from the Windows registryRegistryDeleteValue Deletes a value from the Windows registryRegistryExist Checks the existence of a key in the Windows registryRegistryFirstSubKey Identifies the path of the first sub-key for the specified key in the registry of Win-
dowsRegistryListKey Lists the sub-keys of a registry key.RegistryListValue Returns the name and the type of values of a key found in the registry.RegistryNextKey Identifies the key found after the specified key in the Windows registryRegistryQueryValue Reads the value of a register in the Windows registryRegistryRename Renames a registry key.RegistrySeek Finds a character string in the registryRegistrySetValue Writes a value into a register of the Windows registryRegistryValueType Returns the type of a value found in the registry.
See the online help for more details.See the online help to check the availability of these functions in the different products (WinDev, WebDev,WinDev Mobile).
WLangage.book Page 180 Jeudi, 20. mars 2014 4:29 16

Part 4: Standard functions 181
9.3 Functions for managing the clipboard
The following functions are used to manage the clipboard:
9.4 Functions for managing the recycle bin
The following functions are used to manage the recycle bin:
9.5 Functions for managing the mouse
The following functions are used to manage the mouse:
Clipboard Retrieves the text or the image found in the Windows clipboardClipboardFormat Identifies the format of the information found in the clipboardClipboardHeight Calculates the height of an image (in bitmap format) found in the clipboardClipboardRTF Retrieves an RTF string from the clipboard.ClipboardUnicode Returns the text found in the clipboard in UNICODE format.ClipboardWidth Calculates the width of an image (in bitmap format) found in the clipboardTableToClipboard Copies the content of a table to the clipboard.ToClipboard Writes text information into the Windows clipboardToClipboardRTF Writes a character string in RTF format into the clipboard.TwainToClipboard Enables you to either copy the document coming from the Twain device into the cli-
pboard, or to view the document coming from the Twain device.
See the online help for more details.See the online help to check the availability of these functions in the different products (WinDev, WebDev,WinDev Mobile).
RecycleBinClear Clears the recycle bin.RecycleBinDelete Deletes a file from the recycle binRecycleBinListFile Lists the files found in the recycle binRecycleBinRestore Restores a file found in the recycle bin
See the online help for more details.See the online help to check the availability of these functions in the different products (WinDev, WebDev,WinDev Mobile).
ControlOver Identifies the control hovered by the mouse cursor.CursorCapture Directs all the events associated with the mouse toward a specific window or a controlCursorDisplay Displays or hides the mouse cursorCursorPos Returns and modifies the position of the mouse cursorHourglass Changes the mouse cursor into an hourglass (and conversely)MouseXPos Returns the horizontal position (x-coordinate) of the mouse cursor in relation to the con-
trolMouseYPos Returns the vertical position (Y-coordinate) of the mouse cursor in relation to the control
See the online help for more details.See the online help to check the availability of these functions in the different products (WinDev, WebDev,WinDev Mobile).
WD WDMobile
WD
WD WDMobile
WLangage.book Page 181 Jeudi, 20. mars 2014 4:29 16

182 Part 4: Standard functions
9.6 Functions for checking the spelling
The following functions are used to manage the spelling checker :
9.7 Speech recognition functions
The following functions are used to manage the speech recognition:
9.8 Functions for managing the serial and parallel ports
The following functions are used to manage the serial ports and the parallel ports:
SpellAddDictio-nary
Adds a word to the dictionary of OpenOffice for the instance of the current application.
SpellAvailable Indicates whether an OpenOffice dictionary is available for the spelling checker.SpellCheck Indicates whether the spelling of a word is correct.SpellSuggest Returns the list of possible words found in the dictionary of OpenOffice..
See the online help for more details.See the online help to check the availability of these functions in the different products (WinDev, WebDev,WinDev Mobile).
SpeechRecognitionAddCommand Adds a voice command into the current window.SpeechRecognitionDeleteCom-mand
Deletes a voice command that was added by AddVoiceCommand
SpeechRecognitionTrigger Triggers the service for speech recognition on the device.
See the online help for more details.See the online help to check the availability of these functions in the different products (WinDev, WebDev,WinDev Mobile).
sClose Closes the specified serial port or parallel portsComputeCrc16 Checks a character string before and after transmission between WinDev applicationssComputeCrc32 Checks a character string before and after transmission between WinDev applicationssEndEvent Disables the detection of an event on a serial port.sEscape Starts different functions that directly affect the bits of the serial port or parallel port,
independently of the communication protocolsEvent Branches an event on a serial port.sInEntryQueue Retrieves the number of pending bytes in the input buffer of a specified serial portsInExitQueue Retrieves the number of bytes waiting to be transferred into the output buffer of the spe-
cified serial or parallel portsOpen Opens and initializes the specified serial port (or parallel port)sParameter Defines or modifies the configuration parameters of the specified serial port or parallel
portsRead Reads a character string in the entry buffer of the specified serial portsWrite Writes a character string into the output buffer of the specified serial port or parallel port
See the online help for more details.See the online help to check the availability of these functions in the different products (WinDev, WebDev,WinDev Mobile).
WD WDMobile
WD WDMobile
WLangage.book Page 182 Jeudi, 20. mars 2014 4:29 16

Part 4: Standard functions 183
9.9 Functions for managing Twain devices
The following functions are used to manage the Twain devices:
9.10 USB functions
The following functions are used to manage the USB devices:
TwainCurrentSource Allows you to find out and change the Twain device used by default.TwainListSource Returns the list of drivers for the Twain devices connected to the current compu-
ter.TwainScanZone Allows you to define or re-initialize the area to scan.TwainSelectSource Displays the list of Twain devices available for the current computer and allows
you to choose the Twain device used by default.TwainSourceHeight Returns the height of the area to scan.TwainSourceWidth Returns the width of the area to scan.TwainState Returns the status of the current source.TwainToBMP Allows you to:
• save the document coming from the Twain device in a Bitmap file (".BMP" exten-sion).
• view the document coming from the Twain device in the user interface of the device.TwainToClipboard Allows you to:
• copy the document coming from the Twain device into the clipboard.• view the document coming from the Twain device in the user interface of the device.
TwainToControl Allows you to:• view the document coming from the Twain device in an image control.• view the document coming from the Twain device in the user interface of the device.
TwainToGIF Allows you to:• save the document coming from the Twain device in a GIF file.• view the document coming from the Twain device in the user interface of the device.
TwainToJPEG Allows you to:• save the document coming from the Twain device in a JPEG file.• view the document coming from the Twain device in the user interface of the device.
See the online help for more details.See the online help to check the availability of these functions in the different products (WinDev, WebDev,WinDev Mobile).
USBDetectRemova-bleStorage
Detects whether a removable storage unit (CD, USB key, USB camera, …) wasadded or removed
USBDisconnect Disconnects or ejects a USB deviceUSBFind Finds a USB device according to keywordsUSBListDevice Returns the list of USB devices currently plugged into the current computerUSBProperty Retrieves the value of a property for a USB device
See the online help for more details.See the online help to check the availability of these functions in the different products (WinDev, WebDev,WinDev Mobile).
WD
WD
WLangage.book Page 183 Jeudi, 20. mars 2014 4:29 16
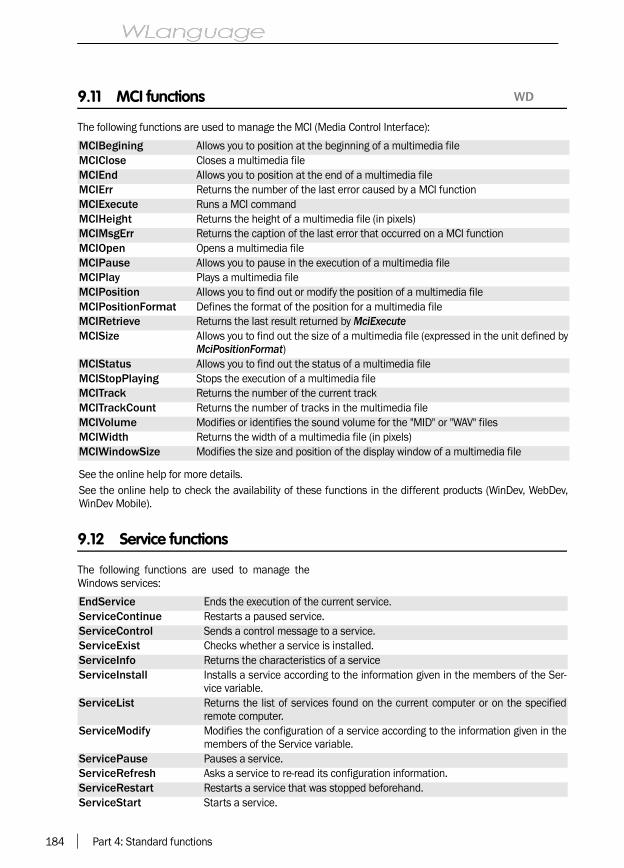
184 Part 4: Standard functions
9.11 MCI functions
The following functions are used to manage the MCI (Media Control Interface):
9.12 Service functions
The following functions are used to manage theWindows services:
MCIBegining Allows you to position at the beginning of a multimedia fileMCIClose Closes a multimedia fileMCIEnd Allows you to position at the end of a multimedia fileMCIErr Returns the number of the last error caused by a MCI functionMCIExecute Runs a MCI commandMCIHeight Returns the height of a multimedia file (in pixels)MCIMsgErr Returns the caption of the last error that occurred on a MCI functionMCIOpen Opens a multimedia fileMCIPause Allows you to pause in the execution of a multimedia fileMCIPlay Plays a multimedia fileMCIPosition Allows you to find out or modify the position of a multimedia fileMCIPositionFormat Defines the format of the position for a multimedia fileMCIRetrieve Returns the last result returned by MciExecuteMCISize Allows you to find out the size of a multimedia file (expressed in the unit defined by
MciPositionFormat)MCIStatus Allows you to find out the status of a multimedia fileMCIStopPlaying Stops the execution of a multimedia fileMCITrack Returns the number of the current trackMCITrackCount Returns the number of tracks in the multimedia fileMCIVolume Modifies or identifies the sound volume for the "MID" or "WAV" filesMCIWidth Returns the width of a multimedia file (in pixels)MCIWindowSize Modifies the size and position of the display window of a multimedia file
See the online help for more details.See the online help to check the availability of these functions in the different products (WinDev, WebDev,WinDev Mobile).
WD
EndService Ends the execution of the current service.ServiceContinue Restarts a paused service.ServiceControl Sends a control message to a service.ServiceExist Checks whether a service is installed.ServiceInfo Returns the characteristics of a serviceServiceInstall Installs a service according to the information given in the members of the Ser-
vice variable.ServiceList Returns the list of services found on the current computer or on the specified
remote computer.ServiceModify Modifies the configuration of a service according to the information given in the
members of the Service variable.ServicePause Pauses a service.ServiceRefresh Asks a service to re-read its configuration information.ServiceRestart Restarts a service that was stopped beforehand.ServiceStart Starts a service.
WLangage.book Page 184 Jeudi, 20. mars 2014 4:29 16

Part 4: Standard functions 185
9.13 System functions
The system functions are as follows:
ServiceStatus Returns the current status of a serviceServiceStop Stops a service.ServiceUninstall Uninstalls a service.ServiceWait Pauses the current service during the specified duration.ServiceWaitStatus Waits for a service to be in a specific status.ServiceWriteEventLog Writes an event into the log of Windows events.
See the online help for more details.See the online help to check the availability of these functions in the different products (WinDev, WebDev,WinDev Mobile).
SysAndroidVersion Returns information about the Android version used by the applicationSysChangeEnviron-ment
Modifies the environment variables of the operating system found on the currentcomputer
SysChangeScreenRe-solution
Modifies the resolution of a screen.
SysColor Identifies or modifies the color of a Windows elementSysColorRes Returns the resolution of the screen in number of colorsSysDir Returns the path of a system directorySysDirStorageCard Returns the list of storage cards found in the current Pocket PCSysEnvironment Returns the environment variables of the operating systemSysErrorMode Modifies the display mode of errorsSysGetDC Retrieves the DC (Device Context) of a window, control or screenSysIconAdd Adds an icon into the taskbarSysIconAddImage Adds an icon that is superimposed over the icon of the application in the taskbar.
This icon can be deleted by SysIconDeleteImage.SysIconDelete Deletes an icon from the taskbarSysIconDeleteImage Deletes the icon that is superimposed over the icon of the application in the task-
bar.SysIconize Allows you to find out whether a window is minimizedSysIconModify Modifies the icon file and/or the rollover message of an icon in the taskbarSysIdentifier Returns the unique identifier of the current mobile device.SysIMEI Returns the IMEI number of a SmartphoneSysInstance Returns the instance of an applicationSysIOSVersion Returns information about the iOS version used by the applicationSysListScreen Returns the list of screens connected to one or more video cards.SysListScreenOrienta-tion
Allows you to find out the possible orientations of a Pocket PC screen.
SysListScreenResolu-tion
Returns the list of possible resolutions for a screen.
SysListVideoCard Returns the name of the video cards connected to the current computer.SysMetric Returns the resolution of a specific elementSysNameExe Returns the name and full path of an applicationSysNameMainScreen Returns the name of the main screenSysNumberScreen Returns the number of screens currently connected to the current computerSysRecentDocAdd Adds a file into the list of recently opened documents. This list is managed by the
shell of Windows.
WLangage.book Page 185 Jeudi, 20. mars 2014 4:29 16
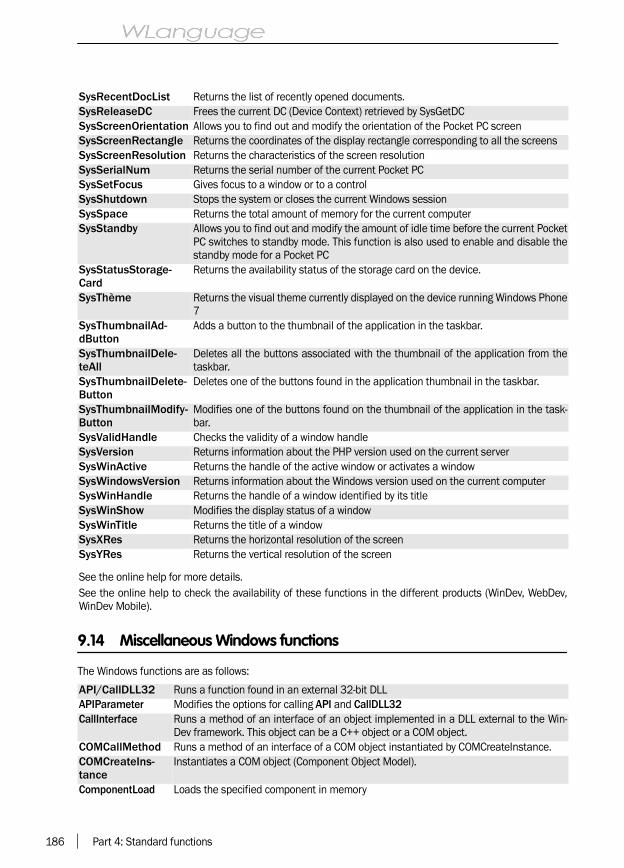
186 Part 4: Standard functions
9.14 Miscellaneous Windows functions
The Windows functions are as follows:
SysRecentDocList Returns the list of recently opened documents.SysReleaseDC Frees the current DC (Device Context) retrieved by SysGetDCSysScreenOrientation Allows you to find out and modify the orientation of the Pocket PC screenSysScreenRectangle Returns the coordinates of the display rectangle corresponding to all the screensSysScreenResolution Returns the characteristics of the screen resolutionSysSerialNum Returns the serial number of the current Pocket PCSysSetFocus Gives focus to a window or to a controlSysShutdown Stops the system or closes the current Windows sessionSysSpace Returns the total amount of memory for the current computerSysStandby Allows you to find out and modify the amount of idle time before the current Pocket
PC switches to standby mode. This function is also used to enable and disable thestandby mode for a Pocket PC
SysStatusStorage-Card
Returns the availability status of the storage card on the device.
SysThème Returns the visual theme currently displayed on the device running Windows Phone7
SysThumbnailAd-dButton
Adds a button to the thumbnail of the application in the taskbar.
SysThumbnailDele-teAll
Deletes all the buttons associated with the thumbnail of the application from thetaskbar.
SysThumbnailDelete-Button
Deletes one of the buttons found in the application thumbnail in the taskbar.
SysThumbnailModify-Button
Modifies one of the buttons found on the thumbnail of the application in the task-bar.
SysValidHandle Checks the validity of a window handleSysVersion Returns information about the PHP version used on the current serverSysWinActive Returns the handle of the active window or activates a windowSysWindowsVersion Returns information about the Windows version used on the current computerSysWinHandle Returns the handle of a window identified by its titleSysWinShow Modifies the display status of a windowSysWinTitle Returns the title of a windowSysXRes Returns the horizontal resolution of the screenSysYRes Returns the vertical resolution of the screen
See the online help for more details.See the online help to check the availability of these functions in the different products (WinDev, WebDev,WinDev Mobile).
API/CallDLL32 Runs a function found in an external 32-bit DLLAPIParameter Modifies the options for calling API and CallDLL32CallInterface Runs a method of an interface of an object implemented in a DLL external to the Win-
Dev framework. This object can be a C++ object or a COM object.COMCallMethod Runs a method of an interface of a COM object instantiated by COMCreateInstance.COMCreateIns-tance
Instantiates a COM object (Component Object Model).
ComponentLoad Loads the specified component in memory
WLangage.book Page 186 Jeudi, 20. mars 2014 4:29 16

Part 4: Standard functions 187
9.15 Windows event
The following functions are used to manage the Windows events:
COMQueryInterface Call the QueryInterface method of the specified COM object to get a specific interface ofthis object so that it can be used with COMCallMethod.
CreateShortcut Creates a shortcut on the Windows desktop, in the "Start" menu of Windows or in a spe-cific directory
DeleteShortcut Deletes a shortcut that was created by CreateShortcutFreeDLL Frees the 32-bit library (DLL) that was loaded in memory by LoadDLLHiWord Returns the two high bytes of an integerIconInstall Creates an icon (associated with a program) in a group of Windows programs, with the
associated command lineInstance Returns the "System handle" (HINSTANCE) of the current programKeyPressed Checks which key is pressedLoadDLL Loads the specified 32-bit library (DLL) in memoryLoWord Returns the two low bytes of an integerMakeInteger Builds an integer from two 2-byte integersOpenSSLCheck Checks, via a public key, that the signature of data performed with the OpenSSL library
is correctPing Checks whether an address is accessible (similar to the PING network command)sComputeCrc16 Checks a character string before and after transmission between WinDev applications
and WebDev sitessComputeCrc32 Calculates the Cyclical Redundancy Check (CRC) of a buffer.SendKey Simulates keystrokesStandardOutput Writes an information into the standard output stream "stdout" (also called "console")Transfer Copies a block of bytes or a fixed-length string from a memory address into another oneWindowsVersion Returns the runtime mode of the program in the current environment
See the online help for more details.See the online help to check the availability of these functions in the different products (WinDev, WebDev,WinDev Mobile).
EndEvent Cancels the interception of a Windows event on a control or a WinDev window implementedby the Event function
EndTimer Ends the execution of a timer triggered by TimerEndTimerSys Ends the execution of a timer triggered by TimerSysEvent Intercepts a Windows event on a control, a group of controls or a WinDev windowHandle Returns the system "Handle" (HWND) of a WinDev control or windowHandleParen-tNext
Forces the parent of the next window to open. This function allows a WinDev window to bethe child of an another application, or to be the child of a non-WinDev window.
Multitask Enables you to define a time-out, to give control back to Windows or to give control back toWindows and to the WLanguage
PostMessage Sends a Windows message to a control or to a windowSendMessage Sends a Windows message to a control or to a windowTimer Periodically and automatically calls a WLanguage procedure. Called in the procedure,
Timer is used to identify the timer that started the procedure.TimerSys Periodically and automatically calls a WLanguage procedure. Called in the procedure,
TimerSys is used to identify the timer that started the procedure.Wait Temporarily stops the execution of a program
WLangage.book Page 187 Jeudi, 20. mars 2014 4:29 16

188 Part 4: Standard functions
9.16 Java functions
The following functions are used to manage the Java applications:
9.17 Miscellaneous WinDev/WebDev functions
The miscellaneous functions are as follows:
See the online help for more details.See the online help to check the availability of these functions in the different products (WinDev, WebDev,WinDev Mobile).
JavaExecute Starts a Java application or a Java applet by invoking the "Main" method of a givenJava class
JavaExecuteFunction Runs a specific static function of a Java classJavaLoad Specifies the location of the classes required to run the Java application or the Java
applet
See the online help for more details.See the online help to check the availability of these functions in the different products (WinDev, WebDev,WinDev Mobile).
WebDev WD
AppliControl Enables (or disables) the remote check for the current multi-user WinDev applica-tion
ASPDisplay Calls an external ASP script and returns the result page in the current browser win-dow
ASPExecute Calls an external .asp script and returns the result in a stringAutomationEvent Branches a procedure to the event of an automation objectAutomationParameter Configures the management of accesses to the ActiveX objects and to the Automa-
tion objectsBeep Emits a beepBuildAutomationVa-riant
Builds an Automation variant parameter
CapsLockVerify Checks whether the CapsLock key is pressed.CertificateClientInfo Returns information about the certificate used by the client computer.ChangeSkinTemplate Dynamically changes the skin template associated with a window (specific window,
windows of WinDev components, …)Compile Compiles a procedure dynamicallyComponentInfo Returns information about a componentComponentLoad Loads the specified component in memoryComponentLoadAll Recursively loads in memory all the components used in the project.ConfigureAAF Allows you to specify the behavior of some automatic features of the application
(AAF).ConfigureSpellCheck Configures the spelling checker of OpenOffice for the edit controls and for the table
columns found in the application. You have the ability to specify the language inwhich the spell check must be performed.
ConnectionCount Returns the number of instances of the WebDev site currently run on the serverCookieRead Retrieves the value of a cookie saved on the computer of the Web userCookieWrite Writes a cookie onto the computer of the Web userDataType Identifies the type of a WLanguage variablediffApply Applies a difference buffer to a specific buffer
WLangage.book Page 188 Jeudi, 20. mars 2014 4:29 16

Part 4: Standard functions 189
diffCreate Compares two buffers and creates a buffer containing the differences betweenthese two buffers
Dimension Calculates the size of a variable or resizes a dynamic arrayDisableAAF Disables an automatic feature of WinDev on a control or on a windowDisables AAF Disables an Automatic Application Feature (AAF) for a control, for a window or for
the current applicationDrawingStyle Allows you to modify parameters for the display mode of windowsEndAutomatedProce-dure
Stops the current or forthcoming execution of an automatic procedure (defined bythe properties of the procedure in the code editor)
EndProgram Ends the execution of the current programErrorInfo Returns information about the last error that occurred in a component functionEvaluateExpression Evaluates the value of an expression built in a character string.Execute Starts the execution of a process by programmingExecuteAAF Runs an automatic application feature (AAF) on a specific controlExecuteAncestor When the code is overloaded, used to run the process of the template correspon-
ding to the process of the current control.ExecuteCode Runs the WLanguage code found in a character string.ExecuteDelayedProce-dure
Runs a delayed procedure (in the WebDev application server).
ExecutePresetAction Runs a preset action of WinDevExecuteProcess Starts the execution of a process by programmingExecutionMode Returns or modifies the behavior of the application (site) when errors are generatedfDataDir Returns the full path of the directory for the HFSQL data filesFileDisplay Returns a specific file to the client browserFolderData FolderData is kept for backward compatibilityFolderWeb Returns the path of the directory containing the images, the Javascript files, …fWebDir Returns the physical name of the directory containing the images, the Javascript
files and the Java files of the WebDev siteGeneratePassword Automatically generates a password with specific characteristics (size, characters
used, …).GetColor Allows you to get a set of harmonious colors without having to use a table of colorsGetGUID Calculates a globally unique identifier (named "GUID")GetIdentifier Calculates a unique identifier (integer) for a given executableHasp Interrogates a HASP electronic keyHelpFile Returns or modifies the name of the help file used by the context-sensitive help of a
window.In64bitMode Indicates whether the code is run in 64-bit mode or not.InAJAXMode Identifies whether the code is run from an AJAX process or from a procedure called
by AJAXEXecute or AJAXExecuteAsynchronousInAndroidEmulator-Mode
Indicates whether the code is run in the Android emulator or not
InAndroidSimulator-Mode
Indicates whether the code is run in the Android simulator
InAutomaticTestMode Enables you to find out whether an automatic test is currently run or notInAWPMode Indicates whether the code is run from an AWP page.InComponentMode Indicates whether the code is run from a WinDev application or from a componentInDelayedProcedure-Mode
Indicates whether the code is run from a delayed procedure or from a scheduledtask on the WebDev application server
InFactoryMode Indicates whether the code is run by an action plan of the software factoryIniOSEmulatorMode Identifies whether the code is running in the iOS emulator (iPhone, iPad) or not.IniOSMode Identifies whether the code currently run is in iOS mode (iPhone, iPad) or not.
WLangage.book Page 189 Jeudi, 20. mars 2014 4:29 16

190 Part 4: Standard functions
IniOSSimulatorMode Identifies whether the code is run in the iOS simulator (iPhone, iPad) or not.INIRead Reads the content of an INI fileInitRandom Initializes the generator of random numbersINIWrite Writes a specific value into an INI fileInJavaMode Indicates whether the code is run in JavaInLinuxMode Indicates whether the code is run in Linux mode or notInPHPMode Indicates whether the code is run in PHPInPHPSimulatorMode Indicates whether the code is run in PHP simulator modeInPocketMode Indicates whether the code is run from a WinDev Mobile application or from a stan-
dard WinDev applicationInPocketSimulator-Mode
Indicates whether the code is run in the Pocket simulator
InReportsAndQueries-Mode
Indicates whether the code is run during the test of a report or query in Reports andQueries
InServiceMode Indicates whether the code is run in a serviceInSimulatorMode Used to find out whether the application is run in "simulator test mode" from Win-
Dev Mobile.InStoredProcedure-Mode
Indicates whether the code is run on a HFSQL server
InTestMode Identifies the startup mode of the application or siteInTSEMode Indicates whether the code is run from a computer in TSE mode or from a remote
desktop.InUMCMode Indicates whether the code is run from a user macro-code.InVGAMode Indicates whether the application is run in VGA mode on a mobile deviceInWebMode Identifies the startup mode of the current codeInWebserviceMode Allows you to find out whether the execution is in progress in the AWWS engine.InWidgetMode Identifies whether the code is run in Android Widget modeInWindowsMobile-Mode
Indicates whether the code is run from a Windows Mobile application.
InWindowsMode Indicates whether the code is run in Windows mode or notInWindowsPhoneE-mulatorMode
Indicates whether the test is run via the Windows Phone emulator
InWindowsPhone-Mode
Indicates whether the code is run in Windows Phone mode.
InWindowsPhoneSimu-latorMode
Indicates whether the code is run in the Windows Phone simulator
InWindowsStoreAp-pMode
Identifies whether the code is run in Windows Store apps mode
IsNumeric Allows you to find out whether a variable or a control is a numeric or a string thatcan be converted into numeric
JSEndEvent Removes the association between a WLanguage browser function and an event(implemented by JSEvent.
JSEvent Associates a browser procedure with an event on an object in browser codeJSInfoEvent Used to handle the JavaScript properties of the browser event that triggered the exe-
cution of the codeJSInterruptEvent Interrupts the process of the current eventJSMethod Allows you to run a Javascript method on an element found in the current pageJSONExecute Calls a server URL of the same domain that returns data in JSON formatJSONExecuteExternal Calls an external server URL that returns data in JSON formatJSProperty Allows you to handle specific features on the objects found in the current page
WLangage.book Page 190 Jeudi, 20. mars 2014 4:29 16

Part 4: Standard functions 191
LargeFontFactor Returns the current enlargement ratio of a WinDev window (only if Windows is inlarge font mode)
LoadProcedure LoadProcedure is kept for backward compatibility.LoadWDL Loads a library of objects in memory (.WDL)MouseXPos Returns the horizontal position of the mouse cursorMouseYPos Returns the vertical position of the mouse cursorNumHelp Returns the number of the help context associated with the specified controlOrderLine Identifies and retrieves the different elements of the command line passed in para-
meter to the current programPHPDisplay Calls an external PHP script and returns the result page in the current browser win-
dowPHPExecute Calls an external .php script and returns the result in a stringProfilerEnd Stops "collecting data" for the performance profilerProfilerStart Starts "collecting data" for the performance profilerRandom Returns a random numberRunReportsAndQueries Starts Reports and QueriesSComputeCrc16 Checks whether a character string has been transmitted properly in case of trans-
mission with risk of information lossScriptDisplay Calls an external script (.php or .asp for example) and returns the result page in the
current browser windowScriptExecute Calls an external script (.asp or .php for example) and returns the result in a string
(an http query is performed, allowing you to use either a POST method or a GETmethod)
SelectColor Opens the standard window for color selectionSound Plays a sound in WAV formatSSLActive Allows you to enable or disable the secure SSL mode.StringDisplay Displays a character string (or a buffer) in the browserTrace Displays the requested information (content of a control for example) in a window
opened in parallel of the current windowTraceEnd Closes the trace window if this window was openedTraceStart Opens the trace windowTrialVersion Used to find out whether the current execution of the application is in "trial version"
modeTypeVar Identifies the type of an expression, a variable (during a call to a procedure for
example) or a controlUnloadProcedure UnloadProcedure is kept for backward compatibilityUnloadWDL Frees the library that was loaded in memory by LoadWDLUnloadWDL Frees the library that was loaded in memory by LoadWDLUploadCopyFile Saves on the server a file "upload" by a Web user (which means sent by a Web user
to the server via an "Upload" edit control)UploadFileName Returns the name of a file "upload" by a Web user (which means sent by a Web user
to the server via an "Upload" edit control)VariableReset Resets the variable to its initial valueVariantConvert Converts the value stored in a Variant variableWHelp Displays a file or a help page in HLP or CHM formatWinDevVersion Returns the version number of the WD150WM DLL of WinDev
See the online help to check the availability of these functions in the different products (WinDev, WebDev,WinDev Mobile).
WLangage.book Page 191 Jeudi, 20. mars 2014 4:29 16

192 Part 4: Standard functions
9.18 Functions for managing the executables
The following functions are used to handle the executables and to get information about the executablesfound on the current computer:
9.19 Hasp functions
The dongles of the Hasp family (Hasp3, Hasp4, NetHasp, memoHasp and Hasp HL) are used to protect theapplications developed with WinDev or WebDev.
The following functions are used to manage the Hasp functions:
AutoRunAdd Allows you to automatically start a WinDev Mobile application when a specific event occurs. This startup is defined from a WinDev Mobile application.
Also enables you to automatically start a WinDev application when a specific eventoccurs. This startup is defined from a WinDev application.
AutoRunDelete Allows you to cancel the automatic startup of a WinDev or WinDev Mobile applica-tion. This automatic startup was defined by the AutoRunAdd function.
ExeGetPID Returns information about the current process.ExeInfo Retrieves the specified information about the version of an executable or DLLExeListDLL Returns the list of libraries (".DLL" files) used by an application currently runExeListProcess Returns the list of applications currently run. For each application found, you can
find out its identifier, the identifier of the parent process (the one that started theapplication), the name and extension of its executable, the name and full path of itsexecutable, its current memory consumption and its maximum memory consump-tion.
ExePriority Returns or modifies the priority of an application currently runExeRun Starts the execution of a program (an executable for example) from the current
application or siteExeRunning Allows you to find out whether an application is already startedExeTerminate Terminates the execution of a 32-bit application: all the instances of the executable
are "killed"GetIdentifier Calculates a unique identifier (integer) for an executable or for a session.ListDLL Returns the list of libraries (".DLL" files) used by the current WinDev application, Win-
Dev Mobile application or WebDev site. Only the libraries loaded in memory are lis-ted.
ShellExecute Directly opens a document in the associated application or site
See the online help to check the availability of these functions in the different products (WinDev, WebDev,WinDev Mobile).
Hasp Interrogates an electronic HASP key (HASP-3, HASP-4, MemoHasp or NetHasp).HaspHLCrypt Encrypts a character string by using the algorithms of the specified Hasp key.HaspHLInfo Returns information about the electronic Hasp key.HaspHLLogin Connects the application with a Hasp key.HaspHLLogout Closes the connection of the application to a Hasp key.HaspHLRead Reads data (character string or buffer) in the internal memory of the Hasp key.HaspHLUncrypt Decrypts a character string by using the algorithms of the Hasp key.HaspHLWrite Writes data (character string or buffer) into the internal memory of the Hasp key.
See the online help for more details.
WLangage.book Page 192 Jeudi, 20. mars 2014 4:29 16

Part 4: Standard functions 193
9.20 Functions for DDE management
The following functions are used to manage the DDE (Dynamic Data Exchange) :
9.21 Functions for managing the applications with "live update"
The following functions are used to manage the applications with "Live update":
DDEConnect Establishes a DDE connection between the current program and the recipient accordingto a given subject
DDEDisconnect Deletes a connection between the current program and a recipientDDEError Returns the status report about the execution of a function used to manage the DDE dia-
logDDEEvent Associates a WLanguage procedure with a DDE eventDDEExecute Sends a command to runDDEItem Identifies the item affected by a DDE eventDDELink Creates a hot link with a dataDDERecipient Identifies the recipient of a DDE connectionDDERetrieve Retrieves a data sent by a program (the recipient of the connection for the specified
object)DDESend Sends a data to the program connected via DDEDDEStart Runs a program from the current application or siteDDEString Returns the information retrieved by DDERetrieveDDETopic Identifies the subject of the conversation associated with a DDE connectionDDEUnLink Interrupts a link between an item and a dataDDEUpdate Modifies a linked dataDDEWarmLink Creates a warm link with a data
See the online help for more details.
AppliActivateVersion Enables one of the application versions available in the history of versions on thereference setup server.
AppliChangeParame-ter
Changes an information in the mechanism for automatic update of the specifiedapplication.
AppliControl Enables (or disables) the remote check for the current multi-user WinDev applica-tion.
AppliDeleteVersion Deletes a version from the history of versions found on the reference setup server.AppliInstallUPD Triggers the automatic update of the current application.AppliInstallVersion Installs a specific version of the application.AppliListVersion Lists the versions available on the reference setup server. These versions are
available in the history of the reference setup.AppliParameter Returns information about the mechanism for automatic update of the specified
application.AppliUPDAvailable Allows you to find out whether an update is available for the specified application.AppliVersionInfo Returns information about a version available on the setup server.
See the online help for more details.See the online help to check the availability of these functions in the different products (WinDev, WebDev,WinDev Mobile).
WebDev WD
WLangage.book Page 193 Jeudi, 20. mars 2014 4:29 16

194 Part 4: Standard functions
9.22 Functions for managing the networks
The following functions are used to manage the networks:
9.23 Functions for managing the SNMP protocol
The following functions are used to manage the SNMP protocol:
9.24 Functions for managing the projects
These functions are used to easily manage the project elements:
NetworkConnect Associates a drive with a shared network directoryNetworkDirName Identifies the directory associated with a network driveNetworkDisconnect Disconnects a network driveNetworkDomain-Name
Returns the domain name associated with the current computer
NetworkUser Identifies the name of the connected user
See the online help for more details.See the online help to check the availability of these functions in the different products (WinDev, WebDev,WinDev Mobile).
SNMPCloseSession Closes an SNMP session.SNMPGet Reads one or more values of an agent with which an SNMP session was started.SNMPGetNext Reads the value found after the last value retrieved for an SNMP agent.SNMPGetTable Reads a table of SNMP values.SNMPLoadMIB Loads a MIB file in memory and analyzes it.SNMPOIDAccess Returns the authorized access modes of a specific OID.SNMPOIDDescription Returns the description of an OID.SNMPOIDStatus Returns the status of an OID.SNMPOIDToString Converts an OID from its numeric representation to its text representation.SNMPOIDType Returns the type of data found in an OID.SNMPSet Writes one or more values onto an SNMP agent for which an SNMP session was
started.SNMPStartSession Starts an SNMP session.SNMPStringToOID Converts an OID from its text representation to its numeric representation.SNMPTrapDisable Disables the interception of an SNMP trap.SNMPTrapEnable Enables the interception of an SNMP "trap" sent by an agent.
See the online help for more details.See the online help to check the availability of these functions in the different products (WinDev, WebDev,WinDev Mobile).
ComponentInfo Returns information about a component.ComponentList Returns the list of components (".WDK" file) used by the current applicationComponentLoad Loads the specified component in memory. This component will be loaded in memory
until the end of the application.ComponentLocate Specifies the access path to a component found in the projectEnumElement Allows you to list the project elements (windows, pages, reports, queries, …) EnumSubElement Allows you to list the sub-elements of a project element (windows, reports, queries, …).
This function can be run even if the element is not opened
WLangage.book Page 194 Jeudi, 20. mars 2014 4:29 16

Part 4: Standard functions 195
9.25 Functions for managing the scheduler
The following functions are used to manage the Windows scheduler:
InComponentMode Identifies whether the code is run:• from a WinDev application, a WebDev site or a PHP page,• from a component
ListDLL Returns the list of libraries (".DLL" files) used by the current application or installed onthe current computer
ProjectInfo Returns a specific information about the project currently run (project name, associa-ted registry key, …)
WindowCount Calculates the number of windows currently opened in the current application
See the online help for more details.See the online help to check the availability of these functions in the different products (WinDev, WebDev,WinDev Mobile).
SchedulerAddTask Creates a task in Windows schedulerSchedulerAddTrigger Creates a schedule for a scheduled taskSchedulerDeleteTask Deletes a scheduled taskSchedulerDeleteTrigger Deletes a schedule from a scheduled taskSchedulerModifyTask Modifies the parameters of a scheduled taskSchedulerModifyTrigger Modifies the parameters for the schedule of a scheduled task,
which means the parameters that will define the execution of a taskSchedulerOpenTaskProperties Opens the property page of a scheduled taskSchedulerReset Fills the ScheduledTask and TriggerScheduledTask structures with
the default valuesSchedulerTaskList Retrieves the list of scheduled tasksSchedulerTaskProperties Reads the properties of a scheduled task and updates the Schedu-
ledTask structureSchedulerTaskStatus Retrieves or modifies the status of a task created in the Windows
schedulerSchedulerTriggerProperties Reads the properties for a schedule of a scheduled task and upda-
tes the TriggerScheduledTask structure
See the online help for more details.See the online help to check the availability of these functions in the different products (WinDev, WebDev,WinDev Mobile).
WD
WLangage.book Page 195 Jeudi, 20. mars 2014 4:29 16

196 Part 4: Standard functions
10. ENABLING AN APPLICATION
10.1 Overview
When distributing an application, it may be usefulto propose a full version and a limited version:• The limited version is supplied by default.
• The full version requires an activation key.WinDev, WebDev and WinDev Mobile allow you toeasily manage this feature.
10.2 How do I proceed?
10.2.1 PrincipleAn initial key (a serial number for example) is gene-rated upon request by the application on the clientcomputer. This key is unique: it depends on para-meters specific to the current computer at the timeof the request.The client can perform an activation request (byInternet for example) toward the application provi-der by communicating this initial key.The provider will generate the activation key fromthe initial key and communicate it to his client.Then, the client will be able to enter the initial keyand the corresponding activation key to activate hisapplication.
10.2.2 Implementation in the client applica-tionThe following steps must be performed by the appli-cation used by the client:1. Generation and distribution of the initial key:• The generation of the initial key is performed by
KeyGenerateInitialKey.• The communication of the initial key to the provi-
der of the application can be performed via an
automatic email or via a Web site.2. Retrieving the activation key and enabling theapplication:• Retrieving the activation key can be performed by
the application or by the input of the key by theend user.
• The check regarding the conformity between theactivation key and the initial key is performed byKeyCompareKey. If it is successful, you will beable to activate some features of the application.
10.2.3 Implementation in the application of the providerThe application provider must own an applicationused to:• generate the activation key from an initial key
(KeyCalcActivationKey).• transmit the activation key to the client applica-
tion. You have an ability to send an email forexample.
These operations can be proposed by a WebDevsite or by a Webservice allowing an immediateonline activation.
10.3 Functions for managing the activation keys
The following functions are used to manage the activation keys:
KeyCalcActivationKey Calculates the activation key of the application from the initial key.KeyCompareKey Compares an initial key with an activation keyKeyGenerateInitialKey Generates the initial key (unique license number) for the activation system of
the applicationKeyGetIdentifier Retrieves the identifier that was used to generate an initial key
See the online help for more details.
WLangage.book Page 196 Jeudi, 20. mars 2014 4:29 16

Part 4: Standard functions 197
11. HANDLING YOUR XLS FILES
11.1 Overview
WinDev et WebDev propose two methods for han-dling the Excel files:• Method 1: Dynamically handling the XLS and
XLSX sheets.• This method uses different types of variables as
well as WLanguage functions. This method is
used to manage the Excel files (XLS or XLSX files)in read and write modes.
Method 2 (for backward compatibility): Using theWLanguage functions to manage the XLS functions.This method can only be used to manage the XLSfiles in read-only.
11.2 Method 1: Dynamically handling the XLS and XLSX files
To handle the XLS and XLSX files, the WLanguageproposes:• different types of variables. These types of varia-
bles are used to handle an XLS document, anXLS row or column, an XLS cell.
• several WLanguage functions that handle the dif-ferent types of data.
To handle the XLS and XLSX files:1. Declare an xlsDocument variable. This type ofvariable is used to describe and modify an Exceldocument.2. Open (if necessary) the XLS file (xlsOpen) andassociate it with the xlsDocument variable.3. The different elements found in the Excel docu-ment can be handled:• by the WLanguage functions.• by the properties of the xlsDocument type.
Example: Note• If the Excel file is opened in read/write mode
(xlsWrite constant), the file is opened and lockeduntil it is closed. To save the modifications perfor-med, use xlsSave.
• The XLS functions do not require "MicrosoftExcel" to be installed on the user computers.
• The XLS files and the files specific to Office 2007(.xlsx files) are supported.
WebDev WD
IdXLSFile is xlsDocument MyFile is string MyFile = fExeDir + ..."\Follow up1.xls"IDXLSFile = xlsOpen(... MyFile, xlsWrite)IF ErrorOccurred = False THEN Azz is int Azz = xlsCurrentWorksheet(IdXls-File)Info("Current sheet in"+ ...
"The Excel file:" + Azz) // Change the worksheet IF xlsCurrentWorksheet(... xlsFileID,2) THEN Info("The current sheet"+ ... "has been modified.") // Read a cell for test Info(xlsData(xlsFileID,11,2)) ELSE Error("The selected file"+... "does not have a second"+... "worksheet") END ELSE Error("Caution! the file "+... "is already opened on another"+... "computer! ")END
WLangage.book Page 197 Jeudi, 20. mars 2014 4:29 16

198 Part 4: Standard functions
11.3 Method 2: Reading the Excel files (kept for backward compatibility)
WinDev and WebDev propose several functionsallowing you to manage your ".XLS" files from yourWinDev applications and from your WebDev sites.These functions allow you to retrieve the data ente-red in Excel.
To handle an XLS document:1. Use xlsOpen. This function returns the identifierof the XLS file used.2. Use the XLS functions to retrieve the requestedinformation about the Excel file and its data.
Notes:• The XLS functions do not require "Microsoft
Excel" to be installed on the user computers.
• Only the XLS files are supported. The files speci-fic to Office 2007 (.xlsx files) are not supported.
• Two operating modes are available for the XLSfunctions:•Operating mode compatible with the earlier ver-
sions of WinDev and WebDev: in this mode, onlythe first sheet of the workbook is accessible.
•New multi-sheet operating mode: in this mode,you can select the workbook sheet where theoperations will be performed.
The function used to modify the mode for handlingthe XLS functions is named xlsOpen.
11.4 WLanguage functions
These functions allow you to:• handle the ".XLS" files: opening and closing.• get information about your ".XLS" files: cell data,
number of rows, number of columns, column
type, column title (see diagram).• find out the Excel version used.• identify the errors that occurred during the diffe-
rent operations performed on an ".XLS" file.
WLangage.book Page 198 Jeudi, 20. mars 2014 4:29 16

Part 4: Standard functions 199
11.5 XLS functions
The following functions are used to manage the Excel files:
Note: TableToExcel is used to create an XLS file from the data found in a table.
xlsAddWorksheet Adds or inserts a new worksheet into an Excel document.xlsClose Closes an XLS filexlsColumnTitle Retrieves the title of a column found in an XLS filexlsColumnType Returns the type of the data entered in a column of an XLS filexlsCurrent-Worksheet
Used to find out and modify the current worksheet in an XLS file
xlsData Retrieves the data from a cell of the XLS filexlsDele-teWorksheet
Deletes a worksheet from an Excel document.
xlsMsgError Returns the caption of the last error caused by an XLS functionxlsNbColumn Returns the number of columns found in an XLS filexlsNbRow Returns the number of rows found in an XLS filexlsNbWorksheet Returns the number of worksheets found in an XLS filexlsOpen Opens an XLS filexlsSave Saves an Excel document.xlsVersion Returns the Excel version used
See the online help for more details.See the online help to check the availability of these functions in the different products (WinDev, WebDev,WinDev Mobile).
WLangage.book Page 199 Jeudi, 20. mars 2014 4:29 16

200 Part 4: Standard functions
12. THE ARCHIVES
12.1 Overview
Several WLanguage functions are used to com-press and group your files into archives.An archive is a physical file:• of ".WDZ" type for a WinDev archive.
• of ".ZIP" type for a WinZip or PKZip archive. This file groups several automatically compressedfiles of different types (".pdf", ".fic", ".mmo", etc.).
For example, the archives allow you to:• save your files on a regular basis while reducing
the storage space,• simplify the transmission of your files over the
Internet/Intranet,• create self-extracting archives,• etc.
An optimized compression allows your files to takeless disk space and to be easily distributed on diffe-
rent media (diskettes, CD, Internet, etc.).
There are two types of archive:• single-part archive: the archive is made of one
file.• multi-part archive: the archive is made of several
files (or sub-archives).
Note: WinDev also supports the standard zip for-mats (WinZip and PKZip).
12.2 Handling the archives
More than 20 WLanguage functions allow you tomanage your archives. These functions allow youto:• handle the archives (creation, opening, closing),• handle the files found in the archive (add and
compress files (single file or all the files in a direc-tory), extract and uncompress a file, delete filesor delete an archive),
• get various information about the archives andabout the compressed files (size before and aftercompression, etc.),
• split and/or merge archive volumes,
• create self-extracting executables.ExampleTo save the database of your customer, your pro-gram creates a backup archive. The files to saveare compressed into the archive.To store this archive on diskettes: this archive issplit into several parts. This enables you to easilytransmit this archive!To simplify the use of the backup files: create a self-extracting archive. All you have to do is run thearchive to automatically decompress all the files.
WLangage.book Page 200 Jeudi, 20. mars 2014 4:29 16

Part 4: Standard functions 201
12.3 The single-part and multi-part archives
12.3.1 OverviewTwo types of archives are available:• single-part archive,• multi-part archive.
Single-part archiveA single-part archive contains a single ".WDZ" or".ZIP" file: an archive file contains all the com-pressed files.The archive occupies the necessary space to con-tain all the compressed files.Example: Your program or your site must save seve-ral large files. Your program or your site can createan archive containing all the files to save. Thisarchive will increase the available disk space.
Multi-part archiveA multi-file archive contains several files (or sub-archives) of identical size. The size of each sub-archive is defined when creating the multi-filearchive.
The first sub-archive is a ".WDZ" or ".ZIP" file. Thefollowing sub-archives are files numbered from 1 toN via their extension.For the archives in WinDev format (WDZ), the sub-archives have the following extensions: ".001",".002", …, ".NNN".For the archives in ZIP format, the sub-archiveshave the following extensions: ".Z01", ".Z02", …,".ZNN".
12.3.2 PrincipleTo create a multi-part archive:1. Create an archive (zipCreate).2. Add files to this archive. The added files areautomatically compressed (zipAddFile, zipAddDi-rectory).3. Split this archive into several sub-archives (zipS-plit). The sub-archives have the same size. Youdefine the size of the sub-archives.You can store the sub-archives on different media(diskettes, CD, etc.).The sub-archives can be merged (zipMerge): thearchive becomes a single-part archive.
Note: All these operations can also be performedvia WDZip (see the online help for more details).
Caution: Some archiving functions can be onlyused with single-part archives (add files, deletefiles, create a self-extracting executable, etc.). Toperform these operations on a multi-part archive,the sub-archives must be merged (zipMerge) tocreate a single-part archive.From a multi-part archive, you only have the abilityto :• Merge the different parts (zipMerge),• Get information about the archive and about the
files found in the archive (zipExtractPath, zipInfo-File, zipListFile, etc.),
• Extract the files (zipExtractFile, zipExtractAll).
12.3.3 Examples• Your WinDev program must store a large amount
of data on diskettes. Your program can create anarchive containing the requested data. Oncecreated, this archive can be divided into severalparts. These volumes have the size of a diskette(1.44 MB). All you have to do is copy these diffe-rent parts on the diskettes.
• Your WebDev site must propose the download ofa large file. For the Web users with a slow connec-tion (phone line for example), there is often anoption used to download a file in several parts.Your site can create an archive containing all therequested data. Once created, this archive canbe divided into several parts. These volumes canhave a suitable size for download. Now, all youhave to do is provide a link for each part of thearchive to the Web user.
WLangage.book Page 201 Jeudi, 20. mars 2014 4:29 16

202 Part 4: Standard functions
12.4 Archiving functions
The following functions are used to manage the archives:
zipAddDirectory Adds all the files found in a directory and in its sub-directories into an archivezipAddFile Adds a file into an archive and compresses itzipAddFileList Adds a list of files into an archive and compresses itzipChangePath Modifies the path of a file found in the archivezipClose Closes an archivezipCompressionLevel Changes the compression level used when creating an archive in ZIP formatzipCreate Creates a new archivezipCreateExe Creates a self-extracting executable from an archivezipCurrentFile Returns the name of the file currently processed by the functions for adding and
extracting fileszipDeleteAll Deletes all the files from an archivezipDeleteFile Deletes a file from an archivezipDeleteFileList Deletes a list of files from an archivezipExist Allows you to find out whether an archive exists. An archive exists if it was opened
by zipOpen or if it was created by zipCreate.zipExtractAll Extracts all the files from an archive and decompresses themzipExtractFile Extracts a file from an archive and decompresses itzipExtractFileList Extracts and automatically decompresses a list of files found in an archive to a phy-
sical location.zipExtractPath Returns the initial path of a file found in the archivezipFileSize Returns the size of a file in an archive (before and after compression)zipFindFile Finds a file in an archive according to a given pathzipInfoFile Returns various information about a file or about an archive (stored path, size
before and after compression, etc.)zipIsMulti Returns the type of the archive: single-part archive or multi-part archivezipListFile Returns the list of files found in the archivezipMerge Merges the different parts of an archive to create a single-part archivezipMsgError Returns the message associated with an error number for an archiving processzipNbFile Returns the number of files found in an archivezipNbPart Returns the number of parts found in an archivezipNbPartNeeded Returns the number of parts of a given size required to contain the archivezipOpen Opens an existing archivezipOpenCAB Opens an existing CAB archivezipOpenRAR Opens an existing RAR archivezipPassword Defines the password used to add files into the specified archive and to extract files
from the specified archivezipSize Returns the size of all the files found in an archive (before and after compression)zipSplit Splits an archive into several parts
See the online help for more details.See the online help to check the availability of these functions in the different products (WinDev, WebDev,WinDev Mobile).
WLangage.book Page 202 Jeudi, 20. mars 2014 4:29 16

Part 4: Standard functions 203
13. BURNING A CD OR A DVD
13.1 Overview
Several WLanguage functions are used to burn theCDs or DVDs. You can create:• data CDs/DVDs.• audio CDs.
Note: You can only burn files onto a CD or a DVD.You cannot copy a CD or DVD directly.
In WinDev, the burn functions are available for Win-dows XP and later.
In WebDev, the burn operation will be performed onthe Web server. This server must be running Win-dows XP or later.
13.2 Burning a CD/DVD
To burn a CD:1. Specify (if necessary) the burner to use:
2. Open (if necessary) the door of the current bur-ner (BurnerEject).3. Specify (if necessary) the type of the CD/DVD tocreate:
4. Erase (if necessary) the files already found onthe CD/DVD (BurnerErase). A WLanguage proce-dure ("callback") is regularly called during this eraseprocess. This procedure is used to manage the dif-ferent events that occur.5. Specify (if necessary) the name that must begiven to the CD/DVD to burn (BurnerVolumeName).6. Select the files to burn on the CD/DVD:
7. Retrieve (if necessary) the characteristics of thecompilation (BurnerCompilationInfo).8. Burn the selected files on the CD/DVD (Burner-Save). A WLanguage procedure ("callback") is regu-larly called during this burn process. This procedureis used to manage the different events that occur.9. Cancel (if necessary) the current burn operation(BurnerCancel).
13.3 Burn functions
The following functions are used to manage the archives:
WebDev WD
BurnerPath Returns the path of the currentburner
BurnerStatus Returns the status of the currentburner
BurnerList Returns the list of burners instal-led on the current computer
BurnerProperty Allows you to to find out andmodify the properties of the cur-rent burner
BurnerSelect Allows you to select the defaultburner
BurnerMediaInfo Retrieves the characteristics of theCD/DVD found in the current bur-ner
BurnerMediaType Allows you to find out or modify thename of the CD/DVD to burn
BurnerAddFile Adds a file to the compilation
BurnerAddDirectory Adds all the files found in a direc-tory to the compilation
BurnerAddDirectory Adds all the files found in a directory to the compilationBurnerAddFile Adds a file to the compilationBurnerCancel Cancels the current burn processBurnerCompilationInfo Retrieves the characteristics of the current compilationBurnerEject Opens or closes the door of the current burnerBurnerErase Erases the files found on a rewritable CDBurnerList Returns the list of burners installed on the current computerBurnerMediaFound Allows you to find out whether the burner is empty or not.BurnerMediaInfo Retrieves the characteristics of the CD found in the current burner
WLangage.book Page 203 Jeudi, 20. mars 2014 4:29 16

204 Part 4: Standard functions
BurnerMediaType Allows you to find out and modify the format of the CD to burnBurnerPath Returns the path of the current burnerBurnerProperty Allows you to to find out and modify the properties of the current burnerBurnerSave Burns the files found in the compilation to the CDBurnerSelect Allows you to select the default burnerBurnerStatus Returns the status of the current burnerBurnerVolumeName Allows you to find out and modify the name of the CD to burn
See the online help for more details.See the online help to check the availability of these functions in the different products (WinDev, WebDev,WinDev Mobile).
WLangage.book Page 204 Jeudi, 20. mars 2014 4:29 16

Part 4: Standard functions 205
14. FUNCTIONS FOR ACCESSING A POCKET PCThese functions are used to access the Pocket PCs from a standard WinDev application.
ceConnect Connects the current computer to a Pocket PCceConnectionStatus Allows you to find out the status of the connection between the current computer and
a Pocket PCceCopyFile Copies a file found on the current computer to the connected Pocket PC; found on
the connected Pocket PC to the current computer; found on the connected Pocket PCto another directory on the Pocket PC
ceCreateShortcut Creates a shortcut on the Pocket PC connected to the current computerceDeleteFile Deletes a file from the Pocket PC connected to the current computerceDeleteShortcut Deletes a shortcut that was created by ceCreateShortcutceDir Finds a file or a directory on the Pocket PC connected to the current computerceDisconnect Closes the connection between the current computer and the Pocket PCceFileDate Returns or modifies the different dates associated with a file (creation, modification
or access)ceFileExist Checks the existence of a fileceFileSize Returns the size (in bytes) of a file found on the Pocket PC connected to the current
computerceFileTime Returns or modifies the different times associated with a file (creation, modification
or access)ceListFile Lists the files found in a directory (and in its sub-directories) and returns the number
of listed filesceMachineName Returns the name of the Pocket PC connected to the current computerceMakeDir Creates a directory on the Pocket PC connected to the current computerceOEMInfo Returns the OEM information of the Pocket PC connected to the current computercePlatform Returns the name of the platform for the Pocket PC connected to the current compu-
tercePowerStatus Returns information about the main or spare battery of the Pocket PCceProcessorType Returns the type of processor for the Pocket PC connected to the current computerceRegistryCreate-Key
Creates a key in the Pocket PC registry
ceRegistryDeleteKey Deletes a sub-key from the Pocket PC registryceRegistryDeleteVa-lue
Deletes a value from the Pocket PC registry
ceRegistryExist Checks the existence of a key in the Pocket PC registryceRegistryFirstSub-Key
Identifies the key found after the specified key in the Pocket PC registry
ceRegistryListValue Returns the name (and possibly the type) of the values for a key found in the PocketPC registry
ceRegistryNextKey Identifies the key found after the specified key in the Pocket PC registryceRegistryQueryVa-lue
Reads the value of a register in the Pocket PC registry
ceRegistrySetValue Writes a value into a register of the Pocket PC registryceRegistrySubKey Identifies the path of the Nth specified sub-key in the Pocket PC registryceRemoveDir Deletes a directory from the Pocket PC connected to the current computer
WD
WLangage.book Page 205 Jeudi, 20. mars 2014 4:29 16

206 Part 4: Standard functions
ceRunExe Starts the execution of a program (an executable for example) from the current appli-cation
ceSysDir Returns the path of a system directory for the Pocket PC connected to the currentcomputer
ceWindowsVersion Returns information about the Windows version used on the Pocket PC connected tothe current computer
ceWinEnum Allows you to enumerate the Windows windows currently opened on the Pocket PCceWinTitle Returns the title of the specified Windows windowceXRes Returns the horizontal resolution of the screen for the Pocket PC connected to the
current computerceYRes Returns the vertical resolution of the screen for the Pocket PC connected to the cur-
rent computer
See the online help for more details.
WLangage.book Page 206 Jeudi, 20. mars 2014 4:29 16

Part 4: Standard functions 207
15. FUNCTIONS SPECIFIC TO WINDEV MOBILE
15.1 WinDev Mobile and SIM cards
15.1.1 OverviewWinDev Mobile allows you to access the informa-tion found in the SIM card of a cell phone via theSIM functions of WLanguage.The SIM card (Subscriber Identity Module) is thechip found in a cell phone. Required to access thecommunication network, this smart card identifiesthe user and stores all the information about thenetwork and about the subscription (phone num-ber, type of contract, …).The SIM card also contains a personal directory.The SIM functions of WLanguage are used tomanage the information found in this directory.Note: the personal directory found on the SIM cardonly contains the name and phone number of thecontacts. Only this information can be handled.
15.1.2 Required configurationTo be able to use the SIM functions, the applicationmust be installed:• on a Pocket PC with phone access (GSM type).• and/or on a Smartphone.
15.1.3 Operating mode in GO mode and at run timeIn GO mode (simulation on the development com-puter), a WLanguage error is generated during thecall to a function for managing the SIM card.
15.1.4 WLanguage functionsThese functions are used to easily manage theinformation found in the personal directory foundon a SIM card:
15.2 Pocket keyboard
15.2.1 OverviewTo allow the users of your applications to enterinformation, the keyboard of the Pocket PC must beused (also called SIP for Software Input Panel).This keyboard allows you to:• display a miniature keyboard at the bottom of the
screen. The user clicks this keyboard with the sty-lus to enter information.
For example:
SIMWrite Writes or modifies anentry in the directory ofthe SIM card
SIMRead Reads an entry in thedirectory of the SIM card
SIMNbContact Returns the number ofentries found in thedirectory of the SIM card
SIMDelete Deletes an entry from thedirectory of the SIM card
WLangage.book Page 207 Jeudi, 20. mars 2014 4:29 16

208 Part 4: Standard functions
• automatically recognize the different words writ-ten on the screen with the stylus (method called"Transcriber").For example:
• automatically recognize the letters entered in aspecific character set (method called "LetterRecognizer").For example:
• automatically recognize the blocks of words ente-red in a specific character set (method called"Block Recognizer").
For example:
WinDev Mobile allows you to easily manage thiskeyboard via the WLanguage functions.Note: Other types of keyboards may also be availa-ble.
15.2.2 WLanguage functionsThe functions used to manage the keyboard of aPocket PC are: SIPList Returns the list of keyboard types
available on the Pocket PCSIPMode Allows you to find out and modify
the keyboard currently usedSIPVisible Allows you to find out whether the
current keyboard is enabled andto enable the keyboard
WLangage.book Page 208 Jeudi, 20. mars 2014 4:29 16

PART 5
Specific Web features
WLangage.book Page 209 Jeudi, 20. mars 2014 4:29 16

WLangage.book Page 210 Jeudi, 20. mars 2014 4:29 16

Part 5: Specific Web features 211
1. UPLOADING FILES
1.1 Overview
The upload consists in saving on the Web server afile accessible from the computer of the Web user.The file found on the computer of the Web user is"uploaded" to the server: it is loaded and saved onthe server.All types of files can be uploaded.Examples for using the file upload:• Address Book site: when adding a new contact,
the user can select a photo for the contact from
his computer. In order for the photo to be dis-played independently of the Web user, the photois "uploaded" to the server.
• Document Management site: each Web user canmake different types of documents available toall: text, ... These documents are selected on thecomputer of the Web user and "uploaded" to theserver in order to be made available to all theWeb users.
1.2 Implementing the upload in a WebDev site
1.2.1 Available elementsThe following elements are used to manage the fileupload:• an UPLOAD edit control: In the browser, a
"BROWSE" button is automatically added on theright of the Upload edit control. This button allowsthe Web user to select the file to "upload". A gray button is displayed in the editor. This but-ton cannot be modified (style, caption, …). Caution: this edit control is a specific control; theValue properties should not be used on this con-trol. To get the name of the uploaded file, useUploadFileName.
• two server functions of WLanguage:
• several WLanguage browser functions are usedto handle the Upload control:
UploadCopyFile Saves an "uploaded" file on theserver. During this backup, thesaved file can be renamed on theserver.
UploadFile-Name
Returns the name of an "uploa-ded" file (initial file name or filename saved on server).
UploadCopy-CurrentFile
Indicates the name of the file cur-rently sent by the upload control.
UploadStart Starts sending the selected filesin an upload control.
UploadDelete Deletes a file from the list of filesto upload: the file will not beuploaded on the server.
UploadDele-teAll
Clears the list of files to upload:no file will be uploaded on theserver.
UploadCurrent-FileSizeSent
Returns the size (in bytes) alreadysent for the file currently uploa-ded via an Upload control.
UploadSize-Sent
Returns the total size (in bytes) ofthe files already sent by the cur-rent upload via an Upload con-trol.
UploadCurrent-FileSize
Returns the total size (in bytes) ofthe file currently uploaded via anUpload control.
UploadSize Returns the total size (in bytes) ofthe file currently uploaded via anUpload control.
WLangage.book Page 211 Jeudi, 20. mars 2014 4:29 16

212 Part 5: Specific Web features
1.2.2 Uploading a file in a pageTo upload a file in a page:1. Create an UPLOAD edit control (the type of thecontrol is defined in the "General" tab of the con-trol). This control allows the Web user to select the file to"upload".2. Add a button or a link. This control will be used to upload the file on theserver. This button (or link) must be a "Submit"button (or link). When the page is validated via thisbutton, the file is uploaded into a temporary direc-tory of the server. Therefore, this file cannot beviewed by the other Web users3. In the server click code of this link or button, youcan use:• UploadFileName (UploadFileName(<Upload Con-
trol>, False) for example) to check that the filewas uploaded and to retrieve its name. Indeed,during the upload, the file is renamed with a tem-porary file name.
• UploadCopyFile to copy and rename the fileuploaded on the server. This file can be copiedinto the resource directory (_WEB) or into a direc-tory accessible via an alias.
• HLinkMemo to load the image in a memo item ofa Hyper File file.
Caution: Directly using the file name on the browsercomputer (read the value via the Value property inserver or browser code) in the functions for filemanagement is a BIG mistake. Indeed, this opera-tion operates in development mode (the server andthe browser are found on the same computer) butNOT in deployment. In this case, the server and thebrowser are different computers. The server doesnot see the browser files. To find out the names ofthe files to use, call UploadFileName.
1.2.3 Displaying the image to uploadTo display the image selected in an upload edit con-trol (EDT_UploadControl) in an image control(IMG_ImageControl) :1. In the description window of the "ImageControl"image control ("General" tab), uncheck "Locate theimage in the _WEB directory in browser code".
2. In the code of the page, add the optional"OnMouseMove" browser code.3. Enter the following code lines in this code:
Note: This operation may not operate according tothe browser used and to the level of security.
Note: Maximum size of the files to upload:By default, the size of the files to upload is limitedin the WebDev engine.This size can be limited:• by the Web server used. See the documentation
about the Web server used for more details.• by the WebDev application server.The file will not be uploaded if its size exceeds thelimit size.
To modify the maximum size of the files to uploadin the WebDev application server, the registry mustbe modified on the server:1. To modify the size of the uploaded files for allthe WebDev 19 applications, select the followingkey: HKEY_LOCAL_MACHINE\SOFTWARE\PCSOFT\WEBDEV\19.02. Add the MAX_UPLOAD string. The value of thisstring will be the maximum size of the files toupload (in KB).For a large transfer (several hundreds of MB), werecommend that you use the FTP protocol insteadof the upload. You have the ability to perform anFTP transfer from a WebDev page, via a Java appletcreated with WinDev.
Limits in PHP:The size of the uploaded files is limited by the"upload_max_filesize" directive in the configura-tion file of PHP (php.ini file).The file upload must be allowed by the PHP server.To do so, the "file_uploads" directive must be set to"on" in the configuration file of PHP (php.ini file).
IF EDT_UpLoadControl <> "" THEN IF IMG_ImageControl<> EDT_UpLoadControl THEN IMG_ImageControl = EDT_UploadControl ENDEND
WLangage.book Page 212 Jeudi, 20. mars 2014 4:29 16

Part 5: Specific Web features 213
2. DOWNLOADING FILES
2.1 Overview
The download is the operation that consists insaving a file stored on the server onto the computerof the Web user. The file is "downloaded" on thecomputer of the Web user.
Some examples:• A site for renting DVDs allows you to download a
movie trailer onto your computer.• Documents can be downloaded into an applica-
tion for document management.
2.2 Implementing file download in a WebDev site
WebDev proposes several methods to download afile:• description window of the button or link used to
perform the download.• programming in WLanguage.
2.2.1 Using the description window of con-trols (button, link,…)To propose a download:1. Create a "Link" control, "Button" control, …2. Display the description window of this control.3. Click the "Other actions" button;.4. In the window that is displayed, select "Otheractions: enter a link".5. Specify the full path of the file (directory + name)found on the server. The file must be found in the"_WEB" directory of the site.At run time, when clicking this control:• if the file type is recognized, the file will be
directly opened in the browser.• if the file type is not recognized or if it corres-
ponds to an executable, a dialog box allows youto download this file and/or to run it directly.
2.2.2 ProgrammingTo propose file download by programming, use File-Display in the server click code of the button or linkused to download the file.Example:
At run time, when clicking this control:• if the file type is recognized, the file will be
directly opened in the browser.• if the file type is not recognized or if it corres-
ponds to an executable, a dialog box allows youto download this file and/or to run it directly.
2.2.3 Forcing the file download
To open this dialog box regardless of the type of fileto download, enter the following code line:
However, the name of the file proposed for down-load does not correspond to a valid name. To imme-diately offer the name of the file to download, addthis name after the parameters of the FileDisplayfunction:
// Displays in the browserFileDisplay(CompleteDir(... fWebDir()) + "NOTES.TXT", .. "text/plain")
FileDisplay(CompleteDir(... fWebDir()) + "NOTES.TXT", ... "application/unknown")
FileDisplay(CompleteDir(... fWebDir()) + "NOTES.TXT",... "application/unknown", ... "Notes.TXT")
WLangage.book Page 213 Jeudi, 20. mars 2014 4:29 16

214 Part 5: Specific Web features
3. COOKIES
3.1 Overview
A cookie is an easy way to temporarily store aninformation on the computer of the Web user. Thisinformation can be retrieved later.When a user revisits a site, the site "recognizes" theuser via cookies. This enables you to avoid reques-ting details already provided during a previous visitand to propose custom pages.Note: A cookie has an expiration date (by default,30 days after its creation). It is automatically des-troyed by the browser of the Web user when its life-time is exceeded.
Example for using cookiesA cookie is used to store on the computer of theWeb user personal details such as the user name,the pages visited by the user, the date of the lastconnection, the backup of options, …This information, saved as cookies, will be readduring the next connection to the site. Then, thesite can propose custom features to the Web user:• advertising banner related to subjects looked up
during the last connection,• custom home page with the user name and the
date of last connection,• special offers corresponding to the searches per-
formed during the last visit, …
3.2 What is a cookie made of?
A cookie is a text file stored on the computer of theWeb user (in the Internet "cache" of the browser)during a specified duration. The cookie is createdby the browser or by the server.
Each cookie contains the following information:• Name of the cookie: used by the site to identify
the cookie.• Text of the cookie: information written by the site
(page viewed, information supplied by the Web
user, …).• Expiration date, after which the cookie is not
valid anymore.• Name of the Internet domain that created the
cookie. Reminder: the Internet domain is a specific sec-tion of the Internet address: http://machine.domain.com/MyPages/Index.html.
3.3 WebDev and the management of cookies
3.3.1 Available elementsTwo WLanguage functions can be used to managethe cookies in your sites:• CookieWrite
Sends a cookie to the client when the HTML pageis displayed in the browser of the Web user.
• CookieReadRetrieves the value of a cookie saved on the com-puter of the Web user.
These functions can be used in server code and inbrowser code.
3.3.2 Writing a cookie on the computer of the Web userTo write a cookie on the computer of the Web user:• In server code:
Use CookieWrite and specify the name of thecookie, its content and its lifetime.
The cookie will be created on the computer of theWeb user when the next page is displayed.Note: a cookie created in server code can be readby CookieRead:•immediately if CookieRead is used in a browser
code.
WLangage.book Page 214 Jeudi, 20. mars 2014 4:29 16

Part 5: Specific Web features 215
•during the next user connection if CookieReadis used in a server code.
• In browser code: Use CookieWrite and specify the name of thecookie, its content and its lifetime. The cookie is immediately created.
3.3.3 Reading a cookie on the computer of the Web user (server code and browser code)To read a cookie on the computer of the Web user,
use CookieRead and specify the name of the coo-kie.Notes: During the connection to the Web site, theserver automatically reads all the cookies associa-ted with the current domain. CookieRead used:• in server code, reads in memory and retrieves the
content of the specified cookie.• in browser code, directly reads the content of the
cookie on the computer of the Web user.
3.4 Checking the management of cookies in a WebDev site
The management of cookies in your site (on thedevelopment computer) can be checked:• from the test page of the WebDev administrator.
• with a simple test via a "GO" of the project fromthe page editor of WebDev.
WLangage.book Page 215 Jeudi, 20. mars 2014 4:29 16

216 Part 5: Specific Web features
4. VALIDITY OF THE SITE PAGES
4.1 Overview
When creating a page, a validity period can be defi-ned for this page.For example, if a page is related to a specific event(a tradeshow, a promotion), this page must not bedisplayed anymore from a given date.
To prevent from forgetting it:• WebDev will inform the developer when the pro-
ject is opened according to a configurable fre-quency. A GUI error will be automaticallydisplayed.
• The application server will send an email to agiven address with a specific message.
The risks to forget are minimized.
4.2 How do I proceed?
4.2.1 Defining the validity period of pagesTo define the validity period of a page:1. Display the description of the page.2. In the "Details" tab:• Specify the validity period of the page.• Click the "Configure the reminders" button. In the
window that is displayed, specify:•the email address of the recipient of the remin-
der. If the WebDev application server is configu-red to find the expired pages, a remindermessage will be automatically sent to thisaddress.
•the text added to the reminder message.•the date for sending the reminder (one week
and one day before by default). This date willalso be used to display a compilation error ofGUI. This compilation error will indicate whetherthe validity period of the page was reached.
3. Validate
4.2.2 Deleting the validity periodTo delete the validity period of a page:1. Display the description of the page.2. In the "Details" tab, delete the validity period ofthe page.3. Validate
4.2.3 Configuring the Windows application server to manage the validity periodIn order for the WebDev application server to checkthe validity period of the pages (version 140025and later) :1. Start the WebDev administrator if necessary.2. In the "Advanced" tab, check "Allow the searchfor expired pages".3. The configuration window is automatically dis-played.4. Specify:• the start time of the search for the expired pages.
At the specified time, the application server willperform a search for the expired pages on all thedynamic WebDev sites managed by the server.
• the email address of the sender of the alertemail. The parameters of the email recipientshave been defined in the page description, in theeditor.
• the address and the port of the SMTP serverused to send the emails. You can also specifywhether the email spooler must be used.
• the login and password of the user of the SMTPserver (for the servers with authentication).
5. Validate.
WLangage.book Page 216 Jeudi, 20. mars 2014 4:29 16

Part 5: Specific Web features 217
4.2.4 Configuring the Linux application ser-ver to manage the validity periodIn order for the WebDev application server to checkthe validity period of the pages (version 140025and later):1. Start the remote WebDev administrator if neces-sary.2. In the setting options, display the "Advancedparameters" and click the "Expired pages" tab.3. Check "Allow the search for expired pages".4. Specify:• the start time of the search for the expired pages.
At the specified time, the application server willperform a search for the expired pages on all the
dynamic WebDev sites managed by the server.• the email address of the sender of the alert
email. The parameters of the email recipientshave been defined in the page description, in theeditor.
• the address and the port of the SMTP serverused to send the emails. You can also specifywhether the email spooler must be used.
• the login and password of the user of the SMTPserver (for the servers with authentication).
5. Click the "Apply" button to validate.
WLangage.book Page 217 Jeudi, 20. mars 2014 4:29 16

218 Part 5: Specific Web features
5. INCLUDING JAVASCRIPT FILES OR A WEB RESOURCE
5.1 Overview
WebDev enables you to include Javascript files orexternal resources in a WebDev project. These filescan:• be included at project level or at page level.
• be found in the _WEB directory of the site or be afile external to the site
• be in a specific format (ISO, UTF8, …).
5.2 How do I proceed?
5.2.1 Including Javascript files (.js)You have the ability to include one or more Javas-cript files in a site or in a page (*.js). These files willbe used by the generated HTML pages. These filesmust be found in the "<ProjectName>_WEB" direc-tory of the site.
To include a Javascript file in a page:1. Display the description of the page. To do so, onthe "Page" pane, click in the "Edit" group.2. Select the "Advanced" tab.3. Select the "Javascript" tab.4. Click the "Add" button and select the path of theJavascript file.5. Select (if necessary) the requested encoding. Ifthe encoding corresponds to "<Not defined>", theencoding is automatically detected.6. Validate.
To include a Javascript file in the project:1. Display the project description (on the "Project"pane, in "Project" group, select "Description").2. Select the "Advanced" tab.3. Click the "Additional Javascript files (.js)" button.4. Click the "Add" button and select the path of theJavascript file.5. Select (if necessary) the requested encoding. Ifthe encoding corresponds to "<Not defined>", theencoding is automatically detected.6. Validate.
5.2.2 Including external resources in the siteIncluding external resources in the site is used toinclude the interface files (programming interface)proposed by the external services (Web API) on theWEB. This gives you the ability to interface withthese external services in browser code.
To include an external resource in a page:1. Display the description of the page. To do so, onthe "Page" pane, click in the "Edit" group.2. Select the "Advanced" tab.3. Select the "Javascript" tab.4. Click the "Add a Web resource" button and spe-cify the address of the requested Web resource.5. Select (if necessary) the requested encoding. Ifthe encoding corresponds to "<Not defined>", theencoding is automatically detected.6. Validate.
To include an external resource in the project:1. Display the project description (on the "Project"pane, in "Project" group, select "Description").2. Select the "Advanced" tab.3. Click the "Additional Javascript files (.js)" button.4. Click the "Add a Web resource" button and spe-cify the address of the requested Web resource.5. Select (if necessary) the requested encoding. Ifthe encoding corresponds to "<Not defined>", theencoding is automatically detected.6. Validate
WLangage.book Page 218 Jeudi, 20. mars 2014 4:29 16

Part 5: Specific Web features 219
5.2.3 Automatic detection of the encodingIf the encoding corresponds to "<Not defined>", theencoding is automatically detected:• case of a Web reference: the server is queried.
The encoding is supplied by the server.• case of a file reference: if the file is in UTF8 for-
mat, the encoding is automatically switched toUTF8.
5.3 Handling external Javascript objects from WLanguage
The WLanguage in "Browser" mode is used to inter-face with the Web APIs such as the ones proposedby Google or Yahoo. The interaction with the exter-nal components proposed by these sites is simpli-fied.You have the ability to allocate external Javascriptobjects in browser code written in WLanguage.The use of external Javascript objects does notnecessarily require the use of the Javascript lan-guage: the programming can be done in WLan-guage.To retrieve a task list from a Google calendar:1. Include the programming interface of Googlecalendar in the page.• Display the "Advanced" tab of the page descrip-
tion.• In the "HTML" tab, add the following code line into
the HTML code of the page header: <scripttype="text/javascript">google.load("gdata","1");</script>.
• This code is supplied in the Google documenta-tion.
• In the "Javascript" tab, click the "Add a Webresource" button. Enter the address used to
include the calendar service: http://www.goo-gle.com/jsapi?key=xxxxxxxxxxxxxxxxxxxxxxxxxxxxxxxxxxxxxxxxxxxx (the key code corresponds to your personalcode).
2. Enter the browser code used to retrieve the tasklist.
MyCalendarService is ... dynamic objectMyCalendarService = ...new object ..."google.gdata.calendar.CalendarSer-vice"MyTasks is dynamic arrayMyTasks = ... MyCalendarService:feed:entry// Browse the array to // fill the listFOR i = 1 TO Dimension(MyTasks) ListAdd(LIST_Task_Choice,... MyTasks[i]:getTitle():getText())END
WLangage.book Page 219 Jeudi, 20. mars 2014 4:29 16

220 Part 5: Specific Web features
6. AJAX
6.1 Overview
The AJAX technology is available in WebDev and inthe PHP sites developed with WebDev.What does AJAX mean and what are its benefits?AJAX (Asynchronous Javascript and XML) is used torefresh the data modified in an HTML page withouthaving to redisplay the entire page. For example, ifsome elements found in the page displayed (con-tent of the basket, characteristics of a product, listof cities, map, …) are modified, only these elementswill be refreshed. The server does not have to sendthe entire page onto the computer of the Web user.
This technology presents several benefits:• the server is less used. Therefore, it can support
an important number of simultaneous connec-tions.
• the information that circulates is less bulky.• the transmission time is shorter.• the display is immediate and without visual effect
for the Web user.AJAX can be used at two different levels in a Web-Dev site:• Automatic and instant AJAX: a simple click gives
access to the benefits of AJAX. The code remainsthe same.
• Programmed AJAX: use the AJAX functions forcomplex processes.
Note: Only the recent browsers support the AJAXtechnology (Internet Explorer 5.5 and later, Firefox1.0 and later, Netscape 7 and later, Opera 8 andlater, Safari 1.2 and later). The function namedAJAXAvailable enables you to find out whether thecurrent browser supports the AJAX technology. If aprocess that uses the AJAX technology is run on abrowser that does not support this technology, theprocess is run "without " using the AJAX technology(the entire page is refreshed for example).
6.2 Automatic and immediate AJAX
6.2.1 OverviewThe diagram below presents the automatic andimmediate use of AJAX in a WebDev site:
For example, a site page is used to find out the dif-ferent characteristics of a country (capital city, cur-rency, flag, location, …). The correspondinginformation is displayed according to the countryselected by the Web user.
Action performed by the Web user. In ourexample, the Web user selects the country inthe combo box named "Select a country".
Sending the query to the server.
Running the query: find the characteristics ofthe selected country.
Sending the result of the query:• without AJAX: the entire page is sent.• with AJAX: only the characteristics of the
country are sent.
Displaying the characteristics of the country:• without AJAX: the entire page is redis-
played.• with AJAX: only the controls containing the
characteristics of the country arerefreshed.
WLangage.book Page 220 Jeudi, 20. mars 2014 4:29 16

Part 5: Specific Web features 221
To use AJAX in this site, the "Whenever Modified"server process of the "Select a country" control isswitched to AJAX mode. A simple click is required!The code remains the same.
6.2.2 Processes that can use AJAX automa-ticallyThe following processes can be switched to auto-matic AJAX mode:• server "Click" process of a button, link, clickable
image or pager.• server quot;Whenever Modified" process of a list
box, combo box, check box or radio button.
To swith to the automatic AJAX mode, click "AJAX" inthe bar of the process :
Process that does not use the AJAX technology
Process that uses the AJAX technology
Note: If a process that uses the AJAX technology isrun on a browser that does not support this techno-logy, the process is run "as if" it was not using theAJAX technology (the entire page is refreshed forexample).
6.2.3 Elements and characteristics that can be automatically used by AJAXAJAX enables you to modify the characteristics ofthe following elements (no specific programming isrequired) :
Value Color of the font Background color Visibility
Edit control X(Text entered)
X(Color of the text ente-
red)
X(Background color of
the text entered)
X
Formatted displaycontrol
X(Text displayed)
X(Color of the text dis-
played)
X(Background color of
the text displayed)
X
Table X(Content of the rows)
X(Color for the content
of the rows)
X(Background color for
the even and odd rows)
X
Looper X(Content of controls)
X(Color for the content
of controls)
X(Background color of
controls)
X
List X(Listed elements and selected elements)
X(Color of listed ele-
ments)
X X
Combo box X(Listed elements and selected elements)
X(Color of listed ele-
ments)
X X
WLangage.book Page 221 Jeudi, 20. mars 2014 4:29 16

222 Part 5: Specific Web features
Notes:• The number of characteristics automatically
managed will increase in the forthcoming ver-sions.
• The elements not found in this list cannot beautomatically used by AJAX.
• To modify other characteristics, you must use theprogrammed AJAX.
* The use of Pager controls is specific in AJAXmode. See "Specific feature" for more details.
Automatic AJAX indicatorAn automatic progress bar can be displayed in apage while an AJAX process is performed.Indeed, the AJAX processes do not display the stan-dard progress bar for page load: there is no pageload in AJAX
To display an automatic AJAX indicator:1. Add a control (cell, image, static or HTML static)to the page.2. Customize this control. This control may containsome text ("Loading…" for instance) and/or an ani-mated image.3. Display the "Details" tab of the page description("Description" from the popup menu of the page).4. In the "Automatic AJAX Progress Bar" area, selectthe added control and define its position.
Check Box X(Selected options)
X(Color of options)
X X
Radio button X(Selected option)
X(Color of options)
X X
Image X(Image)
X
Clickable image X(Image)
X
Thumbnail X(Image)
X
Chart X(Chart)
X
Static X X X X
HTML static X X X X
Button X(Static)
X(Color of the caption)
X X
Link X(Static)
X(Color of the caption)
X X
Pager * X(Content)
Cell control X X
Page X
TreeView X X X X
WLangage.book Page 222 Jeudi, 20. mars 2014 4:29 16

Part 5: Specific Web features 223
6.2.4 Specific features
Specific features of the Pager control
When a table or a looper is automatically updatedin AJAX mode (when clicking a button that runsAJAX code for instance), the content of the pagerassociated with this table or with this looper is alsoautomatically updated.
Note: For the clicks performed on the pager to be inAJAX mode, you must:• check "AJAX Mode" in the description window of
the pager control, "General" tab.• switch the click process of the pager control to
automatic AJAX mode (click "AJAX" found in thebar of the process).
Table/Looper control and AJAX mode
When a table or a looper is in AJAX mode (AJAXmode specified in the control description), the tablerows and the looper rows are no longer viewed via apager but via the vertical scrollbar.See AJAX tables for more details.Note: The scrollbars are not available in MozillaFirefox version 1.7.8
Special characters
Some special characters are automatically repla-ced by an empty string ("") in AJAX mode. Thesecharacters are the characters whose ASCII code isstrictly less than 32, except for the characters 9, 10and 13 (TAB and CR respectively).In most cases, these special characters are notused in the strings.
6.3 Programmed AJAX
6.3.1 OverviewThe diagram below presents the use of "program-med AJAX" in a WebDev site:
6.3.2 Functions for AJAX managementSeveral AJAX functions can be used to manage thecomplex processes:
Run a browser process (AJAXExecute orAJAXExecuteAsynchronous).
Request for running a server procedure.
Running the server procedure.
Generating the result. The result of the pro-cedure will be contained in a character stringor in an XML document.
Send the result of the procedure (RESULT).
Analyze the result of the procedure.
Displaying the modified information. Only thenecessary controls will be refreshed.
AJAXAvailable Used to find out whether the AJAXtechnology is supported by thecurrent browser.
AJAXExecute Runs a server procedure withoutrefreshing the page. This functionis a locking function. No processwill be run as long as the result ofthe procedure run is not retrie-ved.
AJAXExecuteA-synchronous
Runs a server procedure withoutrefreshing the page. This functionis a non-locking function. Theother processes continue to run(no matter whether the result ofthe procedure run is retrieved ornot).
AJAXAsynchro-nousCallPen-ding
Used to find out whether a serverprocedure called by AJAXExecu-teAsynchronous is currently run
AJAXCancelA-synchronous-Call
Cancels the automatic executionof the browser procedure calledby AJAXExecuteAsynchronous.
WLangage.book Page 223 Jeudi, 20. mars 2014 4:29 16
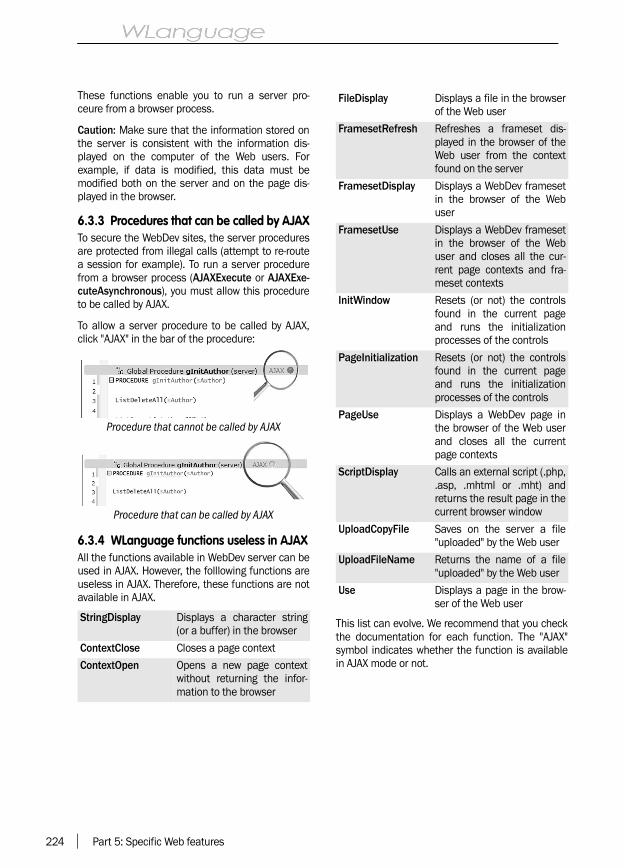
224 Part 5: Specific Web features
These functions enable you to run a server pro-ceure from a browser process.
Caution: Make sure that the information stored onthe server is consistent with the information dis-played on the computer of the Web users. Forexample, if data is modified, this data must bemodified both on the server and on the page dis-played in the browser.
6.3.3 Procedures that can be called by AJAXTo secure the WebDev sites, the server proceduresare protected from illegal calls (attempt to re-routea session for example). To run a server procedurefrom a browser process (AJAXExecute or AJAXExe-cuteAsynchronous), you must allow this procedureto be called by AJAX.
To allow a server procedure to be called by AJAX,click "AJAX" in the bar of the procedure:
Procedure that cannot be called by AJAX
Procedure that can be called by AJAX
6.3.4 WLanguage functions useless in AJAXAll the functions available in WebDev server can beused in AJAX. However, the folllowing functions areuseless in AJAX. Therefore, these functions are notavailable in AJAX.
This list can evolve. We recommend that you checkthe documentation for each function. The "AJAX"symbol indicates whether the function is availablein AJAX mode or not.
StringDisplay Displays a character string(or a buffer) in the browser
ContextClose Closes a page context
ContextOpen Opens a new page contextwithout returning the infor-mation to the browser
FileDisplay Displays a file in the browserof the Web user
FramesetRefresh Refreshes a frameset dis-played in the browser of theWeb user from the contextfound on the server
FramesetDisplay Displays a WebDev framesetin the browser of the Webuser
FramesetUse Displays a WebDev framesetin the browser of the Webuser and closes all the cur-rent page contexts and fra-meset contexts
InitWindow Resets (or not) the controlsfound in the current pageand runs the initializationprocesses of the controls
PageInitialization Resets (or not) the controlsfound in the current pageand runs the initializationprocesses of the controls
PageUse Displays a WebDev page inthe browser of the Web userand closes all the currentpage contexts
ScriptDisplay Calls an external script (.php,.asp, .mhtml or .mht) andreturns the result page in thecurrent browser window
UploadCopyFile Saves on the server a file"uploaded" by the Web user
UploadFileName Returns the name of a file"uploaded" by the Web user
Use Displays a page in the brow-ser of the Web user
WLangage.book Page 224 Jeudi, 20. mars 2014 4:29 16

Part 5: Specific Web features 225
7. VISTA GADGETS
7.1 Overview
Windows Vista enables you to install "Gadgets" onthe desktop. These gadgets are HTML pages thatcan be easily created by WebDev.WebDev allows you to create Vista gadgets fromstatic sites or from AWP sites.
A Vista gadget can contain three types of pages.These three types of pages must respect specificdimensions:• Main page: This page is displayed in the gadget
pane. The width of this page must be included between25 and 130 pixels, and its minimum height mustbe equal to 60 pixels.
• Configuration page: This page is optional. Thispage is used to configure the gadget and it is ope-ned via a special icon.
This page automatically contains 2 buttons: "OK"and "Cancel". The width of this page must be equal to 278pixels.
• Flyout page: Free pages that can be opened fromthe main page (via a button, a link, ?). The maximum size for this type of page is equalto 400 pixels in height and in width.
WebDev enables you to create these three types ofpages and to generate the ".gadget" file. This filecan be supplied to the users of the gadget so that itcan be installed on their computer (gadgets thatcan be downloaded from a site for example).Note: The characteristics of the three types ofpages are presented in details in “Programming theVista gadgets”, page 226.
7.2 Creating the gadget
7.2.1 The stepsTo create a Vista gadget:1. Open or create a WebDev project.2. Create a specific configuration for the develop-ment of your Vista gadget. To do so, on the "Project"pane, in the "Configuration" group, expand "Newconfiguration" and select "Vista gadget".3. Create the pages of your Vista gadget. Thesepages can be static pages or dynamic AWP pages.4. In the description of the gadget pages ("General"tab), specify the type of page in the gadget: Mainpage, Configuration page or Flyout page.5. Program the operating mode of your pages. The"Vista gadget" pages propose specific processes.6. Generate the Vista gadget. To do so, click "Gene-rate" in the "Home" pane.
Vista gadget in AWP mode:• In order for the Vista gadgets in AWP mode to
operate, you must use a WebDev application ser-ver version 120048 or later.
• The server codes will be run in automatic Ajaxmode (if the code exists in Ajax mode).
• The AWP site corresponding to the gadget mustbe deployed on a WebDev application server.
LimitationsThe following controls cannot be used in a Vistagadget: TreeView control, Java control, Site Mapcontrol, Site Map Path control.The image control in a looper in generated mode orin database mode (memo) displays no image.
7.2.2 Generating the gadgetTo generate a Vista gadget:1. Display (if necessary) the configuration corres-ponding to the Vista gadget (double-click the nameof the configuration in the project explorer).2. In the "Home" pane, click "Generate". The wizardstarts.3. Specify the description options of the gadget:• Name of the gadget• Version of the gadget (in wwww.xxxx.yyyy.zzzz for-
mat)• Name of the author or company• URL and text of the link• Logo of the company• Copyright• Image of the gadget. The rollover image is dis-
played when the gadget is moved.• Description of the gadget.
WLangage.book Page 225 Jeudi, 20. mars 2014 4:29 16

226 Part 5: Specific Web features
4. Select the pages that must be included in thegadget. The main page is automatically selected.5. Select the languages of the gadget.6. If the Vista gadget uses AWP pages, specify thecharacteristics of the server (name of the server,virtual directory).
7. Validate. The gadget is created in the "EXE" sub-directory of the project (in the directory correspon-ding to the project configuration). The extension ofthe gadget is ".gadget". If the development compu-ter is running Windows Vista, the gadget can be ins-talled directly and its test can be run.
7.3 Programming the Vista gadgets
7.3.1 OverviewWebDev allows you to easily create gadgets for Win-dows Vista. A gadget is a "mini site" containing spe-cific pages.To manage these pages and to exploit all the pro-perties of the Vista gadgets, WebDev proposes:• specific processes associated with the different
types of pages of a Vista gadget.• specific WLanguage functions used to manage
some specific features of the Vista gadgets.
7.3.2 The different types of pagesThree types of pages can be used in a gadget:• Presentation page• Configuration page• Flyout pageThese three types of pages contain specific proces-ses.Note: only the browser processes are available ifthe pages of the Vista gadget are static pages. Ifthe gadget pages are AWP pages, the standard ser-ver processes are added to the browser processes.
Presentation pageThe presentation page is the page displayed in thegadget pane in Windows Vista. The width of thispage must be included between 25 and 130 pixels,and its minimum height must be equal to 60 pixels.To create a clipped gadget, specify a backgroundimage. This image must support the transparentmode (image in GIF or PNG format for example).This page can be used to display the "Flyout" pages.To do so, GadgetDisplayFlyout must be used in thecode of the relevant button.The browser code associated with this page is asfollows:• Loading (onload) of the page
Browser code run when the page is displayed inthe browser (created by PageDisplay or PageRe-fresh for example)
• Unload (onunload) of the pageBrowser code run when a new page is displayedin the browser.
• Anchoring the page in the Windows paneBrowser code run when the Vista gadget is "doc-ked" to the gadget pane of Windows.
• Exit from the page of Windows paneBrowser code run when the Vista gadget is"undocked" (exit) from the gadget pane of Win-dows.
• When closing the configuration windowBrowser code run when closing the page used toconfigure the Vista gadget.
• Opening the configuration windowBrowser code run when opening the page used toconfigure the Vista gadget.
• Mouse outBrowser code run when the mouse cursor is loca-ted outside the Vista gadget.
Configuration pageThe configuration page is used to configure theVista gadget. This page is displayed by the configu-ration button (tool icon) found in the gadget. Thisbutton is automatically displayed if a configurationpage is found. This button cannot be configured.The width of this page must be equal to 278 pixels.The configuration page automatically contains avalidation button and a cancelation button.In the configuration page, a font must be specifiedin the styles: if the font is "undefined", the defaultfont will be used. In this case, differences in pagelayout may occur between the edit mode and theruntime mode.The background color of the configuration page isgray. This color cannot be modified. A backgroundimage can be used. If this background imagemanages the transparency, it is recommended notto write in the transparent areas.
WLangage.book Page 226 Jeudi, 20. mars 2014 4:29 16

Part 5: Specific Web features 227
The browser code associated with this page is asfollows:• Loading (onload) of the page
Browser code run when the page is displayed inthe browser (created by PageDisplay or PageRe-fresh for example)
• Unload (onunload) of the pageBrowser code run when a new page is displayedin the browser.
• Validating the configuration windowBrowser code run when the validation button ispressed.
• Canceling the configuration windowBrowser code run when the cancelation button ispressed.
Note: GadgetLoadParameter and GadgetSavePa-rameter are used to manage the storage of theparameters.
FlyOut pageThe flyout pages are standard pages. These pagesare free pages that can be opened from the main
page (via a button, a link, …). The maximum size for this type of page is equal to400 pixels in height and in width. The backgroundcolor of the flyout pages is white. This color cannotbe modified.In the flyout pages, a font must be specified in thestyles: if the font is "undefined", the default font willbe used. In this case, differences in page layoutmay occur between the edit mode and the runtimemode.The flyout pages contain the following processes:• Loading (onload) of the page
Browser code run when the page is displayed inthe browser (created by PageDisplay or PageRe-fresh for example)
• Unload (onunload) of the pageBrowser code run when a new page is displayedin the browser.
These pages can be handle by GadgetDisplayFlyoutand GadgetCloseFlyout.
7.3.3 The WLanguage functionsThe Gadget functions are as follows: GadgetCloseFlyout Closes the popup area of a vista gadget.GadgetDisplayFlyout Displays a page of the Vista gadget in a popup area.GadgetLoadParameter Loads a persistent value in a Vista gadget. This value was saved by Gad-
getSaveParameter.GadgetSaveParameter Saves a persistent value in a Vista gadget. Then, this value can be read
by GadgetLoadParameter.
See the online help for more details.See the online help to check the availability of these functions in the different products (WinDev, WebDev,WinDev Mobile).
WLangage.book Page 227 Jeudi, 20. mars 2014 4:29 16

228 Part 5: Specific Web features
8. USING OFFLINE SITES
8.1 Overview
WebDev allows you to specify that a site or a set ofpages can operate in off-line mode (without anInternet connection).If the site can operate in offline mode, all theresources (pages, images, .js files, .css files) usedby the site or by the pages are automatically cachedby the browser on the computer of the Web user.Therefore, the site can be used without having toreconnect to the Internet.The browser function named BrowserIsConnectedis used to find out whether the browser is in onlineor offline mode and to adapt the site behavioraccordingly.
This feature uses the management of manifestsavailable with HTML 5. Some browsers (especiallyInternet Explorer 8 or earlier browsers) do not sup-port this feature.
Note: The mechanism of site cache is specific toHTML 5:• Prior to HTML 5, only the visited pages could be
cached.• With HTML 5, the cache mechanism is performed
from the first connection to a site. A specificmanifest file is used to list all the resources tocache.
8.2 Implementation
8.2.1 Defining the resources to cacheDefining the resources to cache is performed in thedevelopment environment. To indicate the pagesavailable in offline mode:1. Open the WebDev project if necessary.2. On the "Project" pane, in the "Web" group, select"Cache (offline mode").3. In the window that opens, select the pages tocache. Caution: Only the dynamic AWP pages, the dynamicPHP pages and the static pages can be cached.Close the window.
During the next recompilation of the project, the"<Project_Name>.manifest" file is automaticallygenerated in the language sub-directory found inthe _WEB directory of the project. This file will con-tain the specified pages as well as all their depen-dencies (images, CSS style sheets, Javascriptfiles, …).
8.2.2 Configuration of the serverThe use of a manifest requires a specific configura-tion of the server. A specific mime type must beconfigured: ".manifest" associated with "text/cache-manifest".To run the test of your site, this configuration mustbe performed on the development computer.
Notes:• In this version, the configuration of the mime type
must be performed manually. In a forthcomingversion, this configuration will be automatic.
• The configuration of the mime type is automatic.• This mime type is not configured yet for all the
hosting companies.
8.2.3 Programming techniqueA cached site can be used for example:• to simulate an iPhone application (creation of a
Web application that operates in offline modeonly).
• to manage a site that would lose the Internet con-nection.
Programming tips:• The principle is to mainly use browser code.
Indeed, only this code can be run off-line. Howe-ver, you have the ability to use a server code viaAjaxExecute (that is used to run a server code ina browser process).
• Only the browser controls are available. Only thelist boxes, buttons, edit controls, static controls,images, links, menus, check boxes and radio but-tons can be used in the pages in off-line mode.
WLangage.book Page 228 Jeudi, 20. mars 2014 4:29 16
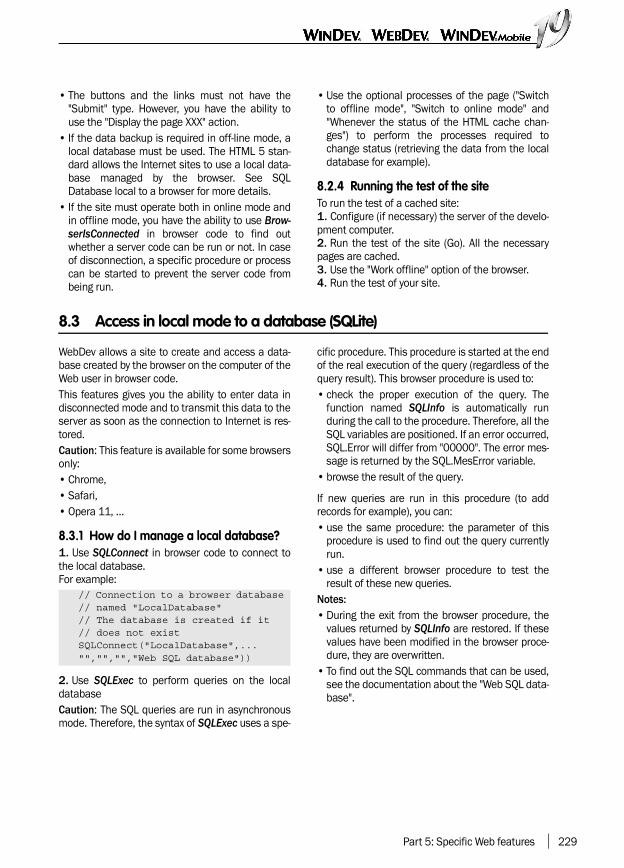
Part 5: Specific Web features 229
• The buttons and the links must not have the"Submit" type. However, you have the ability touse the "Display the page XXX" action.
• If the data backup is required in off-line mode, alocal database must be used. The HTML 5 stan-dard allows the Internet sites to use a local data-base managed by the browser. See SQLDatabase local to a browser for more details.
• If the site must operate both in online mode andin offline mode, you have the ability to use Brow-serIsConnected in browser code to find outwhether a server code can be run or not. In caseof disconnection, a specific procedure or processcan be started to prevent the server code frombeing run.
• Use the optional processes of the page ("Switchto offline mode", "Switch to online mode" and"Whenever the status of the HTML cache chan-ges") to perform the processes required tochange status (retrieving the data from the localdatabase for example).
8.2.4 Running the test of the siteTo run the test of a cached site:1. Configure (if necessary) the server of the develo-pment computer.2. Run the test of the site (Go). All the necessarypages are cached.3. Use the "Work offline" option of the browser.4. Run the test of your site.
8.3 Access in local mode to a database (SQLite)
WebDev allows a site to create and access a data-base created by the browser on the computer of theWeb user in browser code.This features gives you the ability to enter data indisconnected mode and to transmit this data to theserver as soon as the connection to Internet is res-tored.Caution: This feature is available for some browsersonly:• Chrome,• Safari,• Opera 11, …
8.3.1 How do I manage a local database?1. Use SQLConnect in browser code to connect tothe local database. For example:
2. Use SQLExec to perform queries on the localdatabaseCaution: The SQL queries are run in asynchronousmode. Therefore, the syntax of SQLExec uses a spe-
cific procedure. This procedure is started at the endof the real execution of the query (regardless of thequery result). This browser procedure is used to:• check the proper execution of the query. The
function named SQLInfo is automatically runduring the call to the procedure. Therefore, all theSQL variables are positioned. If an error occurred,SQL.Error will differ from "00000". The error mes-sage is returned by the SQL.MesError variable.
• browse the result of the query.
If new queries are run in this procedure (to addrecords for example), you can:• use the same procedure: the parameter of this
procedure is used to find out the query currentlyrun.
• use a different browser procedure to test theresult of these new queries.
Notes:• During the exit from the browser procedure, the
values returned by SQLInfo are restored. If thesevalues have been modified in the browser proce-dure, they are overwritten.
• To find out the SQL commands that can be used,see the documentation about the "Web SQL data-base".
// Connection to a browser database // named "LocalDatabase"// The database is created if it // does not existSQLConnect("LocalDatabase",..."","","","Web SQL database"))
WLangage.book Page 229 Jeudi, 20. mars 2014 4:29 16

230 Part 5: Specific Web features
8.3.2 The SQL functionsThe following SQL functions are available in browser code:
8.3.3 Saving the data of an offline site locallyWebDev allows you to implement offline sites. Ifthis type of site must save data during the discon-nection period, you have the ability to use a localdatabase.The steps are as follows:
1. Connecting to the database. The connection to the database is established bySQLConnect. For example:
2. Creating the local database.The local database must be created before it canbe used. To do so, a CREATE TABLE query must beused. This query must be run by SQLExec. For example:
When the "QRY_CREATION" query is completed, the_cbQuery procedure is run. In this example, thisprocedure is used to manage all the queries runand to perform an appropriate process after thequery. The creation query must be used once, atthe beginning of the day for example. For example,the database can be created only if a specific para-meter ("First" for example) is not passed to thepages.
3. Local or remote data access.In this example, the site can be used in onlinemode or in offline mode. You must be able toaccess the local database (in offline mode) or tothe remote database (in online mode).All the accesses (creation, modification, deletion,...) to the local database must be performed via theSQLExec procedure.
SQLChangeConnection Modifies the current connection.SQLClose Declares the end of the query execution and frees the memory resour-
ces allocated during the execution of the query.SQLColumn Returns the characteristics of all the columns (or items) :
• for a given table.• for a given query.
SQLConnect Connects the current application to a database that must be interroga-ted by SQL.
SQLDisconnect Closes the current connection and frees the memory used by the con-nection
SQLExec Names and runs a SQL query.SQLFetch Goes to the next line (which means to the next record) of the query
result.SQLGetCol Retrieves the content of the specified column from the result of the
query, for the current row.SQLInfo Initializes the different SQL variables with the information relative to the
last query runSQLReqExists Checks the existence of a query.
See the online help for more details.See the online help to check the availability of these functions in the different products (WinDev, WebDev,WinDev Mobile).
SQLConnect("","","", ..."APTCustomers", "Web SQL database")
sQuery is string // Code for creating the table sQuery = [ CREATE TABLE IF NOT EXISTS "Appointment" ("IDAppointment" INTEGER PRIMARY KEY , "StartDate-Time" VARCHAR(16) ,
"Customer" VARCHAR(100) , "Address" VARCHAR(200) , "Summary" LONGVARCHAR ); ]// Run the query SQLExec(sQuery,... "QRY_CREATION",_cbQuery)
WLangage.book Page 230 Jeudi, 20. mars 2014 4:29 16

Part 5: Specific Web features 231
The accesses to the remote database can alwaysbe performed via the Hxxx functions. However, youmust:• run these functions in a browser code, therefore
in AJAX, via AJAXExecute.• make sure that the browser is connected (Brow-
serIsConnected).For example:
To retrieve records from the remote database (ser-ver) into the local database (to initialize it for exam-ple), you must:1. Read the records and store the items as strings,in a server procedure.
2. Retrieve this list in browser code:
3. Browse the string and extract the informationwith ExtractString. Therefore, the records can beeasily added with an addition query (INSERT).Similarly, the data can be retrieved from the localdatabase to update the remote database. To do so:1. Run a query locally to retrieve the records. Forexample, to retrieve the appointments of the day:
2. In the check procedure started by SQLExec, allyou have to do is run a procedure for updating theremote database via AjaxExecute. In our example,the browser procedure named__SynchonizeDatabase is started:
Note: The update of the remote database can betriggered during the reconnection to the server.During the reconnection to the server, the "Switchto online mode" process is run. This process is anoptional process of the page. To display it in thecode editor, you must:• Display the code of the page.• Click […] in the code bar.• Select the "Switch to online mode" event.• Enter the code for updating the remote database.
sQuery is string // The browser is connected IF BrowserIsConnected()... = True THEN // Saves in the remote database //(server) AjaxExecute(SaveData,... EDT_ID,EDT_SUMMARY) END sQuery = [ UPDATE Appointment SET Summary=’%2’ WHERE AppointmentID=%1 ]
// In all cases, saves // in the local database SQLExec(StringBuild ...(sQuery,gnIDAPTBrw,...EDT_SUMMARY), ’QRY_BACKUP’,..._cbQuery)
PROCEDURE GetRec() FOR EACH MyFile sList += [CR]+ ... MyFile.Item1 +TAB + ... MyFile.Item2 +TAB+ ... MyFile.Item3 END RESULT sList
// Retrieves the list sList = AJAXExecute(GetRec)
// Runs the query that // selects the appointments // for the daysQuery is stringsQuery = StringBuild(... "SELECT IDAppointment,Summary ...FROM APPOINTMENT WHERE ...StartDateTime LIKE ’%1%’ ORDER ...BY StartDateTime ASC;",...Today())// Starts the querySQLExec(sQuery, ..."QRY_SYNCHRONIZEAPT",_cbQuery)
PROCEDURE _SynchronizeDatabase ...(sQuery)
// As long as there are appointments // to synchronizeWHILE SQLFetch(sQuery) = 0// Synchronizes the appointmentAJAExecute(_Synchronize ...ARemoteAppointment,SQLGetCol ...(sQuery,1), SQLGetCol...(sQuery,2))END
WLangage.book Page 231 Jeudi, 20. mars 2014 4:29 16

232 Part 5: Specific Web features
9. LOCAL STORAGE
9.1 Overview
In a Web site, the local storage is used to store andretrieve values in browser code. These values can be:• shared by all the windows and tabs of the same
computer browser: they can be restored once thebrowser is closed then re-opened or in anotherbrowser window. In this case, the local storage ispersistent.
• specific to a window or to a tab of the browser: inthis case, the values will be lost when closing thebrowser window. On the contrary, these valuescan be read by the browser windows opened fromthe window where the values have been stored.
In this case, the local storage is not persistent.Notes:• The storage of local parameters is not available
by page.• The storage of local parameters is available for
the recent browsers only (supporting the HTML 5standard).
• Even for the persistent local storage, the storageis not shared by the different browsers (a valuestored in Internet Explorer cannot be retrieved byFirefox).
9.2 The WLanguage functions
The following functions are used to perform a local storage:LocalStorageAdd Adds a value to the local storage.LocalStorageAvailable Indicates whether the local storage is available or not for the current
browser.LocalStorageDelete Deletes a value from the local storage.LocalStorageDeleteAll Deletes all the values from the local storage.LocalStorageGet Retrieves a value from the local storage.LocalStorageOccurrence Returns the number of values for the local storage.LocalStorageValueName Returns the name of a value for the local storage.
See the online help for more details.See the online help to check the availability of these functions in the different products (WinDev, WebDev,WinDev Mobile).
WLangage.book Page 232 Jeudi, 20. mars 2014 4:29 16

Part 5: Specific Web features 233
10. SSL: SECURED TRANSATIONS
10.1 Overview
By default, when using an Internet application, thedata circulating between the computer of the Webuser and the Web server is not protected: the datacan be accessed by any Web user. The confidentia-lity of data is not guaranteed.Several systems can be used to guarantee the con-fidentiality of data. The most common one is theSSL protocol (Secure Socket Layer).SSL is a communication protocol used to ensurethe authentication, the confidentiality and the inte-grity of data. This protocol uses a recognized
encryption method: the RSA public key algorithm. ARSA key is the result of operations between primenumbers.
Practically: what changes when a transaction issecured?• a secured transaction uses a specific address
(https instead of http).• a padlock is automatically displayed in the status
bar of the browser, indicating that a secure tran-saction is in progress.
10.2 Implementing the secured transactions with the SSL protocol
To implement secure transactions (SSL protocol) :1. On the Web server, create a key, with the IIS keymanager for example if your Web server is IIS.2. Send the certificate request to a company provi-ding key certificates (www.verisign.com for exam-ple).3. The company returns a key certificate (for a fee).This certificate must be installed on the server bythe key manager.
4. You can then use secure transactions betweenthe server and the client (see the next paragraph).
Note: "Verisign" provides test certificates, valid for14 days, allowing you to check whether the HTTPSconnection is correct. These test keys enable you tocheck the operating mode of secure transactions.The complete procedure to follow in order to obtainan SSL certificate is detailed later in this chapter.
10.3 Obtaining an SSL certificate for IIS2 (2.0 or later)
10.3.1 Step 1: Creating a certificateTo create a certificate:1. Start the Microsoft Internet Service Manager("Start .. Run": Inetmgr.exe).2. Select the Web site to secure (for example:"Default Web site").3. Right-click this site and select "Properties" fromthe popup menu.
4. Select the "Directory security" tab:• Click the "Server certificate…" button.
A wizard starts.• Choose "Create a certificate".• In the "Usual site name" pane of the wizard: leave
the name of your computer.• The wizard creates a text file named "certreq.txt"
allowing you to ask for your certificate.5. Exit the properties of the Web server.
WLangage.book Page 233 Jeudi, 20. mars 2014 4:29 16

234 Part 5: Specific Web features
10.3.2 Step 2: Requesting a certificateThe certificate request must be sent to a certificateauthority (for example: www.verisign.com). This example presents the steps to follow to send acertificate request to Verisign. These steps are simi-lar for the other authorities.1. In your browser, type: "http://www.verisign.com".2. Click "Free Trial". This option enables you to get afree certificate valid for 15 days.3. Fill out the short form and click "Submit".4. Follow the certification wizard step by step:• Step 1 to 5: Generate CSR: Click "Continue"• Step 2 to 5: Submit CSR: Copy the content of the
created file ("certreq.txt") into the relevant inputarea then click "Continue".
• Step 3 to 5: Complete Application: The content ofthe certificate is listed on the screen, enter yourpersonal details (Caution, the accented charac-ters are not accepted, most of the informationmust be the same as in the certificate. Example:region, company, …). Enter your email address,the certificate will be sent to this address. Click"Accept".
The certificate will be sent to you within an hour.
10.3.3 Step 3: Certification of the certificate on the server1. The certificate is found in the email sent by Veri-Sign.
•Select the part that looks like this.i
Copy the selected part into a new file named "Cer-tif.cer" for example.2. Start the Internet Service Manager ("Start ..Run": Inetmgr.exe).3. Select the Web site to secure (for example:"Default Web site").4. Right-click this site and select the "Properties"option.5. Select the "Directory security" tab:• Click the "Server certificate …" button, then follow
the wizard.• Choose "Process the request and install the certi-
ficate".• Select the created file (Certif.cer).• End the wizard.
Important note:If a test certificate was already installed on thiscomputer:• Remove the former certificate (select "Delete the
certificate" in step 1).• Change the name of your computer (indeed, two
test certificates cannot be installed on the samecomputer = same name).
• Start again from step 1.
-----BEGIN CERTIFICATE-----MIICBzCCA-bECEFi+J6vFjN+EkkfCKLgi6uUwDQYJKoZIhvcNAQEEBQAwgakxFjAUBgNVBAoTDVZlcmlTaWduLCBJbmMxRzBFBgNVBAsTPnd3dy52ZXJpc2lnbi5jb20vcmVwb3NpdG9yeS9UZXN0Q1BTIEluY29ycC4gQnkgUmVmLiBMaWFiLiBMVEQuMUYwRAYDVQQLEz1Gb3IgVmVyaVNpZ24gYXV0aG9yaXplZCB0ZXN0aW5nIG9ubHkuIE5vIGFzc3VyYW
5jZXMgKEMpVlMxOTk3MB4XDTAwMDkwMTAwMDAwMFoXDTAwMDkxNTIzNTk1OVowZDELMAkGA1UEBhMCRlIxEjAQBgNVBAgTCUxBTkdVRURPQzEUMBIGA1UEBxQLTU9OVFBFTExJRVIxDDAKBgNVBAoUA1BDUzEPMA0GA1UECxQGV0VCREVWMQwwCgYDVQQDFANtcjIwXDANBgkqhkiG9w0BAQEFAANLADBIAkEAmqKCTidFBZEwI0Q7WPTBlQzlacQi5nwjNndrW.U2tjGMElrY0IxoduwTgRX+DY42IuptGERQApb5NCx/4/3iBrQIDAQABMA0GCSqGSIb3DQEBBAUAA0EABT7REV9bLiq3EFiug+a/irlbYI7aNiuITsdSVO7j34baFtxaa2jTE4JoGrNhrWTQZgBl1GOMpuMef/MuwXHO1A==-----END CERTIFICATE-----
WLangage.book Page 234 Jeudi, 20. mars 2014 4:29 16

Part 5: Specific Web features 235
10.4 Inserting secure transactions (SSL) into a WebDev site
In an Internet/Intranet site, all the transactions donot necessarily contain confidential data: all youhave to do is secure the transfer of the sensitivedata (transferring a credit card number for exam-ple). Caution: the implementation of a secure transac-tion in a WebDev site assumes that all the steps lin-ked to the SSL protocol have been complied with.
10.4.1 PrincipleThe secure mode is implemented when opening anew page via a button or a link, with SSLActive. Assoon as the secure page is opened, all the actionsand page opening will be performed in securedmode, regardless of the elements used (link, table,click area).The secured mode ends when SSLActive is used inthe code of a link or button used to open a newpage.
10.4.2 ImplementationTo open a page in secure mode:1. Create a button used to open a page. This pagecan be opened either by an action defined in thebutton description, or by programming in servercode. The characteristics of this button are:
•Type: "Send value to server" or "None".•Action: "Display page XXX" (or "None" if the page
is opened by programming).•Destination:
•"Current browser" to open the page in the cur-rent browser.
•"New browser" to open the page in a newbrowser.
2. Enter the following code line in the browser clickcode of the button:
3. If necessary (action not defined in the descrip-tion of the button), use PageDisplay in the serverclick code to display the requested page in securedmode.4. The page opened by the button will be in secu-
red mode. This secured mode will be used until thenon-secure mode is explicitly requested.
10.4.3 Going back to standard mode (non-secured transaction) in the current browser
To go back to standard mode (non-secure transac-tion) in the current browser:1. Create a button used to open a page. This pagecan be opened either by an action defined in thebutton description, or by programming in servercode. The characteristics of this button are:
•Type: "Send value to server" or "None".•Action: "Display page XXX" (or "None" if the page
is opened by programming).•Destination:
•"Current browser" to open the page in the cur-rent browser.
•"New browser" to open the page in a newbrowser.
2. Enter the following code line in the browser clickcode of the button:
3. If necessary (action not defined in the descrip-tion of the button), use PageDisplay in the serverclick code to display the requested page in non-secured mode.4. The page opened by this button will be openedin non-secured mode. This non-secure mode will beused until the mode is explicitly requested.
Special case: Opening a page in secured modewithBrowserOpen:1. Create a global variable (addrPage) for examplein the home page (not secured).2. Initialize this variable with the secured addressof the page:
3. In the requested code, use:
SSLActive(True)
SSLActive(False)
addrPage = PageAddress(... <StartPageName>, paSecure)
BrowserOpen(AddrPage)
WLangage.book Page 235 Jeudi, 20. mars 2014 4:29 16
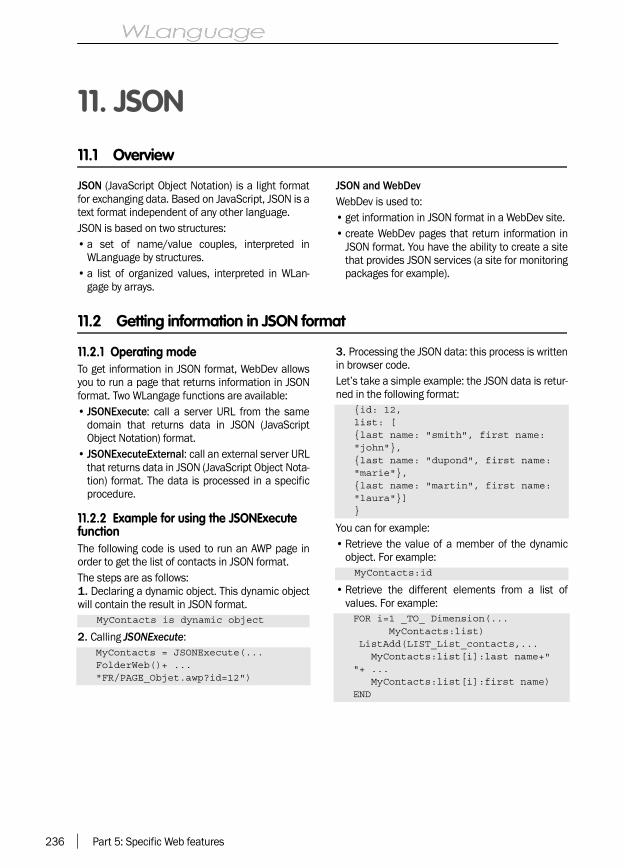
236 Part 5: Specific Web features
11. JSON
11.1 Overview
JSON (JavaScript Object Notation) is a light formatfor exchanging data. Based on JavaScript, JSON is atext format independent of any other language.JSON is based on two structures:• a set of name/value couples, interpreted in
WLanguage by structures.• a list of organized values, interpreted in WLan-
gage by arrays.
JSON and WebDevWebDev is used to:• get information in JSON format in a WebDev site.• create WebDev pages that return information in
JSON format. You have the ability to create a sitethat provides JSON services (a site for monitoringpackages for example).
11.2 Getting information in JSON format
11.2.1 Operating modeTo get information in JSON format, WebDev allowsyou to run a page that returns information in JSONformat. Two WLangage functions are available:• JSONExecute: call a server URL from the same
domain that returns data in JSON (JavaScriptObject Notation) format.
• JSONExecuteExternal: call an external server URLthat returns data in JSON (JavaScript Object Nota-tion) format. The data is processed in a specificprocedure.
11.2.2 Example for using the JSONExecute functionThe following code is used to run an AWP page inorder to get the list of contacts in JSON format.The steps are as follows:1. Declaring a dynamic object. This dynamic objectwill contain the result in JSON format.
2. Calling JSONExecute:
3. Processing the JSON data: this process is writtenin browser code.Let’s take a simple example: the JSON data is retur-ned in the following format:
You can for example:• Retrieve the value of a member of the dynamic
object. For example:
• Retrieve the different elements from a list ofvalues. For example:
MyContacts is dynamic object
MyContacts = JSONExecute(...FolderWeb()+ ..."FR/PAGE_Objet.awp?id=12")
{id: 12,list: [{last name: "smith", first name: "john"},{last name: "dupond", first name: "marie"},{last name: "martin", first name: "laura"}]}
MyContacts:id
FOR i=1 _TO_ Dimension(... MyContacts:list) ListAdd(LIST_List_contacts,... MyContacts:list[i]:last name+" "+ ... MyContacts:list[i]:first name)END
WLangage.book Page 236 Jeudi, 20. mars 2014 4:29 16

Part 5: Specific Web features 237
11.2.3 Example for using the JSONExecu-teExternal functionThe principle for using JSONExecuteExternal is thesame as the principle for using JSONExecute.In this case, the page used to retrieve the JSONdata is not found in the same domain. The securityrules of Internet impose to use a callback functionto process the result in asynchronous way. Thefunction named JSONExecuteExternal is used to
indicate the name of the procedure run to processthe JSON data.Example: In this example, an AWP page is calledand the data is processed in the procedure namedFunctionResponse:
11.3 Creating pages that return JSON data
WebDev gives you the ability to create a site thatprovides JSON services.The pages used to get the JSON data must return acharacter string of a specific format. These pagescan be AWP pages or PHP pages.
11.3.1 Case of a page called by JSONExe-cuteThe following code is used to return an identifierand a list of values:
The function named StringDisplay is used to returnthe JSON information. The function namedStringToUTF8 is used to return a string in UTF8 for-mat. This last function is mandatory to get a validformat.
11.3.2 Case of a page called by JSONExecu-teExternalIn addition to the code used to manage the JSONelement to return, the name of the procedure thatwill be used to process the data must be specifiedin the data returned. The name of this procedure isindicated in parameter on the URL of the page.
The following example is used to manage the callwith JSONExecute and JSONExecuteExternal. Foran external call, you must check the presence of aspecific parameter found on the URL. This parame-ter was supplied to the user of the JSON service.
To allow the users of the WebDev sites to use theJSON services, all you have to do is inform theseusers of the parameters that must be specified inthe address of the page to start.Note: For more details about the syntaxes that canbe used in the data returned in JSON format, werecommend that you consult a specific documenta-tion.
JSONExecuteExternal(..."http://MySite/MySite_WEB/US/PAGE_Object.awp?id=12",... "JsonCallback",FunctionResponse)
sObject is string = [{id: 12,list: [{last name: "smith", first name: "john"},{last name: "dupond", first name: "marie"},{last name: "martin", first name: "laura"}]}]// StringToUTF8 is used to manage// the accented charactersStringDisplay(StringToUTF8(sOb-ject))
sObject is string = [{id: 12,list: [{last name: "smith", first name: "john"},{last name: "dupond", first name: "marie"},{last name: "martin", first name: "laura"}]}]
// Manage an external call. // Check the presence of a name of // procedure on the URLIF PageParameter(... "JsonCallback") <> "" THEN sObject = PageParameter(... "JsonCallback") + "("+ ... sObject + ");"END// StringToUTF8 is used to manage// the accented charactersStringDisplay(StringToUTF8(sOb-ject))
WLangage.book Page 237 Jeudi, 20. mars 2014 4:29 16

238 Part 5: Specific Web features
WLangage.book Page 238 Jeudi, 20. mars 2014 4:29 16

PART 6
Communication
WLangage.book Page 239 Jeudi, 20. mars 2014 4:29 16

WLangage.book Page 240 Jeudi, 20. mars 2014 4:29 16

Part 6: Communication 241
1. THE COMMUNICATION
1.1 Communication with WinDev/WebDev
The WLanguage proposes several communication methods.
Ways of communication
Features supplied by WinDev/WebDev For more details …
• emails Sending and receiving emails. See “Communicate by emails”,page 243.
• Lotus Notes Access to the data handled by LotusNotes.
See “Accessing Lotus Notes and Out-look”, page 252.
• Outlook Access to the data handled by Outlook. See “Accessing Lotus Notes and Out-look”, page 252.
• phone Automated use of the phone. See “WinDev and telephony”,page 270.
• fax Send and receive faxes. See “Sending faxes”, page 277.
• Internet Retrieve HTML pages via the HTTP func-tions.
See “Retrieving the HTML pages”,page 280.
• data transfer Send and receive data via the FTP/RPCfunctions of WinDev.
See “Managing files on Internet”,page 281.
• file transfer Handling files on an FTP server. See “Communicating with an FTP ser-ver”, page 284.
• sockets Communication between applications andsites via the network with the Socket func-tions.
See “Managing the sockets”, page 286.
• Bluetooh and OBEX Communication between a PC and aMobile.
See “Managing the Bluetooth keys”,page 291.
• multitask manage-ment
Running several tasks in parallel in thesame application or in the same site.
See “Managing the threads”,page 293.
• SOAP server Create SOAP client and server applica-tions.
See “SOAP”, page 301.
• procedures on a ser-ver of .Net Web servi-ces
Managing the execution of procedure on aserver of .Net Web services.
See “XML Webservices”, page 305.
• XML Web services Importing and/or generating .Net and J2EE XML Web services.
See “XML Webservices”, page 305.
• XML Files Managing files in XML format. See “XML”, page 311.
• .NET assemblies Creating and using .NET assemblies. See “.NET assemblies”, page 315.
WLangage.book Page 241 Jeudi, 20. mars 2014 4:29 16
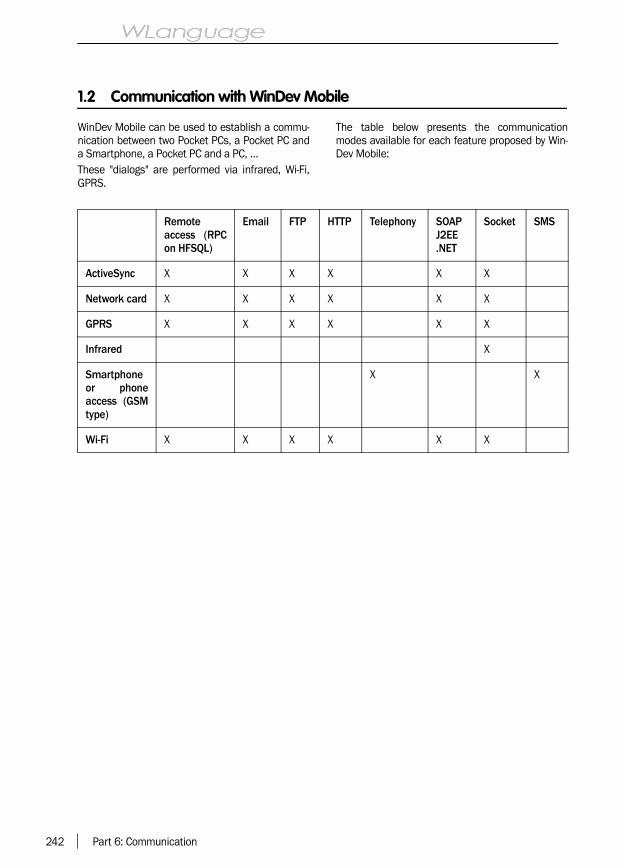
242 Part 6: Communication
1.2 Communication with WinDev Mobile
WinDev Mobile can be used to establish a commu-nication between two Pocket PCs, a Pocket PC anda Smartphone, a Pocket PC and a PC, …These "dialogs" are performed via infrared, Wi-Fi,GPRS.
The table below presents the communicationmodes available for each feature proposed by Win-Dev Mobile:
Remoteaccess (RPCon HFSQL)
Email FTP HTTP Telephony SOAPJ2EE.NET
Socket SMS
ActiveSync X X X X X X
Network card X X X X X X
GPRS X X X X X X
Infrared X
Smartphoneor phoneaccess (GSMtype)
X X
Wi-Fi X X X X X X
WLangage.book Page 242 Jeudi, 20. mars 2014 4:29 16

Part 6: Communication 243
2. COMMUNICATE BY EMAILS
2.1 Overview
WinDev and WebDev enable you to directly managethe emails from your applications. The emails canbe easily sent and received via:• several WLanguage functions,• an email structure allowing you to find out and
store the characteristics of the email used. Youalso have the ability to handle the content of theemails without sending them (EmailBuildSourceand EmailImportSouce).
• the management of advanced types used toeasily handle several connections to servers andan important number of messages:•The Email and EmailAttach types are used to
manage the messages and their attachments.•The EmailPOP3Session, EmailSMTPSession,
EmailNotesSession, EmailOutlookSession andEmailIMAPSession types are used to managethe connections with the messaging server.
2.2 Managing the emails
Several methods can be used to manage theemails:• The POP3/SMTP protocol (most common
method): this protocol is an email managementprotocol recognized by all the service providers.This protocol enables you to directly communi-cate with the server, available at your ISP.
• The "Simple Mail API (also called SMAPI or Sim-ple MAPI)": this email management protocol is
used by most Microsoft applications, and specifi-cally MS Exchange 4.
• The Lotus Notes or Outlook messaging software:these programs allow you to send and receiveemails.
• The IMAP protocol: this protocol is now availablevia to the new EmailIMAPSession type.
2.3 Synchronous/Asynchronous mode (WebDev only)
The email functions are locking functions bydefault. Which means that no other code can berun during their execution. The program will resumeonly when the current email functions have beenrun.WebDev gives you the ability to manage theemails in asynchronous mode. This mode allowsyour sites to send emails without locking the otherprocesses.To use the asynchronous mode, you must:1. Uncheck "Disable the email spooler" in the Web-Dev administrator ("Configuration" tab).2. Enable the asynchronous mode when startingthe SMTP session (with mailStartSMTPSessionorEmailStartSession).3. All the outgoing emails will be transmitted to a"spooler". The emails are queued up before theyare sent.
The execution of the Email functions do not lock therest of your program anymore. EmailStatus is usedfind out the status of an email.
Note:If the WebDev administrator is closed, the emailspooler is cleared: the pending emails are not sentand they are removed from the spooler.If "Disable the email spooler" is checked whilesome emails are still found in the spooler, theseemails will not be lost: the administrator continuesto send them but no new email will be accepted bythe spooler.
Caution: The asynchronous mode can be only usedwhen starting a session on an SMTP server(EmailStartSMTPSession for sending emails). Theasynchronous mode is ignored in all the othercases.
WLangage.book Page 243 Jeudi, 20. mars 2014 4:29 16

244 Part 6: Communication
2.4 Manage the emails via the POP3/SMTP protocols
2.4.1 Overview of the POP3/SMTP protocolsThe POP3 and SMTP protocols are protocols foremail management recognized by all the serviceproviders. These protocols allow you to directlycommunicate with the email server, available atyour service provider.• The POP3 protocol is used to receive emails.• The SMTP protocol is used to send emails
Note: the reception of emails can also be perfor-med by using the IMAP protocol.
2.4.2 PrincipleSending messages by using the SMTP protocol.
To send messages by using the SMTP protocol, youmust:1. Start a SMTP session:• by using an EmailSMTPSession variable and
EmailStartSession.• by using EmailStartSMTPSession.2. Build the message to send in an Email variableor in the Email structure.3. Send the message with EmailSendMessage.4. Close the SMTP session with EmailCloseSes-sion.
Receiving messages by using the POP3 protocol.
To receive some emails by using the POP3 protocol,you must:1. Start a POP3 session:• by using an EmailPOP3Session variable and
EmailStartSession• by using EmailStartPOP3Session.
Example for starting a session by using an EmailS-MTPSession variable:
2. Read the messages on the messaging server:• with EmailGetAll,• with a loop such as:
• or with a loop such as:
3. Close the POP3 session with EmailCloseSes-sion.Note: A POP3 session and an SMTP session can beopened at the same time by EmailStartSession.
// Start the session // for messagingMySession is EmailPOP3SessionMySession.ServerAddress = ...... "pop.mycompany.com"MySession.Name = "user"MySession.Password = "secret"EmailStartSession(MySession)
Example that uses an Email variable :MyMessage is EmailEmailReadFirst(MySession,... MyMessage)WHILE NOT MyMessage.Out// Place the process // of the message read...EmailReadNext(MySession,... MyMessage)END
Example that uses the Email structure :EmailReadFirst(MySession)WHILE NOT Email.Out// Place the process // of the message read...EmailReadNext(MySession)END
MyMessage is EmailFOR EACH MyMessage OF MySession// Place the process // of the message read...END
WLangage.book Page 244 Jeudi, 20. mars 2014 4:29 16

Part 6: Communication 245
Principle and specific features in WinDev
WLangage.book Page 245 Jeudi, 20. mars 2014 4:29 16
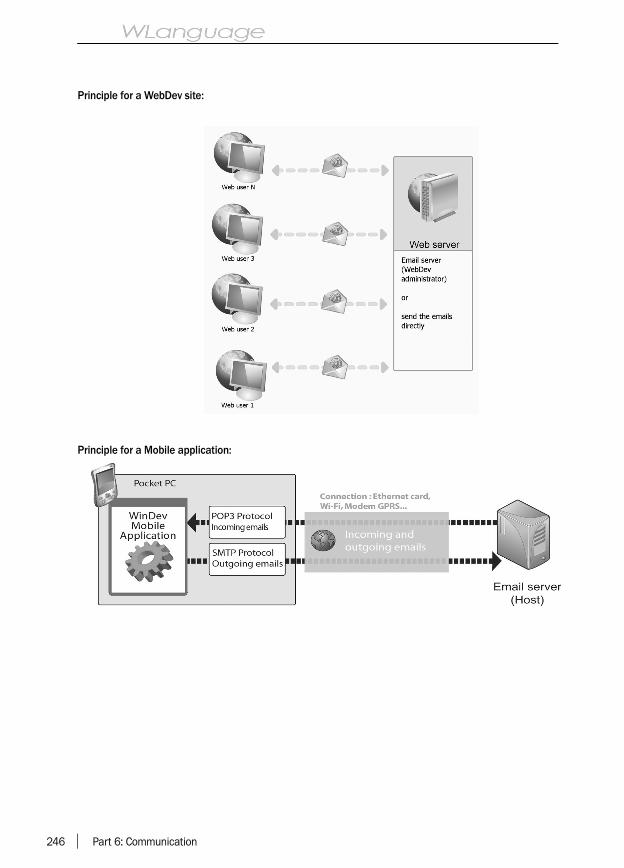
246 Part 6: Communication
Principle for a WebDev site:
Principle for a Mobile application:
WLangage.book Page 246 Jeudi, 20. mars 2014 4:29 16

Part 6: Communication 247
2.5 Manage the emails with the IMAP protocol
2.5.1 Overview of the IMAP protocolThe IMAP protocol is a standard protocol for emailmanagement. Unlike the POP3 protocol, the princi-ple for using the IMAP protocol consists in leavingthe messages on the messaging server in order toread them from several clients. The IMAP protocolincludes a specific indicator in order to find outwhether a message was read. Several messagingservers support both the IMAP protocol and thePOP3 protocol.
2.5.2 Using the IMAP protocolTo receive emails by using the IMAP protocol:1. Open an IAMP session by using an EmailIMAP-Session variable and EmailStartSession.Example for opening a session by using an EmailI-MAPSession variable:
2. Read the messages on the messaging server:• with EmailGetAll,
• with a loop such as:
• or with a loop such as (the "NOT READ" keywordsare optional and they allow you to browse only theunread messages or all the messages):
3. Close the IMAP session with EmailCloseSession.
2.6 Managing emails with "Simple MAPI" (WinDev and WebDev)
Simple MAPI (also called "Simple Mail API") is anAPI for email management used by the Microsoftapplications and specifically by MS Exchange 4.Simple MAPI simplifies the management of emailsreceived at the hosting company. When an email isread, it is automatically loaded in the local inboxand deleted from the server (at the host).All the characteristics required to manage theemails (POP3 protocol, SMTP protocol, remoteaccess, and so on) are grouped in the "User Profile".With the email functions of WLanguage, an applica-tion or a site can directly handle the emails mana-ged in a application or in a site that uses "SimpleMAPI".
2.6.1 PrincipleTo send or read messages via Simple MAPI, youmust:1. Describe a user profile. This user profile must becreated in the Microsoft application for emailmanagement (MS Exchange for example).2. From the application or from the site, connect tothe application for email management (MSExchange 4 for example) with EmailStartSession.3. Send and read the messages.4. Close the session with the application for emailmanagement (MS Exchange 4 for example) withEmailCloseSession.
// Start the session ...// for messagingMySession is EmailIMAPSessionMySession.ServerAddress = ... "pop.mycompany.com"MySession.Name = "user"MySession.Password = "secret"EmailStartSession(MySession)
Example that uses an Email varia-ble:MyMessage is EmailEmailReadFirst(MySession, ... MyMessage)WHILE NOT MyMessage.Out// Place the process// of the message read......EmailReadNext(MySession, ... MyMessage)END
Example that uses the Email struc-ture:EmailReadFirst(MySession)WHILE NOT Email.Out// Place the process// of the message read...EmailReadNext(MySession)END
MyMessage is EmailFOR EACH MyMessage UNREAD OF ... MySession// Place the process // of the message read...END
WLangage.book Page 247 Jeudi, 20. mars 2014 4:29 16

248 Part 6: Communication
2.6.2 Step 1: Creating a user profileThe user profile is used to configure the applicationfor email management (MS Exchange 4 for exam-ple).The following elements are defined in the user pro-file:• the SMTP protocol used,• the POP3 protocol used,• the different communication services used. To
use the "email" functions of WLanguage, the userprofile must use the communication serviceMicrosoft Exchange Server.
Note: You must create as many profiles on the com-puter as the number of users or email accounts.The name of the profile will be used to start theemail session with EmailStartSession.To create a profile:1. Open the control panel.2. Double-click "Email".3. Click the "Display the profiles" button.4. In the window named "Choosing a profile", clickthe "Add" button.5. Give a name to the profile. This name will beused in the WinDev programs.6. Select "Add a new email account".7. Select the "Microsoft Exchange Server" service.
8. Enter the name of the Microsoft Exchange ser-ver.
2.6.3 Step 2: Starting an email sessionTo start an email session, use EmailStartSession.This function must be the first "email" functionused in your WinDev application (on in your Web-Dev site).The function named EmailStartSession returns theidentifier of the session. This identifier will be usedby all the WLanguage functions for email manage-ment.Example: The following procedure is used to open amessaging session from a profile. If an erroroccurs, the Email.Error variable is used to identifythe error.
Function StartSession(Profile)SessionNum is intSessionNum = EmailStartSession(... Profile)IF SessionNum = 0 THEN Error("The session was not"+... "started. Error: "+... Email.Error)ENDRESULT SessionNum
WLangage.book Page 248 Jeudi, 20. mars 2014 4:29 16

Part 6: Communication 249
2.6.4 Step 3: Sending emailsThe following functions are use to send emails viaSimple MAPI:• EmailSendMessage: this function is used to
place the message in the out-box of the applica-tion for email management (out-box of MSExchange 4 for example).
• EmailUpdate: this function is used to synchronizethe email server and the application for emailmanagement; the new incoming emails are auto-matically transfered into the in-box, the emailfound in the out-box are sent.
Example: The following code is used to send all theemails found in a memory table ("TOSEND" table)via MS Exchange 4. Each table row corresponds toan email.For each email, the information found in thememory table is transferred into the email struc-ture and the email is sent. Then, the email server isupdated.
2.6.5 Step 3.1: Reading the emailsReading the emails via Simple MAPI is performedby:• EmailUpdate: this function is used to synchronize
the email server and the software for email
management: the new incoming emails are auto-matically transfered into the in-box, the messa-ges found in the out-box are sent.
• the functions for reading emails (EmailReadFirst,EmailReadNext, etc.): these functions are usedto initialize the email structure of WLanguagewith the characteristics of the email currentlyread (sender, subject, etc.).
Example: The following code is used to read theemails. The incoming emails are stored in amemory table ("Messages"). The SessionNum varia-ble corresponds to the identifier of the session.In this example, the incoming messages are dele-ted from the in-box and from the email server byEmailDeleteMessage.
I is intFOR I = 1 to TableCount("TOSEND")// The mail is sent// to a single person Email.NbRecipient = 1 Email.Recipient[1] = ... ExtractString(TOSEND[I], 1) // Subject and message Email.Subject = ... ExtractString(TOSEND[I], 2) Email.Message = ... ExtractString(TOSEND[I], 3) // No attached file Email.NbAttach = 0 // Send the message to // MS Exchange 4 EmailSendMessage ... (SessionNum, False)END// Send the messages from// MS Exchange 4 // to the email serverIF NOT ... EmailUpdate(SessionNum) THEN Error("Error. Problem"+... Email.Error)END
// Receives the pending messages// found on the email serverIF NOT ... EmailUpdate(SessionNum) THEN Error("Error. Problem"+ ... Email.Error)END// Read the first unread messageIF NOT EmailReadFirst(... SessionNum, "NOT READ") THEN Error("Error while "+... "reading the first message")END// Browse the unread messages// and display them in // a memory tableTableDeleteAll("Messages")WHILE NOT Email.Out // The reception date, // the sender address // and the message are // assigned in the tableTableAdd("Messages",... Email.ReceiveDate + TAB +... Email.SenderAddress + ... TAB +Email.Message) // Delete the messageIF NOT EmailDeleteMessage(... SessionNum) THEN Error("Error: the message"+... "was not deleted") END// Read the next unread message IF NOT EmailReadNext(... SessionNum, "NOT READ") THEN Error("Error while"+... "reading the next message") ENDEND
WLangage.book Page 249 Jeudi, 20. mars 2014 4:29 16

250 Part 6: Communication
2.6.6 Step 4: Ending the email sessionWhen the management of the incoming and/oroutgoing emails is completed, the session is closedby EmailCloseSession. This function must be thelast "email" function used.Example: The following code is a procedure used to
close a messaging session. In this code, the Ses-sionNum variable corresponds to the identifier ofthe session returned by EmailStartSession.
2.7 Manage the emails with CEMAPI (WinDev Mobile only)
CEMAPI is an API for email management used bymost of the Pocket applications to send and receiveemails (Pocket Outlook in most cases).CEMAPI simplifies the management of the emailsreceived by the hosting company. When an email isread, it is automatically loaded in the local inboxand deleted from the server (at the host).
All the characteristics required to manage theemails (POP3 protocol, SMTP protocol, remoteaccess, etc.) are grouped in the "User Account".Via the email functions of WLanguage, a WinDevapplication can directly handle the emails managedin an application that uses "CEMAPI".See the online help for more details.
2.8 Reading and writing an email
Reading and writing emails can be done:• via the email structure (kept for backward compa-
tibility)
• via the EmailXXX variables.See the online help for more details.
2.9 Functions for managing the emails
The following functions are used to manage the emails:
Procedure CloseSession(SessionNum)// Close the sessionEmailCloseSession(SessionNum)
EmailChangeStatus Changes the status of an email on a messaging server.EmailSetTimeOut Changes the value of the "time-out" for connecting to the SMTP and POP3 messa-
ging servers EmailLoadAttachment Adds an attached file to an email.EmailSeekFirstNotes Seeks one or more emails according to specified criteria, in a local or remote
Lotus Notes or Domino database.EmailBuildSource Generates the source code of the outgoing email from the variables currently
found in the email structure. EmailCopy Copies an email found in a directory to another directory of an IMAP server.EmailSend Sends a message via the POP3 protocol while entirely controlling the buffer of the
emailEmailSendMessage Sends a messageEmailStatus Allows you to find out the status of an email sent during an SMTP session opened
in asynchronous modeEmailCloseSession Closes the POP3 sessionEmailImportHTML Allows you to send an email in HTML format with embedded imagesEmailImportSource Fills the variables of the email structure from the content of the Email.Source
variable.EmailProgressBar Manages a progress bar for sending and receiving emailsEmailRunApp Starts the native application for sending emails found on the Android deviceEmailReadLast Reads the last pending message found on the serverEmailReadLastHeader Reads the header of the last pending message found on the server (POP3 protocol
only)
WLangage.book Page 250 Jeudi, 20. mars 2014 4:29 16

Part 6: Communication 251
EmailReadMessageHea-der
Reads the header of a message identified by its number (POP3 protocol only)
EmailReadPreviousHea-der
Reads the header of the previous pending message (POP3 protocol only)
EmailReadFirstHeader Reads the header of the first message (POP3 protocol only)EmailReadNextHeader Reads the header of the next message (POP3 protocol only)EmailReadMessage Reads a message identified by its numberEmailReadPrevious Reads the previous pending messageEmailReadFirst Reads the first messageEmailReadNext Reads the next messageEmailGetTimeOut Reads the value of the "time-out" for connecting to the SMTP and POP3 messa-
ging serversEmailUpdate Sends the messages to the Internet email server and receive messages waiting on
the Internet serverEmailMsgError Returns the message corresponding to the identifier of the errorEmailNbMessage Returns the number of messages currently found on the serverEmailOpenMail Opens the default messaging software of the Web user on the browser computerEmailStartSession Starts a session for email managementEmailStartPOP3Session Starts a session for reading emails with the POP3 protocolEmailStartSMTPSession Starts a session for sending emails with the SMTP protocolEmailReset Reinitializes the variables of the email structureEmailSaveAttachment Copies the email attachments onto the local computerEmailDeleteMessage Deletes a messageEmailMessageLength Allows you to find out the size of an email before loading itEmailCheckAddress Checks the validity of an email address
See the online help to check the availability of these functions in the different products (WinDev, WebDev,WinDev Mobile).
WLangage.book Page 251 Jeudi, 20. mars 2014 4:29 16
252 Part 6: Communication
3. ACCESSING LOTUS NOTES AND OUTLOOK
3.1 Access to Lotus Notes
3.1.1 OverviewWinDev and WinDev allow you to easily access thedata handled by Lotus Notes (Domino database).You have the ability to retrieve, modify, add or han-dle your contacts, appointments, tasks, emails,databases, ...The data managed by Lotus Notes is organized asfollows:• A database per user containing the emails, the
tasks and the appointments of this user.• A database common to all the users containing
the contacts and the groups of contacts.• Several databases containing documents.To access Lotus Notes, the Lotus Notes client mustbe installed on the end-user computers.The access to Lotus Notes is available for LotusNotes version 6.5 or later.
3.1.2 Method for accessing Lotus Notes1. Establish the connection with the Domino ser-ver: NotesOpenConnection.2. Start session for accessing emails, tasks,appointments, contacts and/or contact groups:EmailStartNotesSession (specifying the connectionidentifier of the local or remote Louts database touse, syntax 2).3. Start a session for accessing the documents:NotesOpenDatabase (by specifying the identifier ofthe connection and the local or remote Lotus Notesdatabase to use).
4. Change the Lotus Notes database to use: Notes-CloseDatabase and NotesOpenDatabase.5. Disconnect from the Domino server: CloseSes-sion or EmailCloseSession.
3.1.3 Quick method if you do not want to access the documentsIf you only want to access the emails, tasks,appointments, contacts and/or contact groups, youcan establish the connection with the Domino ser-ver and start a session for accessing the Lotusdatabase by directly using EmailStartNotesSession(syntax 1), without calling NotesOpenConnection.
3.1.4 Handling the dataOnce the connection was established with theDomino server and once the Lotus Notes databasewas specified, you can handle:• the emails via the Email functions (see
page 253).• the tasks via the the Task functions (see
page 255).• the appointments via the Appointment functions
(see page 255).• the contacts via the Contact functions (see
page 256).• the groups of contacts via the Group functions
(see page 256).• the documents via the Notes functions (see
page 257).
3.2 Access to Outlook
3.2.1 OverviewWinDev and WinDev allow you to easily access thedata handled by Outlook. You have the ability toretrieve, modify, add or handle your contacts,appointments, tasks, emails, …
3.2.2 Method for accessing Outlook1. Starting a session used to access the emails,tasks, appointments, contacts and/or groups ofcontacts: EmailStartOutlookSession or OutlookS-tartSession.2. Closing the session: CloseSession or EmailClo-seSession.
WLangage.book Page 252 Jeudi, 20. mars 2014 4:29 16

Part 6: Communication 253
3.2.3 Sending and receiving emailsTo send and receive emails, Outlook must be star-ted on the current computer.To actually send and receive emails:• Automatic sending and receiving: Select the fol-
lowing options in Outlook:•"Send the messages immediately during the
connection"•"Check the new incoming messages every X
minutes" and specify the requested number ofminutes.
• Manual sending and receiving: click the "Send/Receive" button.
3.2.4 Version of OutlookThe access to Outlook is available for Outlook ver-sion 97 or later.Note: The groups of contacts are not supported byOutlook version 97. Therefore, they cannot beaccessed in this version of Outlook.Caution: In Outlook express, you only have the abi-lity to access the emails. In this case, use EmailS-
tartSession> to start the session for accessing theemails.The access to Outlook is compatible with the MSExchange servers.
3.2.5 Handling the dataOnce the connection was established with theDomino server and once the Lotus Notes databasewas specified, you can handle:• the emails via the Emaill functions (see
page 253).• the tasks via the the Task functions (see
page 255).• the appointments via the Appointment functions
(see page 255).• the contacts via the Contact functions (see
page 256).• the groups of contacts via the Group functions
(see page 256).• the documents via the Notes functions (see
page 257).
3.3 Lotus Notes and Outlook functions
3.3.1 Email functions for Lotus Notes
EmailSeekFirstNotes Seeks one or more emails according to specified criteria, in a local or remoteLotus Notes or Domino database.
EmailBuildSource Generates the source code of the outgoing email from the variables currentlyfound in the email structure. The source code is generated in the Email.Sourcevariable.
EmailSendMessage Allows you to send a message.
EmailCloseSession Closes the session.
EmailImportSource Fills the variables of the email structure from the content of the Email.Sourcevariable.
EmailProgressBar Manages a progress bar for sending and receiving emails.
EmailReadLast Reads the last incoming email.
EmailReadLastHeader Reads the header of the last incoming email.
EmailReadMessageHea-der
Reads the header of an incoming email.
EmailReadPreviousHea-der
Reads the header of the email found before the current email.
EmailReadFirstHeader Reads the header of the first incoming email.
EmailReadNextHeader Reads the incoming email found after the current email.
EmailReadMessage Reads an incoming email.
EmailReadPrevious Reads the email found before the current email.
EmailReadFirst Reads the first message.
WLangage.book Page 253 Jeudi, 20. mars 2014 4:29 16
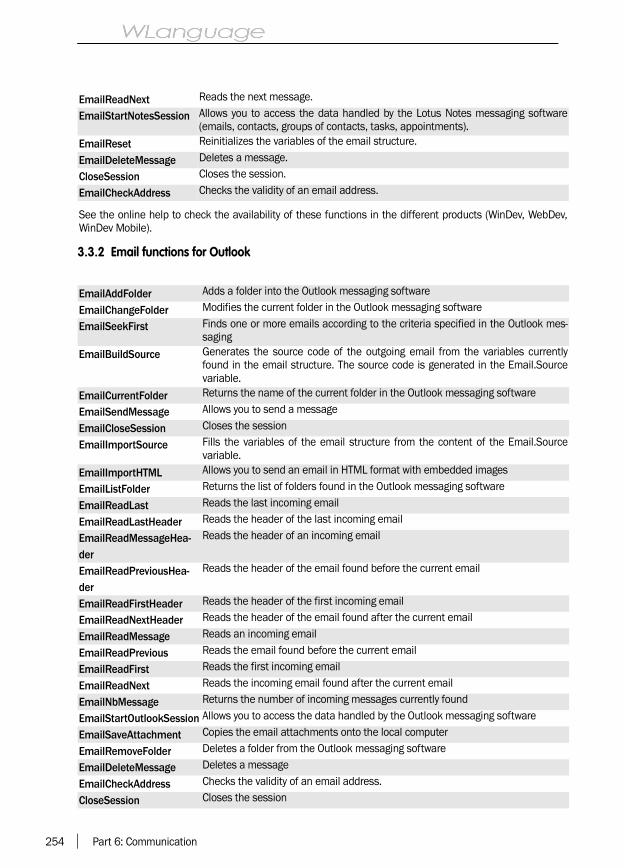
254 Part 6: Communication
3.3.2 Email functions for Outlook
EmailReadNext Reads the next message.
EmailStartNotesSession Allows you to access the data handled by the Lotus Notes messaging software(emails, contacts, groups of contacts, tasks, appointments).
EmailReset Reinitializes the variables of the email structure.
EmailDeleteMessage Deletes a message.
CloseSession Closes the session.
EmailCheckAddress Checks the validity of an email address.
See the online help to check the availability of these functions in the different products (WinDev, WebDev,WinDev Mobile).
EmailAddFolder Adds a folder into the Outlook messaging software
EmailChangeFolder Modifies the current folder in the Outlook messaging software
EmailSeekFirst Finds one or more emails according to the criteria specified in the Outlook mes-saging
EmailBuildSource Generates the source code of the outgoing email from the variables currentlyfound in the email structure. The source code is generated in the Email.Sourcevariable.
EmailCurrentFolder Returns the name of the current folder in the Outlook messaging software
EmailSendMessage Allows you to send a message
EmailCloseSession Closes the session
EmailImportSource Fills the variables of the email structure from the content of the Email.Sourcevariable.
EmailImportHTML Allows you to send an email in HTML format with embedded images
EmailListFolder Returns the list of folders found in the Outlook messaging software
EmailReadLast Reads the last incoming email
EmailReadLastHeader Reads the header of the last incoming email
EmailReadMessageHea-der
Reads the header of an incoming email
EmailReadPreviousHea-der
Reads the header of the email found before the current email
EmailReadFirstHeader Reads the header of the first incoming email
EmailReadNextHeader Reads the header of the email found after the current email
EmailReadMessage Reads an incoming email
EmailReadPrevious Reads the email found before the current email
EmailReadFirst Reads the first incoming email
EmailReadNext Reads the incoming email found after the current email
EmailNbMessage Returns the number of incoming messages currently found
EmailStartOutlookSession Allows you to access the data handled by the Outlook messaging software
EmailSaveAttachment Copies the email attachments onto the local computer
EmailRemoveFolder Deletes a folder from the Outlook messaging software
EmailDeleteMessage Deletes a message
EmailCheckAddress Checks the validity of an email address.
CloseSession Closes the session
WLangage.book Page 254 Jeudi, 20. mars 2014 4:29 16

Part 6: Communication 255
3.3.3 Task functionsThe following functions are used to manage the tasks found in the task list of a Lotus Notes or Outlook mes-saging:
3.3.4 Appointment functionsThe following functions are used to manage the appointments found in the calendar of a Lotus Notes or Out-look messaging:
OutlookListProfile Lists the available Outlook profiles.
OutlookStartSession Allows you to access the data handled by the Outlook messaging (emails, con-tacts, groups of contacts, tasks, appointments and folders).
OutlookDefaultProfile Retrieves the default profile defined in Outlook
See the online help to check the availability of these functions in the different products (WinDev, WebDev,WinDev Mobile).
TaskAdd Adds a task into the task list of a Lotus Notes ou Outlook messagingTaskLast Reads the last task found in the task list of a Lotus Notes or Outlook messagingTaskRead Reads a task previously read in the task list of a Lotus Notes or Outlook messagingTaskModify Modifies the current task in the task list of a Lotus Notes or Outlook messagingTaskPrevious Reads the task found before the current task in the task list of a Lotus Notes or Outlook
messagingTaskFirst Reads the first task found in the task list of a Lotus Notes or Outlook messagingTaskReset Reinitializes the Task structure.TaskNext Reads the task found after the current task in the task list of a Lotus Notes or Outlook
messagingTaskDelete Deletes the current task from the task list of a Lotus Notes or Outlook messaging
See the online help to check the availability of these functions in the different products (WinDev, WebDev,WinDev Mobile).
AppointmentDisplay Displays an appointment in the native application for managing the appointmentsfound on the Android device
AppointmentAdd Adds an appointment into the calendar of a Lotus Notes or Outlook messaging
AppointmentCreate Displays the window for appointment creation of the native application for managingappointments found on the Android device
AppointmentLast Reads the last appointment found in the calendar of a Lotus Notes or Outlook messa-ging
AppointmentList Lists the appointments found on the Android device and et corresponding to the spe-cified criteria
AppointmentListCa-lendar
Lists the calendars available on the Android device
AppointmentRead Reads an appointment found in the calendar of a Lotus Notes or Outlook messaging
AppointmentModify Modifies the current appointment found in the calendar of a Lotus Notes or Outlookmessaging
AppointmentPrevious Reads the appointment found before the current appointment in the calendar of aLotus Notes or Outlook messaging
AppointmentFirst Reads the first appointment found in the calendar of a Lotus Notes or Outlook mes-saging
AppointmentReset Reinitializes the Appointment structure
WLangage.book Page 255 Jeudi, 20. mars 2014 4:29 16

256 Part 6: Communication
3.3.5 Contact functionsThe following functions are used to manage the contacts found in the address book of a Lotus Notes or Out-look messaging:
3.3.6 Group functionsThe following functions are used to manage the groups of contacts found in the address book of a LotusNotes, Domino or Outlook messaging:
AppointmentNext Reads the appointment found after the current appointment in the calendar of aLotus Notes or Outlook messaging
AppointmentDelete Deletes the current appointment from the calendar of a Lotus Notes or Outlook mes-saging
See the online help to check the availability of these functions in the different products (WinDev, WebDev,WinDev Mobile).
ContactDisplay Opens the form of a contact in the native application for managing the contacts of thedevice (Android phone).
ContactAdd Adds a contact into the address book of a Lotus Notes or Outlook messaging
ContactSearch Searches for a contact in the address book of a Lotus Notes or Outlook messaging
ContactCreate Displays the window for contact creation of the native application for managing contactsfound on the device (Android phone)
ContactLast Reads the last contact found in the address book of a Lotus Notes or Outlook messa-ging
ContactEdit Opens in edit the form of a contact in the native application for managing the contactsfound on the device (Android phone)
ContactRead Reads a contact previously read, found in the address book of a Lotus Notes or Outlookmessaging
ContactModify Modifies the current contact in the address book of a Lotus Notes or Outlook messaging
ContactPrevious Reads the contact found before the current contact in the address book of a LotusNotes or Outlook messaging
ContactFirst Reads the first contact found in the address book of a Lotus Notes or Outlook messa-ging
ContactReset Reinitializes the Contact structure
ContactSelect Displays the list of contacts found on the device (Android phone)
ContactNext Reads the contact found after the current contact in the address book of a Lotus Notesor Outlook messaging
ContactDelete Deletes the current contact from the address book of a Lotus Notes or Outlook messa-ging
See the online help to check the availability of these functions in the different products (WinDev, WebDev,WinDev Mobile).
GroupAdd Adds a group of contacts into the address book of a Lotus Notes or Outlook messaging
GroupLast Reads the last group of contacts found in the address book of a Lotus Notes or Outlookmessaging
GroupRead Reads a group of contacts previously read, found in the address book of a Lotus Notesor Outlook messaging
GroupModify Modifies the current group of contacts in the address book of a Lotus Notes or Outlookmessaging
GroupPrevious Reads the group of contacts found before the current group in the address book of aLotus Notes or Outlook messaging
WLangage.book Page 256 Jeudi, 20. mars 2014 4:29 16

Part 6: Communication 257
3.3.7 Notes functionsThe following functions are used to manage the Notes documents found in Lotus Notes:
GroupFirst Reads the first group of contacts found in the address book of a Lotus Notes or Outlookmessaging
GroupReset Reinitializes the Group structure
GroupNext Reads the group of contacts found after the current group in the address book of aLotus Notes or Outlook messaging
GroupDelete Deletes the current group of contacts from the address book of a Lotus Notes or Out-look messaging
See the online help to check the availability of these functions in the different products (WinDev, WebDev,WinDev Mobile).
NotesActivateView Indicates the view that must be handled in Lotus Notes
NotesAddAttachment Attaches a file to an item of the current document in Lotus Notes
NotesItem Returns the value of the items for the current document in Lotus Notes
NotesDeactivateView Disables the view currently handled in Lotus Notes
NotesItemDimension Returns the dimension of an item for the current document in Lotus Notes
NotesDocumentSeek Seeks a document in Lotus Notes
NotesDocumentLast Positions on the last document found in Lotus Notes
NotesDocumentPrevious Positions on the document found before the current document in Lotus Notes
NotesDocumentFirst Positions on the first document found in Lotus Notes
NotesDocumentNext Positions on the document found after the current document in Lotus Notes
NotesDocumentDelete Deletes the current document from the Lotus Notes database
NotesOut Allows you to find out whether there is a current document in Lotus Notes
NotesSave Saves the current document in Lotus Notes
NotesExtractAttachment Extracts a file attached to an item of the current document in Lotus Notes
NotesCloseDatabase Closes the local or remote database used (Lotus Notes or Domino)
NotesListItem Returns the list of items for the current document in Lotus Notes
NotesListAttachment Returns the list of files attached to an item of the current document in LotusNotes
NotesListView Returns the list of views found in the current Lotus Notes database
NotesModifyItem Modifies the specified item of the current document in Lotus Notes
NotesModifyAttachment Modifies a file attached to an item of the current document in Lotus Notes
NotesNbAttachment Returns the number of files attached to an item of the current document inLotus Notes
NotesOpenDatabase Gives access to the documents managed by Lotus Notes
NotesOpenConnection Opens a connection with a local or remote Lotus Notes or Domino database
NotesReset Creates an empty document in Lotus Notes
NotesDeleteItem Deletes the specified item from the current document in Lotus Notes
NotesDeleteAttachment Deletes an attached file from an item of the current document in Lotus Notes
NotesViewSeekLast Seeks the last document found in the current view in Lotus Notes
NotesViewSeekFirst Seeks the first document found in the current view in Lotus Notes
NotesViewListColumn Lists the columns found in the current view in Lotus NotesSee the online help to check the availability of these functions in the different products (WinDev, WebDev,WinDev Mobile).
WLangage.book Page 257 Jeudi, 20. mars 2014 4:29 16

258 Part 6: Communication
4.GOOGLE
4.1 Managing the Google contacts
4.1.1 OverviewThe Google Contact service is used to manage thecontacts on Internet. WinDev and WebDev allowyou to create an application for synchronizing thecontacts of an existing program with the contacts ofGoogle Contact.Warning: Before using a feature linked to Googleservices, we recommend that you check the licensefor using this service. Some restrictions may apply.The content of licenses may change over time.PC SOFT is in no case responsible for the way thenative access functions are used. Please makesure that you comply with the license of the serviceprovider.
4.1.2 How do I manage the Google con-tacts?To manage the Google contacts:1. Create a Google account if necessary. Thisaccount can be created via the following address:http://code.google.com/intl/en/apis/maps/signup.html. Caution: the address of this page may have chan-ged since this page was written. The Google account is identified by an emailaddress and the associated password.2. In the code of your application, create a gglCon-nection variable. This variable contains the charac-teristics of the connection to your Google account.
To create a Google contact:A Google contact can be created via the Googleinterface or by programming with the WLanguagefunctions.To create a Google contact with the WLanguagefunctions:1. Create a gglContact variable.2. Define the characteristics of the contact with thegglContact properties3. Validate the creation of the contact withGglWrite
Note:If a proxy is used to access Internet, the proxy mustbe configured (Proxy) to use the Google functions.
4.1.3 How do I retrieve a Google contact?To retrieve a Google contact:1. Declare an array of gglContact variables.2. Use GglListContact. This function is used to listthe contacts. The contacts found are assigned tothe array of gglContact variables.
Example:
4.1.4 How do I modify or delete the Google contacts?Principle:The principle is straightforward: You must find andposition on the contact to modify or delete beforeperforming the requested operation.
To modify a contact:1. Retrieve the list of contacts.2. Search for the contact to modify.3. Modify the characteristics of the contact.4. Validate the modifications with GglWrite.
Example:
// Retrieves all the contactsArrContacts is array of ...... 0 GglContact ArrContacts = GglListContact(Cnt) // Browse the contactsAContact is gglContactFOR EACH AContact OF arrContacts Trace(AContact..Name)END
// Retrieves all the contactsArrContacts is array of ... 0 GglContact ArrContacts = GglListContact(Cnt) // Browse the contactsAContact is gglContactFOR EACH AContact OF arrContacts IF AContact..Name = "MOORE" THEN AContact..PostalAddress[1] ..Address = "34080 Montpellier"// Effective update of the // changes on the server GglWrite(Cnt, AContact) ENDEND
WLangage.book Page 258 Jeudi, 20. mars 2014 4:29 16

Part 6: Communication 259
To delete a contact:1. Retrieve the list of contacts.2. Find the contact to delete.3. Delete the contact with GglDelete.
Example::
4.1.5 Functions for managing the Google contactsThe following functions are used to manage thecontacts via the "Google Contacts" service:
4.2 Managing the Google calendars
4.2.1 OverviewThe Google Calendar service is an Internet applica-tion provided by Google that is used to manage acalendar on Internet.WinDev and WebDev enable you to create an appli-cation for synchronizing the schedules with an exis-ting program for example: using a meeting room, avehicle, …These WLanguage functions also allow you to deve-lop specific interfaces (suited for your businessrequirements, more user-friendly, …) and to addspecific processes (prints, …). Examples of processes that can be implementednatively in WLanguage:• Retrieving the detailed list of calendars (profes-
sional calendars, personal calendars, …).• Retrieving the list of appointments from a calen-
dar.• Performing a search in the appointments of a
calendar.• Adding, modifying and deleting appointments.Warning: Before using a feature linked to Googleservices, we recommend that you check the licensefor using this service. Some restrictions may apply.
The content of licenses may change over time.PC SOFT is in no case responsible for the way thenative access functions are used. Please makesure that you comply with the license of the serviceprovider.
4.2.2 How do I manage a Google calendar?To manage a Google calendar:1. Create a Google account if necessary. Thisaccount can be created via the following address:http://code.google.com/intl/en/apis/maps/signup.html. Caution: the address of this page mayhave changed since this page was written. The Google account is identified by an emailaddress and the associated password.2. In the code of your application, create a gglCon-nection variable. This variable contains the charac-teristics of the connection to your Google account.To create a Google calendar:A Google calendar can be created via the Googleinterface or by programming with the WLanguagefunctions.To create a Google calendar with the WLanguagefunctions:1. Create a gglCalendar variable.
// Retrieves all the contactsArrContacts is array of ... 0 GglContact
ArrContacts = GglListContact(Cnt) // Browse the contactsAContact is gglContactFOR EACH AContact OF arrContacts IF AContact..Name = "MOORE" THEN // Deletion GglDelete(Cnt, AContact) ENDEND
GglWrite Creates or updates a contact or a group of contacts.
GglListContact Retrieves the list of contacts associated with the specified Google account.
GglListContactByRequest Retrieves a list of contacts from custom parameters.
GglListContactGroup Retrieves the list of groups of contacts associated with the specified Googleaccount.
GglRequest Sends a communication request (HTTP request) to a Google service.
GglDelete Deletes a contact or a group of contacts.
See the online help to check the availability of these functions in the different products (WinDev, WebDev,WinDev Mobile).
WLangage.book Page 259 Jeudi, 20. mars 2014 4:29 16

260 Part 6: Communication
2. Define the characteristics of the calendar withthe gglCalendar properties.3. Define (if necessary) the events linked to thecalendar (gglEvent variable).4. Validate the creation of the calendar withGglWrite.Note: if you are using a proxy to access Internet, theproxy must be configured (Proxy) in order to use theGoogle functions.
4.2.3 How do I retrieve a Google calendar and its elements?1st method: retrieving the list of calendars thentheir events.To retrieve a Google calendar from the list of calen-dars:1. Declare an array of gglCalendar variables (toretrieve several calendars).2. Use GglListCalendar. This function is used to listthe available calendars. The calendars found areassigned to the array of gglCalendar variables.3. Use GglFillCalendar to retrieve the events. Theevents can be retrieved from a single calendar orfrom several calendars. The events to retrieve canbe filtered (between two dates for example).Example:
2nd method: retrieving a specific calendar.To retrieve a specific Google calendar as well as itsevents:1. Declare a gglCalendar variable.2. Use GglGetCalendar. This function is used toretrieve the Google calendar (and its events) corres-ponding to the specified title.Example:
4.2.4 How do I add, modify or delete events in a Google calendar?Principle:The principle for modifying the events is straight-forward: the calendar is retrieved locally, the modifi-cations are performed locally and the calendar isupdated on the server.Note: For the shared calendars, we recommendthat you regularly update the calendars on the ser-ver
To add events to a calendar:1. Retrieve the requested calendar (and its eventsif necessary).2. Declare a gglEvent variable.3. Define the characteristics of the event via theproperties of the variable.4. Use GglWrite to update the calendar on the ser-ver
ArrCalendars is array of ... 0 gglCalendar ArrCalendars = GglListCalendar(Cnt)// First calendarCalendar is gglCalendar Calendar = ArrCalendars[1]// Retrieve the events between// 01/01/2008 and 01/01/2009// includedGglFillCalendar(Cnt, Calendar, ... "20080101", "20090102")// Browse the events of a// calendarEvt is gglEventFOR EACH Evt OF Calendar Trace(Evt..Title)END
// Retrieve the calendar // named "Work"Calendar is gglCalendar Calendar = GglGetCalendar(Cnt,... "Work")// Browse the events of// the calendarIF NOT ErrorOccurred THEN Evt is gglEvent FOR EACH Evt of gglCalendar Trace(Evt..Title) ENDEND
WLangage.book Page 260 Jeudi, 20. mars 2014 4:29 16

Part 6: Communication 261
Example:
To delete an event from a calendar:1. Retrieve the requested calendar and its events.2. Search for the event to delete.3. Delete the event.4. Validate the modifications with GglWrite.Note: Several deletions can be performed beforeusing GglWrite.
Example:
4.2.5 Functions for managing the Google calendarsThe following functions are used to manage thecalendars via the Google Calendar service:
// Retrieve the calendar // named "Work"Calendar is gglCalendar = ... GglGetCalendar(Cnt, "Work")// Create an eventMyEvent is gglEventMyEvent.StartDate = ... "20081201085000"MyEvent.EndDate = ... "20081201093000"MyEvent.Title = "Appointment"MyEvent.Content = ... "Appointment to discuss"+ ... "the status report for November"// Add the event into// the calendarAdd(Calendar.Event, ... MyEvent)// Update the calendar on the serverGglWrite(Cnt, Calendar) ArrCalen-dar ... is array of 0 gglCalendar ArrCalendars = GglListCalendar(Cnt) // Retrieves the events// of the first calendarGglFillCalendar(Cnt, ... ArrCalendars[1])// Create an eventMyEvent is gglEventMyEvent.StartDate = ... "20081201085000"MyEvent.EndDate = ...
"20081201093000"MyEvent.Title = "Appointment"MyEvent.Content = ... "Appointment to discuss the"+... "status report for November"// Add the event into// the calendarAdd(ArrCalendars[1].Event,... MyEvent)// Update the calendar// on the serverGglWrite(Cnt, ArrCalendars[1])
// Retrieve the calendar// named "Work"Calendar is gglCalendar = ... GglGetCalendar(Cnt, "Work")// Delete the second// calendar eventDelete(Calendar.Event, 2)// Effective update// of the changes on the serverGglWrite(Cnt, Calendar)
GglWrite Creates or updates a calendar.
GglListCalendar Retrieves the list of Google calendars associated with the specified Google account.
GglGetCalendar Retrieves a Google calendar and its events according to its title or identifier.
GglFillCalendar Fills a calendar that was previously retrieved: the events corresponding to the calendarare retrieved (by using criteria if necessary).
GglFillCalendarBy-Request
Fills a calendar that was previously retrieved: the events corresponding to the calendarare retrieved via a custom query.
GglRequest Sends a communication request (HTTP request) to a Google service.
GglDelete Deletes a calendar.
See the online help to check the availability of these functions in the different products (WinDev, WebDev,WinDev Mobile).
WLangage.book Page 261 Jeudi, 20. mars 2014 4:29 16

262 Part 6: Communication
4.3 Using the service for managing the Google Picasa photo albums
4.3.1 OverviewPicasa Albums Web is an application for managingthe online images and photos proposed by Google.Examples of processes that can be performed inWLanguage:• Retrieve the list of albums as well as their details.• Retrieve the list of photos found in an album, the
tags of a photo, …• Sending and retrieving photos, …• Retrieve and include the photos found in the Goo-
gle Picasa accounts.Warning: Before using a feature linked to a Googleservice, we recommend that you check the licensefor using this service. Some restrictions may apply.The content of licenses may change over time.PC SOFT is in no case responsible for the way thenative access functions are used. Please makesure that you comply with the license of the serviceprovider.
4.3.2 How do I proceed?1. Create a gglAlbum variable. This variable con-tains the characteristics of the album.2. For each photo that must be included in thealbum, use a gglPhoto variable to describe the cha-racteristics of the photo. You also have the ability todescribe the tags and the comments associatedwith the photo.3. Add the photo to the album (each photo is anelement of the PhotoData array found in the gglAl-bum variable).4. Use GglWrite to create the photo album on theGoogle serverExample :
MyAlbum is gglAlbumATag is gglTagAPhoto is gglPhotoAComment is gglComment// Create the albumMyAlbum.Title = "Summer holidays"MyAlbum.Description = ... "Summer vacation in ... Germany with the family"MyAlbum.Timestamp = ... "UTC Date and Time"MyAlbum.CommentingEnabled = // Photo 1APhoto.CommentingEnabled = ...TrueAPhoto.FileName = "Test"APhoto.Image = CompleteDir(...
fExeDir()) + CST_ImageDir + ... "US.jpg"APhoto.Legend = ... "Tower near the river."// Add tagsATag.Text = "tower"Add(APhoto.Tag, ATag)ATag.Text = "United States of Ame-rica"Add(APhoto.Tag, ATag)ATag.Text = "By night"Add(APhoto.Tag, ATag)
// Add commentsAComment.Text = "Great picture !Add(APhoto.Comment, AComment) AComment.Text = ... "Touched up photo !!! ... "Add(APhoto.Comment, AComment)AComment.Text = ... "How did you do it ?"Add(APhoto.Comment, AComment)// Add the photo 1 into the albumAdd(MyAlbum.PhotoData, ... APhoto)// Photo 2APhoto = new gglPhoto .. // Used to reinitializeAPhoto.Image = CompleteDir(... fExeDir()) + CST_ImageDir+ ... "puzzle.png"Add(MyAlbum.PhotoData, ... APhoto)// Photo 3APhoto = new gglPhotoAPhoto.CommentingEnabled = FalseAPhoto.FileName = ... "Tropical fish"APhoto.Image = CompleteDir( ... fExeDir()) + CST_ImageDir + ... "tropical.jpg"Add(MyAlbum.PhotoData, ... APhoto)// Photo 4APhoto = new gglPhotoAPhoto.FileName = "Drawing"dStartDrawing(IMG_Map)dCircle(20,20,50,50,PastelGreen,... LightRed)APhoto.Image = ... dSaveImageJPEG(IMG_Map,inMemory)IMG_Map = ""Add(MyAlbum.PhotoData, APhoto)// Create the album
WLangage.book Page 262 Jeudi, 20. mars 2014 4:29 16

Part 6: Communication 263
To retrieve and modify a Picasa album:1. Retrieve the requested Picasa album. You havethe ability to use:• GglListAlbum to find out the list of available
albums.• the function named GglGetAlbum to retrieve a
specific album. Several options allow you to spe-cify the elements that will be retrieved (thumb-nails, tags, covers, ?). The images of the photoswill not be retrieved.
• the function named GglFillAlbum to retrieve thecharacteristics of an album (an album listed byGglListAlbum for example). Several options allowyou to specify the elements that will be retrieved(thumbnails, tags, covers). The images of thephotos will not be retrieved.
2. To retrieve the photos from the album, browsethe photos found in the album (..PhotoData pro-perty of the gglAlbum variable) and use GglFill-
Photo. Different options allow you to specify theelements that will be retrieved.3. To add a photo into the album:• describe the photo via a gglPhoto variable.• add the photo to the album (each photo is an ele-
ment of the PhotoData array found in the gglAl-bum variable).
• use GglWrite on the gglAlbum variable to updatethe album on the Google server.
4. To modify a photo of the album:• modify the characteristics of the photo in the
album (via a gglPhoto variable if necessary).• use GglWrite on the gglPhoto variable correspon-
ding to the photo to modify to update the albumon the Google server.
Limitations• No image in PNG format can be added from a
WinDev Mobile application.• The Google Picasa functions use the APIs sup-
plied by Google. Some features may operate onthe online service and may be temporarily bloc-ked by Google via the APIs.
4.3.3 Functions for managing the Picasa albumsThe following functions are used to manage theGoogle Picasa photo albums:
IF NOT GglWrite(sConnection,... MyAlbum) THENError("Error while creating"+... "the album: " + ErrorInfo)END
GglWrite Creates or updates a Google Picasa album or photo.
GglListAlbum Retrieves the list of "Google Picasa" albums available for the user.
GglListComment Retrieves:•the list of comments saved for the Google client account.•the list of comments associated with a photo found in a Google Picasa album.
GglListPhoto Lists the photos found in the Google Picasa albums corresponding to specific criteria.
GglListTag Retrieves:•the list of tags associated with a Google client account.•the list of tags associated with a Google Picasa album•the list of tags associated with a photo found in a Google Picasa album
GglGetAlbum Retrieves a Google Picasa album.
GglFillAlbum Retrieves, from a Google Picasa album, the data corresponding to the requestedoptions.
GglFillPhoto Retrieves, from a Google Picasa album, the data about the photos corresponding tothe requested options.
GglDelete Deletes a Google Picasa album or photo.
See the online help to check the availability of these functions in the different products (WinDev, WebDev,WinDev Mobile).
WLangage.book Page 263 Jeudi, 20. mars 2014 4:29 16

264 Part 6: Communication
4.4 Managing the Google documents
4.4.1 OverviewGoogle Docs and Google Spreadsheet are theonline word processing and the online spreadsheetproposed by Google.WinDev and WebDev allow you to manage thesedocuments via several WLanguage functions. Youhave the ability to:• Upload documents on the Google server.• Automatically translate the documents during the
upload.• Delete documents.• List the documents and perform a search in the
documents.• Retrieve documents.Warning: Before using a feature linked to Googleservices, we recommend that you check the licensefor using this service. Some restrictions may apply.The content of licenses may change over time.PC SOFT is in no case responsible for the way thenative access functions are used. Please makesure that you comply with the license of the serviceprovider.
4.4.2 How do I manage the Google docu-ments?To manage the Google documents found on a Goo-gle server:1. Create a Google account if necessary. Thisaccount can be created via the following address:http://code.google.com/intl/en/apis/maps/signup.html.
Caution: the address of this page may have beenmodified since this page was written. The Google account is identified by an emailaddress and the associated password.2. In the code of your application, create a gglCon-nection variable. This variable contains the charac-teristics of the connection to your Google account.3. To manage the documents found on the Googleserver, use one of the following functions:
If a proxy is used to access Internet, the proxy mustbe configured (Proxy) to use the Google functions.See the online help to check the availability ofthese functions in the different products (WinDev,WebDev, WinDev Mobile).
4.5 Using the Google Maps service
4.5.1 OverviewThe Google Maps service is an Internet cartographysoftware proposed by Google. It is used to display amap by proposing several viewing features.Note: The mapping service proposed is Google Sta-tic Maps.Examples of processes that can be performed inWLanguage:• Retrieving a map, displaying it in a window con-
trol or in a report control and sending it by email.• Defining the map area and the size of the image
to retrieve by specifying the latitude, the longi-
tude, the zoom factor, …• Drawing an itinerary on the map (point by point):
a route can be retrieved by using a GPS devicethat saves the path.
Warning: Before using a feature linked to Googleservices, we recommend that you check the licensefor using this service. Some restrictions may apply.The content of licenses may change over time.PC SOFT is in no case responsible for the way thenative access functions are used. Please makesure that you comply with the license of the serviceprovider.
GglUploadDocument Sends a document to theGoogle server.
GglPrintDocument Prints a document (text orPDF file, images, Word orExcel document, …) by usingthe Cloud Print service ofGoogle
GglListDocument Retrieves the list of docu-ments available on the Goo-gle server for the currentuser
GglGetDocument Downloads a documentfrom the Google Docs ser-vice.
GglDelete Deletes a Google documentfrom the server
WLangage.book Page 264 Jeudi, 20. mars 2014 4:29 16

Part 6: Communication 265
4.5.2 How do I proceed?Retrieve a map in your applications or sites
To include a map that uses the Google Maps ser-vice in your applications or in your sites:1. Generate a Google key. This key is supplied byGoogle. This key can be generated via the followingaddress: http://code.google.com/intl/en/apis/maps/signup.html. Caution: the address of this page may have chan-ged since this page was written.2. Create an Image control in your WinDev or Web-Dev project. This control will be used to display therequested map.3. In the code used to retrieve the map, assign theresult of GglGetMap to the Image control. This func-tion expects the following parameters:• the Google key• the latitude and longitude of the central point of
the map• the zoom performed• the size of the image to retrieve. The maximum
size is set to 640 x 640. This limit is defined bythe Google Maps service at the date of publica-tion of this page.
• the type of requested map (road map,satellite, …).
By default, this map has no border, it is in GIF for-mat and it contains no marker. The language dis-played on the map corresponds to the language ofthe country displayed.
Retrieve a map with advanced setting (markers, …)
To include an advanced map that uses the GoogleMaps service in your applications or in your sites:1. Generate a Google key. This key is supplied byGoogle. This key can be generated via the followingaddress: http://code.google.com/intl/en/apis/maps/signup.html.2. Create an Image control in your WinDev or Web-Dev project. This control will be used to display therequested map.
3. In the code used to retrieve the map:• Create a gglMapParameter variable. This varia-
ble will allow you to define all the map’s settings:presence of a frame, display of a path, format ofthe received image, markers, ... Specify therequested characteristics only.
• Assign the result of GglGetMap to the Image con-trol. In <Advanced Parameters>, specify thename of the gglMapParameter variable contai-ning the requested options.
Notes:• No image is returned if the limitations defined by
Google are exceeded (number of points in a path,number of markers, size of the image, ..). In thiscase, we advise you to modify the parameters ofthe map by reducing the number of elements todisplay.
• If a proxy is used to access Internet, the proxymust be configured (Proxy) to use the Googlefunctions.
4.5.3 Other servicesThe Google Maps service can also be used toretrieve the coordinates of an address. This featurecan be used via the WLanguage function namedGglAddressToCoordinates.This function returns the latitude and longitude ofthe address specified in a gglCoordinate variable.
4.5.4 Functions for managing the Google mapsThe following functions are used to manage mapsvia the "Google Maps" service:
GglAddressTo-Coordinates
Retrieves the coordinates (lati-tude/longitude) of an address.
GglGetStatic-Map
Retrieves the map of a specificlocation via the Google Maps ser-vice.
GglRequest Sends a communication request(HTTP request) to a Google ser-vice.
See the online help to check the availability ofthese functions in the different products (WinDev,WebDev, WinDev Mobile).
WLangage.book Page 265 Jeudi, 20. mars 2014 4:29 16

266 Part 6: Communication
5. SALESFORCE
5.1 Use the Salesforce service
5.1.1 OverviewSalesforce is a very popular CRM software. It iscommercialized as Saas (Software as a Service),which means that the application and the data arehosted on server farms by Salesforce.
However, specific requirements are often createdby this type of software. The development of addi-tional modules is a strong asset in order to use andto customize this type of software.The WLanguage Salesforce functions allow yourapplications to natively interface with Salesforce.
Warning: Before using a feature linked to someSalesforce services, we recommend that you checkthe user license for the service. Some restrictionsmay apply. The content of licenses may changeover time.PC SOFT is in no case responsible for the way thenative access functions are used. Please makesure that you comply with the license of the serviceprovider.
5.1.2 How do I proceed?Connecting to SalesforceTo use a WLanguage Salesforce function, you mustconnect to the Salesforce platform. This connectionis established by SFConnect and by a sfConnectionvariable.
Using the Salesforce features.The WLanguage Salesforce functions are used to:read, modify and add records in the files of theSalesforce databases. These files can be presetfiles or custom files.
Using the Salesforce features.The WLanguage Salesforce functions are used to:• read, modify and add records in the files of the
Salesforce databases. These files can be presetfiles or custom files.
• merge records.• Convert "Lead" into account, contact or opportu-
nity.• request the execution of a specific process. You
can submit records to the approval process orperform an approval action.
5.2 Salesforce functions
The following functions are used to manage the Salesforce databases:
SFAdd Creates a record in a file of a Salesforce database.
SFForwardQuery Continues to run a SOQL query (Salesforce Object Query Language) on the records ofa Salesforce database
SFConnect Allows you to authenticate yourself toward a Salesforce platform.
SFConvertLead Converts the leads. These leads can be converted into account, contact or opportu-nity.
SFDisconnect Disconnects the Salesforce platform, the current Salesforce session or the specifiedSalesforce sessions.
SFExecuteQuery Runs a SOQL query (Salesforce Object Query Language) on a Salesforce database.
SFExecuteProcess Requests the execution of a specific process. You can submit records to the approvalprocess or perform an approval action.
SFMerge Merges the Salesforce records (also called Salesforce objects).
SFRead Retrieves the Salesforce records from their identifiers.
SFModify Modifies the records of a file defined in Salesforce.
WLangage.book Page 266 Jeudi, 20. mars 2014 4:29 16

Part 6: Communication 267
SFSearch Performs a search among the records found in a Salesforce database. The search isperformed via SOSL (Salesforce Object Search Language).
SFSeekModified Seeks and retrieves the records (Salesforce objects) modified during the specifiedperiod.
SFSeekDeleted Seeks and retrieves the records (Salesforce objects) deleted during the specifiedperiod.
SFUndelete Restores the Salesforce records that were previously deleted.
SFDelete Deletes records from a Salesforce database.
SFEmptyRecycleBin Clears the specified records from the Salesforce recycle bin.
WLangage.book Page 267 Jeudi, 20. mars 2014 4:29 16

268 Part 6: Communication
6. RSS STREAM
6.1 Overview
WinDev, WebDev and WinDev Mobile allow you toproduce and/or consume a RSS stream (Rapid Sim-ple Syndication).A RSS stream is used to produce (make available) adata stream in standard format. This data stream
can be read (consumed) by an application.A reader of RSS stream is used to display one ormore RSS streams. WinDev is supplied with anexample for using a RSS stream reader: WD RSSReader.
6.2 How do I proceed?
To read a RSS stream:1. Declare a rssStream variable. This variable willcontain the information regarding the RSS streamto handle.2. Load the RSS stream with rssInitialize. TheRSSStream variable is initialized with the specifiedstream.
3. Check whether the channel of the stream is validand load it. For example:
4. The content of the RSS stream can be displayedin a table linked by data binding to the rssChannelvariable containing the entries of the stream (in ourexample, MyChannel.Entry).
Note: We recommend that you use:• FOR EACH loops to read the entries of a channel
associated with a stream.• manual loops that use the ..Occurrence property
(can be used on the rssChannel type to find outthe number of channels and on the rssEntry typeto find out the number of entries).
Databinding and RSS streamThe Databinding is available for the rssXXX varia-bles so that the RSS information can be displayedwithout programming.
6.3 Functions for managing the RSS streams
The following functions are used to manage theRSS streams:
MyRSS is rssSteamMyRSS = rssInitialize(... "http://blogs.webdev.info/rss.awp?blog=technicalsupport",... fromURL)
IF MyRSSStream.Channel..Occurrence >= 1 THEN MyChannel is rssChannelMyChannel = MyRSSStream.Channel[1]
...
rssDisplay Builds a RSS stream and displays the result on the browser of the Web user.
rssBuildString Builds the RSS stream and returns the result (in XML format) in a character string.
rssInitialize Loads a RSS stream in memory.
rssSave Builds the RSS stream and saves the RSS stream in an XML file.
WLangage.book Page 268 Jeudi, 20. mars 2014 4:29 16

Part 6: Communication 269
7. LDAP SERVER
7.1 Overview
The LDAP protocol (Lightweight Directory AccessProtocol) is increasingly used in the business world.This protocol is used to manage the directories innetwork. This protocol defines the operations foraccessing and searching the data, making incom-patible systems compatible.
Depending on the information stored in the LDAPdirectory, you can for example identify a user whenhe connects to an application, check the user rightsfor the application, ... Functions for managing aLDAP server.The LDAP functions are as follows:
LDAPAddAttribute Adds an attribute or adds a new value to an existing attribute.
LDAPConnect Used to connect to an LDAP server
LDAPStartAdd Initializes the addition of a new object into an LDAP server.
LDAPStartModify Initializes the modification of an existing object in an LDAP server.
LDAPDisconnect Used to disconnect from an LDAP server.
LDAPListAttribute Lists the attributes of an object in an LDAP server.
LDAPListChildren Lists the children of an object in an LDAP server.
LDAPMode Modifies the operating mode of an LDAP session
LDAPNbValue Returns the number of values for an attribute.
LDAPReset Re-initializes the LDAPSession structure used by LDAPConnect.
LDAPFind Performs a search in an LDAP server. The search is performed recursively.
LDAPReplaceAttribute Replaces all the values of an attribute by a specific value.
LDAPReplaceAttributeValue Replaces a specific value of an attribute by a new value.
LDAPRenameAttribute Renames an attribute. The value of the attributes is kept during this opera-tion.
LDAPDelete Deletes an object from the LDAP server. For security reasons, the object willbe deleted only if it has no child element.
LDAPDeleteAttribute Deletes an attribute and all its values.
LDAPDeleteAttributeValue Deletes a value of a specified attribute.
LDAPValue Returns the value corresponding to the subscript passed in parameter forthe specified attribute.
LDAPValidateAdd Validates the addition of a new object into an LDAP server.
LDAPValidateModify Validates the modification of an existing object in an LDAP server.
See the online help for more details.
WLangage.book Page 269 Jeudi, 20. mars 2014 4:29 16

270 Part 6: Communication
8. WINDEV AND TELEPHONY
8.1 Overview
WinDev allows you to easily manage incoming andoutgoing phone calls via the telephony functions.These functions are used to manage a voice box,an answerphone, ... in a WinDev applicationdirectly.
Required WinDev configurationTo be able to use the telephony features, you musthave:• a modem.To save and play recordings, this modem mustinclude voice support.To identify the caller, the modem must support "Cal-ler ID" (caller ID).• the Tapi 2.0 protocol. This technology can be
used on all the systems; however, you must:•install the service pack 4 (or later) if the system
used is Windows NT4.•upgrade the system if the system used is Win-
dows 95 (can be downloaded from ftp://ftp.microsoft.com/developr/tapi/tapi2195.zip). Address valid at the time of publication.
Check the configurationTo check the configuration of your computer, werecommend that you use WDTelDiagno.exe, sup-plied with WinDev. This tool is used to list the availa-
ble TAPI lines and to specify the line that will beused by default by the telephony functions. Thisallows you to quickly detect the conflicts that mayoccur between the different TAPI lines.
Note: The TAPI lines differ from the standard phonelines.Before using the telephony functions, you candefine by programming the TAPI device on whichthe calls must be detected or dialed. Use the func-tions:
Required WinDev Mobile configurationTo be able to use the telephony functions, the appli-cation must be installed:• on a Pocket PC with phone access (GSM type).• and/or on a Smartphone.
8.2 Managing the incoming calls
The management of incoming calls is performed ina specific "thread". When an incoming call is detec-ted, the procedure associated with the thread isrun. The management of the call is performed inthis procedure.
8.2.1 The different stepsTo manage the incoming calls in a WinDev applica-tion:1. Define (if necessary) the TAPI device on whichthe call detection must be performed.
Use the functions:
2. Detect the incoming calls with tapiListen. Thisfunction runs a specific WLanguage procedure.This procedure will be automatically run when anincoming call is detected.
WD WDMobile
tapiCapability Allows you to find out the featuresof a TAPI device
tapiDeviceList Allows you to find out the list ofTAPI 2-compatible devices
tapiDevice Allows you to select the devicethat will be used by the TAPI func-tions.
tapiCapability Allows you to find out the featuresof a TAPI device
tapiDeviceList Allows you to find out the list ofTAPI 2-compatible devices
tapiDevice Allows you to select the devicethat will be used by the TAPI func-tions.
WLangage.book Page 270 Jeudi, 20. mars 2014 4:29 16

Part 6: Communication 271
3. In this procedure, you can:• find out the status of the call via the following
constants:
• manage the call via the following functions:•finding out the characteristics of the incoming
call:
•perform specific operations:
Caution:This WLanguage procedure being run in a thread,all the constraints of the threads must be compliedwith (no window opening, no timer management,no event management, …). See the online help formore details.We recommend that you limit the number of pro-cesses performed in this procedure. Indeed, duringthe duration of the call, the detection of the othercalls (as well as all the telephony events) is frozen.If long processes must be performed, we adviseyou to process the call in the main thread of theapplication (see the example below).
4. To end the session for detecting the incomingcalls, use tapiStopCallDetection.
8.2.2 ExampleThis example manages the incoming calls in themain thread.• Code for declaring the global variables of the
window used for call detection. The differentevents used to manage the calls in the mainthread of the application are declared in thiscode.
tapiLineBusy The line is currently busy
tapiLineConnected The line is connected
tapiLineDialing Dialing in progress
tapiLineDialTone The line gets a dial tone
tapiLineDisconnec-ted
The correspondent has hungup
tapiLineProceeding The call is dialed: looking forthe person called
tapiLineRingBack Ringing in progress
tapiNewCall New call detected waiting foran answer or for a reject.
tapiCallInformation The additional information(presentation of the number)is available. In most cases,this information will be availa-ble after the fist ring.
tapiCallStart Returns the date and time ofthe beginning of call
tapiCallIsOver Allows you to find outwhether the call is over
tapiCallEnd Returns the date and time ofthe end of call
tapiCallDuring Returns the duration of thecall
tapiCallerID Returns the calling phonenumber
tapiStop Forces the playing of a prere-corded message to stop (tapi-Play)
tapiRecord Saves the current communica-tion in a .WAV file.
tapiPlay Plays a sound file (.WAV) forthe specified line. You havethe ability to play the messagefound on the answerphone forexample.
tapiSendKey Allows you to simulate the useof phone keys.
tapiAnswerCall Answers an incoming call(detected beforehand)
tapiKeyPressed Allows you to find out the his-tory of the keys pressed on thephone keypad.
GLOBALgnEventID is int//Event to manage//the incoming calls in popup
IF Event("DetectedCall","*.*",... "PhoneCall")=0 THEN Error("Unable to manage"+... "the popup for call detection",... ErrorInfo())ENDIF Event("EndDetectedCall",... "*.*","EndPhoneCall")=0 THEN Error("Unable to manage"+... "the popup for call detection",... ErrorInfo())ENDIF Event(...
WLangage.book Page 271 Jeudi, 20. mars 2014 4:29 16

272 Part 6: Communication
• Initialization code of the window: this code isused to start the procedure for call detection.
• Procedure for call detection: This procedure isused to detect the incoming calls. For each inco-ming call, the characteristics of the call are sentto the main thread by PostMessage. Caution: The processes performed in this proce-dure are called from a thread. The managementof the display must be performed from the mainthread (this is why PostMessage is used).
To debug this type of process, you must useTrace.
8.3 Managing the outgoing calls
8.3.1 The different stepsTo manage the outgoing calls in a WinDev applica-tion:1. Define (if necessary) the TAPI device on whichthe calls must be dialed. Use the functions:
2. Dial the telephone number via a modem (tapi-Dial).
3. This function calls a specific WLanguage proce-dure used to manage the progress of the call. Inthis procedure, the following variables enable youto find out the status of the line:
"CallIdentifierDetected",... "*.*","PhoneCallInfo")=0 THEN Error("Unable to manage"+... "the popup for call detection",... ErrorInfo())END
// Service for call detectionIF tapiListen("IncomingCall", ... tapiOptionMediaModeFax,... "CallDetection") THEN // The service for detecting the // calls was started Message("Detection of" + ... "calls "+" enabled")ELSE // The service for detecting the // calls was not startedError("Unable to "+ "start"+... "the call detection"+CR+... "Error details:"+CR+... ErrorInfo(errMessage))END
PROCEDURE CallDetection(... nIdService,nIdCall,nStatus)// Detect the incoming callsSWITCH nStatus// Detect a new call: // Note: We will get // additional information// after at least one ringCASE tapiNewCall: // Signals the arrival of a new// call to the main window// to open a popupPostMessage(Handle(Win_Call),... "PhoneCall",nIdCall,nStatus)// Information about the callCASE tapiCallInformation: // Signals the arrival // of a new call // to the main window // to open a popupPostMessage(Handle(Win_Call),... "PhoneCallInfo",nIdCall,nStatus)// The line has been hung upCASE tapiLineDisconnected:// Signals the arrival of a // new call to the // main window to open a popupPostMessage(Handle(Win_Call),... "EndPhoneCall",nCallID,nStatus)END
tapiCapability Allows you to find out the featuresof a TAPI device
tapiDeviceList Allows you to find out the list ofTAPI 2-compatible devices
tapiDevice Allows you to select the devicethat will be used by the TAPI func-tions.
tapiLineBusy The line is currently busy
tapiLineConnected The line is connected
tapiLineDialing Dialing in progress
tapiLineDialTone The line gets a dial tone
tapiLineDisconnec-ted
The correspondent has hungup
tapiLineProceeding The call is dialed: looking forthe person called
tapiLineRingBack Ringing in progress
WLangage.book Page 272 Jeudi, 20. mars 2014 4:29 16

Part 6: Communication 273
4. Pick up the phone receiver to communicate.5. During the communication, you have the abilityto use the WLanguage functions for handling thecall (see below). There is no need to specify theidentifier of the call because the call processed willbe the current call (which means the outgoing call).6. At the end of the call, close the line with tapiHan-gUp.7.Hang up the phone receiver.
8.3.2 Handling an outgoing callThe following operations can be performed on theoutgoing calls:• finding out the characteristics of the outgoing
call:
• perform specific operations:
8.4 Telephony functions
These functions enable you to easily handle all the telephony features of a modem from a WinDev applica-tion:
tapiCallStart Returns the date and time ofthe beginning of call
tapiCallIsOver Allows you to find outwhether the call is over
tapiCallIsBusy Allows you to find outwhether the number called isbusy
tapiCallEnd Returns the date and time ofthe end of call
tapiCallDuring Returns the duration of thecall
tapiNoAnswer Allows you to find outwhether an answer was givento the call
tapiCallerID Returns the calling phonenumber
tapiCalledID Returns the phone numbercalled
tapiStop Forces the reading of a prere-corded message to stop (tapi-Play)
tapiRecord Saves the current communica-tion in a .WAV file.
tapiPlay Plays a sound file (.WAV) forthe specified line.
tapiSendKey Allows you to simulate the useof phone keys.
tapiKeyPressed Allows you to find out the his-tory of the keys pressed on thephone keypad.
tapiCallStart Returns the date and time of the beginning of calltapiCallIsWaiting Allows you to find out whether the call is on holdtapiCallIsBusy Allows you to find out whether the number called is busytapiCallIsOver Allows you to find out whether the call is overtapiCallEnd Returns the date and time of the end of calltapiNoAnswer Allows you to find out whether an answer was given to the calltapiStop Forces the playing of a prerecorded message to stop (tapiPlay)tapiCapability Allows you to find out the capacity of the TAPI device usedtapiDial Dials a phone number for a voice line.tapiLineDial Dials a phone number for a voice line and chooses the device to usetapiListen Starts a service for call detectiontapiDialerDisplay Opens the default telephony application (dialer) and displays the specified num-
ber. No call is madetapiDialerCall Opens the default telephony application (dialer) found on the phone and dials
the specified numbertapiCallDuring Returns the duration of the calltapiRecord Saves the current communication in a .WAV file.
WLangage.book Page 273 Jeudi, 20. mars 2014 4:29 16

274 Part 6: Communication
tapiError Indicates whether the last tapixxx function has returned an error into the TAPImodule
tapiCompleteTransfer Transfers a call with ability to retrieve the calltapiStopCallDetection Stops the specified call detection.tapiPlay Plays a sound file (.WAV) for the specified line. You have the ability to play the
message found on the answerphone for example.tapiDeviceList Lists the TAPI devices installed on the computertapiHold Puts a call on holdtapiCallerID Returns the calling phone numbertapiCalledID Returns the phone number calledtapiSendKey Allows you to simulate the use of phone keys.tapiOrigin Allows you to find out the origin of a calltapiDevice Selects the TAPI device that will be used by defaulttapiHangUp Hangs up a phone line that was opened by tapiDialtapiAnswerCall Answers an incoming call (detected beforehand)tapiUnhold Picks up a call on holdtapiKeyPressed Allows you to find out the key currently pressed.tapiBlindTransfer Performs a "blind" transfer
See the online help for more details.
WLangage.book Page 274 Jeudi, 20. mars 2014 4:29 16

Part 6: Communication 275
9. MANAGING THE SMSS
9.1 Overview
WinDev Mobile allows you to:• send SMSs.• browse the incoming SMSs.• delete one or more incoming SMSs.
An SMS (Short Message Service) is a text message(up to 160 characters) sent on a cell phone.
Required configurationTo be able to use the SMS functions, the applica-tion must be installed:• on a Pocket PC with phone access (GSM type).• and/or on a Smartphone.
WinDev for Pocket PC can only be used to sendSMSs. The SMSs are received as usual by thedevice used (Pocket PC, Smartphone, cellphone, …).
9.2 The SMS structure
9.2.1 OverviewThe SMS structure is a preset structure of WLan-guage (no declaration is required). This structure isused to create an SMS.Note: To reset all the variables of the SMS structureto zero, use SMSReset.
9.2.2 The variables of the SMS structureThe structure contains the following members:
9.2.3 Reading and deleting the SMSs found on SmartphoneTo read and/or delete SMSs on a Smartphone(SMSNbMessage, SMSFirst, SMSNext or SMS-Delete), the executable of the WinDev Mobile appli-cation and its framework (WinDev Mobile libraries)must be digitally signed. A certificate is required toperform this operation.
WDMobile
Receive-Date
Date and time when the SMS wasreceivedNote: On Pocket PC 2002, thismember contains the date andtime when the SMS was read.
Retry Boolean (True by default)Indicates whether the messagemust be sent on a regular basis ifno reception.
Subs-cript
Integer corresponding to the subs-cript of the incoming SMS.
Message Character string containing theoutgoing message or the incomingmessage (up to 160 characters).
Number Character string containing therecipient number or the sendernumber.
CountryPrefix
Character string containing theinternational prefix (33 by defaultfor France).If the recipient number starts with"0" and if a national prefix is speci-fied, "0" will be replaced by thisprefix.If no national prefix is specified,use a number in international for-mat. For example, 33612345678.
Number-Type
Indicates the type of numberused :
•smsInternationalNumber(default value): these numberscan be accessed anywhereand are in 06.xx.xx.xx.xx. for-mat.
•smsNationalNumber: shortnumbers, accessible within thecountry only.
WLangage.book Page 275 Jeudi, 20. mars 2014 4:29 16

276 Part 6: Communication
Note: The use of SMSSend and SMSReset requiresno specific signature.
9.2.4 Different types of numbersTwo types of numbers can be used to send SMSs:• The short numbers (also called "National" num-
bers). These numbers can be accessed from thecountry only.
• The standard numbers (also called "Internatio-nal" numbers, in 06.xx.xx.xx.xx format). Thesenumbers can be accessed from anywhere.
9.2.5 Operating mode in GO mode and at run timeIn GO mode (simulation on the development com-puter), a WLanguage error is generated when usingone of the variables of the SMS structure.
9.3 WLanguage functions
These functions are used to easily send SMSs:
See the online help for more details.
SMSSend Sends an SMSSMSNbMessage Returns the number of SMSs received or the maximum number of SMSs that can be
receivedSMSFirst Positions on the first SMS receivedSMSReset Re-initializes all the variables of the SMS structureSMSNext Positions on the next SMS receivedSMSDelete Deletes the specified SMS
WLangage.book Page 276 Jeudi, 20. mars 2014 4:29 16

Part 6: Communication 277
10. SENDING FAXES
10.1 Overview
Several WLanguage functions can be used to sendfaxes via the system fax server available in Win-dows XP and Windows 2000.How do I send faxes?To send faxes from an application or a site, youmust:1. Configure the computer from which the faxesmust be sent.2. Create the application or the site for sendingfaxes.
3. Configure (if necessary) the options of the faxserver by programming.Notes:• iPreview/iDestination can also be used to send a
print to a fax.• In Windows Vista, the management of faxes is
available in Windows Vista Professional Editionand Windows Vista Ultimate Edition.
10.2 Configuring the "fax server"
10.2.1 Configuring the current computerThe following elements are required to send a fax:• Windows XP or 2000,• a modem configured on the computer,• the Windows fax service must be started.
1. Check the configuration of the modemOpen the control panel of Windows ("Start .. Para-meters .. Control panel") and select "Phone andmodem options".2. Install a standard fax serverWindows XP and Windows 2000 are supplied with afax server.To install this fax server, select "Add/Remove pro-grams" in the control panel of Windows ("Start ..Parameters .. Control panel").3. Check whether the standard fax service of Win-dows is in incoming mode.
10.2.2 Configuring the fax server in Win-dows 2000In Windows 2000, the fax server is called "Fax Ser-vice". To configure the fax server:1. Open the control panel of Windows ("Start .. Con-figures .. Control panel").2. Double-click "Fax Service". If this option is not
displayed, install the fax server of Windows 2000(see above).3. Select the "Advanced options" tab and click the"Open the console for managing the fax service"button.4. The "Device" option is used to list the modemsand faxes installed on the computer.5. Double-click your modem/fax.6. In the "General" tab, enable the option for sen-ding faxes in order to send faxes from an applica-tion or from a site.7. Validate.Note: To create a cover page (.Cov), use the "Coverpage" tab.
10.2.3 Configuring the fax server in Win-dows XPTo configure the fax server:1. Select "Start .. Fax and Printer".2. Double-click "Fax". The wizard for fax configura-tion starts.3. Select "Tools .. Configure".4. Validate the default parameters until you reachthe "Configuration for receiving and sending faxes"plane.5. Enable the feature for sending faxes in order tosend faxes from an application or from a site.6. Validate. The fax server is started.Note: To create a cover page (.Cov), select "Tool ..Custom cover page".
WD WebDev
WB Caution: The following operations onlyapply to the server used to send thefaxes (and not to the browser compu-ters).
WLangage.book Page 277 Jeudi, 20. mars 2014 4:29 16

278 Part 6: Communication
10.3 Application or site for sending faxes
10.3.1 Sending a fax from an application or from a siteTo send a fax from an application or from a site, youmust:1. Prepare the fax, that is the file that is going to besent. A specific first page can also be attached tothe fax (called "Cover Page"). This cover page is a".cov" file and it can be created from the fax server. 2. Use FaxConnect. This function is used to con-nect the application or the site to the fax server ins-talled on the current computer.3. Send the fax:• with FaxSend. When sending the fax, you have
the ability to specify the name of a WLanguageprocedure. This procedure will be called whene-ver the status of the fax is modified by the fax ser-ver. The status of the fax is returned byFaxStatus.
• with iPreview/iDestination and the print func-tions. This solution enables you to directly print areport created with the report editor. In this case,you can give a name to the fax sent. The status ofthe fax will be returned by FaxStatus.
Note: A single fax can be sent at a time. However,FaxSend can be run several times in a row: thefaxes will be added to the queue of outgoing faxes.The WLanguage procedure combined to FaxStatusis used to identify the fax that is currently pro-cessed.4. Once the faxes have been sent, the applicationor the site must be disconnected from the fax ser-
ver with FaxDisconnect.
10.3.2 Sending a fax created with the report editorTo send a fax created with the report editor:You can:• use iPreview/iDestination only (syntax 3). The
report printed by iPrintReport will be directly sentto the specified fax number. In this case, you can-not follow the progress of the fax.
• use the fax functions and iPreview/iDestination(syntax 4). the function named iPreview/iDesti-nation establishes (if necessary) a connection tothe fax server and returns the identifier of thisconnection. This identifier can be used by the Faxfunctions to follow the progress of the send ope-ration.
10.4 Configuring the fax server by programming
10.4.1 Options of the fax serverThe standard fax server of Windows proposes seve-ral options that can be directly configured from theinterface of the fax server. These different optionscan be configured by programming via the registry.You have the ability to configure and find out:• information regarding the sending of faxes (Win-
dows 2000). The corresponding registry key isHKEY_LOCAL_MACHINE\SOFTWARE\’Microsoft\Fax
// Sends the "CustInvoice" report// by faxiDestination(iFax,"0006050402")iPrintReport(CustInvoice)
// Sends the "CustInvoice" report// by faxConnectID is intConnectID = FaxConnect()ConnectID = iDestination(... iFax,"0006050402",... "MyFax",IdConnect) ...iPrintReport(CustInvoice)
Number of attempts Retries
Number of minutesbetween two attempts
Retry Delay
Number of days beforethe unsent faxes are dele-ted
Dirty Days
Archive the outgoing faxes ArchiveOutgoingFax
Directory of outgoingfaxes
ArchiveDirectory
Print the top header Branding
Forbid the custom coverpages
ServerCoverPageOnly
Time when the economyrate starts
StartCheapTime
Time when the economyrate ends
StopCheapTime
WLangage.book Page 278 Jeudi, 20. mars 2014 4:29 16

Part 6: Communication 279
• information regarding the sender of the fax (Win-dows 2000): The corresponding registry key isHKEY_LOCAL_MACHINE\SOFTWARE\Micro-soft\Fax\UserInfo: 10.4.2 Tips
To create a fax server and to manage the redial offaxes, the following options must be specified inthe fax manager:• No retry for sending faxes:
RegistrySetValue("HKEY_LOCAL_MACHINE\SOFTWARE\Microsoft\Fax","Retries",0)
• Time-out set to 0 mn between two attempts: RegistrySetValue("HKEY_LOCAL_MACHINE\SOFTWARE\Microsoft\Fax","Retry Delay",0)
• 0 day for keeping the unsent faxes: RegistrySetValue("HKEY_LOCAL_MACHINE\SOFTWARE\Microsoft\Fax","Dirty Days",0)
It is possible to assume that a fax whose statuschanged from FaxStatusInit OR FaxStatusCall toFaxStatusInactive is a fax on which a send attemptwas performed. This fax can be resent thereafter (itwill not be resent automatically because "No retryfor sending faxes" is set to True).
10.5 Functions for managing the faxes
These functions are used send faxes from an application or from a site:
Note: iPreview iDestination can also be used to send a print to a fax.
Number of the fax sender FaxNumber
Mailbox Address Mailbox
Company Company
Title Title
Full name NomComplet
Department Department
Business address Office
Home Phone HomePhone
Business Phone OfficePhone
Displays the status moni-tor when sending ANDreceiving faxes
VisualNotification
Status monitor always onthe top
AlwaysOnTop
Sound Notification SoundNotification
Billing Code BillingCode
FaxOutbox Enumerates the pending faxes or the outgoing faxesFaxInbox Enumerates the pending faxes or the incoming faxesFaxConnect Establishes a connection to a fax serverFaxDisconnect Closes the connection to a fax serverFaxSend Sends a faxFaxStatus Returns the status of the specified faxFaxRestart Restarts a fax in the spoolerFaxResume Re-enables a fax that was paused in the spoolerFaxDelete Deletes a fax from the spooler and cancels itFaxPause Pauses a fax in the spooler
See the online help to check the availability of these functions in the different products (WinDev, WebDev,WinDev Mobile).
WLangage.book Page 279 Jeudi, 20. mars 2014 4:29 16

280 Part 6: Communication
11. RETRIEVING THE HTML PAGES
11.1 Overview
You have the ability to retrieve pages in HTML for-mat. To retrieve the HTML pages, you must:1. Run a request on the Web server via HTTPRe-quest. This request can be a GET or POST request.This request can be run on a standard URL or on aprotected URL.
2. Retrieve the result of the request with HTTPGet-Result.These functions allow you to retrieve:• the full content of an HTML page,• data files,• images, …
11.2 HTTP functions
The following functions are used to manage the HTTP requests:
HTTPAddFile Adds a file into an HTTP form.HTTPAddParameter Adds a parameter into an HTTP form.HTTPCancelForm Cancels the declaration of an HTTP form and frees all its resources.HTTPCertificate Modifies the client certificate used by default to identify oneself on a server.HTTPCookieWrite Adds or modifies a cookie.HTTPCookieManage Enables or disables the management of cookies during the calls to HTTPRequestHTTPCookieRead Returns the value of a cookie received further to an HTTP request.HTTPCookieReset Deletes all the cookies (globally or for a single domain) stored by the calls to HTTPRe-
quest.HTTPCookieGet Retrieves the cookies read by a call to HTTPRequest for an HTTP domain.HTTPCookieReplace Replaces all the cookies stored by HTTPRequest for a domain.HTTPCreateForm Creates an HTTP form.HTTPDestination Indicates the backup file for the result of the next HTTP request, run in the same
thread.HTTPGetResult Retrieves the result or the header of the last HTTP request (run by HTTPRequest)HTTPSendForm Sends an HTTP form.HTTPProgressBar Manages a progress bar when receiving an HTTP requestHTTPListCertificate Lists the client certificates found on the computer to authenticate on a server.HTTPParameter Allows you to configure the functions that use the HTTP protocol.HTTPResetForm Clears an HTTP form that is currently edited.HTTPRequest Starts an HTTP request on a serverHTTPTimeOut Defines the time-out for the WLanguage functions that use the HTTP protocolInternetConnected Defines whether an Internet connection (by ADSL or modem) is enabled on the cur-
rent computerProxy Specifies that the communication functions that use the HTTP protocol (HTTP,
DotNet, J2EE and SOAP functions) will go via a proxy to run their requestsSee the online help for more details.See the online help to check the availability of these functions in the different products (WinDev, WebDev,WinDev Mobile).
WLangage.book Page 280 Jeudi, 20. mars 2014 4:29 16

Part 6: Communication 281
12. MANAGING FILES ON INTERNET
12.1 Overview
Several methods can be used to upload and down-load files by Internet:• The WinDev FTP or RPC. These protocols require
the use of a specific FTP/RPC server powered byWinDev
• the standard FTP. This protocol requires the useof a standard FTP server. See Voir “Communica-ting with an FTP server”, page 284. for moredetails.
Note:• RPC: Remote Procedure Call• FTP: File Transfer Protocol
12.1.1 Uploading and downloading files via WinDev FTP or RPC: the rules to followTo upload and download files, you must complywith the following rules:1. Connect to a WinDev FTP server with NetCon-nect. This function establishes a connectionbetween WinDev and the server and it provides a
connection identifier.2. Upload, download files.3. Close the connection to the server with NetDis-connect.
Caution:The TCP/IP communication protocol must be instal-led and an IP address must be defined.A WinDev FTP or RPC server operates in 32-bitmode only.
12.1.2 Other featuresIt also allows you to:• Find out the name and IP address of a computer.• Run a program on a WinDev FTP or RPC server.• Trigger a Windows element on the WinDev FTP or
RPC server.• Transmit a character string to a WinDev FTP or
RPC server.
12.2 Detailed use of WinDev FTP/RPC
12.2.1 Step 1: Establishing a connection to a WinDev RPC/FTP serverTo transfer files, a connection must be establishedwith a WinDev RPC or FTP server. The connection isestablished by NetConnect. The source code forestablishing a connection must be found beforethe first "Net" function. The value returned by Net-Connect must be stored because it will be used bythe other "RPC" and "FTP" functions.The code used to connect to a RPC server is as fol-lows:
12.2.2 Step 2: Transmitting a file to a Win-Dev FTP serverIn the following example, a file is transmitted to theWinDev FTP server (NetSendFile). A progress bar isused to follow the progress of the transfer.
WD
Function RPCConnection (Address,... User, Password)//Connection to a RPC serverConnectionNum is intConnectionNum = NetConnect(...Address, RPCServer, ... User, Password) Result ConnectionNum
- - Initialization code of the - - "RPCClient" windowGLOBALTransfer_Completed is boolean Transfer_Completed = FalseTransfer_InProgress is boolean Transfer_InProgress = FalseEvent("ProgressBar_Transfer",... "RPCClient", "SendFile")....hConnect is int hConnect = NetConnect(... "148.61.125.245", FTPServer,... "GUEST", "")- - Button for sending the transferIF Transfer_InProgress = True THEN...
WLangage.book Page 281 Jeudi, 20. mars 2014 4:29 16

282 Part 6: Communication
12.2.3 Step 3: Retrieving a file from a Win-Dev FTP serverThe file named NetGetFile is used to retrieve a filefound on an FTP/RPC server WinDev.Note: you can easily get the list of directories andfiles found on a WinDev FTP server. An example isavailable in the description of NetDirList.
12.2.4 Step 4: Closing a connection to a WinDev RPC/FTP serverOnce the files have been transferred, you must dis-connect from the WinDev RPC or FTP server. Thedisconnection is performed by NetDisconnect. Thedisconnection code must be found after the last"Net" statement. The "ConnectionNum" variable,required for the disconnection, contains the valuereturned by NetConnect.The code for disconnecting from an RPC server WinDev is as follows:
Error("A transfer of "+... "files is currently "+... "in progress")ELSE Transfer_Completed = False Transfer_InProgress = True IF NetSendFile(hConnect,... "C:\autoexec.bat", ... "C:\autoexec.cli", ... "SendFile", 10) = False THEN Info("The transfer failed")END...END- - Transfer_Progress procedure: - - managing the current transferTransfer_Progress procedure Message("Transfer in progress") Gauge(_EVE.wParam, _EVE.lParam) IF _EVE.wParam = _EVE.lParam THEN Transfer_InProgress = False Transfer_Completed = True Message("Transfer completed") Info("Transfer completed") END
-- Code for opening the window// Asks for an available message // to WindowsGLOBALWM_MYMESSAGE is intlpString is fixed string ... on 20 lpString= "ProgBar_Main" ... hConnect is int // ConnectionhConnect = ... NetConnect("148.61.125.245",... FTPServer, "GUEST", "")WM_MYMESSAGE = ...CallDLL32("USER32", ..."RegisterWindowMessageA" lpString)// Branch the Progress Bar procedure // on this messageEvent("UPDProgBar", "MAIN",... WM_MYMESSAGE)
-- Code of the button for downloa-ding -- a fileHourglass(True)IF NOT NetGetFile(... hConnect,... "C:\autoexec.bat", ... "C:\autoexec.cli", ... WM_MYMESSAGE, 10) THEN Error("Error while"+... "transferring the files")ENDHourGlass(False)- - Procedure UPDProgBar()Procedure UPDProgBar() // Display the progress bar // If the entire file is // transferred, // reinitialize the progress bar IF _EVE.wParam = _EVE.lParam THEN // Transfer completed Gauge() ELSE // Transfer in progress Gauge(_EVE.wparam,... _EVE.lParam, ... "Transfer in progress") END
//Disconnect from a server//WinDev RPC//ConnectionNum contains the value //returned by NetConnectNetDisconnect(ConnectionNum)
WLangage.book Page 282 Jeudi, 20. mars 2014 4:29 16

Part 6: Communication 283
12.3 Net functions
The following functions are used to manage the WinDev FTP/RPC communications:
NetIPAddress Returns the IP (Internet Protocol) address of a computerNetMACAddress Returns the MAC address of one of the network cards found on the computer.NetConnect Connects to an FTP server (File Transfer Protocol) or to an RPC server (Remote Pro-
cedure Call) created by WinDevNetDisconnect Disconnects from a WinDev FTP (File Transfer Protocol) or RPC (Remote Procedure
Call) serverNetStartServer Starts an FTP server (File Transfer Protocol) or a RPC server (Remote Procedure
Call) created by WinDevNetSendBuffer Transmits a character string to an FTP server (File Transfer Protocol) or to a RPC
server (Remote Procedure Call) created by WinDevNetSendFile Transmits a file to an FTP server (File Transfer Protocol) created by WinDevNetSendMessage Triggers a Windows event on the system of an FTP server (File Transfer Protocol) or
RPC server (Remote Procedure Call) created by WinDevNetClientSendMessage Sends a message from the server to all the connected client computersNetExecute Runs a specific program on an FTP server (File Transfer Protocol) or on a RPC ser-
ver (Remote Procedure Call) created by WinDevNetCloseRemoteAccess Closes the line that was previously opened by NetOpenRemoteAccessNetEndServer Stops an FTP server (File Transfer Protocol) or a RPC server (Remote Procedure
Call) that was created with WinDev and that was previously started by NetStartSer-ver
NetInfoRemoteAccess Returns information and statistics about the status of a connectionNetIPToMAC Returns the MAC address corresponding to the given IP address.NetListRemoteAccess Returns the list of available remote accessesNetListIPAddress Returns the list of IP addresses (Internet Protocol) for a computer.NetDiskList Lists the available disksNetDirList Lists the directories and the filesNetMACToIP Returns the IP address corresponding to a MAC addressNetClientMessageBox Displays a dialog box on each client computer connected to the serverNetRemoteMessageBox Displays a dialog box on the screen of the FTP server (File Transfer Protocol) or
RPC server (Remote Procedure Call) created by WinDevNetMsgError Returns the error message corresponding to the error number returned by NetO-
penRemoteAccess and NetCloseRemoteAccessNetMachineName Returns the name of the local computerNetServerOption Manages the rights of the clients on the server (FTP server (File Transfer Protocol)
or RPC server (Remote Procedure Call) created by WinDev)NetOpenRemoteAccess Establishes a remote connection with a modemNetGetFile Retrieves an existing file from an FTP server (File Transfer Protocol) created by Win-
DevNetRenameFile Renames (or moves) a file found on the FTP server (File Transfer Protocol) or RPC
server (Remote Procedure Call) created by WinDevNetEraseFile Deletes a file from the FTP server (File Transfer Protocol) or from the RPC server
(Remote Procedure Call) created by WinDev
See the online help for more details.
WLangage.book Page 283 Jeudi, 20. mars 2014 4:29 16

284 Part 6: Communication
13. COMMUNICATING WITH AN FTP SERVER
13.1 Handling files on a RPC server
13.1.1 OverviewThe FTP (File Transfer Protocol) is a protocol used totransfer files from a site to another remote site.This protocol is used to exchange files via TCP/IP,Wi-Fi or Internet.Several thousands of file servers can be accessedby FTP on Internet. These servers propose sha-reware or freeware to the public.Several WLanguage functions enable you tomanage the files on an FTP server from your appli-cations or from your sites.
13.1.2 FTPUse convention• In theory, you cannot connect to an FTP site
without an FTP account and a password. Only auser with an account and a password can con-nect to this site.
• Practically, all the servers found on Internet havean Anonymous account. The password of thisaccount is not implemented but an emailaddress will be requested.
To download the files found on an FTP server, allyou have to do is connect as "anonymous user".To upload files to an FTP server (to send HTMLpages to your Web site for example), a non-anony-mous account and a password are required.
13.1.3 PrincipleTo handle files on an FTP server from an applica-tion or from a site, you must follow these rules:1. Connect to an FTP server (FTPConnect).
2. Upload and download files (according to the con-nection mode). For a passive connection, the appli-cation or the site must request the authorizationfrom the FTP server before each file operation onthe server. It also allows you to:• find out the characteristics of the files found on
the FTP server: attributes, size, …• handle the files found on an FTP server: creation,
deletion, …• list the files of a directory found on the FTP server
by running a procedure used to perform a pro-cess for each file found.
3. Close the connection to the server (FTPDiscon-nect).
13.1.4 Relative path/Absolute pathThe notions of relative path and absolute path arevery important in an FTP application.• A path starting with a slash is considered as
being an absolute path: this is the path from theroot of the FTP server (parameter specific to theserver).ex: /pub/user/FIONA
WLangage.book Page 284 Jeudi, 20. mars 2014 4:29 16

Part 6: Communication 285
• A path not starting with a slash is considered asbeing a relative path, which means a path givenin relation to the current directory. This currentdirectory can be returned or modified by FTPCur-rentDir.
When connecting to an FTP site, the initial directory(the "home directory" of the user) is not necessarilyfound at the root of the FTP server. Therefore, werecommend that you use relative paths.
13.1.5 ExampleA full example is supplied with WinDev: WD FTP.
This example is used to connect to and to discon-nect from an FTP server.Once the connection is established, all the filesfound on the server and on the current computerare listed.You have the ability to:• transfer the files from the local computer to this
FTP server and download the files found on theFTP server to the local computer.
• create, rename and delete the files and/or thedirectories found on the FTP server.
• find out the characteristics of the files found onthe FTP server (size and attributes of the files).
13.2 FTP functions
The following functions are used to manage the FTP (File Transfer Protocol):
FTPAttribute Identifies the attributes of a file found on an FTP server (File Transfer Protocol)FTPCommand Sends a specific FTP command to a serverFTPConnect Connects the current computer to an FTP server (File Transfer Protocol)FTPDate Returns the different dates (creation, modification or access) associated with a file
found on an FTP server (File Transfer Protocol)FTPDisconnect Disconnects the current computer from the FTP server (File Transfer Protocol)FTPSend Transfers a file or directory to an FTP server (File Transfer Protocol)FTPTime Returns the times (creation, modification or access) associated with a file on an FTP
server (File Transfer Protocol)FTPListFile Lists the files found in a directory of an FTP server and returns the number of listed
filesFTPName Returns the name of the last file accessed by an FTP function (File Transfer Protocol)FTPProxy Specifies whether the communication functions that use the FTP protocol must go
through a proxy to run their requestsFTPGet Transfers a file or a directory from an FTP server (File Transfer Protocol) to the current
computerFTPRenameFile Renames or moves a file found on an FTP server (File Transfer Protocol)FTPMakeDir Creates a directory on an FTP server (File Transfer Protocol)FTPCurrentDir Identifies or modifies the current directory on an FTP server (File Transfer Protocol)FTPRemoveDir Deletes a directory and its content (files and sub-directories) from an FTP server (File
Transfer Protocol)FTPDeleteFile Deletes a file from an FTP server (File Transfer Protocol)FTPSize Returns the size (in bytes) of a file found on an FTP server (File Transfer Protocol)
See the online help for more details.See the online help to check the availability of these functions in the different products (WinDev, WebDev,WinDev Mobile).
WLangage.book Page 285 Jeudi, 20. mars 2014 4:29 16

286 Part 6: Communication
14. MANAGING THE SOCKETS
14.1 Overview
Several WLanguage functions are used to performan advanced management of sockets.A socket is a communication resource used by theapplications to communicate between computersregardless of the network type.This communication mode can be used, for exam-ple, to establish a communication between compu-ters connected by Internet.With a Pocket PC, data can be exchanged betweentwo computers:• by Wi-Fi.• by ActiveSync.• by GPRS (caution: some phone contracts do not
allow you to connect two computers).• by network card.WinDev, WebDev and WinDev Mobile enable you tomanage:• The standard sockets• The UDP sockets• The sockets by infrared• The SSL sockets
Examples for using the sockets:• managing a messaging in real-time,
• access to a news server (forum).
14.1.1 Different possibilitiesA WinDev application can manage the socketsaccording to different modes:• Client WinDev application: the application con-
nects to a standard server and exchanges datavia a socket. See “Client WinDev application/Client WebDev site”, page 286 for more details.
• WinDev "Simplified Server" application: the Win-Dev application is a server that exchanges infor-mation via a socket with a single client computer(WinDev socket recommended on the client com-puter but not mandatory). See “WinDev "Simpli-fied Server" application”, page 287 for moredetails.
• WinDev "Standard Server" application: the Win-Dev application is a server that exchanges infor-mation via sockets with several client computers.See “Standard socket server”, page 288 for moredetails.
14.1.2 ExampleWinDev is supplied with an example for socketmanagement: WD Instant messaging.
14.2 Client WinDev application/Client WebDev site
A client application of a socket server connects to astandard server in order to exchange informationvia a socket.Example: A client WinDev application or a clientWebDev site can connect to a standard news serveron Internet.
14.2.1 Principle of a client application or client site
Step 1: Connecting to the serverTo connect to a server socket, all you have to do isuse SocketConnect. This function is used to esta-blish a request for connecting to the server.
The socket is identified by its port and by anaddress.
Step 2: Exchanging dataOnce two computers have connected their socket, acommunication channel is established betweenthese two computers. These two computers canread and write character strings on the socket.
WLangage.book Page 286 Jeudi, 20. mars 2014 4:29 16

Part 6: Communication 287
Note: To avoid locking the applications or the sites,the incoming email must be managed by a specialthread (see “Managing the threads”, page 293 formore details).To read and write on the server socket, WinDev theclient application or the client WebDev site mustuse SocketRead and SocketWrite.
Caution: To perform a read operation, a write opera-tion must have been performed beforehand. Forexample:1. The client computer writes onto the socket: itsends a request to the server.2. The server computer performs a read operationin the socket.3. If a response to the message is required, the ser-ver sends a response to the client computer.
Step 3: Ending the communicationTo end the communication, all you have to do isclose the socket from the client computer with Soc-ketClose.
Note: the communication can also be ended fromthe server.
14.2.2 Transmission mode of informationThe transmission mode of the message defines themode used to specify the length of the message.Several methods are available to find out the lengthof the message during the communication betweensockets.Method 1: WinDev/WebDev mode: By default, thenumber of characters in the message is specifiedat the beginning of the message. This transmissionmode is recommended when the sockets are usedto communicate between two WinDev applications,or between a WebDev site and a WebDev serverapplication.The message has the following format: "11\r\nHel-loWord"Method 2: Standard mode: The end of the mes-sage is signaled by a specific character, defined inadvance. This transmission mode is recommendedwhen the sockets are used to communicatebetween a WinDev application and another applica-tion, or between a WebDev site and another site. Inthis case, a specific character must be included inthe message to indicate that the message is over.The message has the following format: "HelloWorld<EOF>"Method 3: Standard mode with buffer: Corres-ponds to the standard mode optimized for the mostcommon protocols on Internet.SocketChangeTransmissionMode allows you tomodify the transmission mode used.
14.3 WinDev "Simplified Server" application
WinDev gives you the ability to create a simplifiedsocket server. This server is used to communicatewith a single client computer at a time. This type ofapplication is very useful when two remote applica-tions must communicate between themselves.Note: WinDev also gives you the ability to create amore elaborated socket server (standard socketserver), managing the connection of several clientcomputers. See “Standard socket server”,page 288 for more details.
14.3.1 The simplified serverStep 1: Creating the socket
To create the socket, the server uses SocketCreate.A socket is associated with a specific port. To sim-plify the use of the socket by programming on the
server, specify the name of the socket.The client computer will connect to this socket inorder to exchange data. The connection betweenthe two computers will be actually establishedduring the first exchange of data between the twocomputers (which means when the server readsinformation for the first time).The connection is established during the first suc-cessful attempt of SocketRead on the server.
WD WDMobile
WLangage.book Page 287 Jeudi, 20. mars 2014 4:29 16

288 Part 6: Communication
Step 2: Exchanging dataWhen two computers use the same socket, a com-munication stream is established between thesetwo computers. These two computers can read andwrite character strings on the socket.Note: To avoid locking applications, the incomingmessages are often managed by a special thread(see “Managing the threads”, page 293 for moredetails).To read and write on the socket, the WinDev serverapplication must use SocketRead and Soc-ketWrite.
Caution: To perform a read operation, a write opera-tion must have been performed beforehand. Forexample:1. The client computer writes onto the socket: itsends a request to the server.2. The server performs a read operation on the soc-ket in a thread. As soon as a message is received,the message is processed by the server.3. If a response to the message is required, the ser-ver identifies the client computer (SocketClientInfo)and sends a response to it.
Step 3: Closing the socketTo end the communication, the server can close thesocket with SocketClose.
Note: the socket can also be closed by the clientcomputer.
14.3.2 Transmission mode of informationThe transmission mode of the message defines themode used to specify the length of the message.Several methods can be used to define the lengthof the message during the communication betweensockets.Method 1: WinDev mode: By default, the number ofcharacters in the message is specified at the begin-ning of the message. This transmission mode isrecommended when the sockets are used to com-municate between two WinDev applications.The message has the following format: "11\r\nHel-loWord"Method 2: Standard mode: The end of the mes-sage is signaled by a specific character, defined inadvance. This transmission mode is recommendedwhen the sockets are used to communicatebetween a WinDev application and another applica-tion. In this case, a specific character must beincluded in the message to indicate that the mes-sage is over.The message has the following format: "HelloWorld<EOF>"Method 3: Standard mode with buffer: Corres-ponds to the standard mode optimized for the mostcommon Internet protocols.SocketChangeTransmissionMode allows you tomodify the transmission mode used.
14.4 Standard socket server
WinDev gives you the ability to create a standardsocket server. This server enables you to managethe connection of several client computers to thesame socket. This principle is used to create anews server for example.
14.4.1 The standard socket serverStep 1: Creating the socketTo create the socket, the server uses SocketCreate.A socket is associated with a specific port. Severalsockets can be created, each socket using a speci-fic port number. A name (used to handle the socketby programming) and a port number are associatedwith each socket.
WD
WLangage.book Page 288 Jeudi, 20. mars 2014 4:29 16

Part 6: Communication 289
Step 2: Waiting for connection on the socketAll the computers wanting to communicate with theserver can connect to the socket: these are theclient computers. The server manages the differentconnection requests from the client computers viaSocketWaitForConnection. This function is used to find out whether a connec-tion request is performed on a specific socket.We recommend that you use SocketWaitForCon-nection in a specific thread. Therefore, this functionis performed in background task. When a connec-tion request is detected, you can:• accept the connection (SocketAccept): in this
case, a specific communication channel is crea-ted. To avoid locking the applications, the inco-ming messages are often managed by a specificthread (see“Managing the threads”, page 293 formore details).
• refuse the connection (SocketDeny).
ExampleThe following example is used to create a socket onthe server and to manage the connections of theclient computers in a thread. If the connection isaccepted, the management of this connection isperformed by a specific thread.A thread is run for each connection. Each threaduses the same service function ("ManagementPro-cedure"). To allow the procedure to be run by seve-ral threads simultaneously, the synchronizationmode of the threads must be changed: use Thread-Mode associated with the threadCriticalSectionconstant in the initialization code of the project.The synchronization between the threads must bedone manually (see “Managing the threads”,page 293 for more details).To differentiate the threads, their name corres-ponds to the name of the communication channel(unique name).
Step 3: Exchanging dataWhen two computers use the same socket, a com-munication channel is established between thesetwo computers. These two computers can read andwrite character strings on the socket.To read and write on the socket, the WinDev serverapplication must use SocketRead and Soc-ketWrite.Caution: To perform a read operation, a write opera-tion must have been performed beforehand. Forexample:1. The client computer writes onto the socket: itsends a request to the server.2. The server reads from the socket in a thread. Assoon as a message is received, the message is pro-cessed by the server.3. If a response to the message is required, the ser-ver identifies the client computer and sends a res-ponse to it.
Step 4: To end the communication, all you have todo is close the socket with SocketClose.
14.4.2 Transmission mode of informationThe transmission mode of the message defines themode used to specify the length of the message.Several methods can be used to define the lengthof the message during the communication betweensockets.Method 1: WinDev mode: By default, the number ofcharacters in the message is specified at the begin-ning of the message. This transmission mode isrecommended when the sockets are used to com-municate between two WinDev applications.The message has the following format: "11\r\nHel-loWord"
IF NOT SocketCreate("Server", ... 8000) THEN Error("creation error " +... ErrorInfo(errMessage))ELSE ThreadExecute("Thread1", ... threadNormal,... WaitProcedure)END
PROCEDURE WaitProcedure() LOOP IF SocketWaitForConnection(... "Server")THEN Channel is string Channel = SocketAccept("Server") ThreadExecute(Channel, ... threadNormal,... ManagementProcedure, channel) ENDEND
WLangage.book Page 289 Jeudi, 20. mars 2014 4:29 16

290 Part 6: Communication
Method 2: Standard mode: The end of the mes-sage is signaled by a specific character, defined inadvance.This transmission mode is recommended when thesockets are used to communicate between a Win-Dev application and another application. In thiscase, a specific character must be included in themessage to indicate that the message is over.
The message has the following format: "HelloWorld<EOF>"Method 3: standard mode with buffer: Corres-ponds to the standard mode optimized for the mostcommon Internet protocols.SocketChangeTransmissionMode allows you tomodify the transmission mode used.
14.5 Socket functions
The following functions are used to manage the sockets:
SocketAccept Accepts the connection of a client computer on the server SocketWaitForConnection Checks whether a request for connection was performed by a client com-
puterSocketChangeTransmissionMode Changes the transmission mode used on a socketSocketClientInfo Allows a server to retrieve information about a socket connected to a
client computerSocketConnect Allows you to connect to a socketSocketConnectBluetooth Connects a client computer to a specific Bluetooth socket.SocketConnectInfrared Connects a client computer to a given socket via the infrared portSocketConnectSSL Connects a client computer to an SSL server.SocketCreate Creates a socketSocketCreateBluetooth Creates a Bluetooth socket.SocketCreateInfrared Creates a socket that uses the infrared portSocketCreateSSL Creates an SSL socket.SocketCreateUDP Creates a socket that uses the UDP protocolSocketWrite Sends a message between two socketsSocketExist Checks the existence of a socketSocketClose Closes a socket or a connection to a socket on the serverSocketRead Reads a message sent by a socketSocketDeny Refuses the connection requested by a client computer
See the online help for more details.See the online help to check the availability of these functions in the different products (WinDev, WebDev,WinDev Mobile).
WLangage.book Page 290 Jeudi, 20. mars 2014 4:29 16

Part 6: Communication 291
15. MANAGING THE BLUETOOTH KEYS
15.1 Overview
Create a new type of application! With no contactbetween the PC and the mobile device, several pro-cesses can be run on the PC by using the datafound on the mobile device.Some examples:• An application on PC (or mobile device) can emu-
late services on a device that supports the blue-
tooth standard.• An application can automatically retrieve photos
from a cell phone.• An application can read the list of contacts found
on a cell phone.• A PC can print the data found on a PDA.
15.2 How do I proceed?
Several groups of functions allow you to communi-cate via Bluetooth:• The Bluetooth functions (BTxxx): These functions
are used to manage the Bluetooth devices. Youcan for example list the services found on adevice, and enable or disable them. You can alsoauthenticate toward a Bluetooth device and getvarious information about the device.
• The OBEXxxx functions: These functions are usedto manage the exchanges of files via the OBEXprotocol.
• The functions named SocketConnectBluetoothand SocketCreateBluetooth that allow you tomanage the sockets that use the Bluetooth devi-ces.
15.3 Which keys should be used?
The functions allowing you to handle the Bluetoothkeys operate with the keys that use a protocol stackissued by Microsoft or Bluesoleil. To find out thestack used, call BTStack.Some WLanguage functions can only be used withsome types of stacks. This information is presentedin details in each relevant WLanguage function.The following keys use a Microsoft stack (withoutinstalling to driver supplied with the keys):• D-Link DBT-120,• Broadcom Bluetooth 2.0 EDR USB,• EMTEC Dongle Bluetooth 2.0 EDR - EKCOB110,• HAMA Nano Bluetooth Adapter 2.0 EDR - 10m,• Conceptronic Dongle Bluetooth 2.0 EDR -
CBT200U2A,• Kensington Bluetooth USB Micro Adapter (Blue-
tooth 2.0 - USB 2.0),• (*) Belkin Bluetooth 2.0 Adapter - F8T013FR1 -
10-meter range (USB 2.0),
• (*) Belkin Bluetooth 2.0 Adapter - F8T012FR1 -100-meter range (USB 2.0),
• TrendNet TBW-104UB - USB Bluetooth 2.0 Adap-ter,
• (*) TrendNet TBW-102UB - Bluetooth Class 2Adapter (Bluetooth 1.1), ...
This list is not exhaustive and it will be updated ona regular basis.
(*) Some keys do not directly operate in Windows, adriver must be installed via the following operatingmode:1. If it was installed, uninstall the driver providedwith the key via "Add/Remove program" in the Con-trol Panel,2. Insert the CD provided with the key in the drive,DO NOT start its automatic execution,3. Connect the key,4. Ask Windows to find the driver on the CD.This method enables you to have a key recognizedby Windows and therefore to use a Microsoft stack.
WLangage.book Page 291 Jeudi, 20. mars 2014 4:29 16

292 Part 6: Communication
15.4 The Bluetooth and OBEX functions
15.4.1 Bluetooth functionsThe following functions are used to manage the Bluetooth devices:
15.4.2 OBEX functionsThe following functions are used to manage the file exchanges via the OBEX protocol:
BTAcceptConnection Allows you to find out whether a Bluetooth radio accepts (or not) the con-nection requests coming from the devices.
BTActivate Enables or disables the management of Bluetooth on the deviceBTEnableService Enables a service provided by a Bluetooth device.BTChangeConnectivity Allows you to configure a Bluetooth radio to accept (or not) the requests for
connection coming from the devices.BTChangeVisibility Changes the visibility of a Bluetooth radio.BTConnectDevice Allows you to be authenticated toward a Bluetooth device.BTDisconnectDevice Cancels the authentication beside a Bluetooth device.BTDisableService Disables a service on a Bluetooth device.BTIsVisible Allows you to find out whether a Bluetooth radio is visible.BTStatus Returns the current activation status of Bluetooth on the device or asks to
be notified when the activation status changesBTInfoDevice Returns specific information about a Bluetooth device.BTInfoRadio Returns specific information about a Bluetooth radio connected to the com-
puter.BTListDevice Returns the list of accessible Bluetooth devices.BTListRadio Returns the list of Bluetooth radios connected to the computer.BTListService Returns the list of services provided by a Bluetooth device.BTOpenDeviceProperties Opens the window of properties for a Bluetooth device.BTStack Returns the Bluetooth stack currently used.BTSelectDevice Opens a system window to select a Bluetooth device.
See the online help for more details.See the online help to check the availability of these functions in the different products (WinDev, WebDev,WinDev Mobile).
OBEXConnect Allows you to connect to a device that supports the OBEX protocol.OBEXDisconnect Allows you to disconnect from a device that supports the OBEX protocol.OBEXSendFile Sends a file to a device that supports the OBEX protocol.OBEXSendVCard Sends a VCard file (virtual business card) to a device that supports the OBEX proto-
col.OBEXListFile Lists the files shared by a device that uses the OBEX protocol.OBEXGetFile Retrieves a file from a device that supports the OBEX protocol.OBEXGetVCard Retrieves a VCard from a device that supports the OBEX protocol.
See the online help for more details.See the online help to check the availability of these functions in the different products (WinDev, WebDev,WinDev Mobile).
WLangage.book Page 292 Jeudi, 20. mars 2014 4:29 16

Part 6: Communication 293
16. MANAGING THE THREADS
16.1 Overview
Several WLanguage functions can be used to per-form an advanced management of threads.The threads are used to run a code (or processes)in parallel of the main application. Therefore, seve-ral processes can be run in background taskwithout locking the main application.The threads replace some types of timers.An efficient thread is a thread that waits for anevent such as a user action, an incoming email, anincoming phone call, ...
Examples for using the threads:• Retrieving emails in background task while a new
email is typed.• Communication application or site: manage the
incoming calls, communication with sockets, ...
16.1.1 From simple management to advan-ced management of threadsSeveral methods can be used to manage thethreads:• Running threads.• Managing the semaphores inside threads, which
means limiting the simultaneous execution of acode by one or more threads at a given time.
• Managing the signals in order to perform a syn-chronization between several threads.
16.1.2 ExampleWinDev is supplied with an example for treadmanagement: WD Thread Pool.
16.2 Principle for using the threads
An application or a site is currently run. This appli-cation or this site is run in a main thread.This application or this site can start a secondarythread at any time: this thread is run in parallel ofthe application or site. This thread corresponds to alocal or global procedure of the application or site.This secondary thread will be run in parallel of themain application or site. All the processes that canbe run in background task can be performed in thisthread: receiving emails, ...Note: an efficient thread is a thread that waits for aspecific event, such as a user action, an incomingcall or email, …
16.2.1 Simple management of threadsA secondary thread is created by ThreadExecute.A secondary thread is automatically stopped when:• the procedure corresponding to the thread is
over,• the object from which the thread originated is
closed.
To force a thread to stop, you also have the ability touse ThreadStop.
Caution: if a WLanguage function is currently runwhen the thread is stopped, the thread will beactually stopped after the execution of the function.
WLanguage functionsThe following functions are used to manage thethreads:
16.2.2 Characteristics of the threadsIn WLanguage, a secondary thread can be associa-ted with:• a procedure local to the current window or page,• a procedure global to the project,• a method of a class,• a global method of a class
ThreadStop Stops a secondary "thread".
ThreadExecute Starts the execution of a secon-dary "thread". This "thread" is anon-locking thread.
ThreadMode Changes the management modeof the threads.
WLangage.book Page 293 Jeudi, 20. mars 2014 4:29 16

294 Part 6: Communication
16.2.3 Access to the existing elements and HFSQL contextWhen creating a thread, all the declarations,objects, elements, ... are common:• to the new secondary thread• to the thread in which the secondary thread was
created (the main thread in most cases).Therefore, these threads can access the variables,procedures, ... All the variables created once athread is started are accessible in the thread wherethey have been created.Similarly, when creating a thread, the HFSQL con-text is automatically duplicated. Each thread han-dles a specific HFSQL context. The number ofHFSQL contexts is equal to the number of threadscurrently run. The entire HFSQL context is copied(filter, search condition, …). The HFSQL context evol-ves independently in each thread.This allows you to perform two different browseoperations on the same file in two differentthreads.Example: A filter is created on Customer file. Threa-dExecute is called to create the CTX2 thread. TheCustomer file is filtered in each thread. If the filteris disabled in the main thread, the filter will still beenabled in the CTX2 thread.Caution: Writing and assigning in a thread: If writeoperations or assignments are performed in athread, the other threads currently run do not sharethis information. Some inconsistencies may occur.Example:
These two threads share the variables but they donot manage the access to the common resources.If the thread 1 is run before the thread 2, i will beset to 1 instead of 2.Note: To share an assignment among severalthreads, the semaphores must be used.
16.2.4 Limits of the processes performed by the threadForbidden processesCaution: The following processes cannot be urn inthe threads:• Opening WinDev windows with the WLanguage
functions such as Open, Use, Close, ... A specificmanagement mode must be implemented if win-dows must be handled in the threads (very rare).See“Managing the opening of a WinDev windowin a secondary thread”, page 298 for moredetails.
• Displaying WebDev pages (or page contexts) withthe WLanguage functions such as ContextOpen,FramesetDisplay, PageDisplay, PageUse, …
• Managing the events.• Managing the timers.
Processes of a WinDev application/site WebDevBy default, any WinDev/WebDev process (clickcode of a button for example), all the procedures aswell as the methods of classes can only be run by asingle thread at a given time.To allow several threads to run these processes atthe same time, you must:1. Change the default management mode ofthreads (ThreadMode).2. Manage the critical sections and the semapho-res in the code of the application or site.
16.3 Managing the semaphores in the threads
The semaphores are used to limit the simultaneousexecution of a code (procedure, code line, …) to oneor more threads at a given time.For example: Two specific threads are used in abanking application:• a thread to credit the accounts,• a thread to debit the accounts.At any given time, there can only be a singleaccount credit or a single account debit.
16.3.1 PrincipleThe semaphore was created by SemaphoreCreate.1. The thread #1 runs SemaphoreStart: no threadis currently found in the semaphore.2.The thread #1 runs the section of code that isprotected by the semaphore.3. While the thread #1 runs the code protected bythe semaphore, a thread #2 runs SemaphoreStart:the code protected by the semaphore being alreadyrun by the thread #1, the thread #2 waits for thesemaphore to be unlocked.
Code of Thread 1 Code of Thread 2
a=ia++i=a
b=ib++i=b
WLangage.book Page 294 Jeudi, 20. mars 2014 4:29 16

Part 6: Communication 295
4. The thread #1 runs SemaphoreEnd: no otherthread runs the code of the semaphore.5. The thread #2 can run the code protected by thesemaphore.
6. The thread #2 runs SemaphoreEnd: no threadruns the code of the semaphore.
16.3.2 Implementing a semaphoreThe different steps for implementing a semaphoreare as follows:1. Create a semaphore with SemaphoreCreate.The semaphore is associated with a name.2. Call SemaphoreStart before the section of codeto protect.3. Call SemaphoreEnd after the section of code toprotect. The code lines found after SemaphoreEndwill not be protected.4. Destroying the semaphore with SemaphoreDes-troy.
Notes:• The code sections protected by a semaphore
must be as short as possible and they must onlyaffect the "critical" processes.
• A semaphore with the same name can be used toprotect several code sections. A single thread canbe found at a given time in one of the areas pro-tected by the semaphore.
• When a thread is pending, the resources of theprocessor are not used.
• The semaphores apply to the main thread and tothe secondary threads as well (created by Threa-
dExecute). You must avoid locking the mainthread. Indeed, if the main thread is locked (pen-ding), the application or the site cannot be runanymore.
• SemaphoreStart and SemaphoreEnd must beused in the same process (in a procedure forexample).
The functions for managing the semaphoresThe following WLanguage functions are used tomanage the semaphores:
Semaphore-Create
Creates a semaphore
SemaphoreStart Locks the current thread whilewaiting for the semaphore tobe opened (which means untila free spot becomes "availa-ble" in the protected section)
SemaphoreDes-troy
Explicitly destroys a sema-phore
SemaphoreEnd Allows one or more threads toexit from the area protected bythe semaphore
WLangage.book Page 295 Jeudi, 20. mars 2014 4:29 16

296 Part 6: Communication
Example: To perform an assignment shared byseveral threads, you must encapsulate in a sema-phore the assignment of the variables as well astheir reading.
16.3.3 A limited semaphore: the critical sec-tionA critical section is a semaphore limited to a singlethread on a single code section (process, proce-dure, …).
Unlike the semaphores, a critical section can beused once only.For example, a critical section can be used to pro-tect a procedure for updating the controls in a win-
dow or a page.
The functions for managing the critical sectionsThe following WLanguage functions are used tomanage the critical sections:
16.4 Managing the mutexes in the threads
The mutexes are used to limit the simultaneousexecution of a code (procedure, code line, …) to onethread at a given time. A mutex can be sharedamong several applications.Note: Other systems can also be used to protect asection of code:• the semaphores are used to limit the simulta-
neous execution of a code (procedure, codeline, …) to one or more threads at a given time. Asemaphore can be shared among several appli-cations.
• the critical sections are used to limit the simulta-neous execution of a code (procedure, codeline, …) to a single thread at a given time in a sin-gle application.
16.4.1 PrincipleThe mutex was created by MutexCreate.1. The thread #1 runs MutexStart: no thread is cur-rently found in the mutex.2. The thread #1 runs the code section protectedby the mutex.3. While the thread #1 runs the code protected bythe semaphore, a thread #2 runs MutexStart: thecode protected by the mutex being already run bythe thread #1, the thread #2 waits for the mutex tobe unlocked.4. The thread #1 runs MutexEnd: no other threadruns the code of the mutex.5. The thread #2 can run the code protected by themutex.
6. The thread #2 runs MutexEnd: no other threadruns the code of the mutex.
16.4.2 How do I implement a mutex?The steps: the different steps for implementing amutex are as follows:The different steps for implementing a mutex are asfollows:1. Creating a mutex with MutexCreate. The mutexis associated with a name.2. Calling MutexStart before the code section toprotect.3. Calling MutexEnd after the code section to pro-tect. The code lines found after MutexEnd will nolonger be protected.
CriticalSectionS-tart
Marks the beginning of a criti-cal section: no other threadwill be able to run the code aslong as the current threaddoes not exit from the criticalsection
CriticalSectionEnd Marks the end of a criticalsection: another thread will beable to run the code
WLangage.book Page 296 Jeudi, 20. mars 2014 4:29 16

Part 6: Communication 297
4. Destroying the mutex with MutexDestroy.
Notes:• The code sections protected by a mutex must be
as short as possible and they must only affectthe "critical" processes.
• When a thread is pending, the resources of theprocessor are not used.
• The mutexes apply to the main thread and to thesecondary threads (created by ThreadExecute).You must avoid locking the main thread. Indeed,if the main thread is locked (pending), the appli-cation cannot be run anymore.
• MutexStart and MutexEnd must be used in thesame process (in a procedure for example).
• The mutexes can be shared (or not) among the
different applications run on the computer. Allyou have to do is specify the share mode of themutexes during their creation (MutexCreate).
16.4.3 The functions for managing the mutexes
16.5 Synchronizing the threads via signals
The signals can be used to synchronize the diffe-rent threads of an application. A thread can wait forthe execution of another thread.Two management modes can be used to managethe signals:• simple management: synchronization between
two threads• advanced management: synchronization
between several threads
16.5.1 Simple management of signalsTwo threads are run in parallel (a main thread and asecondary thread for instance). One of the threadswaits for a specific action from the second threadbefore it can be run.Example: Application or site managing a spellingcheckerWhen the user types the SPACE character in an editcontrol, the spelling checker is automatically star-ted to check the previous word.In this case, the spell check is managed in a secon-dary thread.
Whenever the SPACE key is pressed, the mainthread sends a signal to the secondary thread inorder to start the spelling checker.The code is as follows:• Code of the main thread:
• Code of the secondary thread (ThreadCorrection):
Functions of WLanguageThe following functions are used to perform a sim-ple management of signals:
MutexCreate Explicitly creates a mutex
MutexStart Locks the current thread whilewaiting for the mutex to be freed
MutexDestroy Explicitly destroys a mutex.
MutexEnd Signals that the thread frees themutex
IF Right(Edit1, 1) = " " THEN ThreadSendSignal(... "ThreadCorrection")END
LOOP IF ThreadWaitSignal() = True THEN StartCorrection() ENDEND
ThreadWaitSi-gnal
The current "thread" is locked aslong as no signal is receivedfrom another "thread"
ThreadSendSi-gnal
The current "thread" sends asignal to the specified "thread"to unlock it
WLangage.book Page 297 Jeudi, 20. mars 2014 4:29 16

298 Part 6: Communication
16.5.2 Advanced management of signalsAn advanced management of signals consists incommunicating between several threads (morethan 2). Some threads are waiting for a task perfor-med by the main thread. When the main thread per-forms this task, it sends a signal to all thesecondary threads.
Implementation
The steps for implementing the advanced manage-ment of signals are as follows:1. Create a signal (EventCreate). By default, thissignal is closed.2. Wait for the signal (EventWait).3. Synchronizing the threads with EventChange: thesignal is opened. All the pending threads are unloc-ked and the signal is automatically closed (defaultbehavior).4. Destroy the signal (EventDestroy).The functions for advanced management ofsignalsThe following functions are used to manage theadvanced signals:
16.6 Managing the opening of a WinDev window in a secondary thread
A secondary thread cannot directly open a windowwith the standard WLanguage functions such as:Open, Use, …Nevertheless, you may want to display a windowfrom a secondary thread. For example, if a thread isused to manage some incoming calls, a windowcontaining the characteristics of the caller can bedisplayed by this thread when an incoming call isdetected.The solution consists in making the main threadopen the window.
16.6.1 Opening a window from a secondary threadTo open a window from a secondary thread:1. When the secondary thread wants to open a win-dow, it sends a message to the main thread withPostMessage</em.This message indicates to the main thread the win-dow that must be opened as well as the parame-ters required to open the window.2. The main thread manages a specific event, cor-responding to the request for window opening.When this event occurs, the WLanguage procedureopens the specified window (with Open for exam-
ple) with the specified parameters.
16.6.2 ExampleThe above-mentioned method is used in the exam-ple named WD Instant messaging.The code for opening the main window is used to:• implement an event to manage the opening of
the window in the main thread.• trigger the secondary threads.
EventWait Locks the current thread whilewaiting for the specified signal tobe opened
EventCreate Creates a signal
EventDestroy Explicitly destroys a signal
EventChange Modifies the status of a signal
// Implement an event to// manage the window opening// for "chat"gnEventID = Event(... "OpenChat","*.*", ... "StartChat")IF gnEventID = 0 THEN // Error while implementing // the event for managing the // "chat" window Error("Unable to manage"+... "the window for opening"+ ... "chats",ErrorInfo()) // The application cannot // operate without this event EndProgram()END
WLangage.book Page 298 Jeudi, 20. mars 2014 4:29 16

Part 6: Communication 299
.
• The window is opened in the code of the Listen-RequestStartMessage procedure for example.This procedure is run in a thread. The code usedto open the window from the thread is as follows:
The "StartChat" message is sent to the main win-dow (identified by its handle). This message con-tains the different parameters that must be passedto the window. The message is handled by theevent defined in the opening code of the window.When the message occurs, the ChatOpening proce-dure is automatically run. This procedure is used toopen the window.The code of this procedure is as follows:
16.7 Functions for managing the threads
The following functions are used to manage the threads:
// Listen to the requests for // connection // and for presence testsThreadExecute("ThreadPresence",... threadNormal,... "ListenPresenceRequest")ThreadExecute("ThreadRequest",... threadNormal,... "ListenConnectionRequest")
// Request the opening of// the "chat" windowPostMessage(... Handle(Main_Window),... "StartChat",CONTACT.CONTACTID,... CONTACT.CONTACTID)
PROCEDURE OpenChat(nParam,... nContact)OpenSister(Window_Message, ... nContact)
ExecuteMainThread Triggers the execution of the procedure specified in the main thread of the applica-tion.
MutexCreate Explicitly creates a mutexMutexStart Locks the current thread while waiting for the mutex to be freedMutexDestroy Explicitly destroys a mutexMutexEnd Signals that the thread frees the mutexCriticalSectionStart Marks the beginning of a critical section: no other thread will be able to run the code
as long as the current thread does not exit from the critical sectionCriticalSectionEnd Marks the end of a critical section: another thread will be able to run the codeSemaphoreCreate Creates a semaphoreSemaphoreStart Locks the current thread while waiting for the semaphore to be opened (which
means until a free spot becomes "available" in the protected section)SemaphoreDestroy Explicitly destroys a semaphoreSemaphoreEnd Allows one or more threads to exit from the section protected by the semaphoreEventWait Locks the current thread while waiting for the specified signal to be openedEventCreate Creates a signalEventDestroy Explicitly destroys a signalEventChange Modifies the status of a signalThreadStop Stops a secondary "thread"ThreadWait Waits for the end of execution of the specified "thread". A maximum time-out can be
specifiedThreadWaitSignal The current "thread" is locked as long as no signal is received from another "thread"ThreadCurrent Returns the name of the thread currently runThreadSendSignal The current "thread" sends a signal to the specified "thread" to unlock itThreadState Returns the current status of a threadThreadExecute Starts the execution of a secondary "thread". This "thread" is a non-locking threadThreadMode Changes the management mode of the threads
WLangage.book Page 299 Jeudi, 20. mars 2014 4:29 16

300 Part 6: Communication
ThreadPause Pauses the current thread during the specified durationThreadPersistent Makes a thread persistentThreadPriority Returns or modifies the priority level of a threadThreadResume Resumes the execution of a thread that was interrupted by ThreadSuspendThreadSuspend Temporarily suspends the execution of the specified "thread". The current processes
is not locked
See the online help for more details.See the online help to check the availability of these functions in the different products (WinDev, WebDev,WinDev Mobile).
WLangage.book Page 300 Jeudi, 20. mars 2014 4:29 16

Part 6: Communication 301
17. SOAP
17.1 Overview
"SOAP" (Simple Object Access Protocol) is a commu-nication protocol used to run procedures on aremote server.This protocol is mainly based on the HTTP and XMLprotocols. It can also be used with the SMTP proto-col.
The data is transmitted between the local computerand the SOAP server as text in XML format (Extensi-ble Markup Language).
Benefits of the SOAP protocolThe main benefit of the SOAP protocol is that it isbased on two standard protocols:• XML for the structure of the messages,• HTTP for the transport of data.
For this reason, the SOAP protocol is independentfrom the operating systems and from the program-ming languages. The SOAP protocol promotes inte-roperability.Furthermore, the use of the HTTP protocol (for datatransfer) allows the SOAP protocol to go throughfirewalls without any problem.
17.1.1 WinDev/WebDev and the SOAP proto-colWinDev and WebDev allow you to create a SOAPclient application. This application uses the SOAPfunctions of WLanguage to make the SOAP serverrun procedures and to retrieve their result.Furthermore, WinDev allows you to create a SOAPserver application. This application includes proce-dures that will be started by the client application.
17.1.2 ExampleWinDev is supplied with an example that uses theSOAP functions: WD Using SOAP.
17.2 Running procedures on a SOAP server
Several SOAP functions allow you to manage theexecution of procedures on a SOAP server fromyour WinDev applications or from your WebDevsites.
17.2.1 PrincipleAll the parameters required to run a SOAP proce-dure are supplied in the documentation of theSOAP server.
To run a procedure on a SOAP server:1. Initialize the structure of the parameters of theprocedure to run (see "structure of a SOAP proce-dure").Note (WinDev only): To perform additional checkson the SOAP server, add a procedure header (SOA-PAddHeader).2. Run the procedure (SOAPExecute or SOAPRun-XML). The following operations are automaticallyperformed:• connect the current computer and the SOAP ser-
ver,
• transmit the parameters of the procedure to theSOAP server,
• check the header if necessary,• run the procedure,• send the result or the error of the procedure to
the current computer.3. Check the result of the procedure.The result of SOAPRun or SOAPRunXML is used tofind out whether the connection was successfullyestablished.If the connection was not established, ErrorInforeturns the error details.If the connection was established, check the resultof SOAPGetResult:• If the result differs from an empty string (""), the
procedure was successfully run.• If the result corresponds to an empty string (""),
the procedure was not run and/or an error wasreturned. To find out the error details, use SOA-PError.
WLangage.book Page 301 Jeudi, 20. mars 2014 4:29 16

302 Part 6: Communication
Note: currently the transfers are not secured (noencryption of the transfered data). The SOAP proto-col should not be used to transfer sensitive data.
17.2.2 The SOAP structureThe following structure is used to pass parametersto a procedure run on a SOAP server:
This structure must be used for each parameter.For example:SOAP.Value[1] = 94010SOAP.Name[1] = "ZipCode"
SOAP.Type[1] = SOAPStringType
This structure is equivalent to :SOAP.XMLParam[1] = <ZipCode xsi:type="xsd:string">94010</ZipCode>
17.3 Creating and installing a WinDev SOAP server application
The SOAP Server application is an application con-taining all the procedures to run. These procedures
are run by the SOAP client application.
17.3.1 Principle
Variable Type Details
SOAP.NameSpace Optional characterstring
"NameSpace" of the parameter
SOAP.Name Character string Name of parameter
SOAP.XMLParam Optional characterstring
Structures of a parameter expressed in XML format. The otherparameters (Value, Name, Type, NameSpace and EncodingS-tyle) are ignored if this parameter is specified.
SOAP.EncodingStyle Optional characterstring
Encoding style ("EncodingStyle") of the parameter
SOAP.Type Constant Parameter Type
SOAP.Value Any type Value of the parameter
WLangage.book Page 302 Jeudi, 20. mars 2014 4:29 16

Part 6: Communication 303
17.3.2 How do I create an application SOAP serverTo create a SOAP server application:1. Create a "Library" type WinDev project.2. Create the global procedures. Each global proce-dure can be run by the SOAP client. Caution: theserver application must have no interface (no win-dow, no report, no trace window or dialog box). Thisapplication is also limited by the rights granted tothe Web server.3. Enter (if necessary) the initialization code andthe closing code of the project. These two sectionsof code will be respectively run when loading andunloading the library on the server.4. Generate your project’s library (.WDL). This filecontains all the procedures of the project.Note: In the SOAP client application, to specify thename of the library used (WDL), all you have to do isspecify this name in the NameSpace (SoapRun).
Caution: The transfers are not secured at this time(the transferred data is not encrypted). The SOAPprotocol should not be used to transfer sensitivedata.To run the test of your SOAP server application onthe development computer:1. Generate the library (.WDL file) of your Serverapplication (on the "Project" pane, in the "Generate"group, click "Generate").2. Configure the Internet server installed on yourcomputer for your WinDev application (configura-tion for Apache, IIS5 or Netscape iPlanet 4.1). Seethe online help for more details.3. Configure the SOAP administrator (WDSOAPCon-fig.EXE application in "Data" directory of WinDev).See "Configuring the administrator" for moredetails.4. Restart your Web server.5. Run the test of your SOAP client application.
To install your application on a SOAP server:1. Generate the library (.WDL file) of your Serverapplication (on the "Project" pane, in the "Generate"group, click "Generate").Caution: The WinDev DLLs must not be renamed.2. Create the setup procedure of your application.On the "Project" pane, in the "Generation" group,expand "Setup procedure" and select "Create thesetup procedure".3. The following files must be selected for setup:• WDSOAPConfig.EXE found in the "Data" directory
of the setup directory of WinDev.• the WinDev DLLs required to run your application.
Check whether the following DLLs are selected:WD190IMG.DLL, WD190OBJ.DLL,WD190STD.DLL and WD190VM.DLL.
• the WinDev DLLs specific to the HTTP serverused: WD190SAPA.DLL for Apache, WD190SIISfor IIS, etc.
4. Install the application on the server.5. Configure the Internet server for your WinDevapplication (configuration for Apache, IIS5 or Nets-cape iPlanet 4.1). See the online help for moredetails.6. Configure the SOAP administrator. See theonline help for more details.7. In order for the SOAP client to be able to contactthe server, the server address used in SoapRunmust have the following format:
Note: If several soap server applications are instal-led on the same computer, you must necessarilyinstall:• all the libraries (WDL) in the same directory,• all the WinDev DLLs used in the same directory.A single SOAP administrator will be installed and
<IP Address of Server>\ ... Server.soap
WLangage.book Page 303 Jeudi, 20. mars 2014 4:29 16
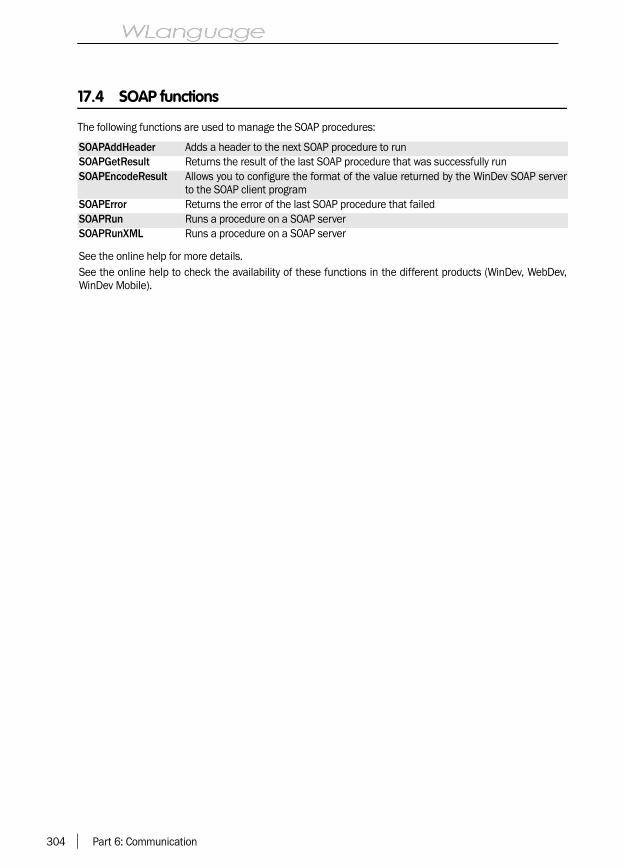
304 Part 6: Communication
17.4 SOAP functions
The following functions are used to manage the SOAP procedures:
SOAPAddHeader Adds a header to the next SOAP procedure to runSOAPGetResult Returns the result of the last SOAP procedure that was successfully runSOAPEncodeResult Allows you to configure the format of the value returned by the WinDev SOAP server
to the SOAP client programSOAPError Returns the error of the last SOAP procedure that failedSOAPRun Runs a procedure on a SOAP serverSOAPRunXML Runs a procedure on a SOAP server
See the online help for more details.See the online help to check the availability of these functions in the different products (WinDev, WebDev,WinDev Mobile).
WLangage.book Page 304 Jeudi, 20. mars 2014 4:29 16

Part 6: Communication 305
18. XML WEBSERVICES
WinDev and WebDev allow you to import XML Webservices of .Net and J2EE types into your WinDevapplications and into your WebDev sites.
Furthermore, WinDev allows you to manage XMLWeb services using the SOAP technology directlyfrom your WinDev applications.
18.1 Importing XML Webservices
18.1.1 OverviewWinDev, WebDev and WinDev Mobile allow you todirectly import Webservices into your applications.A Webservice is a set of entry points made availa-ble to the users in order to perform different pro-cesses. For example, a service for remote accessprovides the processes used to access the data.The exchanges of information with a Webserviceare performed in XML format and they use theSOAP (Simple Object Access Protocol) and HTTPprotocols.From the WSDL (Web Services Description Lan-guage) description of the service, WinDev, WebDevor WinDev Mobile automatically generates WLan-guage types and functions corresponding to theprogramming interface of the Webservice.Note: For backward compatibility with earlier ver-sions, you can also request the generation of a setof procedures or of a class whose methods corres-pond to the operations of the Webservice. However,we recommend you that use the new mechanismfor automatically generation of native types.To use the Webservice, all you have to do is use thefunctions generated during the import.
18.1.2 Importing a Webservice into a projectTo import a Webservice:1. On the "Project" pane, in the "Project" group,expand "Import" and select the "Import a webser-vice (SOAP, .Net, J2EE)" option. The wizard forimporting a Webservice starts.2. Select the WSDL description of the service toimport. This description can be loaded:• from an Internet address,• from an XML file found on the current computer.3. Validate the wizard, the Webservice is automati-cally added into the project explorer (in the "Web-services" branch) and it is ready to be used.
18.1.3 Updating the description of a WebserviceWhen a Webservice evolves (corrections, new ver-sions, etc.), its description may also evolve.To update the type in your project, you must:1. Select the Webservice in the project explorer.2. Select "Update" from the popup menu.Note: the Webservices imported by using themechanism for backward compatibility cannot beupdated.
18.1.4 Properties of a WebserviceProperties of a Webservice modifiable in the editor
To modify the properties of a Webservice in the edi-tor:1. Select the Webservice in the project explorer.2. Select "Description" from the popup menu.3. The window of properties is displayed. The fol-lowing properties can be modified in this window:• The import address of the Webservice: this is the
URL used to reach the WSDL file describing theWebservice.
• The user name and the password used to importthe WSDL.
Note: The properties modifiable in the editor andthe properties modifiable by programming have nolink
Properties of a Webservice modifia-ble by programming
To address a Webservice by programming, all youhave to do is use the name of the Webservice as itis displayed in the project explorer.
Note: you have the ability to perform a drag anddrop from the project explorer to the code editor toinsert the name of the Webservice.
WLangage.book Page 305 Jeudi, 20. mars 2014 4:29 16

306 Part 6: Communication
The following properties can be modified by pro-gramming:
Note: If a user name and password are specified,the authentication of the HTTP requests will bedone by using the "Basic" authentication schema,in which the parameters are in clear in the HTTPrequest. We advise you to use HTTPS requests ifthe authentication is required.
18.1.5 Using a Webservice imported into the projectTo use the set of procedures of the Webservice, allyou have to do is call the functions automaticallygenerated by the import.
The types of variables automatically declared whenimporting the WSDL offer several properties:
Advanced operations of the XML stream of the Webservice
In some cases, you may have to handle the XMLdata stream exchanged with the Webservice. SomeWebservices ask for example to add headers intotheir XML stream to allow the authentication orreturn meta information in the response headers.The following functions can be used to respond tothese particular requests:• SOAPPrepare: This function builds the request to
the Webservice for a given function and parame-ters but does not send it.
• SOAPAddHeader: This function is used to addcustom headers into a Webservice call.
• SOAPGetHeader: This function is used to readagain the information found in the header of theWebservice response.
Name Effect
Address This property is used to replacethe call address of the Webservicedescribed in the WSDL by anotherURL..This property has the followingformat : "http://server:port/webservice_path".
For example, for a Webservicegenerated with WinDev anddeployed on a WebDev ApplicationServer, it is the URL of the "awws"file.
Notes :• The modification of this property
replaces all the URL described inthe WSDL.
• If this property receives anempty string, the URLs descri-bed in the WSDL will be usedagain.
User This character string will be usedas user name to perform theauthentication during the HTTPrequests to the Webservice.
Password This character string will be usedas password to perform theauthentication during the HTTPrequests to the Webservice.
Name Effect
Exist True if the type of variable exists inthe response of the Webservice.False otherwise.
Occurrence Number of elements of this type inthe response of the Webservice.A Webservice can return arrays ofvariables.The property named ..Occurrenceis used to find out the size of thearray and the [ ] operator is used toaccess the array elements.
Type Name of the variable type. This pro-perty is used when a Webservice islikely to return responses of diffe-rent types.
Value Value of the variable.This property is accessed by defaultwhen only the name of the variableis used, for example :
myWebservice.RequestVa-riable = EDT_Value
is equivalent to :
myWebservice.RequestVa-riable..Value = EDT_Value
WLangage.book Page 306 Jeudi, 20. mars 2014 4:29 16

Part 6: Communication 307
• SOAPAddAttribute: This function is used todeclare the additional attributes (not found in theWSDL) on a Webservice variable automaticallygenerated. It is used in advanced programmingwhen the WSDL returned by the Webservice doesnot exactly correspond to the expected type.
Special case: the Webservice returns a result in a type not recognized by WinDev/WebDev/WinDev Mobile
The types of variables available in WinDev and theones available in a SOAP Webservice can differ.The simple types (boolean, integer, etc.) and thecomplex types (datetime, duration, structures,arrays of simple types and array of structures, nes-ted structures, etc.) used in the Webservice areautomatically converted into the WLanguage for-mat (and conversely) when the service is importedinto a project. The Array types are also supported.The more evolved types (classes, advanced types ofWLanguage, etc.) are processed as characterstrings in the WLanguage code. These characterstrings contain the XML code corresponding to thetype of variable returned by the Webservice and toits content.
Therefore, if a Webservice returns a result as aclass instance, this result will be processed in theprocedure as a character string in XML format.Then, you will have to process this character string(in WLanguage) in order to extract the requestedinformation. See the XML functions for moredetails.Note: If the Webservice returns a structure, thename of the members of the returned structure iscase sensitive.
18.1.6 Distributing a WinDev application that uses a WebserviceTo distribute an application that uses a Webservice,all you have to do is include the file describing theWebservice (.wsdl file) in the library of the applica-tion.In order for the application to be able to run theWebservice, the end-user computers must have anaccess to Internet.Note: Before distributing an application that uses aWebservice, we recommend that you check theuser license and the use rights of this service (caseof paying services).
18.2 Generating an XML Web service
18.2.1 OverviewWinDev and WebDev allow you to directly generateWebservices that use the SOAP technology. TheseWebservices can be used in the WinDev, WebDev,WinDev Mobile projects or in any other languagethat supports the SOAP protocol.From the WinDev/WebDev project corresponding tothe Webservice, WinDev/WebDev will automaticallycreate:• A library (.AWWS file). This library will contain all
the procedures of your Webservice. These proce-dures can be used by any application that usesyour Webservice.
• A .WSDL file. This file contains the description ofthe Webservice in WSDL format (Web ServicesDescription Language). This file contains the des-cription of the methods and structures of theWebservice.
To make your Webservice available, these filesmust be installed on a WebDev Application Server.Reminder: A Webservice is a set of entry pointsmade available to the users in order to perform dif-ferent processes. For example, a service for remoteaccess provides the processes used to access the
data. In most cases, the exchanges performed witha Webservice use the XML format and the HTTPprotocolNote: for compatibility purposes, the XML Web ser-vices of previous versions have been kept. Howe-ver, we recommend that you use the new model ofWebservice.The following differences can be noticed betweenthe former XML Web services and the Webservices:
Former XML Web ser-vices
Webservices
Deployed on Apache orIIS with an ISAPImodule.
Deployed on a WebDevApplication Server(compatible with all theWeb servers).
Can only be deployedwith a setup by physi-cal media on the ser-ver directly.
Can be deployed by phy-sical media or remotely(by FTP).
Can only be deployedwith a setup by physi-cal media on the ser-ver directly.
Allows an importantworkload.
WLangage.book Page 307 Jeudi, 20. mars 2014 4:29 16

308 Part 6: Communication
Note: When converting a SOAP server generated byWinDev 14 (or earlier version) to the new Webser-vice model, you must replace the calls to SOAPExe-cute generated by the import of the Webservice inthe WinDev project by the calls to the new conven-tion. See the online help for more details.
18.2.2 How do I make a Webservice availa-ble?To make a Webservice available, you must:1. Generating a Webservice.2. Running the test of the Webservice.3. Deploy the Webservice on a WebDev ApplicationServer.
18.2.3 Generating a WebserviceTo generate a Webservice:1. Create a WinDev project of Webservice type or aWebservice configuration in an existing project.2. Create the global procedures. Each global proce-dure can be run by the WinDev Application Server.Caution: The Webservice must have no GUI (no win-dow, no report, no trace window or dialog box). It isalso limited by the rights defined on the Web server("Internet guest" account usually in Windows).3. Enter (if necessary) the initialization code andthe closing code of the project. These two codeswill be respectively run when loading and whenunloading the library of the Webservice.4. On the "Project" pane, in the "Generation" group,click "Generate". The wizard for generating the Web-service starts.5. Select "Deploy on a WebDev Application Server".For backward compatibility, you also have the abi-lity to choose "Deployment in ISAPI mode". See thedocumentation supplied with WinDev 14 for moredetails.6. The next screen allows you to select the ele-ments that will be included in the library. The libraryand the current project will have the same name.You can:• Add elements
Any type of file can be added to the list of ele-ments inserted into the library: images, textfiles, …
• Delete elementsThe corresponding files and their dependencieswill be ignored in the library.
• Create the library from an existing library des-cription (*.WDU file)When creating a WinDev library, a ".WDU" file withthe same name is automatically created. This filecontains all the references of the elements inclu-ded in the library.
7. End the wizard to generate the Webservice.The deployment wizard is automatically started the-reafter.
18.2.4 Deploying a WebserviceIn order to be used, a Webservice must bedeployed on a WebDev Application Server. Thisdeployment can be performed:• From the development computer.• From a management computer (other than the
development computer)• On the WebDev Application Server, by using a
setup by physical media
To deploy the Webservice in stand-alone mode on acomputer, the setup by physical media can also begenerated in a mode containing:• The Webservice,• A version limited to 10 connections of the Web-
Dev Application Server,• The Apache Web server.
Deployment from the development computer
To deploy the Webservice from the developmentcomputer:1. Follow the steps of the wizard for Webservicegeneration.2. In the setup wizard, select "Deploy the Webser-vice on a remote WebDev application server".3. Enter the connection parameters to the applica-tion server: address, user name and password (thisinformation is provided by the Application Serveradministrator).4. Specify the deployment parameters of the Web-service:• The deployment name: by default, it is the name
of the project, you can change it to allow for thedeployment of several instances of a project onthe same server, several projects of the samename or if the project name does not correspondto the requested name for the Webservice.
• The name of the sub-directory that will containthe HFSQL Classic data files of the Webservice:by default, it corresponds to the name of the pro-ject but it can be changed iin order for two Web-services to share the same data files
Limited to the ver-sions of Windows 32bits.
Operate on all the ver-sions of Windows (32and 64 bits) as well as inLinux.
WLangage.book Page 308 Jeudi, 20. mars 2014 4:29 16

Part 6: Communication 309
• The public address of the Webservice: by default,this address is built with the address of the Appli-cation Server
5. The installer interrogates the Application Serverand displays the list of files to deploy (if it detectsan earlier version of the Webservice, it only propo-ses the files to update). The check boxes found inthe first column of the table of files allow you tomodify the list of files to deploy if necessary.6. Configure the automatic modification of theWebservice data.7. Specify the parameters for running the Webser-vice such as:• Maximum number of simultaneous connections.• Maximum number of simultaneous connections
from a given IP address.• Maximum duration of a request to the Webser-
vice.• You can also specify that a delayed deployment
will be performed.8. Specify whether the Application Server mustgenerate statistics when accessing the Webserviceand the generation directory of statistics. The sta-tistics can be viewed via WDStatistics.9. End the wizard to start the setup. A window dis-plays the progress of the operation and the possi-ble error messages.
Deployment from a management computer
To deploy the Webservice from a managementcomputer other than the development computer, asetup package must be generated by the wizard forsetup creation and it must be deployed by WDDe-ploy.To perform the deployment:1. Follow the steps of the wizard for Webservicegeneration.2. In the setup wizard, select "Create a remotesetup package".3. You can choose a deployment profile or give thischoice to the user of WDDeploy. A deployment pro-file groups the information about the ApplicationServer to use: server address, authentication infor-mation, etc.4. If you have chosen to use a profile, enter ormodify the connection parameter to the ApplicationServer: address, user name and password (thisinformation is provided by the Application Serveradministrator).
5. Specify the deployment parameters of the Web-service:• The deployment name: by default, it is the name
of the project, you can change it to allow for thedeployment of several instances of a project onthe same server, several projects of the samename or if the project name does not correspondto the requested name for the Webservice.
• The name of the sub-directory that will containthe HFSQL Classic data files of the Webservice:by default, it corresponds to the name of the pro-ject but it can be changed in order for two Web-services to share the same data files.
• The public address of the Webservice: by default,this address is built with the address of the Appli-cation Server.
6. The wizard displays the files that will bedeployed. You have the ability to add or removefiles.7. Configure the automatic modification of theWebservice data.8. Specify the parameters for running the Webser-vice such as:• Maximum number of simultaneous connections.• Maximum number of simultaneous connections
from a given IP address.• Maximum duration of a request to the Webser-
vice.• You can also specify that a delayed deployment
will be performed.9. Specify whether the Application Server mustgenerate statistics when accessing the Webserviceand the generation directory of statistics. The sta-tistics can be viewed via WDStatistics.10. Finally, choose the directory where the setuppackage of the Webservice will be generated aswell as the file name.
To install the Webservice:1. Start the WDDeploy tool from an administratormachine.2. Load the deployment package of the Webser-vice.3. Enter or modify the parameters of the Applica-tion Server and the deployment parameters of theWebservice.4. Click the "Deploy" button to trigger the deploy-ment of the Webservice. A window displays the pro-gress of the operation and the possible errormessages
WLangage.book Page 309 Jeudi, 20. mars 2014 4:29 16

310 Part 6: Communication
Deployment by physical mediaTo generate a setup by physical media of the Web-service:1. Follow the steps of the wizard for Webservicegeneration.2. In the setup wizard, select:• "Create a setup of the Webservice via physical
media" to be able to install the Webservice on anexisting WebDev Application Server.
• "Create a setup of the Webservice via stand-alone media" to be able to include the WebDevApplication Server (the limited, 10-connectionversion) and the Web server in the setup
3. The wizard displays the files that will bedeployed. You have the ability to add or removefiles.4. Configure the automatic modification of theWebservice data.5. For a stand-alone setup, you have the ability tochoose the Web server that will be included in thesetup.
6. The wizard displays a plane used to select theinstaller. The default installer (WBSetup) is suppliedwith the sources and it can be customized.7. You can choose the directories where the files ofthe Webservice as well as the data files (for a data-base in HFSQL Classic format) will be deployed. Bydefault, these elements will be associated with anaccount of the WebDev Application Server.8. Select the languages proposed to perform thesetup. WBSetup is supplied in French and inEnglish. To perform setups in other languages, allyou have to do is translate it via WDMsg (not sup-plied with the product).9. Finally, choose the directory where the setup ofthe Webservice will be generated.
To install the Webservice1. Copy the directory generated by the setup wizardonto the WebDev Application Server (or any othercomputer for a stand-alone setup).2. Starting the setup program: INSTALL.EXE.
WLangage.book Page 310 Jeudi, 20. mars 2014 4:29 16

Part 6: Communication 311
19. XML
19.1 Managing XML documents
19.1.1 OverviewWinDev proposes several functions used to handlethe XML code. The XML code used must complywith the XML standard. See a documentation speci-fic to XML for more details.
Reminder: XML is both a standard and a languagederived from HTML (Web pages, Internet, …) thatallows you to structure a document containingdata.The XML code is used for example:• in the information systems (Intranet, …).• in the dialogs with the Web services. See “Gene-
rating an XML Web service”, page 307 for moredetails.
19.1.2 DefinitionXML is a language containing tags and attributes(called "elements" in this help).The structure of the XML code corresponds to atree structure: information is organized in a treelikeway.An XML code (or content) corresponds to:• the content of an XML file.• a response from an XML Web service.
The WinDev XML functions allow you to:• Read, find and analyze the content of an XML file.• Analyze the answers received from XML Web ser-
vices.• Import data (HImportXML).
19.1.3 PrincipleTwo methods can be used to handle an XML docu-ment:1. Using a string variable to store the XML docu-ment. Then, the XML document can be handled bythe different XML functions.2. Using an xmlDocument variable. This method
allows you to use a XSD file.
19.1.4 Using a string variable
To handle an XML code:
1. Store the XML code in a string variable. Thiscode can come from an XML file or from an XMLWeb service.2. Create an XML document (XMLDocument). Thisdocument is stored in memory and it contains theentire XML code to use.3. Handle your XML document with the WLanguagefunctions. You have the ability to:• Browse the XML code (XMLFirst, XMLNext,
XMLLast, XMLPrevious, XMLParent, XMLChild,XMLRoot).
• Perform searches (XMLFind, XMLCancelSearch,XMLExtractString).
• Retrieve information about the elements (tags orattributes) found in the document. (XMLElement-Type, XMLElementName, XMLParentName, XML-Data).
• Modify the XML document (XMLAddAttribute,XMLAddChild, XMLInsertDocument, XMLInsertE-lement, XMLModify, XMLRename, XMLDelete).
• Run an XPath query in an XML document(XMLExecuteXPath, XMLPosition, XMLResult).
• Convert a character string in ANSI format to acharacter string in XML format and conversely(TextToXML or XMLToText).
4. Save the modifications (XMLBuildString and fSa-veText). 5. Close the XML document (XMLClose).Note: You also have the ability to create an XMLdocument:• with the data found in a table (TableToXML).• from a part of an existing XML document (XMLEx-
tractDocument).
WLangage.book Page 311 Jeudi, 20. mars 2014 4:29 16

312 Part 6: Communication
19.1.5 Using an xmlDocument variableThe xmlDocument variables can be declared byindicating a sample document (XML file) or a tem-plate document (XSD file). The structure of thisdocument will be read by WinDev/WebDev and itwill propose the automatic completion on thenames of nodes in the code editor.
To declare an xmlDocument variable with a sam-ple document:
1. Add the XML document into the project:• via the project’s element list.
To display this list, in the "Project" menu, in the"Project" group, click . In the window that isdisplayed, choose the "Add" button.
• by Drag and Drop of the file into the "XML descrip-tion" branch of the "Project explorer" pane.
• from the "Project explorer" pane (select the "XMLdescription" branch, then "Import an XML des-cription file" from the popup menu).
2. The XML document is displayed in the "XML des-criptions" branch of the project explorer. You havethe ability to view its structure.
3. Declare the variable as follows:
<Document Name> can correspond to the name ofthe sample document (with or without extension) orto the name of the template document (with orwithout extension).Notes:• This declaration can be obtained automatically
by dropping the name of the XML document fromthe project explorer.
• When using a sample document, you also havethe ability to use the following syntax:
4. You now have the ability to access the nodes ofthe variable by their names. These names are auto-matically proposed by the mechanism for automa-tic completion of the code editor.Note: XMLSave is used to save the XML document.If an XSD file was used, it will be automaticallytaken into account.
19.2 Managing the XSD
19.2.1 OverviewWinDev, WinDev Mobile and WebDev propose seve-ral functions for handling the XML code. The XMLcode used must comply with the XML standard. Seea documentation specific to XML for more details.See the XML help page for more details.WinDev, WebDev and WinDev Mobile allow you toimport files in XSD format.An XSD file contains the description of the XML fileof the same name. Knowing the structure of anXML document enables you to check the validity ofthis document. The description language for thecontent of an XSD document is also in XML format.An example of XSD file::
Followed by a valid XML file:
<Variable Name> is ... an xmlDocument, description ... = <Name of the document>
<Variable Name> is ... xmlDocument<Variable Name> = ... xmlOpen(<Document Name>)
<?xml version="1.0" ... encoding="UTF-8"?> <xsd:schema xmlns:xsd="http://www.w3.org/2001/XMLSchema"><xsd:element name="person"<xsd:complexType> <xsd:sequence> <xsd:element name="lastname" type="xsd:string"/>
<xsd:element name="lfirstname" type="xsd:string"/> <xsd:element name="dob" type="xsd:date"/> <xsd:element name="email " type="xsd: string" minOccurs=0 maxOccurs= unbounded /> </xsd:sequence> </xsd:complexType> </xsd:element></xsd:schema>
<?xml version="1.0" ... encoding="UTF-8"?><person xmlns:xsi="http://www.w3.org/2001/XMLSchema- ... instance" xsi:noNamespace... SchemaLocation="person.xsd"> <lastname>de Latour</lastname> <firstname>John</firstname> <dob>1967-08-13</dob> <email>[email protected]</email></person></WL code>
WLangage.book Page 312 Jeudi, 20. mars 2014 4:29 16

Part 6: Communication 313
19.2.2 Importing an XSD file into a projectTo import an XSD file into a project:1. Select "XML Description" from the "Project explo-rer" pane.2. Right click and select "Import an XML descrip-tion file".3. Select the XSD file of the description to import.4. Validate. The XSD is automatically added intothe project explorer (in the "XML description"branch). It is ready to use.
19.2.3 Using an imported description in the projectTo use the description of the XML document, all youhave to do is use the variables automatically gene-rated by the import.1. Declare an XML document in the format of theimported description. For example, if the imported
description is named ’person’
2. Initialize the different variables that are includedin the description of the XML document. For exam-ple, if the document includes the last name and thefirst name of a person.
Notes:• Each element is separated by a dot ..• A help is proposed when entering the names of
the variables.3. Save the content of the XML document withXMLSave.
19.3 Functions for managing the XML documents
The following functions are used to manage XML documents:
cMyDoc is xmlDocument ... <description="person">
cMyDoc.person.lastname="JOHNSON"cMyDoc.person.firstname="JOHN"
XMLSave(cMyDoc, ... "ListPersons.xml"
TextToXML Converts a character string in ANSI format into a character string in XML formatTableToXML Creates an XML file from the data found in a table (browsing table or memory
table)XMLAddAttribute Adds an attribute into an XML documentXMLAddChild Adds a child tag into an XML documentXMLCancelSearch Cancels the search that was started by XMLFindXMLFindNamespaceBy-Name
Finds an XML namespace from its name in an XML node and in the parents of thisnode
XMLFindNamespace-ByURI
Finds an XML namespace from its URI (Universal Resource Identifier) in a nodeand in the parents of this node
XMLBuildString Retrieves and formats the content of an XML document (created by XMLDocu-ment) and modified by the XML functions
XMLLast Positions on the last element of the current level in the tree structure or the lasttag of the hierarchy
XMLDocument Creates or defines a new XML document XMLValidDocument Validates an XML document from an XSD schemaXMLData Returns the value of the current element or tagXMLWrite Writes the value of an XML element or the value of the attribute of an XML ele-
mentXMLOut Allows you to find out whether the current position is valid or if the tag on which
we want to be positioned is outside the fileXMLExecuteXPath Runs an XPATH query in an XML documentXMLExtractString Extracts data from an XML codeXMLExtractDocument Creates a new XML document from an existing XML documentXMLChild Positions on the first child element of the current element or the first child tag of
the current tagXMLChildExist Indicates whether the current tag contains child elements corresponding to the
sought type (tag, attribute)
WLangage.book Page 313 Jeudi, 20. mars 2014 4:29 16

314 Part 6: Communication
XMLInsertDocument Inserts an XML document into another XML documentXMLInsertElement Inserts an XML element (tag or attribute) into an XML documentXMLRead Returns the value of an XML element or the value of the attribute of an XML ele-
ment. XMLModify Modifies the content of the current element found in the XML documentXMLNamespace Returns the prefix of the namespace used for the current tag in an XML documentXMLNamespaceURI Returns the URI for defining the namespace used for the current tag in an XML
documentXMLValidNode Validates an XML node, its children and its attributes from its description in the
XSD schema linked to the XML document.XMLElementName Returns the name of the current element or tagXMLParentName Returns the name of the parent element of the current element or the name of
the parent tag of the current tagXMLOpen Loads an XML document from a file, a URL or a string in an xmlDocument variableXMLParent Positions on the parent element of the current element or on the parent tag of the
current tagXMLPath Returns the current position in the document in XPATH formatXMLPrevious Positions on the previous element of the current level in the tree structure or on
the previous tagXMLFirst Positions on the first element of the current level in the tree structure or on the
first tag foundXMLRoot Positions on the root tag of the XML documentXMLFind Performs a search in an XML documentXMLRename Renames the current element (tag or attribute) in an XML documentXMLResult Returns the result of a calculation XPATH query. This query was run by XMLExecu-
tePathXMLRestorePosition Restores the context of an XML document (previously saved by XMLSavePosition).
The filter used when saving the position can be restored.XMLSave Saves an XML document in a file.XMLSavePosition Stores the current position in an XML document. XMLNext Positions on the next element in the current level of the tree structure or on the
next tag of same levelXMLDelete Deletes the next element in the current level of the tree structureXMLClose Closes an XML document that was created by XMLDocumentXMLFound Allows you to find out whether an element was found during the browseXMLElementType Returns the type of the current element or the type of the value for the current tagXMLToText Converts a character string in XML format into a character string in ANSI format
See the online help for more details.See the online help to check the availability of these functions in the different products (WinDev, WebDev,WinDev Mobile).
WLangage.book Page 314 Jeudi, 20. mars 2014 4:29 16

Part 6: Communication 315
20. .NET ASSEMBLIES
20.1 Overview
20.1.1 DefinitionThe .NET technology corresponds to the new deve-lopment platform of Microsoft. This .NET platformgreatly simplifies the development of distributed-object applications whose modules communicatevia Internet.
This chapter only provides an overview of how touse the .NET technology in WinDev. See a specificdocumentation for more details.
20.1.2 WinDev and .NETYou have the ability to create .NET programs (or.NET assemblies) from a WinDev application.These .NET assemblies are directly created fromthe WinDev classes (with all the benefits from thecode editor, the documentation editor, …).
You also have the ability to use .NET assemblies(not created by WinDev) in a WinDev or WinDevMobile application, or in a WebDev site:• in a new application: specify the use of the .NET
assemblies in the wizard for project creation.• in an existing application: select the .NET assem-
blies to use.
This chapter presents:• the conditions required for handling a .NET
assembly.• the creation of a .NET assembly.• the creation of the setup program for a .NET
assembly.• how to use a .NET assembly in an WinDev appli-
cation.
See the online help (keyword: ".NET assembly") formore details.
20.2 Conditions for using a .NET assembly
To create and use a .NET assembly with WinDev,you must:• Installing the .NET Framework on the current
computer.• define the .NET security level.• make the DLLs required to run the .NET assembly
accessible.
20.2.1 Installing the .NET frameworkTo install the .NET framework on the current com-puter:• Method 1: Using Windows Update1. Open the control panel of Windows ("Start ..Parameters .. Control Panel") and select "Add/Remove Programs".2. Click "Add new programs".3. Click "Windows Update".4. Find the setup of the .NET Framework.5. Install the .NET Framework.
• Method 2: Download from the Internet site ofMicrosoft
1. Consult the Microsoft site.2. In the "Microsoft Download Center" section, findthe setup of the .NET Framework.3. Install the .NET Framework.
20.2.2 Defining the .NET security levelTo define the .NET security level:1. Open the control panel of Windows ("Start ..Parameters .. Control Panel") and select "Adminis-trative Tools".2. Select "Microsoft .NET Framework Wizards". Thewindow of the .NET wizard is displayed.3. Click "Adjust the .NET security".4. Select "Apply the modifications to this computer"and click "Next".5. Select "My computer" and configure the securityto "Full trust".
Note: To run a .NET program available on the localnetwork, select the "Local Intranet" icon and set thesecurity to "Total trust".
WLangage.book Page 315 Jeudi, 20. mars 2014 4:29 16

316 Part 6: Communication
20.2.3 Making the DLLs required to run the .NET assembly accessibleTo make the DLLs required to run the .NET assem-bly accessible:1. If needed, copy the "WD190NET.DLL" library:• into the creation directory of the .NET assembly.• into the "Assembly" sub-directory of the setup
directory of Windows.2. Copy (if necessary) the WinDev libraries:• into the creation directory of the .NET assembly.• into the PATH.
Reminder: The PATH list the directories in whichthe executable (".EXE" files) and the libraries(".DLL" files) are sought first.
20.3 Creating a .NET assembly from WinDev
Before creating a .NET assembly, all the elementsrequired by this assembly must have been develo-ped in a WinDev project.
To create a .NET assembly:1. Open the WinDev project from which the .NETassembly must be created.2. Create (if necessary) a project configuration of".NET assembly DLL" type containing all the neces-sary elements.3. On the "Project" pane, in the "Generation" group,click "Generate". The wizard for creating a .NETassembly starts.4. Select the different WinDev elements (project,windows, classes, …) that will be included in the.NET assembly.The "Add" button enables you to add an element tothe .NET assembly: images, text files, …The "Remove" button enables you to delete an ele-ment from the .NET assembly. The correspondingfiles and their dependencies will not be included inthe .NET assembly.The "WDU" button enables you to display the ele-ments found in a library that was previously crea-ted.Note: If the WinDev project (".WDP" file) is selected:• the project analysis will be associated with the
.NET assembly.• the initialization process of the project will be run
when the .NET assembly is initialized.• the ending process of the project will be run
when the .NET assembly is closed.5. Select the WinDev classes (".WDC" files) thatmust be made accessible. These classes can be handled from the applicationthat will use the .NET assembly.6. Configure the error message if necessary.This message will be displayed if an error occurswhen using the .NET assembly.
The "Default" button is used to configure a defaulterror message.7. Specify (if necessary) the information about the.NET assembly: description, version, copyright, …The "Advanced" button enables you to define addi-tional properties specific to the .NET assembly.8. Enter the name of the .NET assembly.The "Compilation options" and "Advanced proper-ties" buttons enable you to access the advancedoptions of the .NET assembly. See "Advancedoptions" for more details.9. Validate.
Limitations: You cannot:• rename an existing .NET assembly.• include the classes of a component in a .NET
assembly.
Advanced optionsThe "Compilation options" button allows you toselect a specific C# compiler and to specify additio-nal compilation options.
The "Advanced properties" button is used to definewhether the .NET assembly must be accessible bya program that uses the COM technology. In thiscase, you must:• select the different classes accessible from this
program.• create a strong-named .NET assembly. The
assembly will be authenticated and it will be pos-sible to check its origin.
• specify the ".SNK" file to use. This file containsthe encryption keys used for authenticating the.NET assembly.
• specify whether the delayed signature mecha-nism must be used. This mechanism allows youto not authenticate the .NET assembly during itsdevelopment.
WLangage.book Page 316 Jeudi, 20. mars 2014 4:29 16

Part 6: Communication 317
20.4 Creating a .NET assembly accessible by COM
20.4.1 OverviewBefore creating a .NET assembly, all the elementsrequired by this assembly must have been develo-ped in a WinDev project.
20.4.2 Creating a .NET assembly accessible by COM from a WinDev projectTo create a .NET assembly accessible by COM, youmust:
1. Create a ".snk" file.The snk file contains the "public key/private key"pair used to digitally sign the assemblies created bya company. In most cases, the same snk file isused to sign al the products of a company.This file must be kept secret in order to prevent athird party from signing its own assemblies with thesame signature.To generate a ".snk" file, you must use the genera-tor supplied with the .NET SDK (sn.exe file). The fol-lowing command line must be used to generate asnk file: "sn.exe -k MySNKFile.snk"Un fichier exemple est fourni avec WinDev, dans lerépertoire "Programmes\Donnees\Example.snk"du répertoire d’installation de WinDev. This file isused to test the generation of strong-named assem-blies.Note: this file being distributed with WinDev, it doesnot allow you to uniquely identify the generatedassemblies.
2. Modifying the code of the classes found in theWinDev project• The class must have a constructor without argu-
ment (this is the only constructor that can beused by COM),
• The static members will not be accessible byCOM,
• The overloaded methods are renamed in COM.
3. In the wizard for generating .NET assemblies,select the following options:• Check "Accessible by COM",• Specify the location of the snk file that was pre-
viously created.
4. Copying the generated assembly into the direc-tory of shared assemblies of Windows:• Copy the assembly into the C:\Windows\Assem-
bly directory,• Copy the wd190net.dll library into the c:\Win-
dows\Assembly directory (otherwise the instanti-ation of the COM object will fail with a "file notfound at the specified location" error),
• Check whether WD190VM.dll is found in thedirectory of PATH.
To use an assembly in a C++ programThese operations must be repeated whenever loa-ding a GUID of interfaces:1. Import the assembly: "regasm MyAssembly.DLL/tlb:MyAssembly.tlb".2. Use the tlb file generated in the C++ project. 3. Recompile the C++ project.
20.5 Creating the setup program of a .NET assembly
The method for creating the setup program of a.NET assembly is identical to the method for crea-ting the setup program of a standard WinDev appli-cation.
See the online help for more details (keyword:"Setup of a WinDev application").
20.6 Using .NET assemblies in a WinDev application
To include .NET assemblies in the current applica-tion:1. On the "Project" pane, in the "Project" group,expand "Import" and select "Import a .Net assem-bly".2. Select the .NET assemblies that will be includedin the current application.
3. Validate.
The method for using a .NET assembly is identicalto the method for using a WinDev class.
Reminder: The classes are visible in the "Projectexplorer" pane.
WLangage.book Page 317 Jeudi, 20. mars 2014 4:29 16

318 Part 6: Communication
WLangage.book Page 318 Jeudi, 20. mars 2014 4:29 16

PART 7
Data files
WLangage.book Page 319 Jeudi, 20. mars 2014 4:29 16

WLangage.book Page 320 Jeudi, 20. mars 2014 4:29 16

Part 7: Managing the data files 321
1. MANAGING DATA FILES
WinDev, WinDev Mobile and WebDev enable you tomanage data files in HFSQL format ("WinDev/Web-Dev" format), in xBase format and in any databaseaccessible by an OLE DB driver.This chapter presents concepts for managing datafiles in format recognized by WinDev/WebDev.To make reading and understanding these con-cepts easier, we recommend that you only read the
chapters that are relevant to you. You can always goback and read the other chapters when you want touse another feature.We sometimes refer to programming functions.These functions are presented in details in theonline help.Note: HFSQL is the new name of HyperFileSQL.
1.1 HFSQL data file management
This section explains the mechanism for managingthe HFSQL data files:• creating a data file,• automatic opening and closing of the data files,• managing the keys,• accessing the records.xBase data file management is not discussed inthis chapter, it has its own chapter, “The data filesin FoxPro xBase format”, page 331.The long names: The long names are supported: you have the abilityto create data files with long names. To create data files with long names, long namesmust be supported by the environment where theprogram will run (or by the Web server environmentwhere the program will run) and by the disk wherethe data files will be created.For example, long names cannot be used withsome networks that don’t support long names butcan be used with Windows XP, 7, ...
1.1.1 Create a data fileTo access a data file, this one must exist on disk.Otherwise, it must be created. The physical datafile is created:• by programming.• if the "Automatically create the data files if not
found when they are opened" options is selectedin the "File" tab of the project description. Remin-der: To display the project description, on the"Project" pane, in the "Project" group, click "Des-cription".
Note: the physical file is not created by generatingthe analysis or by the setup procedure.Two functions can be used to create a data file:• HCreate to create an empty data file (and possi-
bly the index and memo files). If the data filealready existed, it is overwritten by an empty datafile (it is re-created).
• HCreationIfNotFound to create the data file if itdoes not exist or open the data file if it exists.The data file and possibly the index and "memo"files are created empty.
The data file is created:• Under the name (called "Name on disk") defined
in the analysis (except if HChangeName was cal-led before HCreation).
• In the directory defined in the analysis, except ifHSubstDir or HChangeDir was called beforeHCreation or HCreationIfNotFound.
When the data file is created, it is empty: it onlycontains a header. This header contains informa-tion specific to the data file. It is used by WinDev/WebDev for managing the file.
1.1.2 Opening and closing data filesThe data files are automatically opened and closed.This process is described here for imformationpurpose.WinDev/WebDev manages the list of data filesused at a given time by the program.When a function applies to a data file, it the file isnot part of the list of used file, the data file is auto-matically opened.An unlimited number of files can be opened at thesame time.If a closed data file is used later in the program, itwill be automatically re-opened according to thesame process.This is true for any new data file used.
WLangage.book Page 321 Jeudi, 20. mars 2014 4:29 16

322 Part 7: Managing the data files
1.1.3 Managing HFSQL files larger than 2GBBy default, the HFSQL engine allows you to managelarge data files (up to 2 gigabytes).The data files exceeding 2 gigabytes require a spe-cific configuration in the data model editor and inthe hardware.Indeed, to manage the data files exceeding 2 giga-bytes, you must use:• An operating system that supports the files
exceeding 4 gigabytes. The following operatingsystems do not support files exceeding 4 gigaby-tes: Windows 95, Windows 98, Windows Me.
• A file system that supports the files exceeding 4gigabytes (NTFS for example in Windows)
WinDev: This configuration is required both on thecomputer where the data files are installed and thecomputers that access these files. Therefore, acomputer running Windows 98 cannot access adata file exceeding 2 gigabytes installed on Win-dows 2000.WebDev: This configuration is required both on theWeb server and on the data server.WinDev Mobile: The memory capacity being limitedon a Pocket PC, this option is not supported.
Configuring the data files
To manage the data files exceeding 2 gigabytes:1. Display the data file description ("Description ofdata file" from the popup menu).2. In the "Details" tab, select the "Manage files over2 GB" option.Caution: These data files can only be used from acomputer running an operating system that sup-ports the files exceeding 4 gigabytes.
Using data files exceeding 2 GB
Dynamic description of data filesDuring the dynamic description of a data file (viathe HFSQL properties and HDescribeFile), ..Huge-File enables you to configure the managementmode of the data file size.
Caution: Reindexing data files exceeding 2 GB canbe a long operation.
1.1.4 Managing the keysAn item can be defined as unique key, multiple keyor not a key when describing a data file.If the item is described as key (unique or with dupli-cates), the item can be used as a search criteria for
the data file.Depending on the item type, the key can be a textkey or a numeric key.
General definitions
• The text, date and time items, when defined askeys, are called text keys.
• When they are defined as key, the integer (short,long, etc.), real (simple, double, etc.), radio but-ton, combo box and list box items are callednumeric keys.
• A composite key is a key made of text and/ornumeric items.Note: a composite key can be made of the identi-fier of the data file.
Unique keys and keys with duplicates
DefinitionsA key is unique when the value of the item is uniquefor each record in the data file.A key is called a duplicate key when the value of theitem can be the same for several records in thedata file.Checking the uniqueness of a keyWhen HSetDuplicates is enabled:• Automatically check the uniqueness of the key
(WinDev only). When a key with duplicatesappears after the addition or the modification ofa record, a message is automatically displayed,allowing the user to modify the item causing aproblem. This automatic management mode canbe customized. See the online help for moredetails.
• Check by programming. All you have to do ischeck HErrorDuplicates after any function thatmay trigger the creation of duplicates.
// Add a record (WinDev)FileToScreenHAdd(CUSTOMER)IF HErrorDuplicates() THENInfo("A record already exists", ... "It is not added")END
// Add a record (WebDev)FileToPageHAdd(CUSTOMER)IF HErrorDuplicates() THENInfo("A record already exists", ... "It is not added")END
WLangage.book Page 322 Jeudi, 20. mars 2014 4:29 16

Part 7: Managing the data files 323
Note: If the modified or added key is not unique,the functions that may trigger the creation of dupli-cates are: HAdd, HModify or TableSave.
If HErrorDuplicates is not called, the error 10 (dupli-cate error) will be automatically generated duringthe next call to a function for file management. Thiserror cannot be ignored: all the data files are closedand the program execution is canceled.The management of duplicates is enabled bydefault.If the management of duplicates is disabled, thecheck of the key uniqueness is not managed.If the management of referential integrity is ena-bled (HSetIntegrity), the management of duplicatesis automatically enabled.Identifier: WinDev/WebDev proposes the automaticmanagement of a file identifier (unique key). Theidentifier management is presented in “Managingan identifier”, page 339.
Search on text keys
Definitions
• The search criterion is the name of the key (item)used for the search.
• The search argument is the value sought for thiskey.
• The argument can be:• A full value, it is called an exact-match search.• A partial value, it is called a generic search.
ExampleWhen a generic search is performed on "Martin"(NAME item), all the records whose Name itemstarts with "Martin" will correspond to the search.Therefore, the record containing "Martinez" will cor-respond to the search (HFound returns True).When an exact-match search is performed on"Martin" (NAME item), HFound returns True for allthe records whose NAME item exactly matches"Martin".
Note: You have the ability to define specific searchcriteria when the key is described in the data modeleditor. You can define whether the item will be:• Sensitive to the case (uppercase/lowercase cha-
racters): For example, PC SOFT will differ from PCSoft.
• Sensitive to the accented characters: For exam-ple, "été" will differ from "ete".
• Sensitive to the punctuation (comma, period, ...):For example, "C.E.O." will differ from "CEO".
These different criteria will be automatically takeninto account when a search is performed on the keyitem.
Search on numeric keys
Encoding of numeric keysThe numeric items (int, long int, real, ...) are storedin the data files according to the binary format spe-cific to the language used.However, in the index file, the numeric keys areencoded differently (to simplify and speed up thesearches).Example: If the encoding of an integer is the one ofthe language, the negative value is "lexicographi-cally" greater than the positive value (the first bit,the sign bit, is set to "1"). In the index file, the enco-ding is used to restore the order, which means that
Sought Value Options Currentrec
HFound returns
Explanations
Durand 1 True Durand exists.Dupuis 1 False Dupuis does not exist. Positions on the first
greater value (Dupont).Dupon hGeneric 8 True Dupon does not exist but the search is generic
and a customer named Dupond343 existsamong others).
Dupon 8 False Dupon does not exist.Martin 4 True Martin exists.
WLangage.book Page 323 Jeudi, 20. mars 2014 4:29 16

324 Part 7: Managing the data files
the code of a negative value will be "lexicographi-cally" less than the code of a positive value.
Managing the numeric keysImportant: A search performed on a numeric keyis always performed as an exact-match search,which means that the search is performed on thefull size of the item.Example: The zip code can be a text item or a longinteger item. Therefore, the key will be a text key ora numeric key.
For a text key, the search on the first two characterswill allow a search on the state. This type of searchwill not be possible for a numeric key.
Tips• The text keys are easier to use than the numeric
keys but they occupy more space in the data fileand in the index file.
• The numeric keys of real type should be avoided.The rounding specific to the encoding of the realsin the language may disturb the search.
1.1.5 Managing the composite keysA composite key is a key item containing severalother items. These items can be numeric items ortext items.A composite key is used to simplify the searchesperformed on several criteria.The composite keys are binary items. Their valuecannot be directly displayed (in a trace or in a con-trol).
Creating a composite key
A composite key is directly created in the datamodel editor.To create a composite key in a file description:1. Display the description of the file items ("Des-cription of items" from the popup menu).2. Click the icon . A screen allowing you to buildthe composite key is displayed.3. The list of items found in the data file is dis-played in the table on the left. Double-click theitems that must be included in the composite key.These items are displayed in the table on the right.4. Reorganize (if necessary) the items included inthe composite key. Caution: the order of items isvery important because it defines the sort order.For example, the "Name + State" composite key willbe sorted on the name then on the state.
5. Specify the search direction and the searchparameters for each key component.6. Validate. The composite key is displayed in thelist of data file items.
Composite key and link
The composite keys can be used in the linksbetween files. When describing the analysis, thecomposite key found in the linked file does no lon-ger appear as a composite key but as a binary key.You will not be able to access the different compo-nents of the composite key in the linked file.Note: The referential integrity is managed on a"composite key" link key.
Value of a composite key
A composite key is stored as a binary string. Itsvalue cannot be displayed (neither in a control norin the debugger, ...).
Adding a record containing a composite keyWhen adding or modifying a record containing acomposite key, the value of the composite key isautomatically defined according to the values ofthe different key components. No specific program-ming is required.
Adding a record containing a composite key into alinked fileWhen a record containing a composite key is addedinto a linked file, the value of the key must be built.Indeed, in the linked file, the composite key is notconsidered as being a composite key but as being abinary key. Therefore, a value must be assigned toit.This value can be assigned:• directly. For example, a record was added into the
Customer file. To add the value of the key into thelinked file, all you have to do is perform a directassignment: Link.NameDate = Customer.NameDate
• via HBuildKeyValue. This function is used to buildthe value of the composite key from its compo-nents.
Building the value of a composite key to imple-ment a search or a filterWhen a filter or a search is implemented on a com-posite key, the value of the composite key must bedefined (to define the lower bound and the upperbound of the filter for example).
WLangage.book Page 324 Jeudi, 20. mars 2014 4:29 16

Part 7: Managing the data files 325
Several solutions can be used to build the value ofa composite key:• Using HBuildKeyValue• Using an array of values
Using HBuildKeyValueTo do so, the relevant file, the name of the key andthe values of the components must be specified inHBuildKeyValue.Example: To build the name of the "NAMEDATE"composite key corresponding to "CUSTOMER-NAME+DATE_ENTERED" of the Customer file, usethe following code line:
Using an array of valuesAll you have to do is specify the values of the com-posite key during the search or the filter.Example: To create a filter on the "Customer" file,on a composite key made of the name and thedate, all you have to do is write:
Properties for managing the compo-site keys
The following properties are used to manage thecomposite keys by programming:
The composite keys can be used to perform:• exact-match searches,• generic searches,• filters.
See the online help for more details.
1.1.6 Accessing the data file itemsFile record and variable
A record is made of items. The items are definedduring the description of the data file.In the programs, each item is handled by a variable(called file variable) with a defined name and type.The syntax of this variable includes the logicalname of the data file and the name of the item<FileName>.<ItemName>
Example: the variable of the "CUSTNAME" item(customer name) of the "CUSTOMER" file is namedCUSTOMER.CUSTNAMENote: The file variables must not be declared. Allthe record variables are automatically describedand declared by WinDev/WebDev.
Case of the composite keysA composite key can be directly read without goingvia the items included in it. All you have to do isread the variable like any item.
This operation is not recommended.For example, NAMEDATE is a composite key madeof the NAME and DATE items.
Note: Attempting to write into a composite key hasno effect. Indeed, the composite keys are rebuiltduring each write operation.
Pointed record and record loaded in memory
The notions of pointed record and record loadedinto memory are fundamental. It is important tounderstand them in order to properly use the func-tions for managing the data files.The pointed record corresponds to the last recordread according to the specified key. The notion ofpointed record is relative to a key.The record loaded in memory corresponds to thefile record whose values are currently loaded in theprogram variables.At a given time, there can only be a single recordloaded in memory for a data file and a single poin-ted record for the same data file. However, the record pointed by the index and therecord loaded in memory can be different.Special case: when the management of contexts isenabled in the windows or in the pages, each con-text is used to handle different records of the samedata file. There will be a single record loaded inmemory per context.
HBuildKeyValue(Customer,... NAMEDATE,"MARTIN","03/11/85")
HFillter(Customer,DATENAME, ... ("SMITH","03/11/85")
Binary Identifies a binary item (compo-site key, binary string, binarymemo)
CompositeKey Checks whether the specifieditem is a composite key
Component Returns the name of the nthcomponent of a composite key
KeyExpression Returns the expression of a com-posite key
NbComponent Returns the number of compo-nents in a composite key
Info(INVOICE.NAMEDATE)// Displays the composite key value
WLangage.book Page 325 Jeudi, 20. mars 2014 4:29 16

326 Part 7: Managing the data files
Reading a record, automatically or upon request,initializes the different variables of the file with therecord loaded in memory.Writing a record means writing the data file varia-bles into the file when saving the record loaded inmemory.
Note: The following table identifies the record onwhich the functions that position on record operate:the record loaded in memory or the pointed record. The functions not listed in the table use no record.
Reading a record1. Read functionsHReadSeek, HReadSeekFirst, HReadSeekLast,HReadFirst, HReadLast are used to read a record.These functions load a record into memory andthey point to a record in the index.HRead is used to read a record without pointing therecord in the index.HReadNext and HReadPrevious are used to read arecord if this record was pointed by HReadSeek,HReadFirst or HReadLast.Important: HRead is used to read a record accor-ding to its record number, the pointed record is notinitialized. Therefore, HReadNext and HReadPre-vious cannot be called immediately after HRead.However, the pointed record can be initialized byHChangeKey after HRead: HReadNext and HRead-Previous can be used to browse the data file on thekey positioned by HChangeKey.
2. Read operation according to a keyHReadSeek, HReadSeekFirst, HReadSeekLast,HReadPrevious, HReadNext, HReadFirst, HRea-dLast are used to read a record according to thekey that was specified in parameter. The same datafile can be read according to multiple keys.
Seeking a record
HReadSeek, HReadSeekFirst, HreadSeekNext,HReadPrevious, HReadNext, HSeek, HSeekFirst,HSeekLast, HPrevious, HNext are used to find arecord:• HReadSeekXX (or HSeekXX) starts the search.• HReadNext, HReadPrevious (or HNext, HPre-
vious) access the next or previous record.If the record corresponding to the search is found,HFound returns True. Otherwise, it returns False.When seeking a record according to a key, you mustcheck HFound.
Functions positioning a record Record loaded in memory Pointed recordHAdd xHChangeKey xHLast xHWrite xHRead xHReadLast x xHReadPrevious x xHReadFirst x xHReadSeek x xHReadSeekLast x xHReadSeekFirst x xHReadNext x xHModify xHPrevious xHFirst xHSeek xHSeekLast xHSeekFirst xHCross xHRestorePosition xHSavePosition xHNext xHDelete x
WLangage.book Page 326 Jeudi, 20. mars 2014 4:29 16

Part 7: Managing the data files 327
Browsing data files1. PrincipleThe notions of next record and previous record arerelative to the pointed record for a specific key.To be able to read the next or previous record, thepointed record must necessarily be initialized.Otherwise, the error 19 will be generated.The following functions initialize the pointed record:HReadSeek, HReadSeekFirst, HReadSeekLast,HReadFirst, HReadLast, HSeek, HSeekFirst,HSeekLast, HLast, HFirst, HChangeKey.The data files are accessible via the values of thekeys sorted in ascending order. However, a data file
can be read in both directions (ascending or des-cending).Caution: The sort directions of the keys as well asthe search characteristics (accentuation, case andpunctuation) specified in the analysis are takeninto account.
The first record of a data file according to a key isthe one (or one among several) corresponding tothe smallest value of the key. It is reached by HFirstor HReadFirst.The last record of a data file according to a key isthe one (or one among several) corresponding to
Mechanism for reading filesLet’s take a look at an example that illustrates the mechanism for reading a file according to a key.The "PEOPLE" file includes two key items :"CODE": customer number."FIRSTNAME": first name of customer."PEOPLE" contains the following 8 records:
In this file, let’s see the evolution of the record loaded in memory and the evolution of the pointedrecord during the program execution:
Record number CODE FIRSTNAME
1 17 Fabian
2 12 Edgar
3 18 Charlotte
4 05 Louis
5 01 John
6 20 Lara
7 09 Franck
8 14 Mary
Functions Record poin-ting to CODE
Record poin-ting to FIRST-NAME
Record inmemory
Beginning of program ? ? ?HReadFirst(PERSON,CODE) rec.5 ? rec.5
HReadFirst(PERSON,LASTNAME) rec.5 rec.3 rec.3
HReadNext(PERSON,CODE) rec.4 rec.3 rec.4
HReadNext(PERSON,CODE) rec.7 rec.3 rec.7
HReadNext(PERSON,LASTNAME) rec.7 rec.2 rec.2
HReadNext(PERSON,LASTNAME) rec.7 rec.1 rec.1
HReadNext(PERSON,LASTNAME) rec.7 rec.7 rec.7
HReadNext(PERSON,CODE) rec.2 rec.7 rec.2
Etc. ... ... ...
WLangage.book Page 327 Jeudi, 20. mars 2014 4:29 16

328 Part 7: Managing the data files
the highest value of the key. It is reached by HLastor HReadLast.
The record found before or after the pointed recordare reached by the following functions: HReadNext,HReadPrevious or HNext, HPrevious.Example of ascending browse:
2. Positioning outside the data fileAfter the execution of HReadLast, HReadPrevious,HReadFirst, HReadSeek, HReadNext and HLast,HPrevious, HFirst, HSeek, HNext, if the pointedrecord points to the last record loaded in memory,HOut returns True.Therefore, when browsing a file, you must checkHOut after running one of the above-mentionedfunctions.
3. Changing the search keyThe search key can be modified by HChangeKey. Inthis case, the current record is kept even thoughthe search key is modified.HChangeKey can be used to find a record afterbeing positioned in direct access on a record byHRead.For example, the line:
can replace the following algorithm:
4. Browse with duplicatesIn case of equality on the value of a key (duplicates,the order of the records is not significant. The firstrecord returned will be one of the records corres-ponding to the sort argument.HReadNext or HReadPrevious are used to get allthe homonyms.Important: No hypothesis should be made regar-ding real location of the record. Indeed, on a searchvalue with homonyms, a HReadNext loop cannot beused to find out the order in which the homonymswere inserted.
5. Browse according to a filterYou have the ability to define a filter in order toselect records. This filter can:• browse the data file according to the bounds and
select the records corresponding to the filter. Thebounds are defined according to a data file key.
• browse the data file according to the specifiedselection condition. The search key of the datafile is returned by HFilter according to the speci-fied condition.
The selection of records according to the filter isautomatically managed.The filter (lower and upper bounds or selection con-dition) is described by HFilter.The filter is automatically enabled. It can be ena-bled/disabled by programming with HActivateFilterand HDeactivateFilter.
N°.Rec
Last name FirstName
Position
1 GONZALEZ Speedy2 MOUSE Mickey3 TALON Achille first according to
FIRSTNAME4 LAGAFFE Gaston5 DALTON Avrell first according to
LASTNAME6 VAILLANT Michel last according to
LASTNAME7 ONEAU Yoko last according to
FIRSTNAME8 MALTESE Corto
HReadFirst(CUSTOMER,Name)WHILE NOT HOut() PrintLabel() HReadNext(CUSTOMER,Name)END
HChangeKey(CUSTOMER,CUSTNAME)
RecNum is int// Stores record #// for current CustomerRecNum=HRecNum(CUSTOMER)// Move relatively to the CUSTNAME keyHSeek(CUSTOMER,CUSTNAME,... CUSTOMER.CUSTNAME)WHILE NOT HOut() AND ... RecNum<>HRecNum() HNext(CUSTOMER,CUSTNAME)END
WLangage.book Page 328 Jeudi, 20. mars 2014 4:29 16

Part 7: Managing the data files 329
Filter and composite keyTwo methods can be used to create a filter on acomposite key:• Using the advanced filter functions (HFilter-
StartsWith, HFilterIncludedBetween, HFilterIden-tical). All you have to do is specify, for each com-ponent of the composite key, the value to takeinto account for the filter. This method is recommended. See the documentation about these functions formore details.
• Using HFilter combined with HBuildKeyValue.This method is presented in the paragraphsbelow.
Notes• The filter can be used in external language (Win-
Dev only).• A single filter can be defined per file at a given
time.• A filter is enabled:
•on the search key on which it was defined,•on the search key returned according to the
selection condition.• If a filter is enabled, HFirst, HReadFirst, HRead-
FirstLock, HReadFirstNoLock return:•the first record corresponding to the filter,•HOut returns True if no record corresponds to
the filter. For a filter on key with defined bounds, the cur-rent record is the first record whose key is grea-ter than <LowerBound> (if it exists).
• If a filter is enabled, HLast, HReadLast, HRea-dLastLock, HReadLastNoLock return:•the last record corresponding to the filter,•HOut() set to True if no record corresponds to
the filter. For a filter on key with defined bounds, the cur-rent record is the first record whose key is grea-ter than <UpperBound> (if it exists).
• If a filter is enabled, HNext, HReadNext, HRead-NextLock, HReadNextNoLock return:•the next record corresponding to the filter,•HOut returns True if no other record corres-
ponds to the filter.For a filter on key with defined bounds, the cur-rent record is the first record whose key is grea-ter than <UpperBound> (if it exists).
• If a filter is enabled, HPrevious and HReadPre-vious return:•the previous record corresponding to the filter,
•HOut returns True if no other record corres-ponds to the filter.For a filter on key with defined bounds, the cur-rent record is the first record whose key is lessthan <UpperBound> (if it exists).
Addition, deletion and modification of a record
You have the ability to add, modify or delete arecord in a file:• HAdd adds a record,• HWrite writes a record,• HModify modifies a record,• HCross and HDelete delete a record.HAdd, HModify, HCross and HDelete use the recordloaded in memory.Before deleting or modifying a record, the recordloaded in memory must be initialized by HRead,HReadFirst, HReadLast, HReadNext, HReadPre-vious or HReadSeek, HReadSeekFirst,HReadSeekLast, otherwise an error will be genera-ted (see appendix).Important: In the browsing tables, to delete arecord, you must use TableDelete (instead of HDe-lete). To write a record, you must use TableSave(instead of HAdd, HModify, ...).Note: HCopyRecord is used to copy the currentrecord of a data file into the current record of ano-ther data file with the same structure. See “Mana-ging aliases”, page 336 for more details.
Assigning the file variables and the window or page controls
A file’s data can be presented in a window or in apage:• in a form: one record per window or per page• in a table: one record per table row
Presentation in formIf the controls found in a window or in a page arelinked to items, the values of the controls can beassigned to the file variables (or conversely) via asingle function:• ScreenToFile/PageToFile assigns the value of the
controls on the screen to the corresponding filevariables
• FileToScreen/FileToPage assigns the value of thefile variables to the corresponding controls on thescreen.
The file variables can also be assigned individually.For example:
NAME=CUSTOMER.NAMECUSTOMER.CITY=CITY
WLangage.book Page 329 Jeudi, 20. mars 2014 4:29 16

330 Part 7: Managing the data files
Important• Assigning the file variables does not actually
modify the file: the modification is only perfor-med when the record is written (by HAdd, HMo-dify, ...).
• If several controls are linked to the same data fileitem, FileToScreen/FileToPage and ScreenToFile/PageToFile may behave randomly.
Presentation in tableScreenToFile/PageToFile and FileToScreen/FileTo-Page must not be used in the browsing tables.In tables, assigning the table columns with thevalues of the file items (or conversely) is automati-cally managed.The management of files in the tables, called"browsing tables", is specific. It is presented in theonline help.
1.1.7 Schemas: the form mode and the table mode
Managing a file in form to form mode
Managing a file in table mode
1.1.8 Moving and positioning in a data fileThree WLanguage functions can be used to posi-tion or move in a data file without actually browsingthe data file.
Example
HSetPosi-tion
Used to position in a data file accor-ding to a key or to find out the posi-tion of the current record relative toa key in relation to the total numberof records
HForward Used to move forward severalrecords at a time from the currentposition according to a given key
HBackward Used to move backward severalrecords at a time from the currentposition according to a given key
// Position at 50% of CUSTOMER on // the CUSTNAME key // from the last oneMaxRec is intMaxRec = HNbRec()HLast(CUSTOMER, CUSTNAME)HBackward(CUSTOMER,CUSTNAME, MaxRec/2)IF HOut() THEN
Error("Outside position")ELSE Info("Position: rec="+... hRecNum()+" Customer = "+... CUSTOMER.CUSTNAME)END
WLangage.book Page 330 Jeudi, 20. mars 2014 4:29 16

Part 7: Managing the data files 331
1.2 The data files in FoxPro xBase format
1.2.1 OverviewA module for Native xBase/FoxPro Access is availa-ble with WinDev and WebDev. This Native Accessallows you to handle the xBase files from a WLan-guage program without using an external driver.Required configurationThe following files are supplied with WinDev/Web-Dev: WD180DB.DLL. This file is required by theNative Access to the xBase/FoxPro files in order towork with a HFSQL Classic analysis.
1.2.2 Using the native xBase/FoxPro accessTo use the native xBase/Fox Pro access in your Win-Dev or WebDev applications:1. Import (if necessary) the description of xBase/FoxPro files into the WinDev or WebDev analysis.2. Program with the "HFSQL" functions of WLan-guage (see "Programming using the HFSQL func-tions").The management of the xBase/FoxPro files is simi-lar to the management of the HFSQL files except forthe specified limitations (see the online help).
1.2.3 Importing the structure of the files
The import stepsTo perform this import in the data model editor:1. On the "Analysis" pane, expand "Import" andselect "Import the descriptions of files/tables". Thewizard starts.1. Select the type of the database: FoxPro/xBase. Aconnection to the xBase/FoxPro database is auto-matically established and associated with the filesimported into the analysis. This connection will beused to handle the xBase/FoxPro data file by pro-gramming.2. Specify whether the data must be kept in currentformat (option required to use the Native xBase/FoxPro Access).3. Select the access mode to the files (NativexBase Access for WinDev) and specify the directoryof data files.4. Select the tables that will be imported into theWinDev analysis. These tables can be handled byprogramming with the Hyper File functions of Win-Dev. These tables will be displayed in blue in thedata model editor.Note: the FoxPro databases (.dbc extensions) arenot supported. Each file (.dbf extension) must beindividually imported into the analysis.
5. Validate. The tables are imported into the analy-sis. The xBase sub-type of the imported file can befound in the file description (dBase3+, dBase4,FoxPro/FoxBase, Clipper5, Clipper87).Notes:• A Numeric item in FoxPro can be imported as a
Currency item into WinDev or WebDev (if the sizeof the items exceeds the size of a real for exam-ple).
• The Logical items in xBase/FoxPro are importedas Text items. Indeed, for a boolean in xBase, youhave the ability to specify True and False with thestrings ’T’ and ’F’.
Taking into account the changes made to the xBase files
To take into account the evolutions of tables impor-ted into the data model editor, on the "Analysis"pane, in the "Analysis" group, expand "Synchroniza-tion" and select "Update the analysis from the exter-nal databases". A wizard starts, allowing you to:• analyze the differences for the imported tables.• analyze the differences for the imported tables.
1.2.4 Important programming pointsThe management of xBase files is similar to themanagement of HFSQL files except for the pointsmentioned in this paragraph.
New features regarding the management of xBasefiles:• Management of an automatic identifier• Ability to use HIndex. • Managing expressions in HFilter• Ability to use HChangeDir• Using the native xBase access with non-latin cha-
racter sets.
Managing FoxPro files:• Support of VFP format• All the index formats are supported (including the
indexes in VFP format corresponding to the .CDXextension). The indexes are read and modified.
• Management of an automatic identifier• Managing expressions in HFilter• Ability to use HChangeDir• Limitation: no creation or reindexing of a FoxPro
file.
WLangage.book Page 331 Jeudi, 20. mars 2014 4:29 16

332 Part 7: Managing the data files
Dynamic description of an xBase fileAn xBase file can be described by programming bythe following functions:
Example:
Opening files that were described dynamicallyAn xBase file is not automatically opened: this filemust be opened by HDBOpen before its first useunless it was created by HDBCreation (that createsand opens the file).
Opening an indexHDBOpen opens the data file but not the indexfile(s). Therefore, you must open all the index filesrequired for using the data file with HDBIndex.If the index files are not opened, they will not beupdated after a deletion, a modification or an addi-tion.
Links between the xBase or FoxPro filesThe links are not automatically managed. Theymust be managed by programming. Therefore, toaccess a record in the linked file, you must find thecorresponding record according to the link key(HReadSeek).Example: A window displays the customer orders,the "ORDERS" file contains the product number, the"PRODUCT" file contains the product caption andthe product number.For example, the initialization process of the win-dow is:
Using the native xBase/FoxPro access with non-Latin character setsTo use the native xBase access with non-Latin cha-racter sets, a standard OEM/ANSI conversion mustbe performed by the native access. To do so, thefollowing string must be specified in the extendedinformation: OEMTOANSI=WINDOWS;
HDBCreation Ends the dynamic description ofthe file structure. The file that wasjust described is created on disk inthe path specified in HDBDescribe-File. The data, memo and indexfiles are created on the disk
HDBDescri-beFile
Dynamically describes a file indBase 3 format (most common for-mat). This function is used to spe-cify the name, the abbreviationand the access path of the xBasefile.
HDBDescri-beIndex
Dynamically describes the differentindex files that will be created. Anindex file must be described foreach search key. The created indexfile will be in dBase 3 format.
HDBDescri-beField
Dynamically describes each item ofthe structure of an xBase file des-cribed by HDBDescribeFile.
// Describe an xBase file// that contains the following items // LASTNAME, string of 20 characters// FIRSTNAME, string of 20 charac-ters// AGE, integer on 3 digits// BALANCE, real on 10 digits and // 2 decimals// MARRIED, boolean// DOB, date// INFO, text memoHDBDescribeFile("CUSTOMERDB",..."CD","C:\FIC\CUSTOMER.DBF")HDBDescribeField("LASTN,C,20")HDBDescribeField("FIRSTN,C,20")HDBDescribeField("AGE,N,3,0")HDBDescribeField("BALANCE,N,10,2")HDBDescribeField("MARRIED,L")HDBDescribeField("DOB,D")HDBDescriberField("INFO,M")HDBCreation()
// Read the ordersHReadFirst(ORDERS, Date)IF HOut() = False THEN// Find the product // corresponding HReadSeek(PRODUCT, ProdNum, ... ORDERS.ProdNum) FileToScreen()END
WLangage.book Page 332 Jeudi, 20. mars 2014 4:29 16

Part 7: Managing the data files 333
1.3 The data files found on a mobile device (Pocket PC, iOS, Android)
1.3.1 Handling a HFSQL databaseOverview
This HFSQL database format is compatiblebetween WinDev, WinDev Mobile and WebDev. It isa freely distributable Relational DBMS.However, the available size on a Pocket PC beingrestricted and the operating system of the PocketPC being limited, the following features are not sup-ported:• the transactions.• the log process.• the HFSQL logged replication.• the management of locks for the files and
records.• the management of files in Hyper File 5.5 format.
Handling a HFSQL database from the mobile device
A HFSQL database corresponds to a set of ".FIC",".NDX" and ".MMO" files.Each data file can be handled by a Mobile applica-tion. These operations are performed via theHFSQL functions.Note: The sleep mode may have unexpected effectson your data files. We recommend that you closethe data files (HClose) when the computer might gointo sleep mode.
1.4 Data files specific to Windows Mobile
1.4.1 Handling a CEDB database (Pocket PC only)
OverviewThe CEDB format is a database format for PocketPC.A CEDB database corresponds to a ".CDB" file. ACEDB database can contain several data files (alsocalled "tables").Two types of CEDB databases are available:• the standard CEDB databases, that correspond
to the databases found by default on the PocketPC. These databases contain the "Tasks", "Con-tacts" and "Calendar" data files, ...
• the other CEDB databases (called customizabledatabases), that correspond to the Access data-bases (".MDB" file) previously exported from a PC.
When an Access database (".MDB" file) is copiedonto a Pocket PC, this database is automaticallychanged into a CEDB database (".CDB" file).
Handling a Pocket PC database (CEDB)
1. Handling a Pocket PC database (CEDB) from thePocket PCA Pocket PC database (called CEDB) corresponds toa ".CDB" file. A Pocket PC database can containseveral data files (also called "tables").This database can be handled by a WinDev Mobile
application. These operations are performed by thecdbXXX functions.2. Handling a Pocket PC database (CEDB) from thePCIf you own WinDev, you also have the ability tocreate a WinDev application used to directly handlethe Pocket PC database. These operations are alsoperformed by the cdbXXX functions.Note: To handle a Pocket PC database from a stan-dard WinDev application, the PC must be connec-ted to the Pocket PC (ceConnect).3. Synchronizing a Pocket PC database (CEDB)with an Access databaseAn Access database (".MDB" file) is found on thePC. This database is exported to the Pocket PC:ActiveSync automatically transforms it into a PocketPC database (".CDB" file).This Pocket PC database can be handled by a Win-Dev Mobile application.If you own WinDev, you also have the ability tocreate a WinDev application used to handle thePocket PC database.These operations are performed by the cdbXXXfunctions.The synchronization between the Pocket PC data-base and the Access database is performed by Acti-veSync.
WLangage.book Page 333 Jeudi, 20. mars 2014 4:29 16
334 Part 7: Managing the data files
Notes:• To handle a Pocket PC database from a standard
WinDev application, a connection must be esta-blished between the PC and the Pocket PC(ceConnect).
• The WinDev application can also handle theAccess database via the Native Access.
Handling a standard Pocket PC data-base
A standard database (containing the data files formanaging tasks, contacts, ...) is found on the Poc-ket PC. This database can be handled by a WinDevapplication for Pocket PC.If you own WinDev, you also have the ability tocreate a WinDev application to directly handle thisstandard Pocket PC database.These operations are performed by the cdbXXXfunctions.The synchronization between the Pocket PC data-base and the data viewed via Outlook is performedby ActiveSync.
Note: To handle a Pocket PC database from a stan-dard WinDev application, the PC must be connec-ted to the Pocket PC (ceConnect).The format of the "CDB" files is not compatible withWindows CE 3.0 and Windows CE 4.X. Therefore,the same ".CDB" files cannot be used on PocketPCs not running the same operating system.
Structure of standard databasesThe structure of standard databases is a presetstructure of WLanguage (no declaration is requi-red).This structure is used to:• create a record,• modify a record,• retrieve the content of a record.To reset all the variables of a structure to zero, usecdbReset.Note: The variables found in the structure of stan-dard databases differ according to the databaseused: Contacts, Calendar and Tasks. See the onlinehelp for more details.
WLangage.book Page 334 Jeudi, 20. mars 2014 4:29 16
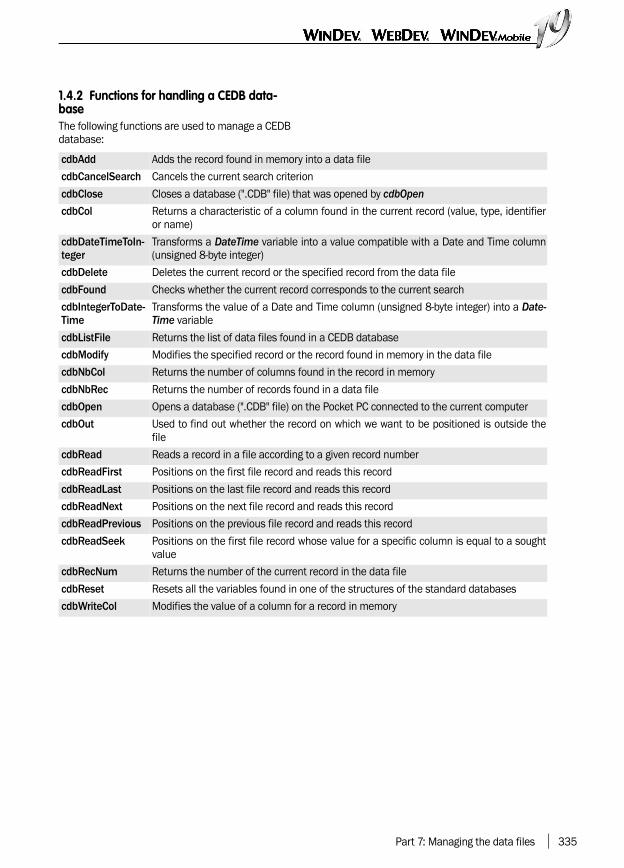
Part 7: Managing the data files 335
1.4.2 Functions for handling a CEDB data-baseThe following functions are used to manage a CEDBdatabase:
cdbAdd Adds the record found in memory into a data file
cdbCancelSearch Cancels the current search criterion
cdbClose Closes a database (".CDB" file) that was opened by cdbOpen
cdbCol Returns a characteristic of a column found in the current record (value, type, identifieror name)
cdbDateTimeToIn-teger
Transforms a DateTime variable into a value compatible with a Date and Time column(unsigned 8-byte integer)
cdbDelete Deletes the current record or the specified record from the data file
cdbFound Checks whether the current record corresponds to the current search
cdbIntegerToDate-Time
Transforms the value of a Date and Time column (unsigned 8-byte integer) into a Date-Time variable
cdbListFile Returns the list of data files found in a CEDB database
cdbModify Modifies the specified record or the record found in memory in the data file
cdbNbCol Returns the number of columns found in the record in memory
cdbNbRec Returns the number of records found in a data file
cdbOpen Opens a database (".CDB" file) on the Pocket PC connected to the current computer
cdbOut Used to find out whether the record on which we want to be positioned is outside thefile
cdbRead Reads a record in a file according to a given record number
cdbReadFirst Positions on the first file record and reads this record
cdbReadLast Positions on the last file record and reads this record
cdbReadNext Positions on the next file record and reads this record
cdbReadPrevious Positions on the previous file record and reads this record
cdbReadSeek Positions on the first file record whose value for a specific column is equal to a soughtvalue
cdbRecNum Returns the number of the current record in the data file
cdbReset Resets all the variables found in one of the structures of the standard databases
cdbWriteCol Modifies the value of a column for a record in memory
WLangage.book Page 335 Jeudi, 20. mars 2014 4:29 16

336 Part 7: Managing the data files
2. ADVANCED FEATURES This chapter presents the features for an advancedmanagement of a database:• managing aliases,• managing NULL in HFSQL,• protection and data encryption,• checking the referential integrity,• managing the "memo" files,• reassigning files,• full-text search and index,
• managing transactions,• logging files,• automatic modification of the files,• exchanging and sharing data between several
programs,• temporary file,• retrieving the structure of a file,• using an ODBC driver on HFSQL Classic.
2.1 Managing aliases
The aliases are used to handle:• several physical files with the same description in
the analysis,• several logical files described in the analysis that
use the same physical file.
2.1.1 Several physical files with identical logical descriptionFor example, you have the ability to handle at thesame time:• the Customer2000.fic that contains the backup
of customers for the year 2000.• the Customer.fic file that contains the references
of customers for the current year.
These two files have the same logical description inthe analysis: the CUSTOMER file.By default, the description of CUSTOMER file foundin the analysis is linked to the Customer.fic file.
To use the Customer2000.Fic file, you must "copy"the description of CUSTOMER file found in the ana-lysis: all you have to do is create an alias withHAlias. The code line is as follows:
The two files will be handled as usual by the stan-dard HFSQL functions.
2.1.2 Several logical files linked to a single physical fileYou can perform several parallel searches on thesame physical file, or a search and a filter in paral-lel on the file.Example: The Customer.Fic file is associated withthe logical file named Customer in the analysis. Tofilter the records of Customer.fic file and to browseat the same time all the records of this file, youmust:• "copy" the description of CUSTOMER file into the
analysis: all you have to do is create an alias withHAlias.
• associate the alias description with the physicalfile named Customer.fic (HChangeName).
Note: This method can be used to manage severalHFSQL contexts for the same physical file.
2.1.3 Functions for managing aliasesSeveral functions are available for handling thealiases:
Other functions can intervene in the definition anduse of aliases:
HAlias(Customer, Customer2000)
HAlias Creates a logical alias of a file orcancels all the existing aliases
HCancelAlias Cancels an alias that was decla-red by HAlias
HChangeName Modifies the physical name of adata file
HChangeDir Modifies the access path to adata file
WLangage.book Page 336 Jeudi, 20. mars 2014 4:29 16
Part 7: Managing the data files 337
2.1.4 Create an alias on what?You have the ability to create and handle aliases onthe following elements:• Data file described in the analysis• Data file described dynamically• Query created in the query editor• HFSQL View (HFSQL Classic format)• Alias
2.1.5 Characteristics of an alias• Physical file associated with an alias:
By default, the name specified for the alias isassigned to the physical file corresponding to thealias. To associate the alias with a physical file ofdifferent name, use HChangeName and HChan-geDir.
• Password of an alias: By default, the password of an alias file is identi-cal to the password of the initial file. This pas-sword can be modified by HPass. The name ofthe file used in this function corresponds to thename of the alias.
• Reindexing: The alias files can be reindexed.
• Automatic modification of data files: This operation can be applied to the alias files.
2.1.6 Handling the alias file and its items• Code editor: To avoid the "Unknown identifier"
error when using an alias file and its items, adata source must be defined to declare the nameof the alias before using HAlias. For example:
Caution: The Extern keyword can be used but itslows down the execution significantly.• Window editor or page editor: the controls and
the tables cannot be directly associated with theitems found in alias files. The controls must beassigned one by one by programming. Note: To redefine the links of controls by pro-gramming, you have the ability to use either Con-trolAlias, or ..FileLink.
2.2 Managing NULL in HFSQL
WinDev and WebDev enable you to manage theNull value in the items found in the HFSQL datafiles and for all the other types of accesses (NativeAccess, OLE DB, ...). When calculations are performed on the filerecords, the records containing a Null item will beignored. For example, if a query calculates the ave-rage grade of students for the quarter, only the gra-des of the attending students will be taken intoaccount. If a student is not attending, his grade willcorrespond to the Null value.
2.2.1 How to manage the Null value in one of your items?To manage the null value in your files, you can use:• In the data model editor:
•the "NULL supported" option found in the "Info"tab of the file description. This option is used tospecify whether the management of NULL issupported by this file. In this case, the NULLvalue can be managed for the different file
items.•the "Default to NULL" option found in the "Gene-
ral" tab of an item description. This option ena-bles you to define the null value as defaultvalue for the item.
• In programming, two properties:
Orders2000 is data sourceHAlias(Orders,Order2000)
Null Used to:• define the NULL value as the
default value for a file itemduring its dynamic description.
• associate (or not) the NULLvalue with a file item.
NullSuppor-ted
Used to:• define the management mode
of the NULL value for a fileduring its dynamic description.
• find out the management modeof the NULL value for a file
WLangage.book Page 337 Jeudi, 20. mars 2014 4:29 16

338 Part 7: Managing the data files
Limitations: The NULL value cannot be used:• on the array items.• on the automatic identifiers.• on the composite keys.
Caution: Writing records by an application that usesa WinDev version earlier than version 75205 maycause the ..Null property to be inconsistent (willreturn True or False).Writing records by an application that uses WinDevversion 75205 or later sets the ..Null property toFalse, even if the item was set to Null by an applica-tion using WinDev.
2.2.2 How can I use the NULL value in my applications?
How do I save a NULL value in an item?
To enter a NULL value in an item:1. Display the description window of the file ("Des-cription of data file" from the popup menu).2. In the "Info" tab, check the "NULL supported"box.3. Validate the window.4. Generate the analysis.5. If no value was entered by the user in a controlassociated with an item: to assign the NULL valueto this item for the current record, the ..Null pro-perty must be used after ScreenToFile.
Example: The "NULL if empty" option is checked forthe edit control named EDT_Mark. In this case, youcan run the following test before saving the data:
Caution: The "NULL if empty" option of edit controlshas no relation with the management of the NULLvalue in the HFSQL data files.See the online help (keyword: "Null if empty") formore details.Note: If the default value of the item is NULL (boxchecked in the editor), HReset resets the ..Null pro-perty to True.
Query: Selection condition
In the query editor, you have the ability to take intoaccount or to ignore the records that have a nullitem. To do so, create a selection condition andchoose "Is null" or "Is not null".In a selection query that performs a calculation, allthe records that have a null value (for the calcula-tion item) will be ignored.
ExampleThe following example is a query used to calculatethe average grade of students for the 2012 Frenchclass. If one of the grades corresponds to the NULLvalue, this grade is ignored.
ScreenToFile()IF EDT_Note = NULL THEN Lesson.Grade..Null = TrueEND
// Add or modify// the recordHAdd(Lesson)
SELECT Marks.Course AS Course,Grades.Date AS Date,LEFT(Grades.Date,4) AS Year,AVG(Marks.Mark) AS the_average_MarkFROM MarksWHERE Grades.Course = ’French’AND Marks.Mark IS NOT NULL AND LEFT(Grades.Date,4) = ’2012’GROUP BY Grades.Course, Grades.Date, LEFT(Grades.Date,4)
WLangage.book Page 338 Jeudi, 20. mars 2014 4:29 16

Part 7: Managing the data files 339
2.3 Protecting and encrypting data files
2.3.1 The protection methodsSeveral methods can be used to preserve the confi-dentiality and security of data when storing datafiles. These methods can be applied to the differenttypes of files: data files (.Fic), index file (.NDX),memo file (.MMO). You have the ability to:• not encrypt the files,• encrypt the file on 128 bits: only the users who
know the password will be able to access them inread and write modes. The password is managedin the program when the file is accessed.
The level of protection for the data file is chosenduring the file description, in the data model editor.It cannot be modified by programming.If a strong security is enabled, the password of thedata file will be requested for each automatic modi-fication of data files.To modify the protection level, you must modify thedescription of the data file.
To summarize, a data file can be:• not protected,• password protected with data encryption,• password protected with index encryption,• password protected with memo encryption.
2.3.2 Managing encrypted filesThe password associated with a data file must betransmitted by programming just before creating oropening the data file. The developer can:
• ask the password to the user,• include the password in the program or read it in
a configuration file.
We advise you to implement a password containingat least 4 characters. The size of the password isunlimited.The password can be passed to the data filesaccording to two methods:• by passing the password in parameter to HOpen,
HCreate, HCreateIfNotFound.• by using HPass before opening or creating the
file.
When WinDev or WebDev interprets HCreation orHCreationIfNotFound, the password must beknown by HPass if it is not specified in the parame-ters of functions.
If the password is incorrect, HErrorPasswordreturns True.
Notes• The data files found in an analysis can have iden-
tical or different passwords.• Each data file is encrypted according to its own
password.• Caution: You cannot retrieve a "forgotten" pas-
sword. If the password is lost, the data file cannotbe accessed anymore.
2.4 Managing an identifier
2.4.1 Automatic managementIn most cases, each record found in a data filemust contain an item having a unique value in thedata file. This item, called identifier, is used to iden-tify the record in the data file. This is a unique keyitem.The record number cannot be used to identify arecord. Indeed, this one is not fixed; for example, itcan be modified after a reindex operation with com-pression.WinDev or WebDev allows you to automaticallymanage an identifier: the identifier is chosen when
describing the data file, in the data model editor.In this case, WinDev or WebDev takes care of every-thing: it automatically creates the item and assignsthis item when the record is added into the datafile.
Important: Never modify the value of the identifierotherwise you could compromise the uniqueness ofrecords.
You have the ability to manage an identifier by pro-gramming, without using the automatic identifierproposed by WinDev or WebDev.
HPass(CUSTOMER, "Secret code")
WLangage.book Page 339 Jeudi, 20. mars 2014 4:29 16

340 Part 7: Managing the data files
2.4.2 Manual managementThe following method is used to manage an identi-fier manually:1. When describing the data file, if it does notinclude a unique key, create an integer item anddefine it as the unique key.2. When adding a record, the value of this item ismanaged by a process: all you have to do isincrease the value of the item for each createdrecord.
Example of manual management of an identifier:this simple management can be used in a single-computer application for example. For more advan-ced examples, see the chapter about the replica-
tion.
2.4.3 Checking the uniqueness of a keyWhether the identifier is managed manually orautomatically by WinDev or WebDev, you mustcheck the uniqueness of the key when modifying arecord in the data file.The check for key uniqueness was presented indetails in the previous chapter of this section.
2.5 Automatic check of referential integrity
The referential integrity consists in checking that:• if a record is deleted from the parent (or owner)
file, the corresponding records are also deletedfrom the child (or member) files,
• if a record is added into a child file, a correspon-ding record exists in the parent file,
• if a record is modified in a parent file, the uniquekey is not modified,
• ...The check of referential integrity depends on thenature of the link between the files.
2.5.1 Benefit of the check of referential inte-grityFor example, when deleting a record from a file, youmust check that the records found in the linked filethat correspond to the deleted record have beendeleted.
Let’s take an example for order management con-taining the following files:• "ORDERS" containing the references of the order.
The identifier is the order number.• "PRODUCT" containing the references of pro-
ducts. The identifier corresponds to the productnumber.
• "CUSTOMER" containing the customer details.The identifier is the customer number.
• "ORDERS" is linked to "CUSTOMER" by the custo-
mer number.• "ORDERS" is linked to "PRODUCT" by the product
number.
When a customer is deleted from "CUSTOMER", ifthe orders corresponding to the customer are notdeleted, what may happen?The customer 1000 is deleted (but not his orders)and he is the last one in the list. When adding anew customer with number 1000, this customerwill have orders that do not belong to him but to thedeleted customer!
Checking the referential integrity is used to automa-tically check whether integrity is preserved and toavoid inconsistencies in the database.
To use the feature for automatic check of referen-tial integrity:• The links must be described in the data model
editor or by HDescribeLink.• The type of links must allow the automatic mana-
gement of referential integrity. The different typesof links are described in the following paragraph.
• The management of referential integrity musthave been enabled in the project by HSetIntegrity(True) in the initialization code of the project.
2.5.2 DefinitionsThe definitions of the different types of links availa-ble are presented in the "Concept" manual.
HReadLast(INVOICE,INVNUM)ScreenToFileINVOICE.INVNUM=INVOICE.INVNUM+1HAdd(INVOICE)
WLangage.book Page 340 Jeudi, 20. mars 2014 4:29 16

Part 7: Managing the data files 341
2.5.3 The different types of linksThe different types of links are presented in "Get-ting Started Guide".
Reminder: Several types of links can be foundbetween the files:• parallel,• optional,• complement,• shared,• complex.
2.5.4 Programming the automatic check of referential integrityThe automatic check of referential integrity can beused in WLanguage only. It cannot be used:• for the files in xBase format,• in external language.
Enabling the mechanismBy default, the mechanism for automatic check ofreferential integrity is disabled. It can be enabled:• for the project description,• by programming.
Activation at project levelIn the project description, you have the ability todefine whether the automatic integrity check and/or duplicate check must be enabled.This choice does not require any additional codeline in your project.Activation by programmingThe mechanism for automatic check of referentialintegrity can be enabled by HSetIntegrity (True) ordisabled byHSetIntegrity (False).
Caution: The activation of the mechanism for automaticcheck of referential integrity implicitly enables themechanism for duplicate management (HSetDupli-cates).You cannot disable the mechanism for duplicatecheck if the mechanism for integrity check is ena-bled (HSetIntegrity (True)).
Notes:• The mechanism for integrity check corresponds
to searches performed in the linked files duringthe calls to functions that write into the data files(HAdd, HModify, HDelete, HCross, TableSave,TableDelete). This mechanism does not modifythe context (positioning) of the base file and lin-ked files.
Summary table of the integrity checks performed by WinDev/WebDevThe table below summarizes, for the functions requiring an integrity check (HCross, HDelete, HAdd,HWrite and HModify), the integrity check performed by WinDev/WebDev depending on the link type.
Legend :1: when deleting an owner, check there is no linked members2: when adding a member, check the existence of a linked owner3: when modifying a member, check the existence of a linked owner (in the case where the value of the linked keychanges)4: when modifying an owner, check there are no members linked to the old owner (in the case where the linked keychanges value)5: when modifying a member, check there are no owners linked to the old member (in the case where the linked keychanges value).
Comple-ment link(0,1) - (1,1)
Shared link(x,n) - (1,1)
Shared link(1,n) - (0,1)
Shared link(0,n) - (0,1)
Optional link(0,1) - (0,1)
Parallel link(1,1) - (1,1)
HCrossHDelete
1 1 1 - - Dev.
HAddHWrite
2 2 Dev - - Dev
HModify 3 and 4 3 and 4 5 - - Dev
WLangage.book Page 341 Jeudi, 20. mars 2014 4:29 16

342 Part 7: Managing the data files
• The referential integrity is not checked when ove-rwriting a file with HCreate. We advise you to useHCreationIfNotFound in order not to overwriteany data files.
Checking the integrityWhen the mechanism for integrity check is enabled(HSetIntegrity (True)), HErrorIntegrity must neces-sarily be checked after each function that writesinto the file: HAdd, HModify, HWrite, HDelete,HCross, TableSave, TableDelete.HErrorIntegrity returns True if an integrity erroroccurred. HErrorInfo returns the error details:If HErrorIntegrity is not called, the error 15 (Inte-grity error) will be automatically generated duringthe next call to a function for file management. Thiserror cannot be ignored: all the files are closed andthe program execution is canceled.Example in single-computer mode (automaticmanagement of locks and integrity management)
Example in network
HSetIntegrity(True)// Delete the customer whose number is NumHReadSeekFirst(CUSTOMER,... CustomerID,Num)IF HFound() THEN IF HDelete(CUSTOMER) THENInfo("Customer deleted")ELSE IF HErrorIntegrity() THEN Error("Cannot delete this custo-mer", there are still orders") ENDELSE Error("Customer not found")END
HSetIntegrity(True)HLockFile(CUSTOMER)IF HErrorLock() THEN Info("Unable to lock the file")ELSE HReadSeekFirst(CUSTOMER,... CustomerID, Num) IF HFound() THENIF HDelete(CUSTOMER) THEN Info("Deletion OK")ELSE Error(HErrorInfo())END ENDEND
WLangage.book Page 342 Jeudi, 20. mars 2014 4:29 16

Part 7: Managing the data files 343
2.6 Managing the "memo" files
2.6.1 Text memo and binary memoThe "memo" files can be managed in WLanguage.The "memo" files complement the data files. Theyare used to associate things such as long texts,images and sounds with the records found in thedata file.A "memo" file is described and created at the sametime as the data file.
To create a "memo" file:1. Describe the data file in the data model editor.2. Create a "text memo" item for the long texts or a"sound, image, binary" item to store images orsounds.3. Generate the analysis.
In WLanguage, the data file and the "memo" fileevolve in parallel:• HCreation and HCreationIfNotFound create the
empty data file, the index file and the "memo" file(<FileName>.MMO),
• HAdd and HModify write into the data file andinto the "memo" file,
• the read functions read the record in the data fileand in the "memo" file.
Caution: HCross and HDelete have differentactions on the "memo" files and on the data files:• HCross delete the record from the data file but
not from the memo file. Indeed, HFree does notfree the crossed records in the "memo" files. Wedo not advise you to use HCross with the "memo"files.
• HDelete deletes the records from the data fileand from the "memo" file. To delete a record froma "memo" file, you must use HDelete.
A function is used to enable the management of"memo" files: HSetMemo. This function enables ordisables the management of memo items. Youhave the ability to manage all the memos of a datafile or a specific memo item of a data file. Themanagement of memos is enabled by default.
If a process on a file does not use the "memo" file,it may be interesting to disable the management ofthe "memo" file to speed up the process. For example, when modifying the "TotalSales" itemfor all the records found in "Customer" file, all youhave to do is disable the management of memosbefore the process, then re-enable it thereafter.Note: The memo files can be encrypted and/orcompressed.
2.6.2 Image, sound, OLE and other binary memosFour types of items are available: image, sound,OLE and other binary memo. These types of memosare used to store binary files (images, sounds, OLEfiles, …) in the item.The items can be handled in WLanguage in order toassign them or to retrieve their content.The following functions are used to manage thebinary memos:• HLinkMemo to assign the item.• HExtractMemo to retrieve the content of the item
and to save it in a file.• HInfoMemo to get information about the item.
Note: The binary memo items can be handled bythe following functions:• Sound if the binary memo item is in WAV format
(WinDev only).• iPrintImage if the binary memo item is in IMG for-
mat.• BitmapInfo if the binary memo item is in IMG for-
mat.
InitializationA binary memo can contain any type of file. A binarymemo can be initialized:• from another binary memo item (simple assign-
ment)
• from a file via HLinkMemo
Notes:• When an OLE file is modified via an OLE control,
to assign the OLE file in an OLE binary memoitem, you must:•save the OLE object with OLESave•assign the item with HLinkMemo.
• When an image control is modified by thedrawing functions of WLanguage, to assign theimage in an image binary memo item, you must:•save the image with dSaveImage,•assign the item with HLinkMemo.
• ScreenToFile or PageToFile does not automati-cally assign the content of an image control in theimage binary memo item that is associated withit. The item must be assigned by HLinkMemo.
ANIMAL.PHOTO=DOG.PHOTO
HLinkMemo(ANIMAL,... PHOTO,"DOG1.TIF",hMemoImg)
WLangage.book Page 343 Jeudi, 20. mars 2014 4:29 16

344 Part 7: Managing the data files
• HLinkMemo is used to give an information: •about the file type,•about the memo itself.
RetrievalA binary memo is retrieved by HExtractMemo. Thisfunction saves the content of the binary memo in afile.
Note: FileToScreen or FileToPage automaticallyassigns the content of an image control with thecontent of the binary memo item that is associatedwith it, providing that the item content has a reco-gnized image format (BMP, PCX, JPEG, TIFF, …).Information about the memoHInfoMemo is used to retrieve information aboutthe binary memo item:• type of the memo,• name, size, date and time of source file,• free information given when the memo is assi-
gned by HLinkMemo.
2.7 Reassigning data files
2.7.1 BenefitThe same file description can correspond to severalphysical files. The data files have:• different physical names,• the same name but they are stored in different
directories.You must be able to modify the name or the direc-tory of the files.The analysis files are described in a hard-codeddirectory. In final use, the setup drive of the filescan change according to the computer on which theWinDev application is installed or according to theserver on which the WebDev site is deployed. Youmust be able to modify the storage directory of thefiles.The name and/or the directory is modified by pro-gramming. It must be done before creating or ope-ning the file.
2.7.2 Modifying the storage directoryWhen the data file is described in the data modeleditor, a directory for storing the data files and theindex files was selected:• a hard-coded directory,• the application directory.
The data files can be stored in directories that dif-fer from the ones described in the analysis. All youhave to do is modify the name of the directory byprogramming.HSubstDir and HChangeDir allow you to specify adirectory that differs from the one described in thedata model editor. The directory defined in the analysis is the reques-ted directory.The directory of the file on disk is the physical direc-
tory.
For example:
2.7.3 Modifying the name of a data fileBy default, a data file is created with the name defi-ned in the data model editor.The data file can be created with another name. Allyou have to do is modify the name of the data fileby programming.HChangeName is used to specify a name that dif-fers from the one defined in the description of thedata file.The file name that was defined in the analysis isthe logical name.The name of the file (or files) on disk is the nameon disk (this name can be a long name if the opera-ting system supports the long names).Note: The long name of a file cannot exceed 260characters (including the access path to the file).
2.7.4 Keeping trace of reassignments
What is the .REP used for?<MyProject>.REP is a file that contains the list offiles used by the application or by the site (identi-fier, logical name and full path of the physical file).The GUID of the analysis is the unique identifier ofthe analysis linked to the project, containing thedescription of the files. This identifier can be foundin the data model editor, in the analysis description("Options" tab).
WB The sound, binary memo and OLE itemsexist for compatibility with WinDev.
// Files described on the C drive and installed on the drive SHSubstDir("C:\Dir1",... "S:\DataDirectory")HCreationIfNotFound(NameFile1)
WLangage.book Page 344 Jeudi, 20. mars 2014 4:29 16

Part 7: Managing the data files 345
The GUID of the file corresponds to the identifier ofthe logical file. This identifier can be found in thedata model editor, in the file description ("Notes"tab).
This file is automatically created in the directory ofthe application or site and it is filled by the HFSQLengine.
The ".REP" file allows you to easily localize the datafiles used by the WinDev application or by the Web-Dev site.The WinDev application or the WebDev site auto-matically updates the ".REP" file but it seldom usesthe ".REP" file.This file is used by all the tools that handle theapplication files or the site files, and mainly by theautomatic file update, …
Example: Updating an application or a site withmodification of the analysis.When updating a WinDev application or a WebDevsite, the automatic modification of the data files isautomatically run if the database structure is modi-fied. This procedure uses the ".REP" file to find the physi-cal files used by the application of by the site inorder to modify them.See “Automatic modification of data files”,page 356 for more details.
Note: The .REP must not be modified "manually"except in exceptional cases, for example on theadvice of a member of PC SOFT technical support.
How is the .REP file managed in WinDev Mobile?
WinDev Mobile enables you to update a list of datafiles used by the application (equivalent to the .REPfile in WinDev).This list is saved in the Pocket PC registry, in the fol-lowing key:"\HKEY_LOCAL_MACHINE\SOFTWARE\PCSOFT\WD Mobile\19.0\<ApplicationName>\DATA".
The following details are stored for each data fileused by the current application:• identifier (file GUID). This identifier can be found
in the data model editor, in the file description("Notes" tab).
• logical name.• full path of the physical file.This information is automatically filled by theHFSQL Mobile engine.For example:
Functions for managing the .REP file
1. Management of .REP
2. Creating and modifying the .REP file
HSetREP Enables or disables the managementof .REP file. When the managementof the .REP file is enabled, you canspecify the name and path of the.REP file. A HFREP.INI file will be crea-ted in the Windows directory. Themanagement of ".REP" file is enabledby default.
HCreation Creates a physical data file (and fillsthe .REP file if the management of.REP is enabled)
HCreationI-fNotFound
Creates a physical data file if it doesnot exist (and fills the .REP file if themanagement of .REP is enabled)
HOpen Opens a physical data file and fillsthe .REP file if necessary (opening afile that does not belong to the ana-lysis for example)
WLangage.book Page 345 Jeudi, 20. mars 2014 4:29 16
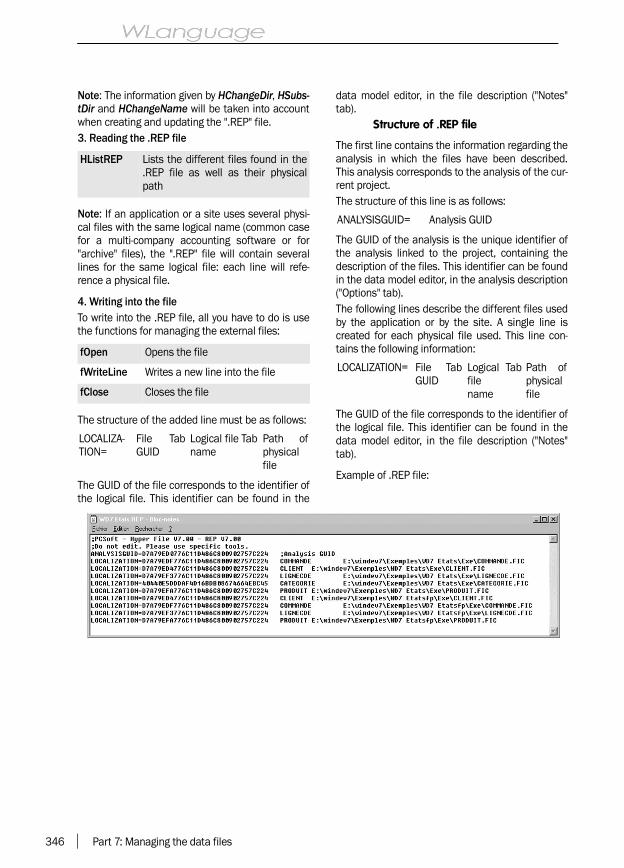
346 Part 7: Managing the data files
Note: The information given by HChangeDir, HSubs-tDir and HChangeName will be taken into accountwhen creating and updating the ".REP" file.3. Reading the .REP file
Note: If an application or a site uses several physi-cal files with the same logical name (common casefor a multi-company accounting software or for"archive" files), the ".REP" file will contain severallines for the same logical file: each line will refe-rence a physical file.
4. Writing into the fileTo write into the .REP file, all you have to do is usethe functions for managing the external files:
The structure of the added line must be as follows:
The GUID of the file corresponds to the identifier ofthe logical file. This identifier can be found in the
data model editor, in the file description ("Notes"tab).
Structure of .REP file
The first line contains the information regarding theanalysis in which the files have been described.This analysis corresponds to the analysis of the cur-rent project.The structure of this line is as follows:
The GUID of the analysis is the unique identifier ofthe analysis linked to the project, containing thedescription of the files. This identifier can be foundin the data model editor, in the analysis description("Options" tab).The following lines describe the different files usedby the application or by the site. A single line iscreated for each physical file used. This line con-tains the following information:
The GUID of the file corresponds to the identifier ofthe logical file. This identifier can be found in thedata model editor, in the file description ("Notes"tab).
Example of .REP file:
HListREP Lists the different files found in the.REP file as well as their physicalpath
fOpen Opens the file
fWriteLine Writes a new line into the file
fClose Closes the file
LOCALIZA-TION=
FileGUID
Tab Logical filename
Tab Path ofphysicalfile
ANALYSISGUID= Analysis GUID
LOCALIZATION= FileGUID
Tab Logicalfilename
Tab Path ofphysicalfile
WLangage.book Page 346 Jeudi, 20. mars 2014 4:29 16

Part 7: Managing the data files 347
2.8 Full-text search and index
2.8.1 OverviewHFSQL allows you to easily find character strings inthe data. This search (called "full-text") is used tofind a word or a set of words.This enables you to index, without programming,the texts found in a HFSQL database. These textscan be found in "Text" items or in "Text memo"items.An index can index one or more different items. Thecreation of the index can take the formatted textsinto account (RTF, HTML): the tags of these formatswill be ignored during the indexing. This enablesyou to find words stored in RTF or HTML docu-ments.The results of the full-text indexing are proposedaccording to a relevance order ("ranking").Caution: the "Full-text" search is not a simple "con-tains" search: the punctuation characters are igno-red.
2.8.2 How do I perform a "full-text" search?To perform a "full-text" search, you must:1. Create a full-text index in the data files affectedby this search.2. Create a query to perform the full-text search.3. Analyze and display the result of the query.
2.8.3 How do I create a full-text index?The creation of a full-text index is performed in thedata model editor.To create a full-text index:1. In the data model editor, display the descriptionof the items found in the relevant file ("Descriptionof items" from the popup menu).2. Click the icon . The window for defining thefull-text index is displayed. Select the items takingpart in the composition of the full-text index. Onlythe "Text" items and the "Text memo" items found inthe file description are proposed. Validate.3. The "Full-text index" item is displayed in the listof items.4. Select the item and modify its characteristics ifnecessary:• in the list of items, you have the ability to modify
the name of the full-text index.• on the right side of the window, select the para-
meter of the full-text index: minimum size ofindexed words, management of RTF tags, mana-
gement of HTML tags, management of the case,management of accented characters.
5. Validate the description window of items.6. Save and generate the analysis. When genera-ting the analysis, the description of the data files ismodified and the full-text index is created (file witha ".FTX" extension).Notes• To directly create a full-text index from a text item
or from a text memo item, select the item in thedescription window of the items and click the linknamed "Create a full-text index on the item".
• You have the ability to manage the full-textindexes in the data files described by program-ming: to do so, use a FullTextIndex Descriptionvariable to describe the index and HDescribeFull-TextIndex to validate the creation of the index.
• The composition of an existing full-text index canbe modified at any time: to do so, click the "Editthe index" button found in the left section of theitem description in the data model editor.
• To create a Full-text Index item, a generation ofthe analysis and an automatic data modificationmust necessarily be performed.
2.8.4 How do I perform a full-text search?The full-text searches are performed via queries:queries created in the query editor or queries crea-ted in SQL code. The search condition is enteredwhen creating the query.
Full-text search: Query editorTo create a query performing a full-text search, allyou have to do is add a "Full-text index" item to thequery. The description window of a full-text searchis automatically displayed.This window is used to specify:• The search value. This value can be entered
directly (a wizard is used to build the soughtstring) or it can correspond to a parameter. See"Syntax of the search value" for more details.
• the sort options of the result.When validating this window, the "full-text" item isautomatically added into the query elements. Acondition was automatically defined: only recordswhose relevance is greater than 0 will be displayedin the query result.
WLangage.book Page 347 Jeudi, 20. mars 2014 4:29 16

348 Part 7: Managing the data files
Full-text search: Query in SQL codeTo create a query that performs a full-text search inSQL code, use the following syntax: MATCH(<Index>) AGAINST <Condition> where:<Index> corresponds to the list of items found inthe index separated by commas (the order of itemsis not important).<Condition> corresponds to the sought string. See"Syntax of the search value" for more details.Example:In this example, EDT_Find is an edit control andConnectedUserID is a variable.
Note: Query with a parameter on a full-text index:how to ignore the parameter?The "MATCH" of the query must not be found in thequery result but in the WHERE. Indeed, if the perti-nence must be included in the result, the parame-ter must be specified to evaluate the result.In order for a query created with the query editor tohave the MATCH statement included in the WHEREstatement, the pertinence must not be displayed inthe result.Example with pertinence:
Example with pertinence:
Syntax of the search valueThe search value can contain the following ele-ments:
MyQuery is string = [ SELECT * FROM Contacts WHERE MATCH(Contacts.LastName, ... Contacts.FirstName, ... Contacts.HTMLComment, Contacts.RoughTextComment,... Contacts.Comments, .. Contacts.Phone, ... Contacts.Office,... Contacts.Cell, ... Contacts.Mail,... Contacts.MSN, ... Contacts.Internet_site, ... Contacts.Country, ...Contacts.FaxNum, Contacts.City) AGAINST (’] MyQuery = ... MyQuery + EDT_Search + [’) AND Contacts.UserID = ]MyQuery = MyQuery + ... IDConnectedUser + [ ORDER BY Name DESC]HExecuteSQLQuery(QRY_SRCH, ... hQueryDefault, MyQuery)FOR EACH QRY_SRCH TableAddLine(... Table_Contact_by_category, QRY_SRCH.idcontact,... QRY_SRCH.IDCategory, ... QRY_SRCH..IDConnectedUser, ... QRY_SRCH.LastName, QRY_SRCH.FirstName)ENDCASE ERROR : Error(HErrorInfo())
SELECT MATCH(XX, YY, ZZ) AGAINST ... ({ParamFullText}) AS ... FullTextPertinenceFROM TABLEWHERE <Parameters>AND PertinenceFullText > 0ORDER BYPertinenceFullText DESC
SELECT *FROM TABLEWHERE <Parameters>AND MATCH(XXX, YYY, ZZZ)AGAINST({ParamFullText }) > 0
Element Meaning
A singleword
The specified word will be sought.The relevance will be increased if thetext contains this word. Example: "Win-Dev" find the word "WinDev
Two wordsseparatedby a spacecharacter
Searches for one of the words.Example: "WinDev WebDev" find thetexts that contain either "WinDev" or"WebDev".
A word pre-ceded by the"+" sign
The specified word is mandatory.Example: "+WinDev" searches for the texts that necessarily contain "Win-Dev".
A word pre-ceded by the"-" sign
The specified word must not be found inthe text.Example: "-Index" find the texts that do not contain the "Index".
A word pre-ceded by the"~" sign
If the text contains the specified word,the relevance will be reduced.
WLangage.book Page 348 Jeudi, 20. mars 2014 4:29 16

Part 7: Managing the data files 349
2.8.5 Analyzing the result of a "full-text" queryThe result of a full-text query gives, for each recordfound in the data file, the relevance of the record inrelation to the search value.
This relevance depends on several factors:• the number of times the sought word is found in
the record.• the number of words in the record and their num-
ber of repetitions.• the ratio between the records that contain the
sought words and the records that do not containthe sought words. Indeed, the more the soughtword is found in all the records, the less the rele-vance will be important.
• …
The result of a "full-text" query can be processedlike any other query result: you can for example dis-play the result in a table, sorted according to rele-vance, …
2.8.6 Managing the full-text indexes by pro-grammingSeveral WLanguage functions are used to managethe full-text indexes:
Notes:• The creation of a full-text index in a data file crea-
ted by programming can be done via a FullTextIndex Description variable.
• HIndex is used to reindex the full-text indexes.
One or morewordsenclosed inquotes
The specified words are searched ingroup and in order.Caution: if "Ignore the words smaller than " differs from 0, the words in-between quotes whose length is shor-ter than the specified length will not be sought.
A word fol-lowed by the"*" sign
The type of the search performed is"Starts with" the specified word.
HDescribeFullTextIn-dex
Describes a full-text indexby programming for adata file created by pro-gramming.
HListFullTextIndex Returns the list of full-textindexes of a file (query orview) recognized by theHFSQL engine
WLangage.book Page 349 Jeudi, 20. mars 2014 4:29 16
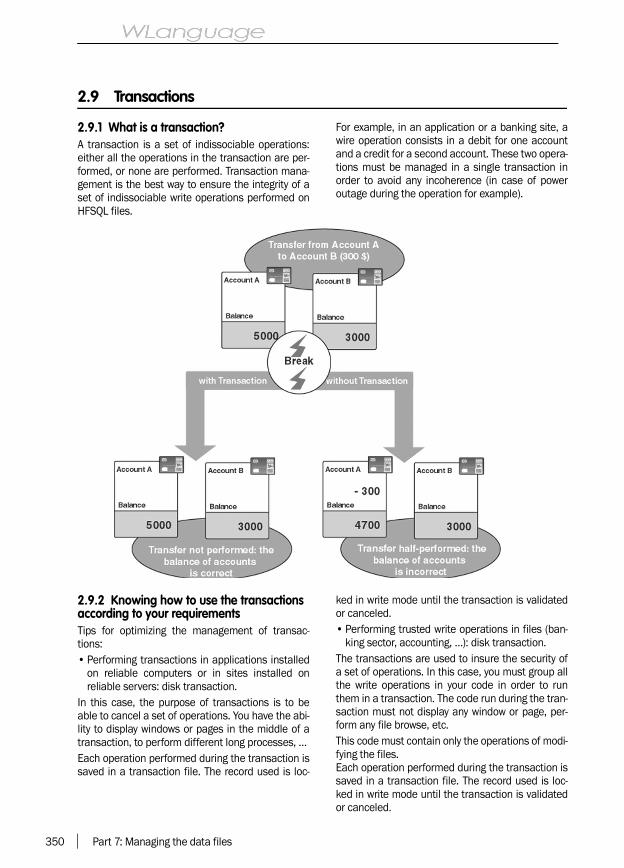
350 Part 7: Managing the data files
2.9 Transactions
2.9.1 What is a transaction?A transaction is a set of indissociable operations:either all the operations in the transaction are per-formed, or none are performed. Transaction mana-gement is the best way to ensure the integrity of aset of indissociable write operations performed onHFSQL files.
For example, in an application or a banking site, awire operation consists in a debit for one accountand a credit for a second account. These two opera-tions must be managed in a single transaction inorder to avoid any incoherence (in case of poweroutage during the operation for example).
2.9.2 Knowing how to use the transactions according to your requirementsTips for optimizing the management of transac-tions:• Performing transactions in applications installed
on reliable computers or in sites installed onreliable servers: disk transaction.
In this case, the purpose of transactions is to beable to cancel a set of operations. You have the abi-lity to display windows or pages in the middle of atransaction, to perform different long processes, …Each operation performed during the transaction issaved in a transaction file. The record used is loc-
ked in write mode until the transaction is validatedor canceled.• Performing trusted write operations in files (ban-
king sector, accounting, …): disk transaction.The transactions are used to insure the security ofa set of operations. In this case, you must group allthe write operations in your code in order to runthem in a transaction. The code run during the tran-saction must not display any window or page, per-form any file browse, etc.This code must contain only the operations of modi-fying the files. Each operation performed during the transaction issaved in a transaction file. The record used is loc-ked in write mode until the transaction is validatedor canceled.
WLangage.book Page 350 Jeudi, 20. mars 2014 4:29 16

Part 7: Managing the data files 351
2.9.3 PrinciplesTransaction principle on HFSQL filesEach write operation performed during a transac-tion is stored in a transaction file. The transactioncan be canceled at any time: all the operations per-formed since the beginning of transaction will becanceled.Once the write operations included in the transac-tion are completed, the program can validate theoperations of the transaction.
Special cases• Program error, the transaction is automatically
canceled.• Call to EndProgram, the transaction is automati-
cally canceled.• Canceling a test from the editor, the transaction
is automatically canceled.• Power failure or sudden stop of the application or
Web server (via the task manager for example). When the application or the Web server is restar-ted, the consistency of the database can be res-tored:•by WDTRANS,•during the first call to HTransactionStart,•by HTransactionCancel.
• See “Managing the special cases”, page 352 formore details.
2.9.4 Handling the transactions by pro-grammingImplementing the management of transactions1. If your files are password protected, open all thefiles used during the transaction before the begin-ning of transaction. If your files are not password protected, the filesused after the call to HTransactionStart will auto-matically belong to the transaction.2. Start the transaction with HTransactionStart.This function can also be used to define the nameof the transaction log.3. Perform your operations. All the write operationsperformed on the files in transaction are automati-cally saved in the transaction file. Caution: the pro-cesses performed are relatively slower (as eachoperation is saved in a specific file).4. Cancel (if necessary) the operations performedduring the transaction (HTransactionCancel).5. Specify the end of transaction with HTransactio-nEnd. The transaction is validated.
Summary table of WLanguage functions used (fora HFSQL database)
Handling the records during a transaction: therules to follow• The records modified during the transaction can
be read before or after the beginning of transac-tion: they will always be taken into account in thetransaction logs.
• Managing the transactions does not excludemanaging the locks for the records in transac-tion. Indeed, the records handled during the transac-tion are automatically locked in write mode. In a WinDev application in network, if the usertries to modify a record in transaction, a messagewill be displayed, asking him to retry the opera-tion. Therefore, the transaction must be as short aspossible to avoid locking the users.
Errors specific to the management of transactions• 70031: Operation not allowed in transaction
You are using a function that is not allowedduring a transaction. For example, HTransac-
HSetTransaction Enables (or not) the mana-gement of transactions (the management of tran-sactions is enabled bydefault)
HTransactionStart Starts the transaction
HTransactionEnd Validates the transaction
HTransactionCancel Cancels the current tran-saction
HTransactionCancelHTransactionStartHTransactionEndWDTRANS
Cancels a transaction thatfailed (power outage)
HTransactionInterrup-ted
Used to find out whether atransaction was interrup-ted (the transaction wasneither validated nor can-celed). Case of poweroutage.
HTransactionFree If a record found in thespecified data file is consi-dered as being in transac-tion but does not belong toa transaction in progress,it is automatically freed
WLangage.book Page 351 Jeudi, 20. mars 2014 4:29 16

352 Part 7: Managing the data files
tionStart is used in the middle of a transaction.• 70034: The last transaction failed
You are trying to use a record that belongs to afailed transaction (power outage, …). The pro-gram is restarted but the transaction is not can-celed. In this case, we recommend that youcancel the transaction that failed (see below).
2.9.5 Managing the special casesPower failure
If a breakdown (power outage, reboot, …) occursduring a transaction, the data files may be inconsis-tent: the transaction was neither validated nor can-celed. The transaction file is still found on thecomputer.In this case, the consistency of the database will berestored:• during the first call to HTransactionStart,• by HTransactionCancel,• by WDTrans.
Caution: Restoring the consistency of the databasemay take quite a long time.Note: To find out whether the consistency of thedatabase must be restored, check the result ofHTransactionInterrupted in the initialization code ofthe project (for example).
Tip: restoring the consistency of the database
To restore the consistency of the database, the fol-lowing operations are recommended:1. Check the result of HTransactionInterrupted inthe initialization code of the project for example.2. If the transaction was interrupted, perform oneof the following operations to restore the consis-tency of the database:• call HTransactionCancel,• call HTransactionStart/HTransactionEnd,• start WDTRANS.
Example:
Other solution: the error 70034 can also be mana-ged in the initialization code of the project via theWHEN EXCEPTION keyword. Therefore, when theerror 70034 occurs, the consistency of the data-base will be restored either by HTransactionCancel,or by HTransactionStart/HTransactionEnd.Note: After a power outage, we advise you to rein-dex the data files of the application.
Error while using theupdate
When the execution of the application or site stopsbecause of a programming error (division by zerofor example), the current transaction is automati-cally canceled.
Deleting the log of transactionThe transaction log is a HFSQL file created and pre-sent only during the time of the transaction. Youmust not delete this file otherwise the databasemay not be consistent anymore.
If HTransactionInterrupted() THEN If Confirm("The transaction per-formed by " + h.trsPost + ... "was interrupted. Do you want to restore the integrity of the files?") THEN// Cancels the interrupted // transactionsIF HTransactionCancel() = False THEN Info("Cannot cancel the transac-tion") END ENDEND
WLangage.book Page 352 Jeudi, 20. mars 2014 4:29 16
Part 7: Managing the data files 353
2.9.6 Advanced managementTransactions: The created files
Two types of HFSQL data files are created whenimplementing the transactions:• The log of operations in transaction: Temporary
file in HFSQL format containing the different ope-rations performed on the application or site filestaken into account by the transaction. This file iscreated by HTransactionStart. By default, it isnamed <Project Name>_$TRS_OPERATION. Thisname can be modified by HTransactionStart.
• The log of values: Temporary file associated witheach data file taken into account by the transac-tion. This file is named <File Name>_$$_TRSVAL.Fic.For each operation performed in the transaction,this file contains:•the content of the record after the operation
(during a deletion for example),•the content of the record after the operation
(during an addition for example).
Identifier of the computer that performs the transaction
By default, the computer is identified by a uniquenumber and by the name of the computer (definedin Windows).
To easily identify the computer that performs theoperations in transaction, HPost is used to definean identifier specific to the computer. This identifierreplaces the name of the computer. This identifieris saved in the log of operations in transaction andit can be consulted with WDTRANS.By default, the computer performing the transac-tion corresponds to the Web server. This computeris identified by a unique internal number and by thename of the computer (name defined in Windows).To easily identify the computer of the Web user whoperforms the operations in transaction, HPost isused to define an identifier specific to the computerof the Web user. To define a unique identifier foreach Web user, call BrowserIPAddress. This identi-fier is saved in the log of operations in transactionand it can be consulted with WDTRANS.
2.10 Logs
2.10.1 General points"Logging" the files found in an analysis is an inte-resting feature.
What is a log?The log is a special file in which WinDev or WebDevautomatically stores all the operations performedon one or more data files from a given time (filecreation, last automatic data modification, last bac-kup performed by WDLog, …). The log contains the history of file use, whichmeans:• the full backup before it is used or modified by
the user or by the Web user,• the full backup after it is used or modified by the
user or by the Web user,• the author of the operation or modification,• the date of the operation or modification,• the nature of the operation performed: addition,
modification, deletion, reading.
What is a log used for?The log can be handled by WDLog. The followingoperations can be performed from a log:• Restore the content of a logged data file if the
data file is lost or destroyed.• Restore the content of a logged data file up to a
given date.• Find the author, the date and time of an opera-
tion performed on a specific record.• Keep a history of file use (to calculate statistics
for example).Examples:• The last backup was done a month ago. You
made a mistake when using the file. The log ena-bles you to retrieve your data, without losing thedata from the last month of work!
• A user entered the orders of last week instead ofthe orders of this week during the entire morning. To avoid losing a large amount of data, we adviseyou to restore all the analysis files to their pre-vious status (yesterday evening). The operation is straightforward. The person incharge of maintenance will restore the data filesthat were previously saved by WDLog. Via the log,WDLog can rebuild the files, operation by opera-tion, from the last backup up to the chosen time.
WLangage.book Page 353 Jeudi, 20. mars 2014 4:29 16

354 Part 7: Managing the data files
The types of logsThe following options allow you to log your datafiles. Depending on the selected option, different
files will be automatically created.
2.10.2 Implementing the log processDefining the log process for the data files
The log process for the HFSQL data files is imple-mented in the data model editor.To implement the log process on a file described inthe analysis:1. Perform a backup of the data files in their cur-rent status via WDLog.2. In the data model editor, display the file descrip-tion ("Description of data file" from the popupmenu).3. In the "Various" tab, select the type of log tomanage for this file.
4. Depending on the selected option, specify (ifnecessary) the directory of the different files crea-ted by the log process.
Caution: the JournalIdentification and JournalOpe-ration files are always located in the same direc-tory. By default, these files are created in thedirectory of the application or site. This directory isdefined in the analysis options ("Analysis descrip-tion" from the popup menu of the analysis, "Logs"tab) and it can be modified for each file.Advice: The log files are used to save the opera-tions performed on a file in order to replay them ona backup in case of problem (damaged disk forexample). We recommend that you save the logfiles in directories (and even disks) different fromthe ones used for the data files.
Option Action performed Files automatically created
No log (default option) None
Write-to-file log All the addition, modification and dele-tion operations will be saved in the log. When to choose this option? To find out who modified the file andwhat modification was performed.
<File name>.JNL.fic
History of accesses to the file Only the HFSQL commands used toaccess the file will be stored. When to choose this option? To find out the operations performed onthe file. Caution: you cannot find out thevalue of the record before and after modi-fication.
JournalOpération.ficJournalIdentification.Fic
Write-to-file log + History ofaccesses
All the addition, modification and dele-tion operations will be saved in the log. The HFSQL commands used to accessthe file will be stored as well. When to choose this option? To find out: - who modified the file, - what modification was performed, - what are the operations performed onthe file.
<File name>.JNL.ficJournalOpération.ficJournalIdentification. fic
WLangage.book Page 354 Jeudi, 20. mars 2014 4:29 16

Part 7: Managing the data files 355
Defining the log process for the itemsBy default, all the items of a logged file are automa-tically logged. However, you can specify whethersome items must be logged or not.For example, if one of the data files uses a memoitem to store an image (information not that impor-tant and that does not change very often), you havethe ability not log this item.To avoid performing a log process on an item:1. Display the description window of the data file("Description of items" from the popup menu).2. Select the requested item.3. In the "Advanced" tab, uncheck "Log the item".
Generate the analysisOnce the log process was defined in the datamodel editor, the analysis can be generated.Caution: Before performing this operation, werecommend that you save the data files withWDLog.
Automatic data modification and log process
When an automatic modification of data files is per-formed on logged files:1. The log files are automatically saved.2. The log files are flushed.
2.10.3 Files created when implementing the log processWhen an analysis file was described with a logoption, the following files can be created:
See the online help for more details.
To configure the location of these files and theirpasswords:• JournalOpération and JournalIdentification files:
by default, these files are created in the directory of the application or site. To modify this directory:1. Display the analysis description ("Analysis des-cription" from the popup menu).2. Display the "Log" tab.3. Select the directory of the file and its password if necessary. Note: This directory can also be modified for each logged file ("Description of data file" option, "Various" tab). In this case, the JournalOperation and JournalIdentification files will be created for each file at the specified location.
• *JNL file: By default, this file is created in thedirectory of the application or site. To modify thisdirectory:1. Display the file description ("Description ofdata file" from the popup menu).2. Display the "Various" tab.3. Select the directory of the file. Note: The password of the *JNL.fic file and thepassword of the data file will be identical.
2.10.4 WDLog: Tool for log managementWDLog is used to:• Save and restore your data files.• Check the consistency of a log and clear it if
necessary.• Restore a data file from its log.• Find out who modified a record, and when, ... This tool can be freely distributed. See the onlinehelp for more details.
JournalOpéra-tion.Fic
List of all the operations perfor-med on the logged HFSQL datafiles used by the application orby the site. An operation corres-ponds to a HFSQL function.
JournalIdentifica-tion.Fic
List of the physical locations ofall the logged files found in theapplication or site.
*JNL.Fic File created for each logged file.Contains the backups of therecords for all the operationsperformed by the user.
WLangage.book Page 355 Jeudi, 20. mars 2014 4:29 16
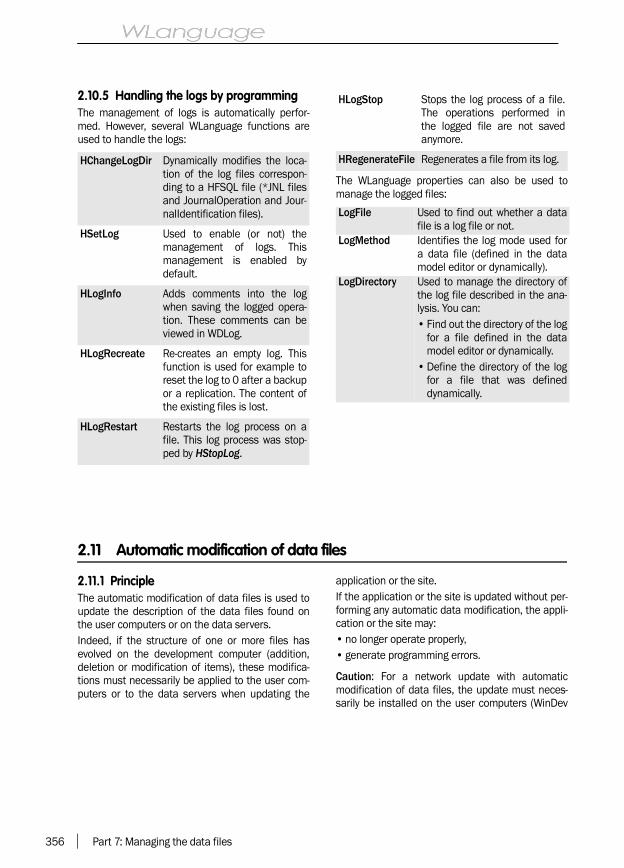
356 Part 7: Managing the data files
2.10.5 Handling the logs by programmingThe management of logs is automatically perfor-med. However, several WLanguage functions areused to handle the logs:
The WLanguage properties can also be used tomanage the logged files:
2.11 Automatic modification of data files
2.11.1 PrincipleThe automatic modification of data files is used toupdate the description of the data files found onthe user computers or on the data servers.Indeed, if the structure of one or more files hasevolved on the development computer (addition,deletion or modification of items), these modifica-tions must necessarily be applied to the user com-puters or to the data servers when updating the
application or the site.If the application or the site is updated without per-forming any automatic data modification, the appli-cation or the site may:• no longer operate properly,• generate programming errors.
Caution: For a network update with automaticmodification of data files, the update must neces-sarily be installed on the user computers (WinDev
HChangeLogDir Dynamically modifies the loca-tion of the log files correspon-ding to a HFSQL file (*JNL filesand JournalOperation and Jour-nalIdentification files).
HSetLog Used to enable (or not) themanagement of logs. Thismanagement is enabled bydefault.
HLogInfo Adds comments into the logwhen saving the logged opera-tion. These comments can beviewed in WDLog.
HLogRecreate Re-creates an empty log. Thisfunction is used for example toreset the log to 0 after a backupor a replication. The content ofthe existing files is lost.
HLogRestart Restarts the log process on afile. This log process was stop-ped by HStopLog.
HLogStop Stops the log process of a file.The operations performed inthe logged file are not savedanymore.
HRegenerateFile Regenerates a file from its log.
LogFile Used to find out whether a datafile is a log file or not.
LogMethod Identifies the log mode used fora data file (defined in the datamodel editor or dynamically).
LogDirectory Used to manage the directory ofthe log file described in the ana-lysis. You can:• Find out the directory of the log
for a file defined in the datamodel editor or dynamically.
• Define the directory of the logfor a file that was defineddynamically.
WLangage.book Page 356 Jeudi, 20. mars 2014 4:29 16

Part 7: Managing the data files 357
2.11.2 When is the automatic data modifica-tion required?The automatic data modification is required in thefollowing cases:
Note: For a network setup, the automatic modifica-tion of data files modifies both the data files foundon the server and the ones found on the user com-puters (WinDev only).
2.11.3 Performing the automatic data modi-ficationDevelopment computerThe automatic modification of data files is systema-tically performed when the analysis is generated onthe development computer.To apply the automatic modification to the datafiles found on the user computers or on the dataservers, the automatic modification must be perfor-med when installing the application update or thesite update. The configuration of this automaticmodification can be performed when creating thesetup program.
Deployment computerWhen installing an update with automatic modifica-tion of data files, the user or the site manager willbe able to configure the automatic modification byclicking the "Advanced" button. This button is foundon the first plane of the setup program. A window isdisplayed, allowing you to:• Create a report file for the operations performed
during the automatic data modification. If a pro-blem occurs, this file can be transmitted to theapplication or site manager. By default, this file is named "LOGMODAUTO.TXT"and it is created in the setup directory of theapplication or site.
• List the data files in HFSQL format onto which theautomatic modification will be performed. Youwill have the ability to add to this list:•additional data files,•additional directories containing data files.
• Specify additional directories containing datafiles in Hyper File 5.5 format that are not automa-tically found during the update.
Development computer User computers/Data server
Case 1: Modifying thestructure of thedata files inHFSQL format
The application or the site isusing data files in HFSQL for-mat.The structure of the data fileswas modified (addition or dele-tion of items, …).
The application or the site is using data files inHFSQL format.These modifications must necessarily be appliedwhen updating the application or the site. Therefore,the structure of the files will be identical to the oneof the development computer.
Case 2:Migrating HyperFile 5.5 data files(WinDev 5.5 orWebDev 1.5) toHFSQL Classic
The application or the site isusing data files in HFSQLClassic format.
The application or the site is using data files in HyperFile 5.5 format (WinDev 5.5/WebDev 1.5).The files must necessarily be migrated from HyperFile 5.5 to HFSQL Classic when updating the applica-tion or the site. Therefore, the structure of the fileswill be identical to the one of the development com-puter.
Case 3:Modifying thestructure of datafiles in Hyper File5.5 format (Win-Dev 5.5/WebDev1.5)
The application or the site isusing data files in Hyper File5.5 format (WinDev 5.5/WebDev 1.5).The structure of the data fileswas modified (addition or dele-tion of items, …)..
The application or the site is using data files in HyperFile 5.5 format (WinDev 5.5/WebDev 1.5)These modifications must necessarily be appliedwhen updating the application or the site. Therefore,the structure of the files will be identical to the oneof the development computer.
WLangage.book Page 357 Jeudi, 20. mars 2014 4:29 16

358 Part 7: Managing the data files
Notes:• During the update, the data files automatically
found are:•the files found in the setup directory of the
application or site,•the files listed in the ".REP" file.
See “Reassigning data files”, page 344 formore details.
• To prevent the user from accessing the optionsfor configuring the automatic modification,WDINST (the setup editor) allows you to hide the"Advanced" button in the setup program (WinDevonly).
Forcing the automatic modification of filesOn the development computer and on the deploy-ment computer, an automatic modification of datafiles can be performed at any time.Indeed, in some cases, the automatic data modifi-cation cannot be performed properly: data filesfound on a laptop computer not connected to thenetwork at the time of update, faulty update, ... Inthis case, the automatic modification of data filesmust be forced in order for the application or thesite to operate. WDModFic allows you to force theautomatic modification of data files.
2.11.4 NotesRunning the automatic modification of data filesseveral timesThe automatic modification will have no effect onthe application or the site if it is performed on datathat is already updated.
Default configuration of the setup programIf the application or the site is associated with ananalysis, by default, the setup program proposes toperform the automatic modification of data files.The user or the site manager can access the confi-guration options of the automatic modification byclicking the "Advanced" button.Saving the data filesThe data files of the application or site are automa-tically saved before performing the automatic modi-fication. The backup directories are named:• "Backup of Auto Modif (<DateAutoModif>
<TimeAutoModif>)" for an automatic modifica-tion of data files without migration
• "Files before conversion (<DateAutoModif><TimeAutoModif>)" for a migration of data filesfrom Hyper File 5.5 to HFSQL.
2.12 Creating dynamic (or temporary) files
In WLanguage, you have the ability to describe tem-porary HFSQL files by programming.To describe temporary files, you must:1. Declare the "File description", "Item description"and "Link description" variables (if necessary). These types are presented from page 56.2. For each file:• describe the characteristics of the file via the
HFSQL properties,• describe the characteristics of the items via the
HFSQL properties,• validate the description of each item (HDescri-
beItem),• validate the description of the file (HDescribe-
File).3. Describe (if necessary) the characteristics of thelinks via the HFSQL properties.4. Validate (if necessary) the description of eachlink (HDescribeLink).
To describe a temporary file, an HFSQL analysismust be associated with the current project.
Notes:• A dynamic file can be linked to a window, a page,
a report or a control via the WLanguage proper-ties.
• The dynamic files can be modified by the automa-tic modification of files.
• A dynamic file can be reindexed by WDTool or byHIndex.
• The functions used to describe the temporaryfiles cannot be used in external language. Theycannot be used to modify a file described in thedata model editor of WinDev/WebDev (non-tem-porary file)
• Specific xBase functions are used to create tem-porary xBase files.
WLangage.book Page 358 Jeudi, 20. mars 2014 4:29 16

Part 7: Managing the data files 359
2.13 Retrieving the structure of the HFSQL files found in an analysis
You have the ability to retrieve the structure of thefiles found in an analysis. This enables you tocreate a tool such as the file viewer (WDMAP).The following functions are used to retrieve thestructure of the files (they cannot be used on xBasefiles).
Notes:• HOpenAnalysis accepts in parameter an optional
password if a password was defined during theanalysis description (WDMAP password). Thispassword protects the access to the analysis byprogramming.
• To use HListFile, HListItem and HListKey, there isno need to open the analysis with HOpenAnaly-sis.
• To retrieve the structure of the data files found inan analysis, if the analysis is associated with theproject, there is no need to open the analysis withHOpenAnalysis. The description file of the analy-sis (WDD) must be installed in the project library(WDL) or in the analysis directory.
2.14 Speeding up processes and optimizing an application or a site
Several management mechanisms are enabled bydefault when creating a WinDev application or aWebDev site. To optimize the response time of your applicationsor sites, we recommend that you "disable" theunnecessary management mechanisms. The fol-lowing management mechanisms are enabled bydefault:• the transactions,• log,• the memos,• the .REP,• the replication,• the triggers,• RPC.
For each one of these management mechanisms,let’s see a summary of the feature and how it canbe disabled by programming.
Caution: All these features must be disabled in theinitialization code of the project.
2.14.1 Management of transactionsThe management of transactions is used to keepthe integrity and consistency of a database, regar-dless of the operation performed on the database.See “Transactions”, page 350 for more details.If no file is in transaction, the management of tran-sactions is useless. It can be disabled by HSetTran-saction.
2.14.2 Managing the logThe log file is a specific file used to store all thewrite operations performed on a data file since thelast backup. Its operating mode is presented in“Logs”, page 353.If no file is logged, HSetLog is used to disable themanagement of logs.
HCloseAnalysis Closes an analysis that wasopened by HOpenAnalysis
HListAnalysis Returns the name of the ana-lyses and the drive on whichthey are installed
HListKey Returns information about thekeys of an analysis
HListFile Returns the name of the filesfound in an analysis
HListItem Returns the structure (items)of a file
HOpenAnalysis Opens an analysis to accessits data files
HRetrieveItem Returns the content of thespecified item for the currentrecord
HToItem Writes the content of the spe-cified item for the currentrecord
WLangage.book Page 359 Jeudi, 20. mars 2014 4:29 16

360 Part 7: Managing the data files
2.14.3 Managing the memosThe management of memos is required when thefiles contain memo items. Their management isdescribed in “Managing the "memo" files”,page 343.If no file contain memo items, their managementcan be disabled by HSetMemo.
2.14.4 Managing the ".REP"The ".REP" file contains the physical name anddirectory of the HFSQL data files found in an appli-cation or site. See “Reassigning data files”,page 344 for more details.If your application or site does not required themanagement of ".REP", it can be disabled by HSe-tREP.
2.14.5 Management of replicationThe data replication is used to keep the data filesfound on different computers updated. Its use ispresented in “The data replication”, page 386.
If your application or site does not use the replica-tion, its management can be disabled by HSetRe-plication.
2.14.6 The management of triggersA trigger corresponds to the association between aprocedure and a modification action performed ona record found in one or more files. Its use is pre-sented in “HFSQL triggers”, page 380.If no trigger is used in the application or site, themanagement of triggers can be disabled by HSet-Trigger.
2.14.7 The management of RPCThe RPC is used to consult a HFSQL database viaInternet/Intranet or STW (Switched TelephoneNetwork). The management of RPC is presented inthe online help.If your application or site does not manage theremote access, we advise you to disable its mana-gement via HSetRemoteAccess.
2.15 ODBC driver on HFSQL
2.15.1 OverviewThe ODBC driver on HFSQL allows you to access aHFSQL database from an external databasesoftware that supports the accesses by ODBC.The HFSQL data can be accessed in read and writemode.
SetupWhen installing WinDev/WebDev on the develop-ment computer, you have the ability to install theODBC driver on HFSQL.Furthermore, the setup of the ODBC driver onHFSQL can be included when configuring the setupprogram of your applications or sites.
2.15.2 ConfigurationTo use the ODBC driver for HFSQL:1. Start the administrator of ODBC data(ODBCAD32.EXE) on your computer or on the ser-ver. Select for example "Start .. Run" in Windowsand type "ODBCAD32.EXE".2. Select the "User database" tab.
3. Click the "Add" button.4. Select the "HFSQL" driver.5. Click the "Done" button.6. Enter the name of the HFSQL data source. Thisname will be used to identify the HFSQL databasein the external programs.7. Click the "Details" button.8. Select the WDD file corresponding to the analy-sis ("Browse" button).9. In the list of analyses, select the requested ana-lysis and the directory of the data files ("Browse"button). All the HFSQL data files corresponding tothe selected analysis are grouped in this directory.
Caution: a file directory must be selected for eachanalysis.10. Validate ("OK" button).
The database can be used in read/write mode fromexternal programs via the ODBC driver on HFSQL .
For more details about the ODBC driver for HFSQLClassic. see the online help.
WLangage.book Page 360 Jeudi, 20. mars 2014 4:29 16

Part 7: Managing the data files 361
2.16 ODBC on HFSQL via J++ and JDBC
2.16.1 OverviewThe ODBC driver on HFSQL is used to access aHFSQL database from an external databasesoftware that supports ODBC accesses. This givesyou the ability to use the ODBC driver on HFSQL 7via J++ and JDBC.You must use:• the Microsoft or Sun JDBC driver• Sun JDK or Visual J++.Caution: The following limitations apply whenusing the ODBC drivers on HFSQL via J++ andJDBC:To prevent the other programs from modifying yourHFSQL data, the driver is read-only. The ODBC dri-ver on HFSQL is a level 2 ODBC driver. See a speci-fic documentation for more details.
2.16.2 SetupThe ODBC driver on HFSQL can be installed whenWinDev or WebDev is installed on the developmentcomputer.
Furthermore, when configuring the setup programof your WinDev applications, you have the ability toinclude the setup of the ODBC driver on HFSQL.
2.16.3 ConfigurationTo use the ODBC driver on HFSQL, you must confi-gure the ODBC driver:1. Start the administrator of ODBC data(ODBCAD32.EXE) on your computer. Select forexample "Start .. Run" in Windows and type"ODBCAD32.EXE".2. Select the "User database" tab.3. Click the "Add" button.4. Select the "HFSQL" driver.5. Click the "Done" button.6. Enter the name of the HFSQL data source. Thisname will be used to identify the HFSQL databasein the external programs.7. Click the "Details" button.8. Click the "Browse" button to select the WDD filecorresponding to the analysis.9. In the list of analyses, select the requested ana-lysis and the directory of the data files ("Browse"button). All the HFSQL data files corresponding to the selec-ted analysis are grouped in this directory. Caution: a file directory must be selected for eachanalysis.
10. Validate ("OK" button). The database can be used in read-only mode fromthe external programs via the ODBC driver onHFSQL.
2.16.4 UseTo use the ODBC driver on HFSQL from your Javaprogram, you must:1. Define the driver used. For example, with the fol-lowing code line:
2. Define the URL on the system ODBC connection("hfodbc" for example):
3. Interrogate the HFSQL database in SQL. Forexample:
Note: The ODBC driver on HFSQL cannot be used toaccess an encrypted HFSQL database.
// Use the JDBC driver of MicrosoftClass.foName("com.ms.jdbc.odbcJ.dbcOdbcDriver");// Use the JDBC driver of SunClass.forName("sun.jdbc.odbc.JdbcO-dbcDriver");
String jURL = "jdbc:odbc:hfodbc";// ConnectionConnection Contact = DriverMana-ger.getConnection(jURL, "<user>", "<pass>");
// Creates a queryStatement jQuery = Contact.createS-tatement();// Run the query and retrieve // ...ResultSet Result = jQuery.execute-Query("SELECT * FROM CUSTOMER");int jColumn = 5; int jRow = 3;
ResultSetMetaData jMetaData= ... Resultat.getMetaData();for (int i=0;i<jLine;i++)Result.next();System.out.println("Column Name : " + jMetaData.getColumnLabel(jCo-lumn)); System.out.println("Value : " + Result.getString(jColumn));Result.close();jQuery.close();Contact.close();
WLangage.book Page 361 Jeudi, 20. mars 2014 4:29 16

362 Part 7: Managing the data files
2.17 OLE DB provider for HFSQL
2.17.1 OverviewThe OLE DB provider for HFSQL is used to access aHFSQL database (Classic or Client/Server) from anexternal software that manages the accesses byOLE DB.The provider is available in read/write mode. Anapplication written in external language can beused to read and write in HFSQL files.See a specific documentation about OLE DB formore details.
2.17.2 SetupThe OLE DB provider for HFSQL is supplied as asetup pack available in the "Install\OLEDB" direc-tory of WinDev/WebDev.By default, the OLE DB provider is installed in the"C:\Program Files\Common files\PCSOFT\19.0\OLEDB" directory.Note: In order for an application to use an OLE DBprovider, you must install the MDAC component(Microsoft Data Access Component) version 2.8 orlater. This component can be downloaded from theMicrosoft site. It is included in the operating systemfrom Windows 2003 Server and Windows Vista.
2.17.3 ConfigurationThe application that uses an OLEDB provider mustsupply a connection string. This string defines theprovider to use as well as the connection parame-ters that must be given to this provider to establishthe connection to the database.This string (called connection string) can be:• entered in programming (in an application in C#
or VB.Net for example).• built via a wizard (with Crystal Report for exam-
ple).The format of the connection string is as follows:
<Element1>=<Value1>;<Element2>=<Value2>;…;<ElementN>=<ValueN>
See the online help for more details.
Using the analysis in a connection to a HFSQL Classic database
For a connection to a HFSQL Classic database:• If the path of the WDD file is not specified in the
"Data Source" parameter of the connectionstring: :•Only the files described in this analysis will be
taken into account by the connection.•The links and the integrity rules described in the
analysis are automatically taken into account.• If the path of the WDD file is specified in the
"Data Source" parameter of the connectionstring: :•All the files found in the directory specified in
the "Initial Catalog" parameter will be taken intoaccount.
•No integrity constraint is automatically respec-ted between the files.
Notes:• During an access by the OLE DB provider for
HFSQL, the automatic assistance windows ofHFSQL are disabled.
• The "Duration" items found in the HFSQL datafiles are returned as 8-byte integers by the OLEDB provider. The unit is the millisecond.
• The array items are not supported by the OLE DBprovider.
• In this version, the SQL commands with parame-ters are not supported.
WLangage.book Page 362 Jeudi, 20. mars 2014 4:29 16

Part 7: Managing the data files 363
Examples of OLE DB connection strings
• Connection to a HFSQL Classic database withoutspecifying the analysis:
• Connection to a HFSQL Classic database andspecifying the analysis:
• Connection to a HFSQL Client/Server database:
• Connection to a HFQL Client/Server databasewith password-protected files that use the Rus-sian character set:
Note: In this example, all the database files are pro-tected by the "secret1" password except for the"File2", that is protected by the "secret2" password.
/Provider=PCSOFT.HFSQL;Initial Catalog=c:\My HFSQL Database
Provider=PCSOFT.HFSQL;Data Source=c:\My HFSQL Database\ ... \MyAnalysis.wdd;Initial ... Catalog=c:\My HFSQL Database
Provider=PCSOFT.HFSQL;Data Source=serverdb. mycompany.fr:4910;User... ID=admin;Password=secret;... Initial Catalog=MyDatabase
Provider=PCSOFT.HFSQL;Data Source=serverdb.mycompany.fr... User ID=user;... Initial Catalog=MyRussianDB; ... Extended Properties= ... "Password=*:secret1; ... Password=File2:secret2;... Language=KOI8-R"
WLangage.book Page 363 Jeudi, 20. mars 2014 4:29 16

364 Part 7: Managing the data files
3. SQL LANGUAGE
3.1 Overview
A program developed with WinDev or WebDev canaccess a database according to several modes:• Native Access• OLE DB
• ODBC via OLE DBThis chapter presents how to access:• HFSQL files via SQL,• files of external database by SQL.
3.2 SQL language HFSQL
3.2.1 OverviewSeveral WLanguage functions can be used to tointerrogate a HFSQL database via SQL queries(HExecuteQuery, HExecuteSQLQuery).The HFSQL files can be interrogated:• By queries created with the query editor.
See the "Query and report generator" guide formore details.
• By SQL queries directly entered in the code editor(HExecuteSQLQuery).
• Via the ODBC driver on HFSQL supplied with Win-Dev/WebDev, from an application or a site notdeveloped with WinDev/WebDev.
3.2.2 SQL commands that can be used with HFSQLThe following SQL commands can be used onHFSQL files:
• ADD_MONTH • ALL
• AND • ANY
• AS • ASC
• ASCII • AVG
• BETWEEN • BIN
• BOTTOM • CASE
• CBRT • CEIL - CEILING
• CHAR_LENGTH • CHARACTER_LENGTH
• COALESCE • CONCAT
• COUNT • CREATE TABLE
• DECODE • DEGREES
• DELETE • DESC
• DISTINCT • DIV
• DROP TABLE • EXISTS
• FROM • FULL OUTER JOIN
• GROUP BY • HAVING
• HEX • IN
• INNER JOIN • INSERT
• INSTR • INTO
WLangage.book Page 364 Jeudi, 20. mars 2014 4:29 16

Part 7: Managing the data files 365
All the other SQL commands not listed here are notsupported.
Note: We will not go into details about these com-mands. We recommend that you read a specializedbook or the online help if necessary.
3.2.3 Functions for running queriesThe queries created with the query editor will be ini-tialized by HExecuteQuery.The queries in SQL language will be initialized byHExecuteSQLQuery. To retrieve the content of anSQL query, a data source is required (or a browsingtable, combo box, ... linked to the query).Important: A "data source" variable must always bedeclared as GLOBAL to the window, to the page orto the project. Otherwise, it could not be used to filla table for example because its lifespan would betoo short.If a "data source" variable is declared as a LOCALvariable, a warning will be generated.
Example of query in the query editor (the query isnamed EditorQuery.WDR) :
Example of query in SQL language:
• IS NULL/IF NULL • LAST_DAY
• LAST_INSERT_ID • LEFT
• LEFT OUTER JOIN • LEN
• LENGTH • LIKE
• LIMIT • LOWER
• LPAD • LTRIM
• MAX • MID
• MIN • MONTHS_BETWEEN
• NEW_TIME • NEXT_DAY
• NOT • NVL
• OCT • OCTET_LENGTH
• ON • OR
• ORDER BY • PATINDEX
• POSITION • RADIAS
• RANDOM • REPLACE
• RIGHT • RIGHT OUTER JOIN
• ROUND • RPAD
• RTRIM • SELECT
• SET • SOME
• SOUNDEX • SOUNDEX LIKE
• SOUNDEX2 • SOUNDEX2 LIKE
• SUBSTR • SUBSTRING
• SUM • SYSDATE
• TOP • TRANSLATE
• TRIM • TRUNC
• UNION • UPDATE
• UPPER • UUID
• VALUES • WHERE
SrcQuery is data sourceIF HExecuteQuery(SrcQuery,... EditorQuery) THEN Error(HErrorInfo())ELSE HReadFirst(SrcQuery) WHILE NOT HOut() // Browse the result of the query HReadNext() ENDEND
SrcQuery is data sourceIF not HExecuteSQLQuery(... SrcQuery,"SELECT CustomerName,... "+... "Address FROM CUSTOMER WHERE "+... "CUSTOMER.City LIKE ’PARIS%’") THEN Error(HErrorInfo())ELSE HReadFirst(SrcQuery) WHILE NOT HOut() // Browse the result of the query HReadNext() ENDEND
WLangage.book Page 365 Jeudi, 20. mars 2014 4:29 16
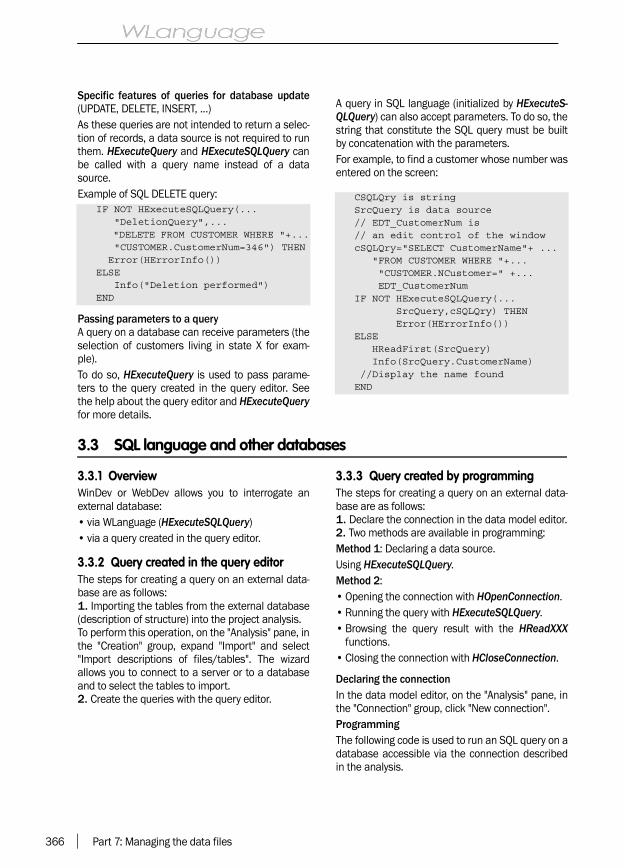
366 Part 7: Managing the data files
Specific features of queries for database update(UPDATE, DELETE, INSERT, ...)As these queries are not intended to return a selec-tion of records, a data source is not required to runthem. HExecuteQuery and HExecuteSQLQuery canbe called with a query name instead of a datasource.Example of SQL DELETE query:
Passing parameters to a queryA query on a database can receive parameters (theselection of customers living in state X for exam-ple).To do so, HExecuteQuery is used to pass parame-ters to the query created in the query editor. Seethe help about the query editor and HExecuteQueryfor more details.
A query in SQL language (initialized by HExecuteS-QLQuery) can also accept parameters. To do so, thestring that constitute the SQL query must be builtby concatenation with the parameters.For example, to find a customer whose number wasentered on the screen:
3.3 SQL language and other databases
3.3.1 OverviewWinDev or WebDev allows you to interrogate anexternal database:• via WLanguage (HExecuteSQLQuery)• via a query created in the query editor.
3.3.2 Query created in the query editorThe steps for creating a query on an external data-base are as follows:1. Importing the tables from the external database(description of structure) into the project analysis. To perform this operation, on the "Analysis" pane, inthe "Creation" group, expand "Import" and select"Import descriptions of files/tables". The wizardallows you to connect to a server or to a databaseand to select the tables to import.2. Create the queries with the query editor.
3.3.3 Query created by programmingThe steps for creating a query on an external data-base are as follows:1. Declare the connection in the data model editor.2. Two methods are available in programming:Method 1: Declaring a data source.Using HExecuteSQLQuery. Method 2:• Opening the connection with HOpenConnection.• Running the query with HExecuteSQLQuery.• Browsing the query result with the HReadXXX
functions.• Closing the connection with HCloseConnection.
Declaring the connectionIn the data model editor, on the "Analysis" pane, inthe "Connection" group, click "New connection".ProgrammingThe following code is used to run an SQL query on adatabase accessible via the connection describedin the analysis.
IF NOT HExecuteSQLQuery(... "DeletionQuery",... "DELETE FROM CUSTOMER WHERE "+... "CUSTOMER.CustomerNum=346") THEN Error(HErrorInfo())ELSE Info("Deletion performed")END
CSQLQry is stringSrcQuery is data source// EDT_CustomerNum is // an edit control of the windowcSQLQry="SELECT CustomerName"+ ... "FROM CUSTOMER WHERE "+... "CUSTOMER.NCustomer=" +... EDT_CustomerNumIF NOT HExecuteSQLQuery(... SrcQuery,cSQLQry) THEN Error(HErrorInfo())ELSE HReadFirst(SrcQuery) Info(SrcQuery.CustomerName) //Display the name foundEND
WLangage.book Page 366 Jeudi, 20. mars 2014 4:29 16

Part 7: Managing the data files 367
Note: All the SQL commands specific to the exter-nal database can be used.
// Declaring the data sourceCustomer75 is data source// Find customer in California// SalesManagement: Name of the// connection described // in the analysisIF NOT ... HExecuteSQLQuery(Customer75,... SalesManagement,... hQueryBreakable,... "SELECT * FROM"+...
" CUSTOMER WHERE STATE "+... "LIKE ’75%’) THEN Error(HErrorInfo()) RETURNEND// Retrieve the resultFOR EACH Customer75 CalculateStats()END
WLangage.book Page 367 Jeudi, 20. mars 2014 4:29 16
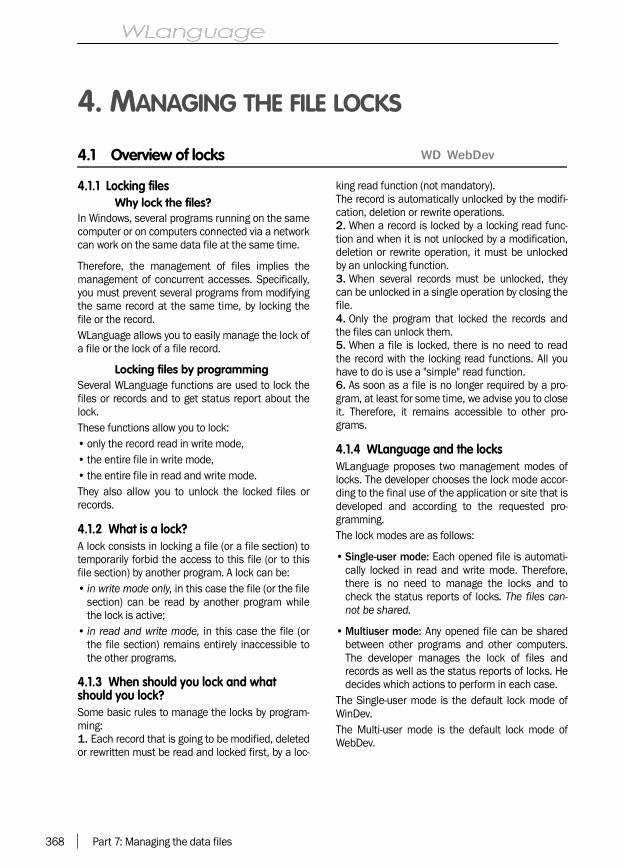
368 Part 7: Managing the data files
4. MANAGING THE FILE LOCKS
4.1 Overview of locks
4.1.1 Locking filesWhy lock the files?
In Windows, several programs running on the samecomputer or on computers connected via a networkcan work on the same data file at the same time.
Therefore, the management of files implies themanagement of concurrent accesses. Specifically,you must prevent several programs from modifyingthe same record at the same time, by locking thefile or the record.WLanguage allows you to easily manage the lock ofa file or the lock of a file record.
Locking files by programmingSeveral WLanguage functions are used to lock thefiles or records and to get status report about thelock.These functions allow you to lock:• only the record read in write mode,• the entire file in write mode,• the entire file in read and write mode.They also allow you to unlock the locked files orrecords.
4.1.2 What is a lock?A lock consists in locking a file (or a file section) totemporarily forbid the access to this file (or to thisfile section) by another program. A lock can be:• in write mode only, in this case the file (or the file
section) can be read by another program whilethe lock is active;
• in read and write mode, in this case the file (orthe file section) remains entirely inaccessible tothe other programs.
4.1.3 When should you lock and what should you lock?Some basic rules to manage the locks by program-ming:1. Each record that is going to be modified, deletedor rewritten must be read and locked first, by a loc-
king read function (not mandatory).The record is automatically unlocked by the modifi-cation, deletion or rewrite operations.2. When a record is locked by a locking read func-tion and when it is not unlocked by a modification,deletion or rewrite operation, it must be unlockedby an unlocking function.3. When several records must be unlocked, theycan be unlocked in a single operation by closing thefile.4. Only the program that locked the records andthe files can unlock them.5. When a file is locked, there is no need to readthe record with the locking read functions. All youhave to do is use a "simple" read function.6. As soon as a file is no longer required by a pro-gram, at least for some time, we advise you to closeit. Therefore, it remains accessible to other pro-grams.
4.1.4 WLanguage and the locksWLanguage proposes two management modes oflocks. The developer chooses the lock mode accor-ding to the final use of the application or site that isdeveloped and according to the requested pro-gramming.The lock modes are as follows:
• Single-user mode: Each opened file is automati-cally locked in read and write mode. Therefore,there is no need to manage the locks and tocheck the status reports of locks. The files can-not be shared.
• Multiuser mode: Any opened file can be sharedbetween other programs and other computers.The developer manages the lock of files andrecords as well as the status reports of locks. Hedecides which actions to perform in each case.
The Single-user mode is the default lock mode ofWinDev.The Multi-user mode is the default lock mode ofWebDev.
WD WebDev
WLangage.book Page 368 Jeudi, 20. mars 2014 4:29 16

Part 7: Managing the data files 369
4.2 Managing locks
4.2.1 Example illustrating the need for locksSeveral examples of lock processes are presentedbelow. They illustrate the need to lock the files.
• To display a list used to select one or morerecords, there is no need to lock the displayedrecords. However, once the selection is performed, inmost cases, the corresponding record must beread to check its existence and it must be lockedso that it can be modified if necessary.
• If one or more records are added into a file, thefile must be locked in order to calculate the valueof an item from another record (customer num-ber for example). In the other cases, there is noneed to lock the file.
• During a statistical process used to calculate theweight of one or more articles in relation to all thearticles, the file must be locked or modificationsmust be forbidden before the process in order tomake sure that the file content will not be modi-fied during the calculation.
• The management of locks often depends on thesituation in which a file is processed. To simplifythe management of locks, for a cash register pro-gram in a store for example, the same customercannot be at several cash registers at the sametime. Therefore, there is no need to lock therecord in the customer file during its processeven though it is modified.
4.2.2 Structure of locksTwo lock levels are proposed:• locking an entire file,• locking a given record.Locking an entire file automatically locks all therecords found in this file.Locking an entire file is possible only if no record inthis file is locked by another computer or anotherprogram.Unlocking a file automatically unlocks all therecords locked by the same program.Important: The locks remain active as long as anunlocking function (on the file or record) or a writefunction (unlocks the written record) is not run.
4.2.3 Dead lock (inter locking)When managing the locks, a situation can occurwhere all the files are locked and cannot be unloc-ked. This is called a "Dead lock".
To avoid a dead lock, we recommend that you fol-low these three steps:1. Lock all the files used in a process according totheir alphabetical order.2. Perform the requested process.3. Unlock the files.
Let’s look at a specific example. The example belowpresents a case of "dead lock".Let’s assume that the P1 and P2 programs performthe following process (do not do!):
The programs perform their locks in the followingorder:• P1 locks F1.• P2 locks F2.• P1 wants to lock F2 but this one is already locked
by P2.• P2 wants to lock F1 but this one is already locked
by P1.
Both programs wait for the file to be unlocked:there is no solution if neither of the 2 programsfrees one of the files!To avoid this situation, let’s follow our previous tips:1. Lock the files according to the alphabeticalorder (F1 then F2).2. Perform the requested process.3. Unlock the files.
The P1 and P2 processes become:
WD WebDev
Program P1 Program P2
LOCK(F1) LOCK(F2)
LOCK(F2) LOCK(F1)
< Process 1 > <Process 2>
UNLOCK(F1) UNLOCK(F2)
UNLOCK(F2) UNLOCK(F1)
Program P1 Program P2
LOCK(F1) LOCK(F1)
LOCK(F2) LOCK(F2)
<Process 1> <Process 2>
UNLOCK(F1) UNLOCK(F1)
UNLOCK(F2) UNLOCK(F2)
WLangage.book Page 369 Jeudi, 20. mars 2014 4:29 16

370 Part 7: Managing the data files
In this case:• P1 locks F1.• P2 cannot lock F1.• P1 locks F2.• P2 waits for F1 to be freed.• The process 1 is run.
• P1 unlocks F1.• P1 unlocks F2.• P2 locks F1.• P2 locks F2. …A dead lock is avoided!
4.3 The available lock modes
Two modes are available for locking the files andrecords.This chapter:• helps you choose the proper mode for your pro-
grams,• explains the method for locking a file or a record,• explains the operating mode of each mode.
4.3.1 Single-user modeThe Single-user mode is the default lock mode ofWinDev.It is characterized by the automatic lock of each fileas soon as it is opened. The file will be unlockedwhen it is closed.WinDev 5.5 user: this mode corresponds to HMo-deAuto of WinDev 5.5.This mode is kept for backward compatibility withWinDev. It must not be used in a WebDev site.WeDev 1.5 user: this mode corresponds to HMo-deAuto of WebDev 1.5.
When should this mode be used?The Single-user mode is used to easily develop pro-grams whose files are not shared by several compu-ters or by several programs at the same time.With the Single-user mode, there is no need tomanage the locks by programming, the files are loc-ked as soon as they are opened in read/write. Thefiles cannot be shared.
Important• The Single-user mode is not suitable for the pro-
grams operating in network.If a program developed in Single-user mode is runseveral times on the same computer or is run innetwork, an error message will be displayed, indi-cating that the Single-user mode is not appro-priate for this type of operating mode.
• A program developed in Single-user mode cannotbe run several times in Windows.
How are the files locked in Single-user mode?
The Single-user mode is the default lock mode ofWinDev.In Single-user mode, as soon as a file is opened bya function (HOpen or any other function, for exam-ple HReadFirst, HCreation, …), the file is automati-cally locked for in read/write.If access to the file is refused (the file is already loc-ked by another program), the program execution isterminated after the display of a message indica-ting that this mode is not appropriate.
A file that was locked during its opening is automa-tically unlocked as soon as it is closed:• by HClose, if it is called,• to be able to open another file when the maxi-
mum number of files that can be opened is rea-ched (automatic file closing).
Notes• If the file is unlocked by HClose (or HUnlockFile,
HUnlockEntireFile) or by the automatic closing, inthe rest of the program, it will be locked again when it is re-opened by afunction.
• In Single-user mode, the file is locked as long asit is opened. Therefore, we advise you to keep afile locked for the smallest amount of time. We recommend that you close a file as soon as itis not used anymore.
How to share data in Single mode?In Single-user mode, the files cannot be shared.However, in some analysis, two programs can berun at the same time, one modifying the files, theother one reading the files. In this case, the pro-grams in Single-user mode can access the file atthe same time.If a program (modifying files) developed in Single-user mode is run several times on the same compu-ter or is run in network, an error message will bedisplayed, signaling that the Single-user mode is
WD WebDev
WLangage.book Page 370 Jeudi, 20. mars 2014 4:29 16
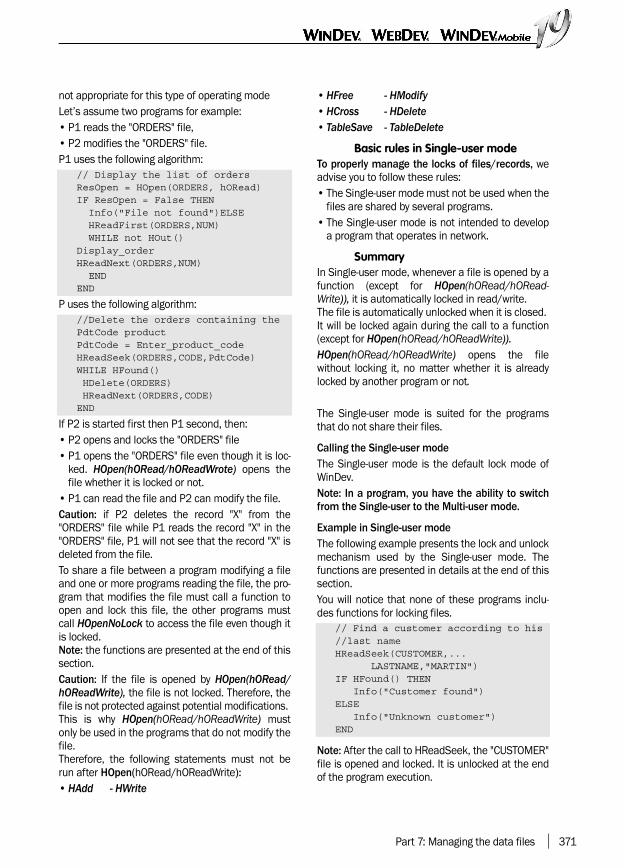
Part 7: Managing the data files 371
not appropriate for this type of operating modeLet’s assume two programs for example:• P1 reads the "ORDERS" file,• P2 modifies the "ORDERS" file.P1 uses the following algorithm:
P uses the following algorithm:
If P2 is started first then P1 second, then:• P2 opens and locks the "ORDERS" file• P1 opens the "ORDERS" file even though it is loc-
ked. HOpen(hORead/hOReadWrote) opens thefile whether it is locked or not.
• P1 can read the file and P2 can modify the file.Caution: if P2 deletes the record "X" from the"ORDERS" file while P1 reads the record "X" in the"ORDERS" file, P1 will not see that the record "X" isdeleted from the file.To share a file between a program modifying a fileand one or more programs reading the file, the pro-gram that modifies the file must call a function toopen and lock this file, the other programs mustcall HOpenNoLock to access the file even though itis locked.Note: the functions are presented at the end of thissection.Caution: If the file is opened by HOpen(hORead/hOReadWrite), the file is not locked. Therefore, thefile is not protected against potential modifications. This is why HOpen(hORead/hOReadWrite) mustonly be used in the programs that do not modify thefile.Therefore, the following statements must not berun after HOpen(hORead/hOReadWrite):• HAdd - HWrite
• HFree - HModify• HCross - HDelete• TableSave - TableDelete
Basic rules in Single-user modeTo properly manage the locks of files/records, weadvise you to follow these rules:• The Single-user mode must not be used when the
files are shared by several programs.• The Single-user mode is not intended to develop
a program that operates in network.
SummaryIn Single-user mode, whenever a file is opened by afunction (except for HOpen(hORead/hORead-Write)), it is automatically locked in read/write. The file is automatically unlocked when it is closed. It will be locked again during the call to a function(except for HOpen(hORead/hOReadWrite)).HOpen(hORead/hOReadWrite) opens the filewithout locking it, no matter whether it is alreadylocked by another program or not.
The Single-user mode is suited for the programsthat do not share their files.
Calling the Single-user modeThe Single-user mode is the default lock mode ofWinDev.Note: In a program, you have the ability to switchfrom the Single-user to the Multi-user mode.
Example in Single-user modeThe following example presents the lock and unlockmechanism used by the Single-user mode. Thefunctions are presented in details at the end of thissection.You will notice that none of these programs inclu-des functions for locking files.
Note: After the call to HReadSeek, the "CUSTOMER"file is opened and locked. It is unlocked at the endof the program execution.
// Display the list of orders ResOpen = HOpen(ORDERS, hORead)IF ResOpen = False THEN Info("File not found")ELSE HReadFirst(ORDERS,NUM) WHILE not HOut()Display_orderHReadNext(ORDERS,NUM) ENDEND
//Delete the orders containing the PdtCode productPdtCode = Enter_product_codeHReadSeek(ORDERS,CODE,PdtCode)WHILE HFound() HDelete(ORDERS) HReadNext(ORDERS,CODE)END
// Find a customer according to his //last name HReadSeek(CUSTOMER,... LASTNAME,"MARTIN")IF HFound() THEN Info("Customer found")ELSE Info("Unknown customer")END
WLangage.book Page 371 Jeudi, 20. mars 2014 4:29 16

372 Part 7: Managing the data files
4.3.2 Multi-user modeThe Multi-user mode is the default lock mode ofWebDev.The Multi-user mode is characterized by:• the locks are managed by the developer in the
programs,• the status reports of locks (to find out whether
some file records are already locked by anotherprogram) are managed in the programs by thedeveloper who decides on the processes to per-form.
WinDev 5.5 user: this mode corresponds to HMode-Perso of WinDev 5.5.
When should this mode be used?The Multi-user mode must be used when one ormore program files must be shared by several pro-grams.Therefore, the Multi-user mode must be used assoon as a logical update operation performed onseveral files cannot be interrupted: either all thefiles are updated or none.
In WinDev, the Multi-user mode proposes an auto-matic management:• of lock errors,• of modification conflicts.This automatic management can be customized atany time by HOnError. See the online help for more details.Note: the management of locks used in WinDev 5.5is available for backward compatibility.
Calling the Multi-user modeTo call the Multi-user mode in a program, all youhave to do is run HMode(hModeMulti) at the begin-ning of the program
Two methods are available for implementing thelocks:• Direct mode: hModeDirect constant (default
value): implement the priority locks (on the modi-fication for example). Therefore, a record on which several read opera-tions are performed will not be modified but thelocks are faster.
• Reservation mode: hModeReservation constant:implement the non-priority locks. This method enables you to immediately modify arecord on which several read operations are per-formed. This method is slower than the hModeDi-rect method.
SummaryThe Multi-user mode allows you to share one ormore files between several programs.The developer manages the file locks by program-ming. He must also check HErrorLock after all theHFSQL functions.The Multi-user mode is suited for the programs thatmanage files that can be shared. The programs pro-cess a logical update operation of several files thatcannot be interrupted.
4.3.3 The possible locks in multi-user modeLocking files by programming
Several methods can be used to lock a file or arecord:• locking the file,• locking record by record.
Lock the fileThe entire file must be locked if the two followingconditions are fulfilled:• if several records must be locked at the same
time,• to simplify the programming.The following functions are used to lock a file:• HLockFile: the file is locked in write mode.• HLockFile(hLockRead/hLockWrite): the file is loc-
ked in read/write.• HNoModif: the file is locked in write mode inclu-
ding for the program that locked it.
The following functions are used to unlock a file:• HUnlockFile: the file was locked by HLockFile.• HEndNoModif: the file was locked by HNoModif.• HLock: the file is closed and unlocked.
Locking record by recordThe records can be locked while they are usedwithout the file being entirely locked.The following functions are used to lock a record:HRead, HReadSeekFirst, HReadSeekLast, HRea-dLast, HReadFirst, HReadNext, HReadPrevious
After each function, you must check HErrorLock tomake sure the record was locked.Caution: at the end of the process, don’t forget tounlock the records locked by: HUnlockFile, HClose,HEndNoModif, HUnlockNumRec, HAdd, HModify,HWrite, HCross, HDelete, TableDelete, TableSave.
WLangage.book Page 372 Jeudi, 20. mars 2014 4:29 16

Part 7: Managing the data files 373
Note: Locking a record by using the "HRead…" func-tions has no effect if the file was previously locked
by the "HLock…" functions, the function is equiva-lent to "HRead…"
4.4 Assisted management of HFSQL errors
The HFSQL engine enables you to manage differenttypes of errors by programming:• Duplicate error• Integrity error• Password error• Error of modification conflict and error of modifi-
cation status conflict• Lock error• Error of mandatory input• Reindexing in progress
At any time, HOnError allows you to customize theassisted management of errors or to disable thismanagement. For each type of error, you can:• manage this error via a specific window or via a
procedure,• Disable the assisted management and manage
the error by programming (like in WinDev 5.5).
4.4.1 PrincipleTo simplify data file management programming, themost common types of errors are automaticallymanaged by the HFSQL engine.This automatic management helps the user pro-cess the error. In most cases, the error is caused bya problem involving the data entered.This automatic management is proposed by defaultand it can be customized or disabled.
Note: The assisted management of errors is availa-ble for the files in HFSQL Classic format,for the files handled via a native access or for thefiles handles via an OLE DB provider.If your files are used via an OLE DB provider, onlythe following will be managed:• The duplicate errors
Caution: Some duplicates error may not be reco-gnized as such by the OLE DB access. Theseerrors will not be managed as duplicates errorsbut they will be considered as being fatal errors.Example: the WinDev analysis and the descrip-tion of the external database are not synchroni-zed and the description of the file in the analysis
does not contain all the unique keys defined inthe database.
• The errors of mandatory input Caution: The error of mandatory input occurs onlyif the OLE DB provider indicates that the item isassociated with the "NULL forbidden" property.Otherwise, the error will be processed like a fatalerror.
If your files are handled via a native access, onlythe management of mandatory password is notavailable.
4.4.2 Standard operating modeDuplicate error
• Cause of the errorThe user adds a record for which the value of aunique key already exists. For example, the name of the city is defined asunique key of Customer file in the analysis.Adding a city with a name taht is already usedtriggers a duplicate error.
• Default assisted management (WinDev andWebDev) If a duplicate error is detected, a window or apage is displayed, asking the user to modify thevalue of the record that caused the error.
• Processing the error (WinDev Mobile) Check HErrorDuplicates after each call to aHFSQL function that may trigger a duplicate error(HAdd or HModify for example). The error detailsare returned by HErrorInfo.
Integrity error• Cause of the error
The user tries to add a record without respectingthe integrity constraints defined between the filesin the analysis. For example, the files named CEDEX, STATE andREGION are linked between themselves.
These links comply with the relational integrityconstraints. An integrity error occurs whenadding a state without creating the correspon-ding region.
WLangage.book Page 373 Jeudi, 20. mars 2014 4:29 16

374 Part 7: Managing the data files
• Default assisted management (WinDev andWebDev) When an integrity error occurs, a window or apage is displayed, allowing the user to cancel theoperation or to modify the data entered.
• Processing the error (WinDev Mobile) Check HErrorIntegrity after each call to a HFSQLfunction that may trigger an integrity error (HAddor HModify for example). The error details arereturned by HErrorInfo.
Password error• Cause of the error
The program tries to handle a password-protec-ted file (opening, first read operation, …). Thepassword was not specified by programming: apassword error occurs.
• Default assisted management (WinDev andWebDev) When a password error occurs, a window or apage is displayed, allowing the user to enter thefile password.
• Processing the error (WinDev Mobile) Check HErrorPassword after each call to aHFSQL function that may trigger a password error(HOpen or the first FSQL function that handlesthe file for example). The error details are retur-ned by HErrorInfo.
Error of modification conflict and error of modification status conflict
• Cause of the error When using an application or a site in network,conflicts may occur due to conflicting data ente-red by different users.For example: 1. The user X edits the form for the state of "Cali-fornia". 2. The user Y edits the form for the state of "Cali-fornia". 3. The user X renames the state to"California_01". 4. The user Y modifies the name of the state("California_02") and saves. A modification con-flict occurs during this backup.
A modification conflict occurs.A modification status conflict occurs when theform is deleted by the user X for example.
The different cases are presented in the tablebelow:
• Default assisted management (WinDev andWebDev) If a conflict occurs when modifying a record, awindow or a page is displayed, proposing the dif-ferent possible values for the record:• the value read in the file (before modification)• the value modified by another user,•the value entered by the current user.
The user can choose the value of the item that willbe saved.If a status conflict occurs when a record is modi-fied, a window is displayed, allowing the user to:• re-enable the deleted data,• keep the data in its current status.The user can choose the value of the item that willbe saved.• Processing the error (WinDev Mobile)
For the errors of modification conflict, check HEr-rorModification after each HFSQL function thatmay trigger this error (HModify for example). Theerror details are returned by HErrorInfo.For the errors of modification status conflict,check HErrorStatusModification after eachHFSQL function that may trigger this error (HMo-dify for example). The error details are returnedby HErrorInfo.
Record read
Record ondisk
Enabled Crossed Deleted
Enabled Modifica-tion con-flict
Modifica-tion conflict
Modifica-tion conflict
Crossed Conflict ofmodifica-tion status
Modifica-tion conflict
Modifica-tion conflict
Deleted Conflict ofmodifica-tion status
Conflict ofmodifica-tion status
XXXX
WLangage.book Page 374 Jeudi, 20. mars 2014 4:29 16

Part 7: Managing the data files 375
Lock error• Cause of the error
In a network application or in a site, you have theability to lock a record or a file (to perform speci-fic operations for example). A lock error occurswhen a computer tries to access a locked record.
• Default assisted management (WinDev or Web-Dev)When a lock error occurs, the management oflocks (checking whether the file is locked, proces-sing the lock) is automatically performed by theHFSQL engine. A window or a page is displayed, indicating thatthe file or record is locked and allowing the userto retry or cancel the operation. In case of cance-lation, the application continues to run properly.
• Processing the error (WinDev Mobile) Check HErrorLock after each call to a HFSQLfunction that may trigger a lock error.
Mandatory input (database accessed via OLE DB)
• Cause of the error Some file items necessarily expect a value. Anerror of mandatory input occurs if this value wasnot specified.
• Default assisted management (WinDev andWebDev) If a value is not specified, the management ofmandatory input is automatically performed bythe HFSQL engine. A window or a page is displayed, indicating thatthe item must be filled and allowing the user toenter the value of the item.
• Processing the error (WinDev Mobile) The error number associated with this problem is70710: Mandatory input.These error numbers are returned by HError.
Reindexing in progress• Cause of the error
The file used is currently reindexed. The file can-not be used (read, write) during this reindex ope-ration.
• Default assisted management (WinDev or WebDev)A window or a page is displayed, indicating thatthe file is currently re-indexed. This window orpage remains displayed during the entire reindexoperation and it cannot be closed. A progress barindicates the status of the reindex operation.
• Processing the error (WinDev Mobile)The error number associated with this problem is70720: reindex in progress.These error numbers are returned by HError.
4.4.3 CustomizationThe different solutions
WinDev, WebDev and WinDev Mobile enable you tocustomize the HFSQL error management.You have the ability to use custom proceduresA specific procedure of your application is automati-cally run as soon as a HFSQL error occurs.Note: A procedure can be defined for each file andfor each type of error.
WinDev and WebDev enable you to use customwindows or pages: the standard windows/pages ofthe HFSQL engine are replaced by windows/pagesfrom your application.Note: a window/page can be defined for each fileand for each type of error.
ImplementationTo implement the assisted custom management ofHFSQL errors, you must:1. For each type of error, create the procedure, thewindow or the page used to customize the error.The same window, page or procedure can manageseveral types of errors. This window, page or proce-dure must return a specific constant depending onthe process to perform (see the paragraph below).2. Define the customization of errors with HOnEr-ror.
Examples of windows or pages that can easily be included (WinDev and WebDev)
The error windows/pages used by default and pre-sented in the previous paragraphs are supplied (aswell as their WLanguage code) as examples.These windows are available in the "Pro-grams\Data\Preset windows\HFSQL - Automatichelp window" of the WinDev installation directory.These pages are available in the "Pro-grams\Data\Preset pages\HFSQL - Automatic helppages" of the WebDev installation directory.
These windows/pages can be included in your pro-jects, customized and passed in parameter toHOnError.
WLangage.book Page 375 Jeudi, 20. mars 2014 4:29 16

376 Part 7: Managing the data files
Constants used to customize the errors
The procedure, the window or the page used to cus-tomize the error must return one of the constantsfound in the table below.The corresponding process will be run according tothe constant returned.
Note: Customizing the modification errors:If the window, page or procedure called during amodification conflict returns the opRetry constantwithout doing anything else, the values will be writ-ten into the file without triggering a new modifica-tion conflict.
4.4.4 Disabling the assisted management (WinDev and WebDev)WinDev and WebDev allow you to entirely disablethe system for automatic management of errors. Inthis case, the different error cases that may occurmust be checked in the application. A WLanguageerror occurs and the application stops if this test isnot run.
ImplementationTo entirely disable the automatic management oferrors, all you have to do is use HOnError and spe-cify an empty string in window or procedure name.
In this case, a test must be run after each HFSQLfunction that may trigger an error, with one or moreof the following functions:
The error details are returned by HErrorInfo.
The assisted management can be re-enabled byHOnError.Note: For the other errors (modification, mandatoryinput, reindexing in progress), no test is required.The error numbers associated with these problemsare:• 70700: Modification conflict• 70710: Mandatory item value• 70720: Reindex operation in progress on the fileThese error numbers are returned by HError.
opRetry The function that triggered theerror is re-run.
OpCancel The function that triggered theerror returns an error and thecode continues to run.
OpEndProcess The function that triggered theerror returns an error and thecurrent process stops. Equiva-lent to the following code line:IF NOT <HFSQL function> THENReturnToCapture()
OpEndProgram The function that triggered theerror returns an error and theprogram stops.
Equivalent to the following codeline:IF NOT <HFSQL function> THENEndProgram()
opRelaunchPro-gram
Ends the application and auto-matically restarts the application
HErrorLock Checks whether a lock erroroccurred.
HErrorDuplicates Checks whether a dupli-cate error occurred.
HErrorIntegrity Checks whether an inte-grity error occurred.
HErrorPassword Checks whether an errorcaused by a wrong pas-sword occurred.
WLangage.book Page 376 Jeudi, 20. mars 2014 4:29 16

Part 7: Managing the data files 377
5. THE HFSQL VIEWS
5.1 Overview of HFSQL views
A "view" is a set of records selected according to aselection condition. These records come from aHFSQL file and they are loaded in memory. A view is a "snapshot" taken at a given time of asection of the database.A HFSQL view can be compared with a "virtual"HFSQL file stored in memory. This file is not physi-cally stored on disk but it can be used almost like a"real" HFSQL file.A view can contain records from a HFSQL file selec-ted according to selection criteria. The records found in a view are "virtual" records. A
virtual record includes some file items or all the fileitems.Creating a view is a file read operation. It can come with a lock operation of the recordsread if these records must be modified.You have the ability to cancel all the modificationsperformed on a view. The modification performedon a view are not immediately applied to the HFSQLfile. To update a HFSQL file according to a view, youmust explicitly give the order via a WLanguage func-tion.
5.2 Benefits of views
The views bring:
• More flexibility and power to all the applicationsor sites that use HFSQL filesThe ability to filter and sort is improved for theviews.A view allows you to perform a file browse with afilter according to any item (and not just the filerkey).
• An additional security level The views are used to limit the access to a selec-ted subset of data.
• A gain of speed A view is the result of a query. Therefore, it is aclient/server exchange that is well suited for thenetworks on which it is the number of exchanges(and not the size of exchanges) that slows downthe communication.
5.3 Handling views
Once created, the views are handled like the HFSQLfiles. The view has a name that can be used in mostHFSQL functions. You have the ability to:• browse a view (HReadFirst, HReadNext, etc.),• add records into a view (HAdd),• implement filters on the view records (HFilter),• modify records (HModify),• …
The following functions are used to manage theviews:
HCreateView Creates a view on a HFSQL file
HCreateView_55
Creates a view in WinDev 5.5/WebDev 1.5 format (compatibi-lity only)
HDeleteView Destroys a view that was createdbeforehand
HExecuteView Runs a view that was createdbeforehand. Used to update thedata of the view with the lastmodified data in the correspon-ding HFSQL file
HMergeView Creates a HFSQL view from twoviews created beforehand(HCreateView). Several opera-tions can be performed whenmerging the views.
HSortView Sorts a view by creating an indexon a view item
WLangage.book Page 377 Jeudi, 20. mars 2014 4:29 16

378 Part 7: Managing the data files
See the online help for more details.
See the online help to check the availability ofthese functions in the different products (WinDev,WebDev or WinDev Mobile).
5.4 Creating HFSQL views
As mentioned before, a view contains "virtual"records coming from a HFSQL file.
To create a view, several steps are required:1. Choosing the items included in the view.2. Choosing the sort item of the view (if necessary).3. Selecting the records contained in the view.4. Create the view.5. Performing union operations if necessary.6. Displaying the view records if necessary.
The following paragraphs present each one ofthese steps.Note: You have the ability to keep the operatingmode of views found in WinDev 5.5/WebDev 1.5(with management of view identifier). To do so, useHCreateView_55.
5.4.1 Choosing the items of a viewTo create a view, the first step consists in definingthe items that must be found in the view. Each viewis attached to a HFSQL file: the view file.The view can contain:
•all the items of the file,•some items of the file.
All the items of the file
In order for the view to contain all the file items,use the following syntax:<Result> = HCreateView(<View Name> <File Name>)
• <View Name> is the name of the created view.• <File Name> is the logical name of the base file
of the view.Example:
Some items of the file
To select some items from the file, use the fol-lowing syntax:<Result> = HCreateView(<View Name>,… <File Name>, <Item Name>)
• <View Name> is the name of the created view.• <File Name> is the logical name of the base file
of the view.• <Item Name> is the list of items that must be
included in the view. The items are separated bya comma in this character string.
Example:
5.4.2 Choosing the initial sort item of the viewWhen creating a view, you have the ability to specifythe view item that will be used for the sort. All theview items can be used for the sort. Once created, the view can be re-sorted at any timeby HSortView.To specify the initial sort, use the following syntax:<Result> = HCreateView(<View Name>, ... <File name>,... <Item Name>, <Sort Item>)
• <View Name> is the name of the created view.• <File Name> is the logical name of the base file
of the view.• <Item Name> is the list of items that must be
included in the view.
HViewToFile Saves the modifications perfor-med in a view (by HModify, HDe-lete or HCross) in thecorresponding HFSQL file
FileToMemo-ryTable
Displays the content of a view ina memory table
Extern MyView1MyFile is string="CUSTOMER"// View with all the// records of all the// file items HCreateView(MyView1, FileName)
Extern MyView1MyFile is string="CUSTOMER"ItemView is string= ... "LASTNAME,FIRSTNAME,ADDRESS"// View containing the records for the LastName, FirstName and Address itemsHCreateView(MyView1, FileName, ... ItemView)
WLangage.book Page 378 Jeudi, 20. mars 2014 4:29 16

Part 7: Managing the data files 379
• <Sort Item> is the name of the sort item. Thisstring contains:•The sort direction, with "+" (ascending, default
value) or "-" (descending).•The name of the sort item or its creation subs-
cript.Example:
5.4.3 Selecting records from the viewWhen creating a view, you have the ability to specifya selection condition for the records. The condition is applied to each record before it isincluded in the view.
To specify a selection condition in a view, use thefollowing syntax:<Result> = HCreateView(<View Name>, ... <File Name>, <Item Name>, ... <SortItem>,<Condition>)
• <ViewName> is the name of the created view.• <File Name> is the logical name of the base file
of the view.• <Item Name> is the list of items that must be
included in the view.• <Sort Item> is the name of the sort item.• <Condition> is the selection condition. This condi-
tion is found in a character string that uses a syn-tax in the following format:
"CustomerName > ’Smith’ and
(ZipCode=94102 or ZipCode=94103)"
5.4.4 Union operations between several viewsWhen creating views, several selection operationscan be performed on the records.However, these operations may be insufficient insome cases. A view can be created from existingviews.To do so, you have the ability to use the standardunion operations: union, exclusive union, intersec-tion, subtraction.
The following syntax must be used:<<Result> =HMergeView(<View Name>,... <View Name1>,<View Name2>,... Operation, SortAndComparisonItem)
• <ViewName> is the name of the created view.• <View Name1> is the name of the first view.• <View Name2> is the name of the second view.• <Operation> is one of the constants used to
define the type of operation to perform:•hViewUnion: union of all the rows found in view
A and view B•hViewUnionEx: union of all the non-common
rows found in view A and view B•hViewIntersection: rows common to A and B•hViewJoin: rows common to A and B•hViewSubtraction: rows of A - common rows
found in B• <SortAndComparisonItem> is a string containing
the subscript of the comparison item betweenthe two views. This item is also the initial sortitem of the created view.
Important: The file of the view generated by anunion operation on two other views is the file of thefirst view passed in parameter to HCreateView.
Note: The union operations allow you to performprocesses that are faster than some selection con-ditions. For example, we advise you to use theunion instead of OR in the condition of HCreate-View.
Extern MyView1FileName is string="CUSTOMER"ViewItems is stringSortItem is view
ItemsView= "LASTNAME,... FIRSTNAME,ADDRESS,ZIPCODE"SortItem = "-LASTNAME" //OR SortItm="-1"
// View containing the records// for the LastName, FirstName, // Address and Zip Code items// Initiallly sorted by last name // reverse orderHCreateView(MyView1, FileName,... ViewItems,SortItem)
WLangage.book Page 379 Jeudi, 20. mars 2014 4:29 16

380 Part 7: Managing the data files
6. HFSQL TRIGGERS
6.1 Overview
6.1.1 DefinitionA trigger corresponds to the association between aprocedure and a write function on a HFSQL file. The triggers are used to easily run processes whenmodifying a record.The procedures called via triggers can be runbefore or after the write operation performed onthe file.A BEFORE trigger is called before running a HFSQLfunction. It can be used to check the consistency ofthe record items for example. In this trigger, aHFSQL state variable can be initialized to cancelthe execution of the function.An AFTER trigger is called after the execution ofthe HFSQL function (except if the program wasinterrupted during this function). It can be used tocentralize the process of errors for example.
Note: Trigger on the functions for handling tables:The functions for handling tables (TableAdd,TableAddLine, TableDelete, TableModify, Table-Save, ... ) implicitly uses the following HFSQL func-tions: HAdd, HDelete and HModify.
When using one of these functions for handlingtables, if a trigger is defined for the correspondingHFSQL function, it is automatically activated.
6.1.2 Benefits of triggersThe triggers allow you to associate processes withall the HFSQL functions for file managementwithout having to worry about the location of thesefunctions in the source code. The triggers associated with the HFSQL functionsused will be run even if it is a window, a page or acode created by a wizard.The use of triggers allows you to reduce the size ofthe code, to simplify its reading and to facilitate thefuture evolutions, by grouping processes.For more information, the diagram found on the fol-lowing page presents the detailed operating modeof triggers.
Note: The triggers are also available in HFSQLClient/Server.
6.2 How to create and handle triggers?
6.2.1 Functions for handling the triggersThe following functions are used to manage the trig-gers:
HActivateTrig-ger
Re-enables a trigger that wasdisabled by HDisableTrigger
HDescribeTrig-ger
Adds or modifies a trigger on aHFSQL file
HDeactivate-Trigger
Disables a trigger. This triggercan be re-enabled by HActivate-Trigger
HDeleteTrigger Destroys a trigger. This triggercannot be used anymore
HSetTrigger Enables or disables the manage-ment of triggers
HListTrigger Returns the list of triggersapplied to one or more data files
See the online help for more details.See the online help to check the availability ofthese functions in the different products (WinDev,WebDev or WinDev Mobile).The functions for handling the triggers on the ser-ver are identical and they include "Server" in theirname.
WLangage.book Page 380 Jeudi, 20. mars 2014 4:29 16

Part 7: Managing the data files 381
6.2.2 Handling triggers
Creating a triggerA "before" trigger or an "after" trigger is created byHDescribeTrigger, in the initialization code of theproject.
The trigger can be created on one or more analysisfiles and for one or more HFSQL functions that han-dle records.
A specific procedure is run whenever the trigger isrun. To create a trigger, use the following syntax:<Result> = HDescribeTrigger (<FileName>, <NameHFFunction>,... <ProcedureName>, <Type>)
• <FileName> corresponds to the logical name ofthe files affected by a process managed by trig-ger.
• <NameHFFunction> corresponds to the name ofthe WLanguage functions that release the trigger.
• <ProcedureName> corresponds to the associatedprocedure called by the trigger.
• <Type> is used to define the type of trigger("before" or "after").
Creating a procedure called by a trigger
A "trigger" procedure accepts no parameter.However, some HFSQL state variables are positio-ned before each call:• h.filename: string containing the logical name of
the file whose trigger is enabled.
• h.action: character initialized to "A" for a "Before",trigger and to "P" for an "after" trigger.
• h.TriggerFunction: string containing the name ofthe HFSQL function that released the trigger, onlyif the integrity management is disabled.
• h.ToDo: During the execution of a before trigger:•canceling the execution of the current Hyper
File function by assigning "A" to the Hyper Filestate variable: H.ToDo = "A". In this case, theaction is not performed and the function (HAdd,HModify, ...) returns True (no error).
•canceling the execution of the current HyperFile function by assigning "E" to the Hyper Filestate variable: H.ToDo = "E". In this case, theaction (HAdd, HModify, ...) is not performed andit returns False. The error message is as fol-lows:"The action on XXX file was interrupted bythe trigger".
Enable/Disable a trigger
You have the ability to start a process used to ena-ble or disable a check performed by a trigger.To temporarily disable a specific trigger, use thefollowing syntax:<Result>=HDeactivateTrigger([<ListHFFiles> [, <ListHFFunction>]] [, <Type>])
Destroy a trigger
HDeleteTrigger is used to delete one or more trig-gers via the following syntax: <Result>=HDeleteTrigger([<ListHFFiles> [, <ListHFFunctions>]] [, <Type>])
WLangage.book Page 381 Jeudi, 20. mars 2014 4:29 16

382 Part 7: Managing the data files
7. THE DATA REPLICATION
7.1 Overview of the replication
7.1.1 OverviewThe replication of data is a powerful feature. Thereplication is the operation allowing the mainte-nance of remote databases with identical structu-res. Each one of these databases evolvesindependently. Via the replication, the operationsperformed on each one of the databases areapplied to all the other databases.WinDev or WebDev allows you to easily performthese operations. WinDev or WebDev proposes twotypes of replication:• The logged replication (based on the log pro-
cess). This type of replication is used to replicatethe HFSQL databases between themselves. Thistype of replication can be implemented by theWLanguage functions or by WDReplic.
• The universal replication that is used to replicateany type of database (a HFSQL database with anOracle database for example). The universal repli-cation can be implemented via the assisted uni-versal replication.
We shall only present the universal replication.
7.1.2 Vocabulary specific to the replicationDatabases
The replication distinguishes between two types ofdatabases:• master database
It is the reference database. All the updates areperformed on this database:•modifications performed by the application run
on this computer.•modifications performed on the remote compu-
ters and transmitted by the replication• the replica database or subscriber database
This remote database is identical to the "Master"database. The modifications performed by theremote computer are applied to this database.The replication transmits these modifications tothe "master" database.
Type of replicationTwo types of replication can be implemented:• Unidirectional replication:
This type of replication consists in performing anupdate from the "Master" database to the "Subs-criber" databases or from a "Subscriber" data-base to the "Master" database.
• Bidirectional replication: This type of replication consists in performing anupdate from the "Master" database to the "Subs-criber" databases and from the "Subscriber"databases to the "Master" database.
Files created during a replicationThe universal replication uses several types of files:• .RPM file: file used to describe a master data-
base as well as the databases that subscribe toit.
• .RPL file: file used to describe a subscriber data-base. A RPL file is created for each subscriberdatabase. This file is found on the subscribercomputer.
• .RPA file: log file containing the replication infor-mation. This file is exchanged between the mas-ter database and the subscriber database.
• .SYN file: file containing information about thesituation on the remote database. This file isused to optimize the size of the synchronizationfiles. This file is found on the master computerand on each subscriber computer.
7.1.3 NoteTo implement the universal replication on databa-ses other than HFSQL ones, a DateTime item mustbe created in each file. This item will be updated bythe application when modifying or adding a record.If the databases use different time zones, werecommend that you use a universal format (GMTdate and time for example).
WLangage.book Page 382 Jeudi, 20. mars 2014 4:29 16

Part 7: Managing the data files 383
7.2 Implementing the universal replication
7.2.1 ActivationTo enable the universal replication, all you have todo is use HSetReplication associated with therplReplicationUniversal constant.This function is used to disable the standard repli-cation mode (if it was enabled) and to enable theuniversal replication.
7.2.2 Declaring the master databaseThis operation must be performed once only on themaster database.To declare the master database, all you have to dois use HCreateMasterReplica.Note: If data can be stored in the current directory,the following code line can be used:
This code line creates the MasterReplica.RPM fileon disk. Then, all you have to do is write the subscri-bers into this file.
7.2.3 Declaring the subscriber databasesThis operation must be performed once only foreach subscriber database. This operation must beperformed on the master database.To declare a new subscriber, use HCreateSubscri-berReplica. This function creates a subscriber (RPLfile) with the specified name. This functions alsoreturns a subscriber number.
Note: HCreateSubscriberReplica uses specificparameters for the universal replication. See thehelp about the function for more details.
7.3 Replication between heterogeneous databases
HCreateMoveableReplica creates a log file (.RPAfile).This file is transmitted and run by HSynchronizeRe-plica.
Caution: By default, the master has priority whenthe synchronisation is performed (HSynchronizeRe-plica): if a replication is performed from the subscri-ber to the master, the data found in the masterdatabase will not be updated. We recommend thatyou use another constant (rplMostRecentFirst forexample).
Two specific functions can also be used:
Notes:• The exchanges of ".RPA" files are not necessarily
symmetrical: it is possible to create and run seve-ral logs in one direction without creating or run-ning a single log in the other direction. However,to improve the performances, you should avoidperforming exchanges always in the same direc-tion.
• The replication respects the filters applied to thetables or to the files (except for links, to respectthe integrity).
• A filter can be implemented on the master side:the subscribers will receive a subset of the datafrom the master database. In this case, there isno need to implement a filter on the database. If, due to the filter, a record is no longer "visible"on the master database, this record will be consi-dered as being deleted. It will be automaticallydeleted from the subscriber computer.
HCreateMasterReplica("")
HRplDeclareLink Used to signal to the replica-tion engine that a link wasfound between two files. Theengine will follow the link toget the list of records thatmust be replicated in thesecond file.
HRplManageFile Defines the options usedfor the universal replica-tion of a file.
HRplManageItem Defines the options usedfor the universal replica-tion of an item.
HRplFilterProce-dure
Used to specify a specific fil-ter procedure when a givenfile is replicated.
WLangage.book Page 383 Jeudi, 20. mars 2014 4:29 16

384 Part 7: Managing the data files
7.4 Limitations
The limitations are as follows:• Each file or table must have at least one unique
key.• You must have the ability to associate a date with
a record. If the item used to associate a date withthe record is automatically filled by trigger, thistrigger must be disabled when running HSynchro-nizeReplica (to avoid filling this item with thereplication date).
• The replication does not open the files or thetables. The files or the tables must have be ope-ned by the program before starting the replica-
tion.• During the replication, the memory consumption
may be very high. Therefore, only the necessaryrecords should be replicated toward a subscribercomputer.
• Caution: special case: only part of the linkedtables are not replicated. In this case, the replication may redo some modi-fications as an {addition, deletion} couple. If anon-replicated table is linked with cascadingmodifications, the linked records may be wronglydeleted.
WLangage.book Page 384 Jeudi, 20. mars 2014 4:29 16

Part 7: Managing the data files 385
8. MANAGING FILES IN "BACK OFFICE"
8.1 Overview
Most of the interactive site available on Internet areintended to be run in parallel of traditional applica-tions, usually run on Windows.
For an e-commerce site for example:• the "Front Office" will be found on the Internet
side and it will consist in presenting the productsand taking orders.
• the "Back Office" will consist in managing theorders placed: delivery forms, invoices, return
forms, statistics, past due payments, ...To build the features of the "Back Office", the use ofthe WinDev IDE is recommended.
WebDev proposes several possibilities to managethe "Back Office":• the update by email,• the remote access to HFSQL,• the replication.
8.2 The update by email
The operation consists in synchronizing two databa-ses, the database of the Back Office applicationand the database of the Front Office application,via a set of emails and a procedure for reading theemails.
The "Front Office" application sends an email whe-never the database is modified.The "Back Office" application automatically readsthe messaging at regular time intervals in order toupdate the main database.
8.3 The remote access to HFSQL
8.3.1 DefinitionThe remote access allows you to consult a HFSQLdatabase via Internet/Intranet or via STN (SwitchedTelephone Network).
Three use modes are available:• Mode 1:
A "Back Office" application interrogates the data-base found on the Web server (where the Web-Dev site is located).
• Mode 2:The Web server accesses a database found onthe computer of the "Back Office" application.
• Mode 3:A WebDev site found on a server A queries adatabase found on a server B (where anotherWebDev site is located).
The WLanguage functions used to manage remoteaccess are: HOpenAnalysis and HConnectRemo-teAccess.
8.3.2 Details of the three use modesMode 1: WinDev Back Office applica-tion and database on the Web server
The database is found on the Web server. The data-base is updated by the WebDev site according tothe actions performed by the Web users.The users of the "Back Office" application interro-gate and update the database from the WinDevapplication.The "Back Office" application establishes the dialogwith the database via remote access.
Note: The WinDev "Back Office" application can beaccessible on a shared server (see the diagram) ordistributed on the computers of the different users.In this case, each user starts a remote access.
WLangage.book Page 385 Jeudi, 20. mars 2014 4:29 16

386 Part 7: Managing the data files
Mode 2: Database on the computer of the WinDev Back Office application
The database is found on the computer of the Win-Dev application. The database is updated by theWebDev site during the actions performed by theWeb users via remote access.The users of the "Back Office" application interro-gate and update the database from the WinDevapplication.
Mode 3: Two WebDev sites on two remote servers for a single database
Depending on the site to which the users connect,the database is updated:• by the WebDev site located on the same compu-
ter.• from the WebDev site via the remote access (see
the online help for more details).
8.4 The data replication
8.4.1 OverviewThe replication of data is a powerful feature. Thereplication is the operation allowing the mainte-nance of remote databases with identical structu-res. Each one of these databases evolvesindependently: different operations are performedon these databases.Via the replication, the operations performed oneach one of the databases are applied to all theother databases.The data replication can be easily applied to a Web-Dev site. In this case, the replication allows the fol-lowing to be kept up to date:• the database found on the Web server, used by
the WebDev site.• the databased found at the company’s headquar-
ters and used by a WinDev "Back Office" applica-tion for example.
Let’s look at a standard use example of data repli-cation:A company proposes two methods for takingorders:• from the Web site of the company: the customer
enters his order by specifying his personal detailsand the products ordered.
• via sales people, who use an application fortaking orders in Windows. This application isused at the company’s headquarters, as a "BackOffice" application.
In this example:• the "Orders" file:
•found on the Web server contains the ordersentered by customers who are using the Inter-net site.
•found at the company’s headquarters containsthe orders entered by the sales people.
The database at the headquarters must be upda-ted with the orders placed on the site.
• the "Product" file:•found on the Web server must contain all the
references of products.•found at the company’s headquarters can
evolve, taking the new products into account.Therefore, the database of the WebDev site mustbe updated with the new products.
Via the replication, the WebDev site found on theWeb server and the WinDev application found atthe company’s headquarters both have their owndatabase.
The database of the WebDev site (or Replica) isidentical to the "master" database, during its initiali-zation.Regularly, a "Synchronization" of these databases isused to take into account the modifications perfor-med on each one of the different databases.
8.4.2 Implementing the replicationSee “The data replication”, page 382 and theonline help for more details.
WLangage.book Page 386 Jeudi, 20. mars 2014 4:29 16

Part 7: Managing the data files 387
9. ACCESSING EXTERNAL DATABASES
9.1 Overview
There are several execution modes of SQL queriesaccording to the type of access to the database.• Access to a HFSQL database (free distribution
with your WinDev applications and your WebDevsites): No setup constraint. The SQL and HFSQL functions (HReadxxx, ...) canbe used with this type of access.
• Access via a native access: Native access to Ora-cle, SQL Server, AS/400, ...An additional module is required for each type ofnative access. Contact the sales departmentregarding the availability for your database. For the Oracle or SQL Server accesses, a clientlayer must be installed on the user computer. The SQL and HFSQL functions (HReadxxx, ...) canbe used with this type of access. This type ofaccess is faster than the accesses by ODBC orvia an OLE DB provider.
• Access via a direct ODBC driver: The characteristics of the connection to the data-base must be defined in the ODBC administratorof Windows. Only the SQL functions can be used
for this type of access. The HFSQL functions(HReadxxx, ...) cannot be used.
• ODBC access via the OLE DB provider: This type of access uses a specific OLE DB provi-der. This type of access is not recommendedbecause it is slower than an access via an ODBCdriver. Indeed, the performance is not as good aswith a direct ODBC driver because the access isperformed both via the ODBC driver and the OLEDB provider. The HFSQL (HReadxxx, ...) and SQL functions canbe used with this type of access. The characteristics of the connection to the data-base must be defined in the ODBC administratorof Windows. The provider as well as MDAC 2.6 (orlater) must be installed on the computer.
• Access via an OLE DB provider: This type of access uses an OLE DB provider. Theprovider as well as MDAC 2.6 (or later) must beinstalled on the computer. The SQL and HFSQL functions (HReadxxx, ...) canbe used with this type of access.
9.2 Specific features
• xBase access possible via HFSQL:Specific xBase functions can be used in additionto the standard HFSQL functions (HDBOpen, ...).
• ASCII files: Use the WLanguage functions specific to theexternal files (fOpen, fRead, fWrite, ...).
• INI files: Use the WLanguage functions specific to the INIfiles (IniRead, IniWrite, ...).
• Management of the registry: Use the WLanguage functions specific to the registry (RegistryQueryValue, RegistrySetValue, ...).
9.3 Functions for managing the external databases
See the online help for more details about the func-tions used to manage an external database (con-
necting to the database, running a query, lockingrecords, ...).
WLangage.book Page 387 Jeudi, 20. mars 2014 4:29 16

388 Part 7: Managing the data files
10. HFSQL FUNCTIONS
The following functions are used to manage the HFSQL files:
FileToPage Automatically initializes the controls of a page with the values of the associateditems found in the current record (loaded in memory) of the HFSQL file
FileToScreen Automatically initializes the controls of a window with the values of the associateditems found in the current record (loaded in memory) of the HFSQL file
HAccelerateSpeed Reorganizes the internal structure of the indexes to optimize the speed for accessingthe data
HActivateAutoFilter Enables an automatic filter on the linked files when browsing an XML fileHActivateFilter Enables the filter that was previously created for the specified fileHActivateTrigger Re-enables a trigger that was disabled by HDisableTriggerHAdd Adds the record found in memory into the data fileHAlias Creates a logical alias of a file or cancels all the existing aliasesHBackward Moves backward several records from the current position in the file, according to a
specified itemHBuildKeyValue Builds the value of a composite key to create a filter or to perform a searchHBuildKeyValueANSI Used to (on a Unicode platform, Pocket PC for example) build the value of a compo-
site key in order to store this composite key in a HFSQL data fileHCancelAlias Cancels an alias that was declared by HAliasHCancelDeclaration Deletes a declaration that was performed by HDeclare, HDeclareExternal or HDescri-
beFileHCancelSeek Cancels the current search criterionHChangeConnection Changes the connection to a database used for a file. This change will be taken into
account during the next file openingHChangeDir Modifies the access path to a data fileHChangeKey Changes the search keyHChangeLocation Modifies the search mode of data filesHChangeLogDir Modifies the access path to a log file (JournalOpération file and JournalIdentification
file)HChangeName Modifies the physical name of a data fileHChangeRplDir Modifies the location of the description of the subscriber replica (RPL file). This func-
tion must be used on the subscriber computerHCheckIndex Checks whether the data found in the index file (.NDX file) properly references the
data found in the data file (.FIC)HCheckStructure Defines the mode for comparing files.HClose Closes a file or all the opened filesHCloseAnalysis Closes the current analysisHCloseConnection Closes a connection to a databaseHConnect Redefines one or more parameters of a connection by native access or by OLE DB
access on a specific table or on a set of tablesHConnectRemoteAc-cess
Opens an analysis in HFSQL format via a remote access
HConvert Converts a numeric value into a binary string in order to perform a search on a nume-ric key
HCopyRecord Copies the content of the current record (loaded in memory) into the current recordof another file
HCreateMasterReplica Creates the description file of a master replica (MasterReplica.RPL file)
WLangage.book Page 388 Jeudi, 20. mars 2014 4:29 16

Part 7: Managing the data files 389
HCreateMoveableRe-plica
Creates a file that can be used to replicate the data from the current databasetoward a remote database (for sending via email or CD for example)
HCreateSubscriberRe-plica
Creates the description file of a subscriber replica (ReplicaAbonne.RPL file)
HCreateView Creates a HFSQL viewHCreation Creates an empty data file (".FIC" extension) with the index file and the memo file if
necessaryHCreationIfNotFound Creates an empty data file (if the file does not exist) or opens a file (if the file exists)HCross Crosses a file recordHDeactivateAutoFilter Disables an automatic filter on the linked files when browsing an XML fileHDeactivateFilter Temporarily disables the filter on a file (view or query)HDeactivateTrigger Disables a triggerHDeclare Declares a file description (found in another analysis) in the current projectHDeclareExternal Temporarily imports into the current analysis the description of a file from an existing
HFSQL fileHDelete Deletes a record from a fileHDeleteAll Deletes all the records from a file or from a query.HDeleteSet Deletes a set of stored procedures from a HFSQL server.HDeleteTrigger Destroys a triggerHDeleteView Destroys a view that was created beforehandHDescribeConnection Describes a temporary connectionHDescribeFile Describes a temporary data fileHDescribeFullTextIn-dex
Describes a full-text index in a data file created by programming.
HDescribeItem Describes an item found in a temporary data fileHDescribeLink Describes a temporary link between two filesHDescribeTrigger Not available in this versionHDuplicateRecord Duplicates the record read in a data file: the record found in memory is added into
the data file (query or view).HEndNoModif Unlocks a file that was locked by HNoModifHError Returns the number of the last error triggered by the HFSQL engineHErrorDuplicates Used to find out whether a duplicate error occurredHErrorInfo Returns a detailed information about the last error triggered by the HFSQL engineHErrorIntegrity Used to find out whether an integrity error occurredHErrorLock Used to find out whether a lock error occurredHErrorModification Returns the value of an item during a modification conflictHErrorPassword Used to find out whether a password error occurred on this fileHErrorStatusModifica-tion
Returns the status of a record during a modification conflict
HExecuteProcedure Runs a stored procedure or function.HExecuteQuery Initializes a query created in the query editor and declares this query to the HFSQL
engineHExecuteSQLQuery Initializes a query written in SQL language and declares this query to the HFSQL
engineHExecuteView Runs a view that was created beforehandHExportXML Exports the records from a file (HFSQL or OLEDB), view or query into an XML fileHExtractMemo Extracts the content of a binary memo item into a fileHFileExist Used to find out whether a file existsHFilter Defines and enables a filter on a file, a view or a queryHFilterContains Defines and enables a "Contains" filter on a data file, a view or a query.
WLangage.book Page 389 Jeudi, 20. mars 2014 4:29 16

390 Part 7: Managing the data files
HFilterIdentical Defines and enables a filter used to search for the exact value of a string item. Thisfilter can be used on a file, a view or a query
HFilterIncluded-Between
Defines and enables an "Included between" filter on a file, view or query. The "Inclu-ded between" filter is used to select all the records found between two values
HFilterStartsWith Defines and enables a "Start with" filter on a file, view or query. The "Starts with" filteris used to select all the records that start with a specific set of characters
HFirst Positions on the first file record (the record is not read)HFlush Forces the operating system of the computer where the data files are found to write
the data onto the diskHForward Moves several records forward from the current position in the file, according to a
specified itemHFound Checks whether the current record corresponds to the current filter or to the current
searchHFree Transforms the crossed records into deleted recordsHFreePosition Deletes a position that was saved by HSavePositionHFreeQuery Frees the resources of a query (once HExecuteQuery or HExecuteSQLQuery has been
used)HGetCurrentPosition Returns the approximate position of the current record in the fileHHistoryModification Returns the modifications made to one or more items of a given record. The result
can be displayed in a list box or in a table to allow the user to view the modificationsperformed on the specified file
HImportHF55 Imports a Hyper File 5.5 file into a file in HFSQL Classic formatHImportText Imports a text file into a file in HFSQL Classic formatHImportXML Imports an XML file into a file in HFSQL Classic formatHIndex Rebuilds the index of a fileHIndexingInProgress Indicates that a data file is currently reindexed and returns the percentage of rein-
dexing performedHInfoAnalysis Returns information about an analysis (WDD file).HInfoLog Returns information about the server logs.HInfoMemo Returns the characteristics of binary memosHInfoReplica Returns information about the specified replicaHInitSubscriber Initializes the range of automatic identifiers for the description file of a subscriber
replica (".RPL" extension)HLast Positions on the last record of a fileHLinkMemo Allows you to associate a file with a binary memo itemHListAnalysis Returns the list of analyses available in a given directoryHListConnection Returns the list of connections defined in the application or in the site (connections
defined in the analysis and/or dynamically)HListCustomFolder Returns the list of custom-folders (also called groups) defined in the analysis.HListFile Returns the list of files found in the current analysis or in a specific analysis recogni-
zed by the HFSQL engineHListFullTextIndex Returns the list of of full-text indexes found in a file (query or view) recognized by the
HFSQL engineHListItem Returns the list of items found in a file recognized by the HFSQL engineHListKey Returns the list of keys found in a file recognized by the HFSQL engineHListLink Returns the list of links (Merise type) found in the current analysis or in a specific
analysisHListProvider Returns the list of OLE DB providers installed on the computerHListQueryParameter Returns the list of parameters for a query created in the query editorHListREP Returns the list of assignments for the files found in an analysisHListTrigger Returns the list of triggers applied to one or more HFSQL data files
WLangage.book Page 390 Jeudi, 20. mars 2014 4:29 16

Part 7: Managing the data files 391
HLockFile Locks a file and restricts the access to this file for all the other applications or sitesHLockRecNum Locks a record and restricts the access to this record for all the other applications or
sitesHLogInfo Inserts comments when logging an operationHLogRecreate Used to re-create an empty log. This function is used for example to reset the log to 0
after a backup or a replication. The content of the existing files is lostHLogRestart Restarts the log process on a file. This log process was stopped by HStopLogHLogStop Stops the log process of a file. The operations performed in the logged file are not
saved anymoreHMergeView Creates a HFSQL view from two views created beforehandHMigrateLinkedCom-positeKey
Migrates the values of linked composite keys
HMode Changes the mode and the method used to lock the filesHModify Modifies the specified record or the record found in memory in the data fileHModifyStructure Used to update the structure of a HFSQL data file by performing an automatic data
modification (also called data synchronization).HNbRec Returns the number of records in a file or a HFSQL viewHNext Positions on the next file record (the record is not read)HNoModif Prevents from modifying a file. The records can be accessed in read-onlyHOnError Customizes the management of errorsHOpen Opens a fileHOpenAnalysis Opens an analysis in HFSQL formatHOpenConnection Establishes a connection to a databaseHOptimize Optimizes the access to the indexes of HFSQL files: the indexes are loaded in the sys-
tem caches. Speeds up the first file browses and the first query executionsHOptimizeQuery Used to handle the idle periods of a software (period without processes) to optimize
the queries. Optimizes the access to the indexes of HFSQL filesHOut Used to find out whether the record on which we want to be positioned is located out-
side the file, filter, view or queryHPass Defines the password used to create or open a fileHPost Stores a unique computer number in order to use the log operations and the transac-
tions in networkHPrepareQuery Initializes a query and declares this query to the database server in order to optimize
the next executions of this queryHPrepareSQLQuery Initializes a query written in SQL language and declares this query to the database
server in order to optimize the next executions of this queryHPrevious Positions on the previous file record (the record is read)HPriority Used to find out and modify the priority of the calling application.HPriorityClient Modifies the priority of a client application.HRead Reads a record in a file according to a given record numberHReadFirst Positions on the first file record, reads the record and updates the HFSQL variablesHReadLast Positions on the last file record, reads the record and updates the HFSQL variablesHReadNext Positions on the next file record, reads the record and updates the HFSQL variablesHReadPrevious Positions on the previous file record, reads the record and updates the HFSQL varia-
blesHReadSeek Positions on the first file record whose value for a specific item is greater than or
equal to a sought valueHReadSeekFirst Positions on the first file record whose value for a specific item is greater than or
equal to a sought valueHReadSeekLast Positions on the last file record whose value for a specific item is less than or equal
to a sought value
WLangage.book Page 391 Jeudi, 20. mars 2014 4:29 16

392 Part 7: Managing the data files
HRecNum Returns the number of the current record in the file or in the HFSQL viewHRecordDate Returns the date and time of the last write operation performed on a record found in
a HFSQL fileHRecordToXML Retrieves the structure and the value of the current record and exports them into a
character string in XML formatHRefreshSet Creates or updates a set of procedures on a HFSQL serverHRegenerateFile Regenerates a file from its logHReset Initializes one or more variables of the file items with their default valuesHRestorePosition Restores a file context that was saved beforehandHRetrieveItem Returns the content of an item for the current recordHRetrieveLog Writes into a file the server logs performed between two given datesHRetrieveRecord Returns the content of the current recordHRplDeclareLink Declares a (1,1) (0,n) link between two tablesHRplFilterProcedure Defines the WLanguage procedure that will be called whenever a replication opera-
tion is performed on a specific fileHRplManageFile Defines the options used for the universal replication of a file:
• the direction for the replication,• the management mode of conflicts.
HRplManageItem Specifies the replication options for an item: the item can be replicated or not.HRplPass Defines the passwords used to protect the movable replicas for the universal replica-
tionHSavePosition Stores the current file contextHSecurity Enables or disables the security mechanismHSeek Positions on the first file record whose value for a specific item is greater than or
equal to a sought valueHSeekFirst Positions on the first file record whose value for a specific item is greater than or
equal to a sought valueHSeekLast Positions on the last file record whose value for a specific item is less than or equal
to a sought value (the record is not read)HSetDuplicates Enables or disables the management of duplicates on a unique keyHSetIntegrity Enables or disables the management of an integrity constraint on a file linkHSetLog Enables or disables the management of the log for a logged fileHSetMemo Enables or disables the management of memo itemsHSetPosition Positions on a record from the approximate position of one of its items (the record is
read)HSetRemoteAccess Temporarily disables the remote access in order to access HFSQL Classic data files
found locallyHSetREP Enables or disables the management of .REP fileHSetReplication Temporarily enables or disables the management of replicationHSetServer Used to find out and modify some server settings.HSetTransaction Enables or disables the management of transactionsHSetTrigger Enables or disables the management of triggersHSortView Sorts a view by creating an index on a view itemHStatCalculate Performs statistical calculations on the keys of a fileHStatDate Returns the date of the last update for the index statisticsHState Used to find out the status of a recordHStatNbDuplicates Returns the number of duplicates for a given itemHStatNbRec Returns the number of entries for a given itemHStatNbRecRange Returns an estimate regarding the number of entries for an item within an interval of
values
WLangage.book Page 392 Jeudi, 20. mars 2014 4:29 16

Part 7: Managing the data files 393
HStatTime Returns the time of the last update for the index statisticsHSubstDir Replaces the logical name of the data directory (specified in the analysis) by a physi-
cal nameHSynchronizeReplica Synchronizes a master replica and a subscriber replicaHToFile Copies a data source (view, query, ...) toward a physical HFSQL file with the same des-
criptionHToItem Assigns the specified value to an item of the current recordHTransactionCancel If a transaction is in progress, cancels all the operations performed on the files in
transaction since the beginning of transaction.If no transaction is in progress, restores the consistency of the database and can-cels the transaction that failed (power outage for example)
HTransactionEnd Validates the current transaction:• the modifications performed on the data file since the beginning of transaction
(HTransactionStart) are validated• the transaction file is deleted (if this transaction is the last current transaction in
case of a network application)• the records locked in read-only by the transaction are unlocked
HTransactionFree Transforms all the records "in transaction" into "normal" records if these records donot belong to a current transaction. If a record found in the specified data file is con-sidered as being in transaction but does not belong to a transaction in progress, it isautomatically freed
HTransactionInterrup-ted
Used to find out whether a transaction was interrupted (the transaction was neithervalidated nor canceled). The characteristics of the interrupted transaction are retur-ned by the HFSQL variables
HTransactionStart Starts a transaction on the HFSQL files and creates the transaction fileHUnlockFile Unlocks a file that was locked by HLockFileHUnlockRecNum Unlocks a recordHVersion Used to find out whether the file content was modifiedHViewToFile Saves the modifications made to a view in the corresponding fileHWrite Writes a record into a data file without updating the indexes corresponding to all the
keys used in the filePageToFile Automatically initializes the memory value of the file items with the value of the page
controlsScreenToFile Automatically initializes the memory value of the file items with the value of the win-
dow controlsWithSpace Adds or deletes the spaces found on the right of a text item when reading it
See the online help for more details.See the online help to check the availability of these functions in the different products (WinDev, WebDev orWinDev Mobile).
WLangage.book Page 393 Jeudi, 20. mars 2014 4:29 16

394 Part 7: Managing the data files
11. HFSQL PROPERTIES
The following properties are associated with the HFSQL files:
Abbreviation Returns the abbreviation of the file defined in the data model editor during the file des-cription
AccentuationSensi-tive
Configures how the accented characters will be taken into account in the different sear-ches performed on the item
Access Used to find out and modify the type of access for a connectionBinary Identifies a binary itemBrowsedFile Used to find out and modify the data source used to display the records in the controls
based on a data fileCacheSize Enables you to find out and modify the maximum number of records that can be contai-
ned in the cache of the Native MySQL AccessCaption Returns the caption associated with the itemCaseSensitive Configures how the case (uppercase/lowercase characters) will be taken into account in
the different searches performed on the itemCharset Enables you to find out the character set used by a HFSQL fileComponent Configures the components of a composite keyCompositeKey Identifies a composite key itemCompression Configures the compression for the data of a connection.Connection Enables you to find out the connection currently associated with a data fileCtAccess Manages the type of access to the file during the OLE DB connection to a specific table
(while taking into account the modifications performed by HConnect)CtCacheSize Enables you to find out and modify the maximum number of records that can be contai-
ned in the cache of the Native MySQL AccessCtCursorOptions Enables you to find out the type of cursor used during a connection to an external data-
baseCtDatabase Manages the OLE DB data source during the OLE DB connection to a specific table
(while taking into account the modifications performed by HConnect)CtDescribedAccess Manages the type of access to the file during the OLE DB connection to a specific table
(while ignoring the modifications performed by HConnect)CtDescribedCap-tion
Configures the caption of the connection to the OLE DB data source
CtDescribedData-base
Manages the OLE DB data source during the OLE DB connection to a specific table(while ignoring the modifications performed by HConnect)
CtDescribedOLE-DBProvider
Manages the name of the OLE DB server (while ignoring the modifications performed byHConnect)
CtDescribedPas-sword
Defines the password used to open the file during an OLE DB connection (file defineddynamically only)
CtDescribedUser-Name
Manages the user name during an OLE DB connection (while ignoring into account themodifications performed by HConnect)
CtExtendedInfo Enables you to find out the additional information inserted into the string for connectingto the database
CtInitialCatalog Enables you to identify the default database defined for the accessCtOLEDBProvider Manages the name of the OLE DB provider (while taking into account the modifications
performed by HConnect)CtUserName Manages the user name during an OLE DB connection (while taking into account the
modifications performed by HConnect)
WLangage.book Page 394 Jeudi, 20. mars 2014 4:29 16

Part 7: Managing the data files 395
CursorOptions Enables you to manage the type of cursor used during a connection (HFSQL Client/Ser-ver, OLE DB, ...).
Database Enables you to find out and modify the database associated with a connectionDate Retrieves and modifies the date in a Date item ("Date and Time" format)Day Retrieves or modifies the day or the number of days in a Date item ("Date", "Date and
Time" or "Duration" format)DecimalPart Enables you to find out and modify the number of decimal digits found in a numeric itemDefaultValue Configures the default value of an itemDeletionRule Manages the deletion rule (integrity management) used in a linkDescribedDirectory Manages the physical directory of HFSQL files (while ignoring the directory changes per-
formed by HChangeDir or HSubstDir)DescribedName Manages the logical name of a data fileDescribedPhysical-Name
Manages the physical name of the HFSQL files (while ignoring the changes of namesperformed by HChangeName)
Directory Manages the physical directory of HFSQL files (while taking into account the directorychanges performed by HChangeDir or HSubstDir)
Encryption Allows you to manage the type of encryption for the communication between the Clientcomputers and the HFSQL server
ExecutionComple-ted
Used to find out whether the execution of a query or view (Hyper File Classic or Client/Server) is completed
ExtendedInfo Returns and modifies the additional information of a data file or item accessed by NativeAccess
Extension Enables you to find out and modify the extension of a data fileFicCryptMethod Configures the encryption mode of the data fileFilterCondition Returns the selection condition implemented by HFilter on a data file, a HFSQL view or a
queryFilteredItem Enables you to find out the item on which a filter was implemented by HFilter on a data
file, a HFSQL view or a queryFilterWithBounds Used to find out whether bounds have been specified on the filter implemented by HFil-
ter on a data file, a HFSQL view or a queryFormat Configures the format of the data found in the data file (ANSI or Unicode)GenerationNumber Defines the generation number of the physical file associated with the specified logical
fileGèreHTLM Configures the management mode of the HTML format in a full-text index.GUIDAnalysis Returns the GUID of the analysis that was used to create the data fileGUIDFile Returns the GUID of the file defined in the analysis that was used to create the data fileHugeFile Configures the maximum size of a data fileInfoThumbnailGe-neration
Enables you to find out whether the thumbnail was generated or enables you to find outthe generation error
InitialFile Used to find out the name of the initial file corresponding to an item defined by an aliasInitialItem Used to find out the name of the source item corresponding to an item defined by an
aliasIntegerPart Enables you to find out and modify the number of digits found in the integer part of a
numeric itemItems Enables you to define and find out the different items included in the full-text index.KeyExpression Configures the components of a composite keyKeySize Enables you to find out and modify the size of the indexed section of a text memoKeyType Configures the characteristics of a key itemLanguage Defines the parameters of the language used to perform the comparisons and the sort
for a Unicode item (while taking into account the modifications performed by the H.Lan-guageCreationUnicode variable).
WLangage.book Page 395 Jeudi, 20. mars 2014 4:29 16

396 Part 7: Managing the data files
LanguageDescri-bed
Defines the parameters of the language used to perform the comparisons and the sortfor a Unicode item (while ignoring the modifications performed by the H.LanguageCrea-tionUnicode variable).
Last name Manages the name of the different HFSQL objectsLinkedFile Configures the name of the linked file used in the linkLinkedKey Returns or modifies the item of the linked file used in the linkLogBackupDirec-tory
Enables you to find out and modify the backup directory of the log files
LogDirectory Manages the directory of the log file described in the analysisLogFile Enables you to find out whether a data file is a log fileLogMethod Configures the log mode of a data fileManageRTF Configures the management mode of the RTF format in a full-text index.MaxAutoID Enables you to find out the maximum automatic identifier on a replicated fileMaxLinkedCardina-lity
Configures the maximum cardinality for the linked item in a link
MaxSourceCardi-nality
Configures the maximum cardinality for the source item in a link
MaxThumbnailHei-ght
Enables you to find out or define the maximum height of the Nth thumbnail
MaxThumb-nailWidth
Enables you to find out or define the maximum width of the Nth thumbnail
MaxValue Retrieves the upper bound of the current filter (defined by HFilter) for a data file, a viewor a query
Memo Identifies a memo itemMillisecond Retrieves or modifies the milliseconds or the number of milliseconds in a Date item
("Date and Time" or "Duration" format)MinAutoID Enables you to find out the minimum automatic identifier on a replicated fileMinimumLength Enables you to define and find out the minimum length of the words to index in a full-text
index.MinLinkedCardina-lity
Configures the minimum cardinality for the linked item in a link
MinSourceCardina-lity
Configures the minimum cardinality for the source item in a link
Minute Retrieves or modifies the minutes or the number of minutes in a Date item ("Date andTime" or "Duration" format) or in a Time item
MinValue Retrieves the lower bound of the current filter (defined by HFilter) for a data file, a view ora query
MmoCryptMethod Configures the encryption mode of the memo file associated with the data fileMmoPackMethod Configures the compression mode of the MMO file associated with the data fileModificationRule Manages the modification rule (integrity management) used in a linkMonths Retrieves or modifies the month in a Date item ("Simple Date" or "Date and Time" for-
mat)Name55 Manages the logical name of a file in Hyper File 5.5 formatNbArrayElement Configures the number of elements in an array itemNbComponent Returns the number of components in a composite keyNbDescribedThum-bnail
Returns the number of thumbnails described for the item
NbItem Returns the total number of key items (including the composite keys) found in a recordfor a file described in the data model editor, defined dynamically, a HFSQL view or aquery
WLangage.book Page 396 Jeudi, 20. mars 2014 4:29 16

Part 7: Managing the data files 397
NbKeyItem Returns the total number of key items (including composite keys) found in a record for afile described in the data model editor, defined dynamically, a HFSQL view or a query
NbMemoItem Returns the total number of memo items found in a record of a file described in the datamodel editor, a file described dynamically, a HyperFileSQL view or a query
NbThumbnail Returns the number of thumbnails generated for the itemNdxCryptMethod Configures the encryption mode of the index file associated with a data fileNewRecord Enables you to find out whether a record was just entered in the data file.Null Enables you to manage the NULL value in the items of the HFSQL filesNullSupported Allows you to manage the NULL value in a HFSQL fileNumeric Identifies a numeric itemOperationLogDirec-tory
Enables you to manage the directory for the operation file of the log associated with alogged file
Password Enables you to define the password of the user who is using the connectionPasswordProtected Enables you to find out whether a file is password protectedPhysicalName Manages the physical name of the data filesProvider Used to manage the type of a connection (HFSQL Client/Server, OLE DB, ...).PunctuationSensi-tive
Configures how the punctuation (comma, dot, etc.) will be taken into account in the diffe-rent searches performed on the item
RecordSize Returns the size of a record while ignoring the composite keysReplication Enables you to find out the replication mode used for a data file (defined in the data
model editor or dynamically). For the files that are dynamically defined, you can specifywhether this file is in replication mode or not
ReplicationDirec-tory
Enables you to manage the directory of the replica (".RPL" or ".RPM" file)
Second Retrieves or modifies the seconds or the number of seconds in a Date item ("Date andTime" or "Duration" format)
Secured Configures the security level for file encryptionServer Enables you to find out and modify the data source of a connectionSize Configures the size of a text item (character string, text memo, character)SortType Configures the characteristics of the sort on an itemSource Enables you to find out and modify the data source of a connectionSourceFile Configures the name of the source file used in the linkSourceKey Returns or modifies the item of the source file used in the linkSQLCode Returns a string containing the SQL code of a query created in the query editor.Subscript Returns the physical subscript of the item in the recordText Identifies a text itemTextItemComple-ted
Configures the management mode of the text items in a HFSQL file (the text items canbe automatically filled with space characters or not)
Thumbnail Enables you to find out the value of the Nth thumbnailTime Retrieves or modifies the hour or the number of hours in a Date item ("Date and Time" or
"Duration" format) or in a Time itemTime Retrieves and modifies the hour in a Date item ("Date and Time" format)TransactionFile Enables you to find out whether a data file is a transaction fileType Identifies and modifies the type of an itemUser Enables you to find out and modify the user of a connectionVisibleEndUser Enables you to find out whether an item is visible (or not) to the end users and to define
whether an item must be visible (or not) to the end usersWDD55 Path of the WDD file in 5.5/1.5 format used to handle the files in 5.5/1.5 format in a
WinDev 18 application or a WebDev 18 siteWDD55Password Gives the password that must be used to handle a file in Hyper File 5.5 formatYear Retrieves or modifies the year in a Date item
WLangage.book Page 397 Jeudi, 20. mars 2014 4:29 16

398 Part 7: Managing the data files
12. SQL FUNCTIONS
The following SQL functions can be used on thequeries written in SQL code (classified by theme):• extract characters:
•ELT•EXTRACTVALUE•LEFT• RIGHT•MID, SUBSTR and SUBSTRING•SPLIT_PART
• deleting characters:• LTRIM• RTRIM•TRIM
• substituting characters:•REPLACE•REVERSE•TRANSLATE
• merging strings:•CONCAT•STRING_AGG
• string completion:•LPAD•REPEAT•RPAD•SPACE
• modifying the case of a character string:•LOWER•UPPER•LCASE•UCASE
• size of a character string:•LEN and LENGTH•CHARACTER_LENGTH•CHAR_LENGTH•OCTET_LENGTH
• position of a character string:•INSTR•FIELD•PATINDEX•POSITION
• number of records in a file:•COUNT
• calculating numeric values:•AVG•MAX•MIN•SUM
• selecting the first n records or the last n records:•BOTTOM•TOP
• ASCII code: •ASCII
• Unicode code: •UNICODE
• phonetic:•SOUNDEX•SOUNDEX LIKE•SOUNDEX2,•SOUNDEX2 LIKE
• managing the dates•ADD_MONTH•LAST_DAY•MONTHS_BETWEEN•NEW_TIME•NEXT_DAY•ROUND•SYSDATE•TRUNC
• Comparison functions:•COALESCE•GREATEST•IF NULL•IS NULL•LEAST•NVL
• Conditional statement:•DECODE•CASE
• "Full-text" search:•MATCH AGAINST
• Checking:•MD5•SHA and SHA1
WLangage.book Page 398 Jeudi, 20. mars 2014 4:29 16

Part 7: Managing the data files 399
See a specific documentation about the SQL lan-guage for more details.To find out all the SQL commands (functions, clau-ses, operators, ...) that can be used in an SQL querymanaged by HFSQL, see the online help.
Notes:• These statements can be used:
•In the SQL code of the queries created in thequery editor. These queries will be run by HExe-cuteQuery.
•in the SQL code of queries run by HExecuteSQL-Query.
• Unless stated otherwise, these functions can beused with all types of data sources (Oracle,Access, SQL Server, ...).
12.1 Details of functions
12.1.1 ELTELT returns the nth character string found in a listof strings.Use format:
Example:The following SQL code is used to selectthe first string of the list:
12.1.2 EXTRACTVALUEEXTRACTVALUE is used to handle the XML strings.This function returns the text (CDATA) of the firsttext node that is a child of the element correspon-ding to the XPATH expression. If several correspon-dences are found, the content of the first child textnode of each node corresponding to the XPATHexpression is returned as a string delimited byspace characters.Use format:
<Fragment of XML> must be a valid XML fragment.It must contain a unique root.Example: The following code is used to count theelements found:
12.1.3 LEFTLEFT extracts the left part (which means the firstcharacters):• from the content of a file item,• of a character string.Use format:
Example: The following SQL code is used to list thestates of customers:
12.1.4 RIGHTRIGHT extracts the right part (which means the lastcharacters):• from the content of a file item,• of a character string.Use format:
Example: The following SQL code is used to extractthe last 5 characters from the customer name:
12.1.5 SPLIT_PARTSPLIT_PART divides a character string according tothe specified separator and returns the nth part ofthe string.
ELT(String number, ...String1, String2, String3, ...)
SELECT ELT(1, ’ej’, ’Heja’, ...’hej’, ’foo’)
EXTRACTVALUE(XML Fragment,... Expression XPATH)
SELECT EXTRACTVALUE(’<a><b/> ...</a>’, ’count(/a/b)’) FROM CUSTOMER WHERE CUUNIKKEY=1
LEFT(... CharacterString or ... Item,NbCharactersToExtract)
SELECT LEFT(CUSTOMER, ZipCode, 2)FROM CUSTOMER
RIGHT(... CharacterString or ... Item,NbCharactersToExtract)
SELECT RIGHT(CUSTOMER.Name, 5)FROM CUSTOMER
WLangage.book Page 399 Jeudi, 20. mars 2014 4:29 16

400 Part 7: Managing the data files
Use format:
Example: The following SQL code is used to extractthe first 3 words corresponding to the address:
12.1.6 MID, SUBSTR and SUBSTRINGMID, SUBSTR and SUBSTRING are used to:• extract a sub-string from the content of an item
from a given position,• extract a sub-string from a string from a given
position.
MIDMID can be used only on an Access data source.Use format:
Example: The following SQL code is used to extractthe third and fourth characters from the customername:
SUBSTRSUBSTR can only be used on an Oracle datasource.Use format:
Example: The following SQL code is used to extractthe third and fourth characters from the customername:
SUBSTRINGSUBSTRING can only be used on an SQL Serverdata source.Use format:
Example: The following SQL code is used to extractthe third and fourth characters from the customername:
12.1.7 LTRIMLTRIM returns a character string:• without the space characters on the left,• without a list of characters.
The characters are deleted from left to right. Thisdeletion is case sensitive (uppercase/lowercasecharacters). This deletion stops when a characterthat does not belong to the specified list is found.The deletions of specific characters cannot beperformed on an Access or SQL Server datasource.
The character string passed in parameter to thefunction corresponds to:• the content of an item,• a character string.
Use format:
Example: The name of customers is preceded bythe title ("Mr.", "Mrs." or "Ms."). The following SQLcode is used to:• delete the title from each name (letters "M", "r"
and "s" as well as the dot character),• delete the space character found in front of the
name (space character found between the titleand the name).
SPLIT_PART(Initial Expression, ...Delimiter, Number of the Part ... to Extract)
SELECT SPLIT_PART(ADDRESS,’ ’, ...1), SPLIT_PART(ADRESS,’ ’,2),...SPLIT_PART(ADRESSE,’ ’,3) FROM CUSTOMER WHERE CUUNIKKEY=2
MID(... CharacterString or ... Item, StartPosition,... NbCharactersToExtract)
SELECT MID(CUSTOMER.Name, 3, 2)FROM CUSTOMER
SUBSTR(... CharacterString or Item,StartPosition,... NbCharactersToExtract)
SELECT SUBSTR(CUSTOMER.Name, 3, 2)FROM CUSTOMER
SUBSTRING(CharacterString or Item, StartPosition,... NbCharactersToExtract)
SELECT SUBSTRING(CUSTOMER.Name, 3, 2)FROM CUSTOMER
// Del. spaces found on the leftLTRIM(CharacterString/Item)// Del. list of charactersLTRIM(... CharacterString or ... Item,CharactersToDelete
// Delete the charactersSELECT LTRIM(CUSTOMER.Name, ’Ms.’)FROM CUSTOMER// Delete the space characterSELECT LTRIM(CUSTOMER.Name)FROM CUSTOMER
WLangage.book Page 400 Jeudi, 20. mars 2014 4:29 16

Part 7: Managing the data files 401
In this example:
12.1.8 RTRIMRTRIM returns a character string:• without the space characters on the right,• without a list of characters.
The characters are deleted from right to left. Thisdeletion is case sensitive (uppercase/lowercasecharacters). This deletion stops when a characterthat does not belong to the specified list is found.The deletions of specific characters cannot beperformed on an Access or SQL Server datasource.
The character string passed in parameter to thefunction corresponds to:• the content of an item,• a character string.
Use format:
Example: The following SQL code is used to deletethe characters ’E’, ’U’ and ’R’ found on the right ofcustomer names:
In this example:
12.1.9 TRIMTRIM returns a character string:• without the space characters on the left and on
the right.• without a character string found at the beginning
or at the end of the string.• without a character string found at the beginning
of the string.• without a character string found at the end of the
string.The characters are deleted from right to left. Thisdeletion is case sensitive (lowercase/uppercasecharacters). This deletion stops when a characterthat does not belong to the specified string isfound.Use format:
12.1.10 REPLACEREPLACE returns a character string:• by replacing all the occurrences of a word found
in character string by another word.• by replacing all the occurrences of a word found
in a string.
If the name of the custo-mer is:
The returned string is:
’Ms. DOE’ ’DOE’
’Mr. CLARK’ ’CLARK’
’Mrs. Davis’ ’Davis’
// Del. spaces on the leftRTRIM(CharacterString or Item)// Del. list of characters RTRIM(CharacterString or ... Item,CharactersToDelete
SELECT RTRIM(CUSTOMER.Name, EUR.’)FROM CUSTOMER
If the name of the custo-mer is:
The returned string is:
’DUVALEUR’ ’DUVAL’
’DRAFUREUR’ ’DRAF’
’Galteur’ ’Galteur’
’FOURMALTE’ ’FOURMALTE’
’BENUR’ ’BEN’
// Del. spaces on the left and on// the right TRIM(// Initial expression)// Del. character string // at the beginning and end of // the string TRIM(Initial expression, ... String to delete)// Del. spaces on the left and on// the right TRIM// (Initial expression)// Del. character string at // the beginning and end of // the string TRIM(Initial expression, ... String to delete)// OR TRIM(BOTH String to delete FROM Initial expression)// Del. string at the beginning of// the string TRIM(LEADING String to delete FROM Initial expression)// Del. string at the end of the// stringTRIM(TRAILING String to delete FROM Initial expression)
WLangage.book Page 401 Jeudi, 20. mars 2014 4:29 16

402 Part 7: Managing the data files
The replacement is performed from right to left.This replacement is case sensitive (uppercase/lowercase characters). This replacement stopswhen a character that does not belong to the speci-fied string is found.Use format:
12.1.11 REVERSEREVERSE returns a character string in which theorder of characters is the reversed order of the ini-tial string.Use format:
12.1.12 TRANSLATETRANSLATE returns a character string by replacingall the specified characters by other characters. If acharacter to replace has no corresponding charac-ter, this character is deleted.The replacement is performed from right to left.This replacement is case sensitive (uppercase/lowercase characters).Use format:
12.1.13 CONCATCONCAT concatenates several strings together.Use format:
CONCAT is not supported by Sybase.
12.1.14 STRING_AGGSTRING_AGG is used to concatenate non-nullstrings from a list of values.Use format:
12.1.15 LPADLPAD returns a string with a given size. To reach therequested size, the string is completed to the left:• by space characters.• by a character or by a given string.Use format:
12.1.16 REPEATREPEAT returns a character string containing ntimes the repetition of the initial string. • If n is less than or equal to 0, the function returns
an empty string.• If the initial string or n is NULL, the function
returns NULL.Use format:
Example: The following SQL code is used to extractthe third and fourth characters from the customername:
12.1.17 RPADRPAD returns a string with a defined size. To reachthe requested size, the string is completed on theright:• by space characters.• by a character or by a given string.
// Replace all the // occurrences of a word by// another one REPLACE(Initial expression, ... String to replace, ... New string) // Delete all the // occurrences of a word REPLACE(Initial expression, ... String to delete)
REVERSE(Initial String)
// Replace the characters TRANSLATE(Initial expression, ... Characters to replace, ... New characters)
CONCAT(String 1, String 2 [, ... , String N])
STRING_AGG(string, separator)
// Fill with space charactersLPAD(Initial expression, Length)// Fill with a character LPAD(Initial expression, Character)// Fill with a string of// charactersLPAD(Initial expression, ... Character string)
REPEAT(Initial String, n)
SELECT REPEAT(CONTACTNAME,14) FROM CUSTOMER WHERE CUSTOMERID=10
WLangage.book Page 402 Jeudi, 20. mars 2014 4:29 16

Part 7: Managing the data files 403
Use format:
12.1.18 SPACESPACE returns a string containing N space charac-ters.Use format:
12.1.19 LOWERLOWER converts to lowercase characters:• the content of an item,• a character string.
LOWER cannot be used on an Access data source.Use format:
Example: The following SQL code is used to convertthe first name of customers into lowercase charac-ters:
12.1.20 LCASELCASE returns a string with all the characters writ-ten in lowercase according to the current characterset.Use format:
Example: The following SQL code is used to convertthe cities of customers into lowercase characters:
12.1.21 UCASEUCASE returns a string with all the characters writ-ten in uppercase according to the current set ofcharacters.Use format:
Example: The following SQL code is used to convertthe cities of customers into uppercase characters:
12.1.22 UPPERUPPER is used to convert into uppercase charac-ters:• the content of an item,• a character string.UPPER cannot be used on an Access data source.Use format:
Example: The following SQL code is used to convertthe cities of customers into uppercase characters:
12.1.23 LEN and LENGTHLEN and LENGTH return the size (the number ofcharacters) of an expression.This size includes all the characters, including thespace characters and the binary 0.
LENLEN can be used with all types of database, exceptthe Oracle data sources. For the Oracle data sour-ces, use LENGTH.Use format:
Example: The following SQL code is used to get thesize of customer names:
LENGTHLENGTH can only be used on an Oracle datasource.Use format:
// Fill with space charactersRPAD(Initial expression, Length)
// Fill with a characterRPAD(Initial expression,Character)// Fill with a string of// charactersRPAD(Initial expression, ... Character string)
SPACE(N)
LOWER(CharacterString or Item)
SELECT LOWER(CUSTOMER.FirstName) FROM CUSTOMER
LCASE(Initial Expression)
SELECT LCASE(City) FROM CUSTOMER
UCASE(Initial Expression)
SELECT UCASE(City) FROM CUSTOMER
UPPER(CharacterString or Item)
SELECT UPPER(CUSTOMER.City) FROM CUSTOMER
LEN(CharacterString or Item)
SELECT LEN(CUSTOMER.LastName) FROM CUSTOMER
LENGTH(... CharacterString or Item)
WLangage.book Page 403 Jeudi, 20. mars 2014 4:29 16

404 Part 7: Managing the data files
Example: The following SQL code is used to get thesize of customer names:
12.1.24 INSTRINSTR returns the position of a character string.This character string can be sought:• the content of an item,• a character string.INSTR can only be used on an Oracle data sourcethat supports the SQL-92 standard.Use format:
Example: The following SQL code is used to get theposition of the first occurrence of the letter "T" ineach city name:
12.1.25 FIELDFIELD returns the index of the sought string in thelist. If the string is not found, the function returns 0.Use format:
12.1.26 PATINDEXPATINDEX returns the position of the first occur-rence of a character string corresponding to a spe-cified value (with wildcard characters).
The authorized wildcard characters are:• ’%’ : represents zero, one or more characters.• ’_’ : represents a single character.These generic characters can be combined.
This character string can be sought:• the content of an item,• a character string.
PATINDEX cannot be used with a HFSQL 7 or SQLServer data source.Use format:
Example: The following table indicates the positionof the first occurrence found according to the diffe-rent values sought:
12.1.27 POSITIONPOSITION returns the position of a character stringin an expression.Use format:
12.1.28 COUNTCOUNT returns:• the number of records found in a file.• the number of non-null values of an item.• the number of different values and non-null
values of an itemUse format:
Examples:• The following SQL code is used to find out the
number of products found in the Product file:
SELECT LENGTH(CUSTOMER.LastName) FROM CUSTOMER
INSTR(... CharacterString or ... Item, StringToFind, ... StartPosition, Occurrence)
SELECT INSTR(CUSTOMER.City, ’T’, 1, 1) FROM CUSTOMER
FIELD(String to Find, ... String1, String2, ...)
PATINDEX(ValueSought, ... CharacterString or Item)
Sought Value
City name ’%E%’ ’%E_’ ’%AR%’
MONTPELLIER 6 10 0
PARIS 0 0 2
TARBES 5 5 2
TOULOUSE 8 0 0
VIENNE 3 0 0
POSITION(String to find, ... Initial expression)POSITION(String to find, ... Initial expression, ... Start position)
COUNT(*)COUNT(Item)COUNT(DISTINCT Item)
SELECT COUNT(*)FROM PRODUCT
WLangage.book Page 404 Jeudi, 20. mars 2014 4:29 16

Part 7: Managing the data files 405
• The following SQL code is used to find out thenumber of products onto which a VAT rate of 5.5% is applied:
12.1.29 AVGAVG calculates:• the mean for a set of non-null values.• the mean of a set of different values, not null.Use format:
Example: The following SQL code is used to get theaverage wages of employees:
12.1.30 MAXMAX returns the greatest of the values found in anitem for all the records selected in the file.MAX used in a query without grouping must returna single record. If the query contains groupings, arecord will be returned for each grouping.If the data source contains records, the recordreturned by the query will contain the maximumvalue.If the data source contains no record, the value ofMAX in the record returned is NULL.Use format:
Example: The following SQL code is used to get themaximum wages of employees:
12.1.31 MINMIN returns the smallest of the values found in anitem for all the records selected in the file.Use format:
Example: The following SQL code is used to get theminimum wages of employees:
12.1.32 SUMSUM returns:• the sum of the non-null values found in an item
for all the records selected in the file.• the sum of the different and non-null values
found in an item for all the records selected in thefile.
Use format:
Example: The following SQL code is used to get thetotal sum of all wages:
Note: The item handled by SUM must not corres-pond to the result of an operation. Therefore, thefollowing syntax generates an error:
This syntax must be replaced by the following syn-tax:
12.1.33 BOTTOMBOTTOM only returns the n last records of a queryresult.BOTTOM can only be used on a HFSQL data source.Use format:
Example: The following SQL code is used to list the10 worst customers:
SELECT COUNT(PRODUCT,VATRate)FROM PRODUCTWHERE PRODUCT.VATRate = ’5.5’
AVG(Item)AVG(DISTINCT Item)
SELECT AVG(EMPLOYEE.Salary)FROM EMPLOYEE
MAX(Item)MAX(DISTINCT Item)
SELECT MAX(EMPLOYEE.Salary)FROM EMPLOYEE
MIN(Item)
SELECT MIN(EMPLOYEE.Salary)FROM EMPLOYEE
SUM(Item)SUM(DISTINCT Item)
SELECT SUM(EMPLOYEE.Salary)FROM EMPLOYEE
SELECT (A*B) AS C, SUM(C)FROM MYFILE
SELECT (A*B) AS C, SUM(A*B)FROM MYFILE
BOTTOM NbrOfLastSelectedRecord
SELECT BOTTOM 10 SUM(ORDERS.Tota-lIncTax) AS TotalIncTax,CUSTOMER.CustomerNameFROM CUSTOMER, ORDERSWHERE CUSTOMER.CustNum=ORDERS.CustomerNumGROUP BY CustomerNameORDER BY TotalIncTax DESC
WLangage.book Page 405 Jeudi, 20. mars 2014 4:29 16

406 Part 7: Managing the data files
Note: We recommend that you use BOTTOM on asorted query. Otherwise, the records returned byBOTTOM will be selected according to their recordnumber.
12.1.34 TOPTOP returns the first n records of the query result.TOP cannot be used on an Oracle data source.Use format:
Example: The following SQL code is used to list the10 best customers:
Note: We recommend that you use TOP on a sortedquery. Otherwise, the records returned by TOP willbe selected according to their record number.
12.1.35 ASCIIASCII returns the ASCII code:• of a character.• of the first character in a string.If the specified character or character string is anempty string (""), ASCII returns 0.Use format:
12.1.36 SOUNDEX, SOUNDEX LIKESOUNDEX returns the phonetic representation of astring (based on an English-language algorithm).Use format:
Note: SOUNDEX used on different databases(Hyper File, Oracle, MySQL, ...) may return differentresults depending on the database used.SOUNDEX LIKE is not supported by Oracle, MySQL,Progress or Informix. SOUNDEX is not supported byInformix.
12.1.37 SOUNDEX2, SOUNDEX2 LIKESOUNDEX2 returns the phonetic representation ofa character string (based on an algorithm close toFrench).Use format:
SOUNDEX2 and SOUNDEX2 LIKE are not supportedby Oracle, SQL Server, MySQL, Progress, Informix orDB2.
12.1.38 ADD_MONTHSADD_MONTHS is used to add several months to aspecified date.Use format:
ADD_MONTHS is not supported by SQL Server,MySQL, Informix, DB2 or Sybase.
12.1.39 LAST_DAYLAST_DAY is used to find out the date of the lastday for the specified month.Use format:
LAST_DAY is not supported by Informix, DB2 orSybase.
TOP NbrOfFirstSelectedRecord
SELECT TOP 10 SUM(ORDERS.TotalInc-Tax) AS TotalIncTax,CUSTOMER.CustomerNameFROM CUSTOMER, ORDERSWHERE CUSTOMER.CustNum=ORDERS.CustomerNumGROUP BY CustomerNameORDER BY TotalIncTax DESC
// ASCII code of a characterASCII(Character)// ASCII code of the first charac-ter// in a stringASCII(Character string)
// ASCII code of a characterASCII(Character)// ASCII code of the first charac-ter// in a stringASCII(Character string)
SOUNDEX2(String)
ADD_MONTHS(Date,Number of months)
LAST_DAY(Date)
WLangage.book Page 406 Jeudi, 20. mars 2014 4:29 16

Part 7: Managing the data files 407
12.1.40 MONTHS_BETWEENMONTHS_BETWEEN is used to find out the numberof months between two specified dates.Use format:
MONTHS_BETWEEN is not supported by MySQL,Informix, DB2 or Sybase.
12.1.41 NEW_TIMENEW_TIME is used to find out a date after conver-sion of time zone.Use format:
NEW_TIME is not supported by SQL Server, MySQL,Progress, Informix, DB2 or Sybase.
12.1.42 NEXT_DAYNEXT_DAY is used to find out the first day of theweek following the specified date or the specifiedday.Use format:
NEXT_DAY is not supported by SQL Server, MySQL,Progress, Informix, DB2 or Sybase.
12.1.43 ROUNDROUND is used to round the date to the specifiedformat.Use format:
ROUND is not supported by Progress, DB2 andSybase.
12.1.44 SYSDATESYSDATE is used to find out the current date andtime.Use format:
SYSDATE is not supported by Informix and Sybase.
12.1.45 TRUNCTRUNC is used to truncate the date to the specifiedformat.Use format:
TRUNC is not supported by SQL Server, MySQL, Pro-gress, DB2 and Sybase.
12.1.46 COALESCECOALESCE is used to find out the first non-nullexpression among its arguments.Use format:
COALESCE is not supported by Progress or Informix.
12.1.47 GREATESTGREATEST returns the greatest value of the ele-ments passed in parameterUse format:
12.1.48 LEASTLEAST returns the lowest value of the elementspassed in parameterUse format:
12.1.49 NVL, IF_NULL, IS_NULLNVL is used to replace the null values of a columnby a substitution value. IS_NULL and IF_NULL areidentical.IS_NULL is used in SQL Server and IF_NULL is usedwith the MySQL or Progress databases.Use format:
12.1.50 DECODEDECODE is used to find out the operating mode ofan IF statement .. THEN .. ELSE.Use format:
MONTHS_BETWEEN(Date1, Date2)
NEW_TIME(Date, Time Zone 1, Time Zone 2)
NEXT_DAY(Date, Day)
ROUND(Date, Format)
DATESYS
TRUNC(Date, Format)
COALESCE(Param1, Param2, ...)
GREATEST(Param1, Param2, ...)
LEAST(Param1, Param2, ...)
NVL(Column name, ... Substitution value)
DECODE(Column_Name, Compared value 1, Returned value 1, [Compa-red value 2, Returned value 2][, Default value])
WLangage.book Page 407 Jeudi, 20. mars 2014 4:29 16

408 Part 7: Managing the data files
DECODE is not supported by SQL Server, MySQL,Progress, Informix, DB2 and Sybase.
12.1.51 CASECASE is used to find out the operating mode of a IFstatement .. THEN .. ELSE;Use format:
Or:
Example:
Or
12.1.52 MATCH AGAINSTMATCH AGAINST is used to find out the pertinenceof the record during a full-text search.Use format:
Or:• List of items corresponds to the list of index
items separated by commas (the order of theitems is not important).
• Value corresponds to the value sought in the dif-ferent items. This parameter can correspond to aliteral value or to a parameter name. The searchvalue can contain the following elements:
[ALL] is used to force the replacement of space cha-racters by "+" in the sought value.
CASE Column_Name WHEN Compared ...value 1 THEN Returned ...value 1 [WHEN compared ...value 2 THEN Returned ...Value 2][ELSE default ...Returned Value] END
CASE WHEN Condition 1 THEN ...Returned value 1 [WHEN ...Condition 2 THEN Returned ...Value 2][ELSE default ...Returned Value] END
SELECT itmInt, CASE itmInt ...WHEN 3 THEN ’three’ WHEN 4 ...THEN ’four’ ELSE ’other’ END
SELECT itmInt, CASE WHEN ...itmInt=3 THEN ’three’ WHEN ...itmInt=4 THEN ’four’ ELSE ...’other’ END
MATCH(List of items) ...AGAINST [ALL] Value
Element Meaning
A single word The specified word will besought. The relevance will beincreased if the text containsthis word. Example: "WinDev" searchesfor the word "WinDev".
Two words separa-ted by a spacecharacter
Searches for one of thewords.Example: "WinDev WebDev"find the texts that containeither "WinDev" or "WebDev".
A word precededby the "+" sign
The specified word is manda-tory. Example: "+WinDev" findsthe texts that necessarilycontain "WinDev".
A word precededby the "-" sign
The specified word must notbe found in the text.Example: "-Index" find thetexts that do not contain theword "Index".
A word precededby the "~" sign
The specified word must notbe found in the text.Example: "-Index" find thetexts that do not contain theword "Index".
One or more wordsenclosed in quotes
The specified words are sear-ched in group and in order.Caution: if "Ignore the wordssmaller than " differs from 0,the words in-between quoteswhose length is shorter thanthe specified length will notbe sought.
A word followed bythe "*" sign
The type of the search perfor-med is "Starts with" the spe-cified word.
WLangage.book Page 408 Jeudi, 20. mars 2014 4:29 16

Part 7: Managing the data files 409
Example: In this example, EDT_Search is an editcontrol and ConnectedUserID is a variable.
See the online help for more details about the full-text search.
12.1.53 MD5MD5 calculates the MD5 check sum of the stringpassed in parameter. The returned value is anhexadecimal integer of 32 characters that can beused as hash key for example.Use format:
12.1.54 SHA and SHA1SHA and SHA1 calculate the 160-bit SHA1 checksum of the string passed in parameter according tothe RFC 3174 standard (Secure Hash Algorithm).The returned value is an hexadecimal string of 40characters or NULL if the argument is NULL. Thisfunction can be used for hashing the keysUse format:
MyQuery is string = [SELECT * FROM Contact WHERE MATCH(Contact.LastName, Contact.FirstName, Contact.HTMLComment, Contact.RoughTextComment, Contact.Comments, Contact.Phone, Contact.Business, Contact.Cell, Contact.Mail, Con-tact.MSN, Contact.Internet_site, Contact.Country, Contact.FaxNum, Contact.City)AGAINST (’]MyQuery = MyQuery +EDT_Search + [’)AND Contact.UserID =]MyQuery = MyQuery + IDConnectedUser + [ORDER BY Name DESC]HExecuteSQLQuery(QRY_SRCH, hQueryDefault, MyQuery)FOR EACH QRY_SRCHTableAddLine(...TABLE_Contact_by_category, ...QRY_SRCH.IDContact,QRY_SRC.IDCategory, IDConnectedUser, ...QRY_SRCH.LastName, QRY_SRCH.First-Name) ENDCASE ERROR: Error(HErrorInfo())
MD5(String)
SHA(String)
SHA1(String)
WLangage.book Page 409 Jeudi, 20. mars 2014 4:29 16

410 Part 7: Managing the data files
13. HFSQL CLIENT/SERVER
13.1 Overview
WinDev enables you to create applications thataccess the HFSQL Client/Server databases.A HFSQL Client/Server application runs an applica-tion on several computers (called client computers)
and stores the databases and processes on a ser-ver. This operating mode makes response timesfaster and more reliable, and it simplifies the main-tenance of the database.
WinDev enables you to:• create a HFSQL Client/Server application from
scratch.
• modify an existing application into a HFSQLClient/Server application.
13.2 Implementing a Client/Server application
The steps for implementing a HFSQL Client/Serverapplication are as follows:1. Configure the server used.2. Connecting the client computers to the server.3. Configure the data files on the server.
4. Using the application.
For more details about HFSQL Client/Server, seethe online help.
WLangage.book Page 410 Jeudi, 20. mars 2014 4:29 16

Part 7: Managing the data files 411
14. HFSQL CLIENT/SERVER FUNCTIONS
The following functions are used to manage the HFSQL Client/Server engine:
HActivateServerTrigger Re-enables a server trigger that was disabled by HDeactivateServerTrigger. HAddGroup Adds a group of usersHAddLink Adds an integrity rule between two files on the serverHAddScheduledBackup Adds a scheduling for full and differential backup on the server defined by
the connectionHAddScheduledOptimization Adds an optimization task of HFSQL Client/Server data files.HAddTask Adds a scheduled task on the server defined by the connection.HAddUser Adds a user to a databaseHBackup Saves the content of a Hyper File server: all the server databases, one or
more databases, one or more files. This backup can be performed whileone or more databases are currently used.
HCancelBackup Cancels a current backup. HChangePassword Changes the password of a HFSQL Client/Server data fileHClearWorkingDir Clears and destroys the temporary directory that was previously created
during the execution of HServerWorkingDirHClusterAddNode Enables a node in a HFSQL cluster.HClusterDeleteNode Disables a node in a HFSQL cluster.HClusterIgnoreSynchro Defines a node of the HFSQL cluster as data source to perform the cluster
synchronization.HClusterNodeInfo Returns the status of each cluster node by interrogating the coordinatorHClusterParameter Reads and modifies the parameters of a HFSQL clusterHClusterStart Starts a HFSQL cluster.HClusterState Returns the status of a HFSQL cluster by interrogating its coordinatorHClusterStop Suspends the execution of a HFSQL clusterHConnectionQuality Returns the quality level of the connection: the higher the level is, the faster
the connection isHCopyFile Copies a HFSQL fileHCreateServerTrigger Adds or modifies a server trigger on the HFSQL server.HDeactivateServerTrigger Disables a Hyper File Client/Server server trigger. This trigger can be re-ena-
bled by HActivateServerTrigger.HDeleteBackup Deletes a backup that was performed by HBackup. The backup is physically
deleted from the disk.HDeleteDatabase Deletes a database found on a HFSQL serverHDeleteDirectory Deletes a directory found in a HFSQL Client/Server databaseHDeleteFile Deletes the HFSQL files (.fic, .ndx and .mmo files if they exist) from the ser-
verHDeleteGroup Deletes (from the server) a group of users associated with a connectionHDeleteLink Deletes an integrity rule between two files on the serverHDeleteParameter Deletes a parameter that was previously saved by HSaveParameter.HDeleteQuery Deletes a query from a Hyper File server.HDeleteScheduledBackup Deletes a scheduling for full and/or differential backup from a HFSQL
Client/Server serverHDeleteScheduledOptimization Deletes a scheduled optimization task of HFSQL Client/Server data filesHDeleteServerTrigger Destroys a server trigger. This server trigger cannot be used anymore.HDeleteSet Deletes a set of stored procedures from a Hyper File server.
WLangage.book Page 411 Jeudi, 20. mars 2014 4:29 16

412 Part 7: Managing the data files
HDeleteTask Deletes a scheduled task from a Hyper File Client/Server server.HDeleteUser Deletes (from the server) a user associated with a connectionHDescribeServerTrigger Adds or modifies a server trigger.HDisconnectClient Displays a message on the client computers and disconnects the applica-
tionHEndNoDatabaseAccess Re-authorizes the access to one or more databases accessible by a connec-
tionHExecuteProcedure Runs a stored procedure or function.HExecuteScheduledBackup Forces the execution of a scheduled backup.HInfoBackup Returns information about one or more backups performed on a Hyper File
Client/Server server.HInfoDatabaseProperty Used to find out the properties of a database found on a HFSQL serverHInfoDatabaseRights Allows you to find out the rights granted to a user or to a group on a data-
baseHInfoFile Returns the characteristics of a file found on a HFSQL serverHInfoFileProperty Used to find out the properties of a data file found on a HFSQL serverHInfoFileRights Allows you to find out the rights granted to a user or to a group on a data fileHInfoGroup Returns information about the specified group of usersHInfoLock Returns information about the lock performed on a file, on a record or on all
the file recordsHInfoLog Returns information about the server logs.HInfoServer Returns the specified information about the serverHInfoServerProperty Used to find out the properties of a HFSQL serverHInfoServerRights Allows you to find out the rights granted to a user or to a group on a serverHInfoTask Returns the characteristics of a scheduled task in an advanced hSchedu-
ledTask variable.HInfoUser Updates the variables for user management with the information about the
specified userHListConnectedUser Returns the list of users currently connected to one or more files handled by
a Client/Server connectionHListDatabase Lists the Client/Server databases associated with a connectionHListGroup Returns the list of groups of users defined for a connectionHListParameter Returns the list of parameters saved from the stored procedures on the ser-
ver.HListScheduledBackup Lists the full and differential backups that have been scheduled on a HFSQL
Client/Server server.HListScheduledOptimization Lists the scheduled optimization tasks of the HFSQL Client/Server data files
for a connectionHListServer Lists the HFSQL servers installed on a computerHListServerTrigger Lists the different triggers available on a connection or on one of the con-
nection files.HListStoredElement Returns the list of elements stored on a Hyper File server (sets of procedu-
res, stored procedures or queries).HListTask Lists the scheduled tasks found on a server.HListUser Returns the list of users defined for a connectionHLoadParameter Reads a parameter that was saved from a stored procedure by HSavePara-
meter.HManageTask Enables or disables a scheduled task on a Hyper File Client/Server server.
This function can also be used to find out the status of a scheduled task.HModifyDatabaseProperty Modifies the properties of a database found on a HFSQL server
WLangage.book Page 412 Jeudi, 20. mars 2014 4:29 16

Part 7: Managing the data files 413
HModifyDatabaseRights Modifies the rights granted to a user or to a group for a HFSQL Client/Serverdatabase
HModifyFileProperty Modifies the properties of a HFSQL file found on a serverHModifyFileRights Modifies the rights granted to a user or to a group on a HFSQL Client/Server
data fileHModifyGroup Modifies the group information according to the elements found in the cor-
responding variables for group managementHModifyScheduledBackup Modifies a scheduling for a full backupHModifyScheduledOptimiza-tion
Modifies a scheduled optimization task on the HFSQL server defined by theconnection. This task is found in an advanced hScheduledOptimizationvariable.
HModifyServerProperty Modifies the properties of a HFSQL serverHModifyServerRights Modifies the rights granted to a user or to a group on a HFSQL serverHModifyTask Modifies a scheduled task on the server defined by the connection. This
task is found in an advanced hScheduledTask variable.HModifyUser Modifies the user information according to the elements found in the cor-
responding variables for user managementHNoDatabaseAccess Forbids all the accesses to a database or to all the databases accessible via
a connectionHNotifAddCCRecipient Adds recipients for the notifications sent via the Control Centers (WDBal
messaging tool).HNotifAddEmailRecipient Adds recipients for the notifications sent by email.HNotifConfigure Specifies and configures the server used to send notifications by the HFSQL
serverHNotifDeleteCCRecipient Deletes the recipients of a notification sent via the Control Centers (WDBal
messaging tool).HNotifDeleteEmailRecipient Deletes the recipients of a notification by email.HNotifListCCRecipient Returns the list of recipients for a notification sent via the Control Centers
(WDBal messaging tool).HNotifListEmailRecipient Returns the list of recipients for a notification by email.HOnServerCall Customizes the management of message display on the client computer
and the management of disconnection from a client computerHPriority Used to find out and modify the priority of the calling application.HPriorityClient Modifies the priority of a client applicationHReconnect Establishes a reconnection to the server for all the interrupted connections.HRefreshQuery Creates or updates a query on a Hyper File serverHRefreshSet Creates or updates a set of procedures on a Hyper File serverHResetClient Initializes the structure for managing the client computers (HClient struc-
ture)HResetGroup Initializes the variables for group management with the default valuesHResetUser Initializes the variables for user management with the default valuesHRestoreBackup Used to restore a backup performed by HBackup (or via the HyperFileSQL
Control Center).HRetrieveLog Retrieves in a file the server logs performed between two given datesHSaveParameter Saves a persistent value from a stored procedure. This value can be read by
HLoadParameter.HSendMessageToClient Displays a message on the client computersHServerStatus Used to find out the status of a server
WLangage.book Page 413 Jeudi, 20. mars 2014 4:29 16

414 Part 7: Managing the data files
HServerWorkingDir Returns the path of a temporary directory on the server. This directory isautomatically created on the server. The stored procedures run on the ser-ver will have the rights to write into this directory. This directory will be auto-matically cleared and destroyed when the client is disconnected.
HSetCache Used to configure the management of caches in the HFSQL Client/Serverengine
HSetServer Used to modify some parameters of the server.HSimulateNetwork Simulates the operating mode of HFSQL Client/Server on an ADSL or 3G
networkHStartServer Used to start a server (uses MantaManager)HStopServer Stops a serverHTransactionList Returns the list of current or interrupted transactions found on the server
for the specified connection
See the online help for more details.See the online help to check the availability of these functions in the different products (WinDev, WebDev orWinDev Mobile).
WLangage.book Page 414 Jeudi, 20. mars 2014 4:29 16

Index 415
Index"Back" key 125.JNL 353.NET 315.Net
Assembly 315.REP 344
AAccessing external databases 387ADD_MONTHS 406AJAX 220Archive 200
ZIP functions 202Archive file (functions) 202ASCIIZ string 41Assembly (.NET) 315Assign file 344Assisted management of errors 373Automatic (code) indent 32Automatic completion 31Automatic identifier 339Automation object (Variable) 54AVG 405
BBack (Management) 125Back Office 385Binary
Binary memos 343Functions 153
BOTTOM 405Break (Statement) 87Breakpoint 33Browse according to filter 328Buffer (Variable) 42
Buffer type 42Burn 203Burner
Functions 203Burning 203
CCD (burn) 203Character (Variable) 41
Character string 155Handling 155
Character stringsFunctions 156
Chart3D 162
Charts 161Column 161Creation 163Default values 163Functions 164Line 161Pie 161Presentation 161Scatter 162Stock 162Types 161
ClientHFSQL Client/Server 410
Client/Server 410Clipboard (functions) 181COALESCE 407Code
Assisted input 31Auto completion 31Automatic indent 32Breakpoints 33Check 32Color 31Help 31History 32Message translation 32Specific processes 33Wizard 31
Code check 32Code history 32Code wizard 31Color
Code 31Communication 241
Emails 243Fax 277FTP server 284HTML page 280Server of XML WebServices 305SOAP 301Socket 286Telephony 270Thread 293WinDev FTP/RPC 281
WLangage.book Page 415 Jeudi, 20. mars 2014 4:29 16

416 Index
XML file 311Composite key 322, 324CONCAT 402Constant 46Continue (Statement) 85Control
Functions 137Properties 137
Cookies 214COUNT 404CTI 270Currency (Variable) 41
DData replication 382, 386Data source (Variable) 56Database 387
External 387Date
Functions 159Date (Variable) 42
Date type 42DateTime type 43Duration type 43Time type 43
Dates and times 159DATESYS 407DateTime (Variable) 43DDE
Functions 193Dead lock 369DECODE 407des actions à refaire 358Description
of a file (Variable) 57Of a link (Variable) 58Of item (Variable) 59
Dialog (dialog boxes) 128Dialog box 128
Multilingual 130Dialog boxes
Functions 132Download 213Download a file 211, 213Drag and Drop 133
From the explorer 135Functions 136
Drag and dropAutomatic 133
Programmed 134Duplicate 322, 328Duplicate key 322, 328Duplicates 373Duration (Variable) 43Dynamic array (Variable) 48Dynamic automation object (Variable) 55Dynamic structure (Variable) 54
EEditor menu (Ribbon) 30Email 243
Functions 250POP 3 and SMTP 244Simple MAPI 247Update HFSQL files 385Write 250
Encrypting HFSQL files 339Error
Assisted management 373Exception management 104
Excel 199Functions 199
Exception (Mechanism) 104Exception mechanism 104Executable
Functions 192Explorer (Drag and Drop) 135Extern (Keywords) 89External files
Functions 168Handling disks and directories 167Handling files 167Handling the content 167Presentation 167
FFax 277
Application for sending faxes 278Fax server 277Functions 279
Fax server 277Programming 278
FileZip 200
File alias 336File browse 327File variable 325
WLangage.book Page 416 Jeudi, 20. mars 2014 4:29 16

Index 417
Filter 328Finances (functions) 154Fixed array (Variable) 49Fixed string on 41Fonction
Menu 121, 124XML 313
Font (Variable) 60For (Statement) 76For all, array browsing (Statement) 81, 82For all, control browsing (Statement) 80For all, file browsing (statement) 77For all, string parsing (Statement) 79For each, array browsing (Statement) 81, 82For each, control browsing (Statement) 80For each, file browsing (Statement) 77For each, parsing string (Statement) 79Framework 315Front Office 385FTP 284FTP (functions) 285FTP server 284Function
Archive 202Binary 153Burner 203Character string 156Chart 164Clipboard 181Date 159DDE 193Dialog box 132Drag and Drop 136Email 250Executable 192External files 168Fax 279Finances 154FTP 285HFSQL 388HFSQL Client/Server 411HTTP 280Java 188Matrix 153MDI 121Memory zone 166Menu options 121, 124Messages 132Miscellaneous functions 188Mouse 181
Net 283Network 194Page 123Print 177Project 194Registry 180Serial and parallel ports 182Service 184SOAP 304Socket 290SQL 398Statistics 154System 185Telephony 273Thread 299Twain 183USB 182, 183Window 119Window control 137Windows 186Windows event 187XLS 199ZIP 202
FunctionsLDAP 269MCI 184SNMP 194
GGenerating an XML Webservice 307Goto (Statement) 76Group button 30Grouping 30Guide 31
HHelp
Code 31HFSQL
Client/Server 410Client/Server functions 411Functions 388NULL management 337ODBC driver 360, 361, 362Properties 394Remote access management (RPC) 385Replication 382, 386SQL 364
WLangage.book Page 417 Jeudi, 20. mars 2014 4:29 16

418 Index
Triggers 380Update by email 385View 377
HFSQL FileAssign 344Backup 355Create 321Identifier 323, 339Key 340Log 353Memos 343Open 321Protection 339Restore 355
HFSQL fileAlias 336Browse 327Browse according to a filter 328Close 321Lock 368Logical name 321Long name 321, 344Optimization 359Positioning 330Read operation according to key 326Remote access (RPC) 385Size greater than 2 GB 322Update by email 385Variable 325View 377
HFSQL view 377Programming 378
HTML page 280Retrieve 280
HTTP (functions) 280
IIdentifier 323IF (Statement) 83IF_NULL 407Importing an XML Webservice 305Incoming calls 270INSTR 404Integer (variable) 40Integrity check 340Inter locking 369IS_NULL 407Item 325
Key 322
JJ++ 361Java (functions) 188JDBC 361
KKey 322
Composite key 324Key type 322Read operation according to key 326
Key uniqueness 340Keyboard
Associated processes 33Keywords
Extern 89Modulo 91MyFile 93MyPage 90MyParent 93MyPopupControl 92MyReport 93Myself 91MySource 91MyWindow 90Stop 94
LLanguage
SQL 364LAST_DAY 406LDAP 269LEFT 399LEN 403LENGTH 403Link
Types of links 341Lock 368
HFSQL file 368Record 369
Lock Mode 368, 370Log 353
Programming 356Log file 353Logical Name 321Long name 321, 344Loop (Statement) 75
WLangage.book Page 418 Jeudi, 20. mars 2014 4:29 16

Index 419
LOWER 403LPAD 402LTRIM 400
MMAPI 247Matrices 151
Functions 153Handling 151
MAX 405MCI (functions) 184MDI
Functions 121MDI window (functions) 121Memo 343Memo file 343Memory zone (functions) 166Menu
Functions 121, 124Menu option
Function 121, 124Message (functions) 132MID 400MIN 405Modulo (Keywords) 91MONTHS_BETWEEN 407Mouse
Associated processes 33Functions 181
Moving inside a file 330Multilingual 32
Dialog box 130MyFile (keyword) 93MyPage (Keywords) 90MyParent (Keywords) 93MyPopupControl (Keywords) 92MyReport (Keywords) 93Myself (Keywords) 91MySource (Keywords) 91MyWIndow (Keywords) 90
NNet (functions) 283Network (functions) 194NEW_TIME 407NEXT_DAY 407NULL 44
NULL in HFSQL 337
Numeric (Variable) 41Numeric key 324NVL 407
OODBC driver on HFSQL 360, 361, 362Operator 66
Arithmetic 67Binary 67Indirection 72Logical 66Miscellaneous 73On address 72On character strings 70
operatorComparison 69
Optimization 359Outgoing calls 272
PPage
Functions 123Overview 123
Pane (ribbon menu) 30Parameters of a procedure 99Pascal string on 41Password 339
Variable 339PATINDEX 404POP3 244Popup (window)
MyPopupControl 92Popup window
MyPopupControl 92Previous (Button) 125Print 174
Drawings 175Fonts 175Functions 177Images 175Parameters 174Principles 174Text 175
PrintingOverview 174
Procedure 95Call 99Declare 98
WLangage.book Page 419 Jeudi, 20. mars 2014 4:29 16

420 Index
Global 95Local 97Parameters 99Sets of procedures 98
ProjectFunctions 194
PropertiesHFSQL 394
PropertyDateTime 43Duration 43File description 57Hour 43Item description 59Link description 58Windows and controls 137
Protecting files 339Protocol
POP 3 244SMTP 244SOAP 301SSL 233
RReal (Variable) 41Record 325
Add 329Delete 329Loaded in memory 327Modify 329Pointed 325, 327Read 326Seek 326Write 326
Referential integrity 340, 341Registry (functions) 180Remote access
HFSQL file 385REPLACE 401Replication file 382, 386Reserved words 89Result (Statement) 87Retrieving the HTML pages 280Return (Statement) 86Ribbon (Editor) 30RIGHT 399ROUND 407RPAD 402RTRIM 401
Rule for variable scope 65
SSearch
Exact match 323Generic 323
Search argument 323Search Criterion 323Search key 327Secured transaction 232Securing the transactions (SSL) 233Seeking records. 326Semaphore in the threads 294Send faxes 277Serial and parallel ports (functions) 182Server
HFSQL Client/Server 410Service (functions) 184Set of procedures 98Signals 297Simple array (Variable) 47Site
AJAX 220Link with WinDev 385
SMTP 244SNMP (Functions) 194SOAP 301
Functions 304SOAP server 301
Running procedures 301Socket 286
Functions 290SOUNDEX 406SOUNDEX2 406Specific processes 33Speeding up processes 359SQL 364
AVG 405BOTTOM 405COUNT 404Functions 398HFSQL 364INSTR 404LEFT 399LEN 403LENGTH 403LOWER 403LTRIM 400MAX 405
WLangage.book Page 420 Jeudi, 20. mars 2014 4:29 16

Index 421
MID 400MIN 405PATINDEX 404RIGHT 399RTRIM 401SUBSRING 400SUBSTR 400SUM 405TOP 406UPPER 403
SSL 233SSL certificate 233Statement 75
Break 87Composite 75Continue 85For 76For all (array browsing) 81, 82For all (control browsing) 80For all (file browsing) 77For all (string parsing) 79For each (array browsing) 81, 82For each (control browsing) 80For each (file browsing) 77For each (string parsing) 79Goto 76IF 83Loop 75Result 87Return 86Switch 83
Statistics (functions) 154Stop (Keywords) 94String (Variable) 41STRING_AGG 402Structure (Variable) 52SUBSTR 400SUBSTRING 400SUM 405Switch (Statement) 83System (functions) 185
TTelephony 270
Functions 273Incoming calls 270Outgoing calls 272
Temporary file 358Text key 323
Thread 293Functions 299Managing the semaphores 294Signals 297
TimeDateTime type 43Duration type 43Time type 43
TOP 406Transaction 350
Programming 351TRANSLATE 402Translation
Messages 32Triggers 380TRIM 401TRUNC 407Twain (functions) 183Twain device (functions) 183Type
Buffer 42Currency 41Data source 56Date 42DateTime 43Duration 43Dynamic array 48File description 57Fixed array 49Font 60Item description 59Link description 58Numeric 41Real 41Simple array 47String 41Time 43Variant 44
UUnique key 322, 339, 340Uniqueness 322Upload 211UPPER 403USB (functions) 182, 183
VVariable
WLangage.book Page 421 Jeudi, 20. mars 2014 4:29 16

422 Index
Advanced type 47Automation object 54Buffer type 42Character type 41Composite variable 51Currency type 41Data source 56Date type 42DateTime type 43Duration type 43Dynamic array 48Dynamic automation object 55Dynamic structure 54File description 57Fixed array 49Font 60Global 64Integer type 40Item description 59Link description 58Local 64Numeric type 41Overview 39Real type 41Scope rule 65Simple array 47Simple type 39String type 41Structure 52Time type 43Variant type 44
Variant (Variable) 44
WWDBackup 355
Web userCookies 214
WinDevMiscellaneous functions 188
WinDev (Back Office) 385WinDev FTP/RPC 281Window
Functions 119Properties 137
Windows 180Functions 186
Windows event (functions) 187WLanguage 37
Browser code 38Server code 38
Writing an email 250
XxBase 331xBase file 331xBase index 331XLS 199
Functions 199XLS file 199XML 311
Functions 313XML document
Functions 313XML file 311XML WebService 305
Import 305XML Webservice
Generate 307
WLangage.book Page 422 Jeudi, 20. mars 2014 4:29 16