Embed Size (px)
Citation preview

8/12/2019 BOM Uuser Guide
http://slidepdf.com/reader/full/bom-uuser-guide 1/331
Oracle® Bills of Material
User's Guide
Release 12.1
Part No. E13688-04
August 2010

8/12/2019 BOM Uuser Guide
http://slidepdf.com/reader/full/bom-uuser-guide 2/331
Oracle Bills of Material User's Guide, Release 12.1
Part No. E13688-04
Copyright © 1996, 2010, Oracle and/or its affiliates. All rights reserved.
Primary Author: Reena Titus, Laurel Dale
Oracle is a registered trademark of Oracle Corporation and/or its affiliates. Other names may be trademarks
of their respective owners.
This software and related documentation are provided under a license agreement containing restrictions on
use and disclosure and are protected by intellectual property laws. Except as expressly permitted in your
license agreement or allowed by law, you may not use, copy, reproduce, translate, broadcast, modify, license,
transmit, distribute, exhibit, perform, publish or display any part, in any form, or by any means. Reverse
engineering, disassembly, or decompilation of this software, unless required by law for interoperability, is
prohibited.
The information contained herein is subject to change without notice and is not warranted to be error-free. If
you find any errors, please report them to us in writing.
If this software or related documentation is delivered to the U.S. Government or anyone licensing it on behalf
of the U.S. Government, the following notice is applicable:
U.S. GOVERNMENT RIGHTS
Programs, software, databases, and related documentation and technical data delivered to U.S. Government
customers are "commercial computer software" or "commercial technical data" pursuant to the applicable
Federal Acquisition Regulation and agency-specific supplemental regulations. As such, the use, duplication,
disclosure, modification, and adaptation shall be subject to the restrictions and license terms set forth in the
applicable Government contract, and, to the extent applicable by the terms of the Government contract, the
additional rights set forth in FAR 52.227-19, Commercial Computer Software License (December 2007). Oracle
USA, Inc., 500 Oracle Parkway, Redwood City, CA 94065.
This software is developed for general use in a variety of information management applications. It is not
developed or intended for use in any inherently dangerous applications, including applications which may
create a risk of personal injury. If you use this software in dangerous applications, then you shall be
responsible to take all appropriate fail-safe, backup, redundancy and other measures to ensure the safe use of
this software. Oracle Corporation and its affiliates disclaim any liability for any damages caused by use of this
software in dangerous applications.
This software and documentation may provide access to or information on content, products and servicesfrom third parties. Oracle Corporation and its affiliates are not responsible for and expressly disclaim all
warranties of any kind with respect to third party content, products and services. Oracle Corporation and its
affiliates will not be responsible for any loss, costs, or damages incurred due to your access to or use of third
party content, products or services.

8/12/2019 BOM Uuser Guide
http://slidepdf.com/reader/full/bom-uuser-guide 3/331
iii
Contents
Send Us Your Comments
Preface
1 Setting Up
Related Product Steps............................................................................................................... 1-1
Setup Steps................................................................................................................................ 1-2
Defining Bills of Material Parameters ..................................................................................... 1-7
Creating Alternates..................................................................................................................1-10
Creating Custom Deletion Statements and Constraints........................................................ 1-11
Creating a Department Class.................................................................................................. 1-13
Defining a Department........................................................................................................... 1-14
Assigning Resources to a Department.................................................................................... 1-16
Defining a Resource ............................................................................................................... 1-24
Defining Resource Setup Information................................................................................... 1-32
Using the Workday Calendar..................................................................................................1-36
Defining Lookups................................................................................................................... 1-46
Assigning View-only Privileges to Forms.............................................................................. 1-47
Bills of Material Profile Options............................................................................................ 1-49
Subscribing to Bills of Material Business Events...................................................................1-54
2 Bills of Material
Overview of Bills of Material................................................................................................... 2-2
Creating a Bill of Material ........................................................................................................ 2-9
Copying Bill and Routing Information ................................................................................. 2-17
Referencing Common Bills and Routings.............................................................................. 2-19

8/12/2019 BOM Uuser Guide
http://slidepdf.com/reader/full/bom-uuser-guide 4/331
iv
Assigning Descriptive Elements ............................................................................................ 2-25
Creating Reference Designators .............................................................................................2-25
Assigning Substitute Components ........................................................................................ 2-27
Defining Item Revisions ........................................................................................................ 2-27
Defining Bill or Routing Operation Documents....................................................................2-28
Attaching Files.........................................................................................................................2-28
Checking for Bill Loops.......................................................................................................... 2-28
Modifying Components and Bills.......................................................................................... 2-29
Mass Changing Bills of Material ........................................................................................... 2-30
Viewing an Indented Bill of Material ....................................................................................2-34
Comparing Bills of Material .................................................................................................. 2-36
Viewing Item Usage ............................................................................................................... 2-38
Bills of Material Field Reference............................................................................................ 2-39
Bill / Component Validation Rules.........................................................................................2-46
Creating a Product Family.......................................................................................................2-49
3 Routings
Overview of Routings............................................................................................................... 3-1
Creating a Routing .................................................................................................................... 3-9
Creating a Standard Operation............................................................................................... 3-22
Viewing Resource Usage.........................................................................................................3-28
Routings Field Reference........................................................................................................ 3-29
4 Deleting Information
Deleting Items, Bills, Routings, Components, and Operations .............................................. 4-1
Deletion Constraints and Statements....................................................................................... 4-6
5 Configure to Order
Overview of Configure To Order............................................................................................. 5-1
Overview of Model and Option Class Bills of Material.......................................................... 5-4
AutoCreate Configuration Items............................................................................................ 5-24
Deactivating Configuration Items ......................................................................................... 5-43
6 Manufacturing Scheduling
Overview of Manufacturing Scheduling.................................................................................. 6-1
Detailed Scheduling.................................................................................................................. 6-2
Repetitive Line Scheduling....................................................................................................... 6-3
Dynamic Lead Time Offsetting................................................................................................ 6-4
Required Lead Time Information............................................................................................. 6-5

8/12/2019 BOM Uuser Guide
http://slidepdf.com/reader/full/bom-uuser-guide 5/331
v
Lead Time Offsetting Computations........................................................................................ 6-6
7 Manufacturing Lead Times
Overview of Lead Time Management...................................................................................... 7-1
Calculating Lead Times...........................................................................................................7-14
8 Oracle E-Records
21 CFR Part 11 Overview........................................................................................................... 8-1
E-records and E-signatures for Oracle Bills of Material...........................................................8-2
Viewing Oracle E-Records and E-Signatures........................................................................... 8-4
9 Reports and Processes
Bill of Material Comparison Report ........................................................................................ 9-2
Bill of Material Listing ............................................................................................................. 9-2
Bill of Material Loop Report .................................................................................................... 9-4
Bill of Material Structure Report ............................................................................................. 9-6
Bills of Material Parameters Report .......................................................................................9-10
Calculate Cumulative Yield for Network Routing.................................................................9-10
Calculate Manufacturing Lead Times.....................................................................................9-11
Consolidated Bill of Material Report .....................................................................................9-12
Delete Items Report ................................................................................................................9-14
Department Classes Report ....................................................................................................9-16
Department Report ................................................................................................................. 9-16
Item Where Used Report ........................................................................................................ 9-17
Pre-Explode Configurable Bills of Material........................................................................... 9-19
Resource Report ......................................................................................................................9-21
Resource Where Used Report .................................................................................................9-21
Rollup Cumulative Lead Times.............................................................................................. 9-22
Routing Report ....................................................................................................................... 9-22
Standard Operation Report .................................................................................................... 9-24
Workday Exception Sets Report ............................................................................................. 9-25
Oracle Configurator Concurrent Programs ............................................................................9-25
A Oracle Bills of Material Windows and Navigator Paths
Bills of Material Windows and Navigator Paths..................................................................... A-1
B Oracle Bills of Material Tools Menu
Bills of Material Tools Menu....................................................................................................B-1
Oracle Bills Of Material Character Mode Forms and Corresponding GUI Windows............B-2

8/12/2019 BOM Uuser Guide
http://slidepdf.com/reader/full/bom-uuser-guide 6/331
vi
C Business Event Data for Oracle Bills of Material
Business Events......................................................................................................................... C-1
Sample Subscription Functions............................................................................................... C-9
Glossary
Index

8/12/2019 BOM Uuser Guide
http://slidepdf.com/reader/full/bom-uuser-guide 7/331
vii
Send Us Your Comments
Oracle Bills of Material User's Guide, Release 12.1
Part No. E13688-04
Oracle welcomes customers' comments and suggestions on the quality and usefulness of this document.Your feedback is important, and helps us to best meet your needs as a user of our products. For example:
• Are the implementation steps correct and complete?
• Did you understand the context of the procedures?
• Did you find any errors in the information?
• Does the structure of the information help you with your tasks?
• Do you need different information or graphics? If so, where, and in what format?
• Are the examples correct? Do you need more examples?
If you find any errors or have any other suggestions for improvement, then please tell us your name, the
name of the company who has licensed our products, the title and part number of the documentation andthe chapter, section, and page number (if available).
Note: Before sending us your comments, you might like to check that you have the latest version of the
document and if any concerns are already addressed. To do this, access the new Oracle E-Business Suite
Release Online Documentation CD available on My Oracle Support and www.oracle.com. It contains the
most current Documentation Library plus all documents revised or released recently.
Send your comments to us using the electronic mail address: [email protected]
Please give your name, address, electronic mail address, and telephone number (optional).
If you need assistance with Oracle software, then please contact your support representative or Oracle
Support Services.
If you require training or instruction in using Oracle software, then please contact your Oracle local office
and inquire about our Oracle University offerings. A list of Oracle offices is available on our Web site at
www.oracle.com.

8/12/2019 BOM Uuser Guide
http://slidepdf.com/reader/full/bom-uuser-guide 8/331
8/12/2019 BOM Uuser Guide
http://slidepdf.com/reader/full/bom-uuser-guide 9/331
ix
Preface
Intended Audience
Welcome to Release 12.1 of the Oracle Bills of Material User's Guide.
This guide assumes you have a working knowledge of the following:
• The principles and customary practices of your business area.
• Oracle Bills of Material
If you have never used Oracle Bills of Material, Oracle suggests you attend one or
more of the Oracle Bills of Material training classes available through Oracle
University.
• The Oracle Applications graphical user interface.
To learn more about the Oracle Applications graphical user interface, read the
Oracle E-Business Suite User's Guide.
See Related Information Sources on page xi for more Oracle E-Business Suite product
information.
Deaf/Hard of Hearing Access to Oracle Support Services
To reach Oracle Support Services, use a telecommunications relay service (TRS) to call
Oracle Support at 1.800.223.1711. An Oracle Support Services engineer will handle
technical issues and provide customer support according to the Oracle service request
process. Information about TRS is available at
http://www.fcc.gov/cgb/consumerfacts/trs.html, and a list of phone numbers is
available at http://www.fcc.gov/cgb/dro/trsphonebk.html.

8/12/2019 BOM Uuser Guide
http://slidepdf.com/reader/full/bom-uuser-guide 10/331
x
Documentation Accessibility
Our goal is to make Oracle products, services, and supporting documentation accessible
to all users, including users that are disabled. To that end, our documentation includes
features that make information available to users of assistive technology. Thisdocumentation is available in HTML format, and contains markup to facilitate access by
the disabled community. Accessibility standards will continue to evolve over time, and
Oracle is actively engaged with other market-leading technology vendors to address
technical obstacles so that our documentation can be accessible to all of our customers.
For more information, visit the Oracle Accessibility Program Web site at
http://www.oracle.com/accessibility/.
Accessibility of Code Examples in Documentation
Screen readers may not always correctly read the code examples in this document. The
conventions for writing code require that closing braces should appear on an otherwise
empty line; however, some screen readers may not always read a line of text that
consists solely of a bracket or brace.
Accessibility of Links to External Web Sites in Documentation
This documentation may contain links to Web sites of other companies or organizations
that Oracle does not own or control. Oracle neither evaluates nor makes any
representations regarding the accessibility of these Web sites.
Structure1 Setting Up
This chapter provides information on setting up Oracle Bills of Material.
2 Bills of Material
This chapter provides you with everything you need to know to define and use bills of
material.
3 Routings
This chapter tells you everything you need to know to use routings.
4 Deleting Information
This chapter tells you everything you need to know to delete item, bill, and routing
information.
5 Configure to Order
This chapter provides an overview of how to use the configure-to-order features within
Oracle Bills of Material.
6 Manufacturing Scheduling
This chapter tells you everything you need to know about manufacturing scheduling.
7 Manufacturing Lead Times

8/12/2019 BOM Uuser Guide
http://slidepdf.com/reader/full/bom-uuser-guide 11/331
xi
This chapter tells you everything you need to know about manufacturing lead times.
8 Oracle E-Records
This chapter discusses the acquisition of electronic signatures (e-signatures) on
electronic records (e-records) in Oracle Bills of Material. E-records and e-signatures
enable you to comply with the 21 CFR Part 11 regulations.
9 Reports and Processes
This chapter describes Oracle Bills of Material reports and processes and their
submission parameters.
A Oracle Bills of Material Windows and Navigator Paths
This appendix shows you the default navigator path for each Oracle Bills of Material
window. Refer to this appendix when you do not already know the navigator path for a
window you want to use.
B Oracle Bills of Material Tools Menu
This appendix describes the options on the Oracle Bills of Material Tools menu.
C Business Event Data for Oracle Bills of Material
Glossary
Related Information Sources
• Oracle Advanced Supply Chain Planning Implementation and User's Guide
• Oracle E-Business Suite Developer's Guide
• Oracle E-Business Suite Flexfields Guide
• Oracle E-Business Suite System Administrator's Guide
• Oracle E-Business Suite User's Guide
• Oracle Capacity User's Guide
• Oracle Configurator Developer User's Guide
• Oracle Cost Management User's Guide
• Oracle E-Records Implementation Guide
• Oracle Engineering User's Guide
• Oracle Flow Manufacturing User's Guide
• Oracle Inventory User's Guide
• Oracle Manufacturing APIs and Open Interfaces Manual

8/12/2019 BOM Uuser Guide
http://slidepdf.com/reader/full/bom-uuser-guide 12/331
xii
• Oracle Manufacturing Scheduling User's Guide
• Oracle Master Scheduling/MRP and Oracle Supply Chain Planning User's Guide
• Oracle Order Management User's Guide
• Oracle Projects User's Guide
• Oracle Quality User's Guide
• Oracle Shop Floor Management User's Guide
• Oracle Warehouse Management User's Guide
• Oracle Work in Process User's Guide
• Oracle Workflow User's Guide
• Oracle Workflow Developer's Guide
• Using Oracle HRMS–The Fundamentals
Integration Repository
The Oracle Integration Repository is a compilation of information about the service
endpoints exposed by the Oracle E-Business Suite of applications. It provides a
complete catalog of Oracle E-Business Suite's business service interfaces. The tool lets
users easily discover and deploy the appropriate business service interface for
integration with any system, application, or business partner.
The Oracle Integration Repository is shipped as part of the E-Business Suite. As your
instance is patched, the repository is automatically updated with content appropriate
for the precise revisions of interfaces in your environment.
Do Not Use Database Tools to Modify Oracle E-Business Suite Data
Oracle STRONGLY RECOMMENDS that you never use SQL*Plus, Oracle Data
Browser, database triggers, or any other tool to modify Oracle E-Business Suite data
unless otherwise instructed.
Oracle provides powerful tools you can use to create, store, change, retrieve, and
maintain information in an Oracle database. But if you use Oracle tools such as
SQL*Plus to modify Oracle E-Business Suite data, you risk destroying the integrity of
your data and you lose the ability to audit changes to your data.
Because Oracle E-Business Suite tables are interrelated, any change you make using an
Oracle E-Business Suite form can update many tables at once. But when you modify
Oracle E-Business Suite data using anything other than Oracle E-Business Suite, you

8/12/2019 BOM Uuser Guide
http://slidepdf.com/reader/full/bom-uuser-guide 13/331
xiii
may change a row in one table without making corresponding changes in related tables.
If your tables get out of synchronization with each other, you risk retrieving erroneous
information and you risk unpredictable results throughout Oracle E-Business Suite.
When you use Oracle E-Business Suite to modify your data, Oracle E-Business Suite
automatically checks that your changes are valid. Oracle E-Business Suite also keeps
track of who changes information. If you enter information into database tables usingdatabase tools, you may store invalid information. You also lose the ability to track who
has changed your information because SQL*Plus and other database tools do not keep a
record of changes.

8/12/2019 BOM Uuser Guide
http://slidepdf.com/reader/full/bom-uuser-guide 14/331

8/12/2019 BOM Uuser Guide
http://slidepdf.com/reader/full/bom-uuser-guide 15/331
8/12/2019 BOM Uuser Guide
http://slidepdf.com/reader/full/bom-uuser-guide 16/331
1-2 Oracle Bills of Material User's Guide
printers
• Managing data security, which includes setting up responsibilities to allow access
to a specific set of business data and complete a specific set of transactions, and
assigning individual users to one or more of these responsibilities
• Setting up Oracle Workflow
• Defining items in Oracle Inventory. See: Defining Items, Oracle Inventory User's
Guide.
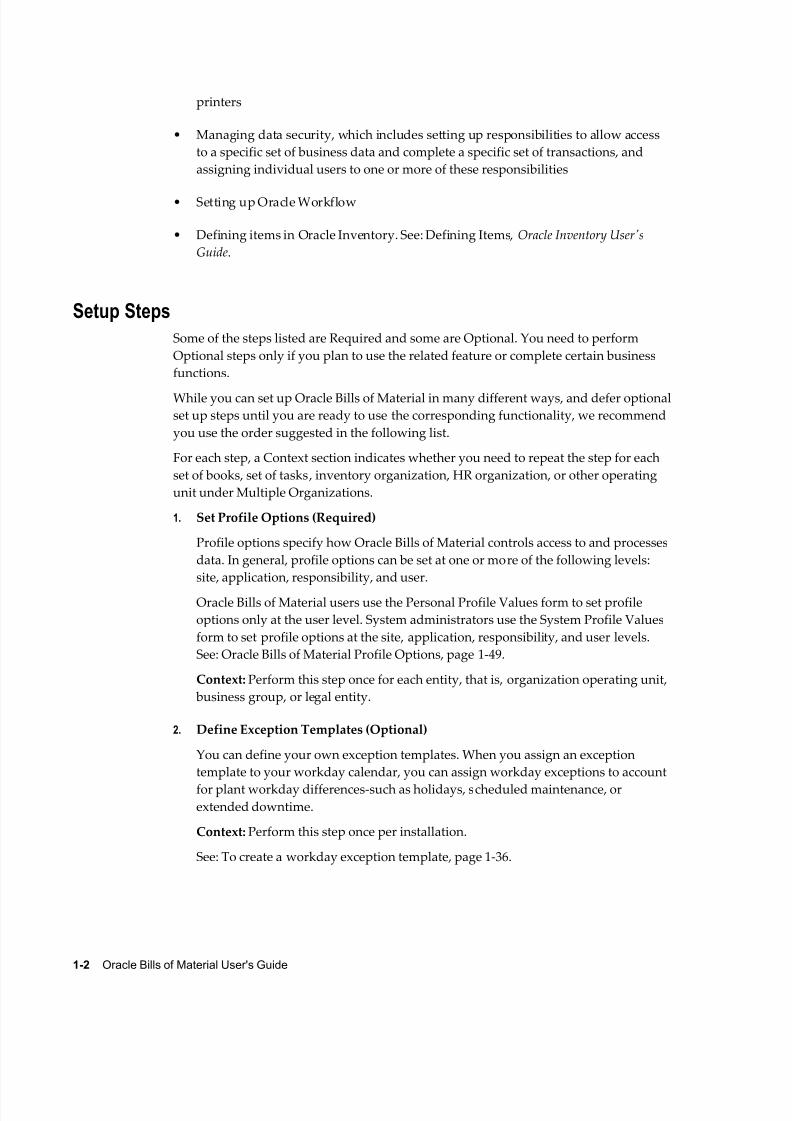
Setup Steps
Some of the steps listed are Required and some are Optional. You need to perform
Optional steps only if you plan to use the related feature or complete certain business
functions.
While you can set up Oracle Bills of Material in many different ways, and defer optional
set up steps until you are ready to use the corresponding functionality, we recommend
you use the order suggested in the following list.
For each step, a Context section indicates whether you need to repeat the step for each
set of books, set of tasks, inventory organization, HR organization, or other operating
unit under Multiple Organizations.
1. Set Profile Options (Required)
Profile options specify how Oracle Bills of Material controls access to and processes
data. In general, profile options can be set at one or more of the following levels:
site, application, responsibility, and user.
Oracle Bills of Material users use the Personal Profile Values form to set profile
options only at the user level. System administrators use the System Profile Values
form to set profile options at the site, application, responsibility, and user levels.
See: Oracle Bills of Material Profile Options, page 1-49.
Context: Perform this step once for each entity, that is, organization operating unit,
business group, or legal entity.
2. Define Exception Templates (Optional)
You can define your own exception templates. When you assign an exception
template to your workday calendar, you can assign workday exceptions to account
for plant workday differences-such as holidays, scheduled maintenance, orextended downtime.
Context: Perform this step once per installation.
See: To create a workday exception template, page 1-36.

8/12/2019 BOM Uuser Guide
http://slidepdf.com/reader/full/bom-uuser-guide 17/331
Setting Up 1-3
3. Define and Build your Workday Calendar (Required)
You define a workday calendar for one or more organizations, and assign an
exception set to each calendar. For each workday calendar and exception set, you
assign a list of holidays or workday exceptions. You then define shifts for your
workday calendar, and assign any shift workday exceptions.
After you define your workday calendar information, you build your workday
calendar with the exception set. If you associate one calendar with multiple
organizations, you can build your workday calendar with multiple exception sets to
account for workday differences across organizations.
Important: If you use Oracle Master Scheduling/MRP, choose the
calendar options 445 weekly quarter pattern or 544 weekly quarter
pattern if you want to report MRP information in weeks and
months. Otherwise, if you choose 13 period calendar or Regular
calendar months, you can only report MRP information in monthly
buckets.
Context: Perform this step once per installation.
See: Creating a Workday Calendar, page 1-36.
4. Assign Workday Calendar to Organization (Required)
You assign a workday calendar and exception set to each of your organizations.
You can share the same workday calendar across organizations with either the
same or a different exception set for each organization.
Default: If you skip this step, <enter value here> will be used as the default value.
Context: Perform this step once per organization.
See: To select workday or shift exceptions, page 1-36.
5. Define Bill of Material Parameters (Required)
You assign the maximum number of bill of material levels for bill explosions, loop
checks and implosions. For assemble to order manufacturers, you assign
configuration item information.
Oracle Cost Management does require that you assign values to each parameter if
you compute an organization's manufacturing costs based on bill of material and
routing information defined in Oracle Bills of Material.
Context: Perform this step once per organization.
See: Defining Bill of Material Parameters, page 1-7.
6. Define Department Classes (Optional)
You can define department classes to group departments and to identify

8/12/2019 BOM Uuser Guide
http://slidepdf.com/reader/full/bom-uuser-guide 18/331
1-4 Oracle Bills of Material User's Guide
manufacturing cells. This information is for your reference only.
Context: Perform this step once per organization.
See: Creating a Department Class, page 1-13.
7. Define Resources (Optional)
You can define a resource as anything of value, except material and cash, required
to manufacture, cost, and schedule products. Resources include people, tools, labor
purchased from a supplier, and physical space.
Context: Perform this step once per organization.
See: Defining a Resource, page 1-24.
8. Define Resource Setup Information (Optional)
Define resource setup information to create a performance model for machines and
resources that includes time needed to change from one setup to another.
Context: Perform this step once per organization.
See: Defining Resource Setup Information, page 1-32.
9. Define Resource Groups (Optional)
You can group department resources by resource group to facilitate bill of resource
generation and capacity planning in Oracle Capacity.
Context: Perform this step once per installation.
See: Defining a Resource, page 1-24.
10. Define Competencies for Resources
You can define competencies for resources while assigning employees to the
resources. The competency, skill levels and qualification must match the
requirements for the resource. You can only add those resources that meet the
requirements to the resource instance. The skill definition of the resource cannot be
changed if there are employee instances assigned to the resource.
Note: If you want to change the skills for the resource, then delete
all employee instances for the resource and then change the skills.
11. Define Competencies for Routings
Define the competencies required for both standard and non-standard operations
and update competencies as required.
12. Define Competencies for Standard Operations
You can define the competencies of the resource to perform the operation.

8/12/2019 BOM Uuser Guide
http://slidepdf.com/reader/full/bom-uuser-guide 19/331
Setting Up 1-5
13. Define Simulation Sets (Optional)
You can group deviations to available resource capacity for resource shifts and use
each set in shop floor scheduling and capacity planning.
Context: Perform this step once per installation.
See: Defining a Resource, page 1-24.
14. Define Locations (Optional)
You define delivery locations for departments with outside processing resources.
Context: Perform this step once per organization.
See: Defining a Resource, page 1-24.
15. Define Departments (Optional)
You can define departments as areas within your organization where you perform
work and/or collect costs.
Context: Perform this step once per organization.
See: Defining a Department, page 1-14.
16. Assign Resources and Resource Shifts to Departments (Optional)
You can assign resources to a department and then assign shifts to those resources.
You can group department resources by resource group, and assign a simulation set
with capacity modifications for each resource shift.
Default: If you skip this step, <enter value here> will be used as the default value.
Context: Perform this step once per organizational department.
See: Assigning Resources to a Department, page 1-16.
17. Define Overheads (Optional)
You can define resource overhead by using the Define Overhead form. Each
overhead sub-element has a default basis, default activity, and absorption account.
The overhead absorption account offsets your corresponding overhead cost pool in
the general ledger.
Context: Perform this step once per organizational resource.
See: Defining a Resource, page 1-24.
18. Associate Overheads with Departments (Optional)
You can assign overhead rates or amounts to your department by cost type and
department. The cost rollup uses the assigned basis type to allocate the overhead
charge. The cost rollup assigns the activity to the calculated overhead cost. You can
define pending rates and use the cost rollup/update process to change the pending
rates to Frozen overhead rates.

8/12/2019 BOM Uuser Guide
http://slidepdf.com/reader/full/bom-uuser-guide 20/331
1-6 Oracle Bills of Material User's Guide
Context: Perform this step once per organizational department.
See: Defining a Department, page 1-14.
19. Define Alternates (Optional)
You can define any number of alternate names that you use when you create
alternate bills of material and routings. You use alternate bills and routings to
produce an identical product using a different bill or routing. You can apply the
same alternate name to a bill of material and a routing.
Context: Perform this step once per organization.
See: Primary and Alternate Bills of Material, page 2-2.
20. Define Standard Bill of Material Comments (Optional)
You can define any number of standard bill of material comments that you can
assign to your bills of material.
Context: Perform this step once per organization.See: Creating a Bill of Material, page 2-9.
21. Define Standard Instructions (Optional)
You can define any number of operation instructions that you can assign to a
routing operation or standard operation.
Context: Perform this step once per organization.
See: Creating a Standard Operation, page 3-22.
22. Define Change Order Types (Optional)
You can define mass change order types, using your own terminology, to describe
mass changes to your manufacturing bills of material.
Default: If you skip this step, Oracle shipped change order types will be used as
the default value.
Context: Perform this step once per installation.
See: Mass Changing Bills of Material, page 2-30.
23. Define Delete Statements and Constraints (Optional)
Oracle Bills of Material provides a list of rules to determine if an item, bill of
material or routing can be deleted and a list of delete instructions. Each rule insuresdata integrity across all Oracle Manufacturing applications. You can add to this list
with your own business rules to further restrict the entities that can be deleted. You
write each of your delete constraints as a SQL select statement that either prevents
or lets a user delete an item, bill, or routing. Once the delete constraint selects the
data to be deleted, the delete statement provides the SQL delete statement used to
delete the selected data.

8/12/2019 BOM Uuser Guide
http://slidepdf.com/reader/full/bom-uuser-guide 21/331
Setting Up 1-7
Default: If you skip this step, Oracle shipped delete constraints and statements will
be used as the default values.
Context: Perform this step once per organization.
See: Creating Custom Deletion Statements and Constraints, page 1-11.
24. Define Lookups (Optional)
Oracle Applications provides a consolidated method across all applications for
defining codes. Bills of Material codes you can define include:
• Bonus Codes
• Scrap Codes
• Resource Down Codes
• Resource Capacity Change Reasons
Context: Perform this step once per organization.
See: Defining Lookups, page 1-46.
25. Assign View-only Privileges to Forms (Optional)
The system administrator can assign view-only privileges to certain forms by user.
For example, most users do not need the ability to define or update department
information. The system administrator can restrict all but the user who maintains
department information from adding or updating departments, while still enabling
everyone to view the Departments window.
Context: Perform this step once per responsibility.
See: Assigning View-only Privileges to Forms, page 1-47.
Defining Bills of Material Parameters
Use bill of material parameters to define modes of operation and default values for an
organization that affect functions such as bill definition, bill deletion, and
assemble-to-order configuration numbering.
Define bill of material parameters for each organization in which you use bills or
routings. (Bill parameters are specific to, and must be defined for, each organization.)
Doing so ensures access to resource, outside processing, and overhead cost informationfor certain cost management functions.
To define bill of material parameters:1. Navigate to the Parameters window.

8/12/2019 BOM Uuser Guide
http://slidepdf.com/reader/full/bom-uuser-guide 22/331
1-8 Oracle Bills of Material User's Guide
2. Enter the maximum bill levels to explode. The maximum is 60.
For configurations only
All fields in the Configuration Options box apply only to configured items. See: BOM
Parameters, Oracle Configure to Order Process Guide , for more detailed information about
each field.
3. Enter an inactive status.
4. Enter the numbering segment to use when creating configuration item numbers.
5. Select an automatic or user defined numbering method. A unique configurationitem number is automatically assigned based on the numbering method you select:
Append Sequence: Appends a sequence number to the item segment you entered for
the numbering segment.
Replace with Sequence: Replace the item segment you entered in the numbering
segment with a sequence number.
Replace with Order, Line Number: Replace the item segment you entered for
numbering segment with the sales order and line number.
User Defined: Allows you to define a numbering scheme that meets your business
needs.
6. Select one of the following in the Create Lower Level Supply field:
• No (default value)
The system creates supply only for the top level assemble to order (ATO) item
or configuration.

8/12/2019 BOM Uuser Guide
http://slidepdf.com/reader/full/bom-uuser-guide 23/331
Setting Up 1-9
• Auto Created Configuration Items Only
Creates supply for any lower level configuration generated because of the
specific sales order configuration.
Note: This option does not create supply for any lower level
configuration that was matched to a preconfigured item.
• Auto Created Configuration Items and ATO Items
Creates lower level supply for all ATO items, preconfigured items, and
autocreated configured items.
Note: Supply is created even for ATO items set up as standard
mandatory components on the model bill. Only use this option
if you do not expect to have inventory on hand for your ATO
items and preconfigured items.
This parameter indicates whether or not the system creates supply for lower level
configurations and assemble to order items when progressing an order on-line in
Oracle Order Management, or when using the Autocreate FAS batch program.
7. Check the Config BOM Creation Allowed box to allow the creation of configuration
bills of material in the organization.
Check this box in all organizations in which you plan to manufacture or purchase
your configurations. Uncheck the box in those organizations where a model BOM
exists, but a configuration BOM is not necessary. For example, leave the box
unchecked for an Order Management validation organization that is not amanufacturing organization.
8. Check the Include Model/Option Class Items in Lead Time Rollup box to include
models and option classes when rolling up cumulative lead times.
If you leave this box unchecked, the cumulative lead time calculations are not
performed for model or option classes.
For all bills of material
9. If you would like Work in Process to maintain the individual operation sequence
numbers for phantom subassemblies, and to charge their resource and overhead
costs to the parent or higher level assembly, you set the following two parameters
in Oracle Bills of Material:
Use Phantom Routings: Set this parameter to specify whether phantom routing
resources and overhead costs (including those for outside processing resources
assigned to phantom routing operations) are charged to the parent or higher level
assembly. Setting this parameter also implies department inheritance for resources;

8/12/2019 BOM Uuser Guide
http://slidepdf.com/reader/full/bom-uuser-guide 24/331
1-10 Oracle Bills of Material User's Guide
thus, phantom resources can be used by departments that they are not owned by or
assigned to as a borrowed resource. You set the parameter at the inventory
organization level and it then applies to all phantoms within a single inventory
organization. These are its two values:
• Yes: If you select this value, phantom routing components and resources and
overheads are included in the cost of the higher level assembly. Routingresource costs are also included in capacity planning.
• No: This is the default. This value specifies that only components are included
in the higher assembly's cost, not resources and overheads.
Inherit Phantom Op Seq: Set this parameter to specify whether phantom subassembly
components inherit the operation sequence number of their parent or higher level
assembly, or maintain their own operation sequence number. This parameter is set
at the inventory organization level, and applies to all phantoms within a single
inventory organization. The parameter has these two values:
• Yes: This is the default. This value specifies that phantom subassemblycomponents inherit the operation sequence number of their parent or higher
level assemblies.
• No: If you select this value, phantom subassembly components maintain their
own operation sequence numbers.
Related Topics
Overview of Configure To Order, page 5-1
Bills of Material Parameters Report, page 9-10
Creating Alternates
An alternate bill describes an alternate list of component items that produce an
assembly. An alternate routing describes an alternate manufacturing process that
produces an assembly.
To create or update an alternate:1. Navigate to the Alternates window.

8/12/2019 BOM Uuser Guide
http://slidepdf.com/reader/full/bom-uuser-guide 25/331
Setting Up 1-11
2. Enter an alphanumeric string to describe a unique alternate.
3. Enter a date that the alternate is inactive on. As of the inactive date, you can no
longer assign the alternate to a bill of material or routing.
Related Topics
Primary and Alternate Bills of Material, page 2-2
Primary and Alternate Routings, page 3-1
Effective Date Fields, page 2-39
Creating Custom Deletion Statements and Constraints
You can create custom deletion statements to specify from which database table to
delete data that meets the deletion constraint criteria. Create custom deletion
constraints to enforce your unique business rules. Custom deletion constraints identify
the rows in a table that meet certain conditions for deletion.
Oracle provides seeded deletion statements and constraints, which you can view using
the Deletion Statements and Deletion Constraints windows. You cannot modify seeded
deletion statements and constraints, though.
To create a custom deletion constraint:1. Navigate to the Deletion Constraints window.

8/12/2019 BOM Uuser Guide
http://slidepdf.com/reader/full/bom-uuser-guide 26/331
1-12 Oracle Bills of Material User's Guide
2. Enter a name for the deletion constraint.
3. Indicate whether the constraint is enabled. An enabled deletion constraint means
that it is in effect when the delete concurrent program runs.
4. Select the kind of delete entity the constraint applies to: item, bill, routing,
component, or operation.
5. Select the name of the product that applies to this deletion constraint.
The Product Name field enables you to group deletion constraints by product.
6. Enter the SQL Select Statement that the delete concurrent program is to execute.
You cannot update SQL statements for predefined deletion constraints.
7. Indicate whether to delete if there are rows found or no rows found by the SQL
Select Statement.
8. Enter a failure message from Oracle Application Object Library's message
dictionary to display if the delete fails.
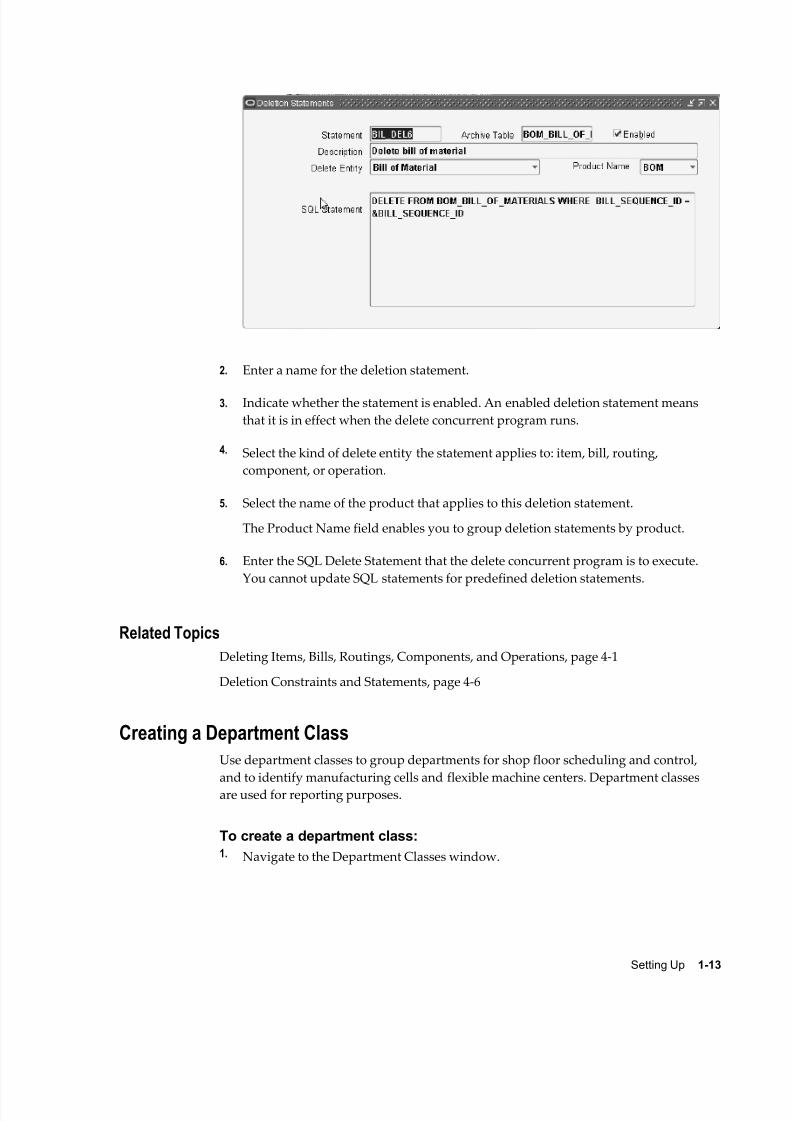
To create a custom delete statement:1. Navigate to the Deletion Statements window.
8/12/2019 BOM Uuser Guide
http://slidepdf.com/reader/full/bom-uuser-guide 27/331
Setting Up 1-13
2. Enter a name for the deletion statement.
3. Indicate whether the statement is enabled. An enabled deletion statement means
that it is in effect when the delete concurrent program runs.
4. Select the kind of delete entity the statement applies to: item, bill, routing,
component, or operation.
5. Select the name of the product that applies to this deletion statement.
The Product Name field enables you to group deletion statements by product.
6. Enter the SQL Delete Statement that the delete concurrent program is to execute.
You cannot update SQL statements for predefined deletion statements.
Related Topics
Deleting Items, Bills, Routings, Components, and Operations, page 4-1
Deletion Constraints and Statements, page 4-6
Creating a Department Class
Use department classes to group departments for shop floor scheduling and control,
and to identify manufacturing cells and flexible machine centers. Department classes
are used for reporting purposes.
To create a department class:1. Navigate to the Department Classes window.

8/12/2019 BOM Uuser Guide
http://slidepdf.com/reader/full/bom-uuser-guide 28/331
1-14 Oracle Bills of Material User's Guide
2. Enter text that uniquely describes the department class. For example, you could use
ASSY to group all final assembly departments.
3. Choose the Departments button to display the departments assigned to this
department class and the dates when these departments can no longer be assigned
to routing operations.
Note: Assign departments to classes when you define departments.
Related Topics
Defining a Department, page 1-14
Department Classes Report, page 9-16
Defining a Department
A department is an area within your organization that consists of one or more people,
machines, or suppliers, where you want to collect costs, apply overhead, and compare
load to capacity. You assign a department to each operation in a routing, and assignresources that are available for that department.
When you define a department, you specify any department overhead costs and the
resources that are available. You can enter multiple resources for each department. For
each resource, you can specify the shifts that the resource is available. For each resource
shift, you can also specify capacity modifications that change the available hours per
8/12/2019 BOM Uuser Guide
http://slidepdf.com/reader/full/bom-uuser-guide 29/331
Setting Up 1-15
day, units per day, or workdays.
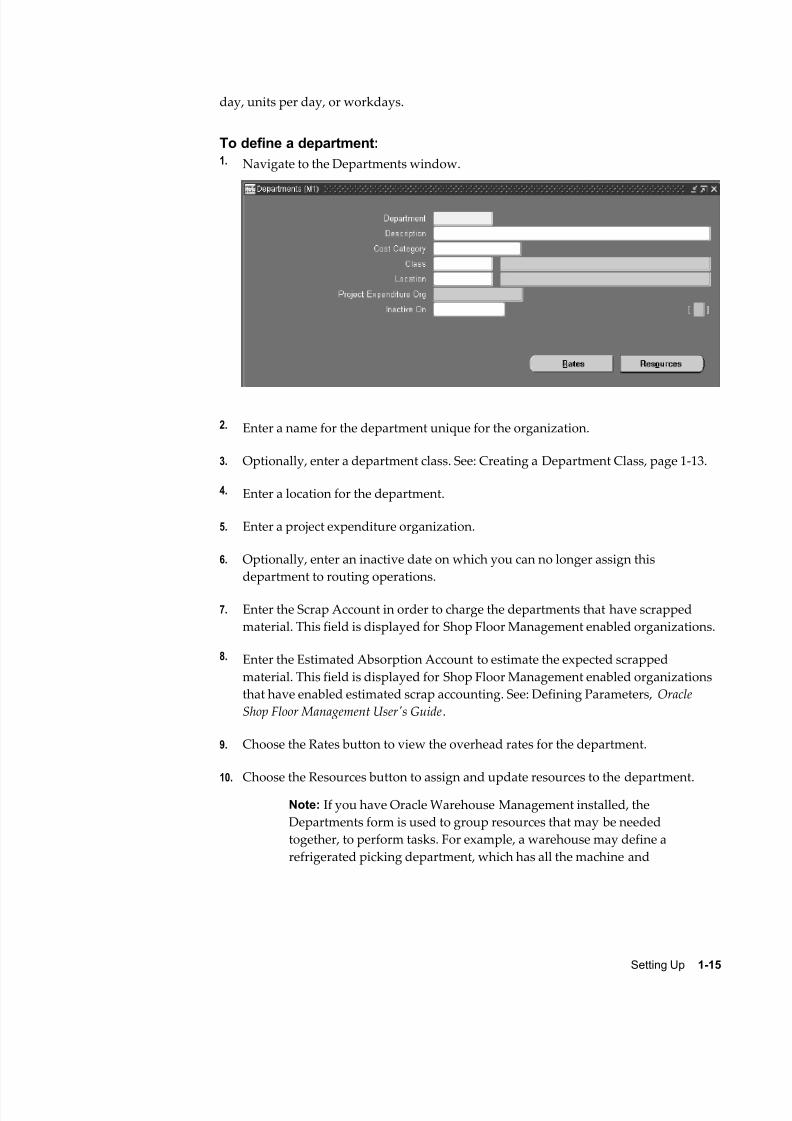
To define a department:1. Navigate to the Departments window.
2. Enter a name for the department unique for the organization.
3. Optionally, enter a department class. See: Creating a Department Class, page 1-13.
4. Enter a location for the department.
5. Enter a project expenditure organization.
6. Optionally, enter an inactive date on which you can no longer assign this
department to routing operations.
7. Enter the Scrap Account in order to charge the departments that have scrapped
material. This field is displayed for Shop Floor Management enabled organizations.
8. Enter the Estimated Absorption Account to estimate the expected scrapped
material. This field is displayed for Shop Floor Management enabled organizations
that have enabled estimated scrap accounting. See: Defining Parameters, Oracle
Shop Floor Management User's Guide.
9. Choose the Rates button to view the overhead rates for the department.
10. Choose the Resources button to assign and update resources to the department.
Note: If you have Oracle Warehouse Management installed, the
Departments form is used to group resources that may be needed
together, to perform tasks. For example, a warehouse may define a
refrigerated picking department, which has all the machine and

8/12/2019 BOM Uuser Guide
http://slidepdf.com/reader/full/bom-uuser-guide 30/331
1-16 Oracle Bills of Material User's Guide
manual resources associated to it that are required to perform a
refrigerated picking task. A warehouse can also use a picking
department, or a generic task department with all resources
associated that are used for warehouse task management. See: Set
Up Departments, Oracle Warehouse Management Implementation
Guide.
Related Topics
Assigning Resources to a Department, page 1-16
Department Report, page 9-16
Assigning Resources to a Department
To assign resources to a department:
1. Navigate to the Resources window. You can do this by choosing the Resources
button from the Departments window.
8/12/2019 BOM Uuser Guide
http://slidepdf.com/reader/full/bom-uuser-guide 31/331
Setting Up 1-17
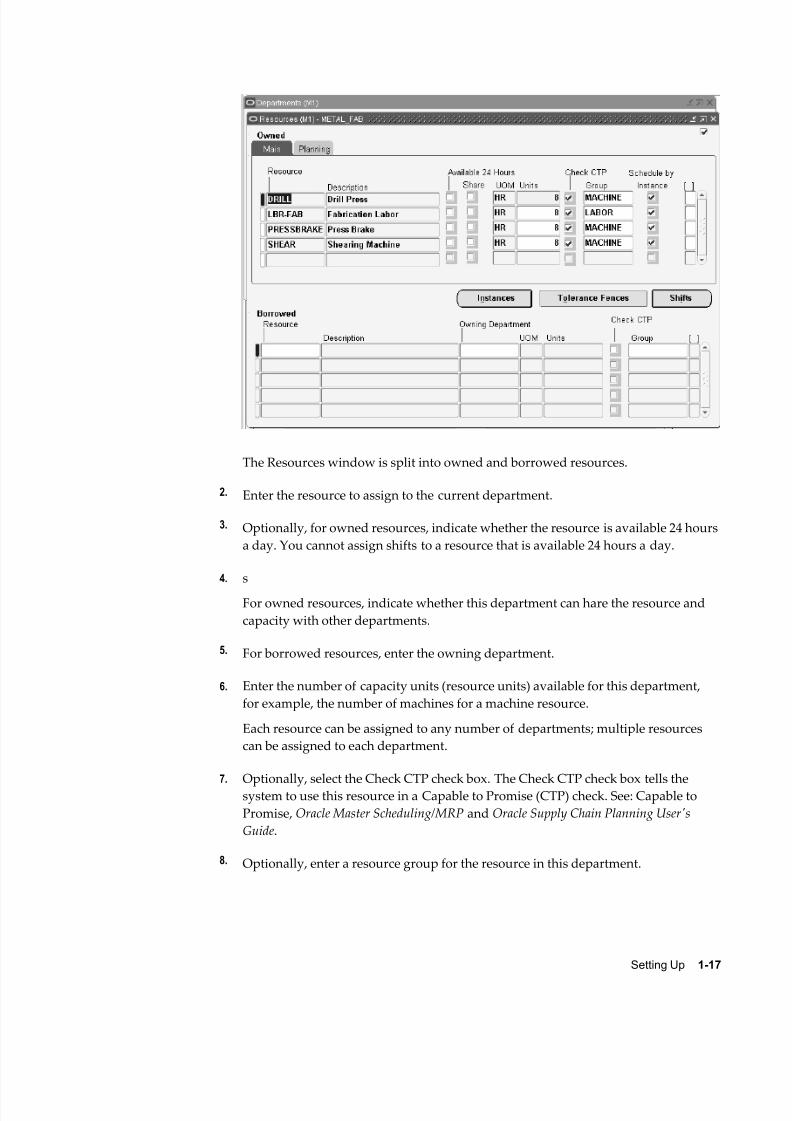
The Resources window is split into owned and borrowed resources.
2. Enter the resource to assign to the current department.
3. Optionally, for owned resources, indicate whether the resource is available 24 hours
a day. You cannot assign shifts to a resource that is available 24 hours a day.
4. s
For owned resources, indicate whether this department can hare the resource and
capacity with other departments.
5. For borrowed resources, enter the owning department.
6. Enter the number of capacity units (resource units) available for this department,
for example, the number of machines for a machine resource.
Each resource can be assigned to any number of departments; multiple resources
can be assigned to each department.
7.Optionally, select the Check CTP check box. The Check CTP check box tells thesystem to use this resource in a Capable to Promise (CTP) check. See: Capable to
Promise, Oracle Master Scheduling/MRP and Oracle Supply Chain Planning User's
Guide.
8. Optionally, enter a resource group for the resource in this department.

8/12/2019 BOM Uuser Guide
http://slidepdf.com/reader/full/bom-uuser-guide 32/331
1-18 Oracle Bills of Material User's Guide
9. Optionally, choose the Instances button to indicate if the department resource
should be scheduled to the instance level (specific employee name or piece of
equipment). See: Defining a Resource, page 1-24.
Caution: You can only schedule machine type resources by
instance, not labor type resources.
10. Enter an expenditure type for the resource.
11. For owned resources that are not available 24 hours, choose the Shifts button to
assign and update shift information for the resource. See: To assign shift
information for the resource, page 1-21.
To plan for resources assigned to a department
If you are using Oracle Capacity or Oracle Advanced Supply Chain Planning to ensure
that you have sufficient capacity to meet your production requirements, then enter
resource availability information in the Planning tab. All fields in this tab are optional.
12. Enter an exception set. The exception sets that you assign help identify capacity
problems. See: Exception Sets, Oracle Advanced Supply Chain Planning Implementation
and User's Guide.
13. Select an ATP rule from the list of values. See: Functional Setup for ATP Based on
Collected Data, Oracle Global Order Promising Implementation and User's Guide.
14. Enter the utilization and efficiency percentage for the resource. Use these values to
calculate the available hours for a resource. See: Resource Efficiency and Utilization,
Oracle Advanced Supply Chain Planning Implementation and User's Guide.
15. Enter the sequencing window (in days) to consider when optimizing the sequence
of jobs running on a resource with sequence dependent setups. See: Sequence
Dependent Steps, Oracle Advanced Supply Chain Planning Implementation and User's
Guide.
To define a resource instance:
You can optionally define each resource instance (specific employee name or piece of
equipment) eligible for use.
If the resource is a person resource, only certain people may be qualified to act as the
resource. For example, only certain people are trained to operate a drill press. Before
you can specify person resource instances, you must perform the following tasks:
• Optionally, define the person resource skills needed in the Resources window,
Skills region (see: Defining a Resource, page 1-24).
• Specify the employees that have the necessary skills for the resource (see: To group

8/12/2019 BOM Uuser Guide
http://slidepdf.com/reader/full/bom-uuser-guide 33/331
Setting Up 1-19
employees by resource, page 1-24).
If the resource is an equipment resource, only certain serial-numbered equipment items
are usable as the resource. Before you can specify equipment resource instances, you
must perform the following tasks:
• Create an equipment item by selecting the Equipment attribute in the OrganizationItem window, Physical Attributes tab (see: Defining Items , Oracle Inventory User's
Guide).
• Set up serial number control for the equipment item (see: Setting Up Serial Number
Control, Oracle Inventory User's Guide).
• Define the equipment item as an equipment type for the resource (see: To group
similar types of equipment by resource, page 1-24).
1. Find the resources assigned to a department by navigating to the Departments
window, then choosing Resources.
2. Select a resource, then choose Instances.
The Instances window contains different fields depending upon whether you select
an equipment or person resource.
3. If you select an equipment resource:
• Enter the equipment item that acts as the resource.
• Enter the serial number of the specific resource instance. Valid serial numbers
for the equipment item appear in the list of values.
8/12/2019 BOM Uuser Guide
http://slidepdf.com/reader/full/bom-uuser-guide 34/331
1-20 Oracle Bills of Material User's Guide
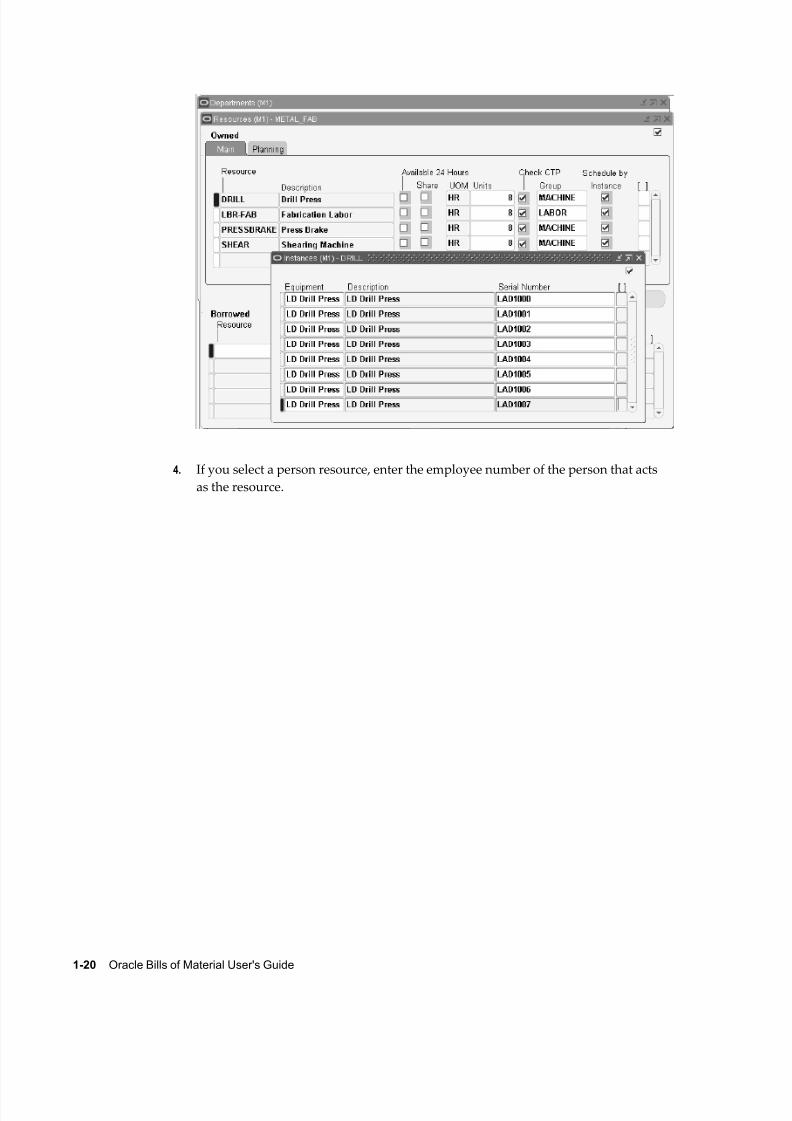
4. If you select a person resource, enter the employee number of the person that acts
as the resource.

8/12/2019 BOM Uuser Guide
http://slidepdf.com/reader/full/bom-uuser-guide 35/331
Setting Up 1-21
5. Save your work.
Important: The number of resource instances must match the
number of units specified in the Resources window.
To assign shift information for the resource:1. Navigate to the Shifts window. Do this by choosing the Shifts button from the
Resources window.
2. Enter a shift number to assign to the resource.
The shifts available to assign to the resource are those assigned to the workday
calendar assigned to the organization.
3. Choose the Capacity Changes button to define capacity changes for a shift.
To define capacity changes:
Capacity modifications can add or delete a day, or add or reduce capacity for a shift.
1. Navigate to the Capacity Changes window. Do this by choosing the Capacity
Changes button from the Shifts window.
2. Enter or select a simulation set for the capacity change. Use simulation sets for
capacity requirements planning in Oracle Capacity. See: Creating Simulation Sets,

8/12/2019 BOM Uuser Guide
http://slidepdf.com/reader/full/bom-uuser-guide 36/331

8/12/2019 BOM Uuser Guide
http://slidepdf.com/reader/full/bom-uuser-guide 37/331
Setting Up 1-23
7. Review the Resource Instance Change region for information on the specific
equipment capacity changes.
Detail Tab
These fields identify the resource instances impacted by the capacity change.
Source TabThis tab provides detailed information (the downtime source, organization, work
order, and operation) about resource downtime due to scheduled maintenance at
the resource instance level.
For the resource downtime information to appear in the Source tab, you must
execute the Load Production Equipment Maintenance Downtime process. See:
Production Equipment Downtime, Oracle Enterprise Asset Management User's Guide.
To define the resource tolerance:
Situations arise where an excess load needs to be placed on a resource. Use the
Tolerance Fences window to define the acceptable excess load (tolerance percentage) foreach resource, based on the number of days in advance of the need.
1. Navigate to the Tolerance Fences window by choosing Tolerance Fences from the
Resources window.

8/12/2019 BOM Uuser Guide
http://slidepdf.com/reader/full/bom-uuser-guide 38/331
1-24 Oracle Bills of Material User's Guide
2. Enter the number of days in advance of the resource need.
3. Enter the acceptable excess load (tolerance percentage) for the resource given the
number of days in advance of the manufacturing capacity need.
4. If the tolerance percentage changes as the number of days in advance changes, then
enter as many combinations of days in advance and tolerance percentage as needed.
5. Save your work.
Related Topics
Cost Management Profile Options and Security Functions, Oracle Cost Management
User's Guide
Defining a Resource
Use resources to define the time an assembly spends at an operation and the cost you
incur at the operation. A resource is anything you require to perform, schedule, or cost,
including but not limited to: employees, machines, outside processing services, and
physical space. A resource and usage rate for all scheduled activities is required in a
routing. Scheduled resources can include queue, setup, run, and move time.
8/12/2019 BOM Uuser Guide
http://slidepdf.com/reader/full/bom-uuser-guide 39/331
Setting Up 1-25
When you define your departments, you assign the resources available in each
department and the shifts that each resource is available. For each operation you define,
you specify a department and list of resources and usages. An operation can use any
resource that is available in the department, but you do not need to use all resources
assigned to the department.
If you have Oracle Manufacturing installed, you can use Resource batching. Resource batching enables you to use resources across multiple jobs. By using a single resource to
process multiple jobs simultaneously, you can prevent a resource from being
underutilized. Work scheduled using resource batching is characterized by equivalent
work performed with the same manufacturing processes. See: Setting Up Batch
Resources, Oracle Advanced Supply Chain Planning Implementation and User's Guide.
Prerequisites
Before you can define resources, set up your units of measure and unit of measure
conversion rates. Some resources may represent currency such as a fixed charge
resource, but currency resources cannot be scheduled since their unit of measure isnot time-based.
Set the site level profile option BOM: Hour UOM to hold the unit of measure that
represents an hour. Oracle Work in Process prevents you from scheduling resources
whose unit of measure is not in the same unit of measure class as the hour unit or
measure and has no conversions defined to the hour unit or measure.
To define a resource:1. Navigate to the Resources window.
8/12/2019 BOM Uuser Guide
http://slidepdf.com/reader/full/bom-uuser-guide 40/331
1-26 Oracle Bills of Material User's Guide
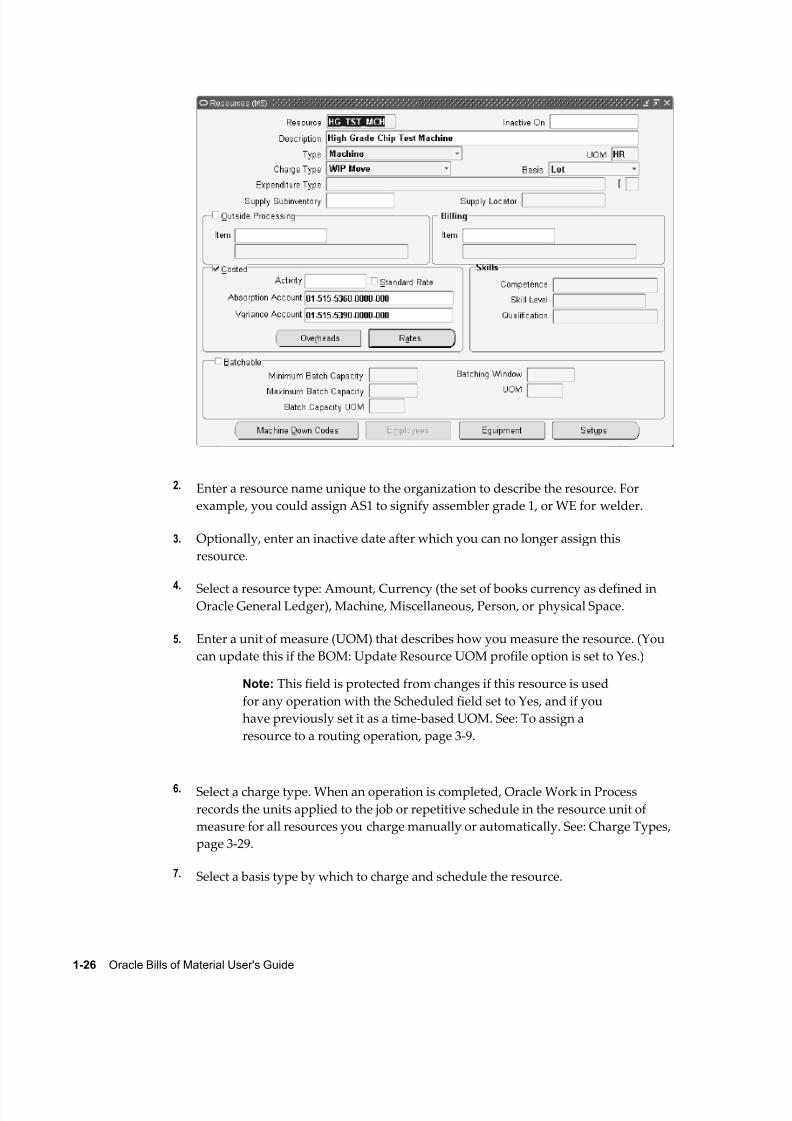
2. Enter a resource name unique to the organization to describe the resource. For
example, you could assign AS1 to signify assembler grade 1, or WE for welder.
3. Optionally, enter an inactive date after which you can no longer assign this
resource.
4. Select a resource type: Amount, Currency (the set of books currency as defined inOracle General Ledger), Machine, Miscellaneous, Person, or physical Space.
5. Enter a unit of measure (UOM) that describes how you measure the resource. (You
can update this if the BOM: Update Resource UOM profile option is set to Yes.)
Note: This field is protected from changes if this resource is used
for any operation with the Scheduled field set to Yes, and if you
have previously set it as a time-based UOM. See: To assign a
resource to a routing operation, page 3-9.
6. Select a charge type. When an operation is completed, Oracle Work in Process
records the units applied to the job or repetitive schedule in the resource unit of
measure for all resources you charge manually or automatically. See: Charge Types,
page 3-29.
7. Select a basis type by which to charge and schedule the resource.
8/12/2019 BOM Uuser Guide
http://slidepdf.com/reader/full/bom-uuser-guide 41/331

8/12/2019 BOM Uuser Guide
http://slidepdf.com/reader/full/bom-uuser-guide 42/331
1-28 Oracle Bills of Material User's Guide
You cannot view costing information if the Privilege To View Cost Information
function is excluded from the responsibility. You cannot update costing information
if, in addition, the Privilege To Maintain Cost Information function is excluded.
You can use activities to group resource charges for cost reporting purposes. See:
Defining Activities and Activity Costs in Oracle Cost Management User's Guide.
14. If the resource is costed, indicate whether to charge jobs and repetitive schedules
based on a standard rate you define.
Or, disable Standard Rate to enter a rate to charge the resource in Work in Process
for an internal resource, or derive the rate from the purchase order for an outside
processing resource. For outside processing resources, if you charge a job or
repetitive schedule at the standard rate, a purchase price variance is computed and
posted to the rate variance account. If you charge for all other resources, if you
charge a job or repetitive schedule at the actual rate, a resource rate variance is
computed and posted to the rate variance account.
15. If this resource is costed, enter an absorption account (general ledger account) usedto offset resource charges earned in work in process.
At period end, you normally compare this account to the resource charges in the
general ledger.
For outside processing resources, the default is the receiving valuation account
from Oracle Purchasing, as defined in the receiving options.
Important: For outside processing resources, do not change the
default receiving valuation account. When you receive an outside
processing purchase order, Oracle Purchasing credits the inventory
AP accrual account and debits the receiving valuation account. Bills
of Material then debits the work in process outside processingaccount and credits the receiving valuation account. If you change
the above default account, your receiving valuation account will
have an incorrect balance.
16. If this is a person type resource, enter the skill necessary for a particular person to
act as this resource. Define the skill needed by selecting from the following fields'
lists of values:
• Competence
• Skill Level
• Qualification
See: Creating a Competency Profile, Talent Management, Workforce Sourcing,
Deployment, and Talent Management Guide (US) for more information on competence,

8/12/2019 BOM Uuser Guide
http://slidepdf.com/reader/full/bom-uuser-guide 43/331
Setting Up 1-29
skill level, and qualification.
See: To group employees by resource, page 1-24 to select employees that meet the
skill requirements.
17. If this resource is costed, enter a variance account (general ledger account) to
accumulate resource rate variances for a job or repetitive schedule. For outsideprocessing resources, this is the purchase price variance account.
18. If you have Oracle Manufacturing installed, you can use Resource batching. To
enable resource batching, select the Batchable check box in the Batchable region.
This enables the other batch fields. See: Setting Up Batch Resources, Oracle Advanced
Supply Chain Planning Implementation and User's Guide.
Note: The Batchable region is disabled when the Basis field is set to
Item.
19. Enter the maximum number units to be batched in the Maximum Batch Capacity
field.
20. Enter the minimum number of units to be batched in the Minimum Batch Capacity
field
21. Select the unit of measure for the batch capacity from the list of values available in
the Batch Capacity UOM field.
22. Enter the time value for the batching process in the Batching Window field.
23. Select the time unit of measure available in the UOM field.
Note: The UOM list of values only appears if you enter Time in the
BOM: Time Unit of Measure Class profile option User Value field.
See: Bills of Material Profile Options, page 1-49.
To define cost type and resource rate associations:1. Navigate to the Resource Costs window. Do this by choosing the Rates button from
the Resources window.
Note: You cannot view costing information if the Privilege To ViewCost Information function is excluded. You cannot update costing
information if, in addition, the Privilege To Maintain Cost
Information function is excluded.
2.
8/12/2019 BOM Uuser Guide
http://slidepdf.com/reader/full/bom-uuser-guide 44/331
1-30 Oracle Bills of Material User's Guide
Enter or select a cost type to associate with each resource overhead rate.
3. Enter the Resource Unit Cost, that is, the resource's current standard cost per UOM.
To associate overheads with resources:1. Navigate to the Resource Overhead Associations window. Do this by choosing the
Overheads button from the Resources window.
Note: You cannot view costing information if the Privilege To View
Cost Information function is excluded from the responsibility. You
cannot update costing information if, in addition, the Privilege To
Maintain Cost Information function is excluded.
2. Enter or select the cost type for the resource.
The Allow Updates check box indicates whether the cost type is defined as
updatable.
3. Enter or select the overhead to associate with the resource.
For example, you could assign resource cost as dollars per hour. If you enter a new
resource, you can directly enter a frozen unit cost. However, you cannot directly
update the frozen unit cost for a previously entered resource.
To group similar types of equipment by resource:
You can define Equipment Types to group similar types of resources. For example, you
can define an Equipment Type of Forklift.
1. Navigate to the Equipment Types window. Do this by choosing the Equipment
button from the Resources window. You can choose the Equipment button if the
Resource is a Machine type.
2. Enter an Item Number in the Equipment field.
3. Save your work.
Note: If you have Warehouse Management installed, you can use
the Resources form to define a class of manual or machine
resources. For example, a forklift machine resource is indicated by
entering the resource name and description, as well as whichequipment items are capable of performing pallet picking. See: Set
Up Equipment Resources, Oracle Warehouse Management
Implementation Guide.
8/12/2019 BOM Uuser Guide
http://slidepdf.com/reader/full/bom-uuser-guide 45/331
Setting Up 1-31
To group employees by resource:
You can define the roles which represent what an employee can do for a required task.
For example, a role could be defined as Cycle Counter, or a Case Picker. See: Entering a
New Person (People Window), Oracle Human Resources Management Systems Workforce
Sourcing, Deployment, and Talent Management Guide (Global).1. Navigate to the Employees window. Do this by choosing the Employees button
from the Resources window. You can choose the Employees button if the Resource
is a Person type.
2. Select an Employee from the list of values to associate with the resource.
If you defined skills in the Resources window, then only those employees that have
the competence, skill level, and qualification required for the resource appear in the
list of values.
3. Save your work.
Note: If you have Warehouse Management installed, you can use
the Resources form to define employees qualified for each resource.
For example, a hazardous materials manual resource is indicated
by entering the resource name and description, as well as which
employees are capable of performing hazardous material tasks. See:
Set Up Warehouse Employee Resources, Oracle Warehouse
Management Implementation Guide.
To define a reason for a resource capacity change:
You can assign a reason for a resource capacity change in the Capacity Changes
window (see: To define capacity changes, page 1-21) by selecting the reason from a list
of values. Define the reasons for this list of values in the Resource Capacity Change
Reasons window.
The resource capacity change reasons list of values are defined as lookups. Lookup
codes must be decided upon and defined during the implementation process. For more
information about lookups, see: Application Utilities Lookups and Application Object
Library Lookups, Oracle Applications online help.
1. Navigate to the Resource Capacity Change Reasons window.
2. Enter a numeric Code for the resource capacity change reason. Oracle recommendsthat you enter values in increments of 10, enabling you to easily add codes later.
3. Enter the Meaning of the code, for example, Breakdown.
4. Enter a Description for the code.

8/12/2019 BOM Uuser Guide
http://slidepdf.com/reader/full/bom-uuser-guide 46/331

8/12/2019 BOM Uuser Guide
http://slidepdf.com/reader/full/bom-uuser-guide 47/331

8/12/2019 BOM Uuser Guide
http://slidepdf.com/reader/full/bom-uuser-guide 48/331
1-34 Oracle Bills of Material User's Guide
4. Select the setups for which you want to define changeovers.
To select a setup, use the arrow button to move the setup from the Available
column to the Selected column. Use the double arrow button to move all setups
from the Available column to the Selected column.
5. Save your work.
6. Choose Changeovers to access the Changeover Times window.
8/12/2019 BOM Uuser Guide
http://slidepdf.com/reader/full/bom-uuser-guide 49/331
Setting Up 1-35
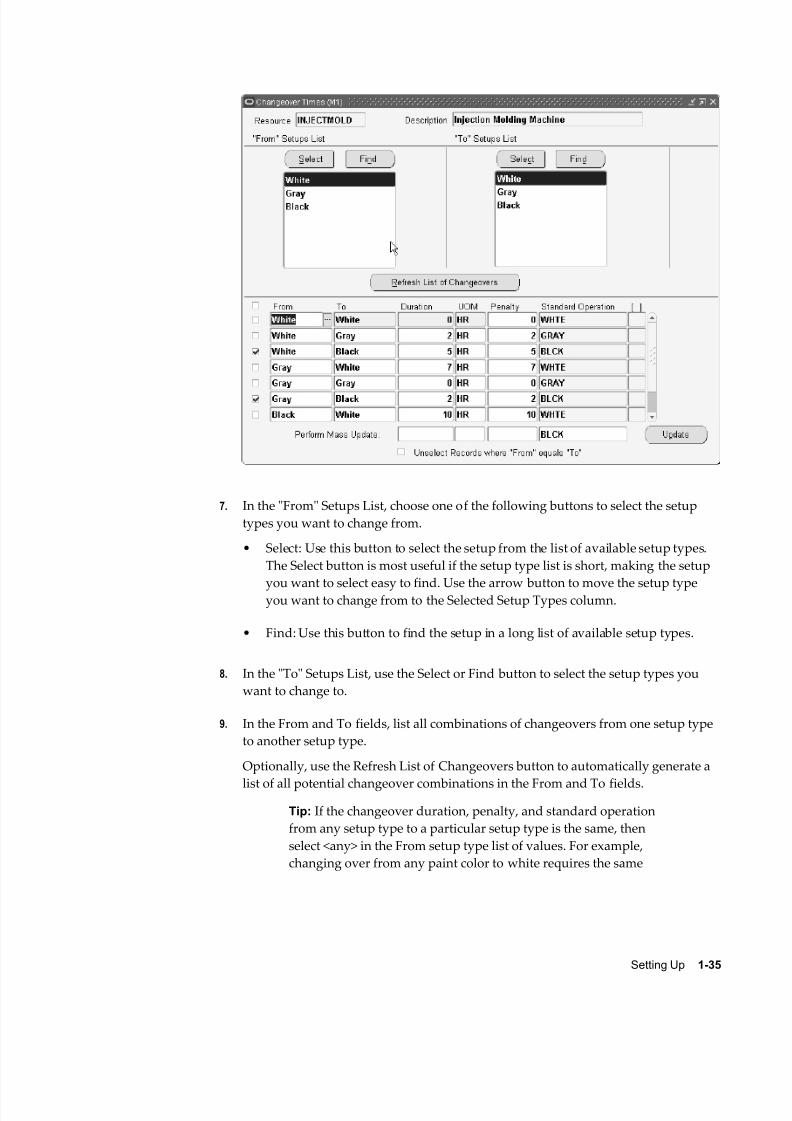
7. In the "From" Setups List, choose one of the following buttons to select the setup
types you want to change from.
• Select: Use this button to select the setup from the list of available setup types.
The Select button is most useful if the setup type list is short, making the setup
you want to select easy to find. Use the arrow button to move the setup typeyou want to change from to the Selected Setup Types column.
• Find: Use this button to find the setup in a long list of available setup types.
8. In the "To" Setups List, use the Select or Find button to select the setup types you
want to change to.
9. In the From and To fields, list all combinations of changeovers from one setup type
to another setup type.
Optionally, use the Refresh List of Changeovers button to automatically generate a
list of all potential changeover combinations in the From and To fields.
Tip: If the changeover duration, penalty, and standard operation
from any setup type to a particular setup type is the same, then
select <any> in the From setup type list of values. For example,
changing over from any paint color to white requires the same

8/12/2019 BOM Uuser Guide
http://slidepdf.com/reader/full/bom-uuser-guide 50/331
1-36 Oracle Bills of Material User's Guide
amount of time and incurs the same penalty no matter what color
you are changing from. In this case, enter <any> in the From field
and White in the To field.
10. Enter the time it will take to perform the changeover in the Duration field and enterthe unit of measure for the duration in the UOM field.
11. Assign a penalty to the changeover if there is one.
12. Select a Standard Operation (optional). See: Creating a Standard Operation, page 3-
22.
13. If you need to update many changeovers that have the same duration, unit of
measure, penalty, or Standard Operation values, use the Perform Mass Update
function.
• Select the check box next to the rows you want to update. If you want to updateall rows, select the first check box. Use the Unselect Records where "From"
equals "To" box to uncheck those rows where the From and To field entries are
the same.
• In the Perform Mass Update fields, enter values only in those fields that you
want to update. For example, if you only want to update the penalty in the
checked rows, then only enter a value in the Perform Mass Update Penalty
field.
• Choose Update.
14. Save your work.
Using the Workday Calendar
A workday calendar defines the valid working days for a manufacturing organization
and consists of repeating pattern of days on and days off and exceptions to that pattern.
This allows you to, for example, designate a normal workday as a scheduled downtime
day, or designate a holiday as a workday.
You can define one or more workday calendars and assign them to any number of
organizations, and any number of organizations can share a calendar. You can specifythe start and end dates, and the weekend schedule for each calendar.
Repeating Workday Patterns
You can also define a series of repeating workday patterns for a given calendar. For
example, you have a repeating two-week pattern where you work five days the first
8/12/2019 BOM Uuser Guide
http://slidepdf.com/reader/full/bom-uuser-guide 51/331
Setting Up 1-37
week, and three days the second week. Or, you have a repeating pattern of 17
consecutive workdays, followed by four days off. When you build the calendar, Oracle
Bills of Material automatically determines the valid workdays for you, based on the
patterns you specify.
You can also specify repeating workday patterns for shifts (see below).
Workday Exceptions
There are three ways to apply exceptions to the workday calendar:
• selecting individual exception days
• loading them from an exception template, another calendar, and another calendar
shift
• copying a set of exceptions from another calendar
An exception template allows you to create groups of exception dates and apply themto different calendars. You can define multiple workday exception templates that define
different holidays and scheduled down times for different organizations. Multiple
exception templates can be applied to the same calendar. As each template is applied,
new exception dates are added to the exception list for that calendar.
Conflicts on a particular date between one template and another are resolved as
follows:
• if the exception date already exists in the target calendar, it is not copied
• if the exception on day falls on a workday, the exception is copied but is redundant
and has no effect on the calendar
• if the exception off day falls on a non-workday, the exception is copied but is
redundant and has no effect on the calendar
This allows you to define different holidays or scheduled down times, for example, for
organizations in different countries. Different organizations can use the same calendar,
but apply different exception dates. In addition, you can apply the same exception dates
to different organizations.
You can optionally define exception templates, lists of exception dates, before you set
up your workday calendar. Then when you define your calendar, you can choose an
exception template, and apply its exception dates to that calendar.
Shifts
For a given workday calendar, you can specify any number of shifts. Each shift can
have a different weekend schedule and a list of specific work interval start and end
times. For both calendars and shifts, you can assign sets of workday exceptions and
8/12/2019 BOM Uuser Guide
http://slidepdf.com/reader/full/bom-uuser-guide 52/331
1-38 Oracle Bills of Material User's Guide
repeating workday patterns.
Shifts inherit workday exceptions and workday patterns from the base calendar. Shift
exceptions can either add to or override those of the base calendar.
If an exception on the base calendar changes, those shifts that do not have an overriding
exception on that date will automatically reflect the change. Those shifts that do have an
overriding exception on that date will not reflect the change and must be changed
manually if they are to reflect the change in the base calendar.
Shift exceptions are applied to a calendar the same way as workday calendar exceptions
by selecting individual exception days, by defining exception templates, or by copying
a set of exceptions from another shift.
The following diagram illustrates the steps Bills of Material uses to determine workdays
from an organization's workday calendar and exception template information.

8/12/2019 BOM Uuser Guide
http://slidepdf.com/reader/full/bom-uuser-guide 53/331

8/12/2019 BOM Uuser Guide
http://slidepdf.com/reader/full/bom-uuser-guide 54/331
1-40 Oracle Bills of Material User's Guide
When defining a workday calendar, specify which days (or shifts) are on and off. The
workday calendar, in combination with the exceptions to it, determine the work pattern
for each organization.
1. Navigate to the Exception Templates window.
2. Enter a unique name for the exception template.
3. Enter a date on which this template becomes inactive.
4. Enter all exception dates, and indicate whether each is an on or off workday.
To create a workday calendar:
A workday calendar consists of a start date, and end date, and on and off days that
follow one or more defined workday patterns. A workday calendar can also include
shift information and exception dates, such as holidays or scheduled down time.
Use a workday calendar for forecasting and planning material requirements, use shift
information for job scheduling, and capacity analysis.Workday exceptions identify deviations to the workday calendar. Shift exceptions
identify deviations for a shift.
Important: Shift exceptions take precedence over workday exceptions.
(This is only relevant if a workday exception and a shift exception
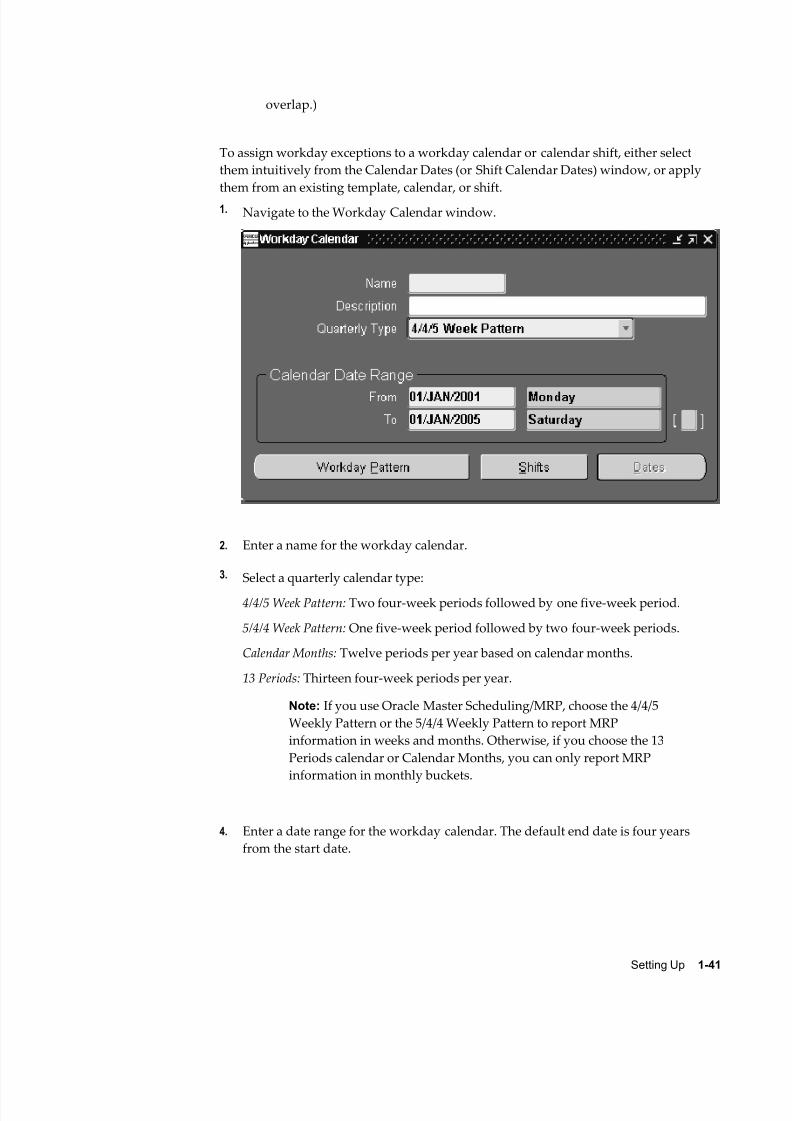
8/12/2019 BOM Uuser Guide
http://slidepdf.com/reader/full/bom-uuser-guide 55/331
Setting Up 1-41
overlap.)
To assign workday exceptions to a workday calendar or calendar shift, either select
them intuitively from the Calendar Dates (or Shift Calendar Dates) window, or apply
them from an existing template, calendar, or shift.
1. Navigate to the Workday Calendar window.
2. Enter a name for the workday calendar.
3. Select a quarterly calendar type:
4/4/5 Week Pattern: Two four-week periods followed by one five-week period.
5/4/4 Week Pattern: One five-week period followed by two four-week periods.
Calendar Months: Twelve periods per year based on calendar months.
13 Periods: Thirteen four-week periods per year.
Note: If you use Oracle Master Scheduling/MRP, choose the 4/4/5
Weekly Pattern or the 5/4/4 Weekly Pattern to report MRP
information in weeks and months. Otherwise, if you choose the 13
Periods calendar or Calendar Months, you can only report MRP
information in monthly buckets.
4. Enter a date range for the workday calendar. The default end date is four years
from the start date.

8/12/2019 BOM Uuser Guide
http://slidepdf.com/reader/full/bom-uuser-guide 56/331
1-42 Oracle Bills of Material User's Guide
Note: Days on and off are calculated based on the start date and the
day of the week. For example, if you want a standard five day
workweek to start on 01-JAN, you must enter the start date as the
Monday before 01-JAN (unless 01-JAN falls on a Monday).
Note: Set profile option BOM: Week and Period Start Day, to
determine the start date. This profile option works in conjunction
with the Workday Calendar. See: Bills of Material Profile Options,
page 1-49.
5. Continue creating the workday calendar by choosing one of the following buttons:
Workday Pattern: Set workdays on or off.
Shifts: Assign shifts to the workday calendar.
Dates: Review your work so far and its effect on the workday calendar. Do this before you build or rebuild the workday calendar you are now creating. (You can
only do this after you have defined a workday pattern.)
Once you have created a workday pattern, assigned shifts, assigned workday and
shift exceptions, and reviewed your work, you must build the calendar and assign
it to an organization.
6. Save your work.
To copy a calendar or shifts:
You can copy the entire calendar, including workday patterns, exceptions, and all or
none of its specific shift information. Or, you can copy a specific shift, including the
workday patterns, exceptions, and shift times.
Exactly what is copied depends upon how you navigate to the Copy window:
• From the Workday Calendar, Calendar Dates, and Workday Patterns windows, all
workday patterns, all exceptions, and selected shift information are copied.
• From the Shifts, Shift Times, Shift Dates, or Shift Workday Patterns windows, the
shift workday patterns, shift exceptions, and all shift times for the specified shift are
copied.
Note: If you copy calendar information to an existing calendar, all new
information is appended to the existing calendar; existing information, in
other words, is retained.
1. Navigate to the Copy window. Do this by choosing Copy from the Tools menu.

8/12/2019 BOM Uuser Guide
http://slidepdf.com/reader/full/bom-uuser-guide 57/331
Setting Up 1-43
2. If you are copying calendar information, enter the calendar to copy information
from and indicate if you want none, all, or specific shift information. If you select a
specific shift, enter the shift number.
If you are copying shift information, enter the calendar you want to copy the shift
information from and the specific shift number.
To create a workday pattern:1. Navigate to the Workday Patterns (or Shift Workday Patterns) window. You can do
this by choosing the Workday Pattern button from either the Workday Calendar or
Shifts window.
2. Enter a sequence number in which the workday patterns are applied when the
calendar is built.
3. Enter the number for consecutive workdays on and off. For example, if you want
Monday through Friday on and Saturday and Sunday off, enter 5 for Days On and2 for Days Off.
4. Enter a description for the sequence.
Repeat the previous three steps for each workday pattern to create. All defined
sequences are repeated for the duration of the workday calendar. If there are two
sequences, sequence 1 will be in effect first, then sequence 2, then 1 again, and so
on.
For example, assume that sequence 1 is 5 on and 2 off, and sequence 2 is 4 on and 3
off. The calendar shows 5 on, 2 off, 4 on, and 3 off.
5. Save your work. Doing so ensures that you can view calendar dates.
To create shifts and shift times:1. Navigate to the Shifts window. You can do this by choosing the Shifts button from
the Workday Calendar window.
2. Enter a shift number and a description.
3. Choose the Times button to open the Shift Times window.
4. Enter the start and stop times for each shift.
You can enter multiple start and stop times, but the start and stop times for a shift
cannot overlap.
If you create a shift without first creating a workday pattern, a default workday
pattern of 5 days on and 2 days off is created. You can then update that workday

8/12/2019 BOM Uuser Guide
http://slidepdf.com/reader/full/bom-uuser-guide 58/331
1-44 Oracle Bills of Material User's Guide
pattern.
5. Save your work.
To select workday or shift exceptions:1. Navigate to the Calendar Dates window (or Shift Calendar Dates window). Do this
by choosing the Dates button from the Workday Calendar window.
2. Select individual days of the month to toggle them on or off. Days you change
become either workday or shift exceptions, depending on how you entered the
window.
The shift information displayed is specific to the date selected.
3. Save your work.
To load existing workday or shift exceptions:1. Navigate to the Exceptions window. Do this by choosing the Exception List button
from the Calendar Dates window.
2. Chooses the Load button and select whether existing exceptions should be applied
from a template, a calendar, or a shift.
If you select Template, enter a template name.
If you select Calendar, enter a calendar name.
If you select Shift, enter the calendar name that the shift belongs to and the shift

8/12/2019 BOM Uuser Guide
http://slidepdf.com/reader/full/bom-uuser-guide 59/331

8/12/2019 BOM Uuser Guide
http://slidepdf.com/reader/full/bom-uuser-guide 60/331
1-46 Oracle Bills of Material User's Guide
3. Indicate whether to import routings from the interface tables.
4. Indicate whether to import bills of material from the interface tables.
5. Indicate whether to delete processed rows from the bill of material and routing
interface tables.
6. Indicate whether to import bills of material and routings for only a certain batch ID.
Tip: You can segment your import data by assigning a batch
identifier to each segment. This enables you to break apart large
data sets and process them concurrently, which improves data
loading efficiency.
Related Topics
Organization Parameters Window, Oracle Inventory User's Guide
Defining Lookups
The following lookup types are accessible from the Bills of Material menu:
• Bonus codes
• Scrap codes
• Resource down codes
Warning: If you had entered an alphanumeric value for a BOM
Resource down code in the Resource Down Codes Lookups
window, then you cannot attach any down code to a resource while
creating the resource from the Resources window.
• Resource capacity change reasons
Optionally, define the lookups for each lookup type.
To define lookups:• For information on defining lookups, see: Application Utilities Lookups and
Application Object Library Lookups, Oracle Applications online help.

8/12/2019 BOM Uuser Guide
http://slidepdf.com/reader/full/bom-uuser-guide 61/331
Setting Up 1-47
Related Topics
To define a reason for a resource capacity change, page 1-31
Resource Down Codes, Oracle Shop Floor Management User's Guide
Scrap Codes, Oracle Shop Floor Management User's Guide
Bonus Codes, Oracle Shop Floor Management User's Guide
To create a standard operation for a Shop Floor Management enabled organization,
page 3-22
Assigning View-only Privileges to Forms
The system administrator can choose to exclude certain responsibilities from adding or
updating information by function. Even though the system administrator excludes the
function from a responsibility's menu, the responsibility retains view-only privileges for
the function. The functions that can be excluded are:
• Bills of Material: Update (Bills of Material window)
• Workday Calendars: Update (Workday Calendar window)
• Delete Constraints: Update (Deletion Constraints window), including:
• Deletion Statements
• Delete Groups: Update (Deletion Groups window)
• Exception Templates: Update (Exception Templates window)
• Departments: Update (Departments window)
• Resources: Update (Resources window)
• Product Family: Update (Product Families window)
• Standard Operations: Update (Standard Operations window), including:
• Standard Event
• Line Operations
• Standard Process
• Routings: Update (Routings window), including:
• Engineering Flow Routings
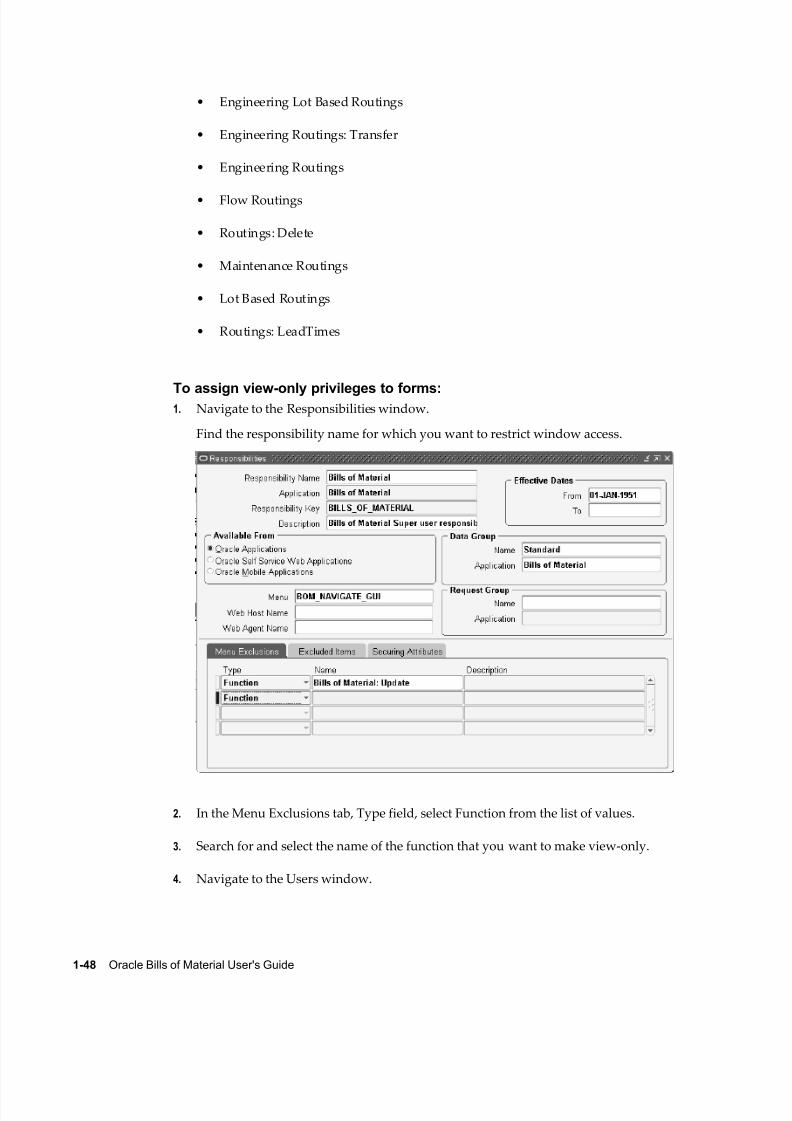
8/12/2019 BOM Uuser Guide
http://slidepdf.com/reader/full/bom-uuser-guide 62/331
1-48 Oracle Bills of Material User's Guide
• Engineering Lot Based Routings
• Engineering Routings: Transfer
• Engineering Routings
• Flow Routings
• Routings: Delete
• Maintenance Routings
• Lot Based Routings
• Routings: LeadTimes
To assign view-only privileges to forms:1. Navigate to the Responsibilities window.
Find the responsibility name for which you want to restrict window access.
2. In the Menu Exclusions tab, Type field, select Function from the list of values.
3. Search for and select the name of the function that you want to make view-only.
4. Navigate to the Users window.

8/12/2019 BOM Uuser Guide
http://slidepdf.com/reader/full/bom-uuser-guide 63/331
Setting Up 1-49
Find the user name to which you want to assign the responsibility containing the
view-only function(s).
5. In the Direct Responsibilities tab, find and select the responsibility containing the
view-only function(s).
6. Save your work.
Note: When you select the view-only menu option from the
responsibility menu, the menu option and the window nameappear with the word "View" in front of it. For example, if you
made the Bills of Material: Update function view-only in the Bills of
Material responsibility, then the menu option appears as View Bills
and the window name appears as View Bills of Material.
Related Topics
Overview of Function Security, Oracle E-Business Suite System Administrator's Guide -
Security
Bills of Material Profile Options
During implementation, you set a value for each user profile option to specify how Bills
of Material controls access to and processes data.

8/12/2019 BOM Uuser Guide
http://slidepdf.com/reader/full/bom-uuser-guide 64/331
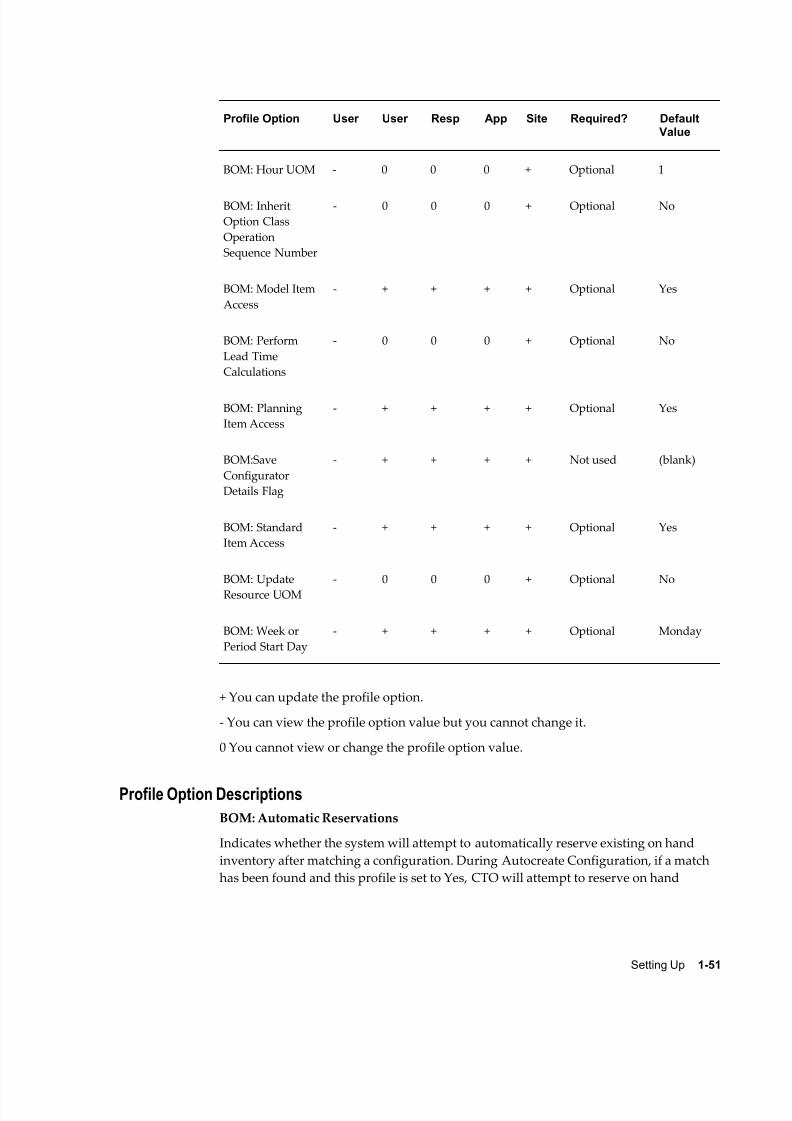
8/12/2019 BOM Uuser Guide
http://slidepdf.com/reader/full/bom-uuser-guide 65/331
Setting Up 1-51
Profile Option User User Resp App Site Required? DefaultValue
BOM: Hour UOM - 0 0 0 + Optional 1
BOM: Inherit
Option Class
Operation
Sequence Number
- 0 0 0 + Optional No
BOM: Model Item
Access
- + + + + Optional Yes
BOM: Perform
Lead Time
Calculations
- 0 0 0 + Optional No
BOM: Planning
Item Access
- + + + + Optional Yes
BOM:Save
Configurator
Details Flag
- + + + + Not used (blank)
BOM: Standard
Item Access
- + + + + Optional Yes
BOM: Update
Resource UOM
- 0 0 0 + Optional No
BOM: Week or
Period Start Day
- + + + + Optional Monday
+ You can update the profile option.
- You can view the profile option value but you cannot change it.
0 You cannot view or change the profile option value.
Profile Option Descriptions
BOM: Automatic Reservations
Indicates whether the system will attempt to automatically reserve existing on hand
inventory after matching a configuration. During Autocreate Configuration, if a match
has been found and this profile is set to Yes, CTO will attempt to reserve on hand

8/12/2019 BOM Uuser Guide
http://slidepdf.com/reader/full/bom-uuser-guide 66/331
1-52 Oracle Bills of Material User's Guide
inventory for any order line having a schedule date within the OM: Reservation Time
Fence. If progressing the order via the workflow, a message will display with details of
the match and reservation performed. If you are using the batch program, the log file
provides details of the match and reservations performed.
BOM: Check for Duplicate Configuration
Indicates whether to search for an existing duplicate configuration rather than create a
new item.
BOM: Component Item Sequence Increment
Indicates the value by which to increment the sequence of the component item on the
bill.
BOM: Configuration Item Delimiter
Indicates a character used to separate the order and line numbers when you replace the
base model's segment value with the order number/line number.
BOM: Configuration Item Type
Indicates the item type of the new configuration items that the create configuration
program creates.
BOM: Days past for starting cutoff of Order Entry bills
Indicates the starting revision date used in the Order Management explosion.
BOM: Default Bill of Material Levels
Indicates the number of explosion levels to use as a default for bill of material indented
explosions.
BOM: Default WIP Supply Values for Components
Indicates whether to default WIP Supply Type, WIP Supply Subinventory, and WIPSupply Locator from item master for a component item when defining a bill. If set to
No, WIP reads the item master.
BOM: Hour UOM
Indicates the unit of measure that represents an hour. You cannot schedule resources
whose unit of measure is not in the same class as the hour unit of measure.
BOM: Inherit Option Class Operation Sequence Number
Indicates whether to allow components on model bills to inherit operation information
from parent items.
BOM: Model Item Access
Indicates whether a holder of this responsibility can define and update bills of material
for model and option class items.
BOM: Perform Lead Time Calculations
Indicates whether to perform lead time calculations when you autocreate configuration
8/12/2019 BOM Uuser Guide
http://slidepdf.com/reader/full/bom-uuser-guide 67/331
Setting Up 1-53
items.
The profile option will be at the system level. The first value of the profile option would
include the calculation: Lead time (days) = Lead time (Hours) /24 always and the second
value would calculate lead time as: Lead time (days) = Lead time (Hours) /Line hours
(Stop Time- Start Time of the Production Line).
BOM: Planning Item Access
Indicates whether a holder of this responsibility can define and update bills of material
for planning items.
BOM: Resource Usage Rounding Value
Resource Usage Rounding Value is a profile that is created to set the rounding off value
for resource usage and inverse. You can update the profile option at the system
administrator level only.
BOM: Save Configurator Details Flag
Not used.
BOM: Standard Item Access
Indicates whether a holder of this responsibility can define and update bills of material
for standard items.
BOM: Update Resource UOM
Indicates whether you can update the resource unit of measure.
BOM: Week or Period Start Day
Indicates whether the workday calendar starts on a weekly or period basis. This profile
option works in conjunction with the Workday Calendar. See: Overview of Workday
Calendar, page 1-36.For example, the BOM: Week or Period Start Day profile is set to Monday. Your
Workday Calendar is set to start on January 1, which is a Friday, with a five days
on/two days off work day pattern. After building the calendar, the system creates a start
day of the following Monday, January 4.
Related Topics
Setting Your Personal User Profile, Oracle E-Business Suite User's Guide
Common User Profile Options, Oracle E-Business Suite User's Guide
Profile Options in Oracle Application Object Library, Oracle E-Business Suite System Administrator's Guide
Defining Items, Oracle Inventory User's Guide
Overview of Function Security, Oracle E-Business Suite System Administrator's Guide
Implementing Function Security, Oracle E-Business Suite System Administrator's Guide

8/12/2019 BOM Uuser Guide
http://slidepdf.com/reader/full/bom-uuser-guide 68/331
1-54 Oracle Bills of Material User's Guide
Subscribing to Bills of Material Business Events
Using Oracle Workflow, you can automatically trigger actions based on the following
Oracle Bills of Material business events:
• bill of material creation
• modification to a bill of material header, component, or component attribute
• bill of material deletion
• error during a bill of material deletion
• creation or modification of a substitute component, reference designator, or
component operation
• component deletion using a delete group
• error during a component deletion
Examples of actions you can trigger include issuing notifications or launching a
workflow.
Business Event Examples
The following scenarios show how subscribing to a business event can simplify
business processes:
• A business needs to notify a contract manufacturer each time a bill of material
changes. The business can set up Oracle Workflow to automatically send thecontract manufacturer an email each time this occurs.
• A business maintains bills of material in the master organization. Every time a bill
of material is created in the master organization, the business needs to copy the bill
or create a common bill in the child organizations.
For more information about setting up and subscribing to business events, see the
related topics listed below.
Related Topics
Business Events, page C-1
Sample Subscription Functions, page C-9
Managing Business Events, Oracle Workflow Developer's Guide
Defining Procedures and Functions for Oracle Workflow, Oracle Workflow Developer's
Guide
8/12/2019 BOM Uuser Guide
http://slidepdf.com/reader/full/bom-uuser-guide 69/331
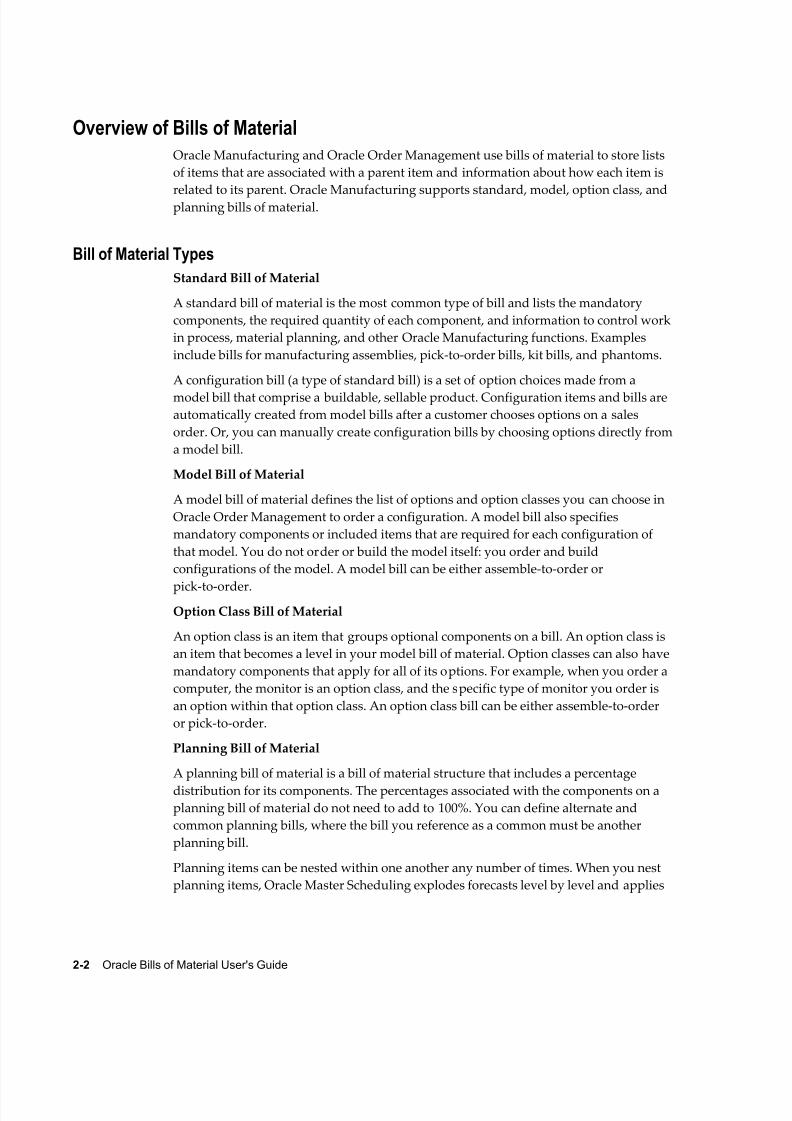
8/12/2019 BOM Uuser Guide
http://slidepdf.com/reader/full/bom-uuser-guide 70/331
2-2 Oracle Bills of Material User's Guide
Overview of Bills of Material
Oracle Manufacturing and Oracle Order Management use bills of material to store lists
of items that are associated with a parent item and information about how each item is
related to its parent. Oracle Manufacturing supports standard, model, option class, andplanning bills of material.
Bill of Material Types
Standard Bill of Material
A standard bill of material is the most common type of bill and lists the mandatory
components, the required quantity of each component, and information to control work
in process, material planning, and other Oracle Manufacturing functions. Examples
include bills for manufacturing assemblies, pick-to-order bills, kit bills, and phantoms.
A configuration bill (a type of standard bill) is a set of option choices made from a
model bill that comprise a buildable, sellable product. Configuration items and bills are
automatically created from model bills after a customer chooses options on a sales
order. Or, you can manually create configuration bills by choosing options directly from
a model bill.
Model Bill of Material
A model bill of material defines the list of options and option classes you can choose in
Oracle Order Management to order a configuration. A model bill also specifies
mandatory components or included items that are required for each configuration of
that model. You do not order or build the model itself: you order and build
configurations of the model. A model bill can be either assemble-to-order or
pick-to-order.
Option Class Bill of Material
An option class is an item that groups optional components on a bill. An option class is
an item that becomes a level in your model bill of material. Option classes can also have
mandatory components that apply for all of its options. For example, when you order a
computer, the monitor is an option class, and the specific type of monitor you order is
an option within that option class. An option class bill can be either assemble-to-order
or pick-to-order.
Planning Bill of Material
A planning bill of material is a bill of material structure that includes a percentage
distribution for its components. The percentages associated with the components on a
planning bill of material do not need to add to 100%. You can define alternate and
common planning bills, where the bill you reference as a common must be another
planning bill.
Planning items can be nested within one another any number of times. When you nest
planning items, Oracle Master Scheduling explodes forecasts level by level and applies

8/12/2019 BOM Uuser Guide
http://slidepdf.com/reader/full/bom-uuser-guide 71/331
Bills of Material 2-3
planning percentages at each level.
Engineering Bills of Material
You can define an engineering bill of material as an alternate for a manufacturing bill.
The typical use for an alternate engineering bill is to prototype variations from the
primary bill that produce the same assembly.
You can specify a list of item catalog descriptive elements for model and option class
engineering bills. After you release the engineering bill to manufacturing and take
customer orders for specific configurations, Bills of Material creates the new
configuration item and automatically assigns values to each catalog descriptive
element.
Oracle Engineering users are allowed to assign manufacturing and engineering items as
components to an engineering bill. Bills of Material users can assign only
manufacturing items as components to manufacturing bills.
PhantomsA phantom assembly is a non-stocked assembly that lets you group together material
needed to produce a subassembly. When you create a bill of material for a parent item,
you can specify whether a component is a phantom. One bill of material can represent a
phantom subassembly for one parent item, and a stocked subassembly for another
parent item.
Oracle Work in Process explodes through a phantom subassembly to the components as
if the components were tied directly to the parent assembly. You can define routing for
phantoms assemblies the same way as other assemblies. Work in Process ignores
phantom assembly routings when you define a job or repetitive schedule.
You can compute manufacturing and cumulative lead times for phantom assembliesthat have routings. If you do not want to offset the components of a phantom assembly
in the planning process, exclude the phantom item from the lead time calculations.
In general, phantom assemblies behave like normal assemblies when they represent a
top level assembly, such as when you master schedule them or manufacture them using
a discrete job. As a subassembly, however, they lose their identity as distinct assemblies
and are a collection of their components. The components of the phantom subassembly
are included on the job and on the pick list of the job-not the phantom itself.
Oracle Master Scheduling/MRP plans the phantom subassembly using the lot-for-lot
lot-sizing technique. Otherwise, the same rules apply to phantoms as for other
assemblies. Set the lead time of a phantom to zero to avoid lead time offset during the
planning process.
When model or option class bills are components to another bill of material, the
component supply type is phantom. See: Two-Level Master Scheduling, Oracle Master
Scheduling/MRP User's Guide.
The cost rollup treats phantom assemblies the same as regular assemblies. The phantom
is treated as a distinct entity; the cost elements of the phantom (material, resource, and

8/12/2019 BOM Uuser Guide
http://slidepdf.com/reader/full/bom-uuser-guide 72/331
2-4 Oracle Bills of Material User's Guide
so on) are added to the cost elements of the higher assembly. Also, the full cost rollup
process sets the pending phantom assembly burden to 0.
Primary and Alternate Bills of Material
A primary bill is a list of the components you most frequently use to build a product.An alternate bill is another list of components for the same basic assembly. The primary
bill is the default for rolling up costs, defining a job, and calculating cumulative item
lead times.
You must define a primary bill before you define an alternate. A primary bill can have
many alternate bills. Any bill of material type can have an alternate.
Oracle Master Scheduling/MRP uses the primary bill to plan your material. Oracle
Order Management uses the primary bill for model and option class products to list
available options.
When you build an item, roll up costs, and perform other functions that use bills of
material, you can specify whether to use the primary bill (the default) or an alternate bill. You can also use engineering change orders to control changes to primary and
alternate bills of material.
Use alternate bills to account for manufacturing variations that produce the same
assembly, by specifying the parent item number and an alternate name when you create
a bill. You cannot enter new revisions for alternate bills of material.
You can use an alternate to define an engineering bill or routing. The alternate used as a
prototype variation from the primary manufacturing bill that produces essentially the
same assembly.
Bills and routings can share alternate labels. If you create an alternate bill with the same
label as an alternate routing, components are assigned to operations on the alternaterouting. If there is no routing with the same alternate label, components are assigned to
operations on the primary routing.
Item and Routing Revisions
You can define any number of revisions for the item and any number of routing
revisions for an item's routing.
Important: Item revisions and routing revisions function alike and are
discussed together below. However, item revisions and routing
revisions are two distinct pieces of information. They are created and
maintained separately and have no influence over each other.
Assign each revision a unique three character alphanumeric revision identifier (such as
A, B, B1, and so on) and a revision date. Revisions are sorted according to ASCII rules.
Each revision must be greater than the previous revision. Therefore, you cannot use
revision 10 after revision 9 because, according to ASCII sorting, 10 precedes 9.

8/12/2019 BOM Uuser Guide
http://slidepdf.com/reader/full/bom-uuser-guide 73/331
Bills of Material 2-5
Use letters and/or numbers to label revisions. Letters are always upper case and
numbers may include decimals. To ensure that revisions sort properly (according to
ASCII sorting rules), decimals should always be followed by a number. Therefore, valid
revisions can include: A, B, 1, 2, A1, B1, 1A, 1B, 0.0, 0.1, A.0, A.1, and so on. When you
create an item or a routing, the beginning revision defaults to the value for Starting
Revision in the Organization Parameters window.When you create or update a bill of material or routing, you can choose to create a new
revision or modify an existing revision. When adding new revisions, you should be sure
that the revision date you enter does not overlap with other existing revision dates.
Revisions are time-stamped, so you can determine the latest revision for multiple
revisions defined on the same date. New revision numbers must be greater than the
revision number of the currently effective revision.
Different versions of a bill of material or routing can be defined within the same
revision. You can change component information for bills or operation information for
routings without modifying the revision.
For example, assume that you defined an initial revision A on 18-AUG and made achange on 20-AUG without creating a new revision. If you make another change on
22-AUG, you can create a new revision B, effective 22-AUG. There are now three
different versions of the item: revision A of 18-AUG, revision A of 20-AUG, and
revision B of 22-AUG.
Components
Bills of Material restricts the types of items you can assign as components based on the
type of bill you are defining.
The following table lists valid components for each parent item type.
Valid Parent/Component Relationships
Parent BOM Item Type Component BOM Item Type
Standard Item Standard Item
Model Item Standard Item, Model Item, Option Class Item
Option Class Item Standard Item, Model Item, Option Class Item
Planning Item Standard Item, Model Item, Option Class,
Planning Item
Each bill of material can have many components. For each component, you specify
attributes, such as operation sequence, item sequence, usage quantity, yield, supply
type, supply subinventory and locator, and others.
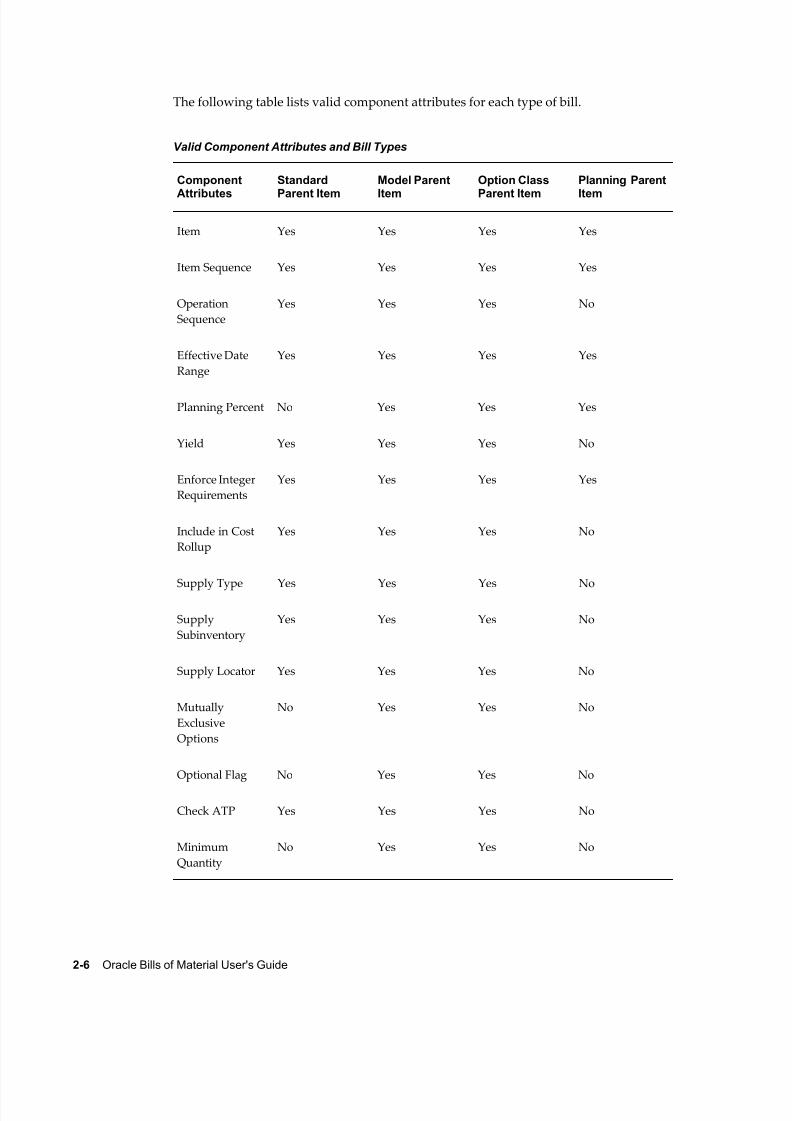
8/12/2019 BOM Uuser Guide
http://slidepdf.com/reader/full/bom-uuser-guide 74/331
2-6 Oracle Bills of Material User's Guide
The following table lists valid component attributes for each type of bill.
Valid Component Attributes and Bill Types
Component
Attributes
Standard
Parent Item
Model Parent
Item
Option Class
Parent Item
Planning Parent
Item
Item Yes Yes Yes Yes
Item Sequence Yes Yes Yes Yes
Operation
Sequence
Yes Yes Yes No
Effective Date
Range
Yes Yes Yes Yes
Planning Percent No Yes Yes Yes
Yield Yes Yes Yes No
Enforce Integer
Requirements
Yes Yes Yes Yes
Include in Cost
Rollup
Yes Yes Yes No
Supply Type Yes Yes Yes No
Supply
Subinventory
Yes Yes Yes No
Supply Locator Yes Yes Yes No
Mutually
Exclusive
Options
No Yes Yes No
Optional Flag No Yes Yes No
Check ATP Yes Yes Yes No
Minimum
Quantity
No Yes Yes No

8/12/2019 BOM Uuser Guide
http://slidepdf.com/reader/full/bom-uuser-guide 75/331
Bills of Material 2-7
ComponentAttributes
StandardParent Item
Model ParentItem
Option ClassParent Item
Planning ParentItem
Maximum
Quantity
No Yes Yes No
Basis No Yes Yes No
Include in
Shipping Doc.
Yes Yes Yes No
Required to Ship Yes Yes Yes No
Required for
Revenue
Yes Yes Yes No
Quantity Yes Yes Yes No
Descriptive
Flexfield
Yes Yes Yes Yes
Comments Yes Yes Yes Yes
Access Control by Item Type
Control access to bills of material by item type using the following profile options:• BOM: Standard Item Access
• BOM: Planning Item Access
• BOM: Model Item Access (also controls access to option class items)
Each profile option can have either a Yes or No value. A Yes value indicates that you
can create and update bills for the associated item type. For example, you might specify
No at the site level for BOM: Standard Item Access profile to restrict access for creating
standard bills. But you might specify Yes for BOM: Planning Item Access profile option
at the user level for specific engineers so they can update engineering bills of material
for planning items.
Note: Profiles are ignored in query mode. A user with no access to any
type of item can query all types of bills.

8/12/2019 BOM Uuser Guide
http://slidepdf.com/reader/full/bom-uuser-guide 76/331
2-8 Oracle Bills of Material User's Guide
Related Topics
Bill of Material Types, page 2-2
Phantoms, page 2-2
Primary and Alternate Bills of Material, page 2-2
Item and Routing Revisions, page 2-2
Components, page 2-2
Access Control By Item Type, page 2-2
Creating Alternates, page 1-10
Item and Operation Sequence Fields, page 2-39
Engineering Bills of Material and Routings, Oracle Engineering User's Guide
Overview of Routings, page 3-1
Effective Date Fields, page 2-39
Defining Item Revisions, Oracle Inventory User's Guide
Item and Operation Sequence Fields, page 2-39
Effective Date Fields, page 2-39
Yield Field, page 2-39
Planning Percent Field, page 2-39
Enforce Integer Requirements, page 2-39
Supply Subinventory and Locator Fields, page 2-39
Mutually Exclusive and Optional Fields, page 2-39
Check ATP (Available to Promise) Field, page 2-39
Minimum and Maximum Quantity Fields, page 2-39
Basis Field, page 2-39
Shipping Details Fields, page 2-39
Bill / Component Validation Rules, page 2-46
Consolidated Bill of Material Report, page 9-12
Supply Types, Oracle Work in Process User's Guide
Bills of Material Profile Options, page 1-49
Defining Items, Oracle Inventory User's Guide

8/12/2019 BOM Uuser Guide
http://slidepdf.com/reader/full/bom-uuser-guide 77/331
Bills of Material 2-9
Creating a Bill of Material
A bill of material contains information on the parent item, components, attachments,
and descriptive elements. Each standard component on a bill can have multiple
reference designators and substitute components.You can create an engineering, manufacturing, or asset (maintenance) bill, copy an
existing bill, or reference a common bill. When you create a bill, it exists only in the
current organization. To use a bill in another organization, you must either copy it or
reference it as a common.
The procedure below describes how to create a bill. In addition, see: Setting Up
Maintenance Bills of Material, Oracle Enterprise Asset Management User's Guide , Copying
Bill and Routing Information, page 2-17, and Referencing Common Bills and Routings,
page 2-19.
Prerequisites Define the parent item and all components as inventory items and set the BOM
Allowed attribute to Yes and BOM Item Type to model, option class, planning or
standard. See: Defining Items, Oracle Inventory User's Guide .
Caution: You can set the BOM Enabled flag to Yes and BOM Item
Type to Model/Option Class for a Dual UOM tracked Item. But you
cannot create a Model/Option Class bill for Dual UOM tracked
Items as Dual UOM functionality is not supported in Bills of
Material.
To create a bill of material:
1. Navigate to the Bills of Material window.
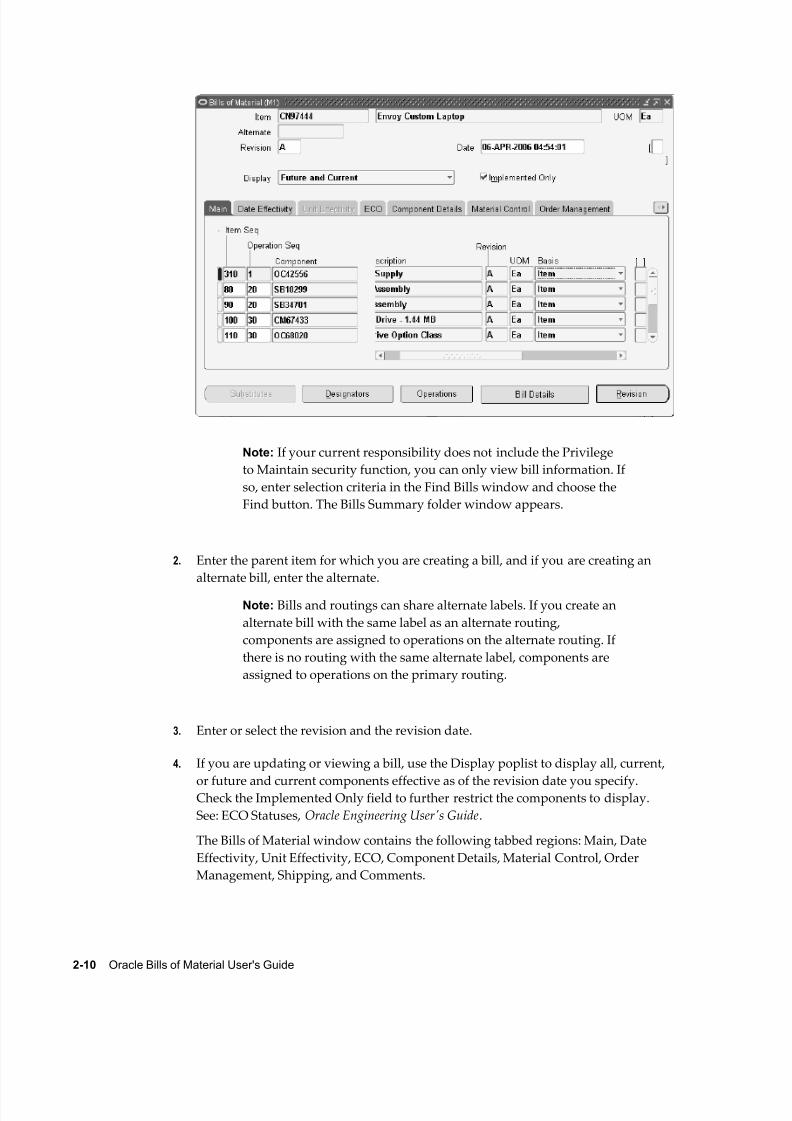
8/12/2019 BOM Uuser Guide
http://slidepdf.com/reader/full/bom-uuser-guide 78/331
2-10 Oracle Bills of Material User's Guide
Note: If your current responsibility does not include the Privilege
to Maintain security function, you can only view bill information. If
so, enter selection criteria in the Find Bills window and choose the
Find button. The Bills Summary folder window appears.
2. Enter the parent item for which you are creating a bill, and if you are creating an
alternate bill, enter the alternate.
Note: Bills and routings can share alternate labels. If you create an
alternate bill with the same label as an alternate routing,
components are assigned to operations on the alternate routing. If
there is no routing with the same alternate label, components are
assigned to operations on the primary routing.
3. Enter or select the revision and the revision date.
4. If you are updating or viewing a bill, use the Display poplist to display all, current,
or future and current components effective as of the revision date you specify.Check the Implemented Only field to further restrict the components to display.
See: ECO Statuses, Oracle Engineering User's Guide.
The Bills of Material window contains the following tabbed regions: Main, Date
Effectivity, Unit Effectivity, ECO, Component Details, Material Control, Order
Management, Shipping, and Comments.

8/12/2019 BOM Uuser Guide
http://slidepdf.com/reader/full/bom-uuser-guide 79/331
Bills of Material 2-11
5. Enter the item sequence, operation sequence, and the component item. See: Item
and Operation Sequence Fields, page 2-39.
6. If you need to specify an additional operation within this operation, choose the
Operations button to navigate to the Assign Operations window.
In the Operation Seq Num field column, enter the additional operation sequences toperform, along with the operation listed in the Bills of Material window.
Note: The Operations button is only enabled for optional
components.
Specifying Additional Operations Example
In an automobile factory, one operation sequence on an automobile's bill of material
is Install Wheels. The front wheels require 5 percent more torque than the back
wheels during this operation. Ensure that this extra torque operation is performed
by specifying the Additional Torque operation in the Assign Operations window
for the Install Wheels operation sequence.
7. In the Basis field, select whether the quantity of the component used is a fixed
amount (Lot) or increases linearly along with the quantity produced (Item).
If the component quantity required increases or decreases linearly along with
changes to the work order or job quantity, then select Item. If the component
quantity required remains the same regardless of the work order or job quantity,
then select Lot.
8/12/2019 BOM Uuser Guide
http://slidepdf.com/reader/full/bom-uuser-guide 80/331
2-12 Oracle Bills of Material User's Guide
Basis Field Constraints
• You can define the Basis field as Item or Lot for mandatory components in an
ATO Option Class or an ATO Model bill of material.
• You can only define the Basis field as Item for option items, option classes or
submodels in an ATO Option Class or ATO Model bill of material.
• You can only define the Basis field as Item for any component in an ATO or
PTO Model or Option class.
• You can only define the Basis field as Item when the WIP Supply Type is
Phantom. See: Phantoms, page 2-2.
See: Fixed Component Usage, Oracle Work in Process User's Guide
8. In the Main tabbed region, enter either the Quantity or Inverse Usage used to make
one unit of this assembly item at the current operation.
The Inverse Usage field calculates a fractional quantity for you in the Quantity field,to 42 decimal places. Use the Quantity field when the quantity used is a whole
number. Use the Inverse Usage field when the quantity used is a fractional number.
When you enter a value in either field, the system automatically calculates and
populates the value in the other field. Inverse usage is also available using Work in
Process, Shop Floor Management, and Product Lifecycle Management.
The Quantity and Inverse Usage fields can include negative or decimal values,
subject to the following rules:
• Pick-to-order bills cannot have fractional component quantities if Oracle Order
Management is installed.
• Pick-to-order option class components cannot have negative values.
• Components with Check ATP turned on cannot have negative or zero
quantities.
• If the component has Quantity Related turned on, then the component quantity
cannot be fractional or negative.
• If an implemented component has Quantity Related turned on, then the
component quantity must be equal to the number of reference designators. See:
By-Product Recovery, Oracle Work in Process User's Guide.
Important: The planning process in Oracle Master Scheduling/MRP
ignores negative requirements on standard discrete jobs and
components with a negative usage on a bill of material when
netting supply and demand.

8/12/2019 BOM Uuser Guide
http://slidepdf.com/reader/full/bom-uuser-guide 81/331
Bills of Material 2-13
Note: If you enter a negative quantity for a component, you should
enter either Assembly pull or Operation pull for the supply type to
ensure that you transact the material when you build the bill.
The Revision field displays the current revision of the component as of the revision
date of the parent item.
The Eng Item field displays a checkmark if the item is defined as a prototype item
in Oracle Engineering. See: Overview of Engineering Prototype Environment,
Oracle Engineering User's Guide.
9. Select Auto Request Material to automatically create move orders or purchase
orders for the component item.
10. Open the Date Effectivity tabbed region and enter the effective date range for each
component. See: Effective Date Fields, page 2-39.
The Date Effectivity tab is disabled if the BOM item's effectivity control is set toModel/Unit Number. See: Bills of Material Attribute Group, Oracle Inventory User's
Guide.
11. Open the Unit Effectivity tabbed region and enter the effective unit number range
for each component. The unit number list of values displays all of the unit numbers
defined in the master organization. See: Model/Unit Effectivity, Oracle Project
Manufacturing Implementation Manual.
The Unit Effectivity tab is disabled if the BOM item's effectivity control is set to
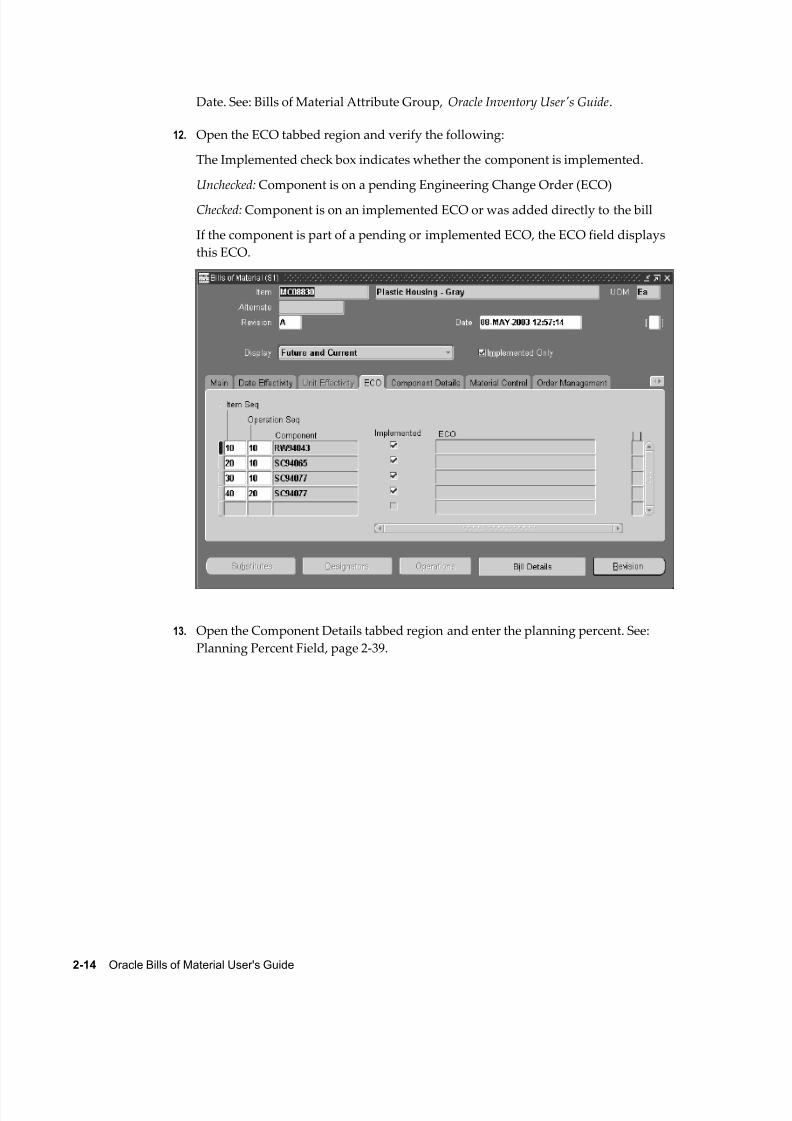
8/12/2019 BOM Uuser Guide
http://slidepdf.com/reader/full/bom-uuser-guide 82/331
2-14 Oracle Bills of Material User's Guide
Date. See: Bills of Material Attribute Group, Oracle Inventory User's Guide.
12. Open the ECO tabbed region and verify the following:
The Implemented check box indicates whether the component is implemented.
Unchecked: Component is on a pending Engineering Change Order (ECO)
Checked: Component is on an implemented ECO or was added directly to the bill
If the component is part of a pending or implemented ECO, the ECO field displays
this ECO.
13. Open the Component Details tabbed region and enter the planning percent. See:
Planning Percent Field, page 2-39.

8/12/2019 BOM Uuser Guide
http://slidepdf.com/reader/full/bom-uuser-guide 83/331
Bills of Material 2-15
Enter the yield. See: Yield Field, page 2-39.
Enter the Enforce Integer Requirement, or select a value from the list of values.
Acceptable values are up, down and none. See: Enforce Integer Requirements, page
2-39.
Indicate whether the component should be included in cost rollups. If enabled, the
material cost of this component, but not the routing cost, is included in the cost of
the parent item.
14. Optionally, open the Material Control tabbed region and enter the supply type. See:
Supply Types, Oracle Work in Process User's Guide.

8/12/2019 BOM Uuser Guide
http://slidepdf.com/reader/full/bom-uuser-guide 84/331
2-16 Oracle Bills of Material User's Guide
Enter the supply subinventory and the locator. See: Supply Subinventory and
Locator Fields, page 2-39.
If you have set the BOM: Default WIP Supply Values for Components profile option
to Yes, these values default from the item master. If any of these values are left
blank, Work in Process will read the values contained in the item master. See: Bills
of Material Profile Options, page 1-49.
15. For model, option class, and kit bills, open the Order Management tabbed region
and enter the minimum and maximum sales order quantities. See: Minimum andMaximum Quantities, page 2-39.
Indicate whether to check ATP. See: Check ATP (Available to Promise) Field, page
2-39.
Indicate whether the component is optional and mutually exclusive. See: Mutually
Exclusive and Optional Fields, page 2-39.
Enter the sales order basis. See: Sales Order Basis Field, page 2-39.
16. Open the Shipping tabbed region, and choose whether the component should be
listed on shipping documents, required to ship, or required for revenue. See:
Shipping Details Fields, page 2-39.
17. Open the Comments tabbed region, and enter any comments about the component.
18. Choose buttons to perform related tasks:
Substitutes: Assign substitute components. See: Assigning Substitute Components,
8/12/2019 BOM Uuser Guide
http://slidepdf.com/reader/full/bom-uuser-guide 85/331
Bills of Material 2-17
page 2-27.
Designators: Create reference designators. See: Creating Reference Designators, page
2-25.
Operations: Specify additional operation sequences within a bill of material
operation sequence. See the step explaining the Operations button, page 2-11,
described previously in this procedure.
Bill Details: Reference common bills. See: Referencing Common Bills and Routings,
page 2-19.
Revision: Define item revisions. See: Defining Item Revisions, page 2-27.
Related Topics
Copying Bill and Routing Information, page 2-17
Referencing Common Bills and Routings, page 2-19
Assigning Descriptive Elements, page 2-25
Creating Reference Designators, page 2-25
Assigning Substitute Components, page 2-27
Defining Item Revisions, page 2-27
Attaching Files, page 2-28
Checking for Bill Loops, page 2-28
Deleting Components and Operations, page 4-1
Creating a Product Family, page 2-49
Bill / Component Validation Rules, page 2-46
Bill of Material Listing Report, page 9-2
Bills of Material Profile Options, page 1-49
Customizing the Presentation of Data, Oracle E-Business Suite User's Guide
Copying Bill and Routing Information
You can save time defining new, similar bills or routings by copying their information
rather than creating them manually.
You can copy a bill or routing from your current organization or from another
organization that shares your same item master organization. You can then modify
your new bill or routing as necessary.
You can copy any revision of a primary or alternate bill or routing.
Subinventory and locator information are not copied across organizations.

8/12/2019 BOM Uuser Guide
http://slidepdf.com/reader/full/bom-uuser-guide 86/331
2-18 Oracle Bills of Material User's Guide
Bills of Material Only
When you copy bills from your current organization, everything is copied to the new
bill including the supply type and the supply subinventories and locators.
You can only copy bills between items having the same BOM Item Type attribute. Forexample, if the new bill is a model bill, you can only copy existing bills that are model
bills.
Know the structure of the bill you are copying, since the copy function only copies
single level components of the bill. For example, if the parent item whose bill you want
to copy has single level components that are subassemblies, the bill copy function will
not copy the components of the subassembly.
When you copy the bill from another organization, the components on the bill you are
copying must exist in the target organization. The supply subinventories and locators
are not copied. Substitute component items must also exist in the target organization to
be copied.
When copying an engineering bill to manufacturing, only those single-level
manufacturing (not engineering) components are copied.
Routings Only
When copying from another organization, only operations occurring in departments
that exist in both organizations are copied. Similarly, only resources that exist in both
organizations are copied. The resource must also belong to the same department in the
target organization.
To copy bill or routing information:1. Navigate to the Copy Bill / Rtg From window. Do this by choosing the Tools menu
item and then choosing Copy Bill / Rtg From.
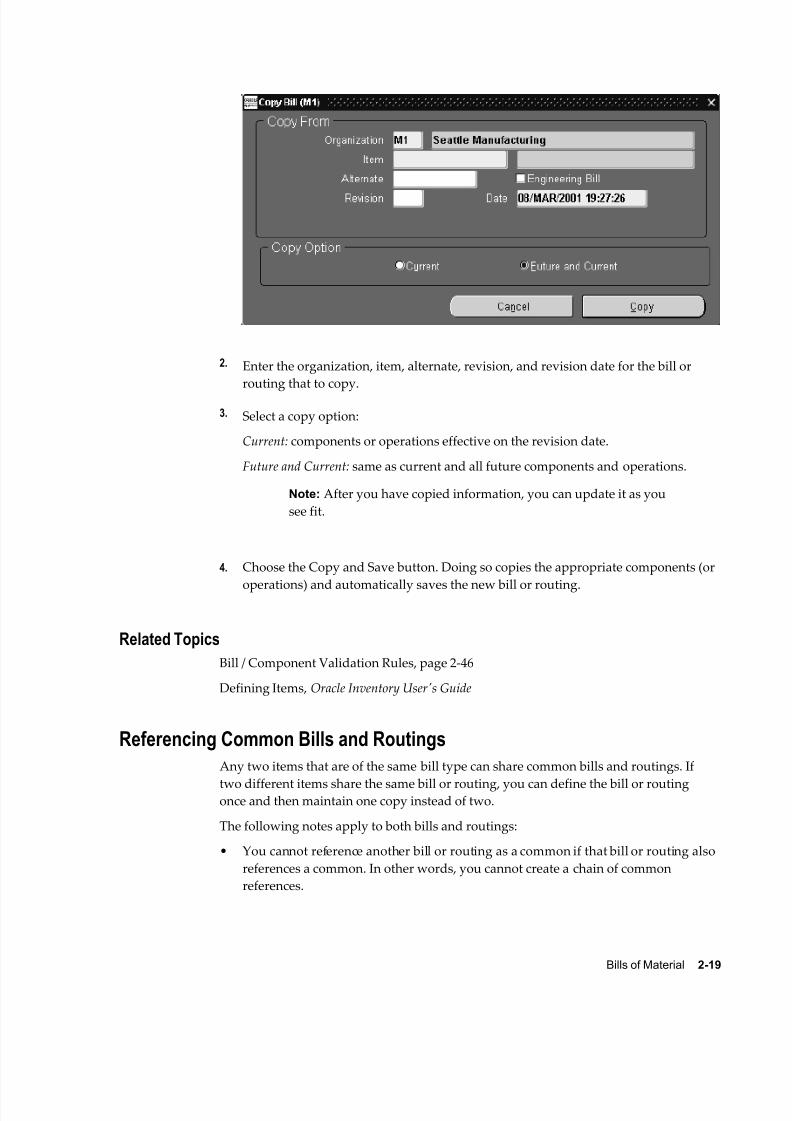
8/12/2019 BOM Uuser Guide
http://slidepdf.com/reader/full/bom-uuser-guide 87/331
Bills of Material 2-19
2. Enter the organization, item, alternate, revision, and revision date for the bill or
routing that to copy.
3. Select a copy option:
Current: components or operations effective on the revision date.
Future and Current: same as current and all future components and operations.
Note: After you have copied information, you can update it as you
see fit.
4. Choose the Copy and Save button. Doing so copies the appropriate components (or
operations) and automatically saves the new bill or routing.
Related Topics
Bill / Component Validation Rules, page 2-46
Defining Items, Oracle Inventory User's Guide
Referencing Common Bills and Routings
Any two items that are of the same bill type can share common bills and routings. If
two different items share the same bill or routing, you can define the bill or routingonce and then maintain one copy instead of two.
The following notes apply to both bills and routings:
• You cannot reference another bill or routing as a common if that bill or routing also
references a common. In other words, you cannot create a chain of common
references.
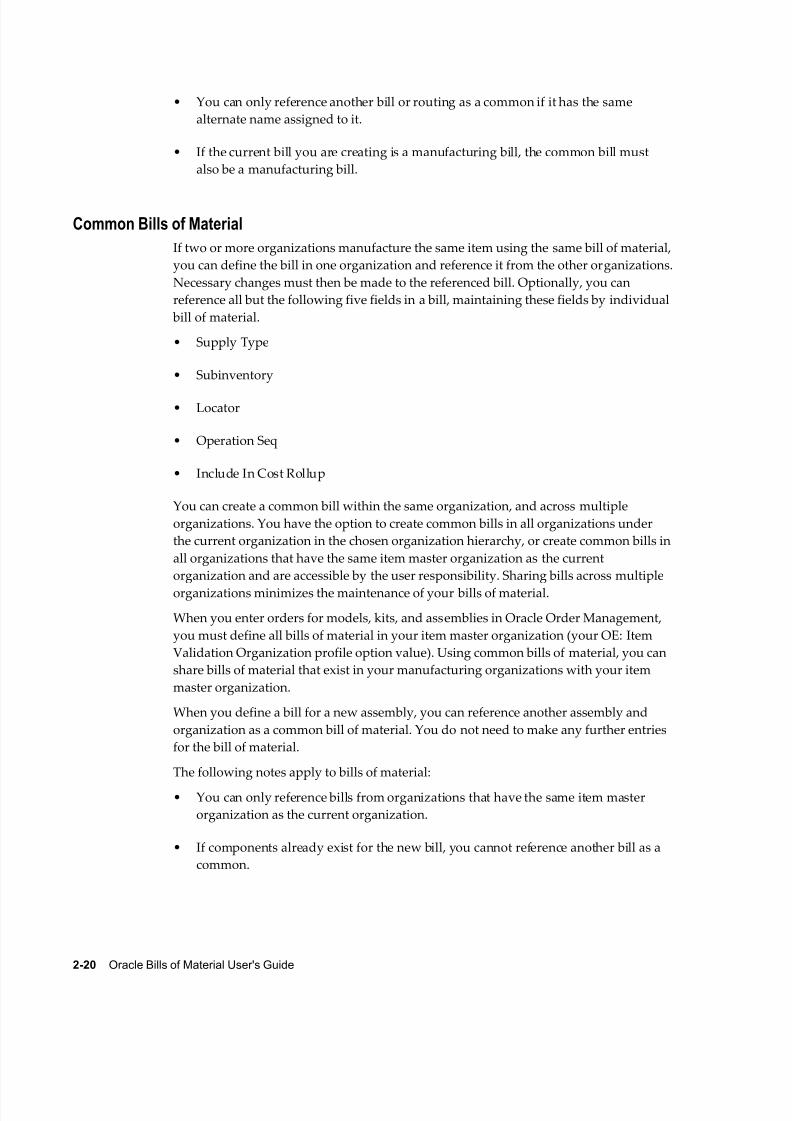
8/12/2019 BOM Uuser Guide
http://slidepdf.com/reader/full/bom-uuser-guide 88/331
8/12/2019 BOM Uuser Guide
http://slidepdf.com/reader/full/bom-uuser-guide 89/331
Bills of Material 2-21
• If your new assembly is in a different organization than the bill you reference, all
component items must exist in the new bill's organization. This also applies to
substitute components.
Common RoutingsThe following notes apply to routings:
• You cannot reference a routing outside your current organization.
To reference a common bill:1.
In the Bills of Material window, find the bill that you want to use as the source, or
common, bill.
2. Navigate to the Create Common Bills window. Do this by choosing Create
Common Bill from the Tools menu.
3. In the Scope region, select one of the following three options:
• Single Organization
• Hierarchy
• All Organizations
If you select Single Organization, enter the organization and item that will reference
8/12/2019 BOM Uuser Guide
http://slidepdf.com/reader/full/bom-uuser-guide 90/331
2-22 Oracle Bills of Material User's Guide
the common bill. If you select Organization Hierarchy, enter the required name of
the organization hierarchy. In this case, the common bill created is referenced by all
organizations below the current organization in the chosen organization hierarchy.
If you select All Organizations, then the common bill created is referenced by all
organizations that have the same item master organization as the current
organization.
4. Optionally, select the Enable attributes update box.
Selecting this box enables you to update the following fields in the bills that
reference this common bill.
• Supply Type
• Subinventory
• Locator
• Operation Seq
• Include in Cost Rollup
Note: Initially, the values in the above fields within the bills that
reference the source bill are copied from the source bill, but you can
change these values at a later time.
The profile option BOM: Default WIP Supply Values for
Components governs the behavior for defaulting the Supply Type,
Subinventory, and Locator field values for components in the
common bill. If this profile value equals Yes, then the item
attributes Supply Type, Subinventory, and Locator for thecomponent in the source organization default to the common bill of
material in another organization. If this profile value equals No,
then the Supply Type value in the source bill is retained in the
common bill. The Subinventory and Locator field values default to
NULL in the common bill.
Caution: Once you enable the material control attributes in a
common bill and save the bill, you cannot disable the attributes. If
you need to disable the attributes, then delete the bill and enter a
new bill.
Note: You can choose to enable the above attributes at a later time,
too. To do this find a common bill. Select one of the above five
fields. A message appears and asks if you would like to edit any of

8/12/2019 BOM Uuser Guide
http://slidepdf.com/reader/full/bom-uuser-guide 91/331
Bills of Material 2-23
the five attributes. Choose Yes. You can now update the above five
fields.
5. Choose OK.
Tip: In addition to navigating to the Create Common Bills window,
you can also create common bills by running the concurrent
program Create Common Bills.
To identify the common bill used:
Use the Bill Detail window to identify the common, or source, bill referenced by the bill
in the Bills of Material window.
1. From the Bills of Material window, choose Bill Detail.
The Common Bill region in the Bill Detail window identifies the organization and
item used as the source (common) bill. If the Organization and Item fields are blank,
then the bill in the Bills of Material window is not referencing a common bill.
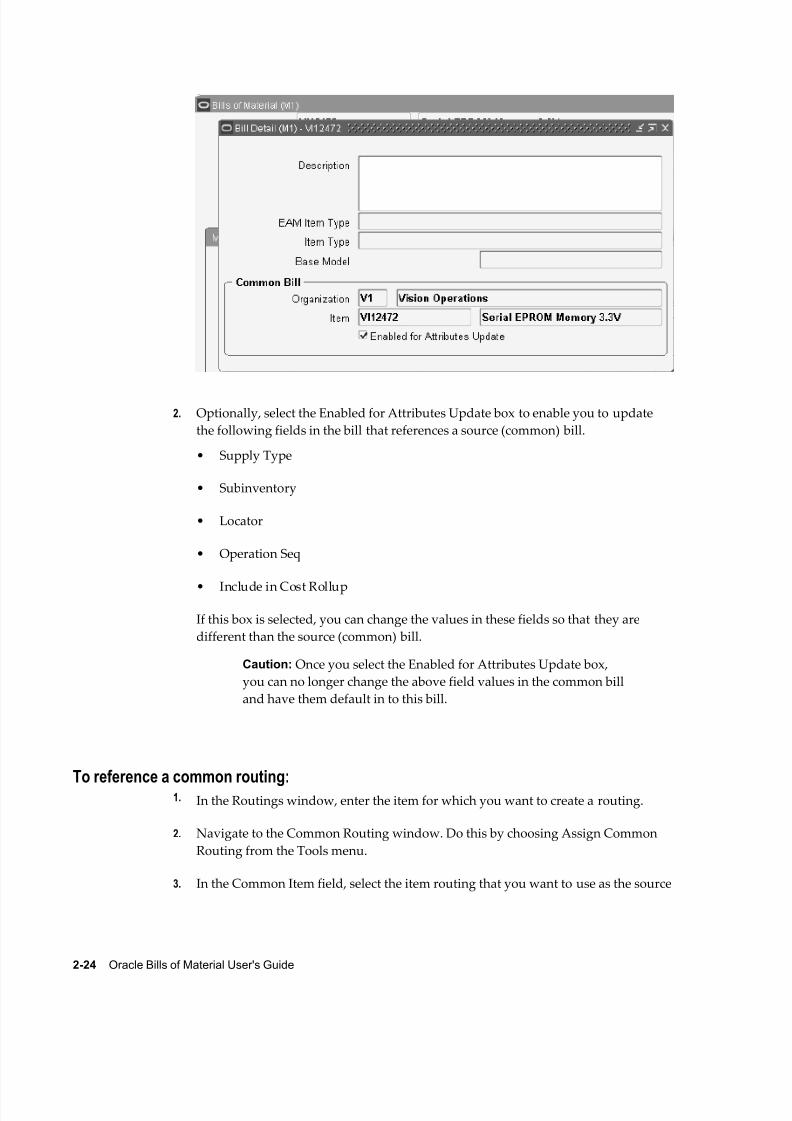
8/12/2019 BOM Uuser Guide
http://slidepdf.com/reader/full/bom-uuser-guide 92/331
2-24 Oracle Bills of Material User's Guide
2. Optionally, select the Enabled for Attributes Update box to enable you to update
the following fields in the bill that references a source (common) bill.
• Supply Type
• Subinventory
• Locator
• Operation Seq
• Include in Cost Rollup
If this box is selected, you can change the values in these fields so that they are
different than the source (common) bill.
Caution: Once you select the Enabled for Attributes Update box,
you can no longer change the above field values in the common bill
and have them default in to this bill.
To reference a common routing:1. In the Routings window, enter the item for which you want to create a routing.
2. Navigate to the Common Routing window. Do this by choosing Assign Common
Routing from the Tools menu.
3. In the Common Item field, select the item routing that you want to use as the source

8/12/2019 BOM Uuser Guide
http://slidepdf.com/reader/full/bom-uuser-guide 93/331
Bills of Material 2-25
(common) routing.
4. Choose OK.
The operations from the common routing default into the Operations region.
5. Save your work.
Related Topics
Creating Organization Hierarchies, Using Oracle HRMS-The Fundamentals
Assigning Descriptive Elements
For each model and option class bills only, you can specify a list of item catalog
descriptive elements. Values are assigned to catalog descriptive elements when new
configuration item are created. The descriptive element value of the chosen option is
assigned for each descriptive element.
Prerequisites
For model bills, you must assign the item to a catalog group. See: Defining Item
Catalog Groups, Oracle Inventory User's Guide.
To assign descriptive elements:
1. Navigate to the Descriptive Elements window.
2. Enter a descriptive element to assign automatically based on the option chosen inthe current bill.
For model bills, you can only specify a descriptive element name within the model
item catalog group. For option class bills, you can specify a descriptive element
name from any catalog group.
When you order a configuration, Bills of Material automatically creates and assigns
the configuration item to the model's item catalog group, and assigns values to the
descriptive elements in this group.
Related TopicsOverview of Configure to Order, page 5-1
Creating Reference Designators
Reference designators are sequenced comments and instructions that pertain to a
8/12/2019 BOM Uuser Guide
http://slidepdf.com/reader/full/bom-uuser-guide 94/331
2-26 Oracle Bills of Material User's Guide
component. For example, you may have drawings that clarify the assembly process for
certain components, or further instructions for the use of a large quantity of the same
component. You can specify whether to assign one reference designator for every usage
of the component or assign any number of reference designators to the component.
Planning bills and model, option class, and planning components cannot have reference
designators.
Reference designators are sorted in alphanumeric order on inquiries and reports. You
can also specify a comment for each reference designator.
To create reference designators:
1. Navigate to the Reference Designators window. Do this by choosing the
Designators button from the Bills of Material window.
2. Indicate whether you want component quantity related to the number of reference
designators.
Off: Assign any number of reference designators to each component (the default).The number of reference designators is independent of the component quantity.
With Quantity Related unchecked, if the usage quantity of the component is four,
you could, for example, define six or more reference designators.
On: Use one reference designator per usage of the component. The component
usage quantity must be a positive integer in order for you to use this option. When
the bill requires a quantity of four of a given component, you assign four reference
designators to that component, one for each usage.
3. Do one of the following:
• Enter a reference designator for the component. (A reference designator must
be ten characters or less.)
• Choose the Add Range or Delete Range button to open the Range window.
Enter a prefix and a suffix for the range of reference designators to add or
delete. For example, if you enter A as the Prefix, 1 and 4 as the starting and
ending values, and XYZ as the Suffix; A1XYZ, A2XYZ, A3XYZ, and A4XYZ are
the reference designators.
• To number reference designators, use the Starting Value field to define the
beginning value for a range of reference designators. Then either enter the
number of values to add or delete, or define the ending value in the Ending
field.
4. Save your work.

8/12/2019 BOM Uuser Guide
http://slidepdf.com/reader/full/bom-uuser-guide 95/331
Bills of Material 2-27
Assigning Substitute Components
You can assign any number of substitute items to each bill component and you can
assign the same substitute item to more than one component. The substitute item
quantity is the quantity needed to replace the full component quantity. The quantity candiffer from the component usage quantity. Oracle Master Scheduling/MRP reports these
substitutes on some planning reports, such as the MRP Detail Report. Oracle Work in
Process does not consider substitute items in its pick lists.
Planning bills and model, option class, and planning components cannot have
substitute components.
To assign substitute components:
1. Navigate to the Substitute Components window. Do this by choosing the
Substitutes button from the Bills of Material window.
2. Enter a substitute item for the component. If you are using Bills of Material, use amanufacturing item; if you are using Oracle Engineering, use an engineering or a
manufacturing item.
3. Enter the quantity of the substitute item needed to replace the full component
quantity. This quantity can differ from the bill usage quantity of the component.
Defining Item Revisions
A bill of material revision is an item revision which indicates that the components of an
item have changed. You do not have to use item revisions when you change bills ofmaterial, however, in some industries, it is best to create a new item revision when you
change a bill of material.
To define an item revision:1.
Navigate to the Item Revisions window. Do this by choosing the Revisions button
from the Bills of Material window.
2. Enter an alphanumeric revision for the item.
3. Enter the effective date of the item revision.
Related Topics
Item and Routing Revisions, page 2-2

8/12/2019 BOM Uuser Guide
http://slidepdf.com/reader/full/bom-uuser-guide 96/331
2-28 Oracle Bills of Material User's Guide
Defining Bill or Routing Operation Documents
You can attach documents to bills of material or to routing operations.
To define bill or routing operation documents:1. Navigate to either the Bill Documents or Operation Documents window.
Related Topics
Attaching Files, page 2-28
Attachments, Oracle E-Business Suite User's Guide
Attaching Files
You can attach text and files, such as spreadsheets, graphics, and OLE objects to bills of
material, engineering change orders, routings, routing revisions, and routing
operations.
For example, an attached file may include comments, such as a graphical representation
of the bill structure, or detailed instructions and schematic diagrams for routing
operations.
To attach files:1. From the Bills of Material, Engineering Change Orders, Routings, or Routing
Revisions window, choose the Attachments icon.
Note: To attach a file to a bill or ECO, position the cursor in the
header region. To attach a file to a routing operation, position the
cursor in the Operations region.
Related Topics
Defining Bill or Routing Operation Documents, page 2-28
Attachments, Oracle E-Business Suite User's Guide
Checking for Bill Loops
Bill loops occur when a bill is assigned as a component to itself somewhere in the
multilevel structure of the bill. The loop check program searches for such loops.
The Check for Loops program can be run from the Tools menu of the Bills of Material

8/12/2019 BOM Uuser Guide
http://slidepdf.com/reader/full/bom-uuser-guide 97/331
Bills of Material 2-29
window.
To check for bill loops:1. Navigate to the Bills of Material window.
Note: The Check for Loops item on the Tools menu is onlyavailable when creating a new bill, after that new bill has been
saved.
2. Choose Check for Loops from the Tools menu.
Related Topics
Bill of Material Loop Report, page 9-4
Modifying Components and Bills
You can receive notification when components and bills are modified by subscribing to
Oracle Workflow events.
Prerequisites
Your system administrator can help you subscribe to Oracle Workflow events. Refer to
the Oracle Workflow User's Guide and Oracle Workflow Developer's Guide for more
information on business events and how to subscribe to them.
The following Oracle Bills of Material business events trigger Oracle Workflow events:
Business Event Workflow Event
Creating a bill of material oracle.apps.bom.structure.created
Changing a bill of material oracle.apps.bom.structure.modified
Deleting a bill of material oracle.apps.bom.structure.deleteSuccess
or
oracle.apps.bom.structure.deleteError
Creating a component oracle.apps.bom.component.created
Changing a component oracle.apps.bom.component.modified
8/12/2019 BOM Uuser Guide
http://slidepdf.com/reader/full/bom-uuser-guide 98/331
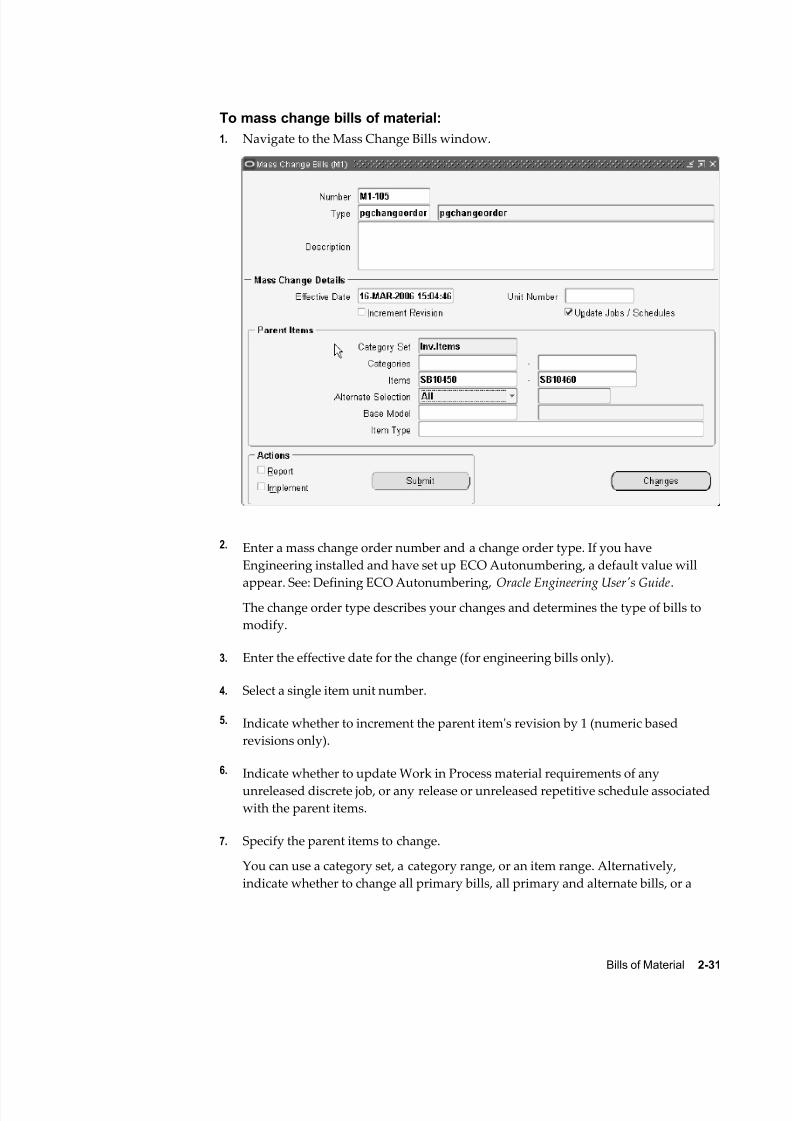
8/12/2019 BOM Uuser Guide
http://slidepdf.com/reader/full/bom-uuser-guide 99/331
Bills of Material 2-31
To mass change bills of material:
1. Navigate to the Mass Change Bills window.
2. Enter a mass change order number and a change order type. If you have
Engineering installed and have set up ECO Autonumbering, a default value will
appear. See: Defining ECO Autonumbering, Oracle Engineering User's Guide.The change order type describes your changes and determines the type of bills to
modify.
3. Enter the effective date for the change (for engineering bills only).
4. Select a single item unit number.
5. Indicate whether to increment the parent item's revision by 1 (numeric based
revisions only).
6. Indicate whether to update Work in Process material requirements of any
unreleased discrete job, or any release or unreleased repetitive schedule associated
with the parent items.
7. Specify the parent items to change.
You can use a category set, a category range, or an item range. Alternatively,
indicate whether to change all primary bills, all primary and alternate bills, or a

8/12/2019 BOM Uuser Guide
http://slidepdf.com/reader/full/bom-uuser-guide 100/331
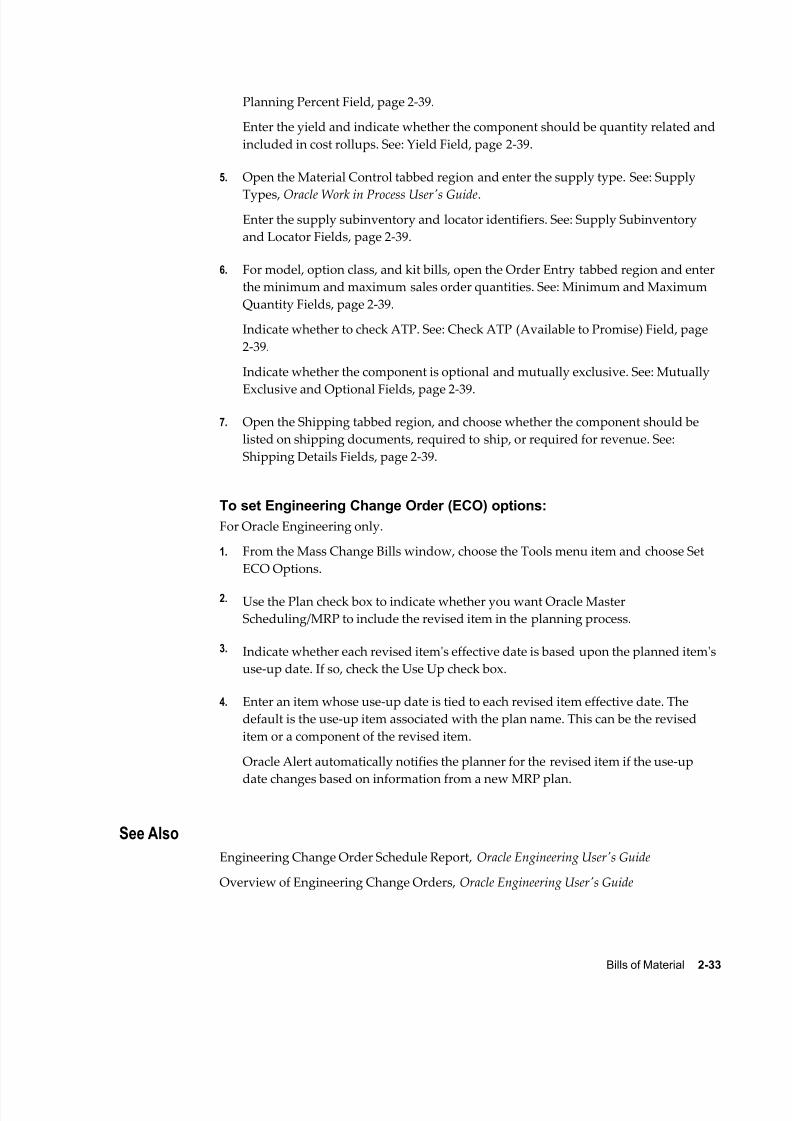
8/12/2019 BOM Uuser Guide
http://slidepdf.com/reader/full/bom-uuser-guide 101/331
Bills of Material 2-33
Planning Percent Field, page 2-39.
Enter the yield and indicate whether the component should be quantity related and
included in cost rollups. See: Yield Field, page 2-39.
5. Open the Material Control tabbed region and enter the supply type. See: Supply
Types, Oracle Work in Process User's Guide.
Enter the supply subinventory and locator identifiers. See: Supply Subinventory
and Locator Fields, page 2-39.
6. For model, option class, and kit bills, open the Order Entry tabbed region and enter
the minimum and maximum sales order quantities. See: Minimum and Maximum
Quantity Fields, page 2-39.
Indicate whether to check ATP. See: Check ATP (Available to Promise) Field, page
2-39.
Indicate whether the component is optional and mutually exclusive. See: Mutually
Exclusive and Optional Fields, page 2-39.
7. Open the Shipping tabbed region, and choose whether the component should be
listed on shipping documents, required to ship, or required for revenue. See:
Shipping Details Fields, page 2-39.
To set Engineering Change Order (ECO) options:
For Oracle Engineering only.
1. From the Mass Change Bills window, choose the Tools menu item and choose Set
ECO Options.
2. Use the Plan check box to indicate whether you want Oracle Master
Scheduling/MRP to include the revised item in the planning process.
3. Indicate whether each revised item's effective date is based upon the planned item's
use-up date. If so, check the Use Up check box.
4. Enter an item whose use-up date is tied to each revised item effective date. The
default is the use-up item associated with the plan name. This can be the revised
item or a component of the revised item.
Oracle Alert automatically notifies the planner for the revised item if the use-up
date changes based on information from a new MRP plan.
See Also
Engineering Change Order Schedule Report, Oracle Engineering User's Guide
Overview of Engineering Change Orders, Oracle Engineering User's Guide

8/12/2019 BOM Uuser Guide
http://slidepdf.com/reader/full/bom-uuser-guide 102/331
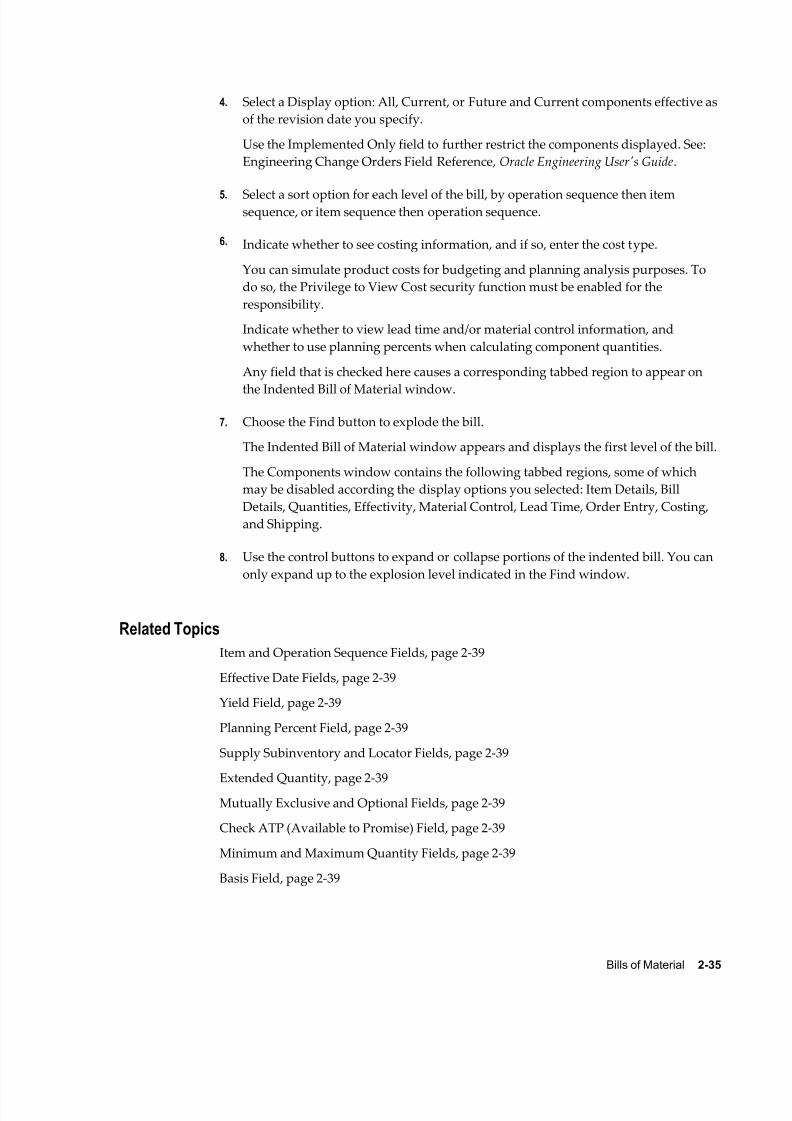
8/12/2019 BOM Uuser Guide
http://slidepdf.com/reader/full/bom-uuser-guide 103/331
Bills of Material 2-35
4. Select a Display option: All, Current, or Future and Current components effective as
of the revision date you specify.
Use the Implemented Only field to further restrict the components displayed. See:
Engineering Change Orders Field Reference, Oracle Engineering User's Guide.
5. Select a sort option for each level of the bill, by operation sequence then itemsequence, or item sequence then operation sequence.
6. Indicate whether to see costing information, and if so, enter the cost type.
You can simulate product costs for budgeting and planning analysis purposes. To
do so, the Privilege to View Cost security function must be enabled for the
responsibility.
Indicate whether to view lead time and/or material control information, and
whether to use planning percents when calculating component quantities.
Any field that is checked here causes a corresponding tabbed region to appear on
the Indented Bill of Material window.
7. Choose the Find button to explode the bill.
The Indented Bill of Material window appears and displays the first level of the bill.
The Components window contains the following tabbed regions, some of which
may be disabled according the display options you selected: Item Details, Bill
Details, Quantities, Effectivity, Material Control, Lead Time, Order Entry, Costing,
and Shipping.
8. Use the control buttons to expand or collapse portions of the indented bill. You can
only expand up to the explosion level indicated in the Find window.
Related Topics
Item and Operation Sequence Fields, page 2-39
Effective Date Fields, page 2-39
Yield Field, page 2-39
Planning Percent Field, page 2-39
Supply Subinventory and Locator Fields, page 2-39
Extended Quantity, page 2-39
Mutually Exclusive and Optional Fields, page 2-39
Check ATP (Available to Promise) Field, page 2-39
Minimum and Maximum Quantity Fields, page 2-39
Basis Field, page 2-39

8/12/2019 BOM Uuser Guide
http://slidepdf.com/reader/full/bom-uuser-guide 104/331
2-36 Oracle Bills of Material User's Guide
Shipping Details Fields, page 2-39
Overview of Lead Time Management, page 7-1
Viewing Item Usage, page 2-38
Overview of Routings, page 3-1
Bill of Material Structure Report, page 9-6
Supply Types, Oracle Work in Process User's Guide
Searching for Data (Using Query Find), Oracle E-Business Suite User's Guide
Searching for Data (Using Query Operators), Oracle E-Business Suite User's Guide
Searching For Data, Oracle E-Business Suite User's Guide
Searching For Data (Performing Query-by-Example and Query Count), Oracle
E-Business Suite User's Guide
Comparing Bills of MaterialYou can compare any two bills. For example, compare the primary to an alternate bill,
the same bill across organizations, or the current revision of an item to a future revision.
Note: The two assemblies and their attributes are referred to as Bill 1
and Bill 2, or simply as 1 and 2.
To compare two bills of materials:1. Navigate to the Bill Components Comparison (or the Report Bill of Material
Comparison) window.

8/12/2019 BOM Uuser Guide
http://slidepdf.com/reader/full/bom-uuser-guide 105/331
Bills of Material 2-37
2. In the Find Bills to Compare window, enter selection criteria for Bill 1. Do the same
for Bill 2.
3. Check comparison criteria check boxes for the attributes to compare the bills on.
4. Select an Order By option: by item sequence then operation sequence, or by
operation sequence then item sequence.
5. To view only the differences between bills, check the Differences Only check box.
6. Choose the Compare button to compare the bills online. (If you are running the Billof Material Comparison Report, choose the Report button.)
The Bill Components Comparison window displays both bills. Two columns of
check boxes, one for assembly #1 and one for assembly #2, indicate if the component
appears in the assembly.
The Main tabbed region displays the item and operation sequences, the planning
percent, the quantity, and whether the item is optional.
The Effectivity tabbed region displays the effective date range and whether the item
is implemented.
Related Topics
Item and Operation Sequence Fields, page 2-39
Planning Percent Field, page 2-39
Yield Field, page 2-39

8/12/2019 BOM Uuser Guide
http://slidepdf.com/reader/full/bom-uuser-guide 106/331
2-38 Oracle Bills of Material User's Guide
Effective Date Fields, page 2-39
Bill of Material Comparison Report, page 9-2
Viewing Item Usage
View an imploded list of all the using assemblies for a specified component.
To view item where used:1. Navigate to the Find Item Where Used window.
2. In the Find Item Where Used window, enter the item, the revision, the revision
date, and the number of levels to implode for this bill of material.
Tip: Only Current components effective as of the revision date you
specify will be displayed.
3. Indicate whether you need to inquire about component usage for the current
organization, the current organization and all subordinate organizations in the
chosen organization hierarchy, or all organizations that have the same item master
organization as the current organization. You have the ability to specify the
organization hierarchy name because current organizations can be accessed from
more than one organization hierarchy.
Note: Use the Implemented Only field to further restrict the
components to display.
4. Choose the Find button to open the Item Where Used window.
The level bill of material where the inventory item appears in the using assembly is
displayed, starting at 1 (level 2 signifies the parent of level 1; level 3 signifies the
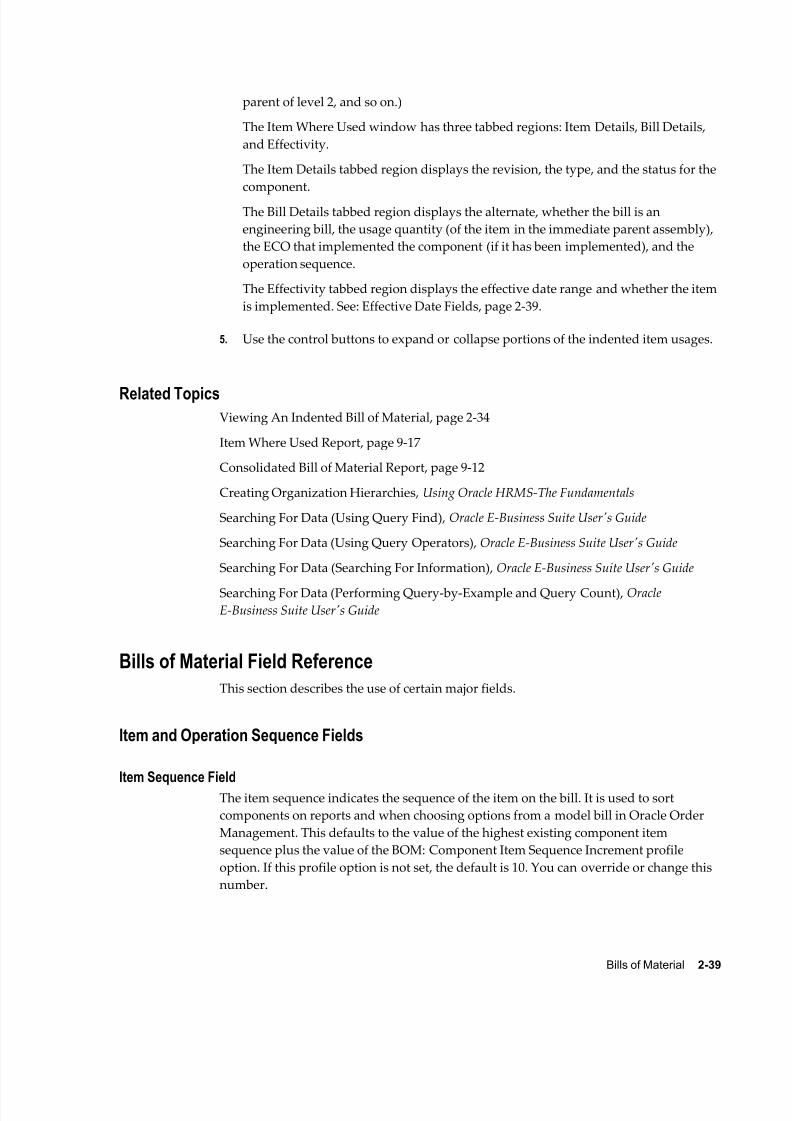
8/12/2019 BOM Uuser Guide
http://slidepdf.com/reader/full/bom-uuser-guide 107/331

8/12/2019 BOM Uuser Guide
http://slidepdf.com/reader/full/bom-uuser-guide 108/331
2-40 Oracle Bills of Material User's Guide
Operation Sequence Field
Every routing carries operations. You can use the Routings form to assign operations to
routings. Each operation must have a sequence number called the Operation Sequence
Number.
On a bill, the operation sequence indicates the order in which you perform operationson a routing. You can have the system automatically generate Operation Sequence
Numbers using a user-defined increment factor. A profile must be created where you
can indicate how much the Operation Sequence Number will increment every time a
new operation is generated. You can change the generated value if necessary in the
Routings form. Valid values range from 1 to 9999999.
You can assign any component to any operation on the routing, including all
components to the same operation (such as the first operation). The planning process
assigns material requirement dates based on the operations to which you assign each
component.
You can define bills of material for items with or without routings. If you use routings,you can either define the bill first or the routing first.
With component-to-operation assignments, you can schedule and issue component
material to the operation that requires the component on the exact requirement date.
You can also assign the same component on the bill to different operations on the
routing, with different usage quantities for each assignment.
If no routing exists for the item, all components default to operation sequence 1. You
cannot change this value until you define a routing for the item. After you define the
routing, you can update your bill of material with routing operations if you want
specific component-to-operation assignments.
If you define the routing before you define a bill, assign components to valid routingoperations, or an operation sequence 1 when you define the bill. If you define an
alternate routing and then define the alternate bill, you can assign components to the
alternate routing operations. If you define an alternate bill and no alternate routing
exists, you can assign components to the primary routing operations.
Effective Date Fields
Effective date fields appear throughout Oracle Manufacturing products. These are
defined as follows:
• Effective From / Effectivity Date: First date and time the component or operation
becomes effective. For components, the effective date is the first day a component becomes effective for a bill. For routings, it is the first day an operation becomes
effective in a routing.
• Effective To / Disable Date: Last date and time the component or operation is
effective. After this date, you can no longer assign the operation to a routing. From

8/12/2019 BOM Uuser Guide
http://slidepdf.com/reader/full/bom-uuser-guide 109/331
Bills of Material 2-41
this date, you can no longer assign the component to a bill.
• Inactive On: The first date and time the component or operation is inactive. As of
12:00AM on this date, you can no longer assign the component to a bill or the
operation to a routing. If this date equals the effective date, the component or
operation is inactive.
To avoid confusion, make sure that effective dates for one revision do not overlap with
those of another.
For example, if you must introduce three new components to a bill in a specific order,
you should assign each change to the appropriate parent item revision. So, component 1
of revision B may be effective today, component 2 of revision C tomorrow, then
component 3 of revision D may be effective the following day. If there are two
operations on a routing and you replace the first operation with a new operation, you
should set the effective date for the new operation to the date the operation you are
replacing becomes inactive.
Effective dates can be either the current date or a date in the future; you cannot enter adate in the past.
For components, the default effective date is the later of the current date or the date
entered for the bill. If an inactive date already exists for the operation sequence/item
combination, the default effective date of any subsequent rows with the same operation
sequence/item combination is the same as the inactive date. That means that the
subsequent operation sequence/item combination becomes effective immediately after
the previous one becomes inactive.
You cannot assign duplicate components to the same operation with overlapping
effective date ranges. For example, suppose component A001 at operation 10 is effective
from 10-JAN to 14-FEB. You may not add another component A001 at operation 10 to
the bill with an effective date of 10-FEB.
Use Oracle Master Scheduling/MRP to identify any overlapping effective dates.
Yield Field
The yield is the percentage of the component that survives the manufacturing process.
A yield factor of 0.90 means that only 90% of the usage quantity of the component on a
bill actually survives to be incorporated into the finished assembly.
To compensate for the expected gain or loss, any function that explodes a bill of
material increases or decreases the material requirements for the component, based on
the yield.
component requirements = component usage quantity / component yield
For example, when Master Scheduling/MRP plans a component with a usage quantity

8/12/2019 BOM Uuser Guide
http://slidepdf.com/reader/full/bom-uuser-guide 110/331
2-42 Oracle Bills of Material User's Guide
of 10 units per assembly and a component yield of 50% (or 0.5), the resulting component
requirements increase to 20 units per assembly.
Note: You cannot enter component yield for an option class item or for
any components of a planning bill.
The default is 1, indicating 100% yield (no loss or gain).
Planning Percent Field
Master Scheduling/MRP uses component planning percentages in forecast explosions
through planning, model, and option class bills of material.
Assign planning percentages to components on model, option class, and planning bills.
Note: You can assign planning percents to mandatory components on
model or option class bills only if the Forecast Control attribute is set to
Consume and Derive.
Enter a component planning percent to specify a distribution percentage for the
components. You can enter a planning percent greater than 100 to overplan a
component. The default is 100.
Enforce Integer Requirements
The Enforce Integer Requirements attribute enables you to generate demand in integer
quantities and eliminate pegging partial quantities across the demand. If you pass the
demand in integer values for lower level components in the BOM, you avoid passing
fractional values across the BOM. This enables pegging to reflect the true integer nature
of supply and demand. You can select from one of three following values:
• Up: The system rounds the gross requirements for every demand for the component
to the next higher integer value. To set the value to up, you must set the item master
attribute Rounding in Oracle Inventory.
• Down: The system rounds the gross requirements for every demand for the
component to the next lower integer value.
• None: This is the default value. Leaving the value at none allows pegging in
fractional quantities across the BOM.
Note: If you use Oracle Work in Process, select None. Oracle Work in
Process does not support Enforce Integer Requirements.

8/12/2019 BOM Uuser Guide
http://slidepdf.com/reader/full/bom-uuser-guide 111/331
Bills of Material 2-43
Extended Quantity Field
The extended quantity of the component used in the parent item is calculated as
follows:
((explosion quantity of parent item x component usage quantity) / component yield) / (1 -
shrinkage rate for parent)
Supply Subinventory and Locator Fields
Work in Process pulls components from the supply subinventory and the locator within
the subinventory during backflushing.
Assign a supply subinventory and locator, if applicable, to components that have a
supply type of Assembly pull or Operation pull. You must specify a supply locator if
you have mandatory locator control for the supply subinventory. The system validates
any item subinventory and locator restrictions you defined during your Oracle
Inventory setup.
Mutually Exclusive and Optional Fields
The following pertains to options for model and option class bills. All components are
mandatory on standard and planning bills. Model and option class bills can have both
mandatory and optional components.
The Optional field indicates whether the component is mandatory or optional. The
Mutually Exclusive field applies only to option class bills and indicates whether you
can choose one or many options within an option class.
Oracle Order Management uses the Mutually Exclusive check box in combination with
the Optional check box to determine the number of option items you can or must
choose to order the components of the option class bill. Refer to the table below for
details on how the Optional check box and the Mutually Exclusive check box work
together.
Description [ ] Mutually Exclusive(default)
[X] Mutually Exclusive
[X] Optional Choose any number or nooptions on the option class
bill
Choose one or no options onthe option class bill
[ ] Optional (default) Choose at least one option on
the option class bill
Choose one, and only one,
option on the option class bill

8/12/2019 BOM Uuser Guide
http://slidepdf.com/reader/full/bom-uuser-guide 112/331

8/12/2019 BOM Uuser Guide
http://slidepdf.com/reader/full/bom-uuser-guide 113/331

8/12/2019 BOM Uuser Guide
http://slidepdf.com/reader/full/bom-uuser-guide 114/331

8/12/2019 BOM Uuser Guide
http://slidepdf.com/reader/full/bom-uuser-guide 115/331
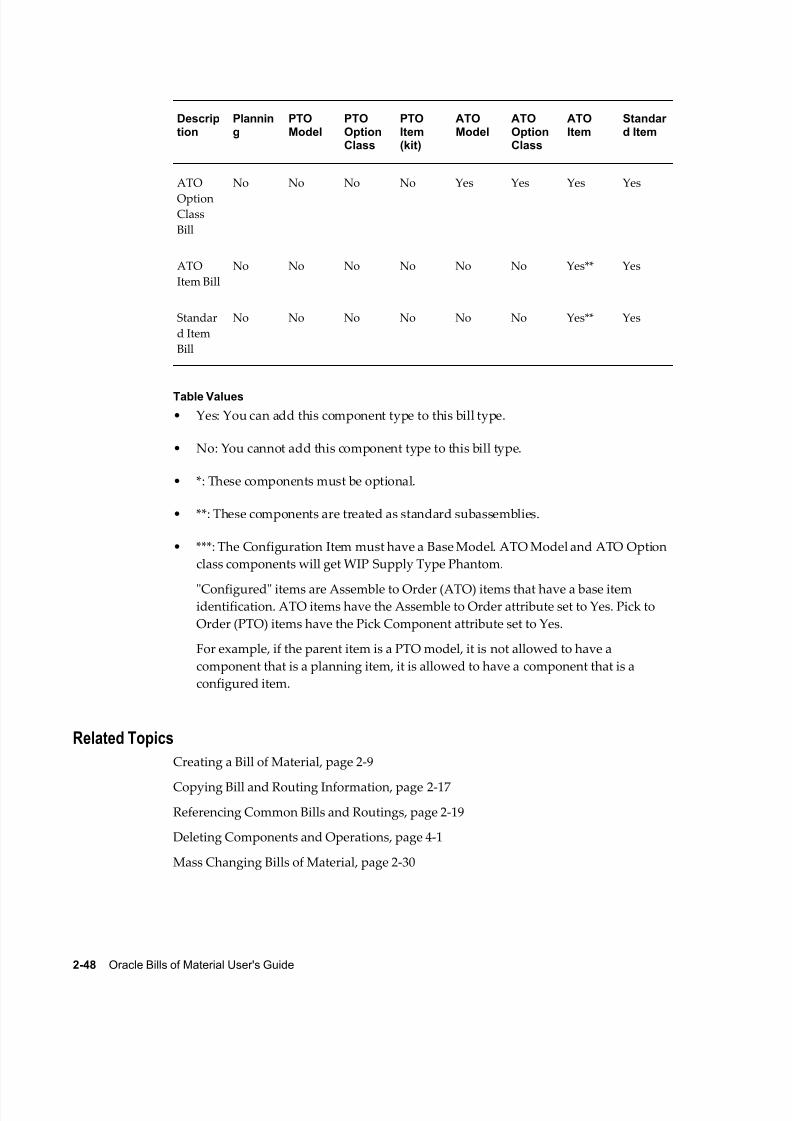
8/12/2019 BOM Uuser Guide
http://slidepdf.com/reader/full/bom-uuser-guide 116/331
2-48 Oracle Bills of Material User's Guide
Description
Planning
PTOModel
PTOOptionClass
PTOItem(kit)
ATOModel
ATOOptionClass
ATOItem
Standar d Item
ATO
OptionClass
Bill
No No No No Yes Yes Yes Yes
ATO
Item Bill
No No No No No No Yes** Yes
Standar
d Item
Bill
No No No No No No Yes** Yes
Table Values
• Yes: You can add this component type to this bill type.
• No: You cannot add this component type to this bill type.
• *: These components must be optional.
• **: These components are treated as standard subassemblies.
• ***: The Configuration Item must have a Base Model. ATO Model and ATO Option
class components will get WIP Supply Type Phantom.
"Configured" items are Assemble to Order (ATO) items that have a base itemidentification. ATO items have the Assemble to Order attribute set to Yes. Pick to
Order (PTO) items have the Pick Component attribute set to Yes.
For example, if the parent item is a PTO model, it is not allowed to have a
component that is a planning item, it is allowed to have a component that is a
configured item.
Related Topics
Creating a Bill of Material, page 2-9
Copying Bill and Routing Information, page 2-17
Referencing Common Bills and Routings, page 2-19
Deleting Components and Operations, page 4-1
Mass Changing Bills of Material, page 2-30

8/12/2019 BOM Uuser Guide
http://slidepdf.com/reader/full/bom-uuser-guide 117/331
Bills of Material 2-49
Creating a Product Family
A product family is a grouping of products whose similarity in resource usage, design,
and manufacturing process facilitates planning at an aggregate level. A product family
cannot be a part of a Standard, Model, Option Class, or Planning Bill of Material.Consequently, a product family is a single level bill. Members of a product family can
belong to one and only one product family. You will be able to plan based on the
planning percentages and effectivity of the product family members.
Caution: You must make sure that the Product Family flex structure is
configured to match the System Items structure. If the System Items
structure is changed it should be reflected in the Product Family
structure as well. See: System Items (Item Flexfield), Oracle Inventory
User's Guide.
To create a product family item:1. Navigate to the Master Item window.
Note: If you are a Flow Manufacturing customer, select Product
Family from the Flow Manufacturing window. The product family
template is automatically applied.
2. Apply the product family template. See: Item Templates, Oracle Inventory User's
Guide.
To define a default template for product family items, you must select a templatefrom the INV: Product Family Item Template Name profile option. The template
assigned in this profile option will be automatically applied when you create a new
product family item.
Note: You are not required to use the product family template. If
you choose not to use a template, make sure that you define the
correct product family attributes. Specifically, the item must be an
inventory item and the BOM Item Type must be Product Family.
The item must also be BOM allowed.
Each product family corresponds to an item category. A new category is added foreach product family item that is defined. The relationship between the product
family item and the product family category is established by the equality of their
concatenated key flexfield segment values. The category has the same name as the
product family item. Consequently, product family item categories have the same
flexfield structure as the System Items Flexfield. A new structure called Product
Family has been defined for the Item Categories Flexfield. Each product family

8/12/2019 BOM Uuser Guide
http://slidepdf.com/reader/full/bom-uuser-guide 118/331
2-50 Oracle Bills of Material User's Guide
member item and the product family item itself are assigned to the corresponding
category within the Product Family category set. The assignment is removed when
an item is no longer a member of a product family.
To assign product family members:1. Navigate to the Product Family window.
Note: If you are using Oracle Flow Manufacturing, you can select
Product Family Members from the Flow Manufacturing menu.
2. Select a product family item.
3. Select item members of the product family. The description, type, forecast control,
and planning method for the member items are displayed for the items selected.
Note: When an item is included in a product family, it will be
automatically assigned to the same category as the family item.
4. Commit the record by selecting Save from the File menu.
Note: You can commit a record without assigning planning
percentages. The default planning percent is 100. The default
effectivity date is the system date.
To assign planning percentages to product family members:1. Navigate to the Product Family window. Do this by selecting Defining Product
Families from the Bills of Material menu.
2. To assign planning percentages for a member item, choose the Allocation button.
3. Enter the product family member's planning factor.
4. Enter effectivity dates for the item. Effectivity dates cannot overlap.
5. Optionally, enter comment text.
6. Commit the record by selecting Save from the File menu.
Note: You can commit a record without assigning planning
percentages. The default planning percent is 100. The default
effectivity date is the system date.

8/12/2019 BOM Uuser Guide
http://slidepdf.com/reader/full/bom-uuser-guide 119/331
Bills of Material 2-51
Related Topics
Overview of Flow Manufacturing, Oracle Work in Process User's Guide
Creating a Flow Routing, Oracle Flow Manufacturing User's Guide
Overview of Mixed Model Map, Oracle Flow Manufacturing User's Guide

8/12/2019 BOM Uuser Guide
http://slidepdf.com/reader/full/bom-uuser-guide 120/331

8/12/2019 BOM Uuser Guide
http://slidepdf.com/reader/full/bom-uuser-guide 121/331
Routings 3-1
3Routings
This chapter tells you everything you need to know to use routings.
This chapter covers the following topics:
• Overview of Routings
• Creating a Routing
• Creating a Standard Operation
• Viewing Resource Usage
• Routings Field Reference
Overview of Routings
A routing defines the step-by-step operations you perform to manufacture a product.
Each routing can have any number of operations. For each operation you specify adepartment that determines the resources you may use for that operation.
Primary and Alternate Routings
A primary routing is the list of operations most frequently performed to build a
product. You can define one primary routing and many alternate routings an item.
When you define a new primary routing, you specify only the item (no alternate name)
and you can assign a routing revision. For example, you can define a routing for an item
that includes two operations-an assembly and a testing operation. You typically build
your product with these operations, so you define this routing as the primary routing
for the item.The following table presents an example primary routing.

8/12/2019 BOM Uuser Guide
http://slidepdf.com/reader/full/bom-uuser-guide 122/331
3-2 Oracle Bills of Material User's Guide
Primary Routing
Item Alternate Name Operation Sequence Description
A n/a 10 Assembly
n/a n/a 20 Test A/B
You can define an alternate routing to describe a different manufacturing process used
to produce the same product. Unlike a new primary routing, specify the item and
alternate name to define an alternate routing. You must define a primary routing before
you can define alternate routings, and you can define any number of alternate routings
for an item. For example, you have three test machines, one new machine capable of
performing both tests A and B and two older machines that can only perform test A or
test B. Ideally you would like to use the new machine that can perform both tests, but if
it is unavailable, you use the other machines to complete the job.
The following table presents an example of a primary and alternate routing for Item A.
Primary and Alternate Routings
Item Alternate Name Operation Sequence Description
A n/a 10 Assembly
n/a n/a 20 Test A/B
A Split Test 10 Assembly
n/a n/a 20 Test A
n/a n/a 30 Test B
Bills and routings can share alternate labels. If you create an alternate bill with the same
label as an alternate routing, components are assigned to operations on the alternate
routing. If there is no routing with the same alternate label, components are assigned to
operations on the primary routing.
Engineering Routings
You can define an engineering routing as an alternate for a manufacturing routing. This
would typically be used to prototype a variation from the primary routing that
produces the same assembly.

8/12/2019 BOM Uuser Guide
http://slidepdf.com/reader/full/bom-uuser-guide 123/331
Routings 3-3
Both engineering and manufacturing routings share the same resource, department,
and standard operation information.
Flow Routings
In a Flow Manufacturing environment, products are produced on a flow line to meetcustomer demand. Typically one flow line makes a mix of products.
Product Synchronization is the process of defining your product's process flow. This is
done through the Flow routing where you are able to define processes, events and
operations for your flow line. Although you can only define processes, events, and
operations using Oracle Flow Manufacturing, you are defining them in windows
owned by Oracle Bills of Material.
Dynamic Routings
Paths that jobs take are not always known at creation. Depending on initial operations
and their results, operation flexibility is frequently required. There can be numerouspossibilities defined as part of a routing network, any one of them being selectable
based on the outcome of the last operation, within the job performed. All possible
operation paths that a route may flow through are first determined. This networked,
predefined path definition provides for dynamic, flexible operation.
Lot-Based Flow Routing
A flow route is defined as a comprehensive routing network. It enables you to model
your shop floor, define possible re-work points, or it can be linear. Conceptually, a flow
routing consists of a series of nodes and paths, which make up the entire routing
network.
A WIP lot will begin with any one of the possible routes that a job can potentially take,
which consists of a route having only the beginning and ending tasks. As the job
progresses through the production cycle, you can populate the Build Class route with
the operations that the WIP lot actually goes through, selectable from the Flow Route.
Within each sector, the operations that a WIP lot can progress to will be mapped out in
the lot-based type routing. All operations that the WIP lot can potentially progress to
are listed as operations for the lot-based routing. Lot-based routings are extensions of
standard routings, and have network entities defined for their operations.
Operations
To define a routing operation you first specify an operation sequence number to
indicate the order to perform operations. Components in your bill of material can
reference an operation sequence. Next, you can choose either a standard operation, or
you can enter a new operation.

8/12/2019 BOM Uuser Guide
http://slidepdf.com/reader/full/bom-uuser-guide 124/331
3-4 Oracle Bills of Material User's Guide
Sequence of Operations
Routings define the step-by-step descriptions, or operations, for manufacturing an
assembly. Each operation on a routing defines a specific portion of the manufacturing
process for the assembly. You can use operations to identify the location, the quantity,
and the state of completion of the assemblies you are currently manufacturing.For each component item on the bill of material associated with a routing, you can
specify the operation sequence where you require the item. You can then only issue
material where and when it is needed. See: Creating a Bill of Material, page 2-9.
Standard Operation
A standard operation is a commonly used operation that you define as a template to
default operation information when you define routings. When you define a new
operation on a routing, you can specify a standard operation whose information Bills of
Material copies into the operation you are currently defining. You can then change any
of the copied information for the new operation. See: Creating a Standard Operation,
page 3-22.
Setup Standard Operation
A setup standard operation is the same as a standard operation except that it defines an
operation used for setting up machine type resources only. Use the setup standard
operation to specify the operation used during changeovers. See: Defining Resource
Setup Information, page 1-32.
Backflushing Transactions
You can specify at what point in the routing you backflush component material. Moves
automatically backflush the appropriate components at the time they are needed. Youcan postpone the backflush of material at time-critical operations until a later operation.
See: Issuing and Returning Specific Components, Oracle Work in Process User's Guide.
Minimum Transfer Quantities
You can set the minimum quantity that you move from an operation when you define a
routing. The Move Transactions window in Oracle Work in Process issues a warning
when you move a quantity less than this minimum.
Attachments
You can attach files, which may include instructions, to routing operations. See:
Attaching Files to Bills and Routing Operations, page 2-28.
Option Dependent Operations
When you define routings for model and option class items, you can indicate the
operations that appear in a configuration item's routing only if you choose an option
that references that operation. Bills of Material automatically creates a configuration

8/12/2019 BOM Uuser Guide
http://slidepdf.com/reader/full/bom-uuser-guide 125/331
Routings 3-5
item's routing including all operations that are not option-dependent and any
option-dependent operations referenced by a chosen option. See: Configure to Order
Environments, page 5-4.
Resource Usage
You can associate multiple resources with an operation on a routing. For each resource,
you can determine if you want to include that resource in scheduling and lead time
calculations. You can also collect costs for a resource on a routing if you specified the
resource as a costed resource. See: Defining a Resource, page 1-24. If a resource is
unavailable, you can define alternate resources. An alternate resource can be a single
resource or a set of resources.
Resource parents and resource sets are used to group similar resources. Routings can
then be defined with their general resource requirements, while WIP lots are tracked
with the usage of the specific resources. While a resource can belong to several resource
sets, a resource can only belong to one parent resource. When a WIP lot is at an
operation with a parent resource or resource set attached to it, you are prompted toenter a valid resource used in processing the WIP lot.
Alternate Resources
You can define alternate resources for each resource. You can define an alternate
resource or set of alternate resources to describe a different manufacturing step used to
produce the same product. For example, you have a routing for an item TEST. The
routing includes an operation with operation sequence number 70. The operation
includes two operation resources, R1 (resource sequence 10) and R2 (resource sequence
20). The Substitute Group Number 10 groups the substitute resources R3, R4, and R5.
These three resources are further classified into Replacement Group 10 and 20.
Replacement Group 10 includes the resource R3 and Replacement Group 20 containsthe resources R4 and R5. If the resources R1 or R2 are not available, you can replace
them with either Replacement Group 10 or 20, so either R3 or R4 and R5 can replace R1
or R2. The following table describes how this example is set up in the Operation
Resources and Operation Alternate Resources windows.
Primary and Alternate Resources for Item TEST, Sequence 70
Resource Resource Seq Substitute GroupNumber
Replacement Group
R1 10 10 n/a
R2 20 10 n/a
R3 10 or 20 (default) 10 (default) 10

8/12/2019 BOM Uuser Guide
http://slidepdf.com/reader/full/bom-uuser-guide 126/331
3-6 Oracle Bills of Material User's Guide
Resource Resource Seq Substitute GroupNumber
Replacement Group
R4 10 or 20 (default) 10 (default) 20
R5 10 or 20 (default) 10 (default) 20
Item or Lot-Based Resources
You can specify resource usage as a fixed rate per job for activities such as setup and
teardown, and variable rates for resources whose usage depends on the number of units
processed. For lot based resources you choose the Lot basis type and your usage rate is
fixed, and for item based resources you choose the Item basis type to indicate that your
usage rate is variable.
For example, you might define an operation where you schedule lot based and item based resources, as presented in the following table:
Scheduling by Item or Lot
OperationSequence
ResourceSequence
Activity Resource
Usage UOM Basis Resource UnitCost
10 1 Queue Time 1 HR Lot $0
n/a 2 Run Labor 01 .2 HR Item $10
Oracle Cost Management divides lot based resource usages by lot size to determine
item costs. For example, you might define a lot based resource that represents time
spent setting up a machine, and a resource that represents the time to tear down the
machine for the next job or schedule. You could schedule and collect costs for both the
setup and tear down resources.
Resource Scheduling
You can specify usage rates either as resource units per item unit, or the inverse - item
units per resource unit. For example, you could specify usage rate for a machine hour
resource in either units per hour, or hours per unit. For each routing operation, you can
specify multiple resources and usage rates.
For each resource, you can specify whether to schedule it, and whether it overlaps the
prior or next operation. If you specify that a resource overlaps the prior operation,
Oracle Work in Process schedules the resource so that the last resource on the prior

8/12/2019 BOM Uuser Guide
http://slidepdf.com/reader/full/bom-uuser-guide 127/331
8/12/2019 BOM Uuser Guide
http://slidepdf.com/reader/full/bom-uuser-guide 128/331
3-8 Oracle Bills of Material User's Guide
either the quantity per item or per lot. If you assign more than one resource unit to
work at an operation, Work in Process considers the number of units when scheduling a
resource at an operation. (Assign the usage rate for the resource as the total quantity per
item or lot, regardless of the number of resource units you specify.) For example, if you
define a machine resource to require 10 hours per item and you assign 2 resource units
to the resource, Work in Process automatically schedules 2 machines for 5 hours.
Standard Resource Costs
When you define a routing, you specify the resources you use to build the items, and
each resource has costs associated with it. By defining the routing with specific
resources, you establish standard resource costs for any item that uses the routing. See:
Setting Up Standard Costing for Manufacturing in Oracle Cost Management User's Guide.
Outside Processing
You can define outside processing resources and then assign these resources to
operations on a routing. Work in Process considers any operation that has an outside
processing resource as an outside operation. See: Outside Processing, Oracle Work inProcess User's Guide.
Labor Skill Validation
You can define competencies for a resource to perform a particular operation. Labor
Skill Validation ensures that job operations are performed by competent operators who
have the required qualifications, competencies and certifications. This prevents
potential errors and issues that arise from incompetent operators performing job
operations.
Related Topics
Item and Routing Revisions, page 2-2
Creating a Routing, page 3-9
Defining a Department, page 1-14
Defining a Resource, page 1-24
To switch between a primary and alternate routing, page 3-9
Creating Alternates, page 1-10
Primary and Alternate Bills of Material, page 2-2
Defining Flow Manufacturing Standard Processes, Oracle Flow Manufacturing User's
Guide
Defining Flow Manufacturing Standard Events, Oracle Flow Manufacturing User's Guide
Defining Flow Manufacturing Standard Line Operations, Oracle Flow Manufacturing
User's Guide

8/12/2019 BOM Uuser Guide
http://slidepdf.com/reader/full/bom-uuser-guide 129/331
Routings 3-9
Creating a Routing, page 3-9
Creating a Standard Operation, page 3-22
Creating a Network Routing, Oracle Shop Floor Management User's Guide
Setup Steps (Defining Parameters), Oracle Shop Floor Management User's Guide
Creating a Routing
For each routing, define the operations, the sequence to perform them, and the
resources required at each operation. You can define either a primary or an alternate
routing. If you are a Flow Manufacturing customer you can also create a Flow Routing.
See: Creating a Flow Routing, Oracle Flow Manufacturing User's Guide.
Caution: You cannot create routings for planning or pick-to-order
items.
Note: Use attachments, such as detailed operation instructions, for
routing operations. See: Attaching Files, page 2-28.
You can create a routing manually, copy an existing routing, or reference a common
routing. See: Copying Bills and Routing Information, page 2-17. See: Referencing
Common Bills and Routings, page 2-19.
The procedure below describes how to manually create a routing.
Prerequisites
You must define at least one department before you can create a routing.
BOM Allowed must be set to Yes for the item you are creating a routing for.
To create a routing:1. Navigate to the Routings window.
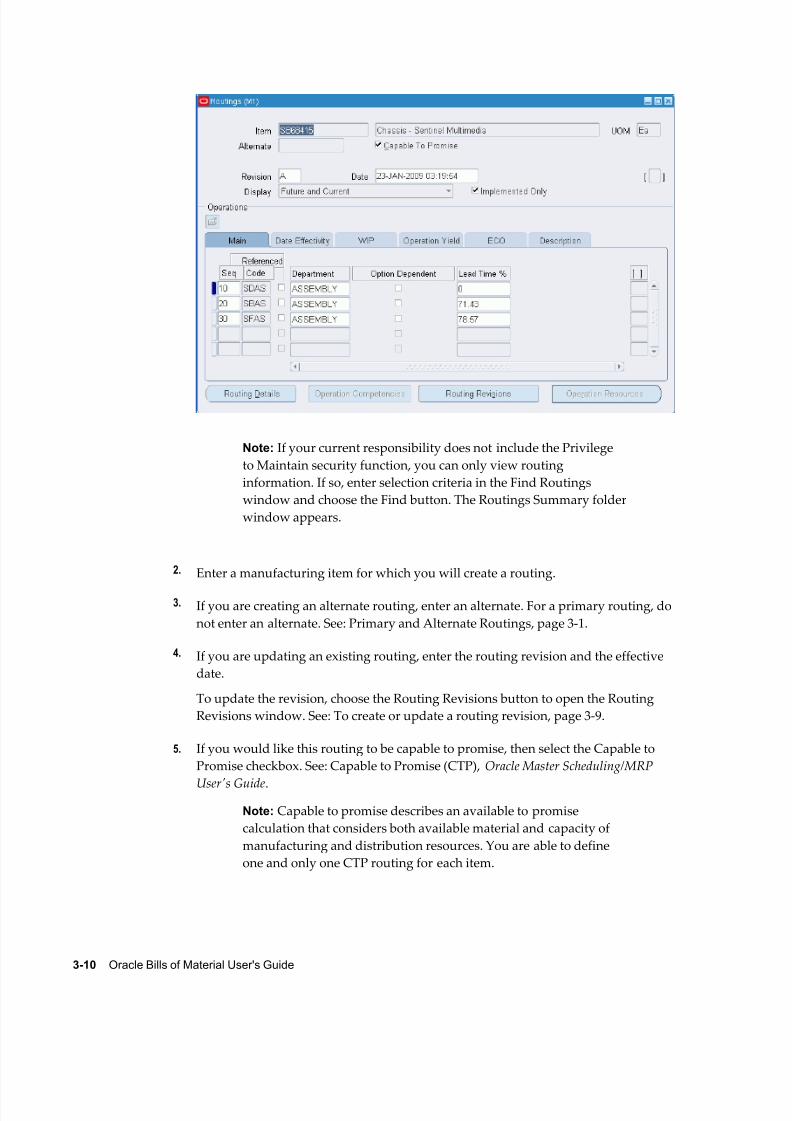
8/12/2019 BOM Uuser Guide
http://slidepdf.com/reader/full/bom-uuser-guide 130/331

8/12/2019 BOM Uuser Guide
http://slidepdf.com/reader/full/bom-uuser-guide 131/331
Routings 3-11
6. Select a display option to display All, Current, or Future and Current operations
effective as of the revision date you specify.
To enter completion subinventory and locator information, or view a common
routing, choose the Routing Details button to open the Routing Details window.
See: Completion Subinventory and Locator, page 3-29.
7. Enter the operation sequence, or let the system automatically generate it for you,
according to your profile setup. See: Item and Operation Sequence Fields, page 2-39.
8. To copy or reference standard operations into a routing, use the Operation Code list
of values. You can define a new standard operation by selecting Standard
Operations from the Tools menu.
If you use a standard operation code, the operation information for that code will be
copied into the operation you are currently defining. You can then update that
information as desired. See: Creating a Standard Operation, page 3-22.
Tip: You can assign the same standard operation to more than one
operation sequence within the same routing.
The Routings window has five tabbed regions: Main, WIP, Date Effectivity,
Operation Yield, ECO, and Description.
9. Enter the department in which the operation is performed.
10. For operations in ATO model or option class routings only, indicate whether the
operation is option dependant, that is, whether the operation is dependant on the
choice of an optional component. All mandatory components and their related
operations appear on the routing for each configuration. The default is enabled. See:Overview of Configure to Order, page 5-1.
11. Optionally, enter the item's manufacturing lead time percent required to complete
all previous operations on the routing. See: Calculating Lead Times, page 7-14.
If the manufacturing lead time equals 10 days and all previous operations
combined require 2 days, the lead time percent is 20%.
12. Open the Date Effectivity tabbed region and enter an effective date range. See:
Effective Date Fields, page 2-39.
13. Open the WIP tabbed region and select Count Point and Autocharge options. See:
Count Point and Autocharge, page 3-29. See: Charge Type, page 3-29.
Indicate whether to backflush components on shop floor moves at this operation. A
backflush transaction automatically pulls Operation pull components from
inventory. Work in Process also pulls all Operation pull components at
non-backflush operations preceding this operation (through the previous
8/12/2019 BOM Uuser Guide
http://slidepdf.com/reader/full/bom-uuser-guide 132/331
3-12 Oracle Bills of Material User's Guide
completed backflush operation.) See: Backflush Transaction Options, Oracle Work in
Process User's Guide.
Enter the minimum transfer quantity of assemblies to move from this operation to
the next. Work in Process will warn you if you attempt to move a number less than
this value. If you used a standard operation, this value defaults to minimum
transfer quantity defined for the standard operation. Otherwise the default is 0.
14. Open the Operation Yield tabbed region. You can define routing networks for
Standard, Flow, and Lot-based routings.
If the routing is standard or lot-based, then the Yield, CUM Yield, Reverse CUM
Yield, and Include in Rollup fields will display. To enable Operation Yield in Shop
Floor Management, enter expected operation yields for each operation listed. For
example, enter 0.9 for a 90% yield. These fields are displayed for Shop Floor
Management enabled organizations.
15.Indicate whether the operation yield is to be considered in the cost rollup, as
required by the costing team.
16. Open the ECO tabbed region and verify the following:
The Implemented check box indicates whether the component is implemented.
Checked: Operation is on a pending Engineering Change Order (ECO)
Unchecked: Operation is on implemented ECO or was added directly to the routing
17. Open the Description tabbed region and enter a description of the operation.
To calculate lead times for a routing:You can create and calculate lead times from the Routings form.
1. Navigate to the Routings form.
2. Query on a manufacturing item's routing.
3. From the main menu, select Tools > Compute Lead Times or Rollup Lead Times.
If the item's Effectivity Control attribute is set to Date, a concurrent program will
run automatically to calculate the lead times. If the item's Effectivity Control
attribute is set to Model/Unit Number, a window will display to enter the Unit
Number parameter. When this number is entered, a concurrent program will
launch, calculating lead time attributes. See: Bills of Material Attribute Group,
Oracle Inventory User's Guide.
See Also
Calculating Lead Times, page 7-14
8/12/2019 BOM Uuser Guide
http://slidepdf.com/reader/full/bom-uuser-guide 133/331
Routings 3-13
Defining a Department, page 1-14
Creating a Standard Operation, page 3-22
Defining Bill or Routing Operation Documents, page 2-28
Defining a Resource, page 1-24
Deleting Components and Operations, page 4-1
Attaching Files, page 2-28
Creating a Bill of Material, page 2-9
Routing Report, page 9-22
Customizing the Presentation of Data in a Folder, Oracle E-Business Suite User's Guide
Creating a Network Routing, Oracle Shop Floor Management User's Guide
Setup Steps (Defining Parameters), Oracle Shop Floor Management User's Guide
To switch between a primary and alternate routing:From the Routings window you can switch between Primary and Alternate routings.
1. Navigate to the Routings window.
2. Perform a query to display the alternate routing which you would like to switch to
the primary routing.
3. Choose the Actions menu and select Switch to Primary.
Note: Switch To Primary option appears in Actions menu.
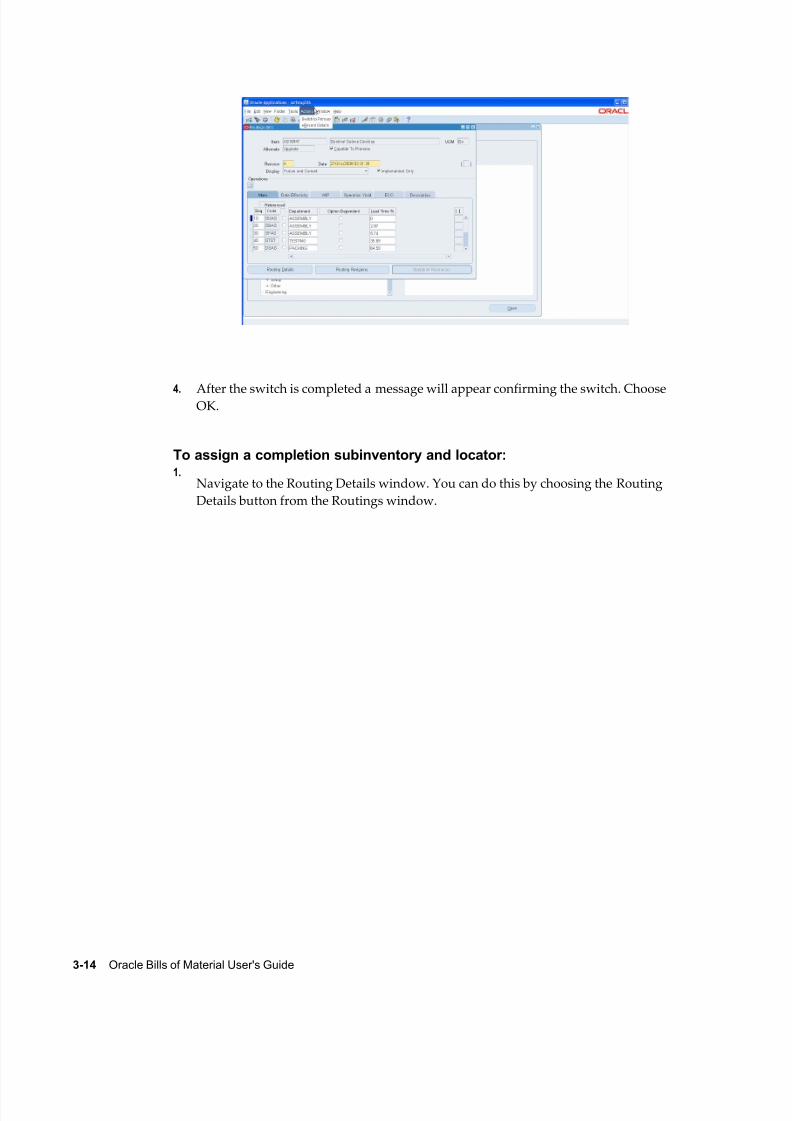
8/12/2019 BOM Uuser Guide
http://slidepdf.com/reader/full/bom-uuser-guide 134/331
3-14 Oracle Bills of Material User's Guide
4. After the switch is completed a message will appear confirming the switch. ChooseOK.
To assign a completion subinventory and locator:1.
Navigate to the Routing Details window. You can do this by choosing the Routing
Details button from the Routings window.
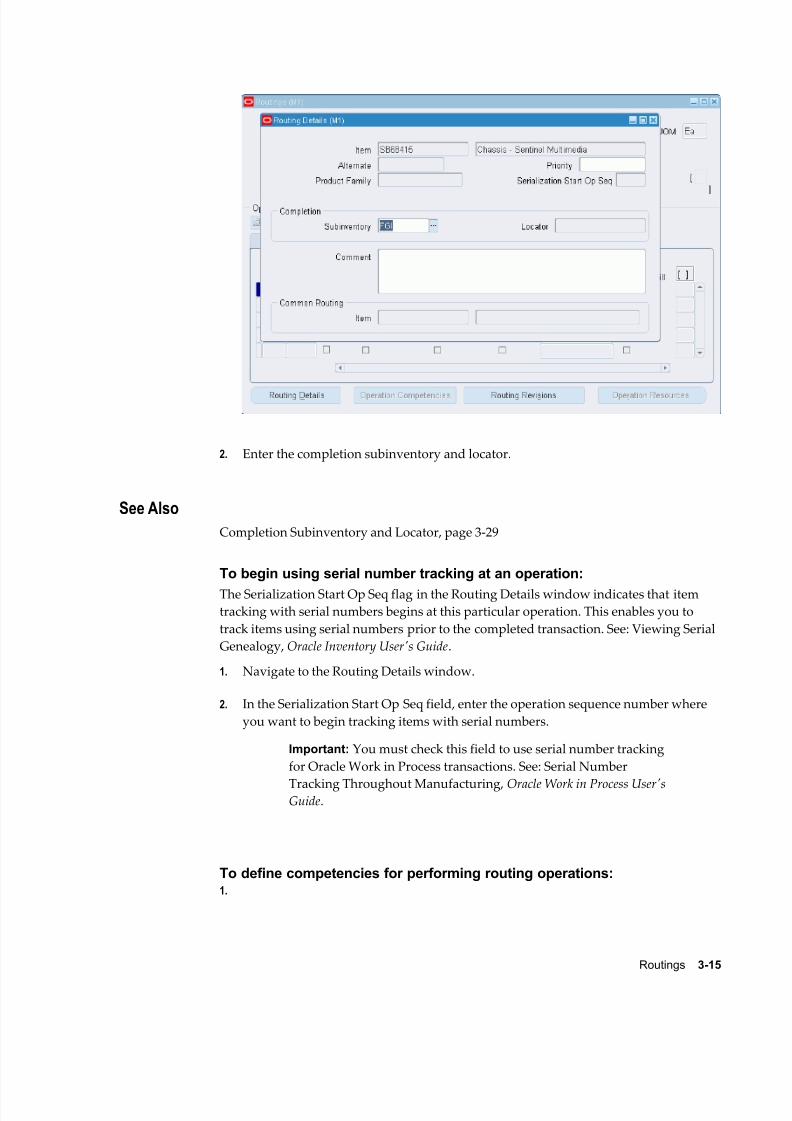
8/12/2019 BOM Uuser Guide
http://slidepdf.com/reader/full/bom-uuser-guide 135/331
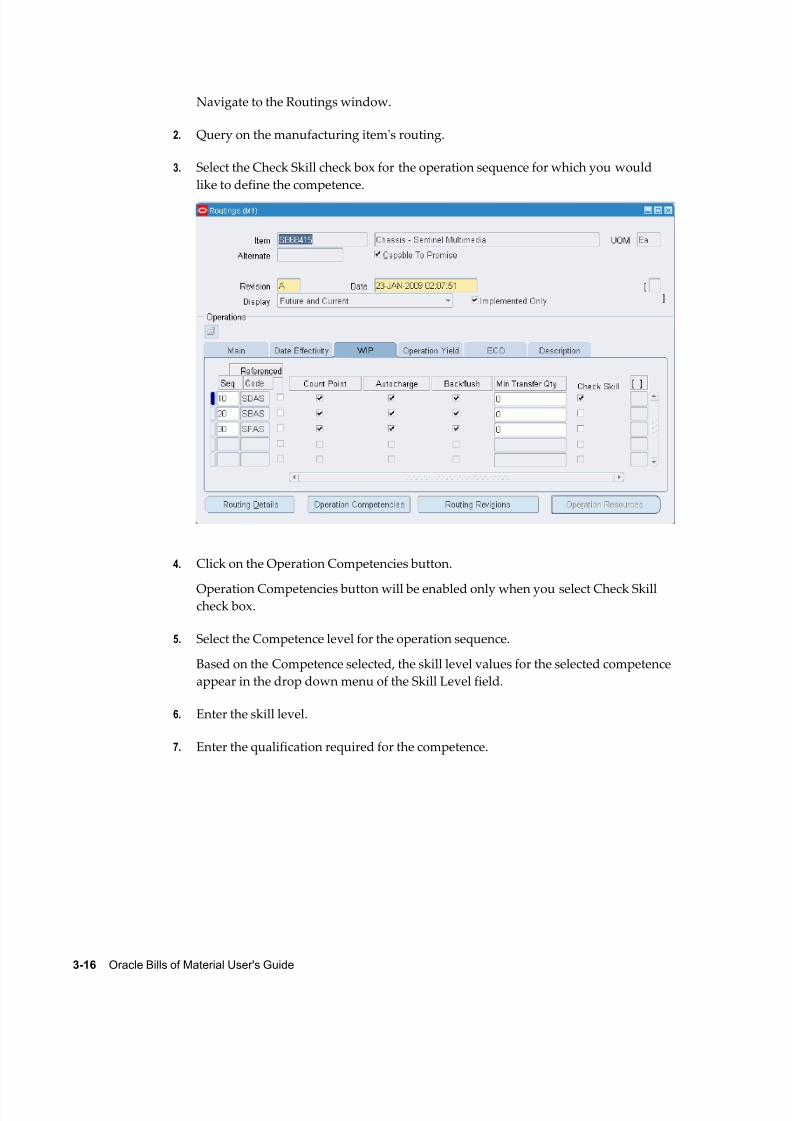
8/12/2019 BOM Uuser Guide
http://slidepdf.com/reader/full/bom-uuser-guide 136/331

8/12/2019 BOM Uuser Guide
http://slidepdf.com/reader/full/bom-uuser-guide 137/331
Routings 3-17
8. Save your work and close the Operation Competencies window.
See Also
Moving and Completing Assemblies., Oracle Manufacturing Execution System for
Discrete Manufacturing User's Guide
Operator Skill Validation., Oracle Manufacturing Execution System for Discrete
Manufacturing User's Guide
Adding and Updating Operations., Oracle Work in Process User's Guide
Qualification Types., Oracle HRMS Workforce Sourcing, Deployment, and Talent
Management Guide
Defining Competencies., Oracle HRMS Workforce Sourcing, Deployment, and Talent
Management Guide
To create or update a routing revision:1. Navigate to the Routing Revisions window. You can do this by choosing the
Routing Revisions button from the Routings window.
2. Enter the routing revision.
3. Enter an effective date and time.
The implementation date, which is either the date the revision was added or the
date the routing was transferred from Oracle Engineering, is displayed. If the
routing was transferred from Engineering, the ECO text is displayed.
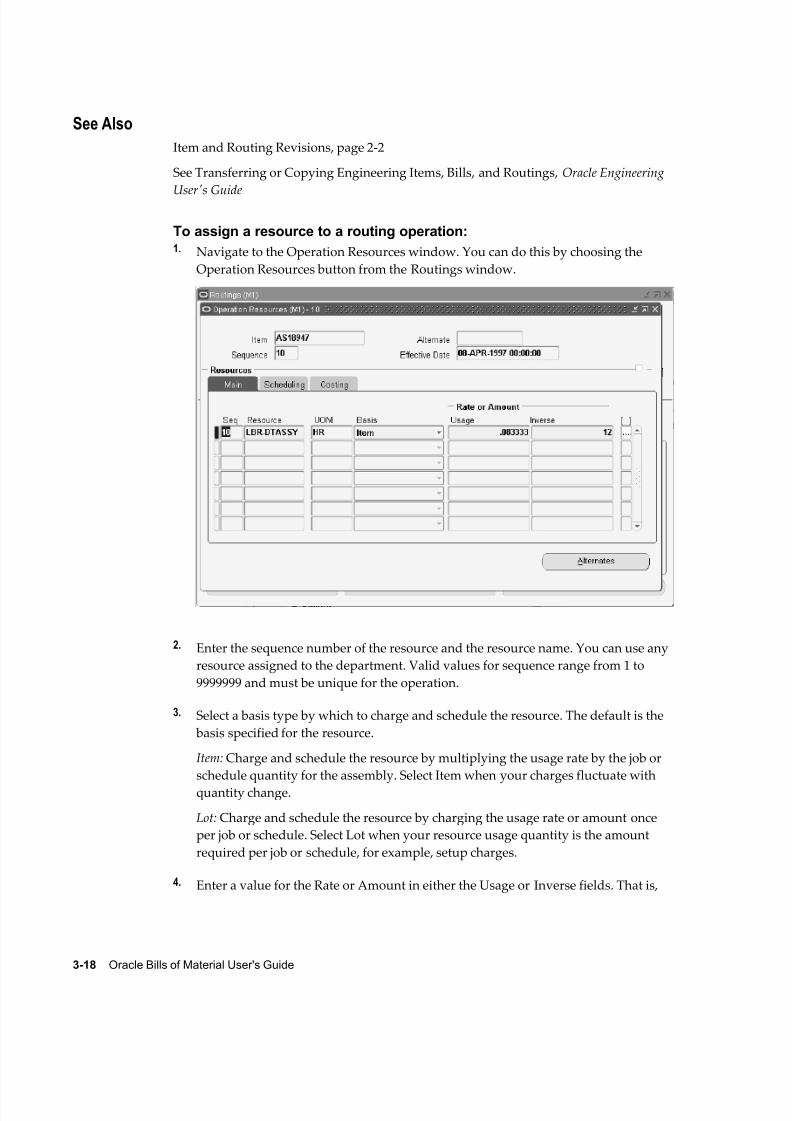
8/12/2019 BOM Uuser Guide
http://slidepdf.com/reader/full/bom-uuser-guide 138/331
3-18 Oracle Bills of Material User's Guide
See Also
Item and Routing Revisions, page 2-2
See Transferring or Copying Engineering Items, Bills, and Routings, Oracle Engineering
User's Guide
To assign a resource to a routing operation:1. Navigate to the Operation Resources window. You can do this by choosing the
Operation Resources button from the Routings window.
2. Enter the sequence number of the resource and the resource name. You can use any
resource assigned to the department. Valid values for sequence range from 1 to
9999999 and must be unique for the operation.
3. Select a basis type by which to charge and schedule the resource. The default is the
basis specified for the resource.
Item: Charge and schedule the resource by multiplying the usage rate by the job or
schedule quantity for the assembly. Select Item when your charges fluctuate with
quantity change.
Lot: Charge and schedule the resource by charging the usage rate or amount once
per job or schedule. Select Lot when your resource usage quantity is the amount
required per job or schedule, for example, setup charges.
4. Enter a value for the Rate or Amount in either the Usage or Inverse fields. That is,
8/12/2019 BOM Uuser Guide
http://slidepdf.com/reader/full/bom-uuser-guide 139/331
Routings 3-19
enter the resource consumed at the operation (per item or per lot) or it's inverse.
Entering a value for either field updates the other field.
Resources with time-based unit of measures must have usage rates greater than
zero.
Enter an inverse when you know the number of units a resource can process (rather
than the duration an assembly unit consumes the resource. For example, if you
know a resource can process 10 units per hour, enter 10 for the inverse.
Usage or Inverse can be negative only for resources that cannot be scheduled and
where the charge type is neither PO move nor PO receipt.
5. Open the Scheduling tabbed region and enter the Schedule Sequence Number. Two
or more resources can be scheduled to be working concurrently within the same job
operation. Simultaneity is implemented by having more than one resource with the
same Schedule Sequence Number.
Note: The Schedule Sequence Number field is independent of the
resource sequence, which is used only as part of the primary key tolist the resources. The Schedule Sequence Number shows the actual
sequence of each resource used in the operation.
6. Optionally, enter the Substitute Group Number.
Resources with the same substitute group number are substituted together with
alternate resources that have the same substitute group number as the operation
resource and the same replacement group number. See: Alternate Resources, page
3-1 for an explanation of using the Substitute Group Number field when defining
alternate resources.
7. Enter the number of assigned units to the resource. See: Resource Usage, page 3-1.
8. If the unit of measure of the resource is time-based, select a schedule value. See:
Schedule, page 3-29 and Defining a Resource, page 1-24.
Caution: When defining either primary or alternate resources
within the same Schedule Sequence Number, you must set the
Schedule field value for the next resource to:
• Prior or No if another resource within the same Schedule
Sequence Number has a Schedule field value of Prior
• Next or No if another resource within the same Schedule
Sequence Number has a Schedule field value of Next
9. o

8/12/2019 BOM Uuser Guide
http://slidepdf.com/reader/full/bom-uuser-guide 140/331
3-20 Oracle Bills of Material User's Guide
Enter the resource ffset percent within this routing.
For example, a value of 50 means that you utilize the resource when the routing is
half completed. This value is automatically calculated when you compute the lead
time for the assembly.
10. Indicate which resource is the principle resource, within a group of simultaneousresources.
Users can schedule two or more resources to work concurrently within the same
routing operation by having more than one resource with the same schedule
sequence number. The Principal Flag defines which resource to use first when there
is a choice. Similarly, when defining alternate resources, you must define one of the
alternates as the principal substitute resource within a replacement group.
Although you can have many replacement groups, you can only designate one
principle resource per replacement group.
11. Open the Costing tabbed region and enter an activity to perform when you use the
resource. Use activities to group resource charges for cost reporting. The default isthe activity associated with the resource. See: Defining Activities and Activity Costs
in Oracle Cost Management User's Guide.
12. Indicate whether to charge jobs or schedules based on the standard rate defined for
the resource (default).
Off: Use this option if you import charges from an outside labor system and want to
record actual costs, or to record the labor rate of an employee.
On: For outside processing resources, if you charge a job and repetitive schedule at
the standard rate, Oracle Purchasing computes any purchase price variance and
posts it to the rate variance account.
13. Select a charge type. The default is the charge type specified for the resource. See:
Charge Type, page 3-29.
14. Select the Alternates button.
Optionally, you can define substitute resources for each primary resource group
defined. This enables you to specify resource sequences that can replace the
primary resource group.
15. Enter the substitute resource name.
This is one of the resources that may replace the resource group.

8/12/2019 BOM Uuser Guide
http://slidepdf.com/reader/full/bom-uuser-guide 141/331
Routings 3-21
16. Enter the Replacement Group.
This is used to group substitute resources together, to substitute a resource group.
See: Alternate Resources under Resource Usage, page 3-1 for an explanation of
using the Replacement Group field when defining alternate resources.
17. Select a basis type by which to charge and schedule the resource. The default is the
basis specified for the resource.
18. Enter a value for the Rate or Amount in either the Usage or Inverse fields. That is,
enter the resource consumed at the operation (per item or per lot) or it's inverse.
Entering a value for either field updates the other field.
See Also
Viewing Resource Usage, page 3-28
Resource Report, page 9-21
To roll up costs:
From the Routing window, you can perform a single-level cost rollup for the
currently-selected routing.
1. Navigate to the Cost Rollup window. Do this by choosing Cost Rollup from the
Tools menu.

8/12/2019 BOM Uuser Guide
http://slidepdf.com/reader/full/bom-uuser-guide 142/331
3-22 Oracle Bills of Material User's Guide
2. Enter the cost type.
3. Enter the effective date and time to determine the structure of the bill of material to
use in the cost rollup. You can use this to roll up historical and future bill structures
using current rates and component costs. The default is the current date and time.
4. Indicate whether to include unimplemented engineering change orders (ECO).
5. Indicate whether to produce the Indented Bill of Material Cost Report, which lists
the detailed cost structure by level.
6. Choose OK.
See Also
Indented Bills of Material Cost Report, Oracle Cost Management User's Guide.
Creating a Standard Operation
Standard operations are commonly used operations you can define as a template for use
in defining future routing operations. If you assign the operation code of standard
operation in a routing, the standard operation information is copied into the operation
you are currently defining. You can then modify the operation information in your new
operation.
You can also create setup standard operations that are used only when setting up
machine type resources. When defining resource setup information (see: Defining
Resource Setup Information, page 1-32), you have the option of specifying the standard
operations used during changeovers.
Prerequisites
You must define at least one department before you can define a standard
operation. See: Defining a Department, page 1-14.
To create a standard operation:1.
Navigate to the Standard Operations window.
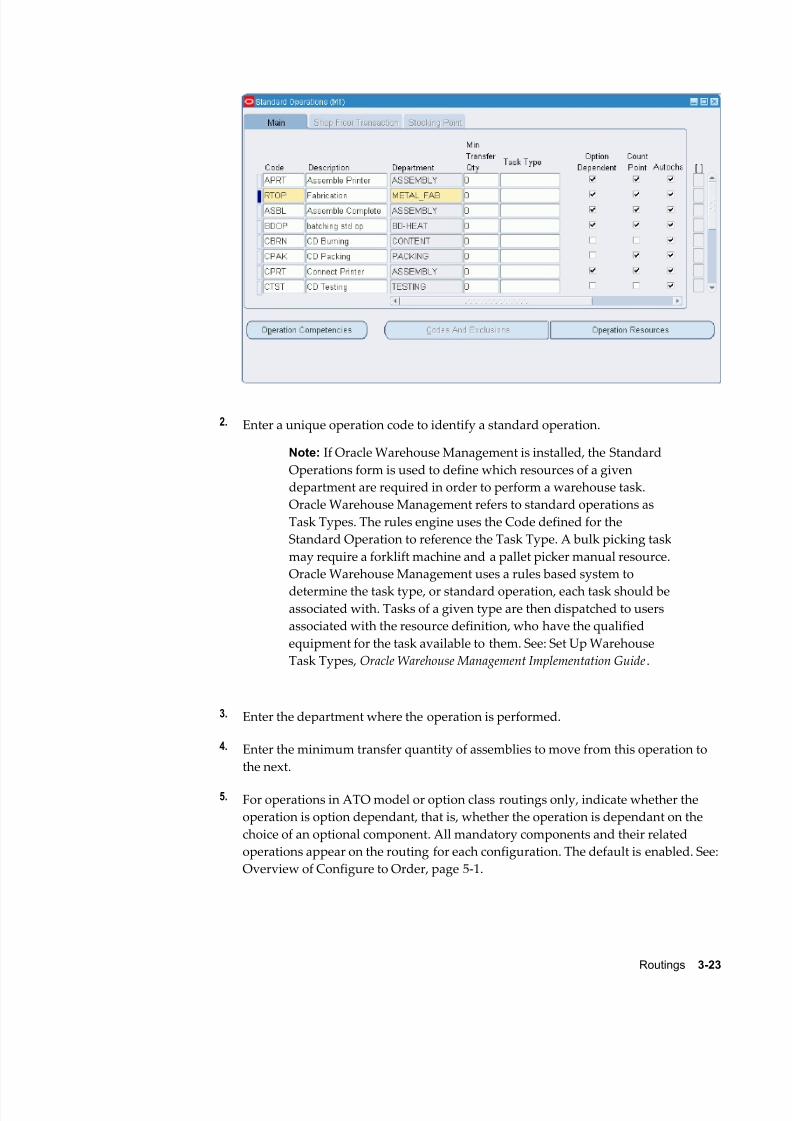
8/12/2019 BOM Uuser Guide
http://slidepdf.com/reader/full/bom-uuser-guide 143/331
Routings 3-23
2. Enter a unique operation code to identify a standard operation.
Note: If Oracle Warehouse Management is installed, the Standard
Operations form is used to define which resources of a given
department are required in order to perform a warehouse task.
Oracle Warehouse Management refers to standard operations as
Task Types. The rules engine uses the Code defined for the
Standard Operation to reference the Task Type. A bulk picking task
may require a forklift machine and a pallet picker manual resource.
Oracle Warehouse Management uses a rules based system to
determine the task type, or standard operation, each task should beassociated with. Tasks of a given type are then dispatched to users
associated with the resource definition, who have the qualified
equipment for the task available to them. See: Set Up Warehouse
Task Types, Oracle Warehouse Management Implementation Guide.
3. Enter the department where the operation is performed.
4. Enter the minimum transfer quantity of assemblies to move from this operation to
the next.
5. For operations in ATO model or option class routings only, indicate whether the
operation is option dependant, that is, whether the operation is dependant on the
choice of an optional component. All mandatory components and their related
operations appear on the routing for each configuration. The default is enabled. See:
Overview of Configure to Order, page 5-1.
8/12/2019 BOM Uuser Guide
http://slidepdf.com/reader/full/bom-uuser-guide 144/331
3-24 Oracle Bills of Material User's Guide
6. Select your Count Point and Autocharge options. See: Count Point and Autocharge,
page 3-29.
7. Indicate whether to backflush components on shop floor moves at this operation.
A backflush transaction automatically pulls Operation pull components from
inventory. Work in Process also pulls all Operation pull components atnon-backflush operations preceding this operation (through the previous
completed backflush operation.)
8. Select the Check Skill option to enable check skill.
If the Check Skill option is selected, then you have to capture the requirement for
skill check.
Tip: The value in this check box is only a default value in routing
and can be overridden in the Routing window.
9. If you are creating operations for a Shop Floor Management enabled organization,
see: To create a standard operation for a Shop Floor Management enabled
organization, page 3-22. If not, choose the Operation Resources button to assign
resources to the standard operation. See: To assign a resource to a standard
operation, page 3-22.
To create a standard operation for a Shop Floor Management enabledorganization
1. To enable operation yield in Shop Floor Management, enter the Yield for each
operation listed. The valid values range between zero and one. This field is
displayed for Shop Floor Management enabled organizations.
2. Indicate whether this operation yield needs to be considered in the cost rollup,
as required by the costing team. This field is displayed for Shop Floor
Management enabled organizations.
3. Select the Shop Floor Transaction tab and select the following fields, if
appropriate. See: Oracle Shop Floor Management User's Guide for information
about each field. This tab is enabled for Shop Floor Management enabled
organizations.
• Lowest Acceptable Yield
• Use Organization Settings
• Queue Mandatory Flag
• Run Mandatory Flag
8/12/2019 BOM Uuser Guide
http://slidepdf.com/reader/full/bom-uuser-guide 145/331
Routings 3-25
• To Move Mandatory Flag
• Show Next Operation by Default
• Show Lot Attributes
• Show Scrap Codes
4. Optionally, select the Stocking Point tab and enter the default subinventory and
locator for the standard operation.
5. Optionally, choose Codes and Exclusions to enter Bonus Codes, Scrap Codes,
and Responsibility Exclusions for a Shop Floor Management enabled
organization.
To define operation competencies for standard operations
Use the Operation Competencies window to enter the competencies required forcarrying out the operation. You can add the competency for a resource only once
and you cannot enter duplicate records in the operation competency set.
For standard operations and routing, the Check Skill option will remain unchecked
when imported. For discrete jobs created through the interface, the job operations
will have competencies and check Skill values inherited from the routing. While
adding standard operations through the interface the values for Check Skill and
competencies will be inherited from standard operation.
Competence and Skill Level are related fields. The Skill Level field is enabled if you
enter value in the Competence field and tab out and the Skill Level will have the
values relevant to that Competence.
The competencies defined in the resource definition are added to the operation by
selecting the assigned resources in the list of values and clicking the Add button.
6. Navigate to the Operation Competencies window by choosing Operation
Competencies from the Standard Operations window.
7. Create a standard operation.
8. Select the Check Skill check box.

8/12/2019 BOM Uuser Guide
http://slidepdf.com/reader/full/bom-uuser-guide 146/331
3-26 Oracle Bills of Material User's Guide
9. Click on the Operation Competencies button.
Operation Competencies button will be enabled only when you select Check
Skill check box.
The Operation Competencies window opens. Based on the Competence
selected, the skill level values for the selected competence appear in the drop
down menu of the Skill Level field.
10. Enter the skill level.
11. Enter the qualification required for the competence.
12. Save your work and close the Operation Competencies window.
See Also
Moving and Completing Assemblies, Oracle Manufacturing Execution System for
Discrete Manufacturing User's Guide
Operator Skill Validation, Oracle Manufacturing Execution System for Discrete
Manufacturing User's Guide
Adding and Updating Operations, Oracle Work in Process User's Guide
Qualification Types, Oracle HRMS Workforce Sourcing, Deployment, and Talent Management Guide
Defining Competencies, Oracle HRMS Workforce Sourcing, Deployment, and Talent
Management Guide
To enter codes and exclusions

8/12/2019 BOM Uuser Guide
http://slidepdf.com/reader/full/bom-uuser-guide 147/331
Routings 3-27
Use the Codes and Exclusions window to define the bonus and scrap codes
available for this operation at manufacturing execution time. See: Bonus and Scrap
Codes, Oracle Shop Floor Management User's Guide. This window also enables you to
exclude certain job roles from updating this operation at manufacturing execution
time. Responsibility exclusions identify job roles that cannot perform this operation.
For example, you can exclude users assigned to the Accounting responsibility fromupdating a grinding machine operation.
If you gain something or lose something at this operation, you assign either a bonus
or scrap code to it. At manufacturing execution time, use the bonus or scrap code
available for this operation. Use the responsibility to indicate who cannot perform
this operation. For example, a foreman shouldn't be able to use the grinding
machine.
13. Navigate to the Codes and Exclusions window by choosing Codes and
Exclusions from the Standard Operations window.
14. Select the Bonus Codes tab and enter the sequences and codes for this
operation.
15. Select the Scrap Codes tab and enter the sequences and codes for this operation.
16. Select the Responsibility Exclusions tab and enter the responsibilities to exclude
from updating this operation.
17. Save your work and close the Codes and Exclusions window.
To assign a resource to a standard operation
18. In the Standard Operations window, choose the Operation Resources button to
assign resources to the standard operation. See: To assign a resource to arouting operation, page 3-9.
Caution: To assign resources to the standard operation, follow
the same steps as you would to assign a resource to a routing
operation with one exception. When assigning resources to a
standard operation, the Schedule Sequence Number field in the
Resources window, Scheduling tab does not exist. If you use
the Schedule Sequence Number functionality, you must
manually update this field when adding a new operation to a
routing using the Standard Operations window.
To create a setup standard operation:
Use a setup standard operation only when specifying the standard operation used
during a changeover in the Changeover Times window. You cannot use a setup
standard operation as a routing operation. See: Defining Resource Setup Information,
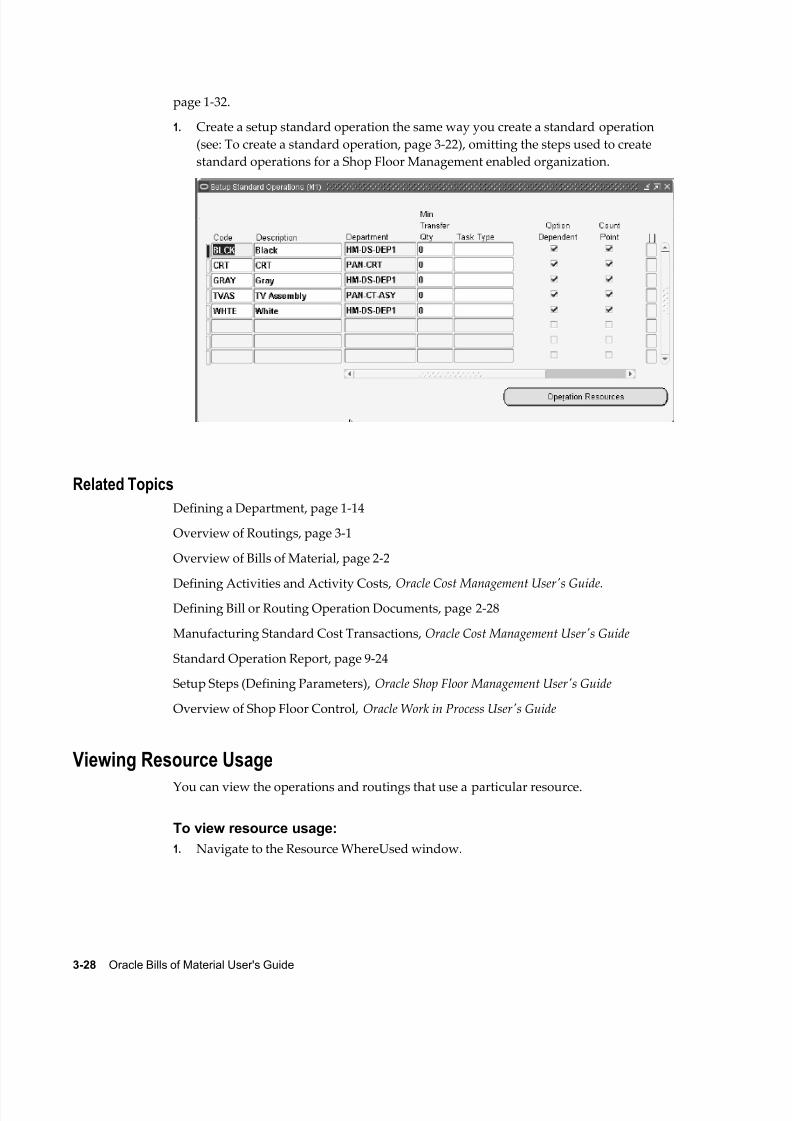
8/12/2019 BOM Uuser Guide
http://slidepdf.com/reader/full/bom-uuser-guide 148/331
3-28 Oracle Bills of Material User's Guide
page 1-32.
1. Create a setup standard operation the same way you create a standard operation
(see: To create a standard operation, page 3-22), omitting the steps used to create
standard operations for a Shop Floor Management enabled organization.
Related Topics
Defining a Department, page 1-14
Overview of Routings, page 3-1
Overview of Bills of Material, page 2-2
Defining Activities and Activity Costs, Oracle Cost Management User's Guide.Defining Bill or Routing Operation Documents, page 2-28
Manufacturing Standard Cost Transactions, Oracle Cost Management User's Guide
Standard Operation Report, page 9-24
Setup Steps (Defining Parameters), Oracle Shop Floor Management User's Guide
Overview of Shop Floor Control, Oracle Work in Process User's Guide
Viewing Resource Usage
You can view the operations and routings that use a particular resource.
To view resource usage:
1. Navigate to the Resource WhereUsed window.

8/12/2019 BOM Uuser Guide
http://slidepdf.com/reader/full/bom-uuser-guide 149/331
Routings 3-29
2. Enter the name of the resource for which to view the operation and routing usage.
3. Enter an effective date. Operation information effective on this date is displayed.
The Resource WhereUsed window contains four tabbed regions: Operation Details,
Resource Details, Descriptions, and More.
The Operation Details tabbed region displays the operation sequence, department,
the effective date range, and the routing in which the resource is used.
The Resource Details tabbed region displays the resource, the basis type, the usage
rate (or amount) and its inverse, and the number of resource units assigned.
The More tabbed region displays the resource sequence, the activity for the
resource, the scheduling type (Yes, No, Prior, Next), and whether this is an
engineering routing.
Related Topics
To assign a resource to a routing operation, page 3-9
Resource Where Used Report, page 9-21
Routings Field Reference
This section describes the use of certain major fields.

8/12/2019 BOM Uuser Guide
http://slidepdf.com/reader/full/bom-uuser-guide 150/331
3-30 Oracle Bills of Material User's Guide
Completion Subinventory and Locator Fields
In a routing, you can define the completion subinventory and locator where you store
finished assemblies upon completion. When you define a job or repetitive schedule,
Work in Process uses these values as the default, and you can change the completion
subinventory and locator if necessary. Upon completion of assemblies, the completionsubinventory and locator you defined for the job and repetitive schedule is the default,
and you can change these values if necessary.
Count Point and Autocharge Fields
You can define which operations in a routing record move transactions by defining how
resources are consumed at that operation.
The Count Point and Autocharge check boxes work together. In the following
discussion, the Count Point and Autocharge check boxes can be set to either on or off.
However, you cannot set Count Point on and Autocharge off.
When you move assemblies from an operation with Count Point on / Autocharge on
operation to another count point operation set the same way, Work in Process
automatically completes all Count Point off / Autocharge on count point operations
between them.
To transact a Count Point off / Autocharge off count point operation, you must
explicitly move assemblies into and out of that operation. Moving assemblies past a
Count Point off / Autocharge off count point operation acts as though the operation did
not exist in the routing. This is particularly useful for rework or debug operations that
are performed on a portion of the assemblies you process.
If you issue components with a supply type of Operation pull to an assembly at a Count
Point off / Autocharge off count point operation, Work in Process backflushes these
components when you move out of the Count Point off / Autocharge off count point
operation into a count point operation that allows backflushing. Work in Process never
pulls components with a supply type of Assembly pull from Count Point off/
Autocharge off count point operations. However, you must turn Backflush on for Count
Point off / Autocharge offcount point operations. The Backflush field should always be
turned on for the last operation in a routing. See: Overview of Shop Floor Control,
Overview of Shop Floor Control.
In the following example, the routing has five operations. The second and fourth
operations are not count points, and you must explicitly move units in and out of the
fourth operation if you want to charge the job or repetitive schedule for the consumed
resources.
The following table presents an example of count point operations.
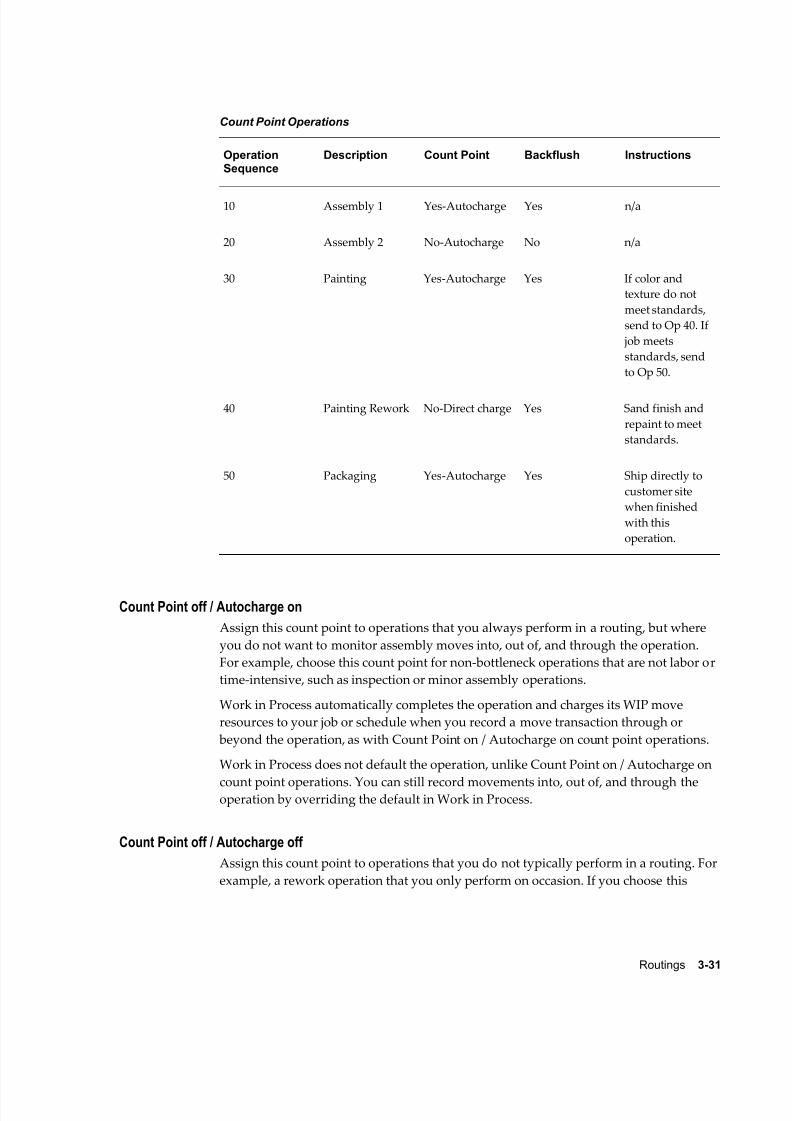
8/12/2019 BOM Uuser Guide
http://slidepdf.com/reader/full/bom-uuser-guide 151/331
Routings 3-31
Count Point Operations
OperationSequence
Description Count Point Backflush Instructions
10 Assembly 1 Yes-Autocharge Yes n/a
20 Assembly 2 No-Autocharge No n/a
30 Painting Yes-Autocharge Yes If color and
texture do not
meet standards,
send to Op 40. If
job meets
standards, send
to Op 50.
40 Painting Rework No-Direct charge Yes Sand finish and
repaint to meet
standards.
50 Packaging Yes-Autocharge Yes Ship directly to
customer site
when finished
with this
operation.
Count Point off / Autocharge on
Assign this count point to operations that you always perform in a routing, but where
you do not want to monitor assembly moves into, out of, and through the operation.
For example, choose this count point for non-bottleneck operations that are not labor or
time-intensive, such as inspection or minor assembly operations.
Work in Process automatically completes the operation and charges its WIP move
resources to your job or schedule when you record a move transaction through or
beyond the operation, as with Count Point on / Autocharge on count point operations.
Work in Process does not default the operation, unlike Count Point on / Autocharge on
count point operations. You can still record movements into, out of, and through theoperation by overriding the default in Work in Process.
Count Point off / Autocharge off
Assign this count point to operations that you do not typically perform in a routing. For
example, a rework operation that you only perform on occasion. If you choose this

8/12/2019 BOM Uuser Guide
http://slidepdf.com/reader/full/bom-uuser-guide 152/331

8/12/2019 BOM Uuser Guide
http://slidepdf.com/reader/full/bom-uuser-guide 153/331
Routings 3-33
• Manual: Work in Process does not automatically charge this type of resource to a
job or repetitive schedule. You must manually charge it to a job or repetitive
schedule using Work in Process.
• PO Receipt: Automatically charge this resource upon receipt of a purchase order in
Oracle Purchasing. The assemblies are not automatically moved to the next
operation upon receipt, so you must manually move them using Work in Process.
• PO Move: Automatically charge this resource upon receipt of a purchase order in
Oracle Purchasing and move the assemblies to the Queue intraoperation step of the
next operation, or to the To move intraoperation step if this is the last operation.
• WIP Move: Work in Process automatically charges this type of resource to a job or
repetitive schedule when you complete an operation.
Related Topics
Assembly Completions and Returns, Oracle Work in Process User's Guide
Overview of Routings, page 3-1
Overview of Shop Floor Control, Oracle Work in Process User's Guide

8/12/2019 BOM Uuser Guide
http://slidepdf.com/reader/full/bom-uuser-guide 154/331

8/12/2019 BOM Uuser Guide
http://slidepdf.com/reader/full/bom-uuser-guide 155/331
Deleting Information 4-1
4Deleting Information
This chapter tells you everything you need to know to delete item, bill, and routing
information.
This chapter covers the following topics:
• Deleting Items, Bills, Routings, Components, and Operations
• Deletion Constraints and Statements
Deleting Items, Bills, Routings, Components, and Operations
Set up groups of entities to check, delete and optionally archive. Entities can include
items, bills of material, components, routings, or operations.
What entities you can delete depends on what Oracle application you are currently
using and what applications you have installed.
• if you are using Oracle Bills of Material, you can delete only bills, routings,
components, and operations
• if you are using Oracle Engineering, you can delete any engineering entity except
ECOs
• if you are using Oracle Inventory and you do not have Bills of Material installed,
you can only delete manufacturing items
• if you are using Inventory and you do have Bills of Material installed, you can
delete only items, bills, and routings
Deleting physically removes information from the database tables. Deleted bill or
routing information can be archived to database tables. (You cannot archive item-level
information.) You can then write custom programs to report on the archived data.
Summary information is saved for all deletion groups. You can report on deletion
groups.
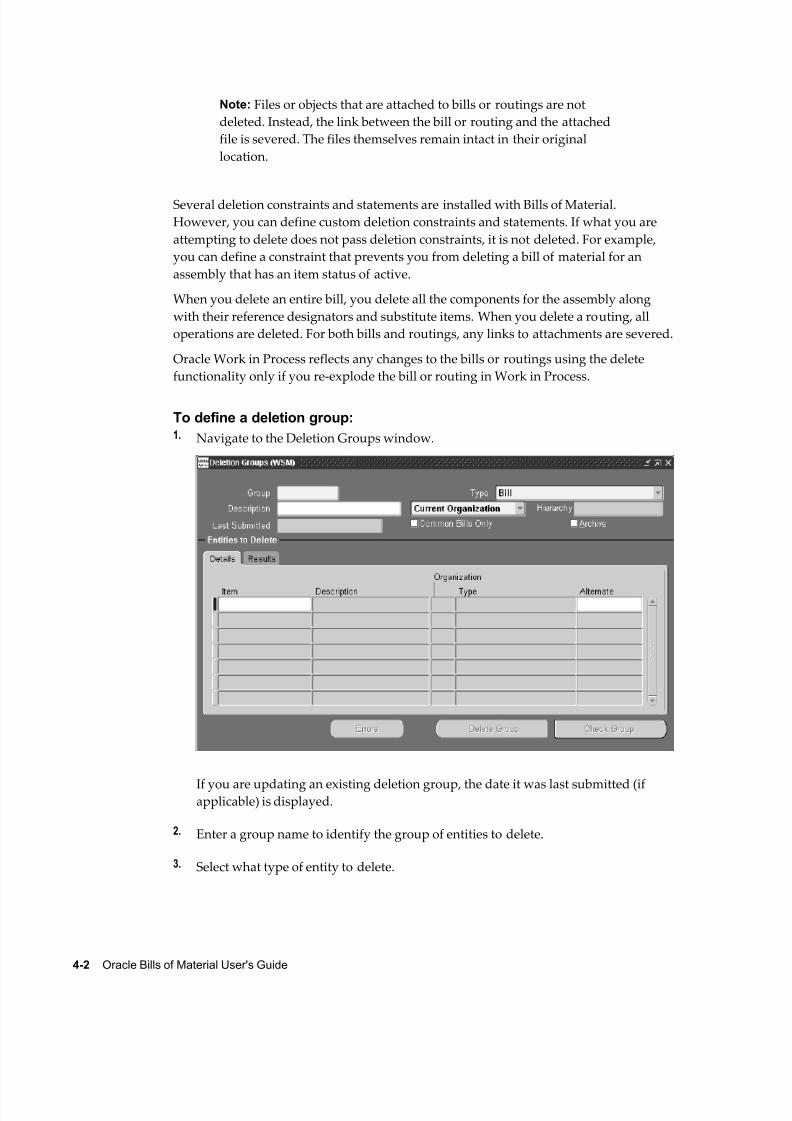
8/12/2019 BOM Uuser Guide
http://slidepdf.com/reader/full/bom-uuser-guide 156/331
4-2 Oracle Bills of Material User's Guide
Note: Files or objects that are attached to bills or routings are not
deleted. Instead, the link between the bill or routing and the attached
file is severed. The files themselves remain intact in their original
location.
Several deletion constraints and statements are installed with Bills of Material.
However, you can define custom deletion constraints and statements. If what you are
attempting to delete does not pass deletion constraints, it is not deleted. For example,
you can define a constraint that prevents you from deleting a bill of material for an
assembly that has an item status of active.
When you delete an entire bill, you delete all the components for the assembly along
with their reference designators and substitute items. When you delete a routing, all
operations are deleted. For both bills and routings, any links to attachments are severed.
Oracle Work in Process reflects any changes to the bills or routings using the delete
functionality only if you re-explode the bill or routing in Work in Process.
To define a deletion group:1. Navigate to the Deletion Groups window.
If you are updating an existing deletion group, the date it was last submitted (ifapplicable) is displayed.
2. Enter a group name to identify the group of entities to delete.
3. Select what type of entity to delete.

8/12/2019 BOM Uuser Guide
http://slidepdf.com/reader/full/bom-uuser-guide 157/331
Deleting Information 4-3
Note: If the type of entity to delete is a bill, then the checkbox,
Common Bills Only, is enabled. If you check this box, only bills
referencing the specified bill entities are considered for deletion. If
you do not check this box, then both bills referencing the specified
bill entities and non-specified bill entities are considered for
deletion.
4. Indicate whether to create a delete group for the current organization, an
organization hierarchy, or all organizations.
Note: Create a delete group for the current organization by
specifying the entities (Item, Bill, Routing) and subentities
(Component, Routing) to be deleted. You can enter an organization
hierarchy name while creating the delete group for the current
organization. In this case, processing is done for all subordinate
organizations in the chosen organization hierarchy. You can create
a delete group for all organizations. In this case, processing is donefor all organizations having the same item master organization as
the current organization.
5. Indicate whether to archive the deleted entities in the archive tables.
Note: You can archive bill and routing information, but not item
information. The option to archive is not available if you are
deleting only items.
6.Enter the item, bill, or routing to delete, or from which to delete components or
operations.
The Details tabbed region displays the organization the entity belongs to, its type,
and the alternate (if applicable). The Effectivity tabbed region displays the effective
date range. See: Effective Date Fields, page 2-39.
The Results tabbed region displays the delete status and the date of deletion (if
applicable).
7. To delete an alternate bill or routing, enter the alternate.
8. If you are deleting components, choose the Components button; if you are deleting
operations, enter the Operations button.
9. When finished, choose either the Delete Group button or the Check Group button.

8/12/2019 BOM Uuser Guide
http://slidepdf.com/reader/full/bom-uuser-guide 158/331
4-4 Oracle Bills of Material User's Guide
To specify components to delete:1. Navigate to the Components window. Do this by choosing the Components button
from the Deletion Groups window.
2.
Enter a component item to delete.The Results tabbed region displays the status as Error, Check OK, or Deleted. A
status of Pending indicates the delete program has not run yet. The Effectivity
tabbed region displays the effective date range of the component. See: Effective
Date Fields, page 2-39.
If the status is listed as Error, choose the Error button to review why the deletion
failed.
To specify operations to delete:1. Navigate to the Operations window. Do this by choosing the Operations button
from the Deletion Groups window.
2. Enter the operation sequence to delete.
The Results tabbed region displays the status as Error, Check OK, or Deleted. A
status of Pending indicates the delete program has not run yet. The Effectivity
tabbed region displays the effective date range of the operation. See: Effective Date
Fields, page 2-39.
If the status is listed as Error, choose the Error button to review why the deletion
failed.
To check entities for deletion:
Note: If you perform a check on the item, bill, and routing, the check
program will return an Error status for the item. This simply indicates
that the item's bill or routing still exists. In this case, disregard the Error
status for the item.
1. Choose the Check Group button to verify whether any deletion constraints are
violated.
The delete concurrent program updates the entity's status to Error, or Check OK. A
status of Pending indicates the delete program has not run yet.
To submit entities for deletion:
1. Choose the Delete Group button to submit the delete concurrent program.
The delete concurrent program first performs a check for all the entities listed for

8/12/2019 BOM Uuser Guide
http://slidepdf.com/reader/full/bom-uuser-guide 159/331
Deleting Information 4-5
deletion. Once the check succeeds, the entities are deleted.
The delete concurrent program updates the entity's status to Error, Check OK, or
Deleted. A status of Pending indicates the delete program has not run yet.
Note: You can subscribe to an Oracle Workflow success or failure
business event for item, structure, or component deletions inaddition to verifying entity deletion from the Deletion Groups
window. These workflow events tell you if an entity is successfully
deleted or if there is an error associated with the deletion. You can
also find out if an item is marked for deletion. See: Modifying
Components and Bills, page 2-29.
To review errors:
1. Choose the Errors button to see why the entity could not be deleted. Do this from
either the Components, Operations, or Delete Groups windows.
2. Choose the View Constraint button or the drill down indicator to see the violated
deletion constraint.
To delete components and operations:
You can delete components from the Bills of Material or operations from the Routings
window.
1. Navigate to either the Bills of Material or Routings windows.
2. Do one of the following:
• If deleting a component, select a component.
• If deleting an operation, select an operation.
3. Choose either the Delete Record icon, or Delete from the Edit menu.
The Delete Component or Delete Operation window appears. A default value for
the delete group name may appear, depending upon the last entity deleted.
4. Do one of the following:
• accept the default delete group name
• select or enter an existing delete group name
• enter a new delete group name
5. If you are entering a new delete group name, enter a description for the group.

8/12/2019 BOM Uuser Guide
http://slidepdf.com/reader/full/bom-uuser-guide 160/331
4-6 Oracle Bills of Material User's Guide
6. Choose OK.
7. Navigate to the Delete Groups window and run the Delete Group concurrent
process.
Note: Components and operations are not assigned to the delete
group until you save the bill or routing. If you do not save the billor routing, components and operations are not assigned to the
delete group.
Related Topics
Deletion Constraints and Statements, page 4-6
Creating Custom Deletion Statements and Constraints, page 1-11
To delete components and operations, page 4-1
Delete Items Report, page 9-14
Creating Organization Hierarchies, Oracle HRMS-The Fundamentals
Item Deletion, Oracle Inventory User's Guide
Deletion Constraints and Statements
Predefined constraints for deleting bills of material or routings are as follows:
• a primary bill if an alternate exists
• a bill if it is used as a common in another bill
• a bill if a repetitive schedule references the bill
• a bill if a discrete job references the bill
• a bill if any sales orders are open for the parent item
• a bill if any demand exists for the parent item
• a model bill if any configuration items exist for the model
• an option class bill if it is a component of another bill
• a primary routing if an alternate exists
• a routing if it is used as a common routing

8/12/2019 BOM Uuser Guide
http://slidepdf.com/reader/full/bom-uuser-guide 161/331

8/12/2019 BOM Uuser Guide
http://slidepdf.com/reader/full/bom-uuser-guide 162/331

8/12/2019 BOM Uuser Guide
http://slidepdf.com/reader/full/bom-uuser-guide 163/331
Configure to Order 5-1
5Configure to Order
This chapter provides an overview of how to use the configure-to-order features within
Oracle Bills of Material.
This chapter covers the following topics:
• Overview of Configure To Order
• Overview of Model and Option Class Bills of Material
• AutoCreate Configuration Items
• Deactivating Configuration Items
Overview of Configure To Order
Oracle Manufacturing enables you to define options available for products and to
process orders for unique product configurations while maintaining control of
inventory, planning, and cost accounting.
A Configure to Order environment is one where the product or service is assembled or
kitted on receipt of the sales order. Oracle Applications supports the Configure to Order
environment with a range of features in order entry, demand forecasting, master
scheduling, production, shipping, and financial accounting.
Configure to Order:
• includes Pick-to-Order (PTO) and Assemble-to-Order (ATO) items, models, and
hybrids.
• supports building configurations using other configurations as sub-assemblies
(multi-level configure-to-order)
• supports internal and external sourcing of ATO models at any level in the BOM
• supports multi-level PTO/ATO hybrids

8/12/2019 BOM Uuser Guide
http://slidepdf.com/reader/full/bom-uuser-guide 164/331
8/12/2019 BOM Uuser Guide
http://slidepdf.com/reader/full/bom-uuser-guide 165/331
Configure to Order 5-3
Pick-to-Order Model (PTO Configuration):
• Model bill of material with optional items and option selection rules
• Pick slip used to kit included items and selected options
Pick-to-Order Item (Kit):• Standard bill of material with mandatory included items
• Pick slip used to kit included items
Hybrid:
• Pick-to-Order models with optional Assemble-to-Order items
• Pick-to-Order model containing Assemble-to-Order model
Multi-Level Assemble-to-Order Model (Multi-Level ATO Configuration):
• A model bill of material with a non-phantom model as a component
• Configuration manufactured from mandatory components selected options,
configured sub-assemblies, or purchased from a supplier.
Multi-Level Assemble-to-Order Items:
• Standard bill of material with standard components and configured components
• Item manufactured from standard components and configured components
Multi-Organization Assemble-to-Order Model(Multi-Organization ATO):
• An ATO model which will be transferred from another organization
BOM Support for CTO
• Support assemble-to-order (ATO), pick-to-order (PTO), buy to order (BTO) and
hybrid (PTO/ATO, ATO/ATO) product structures
• Support for Multi-level ATO, PTO, and BTO multi-level ATO hybrid structures,
which enables building configured items having other configured items as
sub-assemblies
• Planning support for complex configurations where lower level configurations are
sourced across the supply chain
• Mandatory and mutually exclusive option selection rules
• Option dependent routings

8/12/2019 BOM Uuser Guide
http://slidepdf.com/reader/full/bom-uuser-guide 166/331
5-4 Oracle Bills of Material User's Guide
• Define sourcing rule for models and options at any level in the BOM
Overview of Model and Option Class Bills of Material
Oracle Manufacturing enables you to define integrated multilevel bills that contain
planning bills, model and option class bills, as well as standard product and
subassembly bills.
The following table is an example of an indented planning bill of material:
Indented Planning Bill of Material
Level Item Item Type Optional Planning % Qty
1 Training
Computer
Planning n/a n/a 1
. 2 . Laptop
Computer
ATO Model No 60% 1
. . 3 . . Carrying
Case
Product No 100% 1
. . 3 . . Keyboard Product No 100% 1
. . 3 . . CPU ATO Option
Class
No 100% 1
. . . 4 . . . 386
Processor
Purchased
Item
Yes 65% 1
. . . 4 . . . 486
Processor
Purchased
Item
Yes 35% 1
. . 3 . . Monitor ATO Option
Class
No 100% 1
. . . 4 . . . VGA ATO Option
Class
Yes 70% 1
. . . . 5 . . . . VGA
Manual
Purchased
Item
No 100% 1
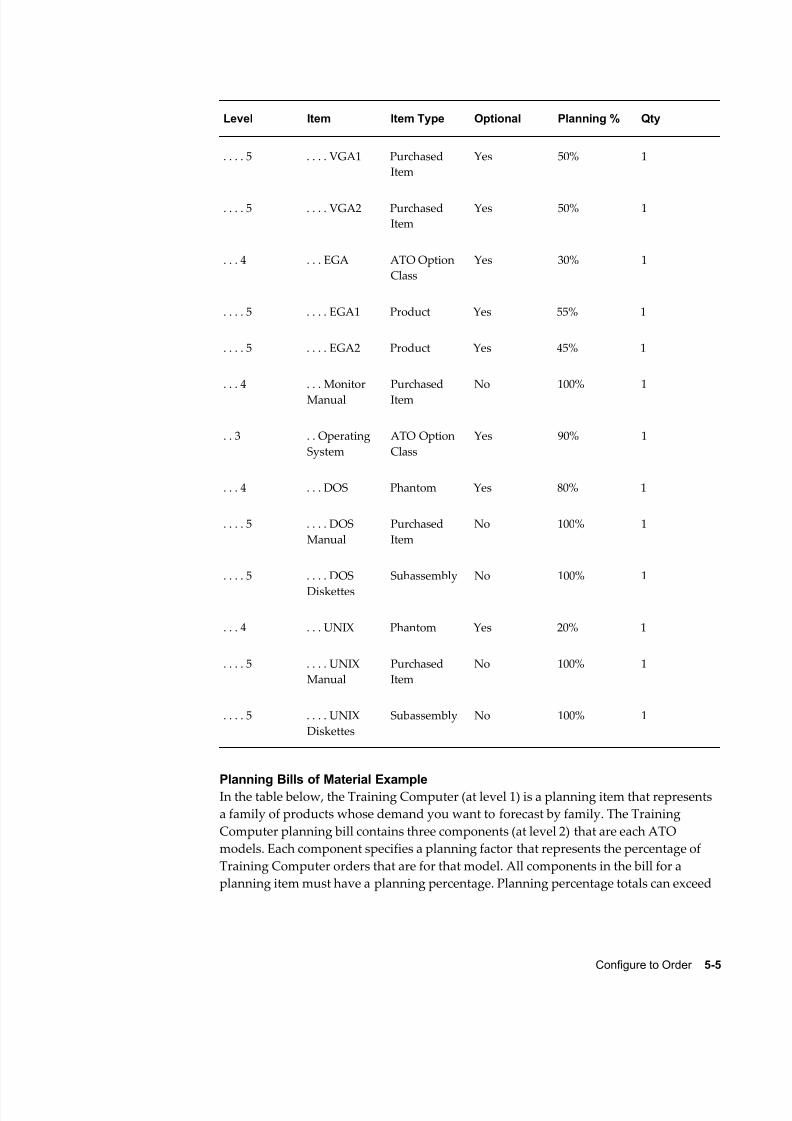
8/12/2019 BOM Uuser Guide
http://slidepdf.com/reader/full/bom-uuser-guide 167/331
Configure to Order 5-5
Level Item Item Type Optional Planning % Qty
. . . . 5 . . . . VGA1 Purchased
Item
Yes 50% 1
. . . . 5 . . . . VGA2 Purchased
Item
Yes 50% 1
. . . 4 . . . EGA ATO Option
Class
Yes 30% 1
. . . . 5 . . . . EGA1 Product Yes 55% 1
. . . . 5 . . . . EGA2 Product Yes 45% 1
. . . 4 . . . Monitor
Manual
Purchased
Item
No 100% 1
. . 3 . . Operating
System
ATO Option
Class
Yes 90% 1
. . . 4 . . . DOS Phantom Yes 80% 1
. . . . 5 . . . . DOS
Manual
Purchased
Item
No 100% 1
. . . . 5 . . . . DOS
Diskettes
Subassembly No 100% 1
. . . 4 . . . UNIX Phantom Yes 20% 1
. . . . 5 . . . . UNIX
Manual
Purchased
Item
No 100% 1
. . . . 5 . . . . UNIX
Diskettes
Subassembly No 100% 1
Planning Bills of Material ExampleIn the table below, the Training Computer (at level 1) is a planning item that represents
a family of products whose demand you want to forecast by family. The Training
Computer planning bill contains three components (at level 2) that are each ATO
models. Each component specifies a planning factor that represents the percentage of
Training Computer orders that are for that model. All components in the bill for a
planning item must have a planning percentage. Planning percentage totals can exceed

8/12/2019 BOM Uuser Guide
http://slidepdf.com/reader/full/bom-uuser-guide 168/331
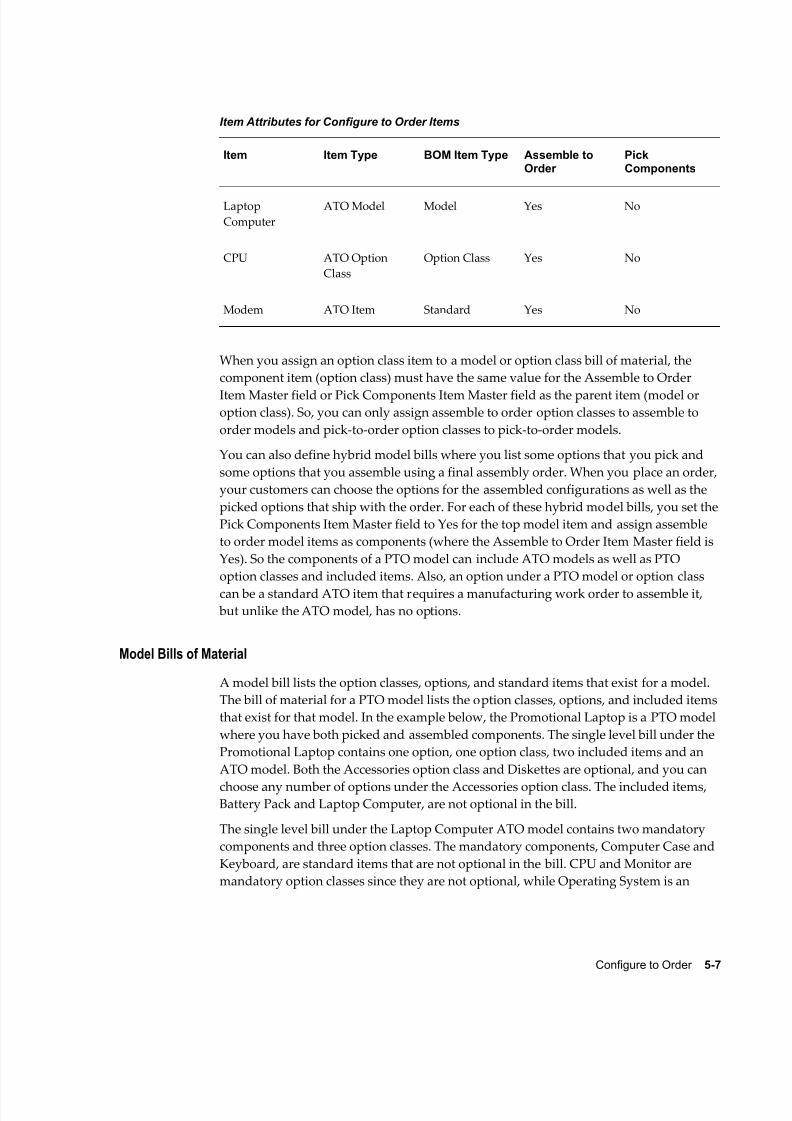
8/12/2019 BOM Uuser Guide
http://slidepdf.com/reader/full/bom-uuser-guide 169/331
Configure to Order 5-7
Item Attributes for Configure to Order Items
Item Item Type BOM Item Type Assemble toOrder
PickComponents
Laptop
Computer
ATO Model Model Yes No
CPU ATO Option
Class
Option Class Yes No
Modem ATO Item Standard Yes No
When you assign an option class item to a model or option class bill of material, the
component item (option class) must have the same value for the Assemble to Order
Item Master field or Pick Components Item Master field as the parent item (model oroption class). So, you can only assign assemble to order option classes to assemble to
order models and pick-to-order option classes to pick-to-order models.
You can also define hybrid model bills where you list some options that you pick and
some options that you assemble using a final assembly order. When you place an order,
your customers can choose the options for the assembled configurations as well as the
picked options that ship with the order. For each of these hybrid model bills, you set the
Pick Components Item Master field to Yes for the top model item and assign assemble
to order model items as components (where the Assemble to Order Item Master field is
Yes). So the components of a PTO model can include ATO models as well as PTO
option classes and included items. Also, an option under a PTO model or option class
can be a standard ATO item that requires a manufacturing work order to assemble it,
but unlike the ATO model, has no options.
Model Bills of Material
A model bill lists the option classes, options, and standard items that exist for a model.
The bill of material for a PTO model lists the option classes, options, and included items
that exist for that model. In the example below, the Promotional Laptop is a PTO model
where you have both picked and assembled components. The single level bill under the
Promotional Laptop contains one option, one option class, two included items and an
ATO model. Both the Accessories option class and Diskettes are optional, and you can
choose any number of options under the Accessories option class. The included items,Battery Pack and Laptop Computer, are not optional in the bill.
The single level bill under the Laptop Computer ATO model contains two mandatory
components and three option classes. The mandatory components, Computer Case and
Keyboard, are standard items that are not optional in the bill. CPU and Monitor are
mandatory option classes since they are not optional, while Operating System is an

8/12/2019 BOM Uuser Guide
http://slidepdf.com/reader/full/bom-uuser-guide 170/331
5-8 Oracle Bills of Material User's Guide
optional option class. You must choose at least one option under mandatory option
classes. CPU and Operating System option classes are mutually exclusive which means
you can only choose a single option under each. However, you can choose any number
of Monitors.
The following table presents an example of a model bill of material:
Indented Bill for Promotional Laptop
Level Item Item Type Optional Planning % MutuallyExclusive
1 Promotional
Laptop
PTO Model n/a n/a n/a
.2 . Battery Pack Kit No 100% n/a
.2 . Accessories PTO OptionClass
Yes 40% No
.2 . Diskettes Purchased
Item
Yes 95% n/a
.2 . Laptop
Computer
ATO Model No 100% n/a
. 2 . Laptop
Computer
ATO Model n/a 60% n/a
. . 3 . . Carrying
Case
Product No 100% n/a
. . 3 . . Keyboard Product No 100% n/a
. . 3 . . CPU ATO Option
Class
No 100% Yes
. . 3 . . Monitor ATO Option
Class
No 100% No
. . 3 . . Operating
System
ATO Option
Class
Yes 90% Yes
When you place an order for the Promotional Laptop, you choose from the list of
options (Diskettes, Accessories options) and from the list of options under the Laptop

8/12/2019 BOM Uuser Guide
http://slidepdf.com/reader/full/bom-uuser-guide 171/331
Configure to Order 5-9
Computer bill of material, such as DOS, VGA1 and 386 Processor. As described earlier,
you open a work order or flow schedule for the Laptop Computer configuration.
Order Management then includes the completed Laptop Computer configuration on the
sales order pick slip for the Promotional Computer configuration, along with any other
chosen options and included items. See: Mutually Exclusive and Optional Fields, page
2-39.
Option Class Bills of Material
Option class bills can contain standard components, options, as well as other option
classes. Oracle Manufacturing lets you structure any number of levels of option classes
within option classes so you can create an indented hierarchy of choices. You can also
specify a mandatory component under any option class in the indented structure that
would automatically be included anytime you choose an option from that option class
(or a lower level option class).
In the example below, the indented Promotional Computer (exploded to three levels)
contains one option class at level 2 (Accessories) and three option classes (CPU,Monitor, and Operating System) in its structure at level three. The Accessories option
class has one included item (Peripherals Guide) and three options, Mouse, LaserPrinter,
and Scanner. When you place an order for the Promotional Laptop, you can choose as
many options as you like (or no options) from the Accessories option class. If you
choose at least one option, you automatically include the Peripherals Guide for the
order.
The Laptop Computer bill contains three option classes at level 3 and the Monitor
option class has two option classes (VGA and EGA) in its structure at level 4. The
Monitor option class has a mandatory component (Monitor Manual) that is included for
any monitor choice. The VGA option class has a mandatory component (VGA Manual)
that is included if you choose VGA1 or VGA2.
The following table presents a BOM with multiple layers of option classes:
Indented Bill of Material for Promotional Laptop
Level Item Item Type Optional Planning % MutuallyExclusive
1 Promotional
Laptop
PTO Model n/a n/a n/a
.2 . Battery Pack Kit No 100% n/a
.2 . Accessories PTO Option
Class
Yes 40% No
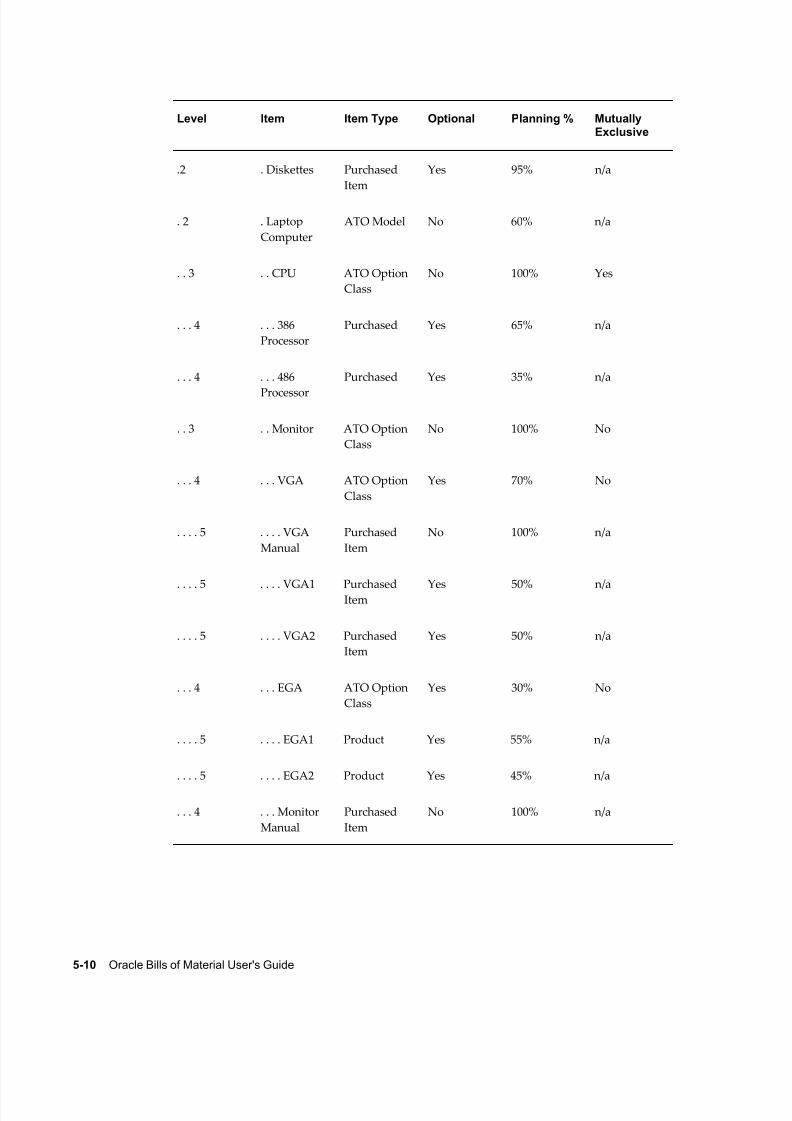
8/12/2019 BOM Uuser Guide
http://slidepdf.com/reader/full/bom-uuser-guide 172/331
5-10 Oracle Bills of Material User's Guide
Level Item Item Type Optional Planning % MutuallyExclusive
.2 . Diskettes Purchased
Item
Yes 95% n/a
. 2 . Laptop
Computer
ATO Model No 60% n/a
. . 3 . . CPU ATO Option
Class
No 100% Yes
. . . 4 . . . 386
Processor
Purchased Yes 65% n/a
. . . 4 . . . 486
Processor
Purchased Yes 35% n/a
. . 3 . . Monitor ATO Option
Class
No 100% No
. . . 4 . . . VGA ATO Option
Class
Yes 70% No
. . . . 5 . . . . VGA
Manual
Purchased
Item
No 100% n/a
. . . . 5 . . . . VGA1 PurchasedItem Yes 50% n/a
. . . . 5 . . . . VGA2 Purchased
Item
Yes 50% n/a
. . . 4 . . . EGA ATO Option
Class
Yes 30% No
. . . . 5 . . . . EGA1 Product Yes 55% n/a
. . . . 5 . . . . EGA2 Product Yes 45% n/a
. . . 4 . . . Monitor
Manual
Purchased
Item
No 100% n/a

8/12/2019 BOM Uuser Guide
http://slidepdf.com/reader/full/bom-uuser-guide 173/331
Configure to Order 5-11
Level Item Item Type Optional Planning % MutuallyExclusive
. . 3 . . Operating
System
ATO Option
Class
Yes 90% Yes
. . . 4 . . . DOS Phantom Yes 80% n/a
. . . 4 . . . UNIX Phantom Yes 20% n/a
Multi-Level Bills of Material
A model item can be a component of another model assembly. If you specify any
supply type other than phantom for the lower level models, they will be treated as
sub-assemblies during the AutoCreate Configuration process.
In the example above, change the monitor to a Model instead of an option class. Give it
a BOM supply type other than phantom. When you place an order for a Promotional
Laptop, you choose from the same list of options as you would in the original example.
However, now a new configuration item, BOM, and routing is created for both the
Laptop Computer and the Monitor.
Note: If the Monitor is a model with a BOM supply type of phantom, it
will be treated like an option class.
Multi-Organization Bills of MaterialAny non-phantom model can be sourced from any organization or from a supplier. In a
multilevel structure, this means that the sub-models can be made in an organization
other than the parent. To set up the BOM correctly in this environment, create the BOM
and routing for each model in its manufacturing organization.
In the example above, the Laptop Model BOM and Routing may be created in the
Seattle organization, while the Monitor Model BOM and Routing may be created in the
Chicago organization. Each would have its corresponding option class and standard
bills under the model.
If you are purchasing a configuration, set up the model BOM in the receiving
organization.As with standard items, sourcing rules are used to find the organization where the
sub-assembly is manufactured.
Standard Bills of Material
Standard bills are bills of material for manufactured products, kits, subassemblies,

8/12/2019 BOM Uuser Guide
http://slidepdf.com/reader/full/bom-uuser-guide 174/331
5-12 Oracle Bills of Material User's Guide
phantoms, or purchased assemblies. Standard bills appear at the bottom levels of the
indented structure.
In the example below, the DOS option in the model bill for the Laptop Computer is a
phantom item whose bill contains DOS Manual and DOS Diskettes. Each time you
order a Laptop Computer and choose the DOS option, your configured bill will contain
the DOS phantom item. Oracle Work in Process automatically explodes through therequirement for DOS to its components, DOS Diskettes and DOS Manual, since the DOS
option is a phantom item. DOS Diskettes is a subassembly, so it also has a standard bill
of material although it is not shown below.
The following table presents a model bill of material with a standard bill of material
underneath it:
Model Bill of Material with Standard Bill Underneath
Level Item Item Type Optional Supply Type Qty
. 2 . Laptop
Computer
ATO Model No n/a 1
. . 3 . . Operating
System
ATO Option
Class
Yes n/a 1
. . . 4 . . . DOS Phantom Yes n/a 1
. . . . 5 . . . . DOS
Manual
Purchased
Item
No Assembly
Pull
1
. . . . 5 . . . . DOS
Diskettes
Subassembly No Assembly
Pull
1
Option Quantity Ranges
For each option, you can specify a quantity range that limits the quantity of the option
you can order during Order Management. In the example below, you can order only
one CPU and Operating System but you can order up to 10 VGA1 or VGA2 monitors
and up to 20 EGA1 or EGA2 monitors.
The following table presents an example option quantity range for a laptop computer:

8/12/2019 BOM Uuser Guide
http://slidepdf.com/reader/full/bom-uuser-guide 175/331

8/12/2019 BOM Uuser Guide
http://slidepdf.com/reader/full/bom-uuser-guide 176/331
5-14 Oracle Bills of Material User's Guide
Level Item Item Type Optional Min Qty Max Qty
. . 3 . . Monitor ATO Option
Class
No n/a n/a
. . . 4 . . . VGA ATO Option
Class
Yes n/a n/a
. . . . 5 . . . . VGA1 Purchased
Item
Yes 1 10
. . . . 5 . . . . VGA2 Purchased
Item
Yes 1 10
Basis Option Class
You can define a basis of option class for PTO Option Class items. This means Order
Management prevents you from modifying the extended order quantity of the option
class item. You can still modify the extended quantity of the options below the PTO
Option Class.
In the example below, basis is set to Option Class for the Accessories option class item,
and the extended order quantity for the option class is 3. You cannot modify the
extended order quantity for the Accessories option class. You can, however, modify the
extended order quantity for any of the options below the accessories option class
(Mouse, LaserPrinter, and Scanner). The Peripherals Guide included item's extended
quantity is based on the extended order quantity of the option class, so this quantity
cannot be changed by modifying the accessories option class.
The following table presents an example of a basis set to Option Class:
Level Item Item Type Basis Qty QtyOrdered
ExtendQty
1 Promotion
al Laptop
PTO Model n/a 1 3 3
. 2 .
Accessories
PTO
OptionClass
None 1 n/a 3
. . 3 . . Mouse Option Option
Class
1 n/a 3

8/12/2019 BOM Uuser Guide
http://slidepdf.com/reader/full/bom-uuser-guide 177/331
Configure to Order 5-15
Level Item Item Type Basis Qty QtyOrdered
ExtendQty
. . 3 . .
LaserPrinte
r
Option n/a 1 n/a 3
. . 3 . . Scanner Option n/a 1 n/a 3
. . 3 . .
Peripherals
Guide
Included
Item
n/a 1 n/a 3
ATP Check Controls
Oracle Manufacturing lets you specify the components in model and option class billsof material for which you want to check Available to Promise before scheduling a ship
date for a configuration. Oracle Manufacturing lets you specify for each item in the item
master whether you must check ATP for that item itself and whether the item has bill of
material components that require an ATP check.
For example, you might need to check ATP for the keyboard and CPU each time you
order a Laptop Computer configuration but the supply of all other components is not
constrained. In that case, you would set the ATP Components Item Master field to Yes
for the Laptop Computer and the CPU option class, and you would set the Check ATP
Item Master field to Yes for the Keyboard and CPUs. That way, when you order a
Laptop Computer and choose a 486 Processor, Oracle Order Management performs an
ATP check for each component in the Laptop Computer bill where Check ComponentATP is set to Yes (Keyboard only) and it would check ATP for the 486 Processor since
that option was selected.
Note: If the Check ATP item master field is set to Yes, you can change
this value when you create a bill of material. If the Check ATP is set to
No, it cannot be updated when you create the bill.
Note: ATP Check is based on the results of your planning input. See:
Planning Process, Oracle Advanced Supply Chain Planning User's Guide.
The following table presents an example of ATP check control:
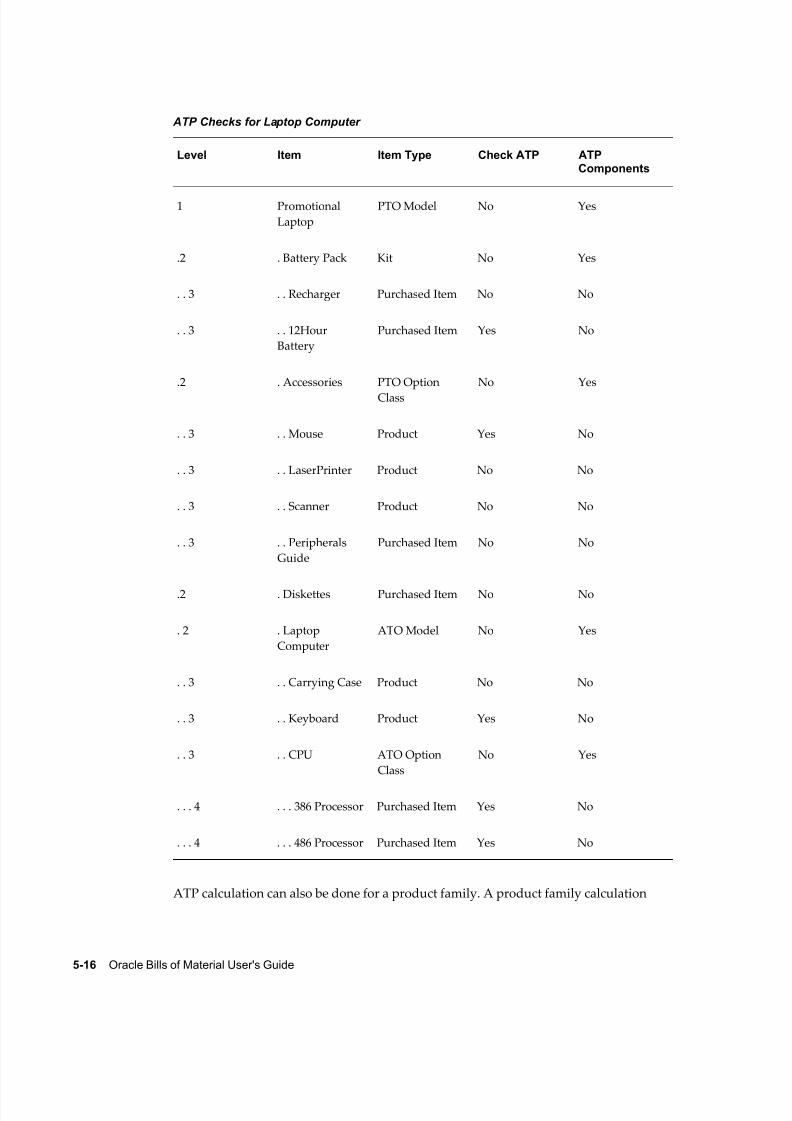
8/12/2019 BOM Uuser Guide
http://slidepdf.com/reader/full/bom-uuser-guide 178/331
5-16 Oracle Bills of Material User's Guide
ATP Checks for Laptop Computer
Level Item Item Type Check ATP ATPComponents
1 Promotional
Laptop
PTO Model No Yes
.2 . Battery Pack Kit No Yes
. . 3 . . Recharger Purchased Item No No
. . 3 . . 12Hour
Battery
Purchased Item Yes No
.2 . Accessories PTO Option
Class
No Yes
. . 3 . . Mouse Product Yes No
. . 3 . . LaserPrinter Product No No
. . 3 . . Scanner Product No No
. . 3 . . Peripherals
Guide
Purchased Item No No
.2 . Diskettes Purchased Item No No
. 2 . Laptop
Computer
ATO Model No Yes
. . 3 . . Carrying Case Product No No
. . 3 . . Keyboard Product Yes No
. . 3 . . CPU ATO Option
Class
No Yes
. . . 4 . . . 386 Processor Purchased Item Yes No
. . . 4 . . . 486 Processor Purchased Item Yes No
ATP calculation can also be done for a product family. A product family calculation

8/12/2019 BOM Uuser Guide
http://slidepdf.com/reader/full/bom-uuser-guide 179/331
Configure to Order 5-17
takes into account demand and supply for individual items that are members of the
product family.
Oracle supports multiple levels of ATP check components. For example, a standard
component of a model could contain a phantom item with ATP check components in its
bill. In that case, you would set the ATP Components Item Master field to Yes for both
the model and the phantom item. That way, Order Management knows to continueexploding the bill through the phantom item looking for components to include in the
group ATP check for the configuration.
Note: Multi-level, multi-organization environments require that ATP
Check be based on the results of your planning input. See: Planning
Process, Oracle Advanced Supply Chain Planning User's Guide.
Multi-Organization Bills of Material Setup
You can enter sales orders for assemble to order configurations, with a warehouse as
the shipping organization, and build the configurations in other organizations. In a
multi-level structure, each level can be built in a different organization. Using common
bills of material, you can share model and option class bills of material between
organizations. You define the model and option class bills in the primary
manufacturing organization that owns each bill, creating common bills in your item
validation organization (and other manufacturing organizations) to reference the bill in
the primary manufacturing organization.
For example, you can enter orders for the Laptop Computer in your item master
organization (Global Computers) and build the Laptop Computer in two other
organizations-Sacramento and Austin. And, all engineering changes to the Laptop
Computer (and its components) originate from the Sacramento organization. You
define the Laptop Computer model item in your item master organization (Global
Computers) and assign the item to the Sacramento and Austin organizations. Then you
can define the Laptop Computer's model bill of material in the Sacramento
organization, creating common bills of material in the Global Computers and Austin
organizations. Each common bill references the model bill in the Sacramento
organization. For each component that has its own bill of material (option class and
standard items), you define the component's bill in the Sacramento organization and
create common bills in the Global Computers and Austin organizations (where each
common bill references a bill in the Sacramento organization).
The following table presents an example of a bill of material shared between
organizations. The Organization, Item, and Alternate columns represent Common Bill
Details:

8/12/2019 BOM Uuser Guide
http://slidepdf.com/reader/full/bom-uuser-guide 180/331
5-18 Oracle Bills of Material User's Guide
Shared Bills of Material for Laptop Computer
Organization Alternate Common BillDetailsOrganization
Common BillDetails Item
Common BillDetailsAlternate
Sacramento Primary n/a n/a n/a
Global
Computers
Primary Sacramento Laptop
Computer
Primary
Austin Primary Sacramento Laptop
Computer
Primary
Option Dependent Routing Steps for Discrete ManufacturingOracle Bills of Materials lets you define routing steps for models that can be selected as
options for configurations. You can assign multiple routing steps to a single optional
component. You can specify that a routing step is option dependent which causes the
configuration to include that routing step only if an option referencing that step was
chosen.
You can assign multiple routing steps to a single optional component model bill. You
specify one value in the op sequence column on the main BOM form. The operation you
specify on the main window is used as the back flush location for the item.
You can assign additional operation sequence to the components by using a child
window. The child window is available from any optional BOM component line by button.
The following table presents an example of option dependent routing steps:
Indented Bill of Material for Laptop Computer
Level Item Item Type Op Seq Optional Qty
. 2 . Laptop
Computer
ATO Model n/a No 1
. . 3 . . Carrying
Case
Product 10 No 1
. . 3 . . Keyboard Product 20 No 1

8/12/2019 BOM Uuser Guide
http://slidepdf.com/reader/full/bom-uuser-guide 181/331
Configure to Order 5-19
Level Item Item Type Op Seq Optional Qty
. . 3 . . CPU Option Class 30 No 1
. . . 4 . . . 386Processor
PurchasedItem
30 Yes 1
. . . 4 . . . 486
Processor
Purchased
Item
25, 45, 47 Yes 1
. . 3 . . Monitor Option Class 40 No 1
. . . 4 . . . VGA Option Class 40 Yes 1
. . . . 5 . . . . VGA
Manual
Purchased
Item
40 No 1
. . . . 5 . . . . VGA1 Purchased
Item
40 Yes 1
. . . . 5 . . . . VGA2 Purchased
Item
40 Yes 1
. . . 4 . . . EGA ATO Option
Class
40 Yes 1
. . . . 5 . . . . EGA1 Product 40 Yes 1
. . . . 5 . . . . EGA2 Product 40 Yes 1
. . . 4 . . . Monitor
Manual
Purchased
Item
40 No 1
. . 3 . . Operating
System
ATO Option
Class
50 Yes 1
. . . 4 . . . DOS Phantom 50 Yes 1
. . . 4 . . . UNIX Phantom 50 Yes 1

8/12/2019 BOM Uuser Guide
http://slidepdf.com/reader/full/bom-uuser-guide 182/331
5-20 Oracle Bills of Material User's Guide
Routing Steps for Laptop Computer
Op Seq Option Dependent Department OperationDescription
10 No Casing Cut and smooth case
edges
20 No Assembly 1 Attach keyboard and
cable
25 Yes Assembly 2 Clean processor
30 No Assembly 2 Insert processor into
board
40 No Assembly 3 Attach monitor
cable/glare screen
45 Yes Assembly 2 Test Processor
47 Yes Assembly 2 Enter Supplier
Certification
50 No Packaging Wrap OS kit with
power supply
The table above presents an example of how Oracle Manufacturing automatically
includes Operation Sequences 25, 45 and 47 in any configuration routing containing a
486 processor since the 486 processor option in the bill references step 25, 45 and 47.
These routing steps can also add to the standard cost for configurations with the 486
Processor, since Oracle Manufacturing performs a single level rollup for configurations
and accounts for all costed resources used in the configuration routing.
The routing for your model should include all steps that any configuration might
require. You can then establish option class routings by referencing the model routing
as a common routing. That way, lower level options can still reference the model's
routing. For example, you can reference the Laptop Computer's routing as a common
routing for the CPU option class, referencing the Laptop Computer's routing steps inthe option class bill.
In a multi-level, multi-organization environment, each non-phantom model should
have its routing defined in its manufacturing organization.
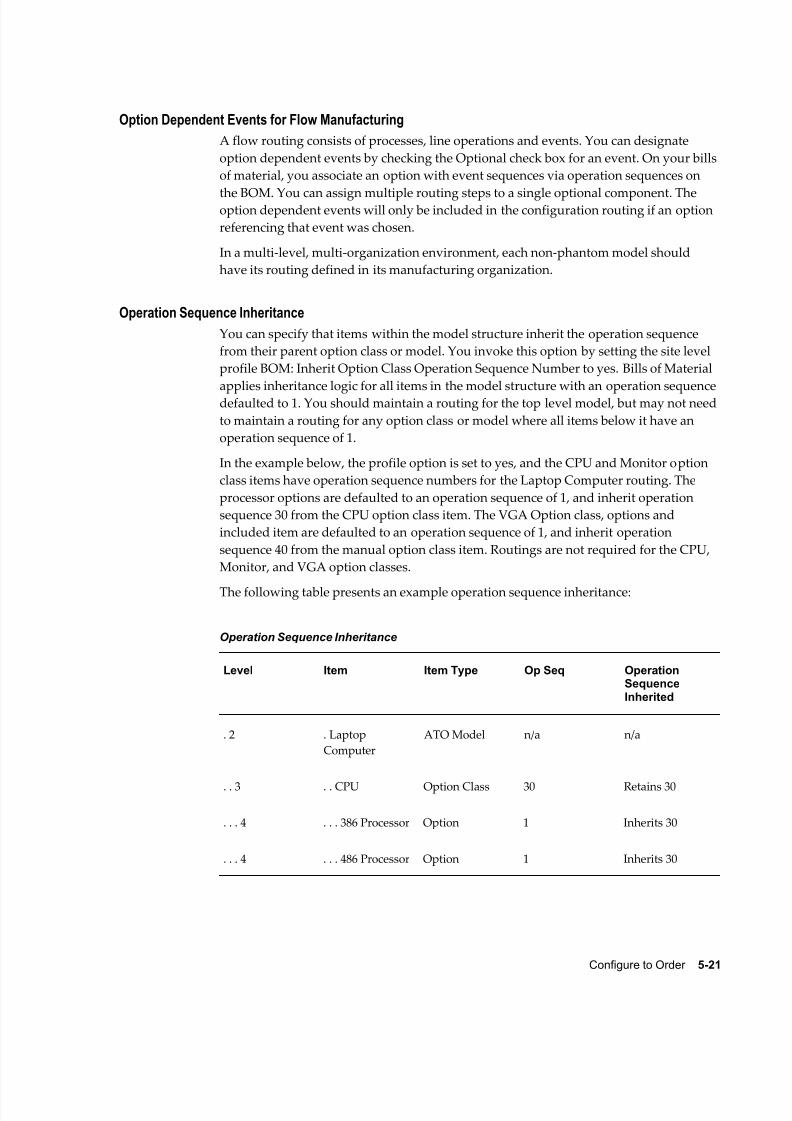
8/12/2019 BOM Uuser Guide
http://slidepdf.com/reader/full/bom-uuser-guide 183/331
Configure to Order 5-21
Option Dependent Events for Flow Manufacturing
A flow routing consists of processes, line operations and events. You can designate
option dependent events by checking the Optional check box for an event. On your bills
of material, you associate an option with event sequences via operation sequences on
the BOM. You can assign multiple routing steps to a single optional component. Theoption dependent events will only be included in the configuration routing if an option
referencing that event was chosen.
In a multi-level, multi-organization environment, each non-phantom model should
have its routing defined in its manufacturing organization.
Operation Sequence Inheritance
You can specify that items within the model structure inherit the operation sequence
from their parent option class or model. You invoke this option by setting the site level
profile BOM: Inherit Option Class Operation Sequence Number to yes. Bills of Material
applies inheritance logic for all items in the model structure with an operation sequencedefaulted to 1. You should maintain a routing for the top level model, but may not need
to maintain a routing for any option class or model where all items below it have an
operation sequence of 1.
In the example below, the profile option is set to yes, and the CPU and Monitor option
class items have operation sequence numbers for the Laptop Computer routing. The
processor options are defaulted to an operation sequence of 1, and inherit operation
sequence 30 from the CPU option class item. The VGA Option class, options and
included item are defaulted to an operation sequence of 1, and inherit operation
sequence 40 from the manual option class item. Routings are not required for the CPU,
Monitor, and VGA option classes.
The following table presents an example operation sequence inheritance:
Operation Sequence Inheritance
Level Item Item Type Op Seq OperationSequenceInherited
. 2 . Laptop
Computer
ATO Model n/a n/a
. . 3 . . CPU Option Class 30 Retains 30
. . . 4 . . . 386 Processor Option 1 Inherits 30
. . . 4 . . . 486 Processor Option 1 Inherits 30

8/12/2019 BOM Uuser Guide
http://slidepdf.com/reader/full/bom-uuser-guide 184/331
5-22 Oracle Bills of Material User's Guide
Level Item Item Type Op Seq OperationSequenceInherited
. . 3 . . Monitor Option Class 40 Retains 40
. . . 4 . . . VGA Option Class 1 Inherits 40
. . . . 5 . . . . VGA
Manual
Included Item 1 Inherits 40
. . . . 5 . . . . VGA1 Option 1 Inherits 40
. . . . 5 . . . . VGA2 Option 1 Inherits 40
Cataloging Configurations
Oracle Manufacturing provides features that help you catalog your assemble to order
configurations so you can easily find on hand configurations that meet customer
requirements, or find configuration item numbers that were used to fulfill previous
orders for the same configuration. Oracle Manufacturing lets you set up rules to
automatically assign Item Catalog descriptive element values to assemble to order
configurations based on the options selected.
For example, you might want to catalog computer configurations using descriptive
elements that indicate the Processor Type, Monitor Type, and Operating System chosen
for each configuration. You could then assign the Laptop Computer model item to a
catalog group that specifies those descriptive elements, but not assign any values to
those attributes since the Laptop Computer is a model, not a specific configuration. You
would also assign each option item to a catalog group with descriptive elements that
describe that option. So you would assign the processor option items (386,486) to a
"Processors" catalog group containing a Processor descriptive element as well as others
that might describe more specific processor attributes.
The following table presents cataloging configurations:
Catalog and Descriptive Elements
Item Catalog Group Descriptive ElementName
Descriptive ElementValue
Laptop Computer Personal Computers Processor n/a

8/12/2019 BOM Uuser Guide
http://slidepdf.com/reader/full/bom-uuser-guide 185/331
Configure to Order 5-23
Item Catalog Group Descriptive ElementName
Descriptive ElementValue
n/a n/a Monitor n/a
n/a n/a OS n/a
386 Processor Processors Processor Slow
486 Processor Processors Processor Fast
VGA1 Monitors Monitor VGA
VGA2 Monitors Monitor VGA
EGA1 Monitors Monitor EGA
EGA2 Monitors Monitor EGA
DOS Operating Systems OS MS-DOS
UNIX Operating Systems OS SCO-Unix
You would also specify which descriptive elements to assign automatically to an
ordered configuration, based on options chosen under each option class in the Laptop
Computer's bill. For example, when you defined the bill for the CPU option class, you
would specify that the Processor descriptive element should be assigned automatically
based on options chosen under this class. The Bills of Material window lets you specify
descriptive elements for each model or option class bill of material. If you want the
autocreate configuration items process to concatenate descriptions, you must specify
descriptive elements for each model and option class bill. An example of a concatenated
description might be "486-VGA-DOS".
The following table presents descriptive elements assigned to an ordered configuration:
Descriptive Elements for Bills of Material
Item Item Type Element Name
CPU Option Class Processor
VGA Option Class Monitor
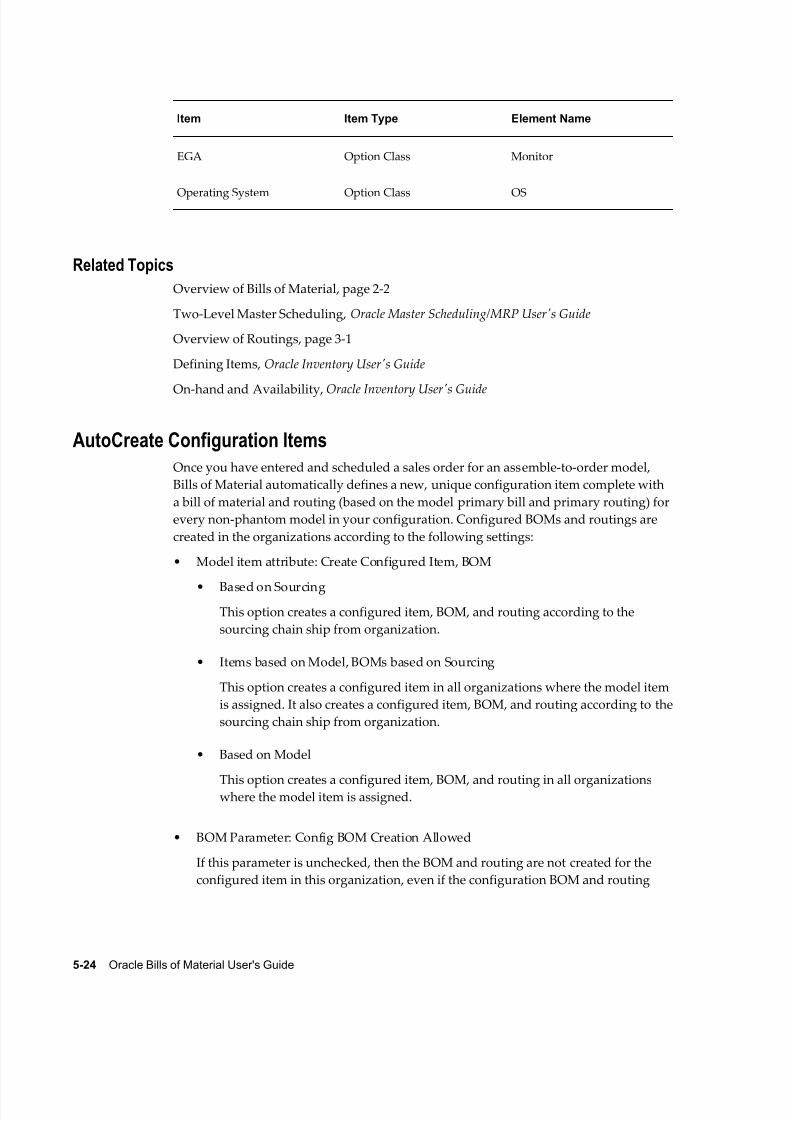
8/12/2019 BOM Uuser Guide
http://slidepdf.com/reader/full/bom-uuser-guide 186/331
5-24 Oracle Bills of Material User's Guide
Item Item Type Element Name
EGA Option Class Monitor
Operating System Option Class OS
Related Topics
Overview of Bills of Material, page 2-2
Two-Level Master Scheduling, Oracle Master Scheduling/MRP User's Guide
Overview of Routings, page 3-1
Defining Items, Oracle Inventory User's Guide
On-hand and Availability, Oracle Inventory User's Guide
AutoCreate Configuration Items
Once you have entered and scheduled a sales order for an assemble-to-order model,
Bills of Material automatically defines a new, unique configuration item complete with
a bill of material and routing (based on the model primary bill and primary routing) for
every non-phantom model in your configuration. Configured BOMs and routings are
created in the organizations according to the following settings:
• Model item attribute: Create Configured Item, BOM
• Based on Sourcing
This option creates a configured item, BOM, and routing according to the
sourcing chain ship from organization.
• Items based on Model, BOMs based on Sourcing
This option creates a configured item in all organizations where the model item
is assigned. It also creates a configured item, BOM, and routing according to the
sourcing chain ship from organization.
• Based on Model
This option creates a configured item, BOM, and routing in all organizationswhere the model item is assigned.
• BOM Parameter: Config BOM Creation Allowed
If this parameter is unchecked, then the BOM and routing are not created for the
configured item in this organization, even if the configuration BOM and routing

8/12/2019 BOM Uuser Guide
http://slidepdf.com/reader/full/bom-uuser-guide 187/331
8/12/2019 BOM Uuser Guide
http://slidepdf.com/reader/full/bom-uuser-guide 188/331

8/12/2019 BOM Uuser Guide
http://slidepdf.com/reader/full/bom-uuser-guide 189/331
Configure to Order 5-27
If this is disabled, (the default), the configuration item lead time value is derived
from the value of the base model.
7. Indicate whether you want to perform flow calculations. If you specify Yes, Total
Product Cycle Time, Yield, Net Planning %, and Operation times will be calculated
for your processes, operations and events in the configuration flow routing. If you
specify No, the data will be copied from the model.
8. Indicate whether you want to perform a cost rollup. If you specify yes, a cost rollup
is performed for each new configuration. This establishes accurate standard costs
that are posted to cost of goods sold. If you specify no, the cost rollup is skipped
during the AutoCreate Configured Items process. You can run the Perform Cost
Rollup concurrent program separately when required.
9. Indicate whether you want to perform a list price rollup. If you specify yes, the list
prices and blanket prices are rolled up for the configuration. If you specify no,
purchase prices are not calculated. You can run the Perform Cost Rollup concurrent
program separately when required.
Batch Versus Online Mode
You can launch the AutoCreate Configuration Items concurrent program to create
configuration items for one or more sales orders. You can also create a configuration
item for a single sales order line online, from the Sales Order pad Action button
(Progress Order).
Sales Order Pad Action Button - Progress Order
You can create a configuration item for one sales order line from the Sales Order Pad.
This mode does not give you the option to decide whether to perform the lead time
calculations, flow routing calculations, cost rollup and purchase price rollup. It inherits
the default values for the parameters Perform Lead Time Calculations, Perform Flow
Calculations, Perform Purchase Price Rollup, and Perform Cost Rollup from the values
entered for the following profile options:
• BOM: Perform Lead Time Calculations
• BOM: CTO Perform Flow Calculations
• BOM: CTO Perform List Price and Purchase Price Rollup
• BOM: CTO Perform Cost Rollup
If you create configured items from the sales order work flow using the Progress Order
action, the work flow refers to these profile option settings when determining whether
to execute the corresponding action.
If you create configured items using the Autocreate Configured Items concurrent
8/12/2019 BOM Uuser Guide
http://slidepdf.com/reader/full/bom-uuser-guide 190/331
5-28 Oracle Bills of Material User's Guide
program, this program uses the settings of the profile options to default the
corresponding program parameters into the Perform Lead Time Calculations, Perform
Flow Calculations, Perform Purchase Price Rollup and Perform Cost Rollup programs.
Optionally, you can override these default values when running Autocreate Configured
Items manually.
Program Parameters Definition
Release Date Option
When you start the AutoCreate Configuration Items concurrent program, you can
specify Release Offset Days or Flow Schedule start date, to help you minimize the
impact of order changes on the planning process. By entering the Release Offset Days,
you can create configuration items only for sales orders whose work order or flow
schedule must be released within that number of days. In other words, if you specify
Release Offset Days = 2, then you only create configuration items for orders whose work
order or flow schedule must begin within two days.
The AutoCreate Configuration Item process searches your new orders, finds your
orders for assemble-to-order models, and assigns an estimated work order or flow
schedule release date to these order lines. Oracle Manufacturing computes the
estimated work order or flow schedule release date by offsetting the scheduled ship
date by the order lead time (through the workday calendar). Using the lead time
information for the model item (as specified in the item master), Oracle Manufacturing
calculates order lead time as follows:
fixed lead time + (quantity x variable lead time)
After assigning the estimated work order or flow schedule release dates to the new
orders, the AutoCreate Configuration Item process finds all orders whose work order or
flow schedule release date is within the Release Offset Days you specified and
automatically creates configuration items for those orders.
Bills of Material automatically defines a new, unique configuration item in the item
master and assigns a bill of material and routing. See tables in the Resulting Bills of
Material, page 5-24 and Resulting Routings, page 5-24 sections, presenting what will be
assigned to the new configuration item.
Note: Do not use the parameter Release Offset Days if you use Oracle
Advanced Supply Chain Planning (ASCP) and ATP based on planning
output. ASCP does not plan scheduled sales orders for which a
configuration has not yet been created.
Lead Time Calculation Option
Discrete Manufacturing
Bills of Material lets you optionally compute the manufacturing and cumulative lead

8/12/2019 BOM Uuser Guide
http://slidepdf.com/reader/full/bom-uuser-guide 191/331
Configure to Order 5-29
times for each new configuration item to establish accurate lead times based only on the
options chosen. The configuration manufacturing and cumulative lead times are
calculated for the configuration item, based on the configuration item routing. This
calculation is performed in all organizations where routings are created for the
configured item.
For example, the AutoCreate Configuration Item concurrent program couldautomatically compute fixed and variable lead times for the Laptop Computer
configuration based on the routing steps that were included from the model routing. In
this case, the Clean Processor step would contribute to the lead time. So, if the Clean
Processor step included one hour of setup time, then it would contribute one hour to
the fixed lead time for the configuration.
Note: When your model's routings has no option dependent routing
steps (or has a minimum amount of time spent at option dependent
steps), you can choose not to calculate lead times for each configuration
item. Oracle Manufacturing automatically assigns the model item's lead
time information to the new configuration item when you do not
specify to calculate lead times for the configuration item.
Flow Manufacturing
Configuration items with flow manufacturing routings inherit the lead times from the
model item master in the appropriate manufacturing organization. Flow manufacturing
environments do not calculate lead time. However, Total Product Cycle Time is an
optional calculation during the AutoCreate Configuration Item process.
Item Numbering Methods
You can choose from four methods to automatically assign item numbers toconfiguration items:
• Replace model item number with a sequence number
• Replace model item number with the order number/line number
Note: When using the order number/line number option in a
multi-level environment, the top level model item will be replaced
with the order number/line number. Sub-level models will be
replaced with the number/line number/sequence number to
differentiate them from the top level configuration.
• Append a sequence to the model number
• User defined Configuration Item numbering
For each method, you can specify which segment of the item flexfield you want to either
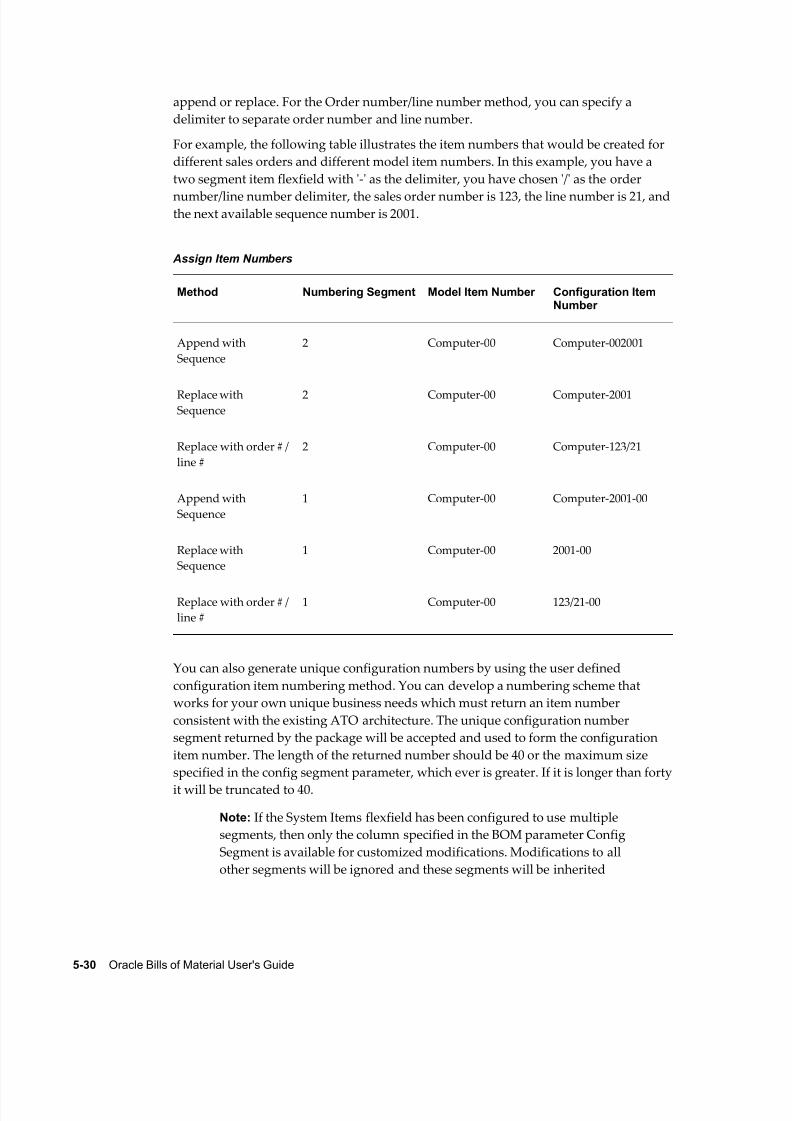
8/12/2019 BOM Uuser Guide
http://slidepdf.com/reader/full/bom-uuser-guide 192/331
5-30 Oracle Bills of Material User's Guide
append or replace. For the Order number/line number method, you can specify a
delimiter to separate order number and line number.
For example, the following table illustrates the item numbers that would be created for
different sales orders and different model item numbers. In this example, you have a
two segment item flexfield with '-' as the delimiter, you have chosen '/' as the order
number/line number delimiter, the sales order number is 123, the line number is 21, andthe next available sequence number is 2001.
Assign Item Numbers
Method Numbering Segment Model Item Number Configuration ItemNumber
Append with
Sequence
2 Computer-00 Computer-002001
Replace withSequence
2 Computer-00 Computer-2001
Replace with order # /
line #
2 Computer-00 Computer-123/21
Append with
Sequence
1 Computer-00 Computer-2001-00
Replace with
Sequence
1 Computer-00 2001-00
Replace with order # /
line #
1 Computer-00 123/21-00
You can also generate unique configuration numbers by using the user defined
configuration item numbering method. You can develop a numbering scheme that
works for your own unique business needs which must return an item number
consistent with the existing ATO architecture. The unique configuration number
segment returned by the package will be accepted and used to form the configuration
item number. The length of the returned number should be 40 or the maximum size
specified in the config segment parameter, which ever is greater. If it is longer than forty
it will be truncated to 40.
Note: If the System Items flexfield has been configured to use multiple
segments, then only the column specified in the BOM parameter Config
Segment is available for customized modifications. Modifications to all
other segments will be ignored and these segments will be inherited
8/12/2019 BOM Uuser Guide
http://slidepdf.com/reader/full/bom-uuser-guide 193/331

8/12/2019 BOM Uuser Guide
http://slidepdf.com/reader/full/bom-uuser-guide 194/331
5-32 Oracle Bills of Material User's Guide
button. You can also match and reserve using AutoCreate Configuration Items,
accessed from the Assemble To Order submenu, within the BOM responsibility. You
can match and reserve using the Create Configuration Item Workflow activity. Finally,
you can match and reserve by creating your own custom matching. The profiles BOM:
Match to Existing Configuration and BOM: Use Custom Match Function and the model
item attribute Configuration Match control whether the match performs using theStandard Match function or Custom Match function. For more information, See:
Profiles, Oracle Configure To Order Process Guide. To select a matching configuration the
following criteria must be met:
• The order must be both booked and scheduled when progressing the order on line
or choosing Actions from the menu, then Match and Reserve. However, the
Autocreate Configured Items concurrent program finds a match for the
configuration on non-booked, but scheduled orders. For more information, see:
Oracle Configure To Order Process Guide.
• The order line cannot have an associated configuration item assigned.
• The profile option BOM: Match to Existing Configurations must be set to Yes and
the model item attribute Configuration Match must be set to either Standard Match
or Custom Match.
• The routing type of the model's primary routing and the configuration item's
primary routing are the same. In other words, if the model currently has a flow
routing as its primary, it will only match to a configuration item with a flow routing
as its primary routing. If the routing currently has a discrete routing as its primary,
it will only match to a configuration item with a discrete routing as its primary.
To reserve a configuration item in all modes, the following additional criteria must be
met:
• The profile option BOM: Automatic Reservations must be set to Yes
• The profile option OM: Reservation Time Fence must not be null
• The order schedule date must be within the time fence defined in the OM:
Reservation Time Fence profile option.
• There must be available on-hand quantity of the configuration item in the shipping
organization
Match and Reserve for Multi-Level Configurations
Multi-level configuration environments create configurable subassemblies that can be
sourced from anywhere in the supply chain. You can match top assemblies and each
configured subassembly in a multi-level ATO configuration. The system will first try to
match the entire configuration. If a match is found, it will link the matching
configuration item to the sales order, and attempt to reserve any on-hand, as described

8/12/2019 BOM Uuser Guide
http://slidepdf.com/reader/full/bom-uuser-guide 195/331
Configure to Order 5-33
above.
If a match for the top assembly is not found, the AutoCreate Configuration process will
create a new configuration item for the top level assembly, and attempt to find matches
at the sub-assembly levels. If a matching sub-assembly is found, it will use the existing
configuration item's BOMs and routings. A new item is created for any unmatched
configuration.
The system automatically matches a configuration against existing configurations,
independent of their sourcing organizations, enabling you to match across all relevant
organizations.
Match During ATP
ATP performs a match prior to performing the availability check. If a match is found,
ATP promises the matched item instead of the model and options. This provides
accurate ATP and scheduling throughout the sales order lifecycle, as well as enables
customers to manage a combination of make-to-stock and make-to-order business
processes. Oracle Advanced Supply Chain Planning (ASCP) identifies that a sales orderfor the model and option matches an existing configuration item. ASCP then nets
existing supplies of pre-configured stock at any supply chain bill of material level.
If a forecast exists for the matched item, its forecast is consumed first, then the model
and option forecast is consumed, if needed.
Weight and Volume Calculation
AutoCreate Configuration Items calculates the weight and volume for the configured
item, by rolling up the weight and volume of the components in the OM validation
organization. For Multi level configurations the weight and volume are first calculated
for the lowest level configuration and then rolled up until the weight and volume of thetop model is determined. The weight and volume are calculated in the unit of measure
for the base model. If the unit of measure is not defined on the base model, the system
calculates the weight and volume in the base units of the UOM class for one of the
components of the model. If the model and options are not all from the same UOM
class, the system uses the UOM conversions defined in inventory. If any required UOM
conversions have not been defined, the system does not calculate the weight and
volume for the configuration. The weight and volume of the top level configuration is
not calculated if the corresponding weight on volume of any of the lower calculations
can not be calculated.
The following table presents an example of the Laptop Computer configuration we are
going to use for our calculation:

8/12/2019 BOM Uuser Guide
http://slidepdf.com/reader/full/bom-uuser-guide 196/331
5-34 Oracle Bills of Material User's Guide
Level Item Item Type Quantity Optional?
1 Laptop
Computer
ATO Model 1 No
. 2 . Carrying Case Purchased Item 2 Yes
. 2 . Keyboard Purchased Item 1 Yes
. 2 . Laptop Manual Purchased Item 1 No
. 2 . CPU ATO Option
Class
1 No
. . 3 . . 486 Processor Purchased Item 1 Yes
. 2 . Monitor *111 ATO Item 2 Yes
. . 3 . . Monitor ATO Model 1 Yes
. . . 4 . . . VGA ATO Option
Class
1 Yes
. . . . 5 . . . . VGA2 Purchased Item 1 Yes
. . . 4 . . . Monitor
Manual
Purchased Item 2 No
In this example, the calculation starts with the monitor which is a configured
sub-assembly: Weight / Volume of Monitor*111 = Wt / Vol of Monitor Model + Wt / Vol
of VGA OC * (1) + Wt / Vol of VGA2 (1 * 1). The weight and volume of the laptop
configuration contains the weight and volume of the monitor configuration. Weight /
Volume of Laptop Configuration = Wt / Vol of Laptop Computer Model * 1 + Wt / Vol
of Carrying case * 2 + Wt/Vol of Keyboard *1 + Wt / Vol of CPU OC *1 + Wt / Vol of 486
Processor * (1 * 1) + Wt / Vol of Monitor * 111 * 2.
Note that the weight and volume of the Laptop manual (a required item) should be
included in the weight and volume assigned to the Laptop Computer Model, since
required items are not included in the weight and volume calculations. Similarly, the
weight and volume of the Monitor Manual (a required item) should be included in the
weight and volume assigned to the Monitor Option Class.
Note: While performing the weight and volume calculation,
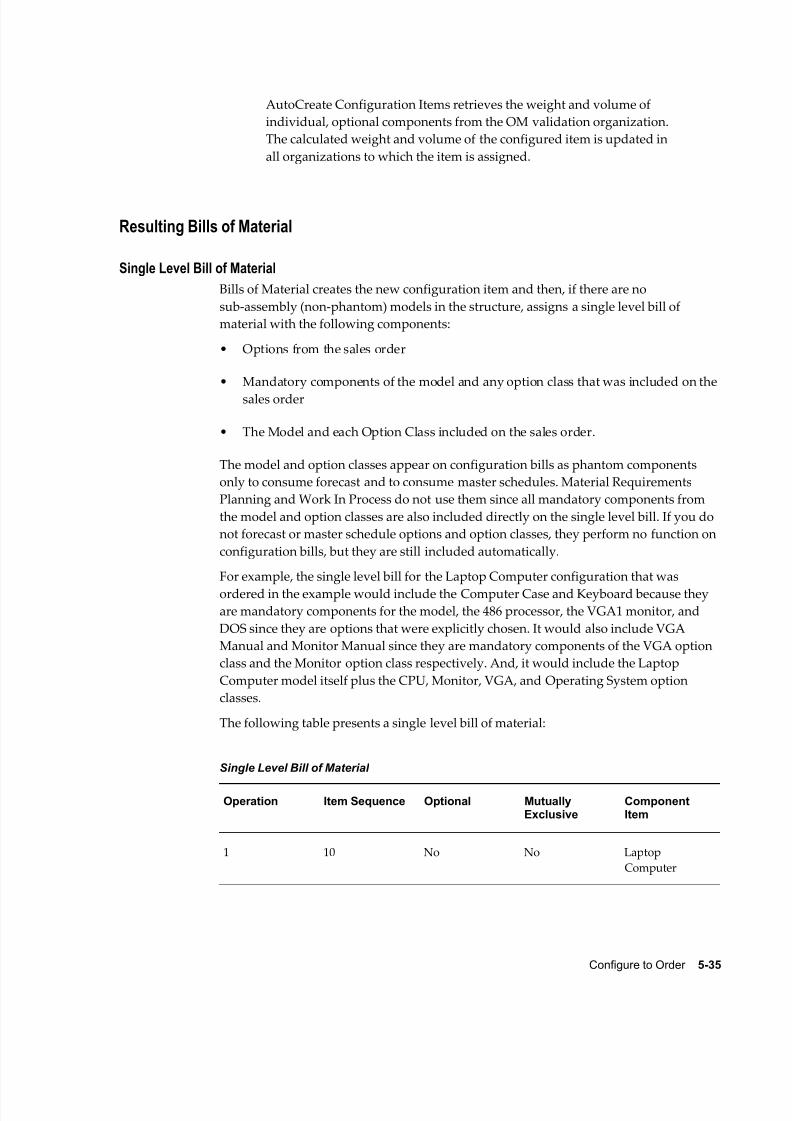
8/12/2019 BOM Uuser Guide
http://slidepdf.com/reader/full/bom-uuser-guide 197/331
Configure to Order 5-35
AutoCreate Configuration Items retrieves the weight and volume of
individual, optional components from the OM validation organization.
The calculated weight and volume of the configured item is updated in
all organizations to which the item is assigned.
Resulting Bills of Material
Single Level Bill of Material
Bills of Material creates the new configuration item and then, if there are no
sub-assembly (non-phantom) models in the structure, assigns a single level bill of
material with the following components:
• Options from the sales order
• Mandatory components of the model and any option class that was included on the
sales order
• The Model and each Option Class included on the sales order.
The model and option classes appear on configuration bills as phantom components
only to consume forecast and to consume master schedules. Material Requirements
Planning and Work In Process do not use them since all mandatory components from
the model and option classes are also included directly on the single level bill. If you do
not forecast or master schedule options and option classes, they perform no function on
configuration bills, but they are still included automatically.
For example, the single level bill for the Laptop Computer configuration that was
ordered in the example would include the Computer Case and Keyboard because they
are mandatory components for the model, the 486 processor, the VGA1 monitor, and
DOS since they are options that were explicitly chosen. It would also include VGA
Manual and Monitor Manual since they are mandatory components of the VGA option
class and the Monitor option class respectively. And, it would include the Laptop
Computer model itself plus the CPU, Monitor, VGA, and Operating System option
classes.
The following table presents a single level bill of material:
Single Level Bill of Material
Operation Item Sequence Optional MutuallyExclusive
ComponentItem
1 10 No No Laptop
Computer
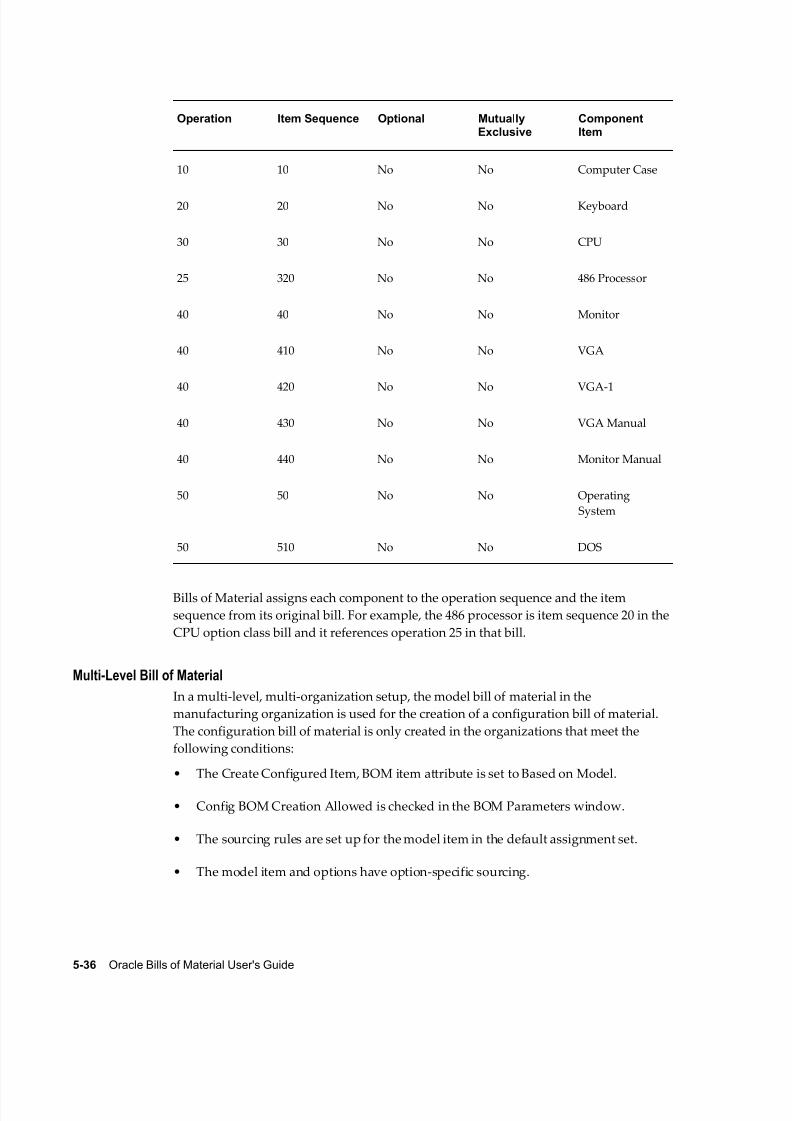
8/12/2019 BOM Uuser Guide
http://slidepdf.com/reader/full/bom-uuser-guide 198/331
5-36 Oracle Bills of Material User's Guide
Operation Item Sequence Optional MutuallyExclusive
ComponentItem
10 10 No No Computer Case
20 20 No No Keyboard
30 30 No No CPU
25 320 No No 486 Processor
40 40 No No Monitor
40 410 No No VGA
40 420 No No VGA-1
40 430 No No VGA Manual
40 440 No No Monitor Manual
50 50 No No Operating
System
50 510 No No DOS
Bills of Material assigns each component to the operation sequence and the item
sequence from its original bill. For example, the 486 processor is item sequence 20 in the
CPU option class bill and it references operation 25 in that bill.
Multi-Level Bill of Material
In a multi-level, multi-organization setup, the model bill of material in the
manufacturing organization is used for the creation of a configuration bill of material.
The configuration bill of material is only created in the organizations that meet the
following conditions:
• The Create Configured Item, BOM item attribute is set to Based on Model.
• Config BOM Creation Allowed is checked in the BOM Parameters window.
• The sourcing rules are set up for the model item in the default assignment set.
• The model item and options have option-specific sourcing.
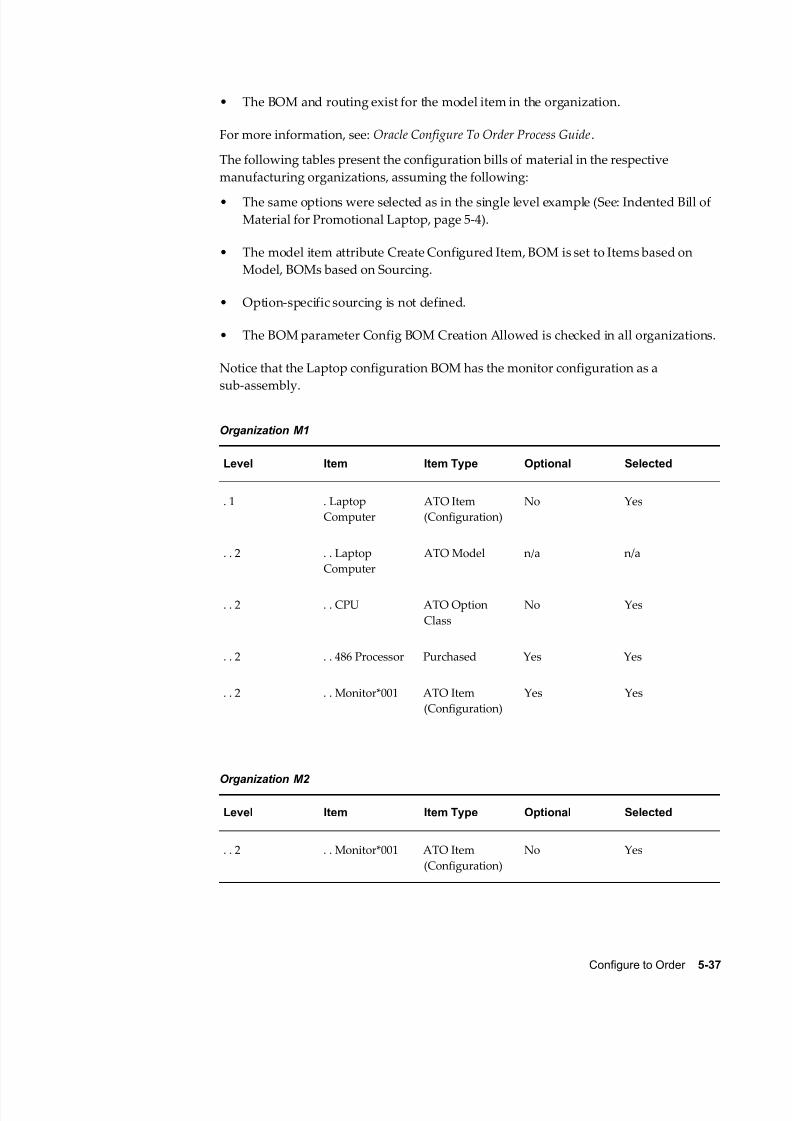
8/12/2019 BOM Uuser Guide
http://slidepdf.com/reader/full/bom-uuser-guide 199/331
Configure to Order 5-37
• The BOM and routing exist for the model item in the organization.
For more information, see: Oracle Configure To Order Process Guide.
The following tables present the configuration bills of material in the respective
manufacturing organizations, assuming the following:
• The same options were selected as in the single level example (See: Indented Bill of
Material for Promotional Laptop, page 5-4).
• The model item attribute Create Configured Item, BOM is set to Items based on
Model, BOMs based on Sourcing.
• Option-specific sourcing is not defined.
• The BOM parameter Config BOM Creation Allowed is checked in all organizations.
Notice that the Laptop configuration BOM has the monitor configuration as a
sub-assembly.
Organization M1
Level Item Item Type Optional Selected
. 1 . Laptop
Computer
ATO Item
(Configuration)
No Yes
. . 2 . . Laptop
Computer
ATO Model n/a n/a
. . 2 . . CPU ATO Option
Class
No Yes
. . 2 . . 486 Processor Purchased Yes Yes
. . 2 . . Monitor*001 ATO Item
(Configuration)
Yes Yes
Organization M2
Level Item Item Type Optional Selected
. . 2 . . Monitor*001 ATO Item
(Configuration)
No Yes
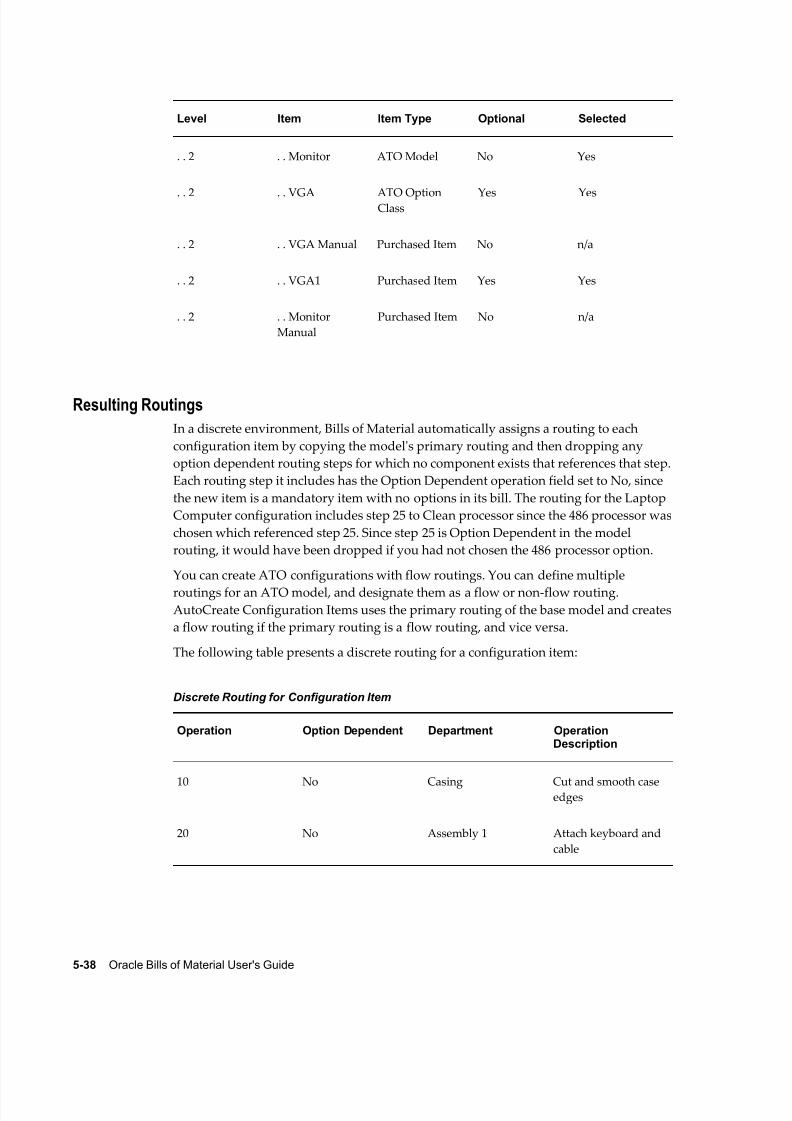
8/12/2019 BOM Uuser Guide
http://slidepdf.com/reader/full/bom-uuser-guide 200/331
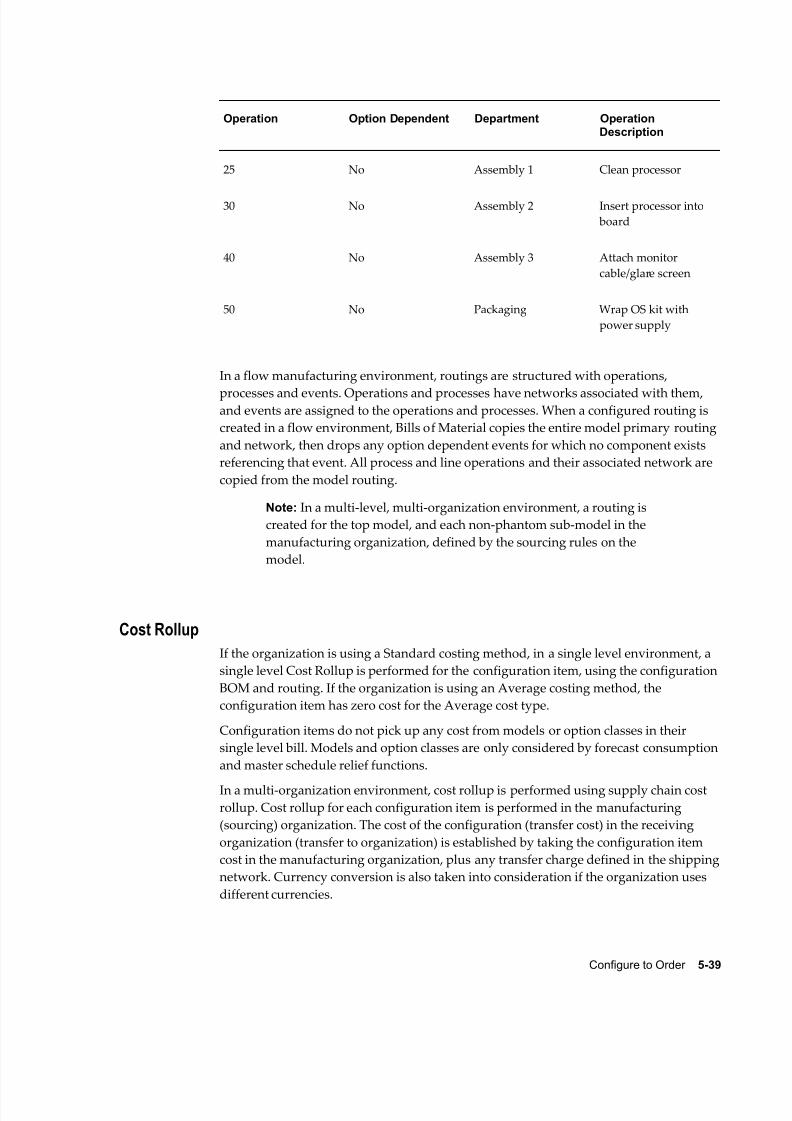
8/12/2019 BOM Uuser Guide
http://slidepdf.com/reader/full/bom-uuser-guide 201/331
Configure to Order 5-39
Operation Option Dependent Department OperationDescription
25 No Assembly 1 Clean processor
30 No Assembly 2 Insert processor into
board
40 No Assembly 3 Attach monitor
cable/glare screen
50 No Packaging Wrap OS kit with
power supply
In a flow manufacturing environment, routings are structured with operations,
processes and events. Operations and processes have networks associated with them,and events are assigned to the operations and processes. When a configured routing is
created in a flow environment, Bills of Material copies the entire model primary routing
and network, then drops any option dependent events for which no component exists
referencing that event. All process and line operations and their associated network are
copied from the model routing.
Note: In a multi-level, multi-organization environment, a routing is
created for the top model, and each non-phantom sub-model in the
manufacturing organization, defined by the sourcing rules on the
model.
Cost Rollup
If the organization is using a Standard costing method, in a single level environment, a
single level Cost Rollup is performed for the configuration item, using the configuration
BOM and routing. If the organization is using an Average costing method, the
configuration item has zero cost for the Average cost type.
Configuration items do not pick up any cost from models or option classes in their
single level bill. Models and option classes are only considered by forecast consumption
and master schedule relief functions.
In a multi-organization environment, cost rollup is performed using supply chain cost
rollup. Cost rollup for each configuration item is performed in the manufacturing
(sourcing) organization. The cost of the configuration (transfer cost) in the receiving
organization (transfer to organization) is established by taking the configuration item
cost in the manufacturing organization, plus any transfer charge defined in the shipping
network. Currency conversion is also taken into consideration if the organization uses
different currencies.

8/12/2019 BOM Uuser Guide
http://slidepdf.com/reader/full/bom-uuser-guide 202/331
5-40 Oracle Bills of Material User's Guide
Preconfiguring Items
You can invoke Oracle Configurator from within Oracle Bills of Material to create a
configured bill of material and routing for a pre-defined ATO item. This is very useful
in a business to business environment where the same configuration is ordered
repeatedly. Preconfigured items can be built to forecast and kept on hand. Customerscan order the preconfigured items directly, as they would a standard ATO item.
You can create pre-configured Multilevel and Multi-organizational ATO items. When
you create a preconfigured ATO item if the base model BOM has child level
non-phantom models, the configurator displays the multi level structure defined in the
OM item validation organization associated with the operation unit defined in the
profile option MO: operating unit. When you select done from the configurator screen,
the system automatically creates the item, the BOM, and the routing for all
non-phantom models in the structure. The system generates unique names for lower
level configuration items by appending a sequence to the model name. If you define
sourcing rules for any of the child models in the base model BOM, the system assigns
the sourcing rule to the configured items, and creates the BOM and routing in the
appropriate manufacturing organization. In this case you cannot see the entire
configured bill structure for the organization.
A match is attempted during pre-configuring processing if the profile BOM: Match to
Existing Configurations is set to Yes and the base model item attribute Configuration
Match is set to Standard Match. If a similar configuration exists, the system gives you a
choice to use the existing configuration or to create a new configuration for the
pre-defined item. If you choose the existing configuration, the process aborts, and no
BOM or Routing is created for the item. If you choose not to use the existing
configuration, the system creates a new BOM and Routing for the item, but reuses the
lower level matched configurations. The system updates the match tables with the new
preconfigured item and BOM, so future matches reflect the new preconfigured item.
You must set the configurator URL properly to enable you to call the configurator from
within BOM.
To preconfigure an item:
1. Create a new item in the master organization and assign it to the appropriate
manufacturing organization.
2. Enter the base model item (on which the pre-configured item is configured) in the
Base Model field on the BOM tab of the item master for the pre-configured item.
3. In the manufacturing organization, create a new bill of material for your item,without components.
4. Place your cursor in the Components region.
5. From the Tools menu, choose Configure Bill.
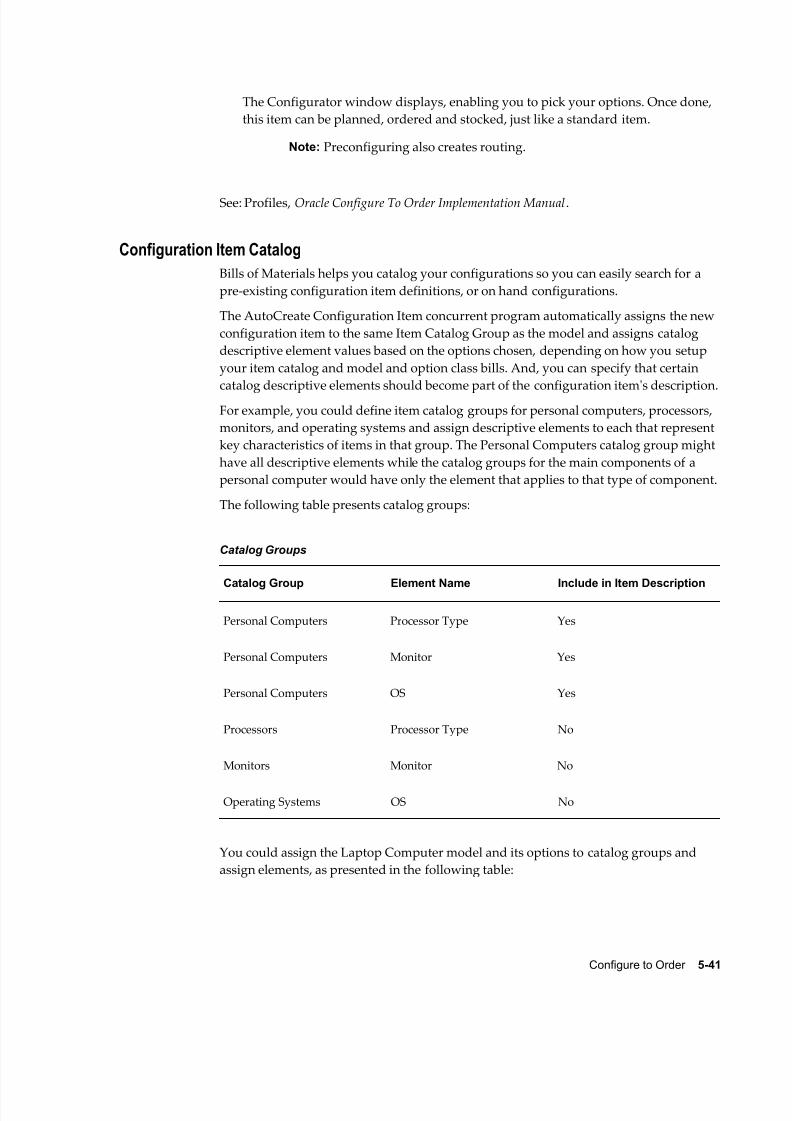
8/12/2019 BOM Uuser Guide
http://slidepdf.com/reader/full/bom-uuser-guide 203/331
Configure to Order 5-41
The Configurator window displays, enabling you to pick your options. Once done,
this item can be planned, ordered and stocked, just like a standard item.
Note: Preconfiguring also creates routing.
See: Profiles, Oracle Configure To Order Implementation Manual.
Configuration Item Catalog
Bills of Materials helps you catalog your configurations so you can easily search for a
pre-existing configuration item definitions, or on hand configurations.
The AutoCreate Configuration Item concurrent program automatically assigns the new
configuration item to the same Item Catalog Group as the model and assigns catalog
descriptive element values based on the options chosen, depending on how you setup
your item catalog and model and option class bills. And, you can specify that certain
catalog descriptive elements should become part of the configuration item's description.For example, you could define item catalog groups for personal computers, processors,
monitors, and operating systems and assign descriptive elements to each that represent
key characteristics of items in that group. The Personal Computers catalog group might
have all descriptive elements while the catalog groups for the main components of a
personal computer would have only the element that applies to that type of component.
The following table presents catalog groups:
Catalog Groups
Catalog Group Element Name Include in Item Description
Personal Computers Processor Type Yes
Personal Computers Monitor Yes
Personal Computers OS Yes
Processors Processor Type No
Monitors Monitor No
Operating Systems OS No
You could assign the Laptop Computer model and its options to catalog groups and
assign elements, as presented in the following table:

8/12/2019 BOM Uuser Guide
http://slidepdf.com/reader/full/bom-uuser-guide 204/331
5-42 Oracle Bills of Material User's Guide
Catalog Groups for Model Item
Item Catalog Group Element Name Element Value
Laptop Computer Personal Computers Processor Type n/a
n/a n/a Monitor n/a
n/a n/a OS n/a
386 Processor Processors Processor Type Slow
486 Processor Processors Processor Type Fast
VGA1 Monitors Monitor VGA
VGA2 Monitors Monitor VGA
EGA1 Monitors Monitor EGA
EGA2 Monitors Monitor EGA
DOS Operating Systems OS MS-DOS
UNIX Operating Systems OS SCO-Unix
When you define the bill of material for models and option classes, you can specify a list
of descriptive elements that the AutoCreate Configuration Item program should assign
automatically to the configuration item. In this example, when you define the bill for
the CPU, VGA, EGA, and Operating System option classes, you would specify a single
descriptive element for each option class as shown in the table below:
Specify Descriptive Elements
Item Item Type Element Name
CPU Option Class Processor Type
VGA Option Class Monitor
EGA Option Class Monitor

8/12/2019 BOM Uuser Guide
http://slidepdf.com/reader/full/bom-uuser-guide 205/331
Configure to Order 5-43
Item Item Type Element Name
Operating System Option Class OS
In the example where you order a Laptop Computer with a VGA1 monitor, and 486
processor, and a DOS operating system, Bills of Material would automatically assign
the following values to descriptive elements, as presented in the following table:
Assign Descriptive Elements
Configuration Item Catalog Group Element Name Element Value
Laptop Computer-01 Personal Computers Processor Type Fast
n/a n/a Monitor VGA
n/a n/a OS MS-DOS
Since the Personal Computers catalog group specifies that each of the three descriptive
elements should be included in the item description, Bills of Material would
automatically assign the description "Fast-VGA-MS-DOS" to the configuration item.
Related Topics
Defining Bills of Material Parameters, page 1-7
Overview of Lead Time Management, page 7-1
Overview of Bills of Material, page 2-2
Overview of Routings, page 3-1
Creating a Flow Routing, Oracle Flow Manufacturing User's Guide
Overview of Item Catalogs, Oracle Inventory User's Guide
Searching For Items, Oracle Inventory User's Guide
Deactivating Configuration ItemsBills of Material lets you automatically deactivate item numbers associated with
completed configuration orders. You can also deactivate configuration items to remove
them from item master reports and screens before you actually purge them from the
database. See: Deletion Constraints and Statements, page 4-6.
You can deactivate configuration items in a multilevel/ multi-organization Bill of

8/12/2019 BOM Uuser Guide
http://slidepdf.com/reader/full/bom-uuser-guide 206/331
5-44 Oracle Bills of Material User's Guide
Material. The deactivation program deactivates the item in the current organization
only because the item may have existing demand or pending transactions in other
organizations. To deactivate the item in all organizations, you must run the deactivate
items process in each organization.
When you set up Inventory and Bills of Material, you can define an item status to
identify inactive configuration items. You can use this status to disable theconfiguration item from all Oracle Manufacturing functions. You would normally
specify No for each of the following item attributes for inactive configuration items:
• BOM allowed
• Build in WIP
• Transactable
• Stockable
When defining bills of material parameters, specify the item status to use for completedconfiguration items. See: Defining Bills of Material Parameters, page 1-7.
You can run the Deactivate Configuration Items concurrent program to automatically
deactivate all configuration items that have the following conditions in the organization
you run the deactivate program.
• No open demand (sales orders)
• No future demand (demand in interface tables)
• No open supply (discrete jobs, flow schedules, purchase requisition, or purchase
orders)
• No material transactions for the number of days ago you specify
• Does not exist in a child organization
• Does not have a common bill and routing
Each deactivated configuration item has its status updated. BOM components and
routing operations are deactivated as well.
To deactivate configuration items:
1. Submit the Deactivate Configuration Items concurrent program using one of the
following navigation path options:• Bills of Materials > ATO. Select Single Request, then choose OK.
• Navigate to the Submit Request window. See: Submitting Requests, Oracle
E-Business Suite User's Guide.

8/12/2019 BOM Uuser Guide
http://slidepdf.com/reader/full/bom-uuser-guide 207/331
Configure to Order 5-45
2. From the Name field list of values, select Deactivate Configuration Items.
3. Enter the organization for which you want to deactivate configuration items that
were completed.
4. Enter the shipped number of days ago. Configuration items with material
transaction within the time frame are evaluated for deactivation. Material
transactions include: WIP, Sales Order, and Internal Sales Order. The default
number of days is 90.
Note: You can delete item information for completed
configurations from the database, including the bills of material
and routings.
The ability to delete configuration items is subject to the same
deletion constraints that operate for other item types as well.
5. You can choose to deactivate the configured items based on the base model and
option item. For example, you can choose to deactivate all configured items that
have the base model as Laptop Computer and option 386 Processor.
Related Topics
Deletion Constraints, page 4-6
Deleting Items, Bills, Routings, Components, and Operations, page 4-1

8/12/2019 BOM Uuser Guide
http://slidepdf.com/reader/full/bom-uuser-guide 208/331
8/12/2019 BOM Uuser Guide
http://slidepdf.com/reader/full/bom-uuser-guide 209/331
Manufacturing Scheduling 6-1
6Manufacturing Scheduling
This chapter tells you everything you need to know about manufacturing scheduling.
This chapter covers the following topics:
• Overview of Manufacturing Scheduling
• Detailed Scheduling
• Repetitive Line Scheduling
• Dynamic Lead Time Offsetting
• Required Lead Time Information
• Lead Time Offsetting Computations
Overview of Manufacturing Scheduling
Oracle Manufacturing schedules production orders and operation dates using three
scheduling methods:
• detailed scheduling
• repetitive line scheduling
• dynamic lead time offsetting
Oracle Manufacturing Products and Scheduling
The following table lists the Oracle Manufacturing products that schedule orders andoperations, and indicates their scheduling method:
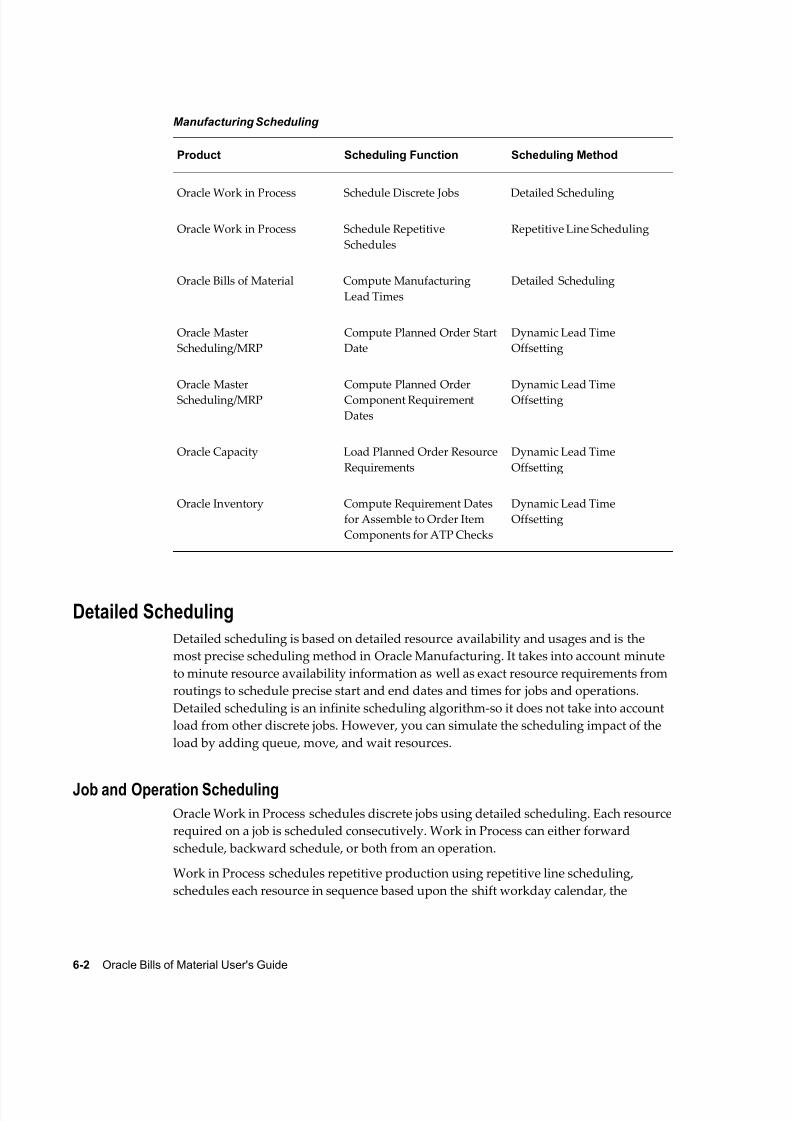
8/12/2019 BOM Uuser Guide
http://slidepdf.com/reader/full/bom-uuser-guide 210/331
6-2 Oracle Bills of Material User's Guide
Manufacturing Scheduling
Product Scheduling Function Scheduling Method
Oracle Work in Process Schedule Discrete Jobs Detailed Scheduling
Oracle Work in Process Schedule Repetitive
Schedules
Repetitive Line Scheduling
Oracle Bills of Material Compute Manufacturing
Lead Times
Detailed Scheduling
Oracle Master
Scheduling/MRP
Compute Planned Order Start
Date
Dynamic Lead Time
Offsetting
Oracle Master
Scheduling/MRP
Compute Planned Order
Component Requirement
Dates
Dynamic Lead Time
Offsetting
Oracle Capacity Load Planned Order Resource
Requirements
Dynamic Lead Time
Offsetting
Oracle Inventory Compute Requirement Dates
for Assemble to Order Item
Components for ATP Checks
Dynamic Lead Time
Offsetting
Detailed Scheduling
Detailed scheduling is based on detailed resource availability and usages and is the
most precise scheduling method in Oracle Manufacturing. It takes into account minute
to minute resource availability information as well as exact resource requirements from
routings to schedule precise start and end dates and times for jobs and operations.
Detailed scheduling is an infinite scheduling algorithm-so it does not take into account
load from other discrete jobs. However, you can simulate the scheduling impact of the
load by adding queue, move, and wait resources.
Job and Operation SchedulingOracle Work in Process schedules discrete jobs using detailed scheduling. Each resource
required on a job is scheduled consecutively. Work in Process can either forward
schedule, backward schedule, or both from an operation.
Work in Process schedules repetitive production using repetitive line scheduling,
schedules each resource in sequence based upon the shift workday calendar, the

8/12/2019 BOM Uuser Guide
http://slidepdf.com/reader/full/bom-uuser-guide 211/331
Manufacturing Scheduling 6-3
amount of the resource required, and the number of assigned resources that can be
simultaneously scheduled.
Related Topics
Overview of Routings, page 3-1Overview of Discrete Manufacturing, Oracle Work in Process User's Guide
Overview of WIP Scheduling, Oracle Work in Process User's Guide
Repetitive Line Scheduling
Repetitive line scheduling is based on production line attributes including start and
stop times, line speed, line capacity, and lead time. Repetitive line scheduling uses your
workday calendar and the line start and stop times rather than detailed resource shift
availability.
Repetitive Assembly
For lines with a lead time basis of Fixed, you must enter a fixed lead time. Oracle
Manufacturing uses this fixed lead time for all repetitive assemblies assigned to the line.
For lines with a lead time basis of Routing-based, you can automatically compute
manufacturing lead time based upon a repetitive assembly's routing.
Work in Process lets you specify the production line where you build each assembly
and the line speed determines the production run rate to schedule that assembly on that
line. If you have a fixed speed line, all assemblies should use the same line speed. For
variable speed lines, you need to specify different speeds for each assembly. The line
speed for any particular assembly cannot exceed the line's maximum rate.
Define Production Lines
Work in Process lets you define production lines and specify a start and stop time for
each line. You must also specify the minimum and maximum hourly rate on each line,
and specify whether a line's lead time is fixed or routing based.
Repetitive Assembly
Related TopicsOverview of Lead Time Management, page 7-1
Defining Production Lines, Oracle Work in Process User's Guide

8/12/2019 BOM Uuser Guide
http://slidepdf.com/reader/full/bom-uuser-guide 212/331
6-4 Oracle Bills of Material User's Guide
Dynamic Lead Time Offsetting
Dynamic lead time offsetting is based on order quantity, lead times, and the workday
calendar. It is a faster scheduling method that quickly estimates the start date of an
order, an operation, or a resource.Dynamic lead time offsetting always computes a date that is a particular number of
days from a specified date in the workday calendar. It accounts for changes in lead time
based on order quantity, using the fixed and variable components of manufacturing
lead time, as well as operation and resource offsets.
Uses of Dynamic Lead Time Offsetting
Oracle Manufacturing functions whose processing performance is most critical use
dynamic lead time offsetting while other functions that schedule exact operation and
resource start and end times use detailed scheduling.
For example, Master Scheduling/MRP generates MRP plans as quickly as possible, so it
schedules planned order start dates using dynamic lead time offsetting. Work in
Process, however, uses detailed scheduling to schedule jobs since it schedules resource
usages in departments with exact start date, end dates and times, not scheduling a
resource when one is not available.
Results from detailed scheduling and dynamic lead time offsetting may differ. The
more resource availability exceptions and capacity modifications from the workday
calendar you have, the more detailed scheduling results differ from dynamic lead time
offsetting results. Assigning preprocessing lead time to manufactured items can also
produce different results; detailed scheduling does not use lead times in its calculations
while dynamic lead time offsetting does.
Material Requirement Dates
Master Scheduling/MRP computes component requirement dates for planned orders
using the offset percentage for the operation where each component is used. Master
Scheduling/MRP multiplies the operation offset percentage times the planned order
lead time to get offset days, and then finds the workday that is the number of days past
the planned order start date.
Resource Load by Department / Date for Planned Orders
Oracle Capacity offsets resource requirement dates the same way that Master
Scheduling/MRP offsets component requirement dates, except it uses resource offset
percentages. Oracle Capacity computes resource offset days as the planned order lead
time multiplied by the resource offset percentage. Oracle Capacity then finds the
workday that is the number of days past the work order start date to find the resource
start date and time.
8/12/2019 BOM Uuser Guide
http://slidepdf.com/reader/full/bom-uuser-guide 213/331
Manufacturing Scheduling 6-5
Component Requirement Dates for ATP Checks
Oracle Inventory lets you check component available to promise (ATP) for assemble to
order (ATO) and Pick to Order (PTO) items. Oracle Bills of Material allows you to
specify the components of an ATO or PTO product that must be promised using ATP.
When you check ATP for a product having such components, Inventory determines therequirement date for components by first computing the manufacturing lead time for
that product using the dynamic lead time calculation and then finding the date that is
the number of workdays before the requested ship date. Inventory assumes that all
ATO product components are required at the beginning of the ATO job.
Related Topics
Overview of Lead Time Management, page 7-1
Overview of Material Requirements Planning, Oracle Master Scheduling/MRP User's
Guide
Overview of On-hand and Availability, Oracle Inventory User's Guide
Required Lead Time Information
Bills of Material lets you automatically compute item, bill of material and routing
information required for dynamic lead time offsetting. You can also maintain lead time
information manually.
Manufactured Items
Dynamic lead time offsetting uses the following lead time attributes for discretelymanufactured items:
• fixed lead time
• variable lead time
• preprocessing lead time
Dynamic lead time offsetting uses the following lead time attributes for repetitively
manufactured items:
• processing lead time
• fixed lead time
Purchased Items
Dynamic lead time offsetting uses the following lead time attributes:
8/12/2019 BOM Uuser Guide
http://slidepdf.com/reader/full/bom-uuser-guide 214/331

8/12/2019 BOM Uuser Guide
http://slidepdf.com/reader/full/bom-uuser-guide 215/331
Manufacturing Scheduling 6-7
workday calendar to calculate the planned order release date.
Suppose your MRP plan produced a requirement for 100 discretely manufactured
assemblies on March 12 and the following information exists for that assembly:
• Requirement date = 12-MAR
• Fixed lead time = 2 days
• Variable lead time = .05 days (1 day per 20 units)
• Preprocessing lead time = 0 days
• Order quantity = 100
Master Scheduling/MRP first computes the total lead time as follows:
Total lead time = 0 + 2 + (100 x .05) Total lead time = 7 days
Suppose your organization's workday calendar has a workday pattern with five days
on and two days off. Workdays 1 - 5 are March 1 - 5. Saturday and Sunday, March 6 and
7, are off. Workdays 6 - 10 are March 8 - 12.
Master Scheduling/MRP then calculates the planned order release date as follows:
Start date = requirement date - total lead time Start date = (12-MAR) - 7 days
Convert planned order requirement date to a workday (using your organization's
workday calendar).
Start date = Date ((Workday 10) - 7)) Start date = Date (3)
Finally, determine the start date.
Start date = 03 - MAR (planned order release date)
Related Topics
Overview of On-hand and Availability, Oracle Inventory User's Guide
Overview of Material Requirements Planning, Oracle Master Scheduling/MRP User's
Guide

8/12/2019 BOM Uuser Guide
http://slidepdf.com/reader/full/bom-uuser-guide 216/331

8/12/2019 BOM Uuser Guide
http://slidepdf.com/reader/full/bom-uuser-guide 217/331

8/12/2019 BOM Uuser Guide
http://slidepdf.com/reader/full/bom-uuser-guide 218/331
7-2 Oracle Bills of Material User's Guide
Item Lead Time Attributes
For all scheduled time elements, which are less than the standard workday, the system
will compute the lead time day by dividing the lead time element by 24. The standard
workday is defined in the workday calendar. Oracle Manufacturing stores the following
lead time information for each item:
• Fixed Lead Time: The portion of manufacturing lead time that is independent of
order quantity. You can enter this factor manually for an item, or compute it
automatically for manufactured items.
• Variable Lead Time: The portion of manufacturing lead time that is dependent on
order quantity. You can enter this factor manually for an item, or compute it
automatically for manufactured items.
• Preprocessing Lead Time: A component of total lead time that represents the time
required to release a purchase order or create a job from the time you learn of the
requirement. You can manually enter preprocessing lead time for bothmanufactured and purchased items.
• Post Processing Lead Time: A component of total lead time that represents the time to
make a purchased item available in inventory from the time you receive it.
Manually enter postprocessing lead time for each purchased item. Postprocessing
lead time for manufactured items is not recognized.
• Processing Lead Time: The time required to procure or manufacture an item. You can
compute processing lead time for a manufactured item, or manually assign a value.
Processing lead time is computed as the time as total integer days required to
manufacture 1 lead time lot size of an item. You must manually assign a processing
lead time for purchased items. Processing lead time does not include preprocessing
and postprocessing lead times.
• Lead Time Lot Size: The quantity you use to calculate manufacturing lead times. You
can specify an item's lead time lot size to be different from the standard lot size.
• Dynamic Lead Time Offsetting: A scheduling method that quickly estimates the start
date of an order, operation, or resource. Dynamic lead time offsetting schedules
using the organization workday calendar.
• Total Lead Time: The fixed lead time plus the variable lead time multiplied by the
order quantity. The planning process uses the total lead time for an item in itsscheduling logic to calculate order start dates from order due dates.
• Cumulative Manufacturing Lead Time: The total time required to make an item if you
had all raw materials in stock but had to make all subassemblies level by level.
Oracle Bills of Material automatically calculates this value, or you can manually
assign a value.
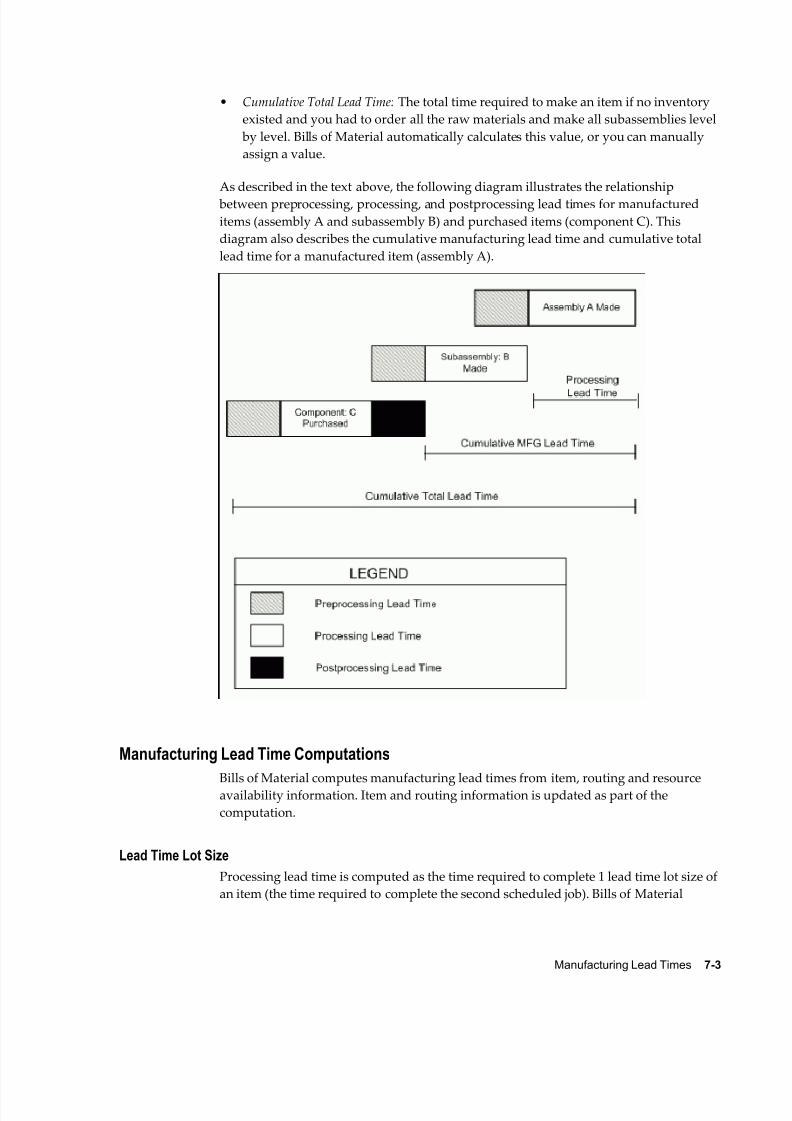
8/12/2019 BOM Uuser Guide
http://slidepdf.com/reader/full/bom-uuser-guide 219/331
Manufacturing Lead Times 7-3
• Cumulative Total Lead Time: The total time required to make an item if no inventory
existed and you had to order all the raw materials and make all subassemblies level
by level. Bills of Material automatically calculates this value, or you can manually
assign a value.
As described in the text above, the following diagram illustrates the relationship
between preprocessing, processing, and postprocessing lead times for manufactured
items (assembly A and subassembly B) and purchased items (component C). This
diagram also describes the cumulative manufacturing lead time and cumulative total
lead time for a manufactured item (assembly A).
Manufacturing Lead Time Computations
Bills of Material computes manufacturing lead times from item, routing and resource
availability information. Item and routing information is updated as part of the
computation.
Lead Time Lot Size
Processing lead time is computed as the time required to complete 1 lead time lot size of
an item (the time required to complete the second scheduled job). Bills of Material

8/12/2019 BOM Uuser Guide
http://slidepdf.com/reader/full/bom-uuser-guide 220/331
7-4 Oracle Bills of Material User's Guide
determines an item's lead time lot size from two item master fields: standard lot size
and lead time lot size.
For items that you plan and cost by the same lot size, you can specify a value only for
the standard lot size. Bills of Material then computes manufacturing lead time using the
standard lot size quantity.
Note: If an item's routing references another item's routing as a
common, set both items' lead time lot size to the same value. If you do
not specify a lead time lot size, ensure that both items' standard lot
sizes are equal.
For items that you plan with one lot size and cost with a different lot size, you can enter
a lead time lot size. Bills of Material then calculates manufacturing lead time using this
value (rather than the standard lot size). If an item does not have a value for the
standard or lead time lot size, Bills of Material uses a quantity of one to compute
manufacturing lead times.
Note: If you enter a lead time lot size for an item, consider the item's
planning lot size to accurately offset lead times. For planned items with
a fixed order quantity, set the lead time lot size to the fixed order
quantity. If a planned item has varying lot sizes, assign a lead time lot
size that represents the typical lot size.
Routings
Oracle Manufacturing uses routing, operation, and resource information to compute
fixed, variable, and processing lead times for manufactured items. Lead times are not
calculated for purchased items even if they have a routing.
When computing manufacturing lead times, primary routings are automatically
updated with lead time and offset percents. As with the item lead time attributes, you
can also manually assign these values.
Lead Time Percent
Oracle Manufacturing stores the lead time percent for each routing operation as the
percent of manufacturing (processing) lead time required for previous operations,
calculated from the start of a job to the start of an operation.
For example, if an item's manufacturing lead time is two days and the primary routinghas two operations with the same duration (1 day), the first operation's lead time
percent is zero and the second operation's lead time percent is 50%.
Offset Percent
Oracle Manufacturing stores the offset percent for each resource on a routing operation
as the percent of manufacturing (processing) lead time required for previous

8/12/2019 BOM Uuser Guide
http://slidepdf.com/reader/full/bom-uuser-guide 221/331
Manufacturing Lead Times 7-5
operations, calculated from the start of the job to the start time of a resource at an
operation.
For example, both operations in the previous example for lead time percent require one
day (eight hours) to perform. If you have two different resources assigned to the second
operation, and each resource requires four hours to complete their task, the offset
percent is 50% for the first resource and 75% for the second resource.
Fixed and Variable Lead Times
You can automatically compute processing, fixed, and variable lead times for
manufactured items, whether they are produced using discrete jobs or repetitive
schedules.
A value of zero is assigned to the fixed, variable, and processing lead times of a
manufactured item that does not have a routing and is not assigned to a production
line.
Discrete Jobs Lead Times
Bills of Material computes manufacturing lead time by forward scheduling two jobs: the
first job is scheduled for a quantity of zero and the second job is scheduled for a
quantity equal to the item's lead time lot size. The first job determines the fixed lead
time and the second job determines the variable and processing lead times.
Using detailed scheduling, fixed and variable lead times are computed as the difference
between the total time required for two scheduled jobs. In other words, Bills of Material
plots total time required for a work in process job as a function of order quantity for
both order quantities and computes the slope of the line that the two points define.
The following diagram illustrates discrete lead times calculation, as described in the text
above:

8/12/2019 BOM Uuser Guide
http://slidepdf.com/reader/full/bom-uuser-guide 222/331
7-6 Oracle Bills of Material User's Guide
Important: Although Bills of Material uses detailed scheduling to
compute lead times, all calendar days are considered workdays
regardless of days off, workday exceptions, or shift exceptions.
Note: Resource availability is calculated based on the average shift
capacity. Shifts assigned to a resource typically specify work shift
patterns. If the shift patterns change on different days, the sum of the
total hours available across all shifts in a day is usually the same. If the
total hours is different, Oracle uses the average total hours per workday.
Example
In the following example, Oracle Bills of Material assumes that the
resource availability for Resource A is 8 hours ((10 + 10 + 4)/3 = 8).
Operation Resource Shift Shift Hours Day
Operation 10 Resource A Shift 1 00:00 - 05:00 Monday
Operation 10 Resource A Shift 2 08:00 - 13:00 Monday
Operation 10 Resource A Shift 3 08:00 - 18:00 Tuesday

8/12/2019 BOM Uuser Guide
http://slidepdf.com/reader/full/bom-uuser-guide 223/331
Manufacturing Lead Times 7-7
Operation Resource Shift Shift Hours Day
Operation 10 Resource A Shift 4 10:00 - 14:00 Wednesday
Operation 10 Resource B Shift 5 06:00 - 18:00 Wednesday
The resource availability for Resource A is calculated as 8 hours ((10 +
10 + 4)/3 = 8). Notice that the shift hours defined for the same workday
(Monday) were added together and the resource availability is an
average. In this case, if the resource usage rate is 10 hours for Resource
A and 12 hours for Resource B, then the variable leadtime is calculated
as 10/8 + 12/12 = 2.25 days. This number is reasonable because if an
actual job to produce this assembly was scheduled over a Wednesday,
it would take slightly more than 2 days to produce the assembly. On
Wednesdays, there is only 6 hours of availability as opposed to the
normal 10 hour shifts during the other workdays.
Note: You cannot schedule a resource unless all prior quantities
scheduled have been completed.
Sequential operations and resources assume that all quantities are
scheduled in their entirety through a resource before the next quantity
is scheduled to begin. For example, the time scheduled for two
resources cannot overlap on a given day. However, when you schedule
the job, the leadtime is slightly longer than you expected:
Operation 10
Resource Usage Rate (Hours) Shift Assigned
1 3 00:00 - 03:00
2 3 05:00 - 08:00
There is no fixed leadtime and the leadtime lot size is 2. The variable
leadtime is 2 days because you need to complete the entire quantity of 2(which takes 2 days) before you can start the second resource.
Bills of Material uses the following formulas to compute fixed and variable lead times:
Schedule a job for zero quantity beginning on the system date and compute fixed lead
time as follows:

8/12/2019 BOM Uuser Guide
http://slidepdf.com/reader/full/bom-uuser-guide 224/331
7-8 Oracle Bills of Material User's Guide
completion date (of one item) - system date
Schedule a job for the lead time lot size beginning on the system date and compute
variable lead time (rate) as follows:
[(completion date (of all items) - system date) - fixed lead time] / lead time lot size
Repetitive Schedule Lead Times
A lead time lot size of 1 is always used to compute lead times for items produced on
routing-based schedules.
The following terms apply to repetitive schedules:
• Day: A day is equal to the number of hours the production line is active. If the line is
active from 8:00 to 16:00, the day is 8 hours long.
• Production Rate (Line Speed): The number of assemblies built per line, per hour.
• Line Fixed Lead Time: The fixed lead time of the production line, that is, the amount
of time for one assembly to travel down a production line.
• Production Interval: The time between two assemblies on a production line. If the
production rate (line speed) is 10 assemblies per hour, then the production interval
is .1 hours or once every .0125 days, or 1/(10*8), for a line that runs 8 hours per day.
1 / (production rate * day)
The Calculate Manufacturing Lead Times program calls the scheduler twice, first using
a quantity of 1, then using a quantity of 0. For each case, the scheduling lead time
(expressed in days) is returned. This is the total time taken to build the assemblies. The
program then converts the two values into the fixed lead time and the variable lead
time item attributes, respectively.
The following table illustrates how scheduling lead times are calculated:
Assembly's Routing Scheduling Basis Quantity Scheduling LeadTime
No routing routing 0 0
No routing routing 1 production interval
No routing fixed 0 line fixed lead time
No routing fixed 1 line fixed lead time +
production interval

8/12/2019 BOM Uuser Guide
http://slidepdf.com/reader/full/bom-uuser-guide 225/331
Manufacturing Lead Times 7-9
Assembly's Routing Scheduling Basis Quantity Scheduling LeadTime
Assembly with
item-based resources
only
routing 0 fixed lead time -
production interval
- routing 1 (fixed lead time -
production interval) +
production interval
- fixed 0 line fixed lead time
- fixed 1 line fixed lead time +
production interval
Assembly with item-and lot- based
resources
routing 0 fixed lead time -production interval
- routing 1 (fixed lead time -
production interval) +
production interval
- fixed 0 line fixed lead time
- fixed 1 line fixed lead time +
production interval
For fixed lead time lines, the fixed and variable lead times are not based on whether a
routing exists. The fixed lead time is always the line fixed lead time , the amount of time
for one assembly to travel down a production line. The variable lead time is always the
production interval:
variable lead time (repetitive schedule) = 1 / (production rate * day)
For a routing-based line, the fixed lead time is the time required to build one assembly;
the fixed lead time includes the time for both item and lot-based resources.
The following diagram illustrates repetitive lead times calculation, as described in the
text above:

8/12/2019 BOM Uuser Guide
http://slidepdf.com/reader/full/bom-uuser-guide 226/331
7-10 Oracle Bills of Material User's Guide
Processing Lead Time
Bills of Material also computes the processing lead time as the time required to
complete the second scheduled job (where the job starts on the system date):
completion date (of one item) - system date
Processing lead time is presented in whole days rounded to the next day.
Example
For example, if for item A, you had the following data:
• Lead time lot size = 10 units
• System date = 01-JAN
• End date for work in process job for 1 unit = 10-JAN
• End date for work in process job for 10 units = 13-JAN
Then:
fixed lead time = completion date (of one item) - system date
fixed lead time = = 10-JAN - 01-JAN
fixed lead time = = 10 days

8/12/2019 BOM Uuser Guide
http://slidepdf.com/reader/full/bom-uuser-guide 227/331
Manufacturing Lead Times 7-11
Variable lead time = [(completion date - system date) (rate) - fixed
lead time] / lead time lot size
Variable lead time = [(13-JAN - 01-JAN) - 10] / 10
Variable lead time = [13 - 10] / 10
Variable lead time = 0.3 days/unit
Processing lead time = completion date - system date
Processing lead time = 13-JAN - 01-JAN
Processing lead time = 13 days
Offset Computations
The corresponding operation lead time percent for operations in the primary routing is
updated automatically.
For example, if the routing operations for item A had the following start dates (on a job
for 10 assemblies), Bills of Material would compute and update the following operation
lead time percentages, as shown in the table below:
Operation Lead Time Percent
Op Seq Start Dateand Time
End Dateand Time
TimeRequired
Previous OpTimeRequired
Lead TimePercent
10 01-JAN -
00:00
02-JAN -
24:00
2 0 0/10 = 0%
20 03-JAN -
00:00
04-JAN -
24:00
2 2 2/10 = 20%
30 05-JAN -
00:00
09-JAN -
24:00
4 4 4/10 = 40%
40 09-JAN -
00:00
10-JAN -
24:00
2 8 8/10= 80%

8/12/2019 BOM Uuser Guide
http://slidepdf.com/reader/full/bom-uuser-guide 228/331
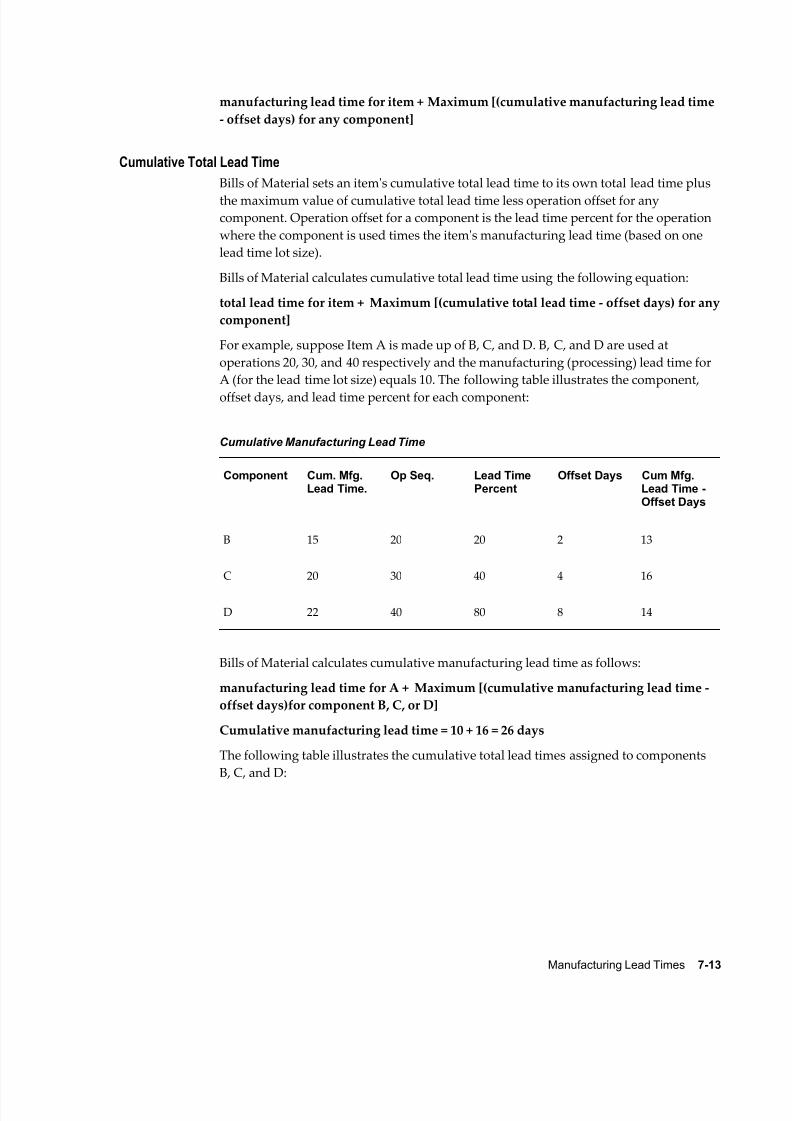
8/12/2019 BOM Uuser Guide
http://slidepdf.com/reader/full/bom-uuser-guide 229/331
Manufacturing Lead Times 7-13
manufacturing lead time for item + Maximum [(cumulative manufacturing lead time
- offset days) for any component]
Cumulative Total Lead Time
Bills of Material sets an item's cumulative total lead time to its own total lead time plus
the maximum value of cumulative total lead time less operation offset for anycomponent. Operation offset for a component is the lead time percent for the operation
where the component is used times the item's manufacturing lead time (based on one
lead time lot size).
Bills of Material calculates cumulative total lead time using the following equation:
total lead time for item + Maximum [(cumulative total lead time - offset days) for any
component]
For example, suppose Item A is made up of B, C, and D. B, C, and D are used at
operations 20, 30, and 40 respectively and the manufacturing (processing) lead time for
A (for the lead time lot size) equals 10. The following table illustrates the component,
offset days, and lead time percent for each component:
Cumulative Manufacturing Lead Time
Component Cum. Mfg.Lead Time.
Op Seq. Lead TimePercent
Offset Days Cum Mfg.Lead Time -Offset Days
B 15 20 20 2 13
C 20 30 40 4 16
D 22 40 80 8 14
Bills of Material calculates cumulative manufacturing lead time as follows:
manufacturing lead time for A + Maximum [(cumulative manufacturing lead time -
offset days)for component B, C, or D]
Cumulative manufacturing lead time = 10 + 16 = 26 days
The following table illustrates the cumulative total lead times assigned to components
B, C, and D:
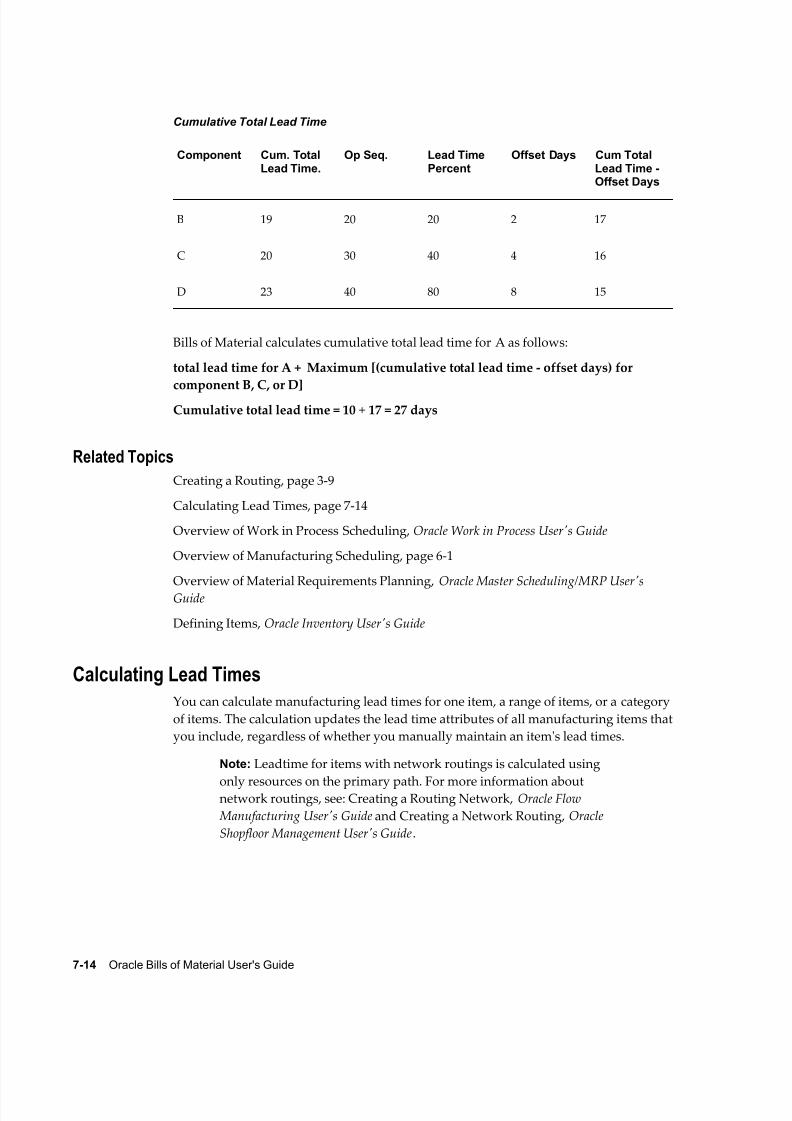
8/12/2019 BOM Uuser Guide
http://slidepdf.com/reader/full/bom-uuser-guide 230/331
7-14 Oracle Bills of Material User's Guide
Cumulative Total Lead Time
Component Cum. TotalLead Time.
Op Seq. Lead TimePercent
Offset Days Cum TotalLead Time -Offset Days
B 19 20 20 2 17
C 20 30 40 4 16
D 23 40 80 8 15
Bills of Material calculates cumulative total lead time for A as follows:
total lead time for A + Maximum [(cumulative total lead time - offset days) for
component B, C, or D]
Cumulative total lead time = 10 + 17 = 27 days
Related Topics
Creating a Routing, page 3-9
Calculating Lead Times, page 7-14
Overview of Work in Process Scheduling, Oracle Work in Process User's Guide
Overview of Manufacturing Scheduling, page 6-1
Overview of Material Requirements Planning, Oracle Master Scheduling/MRP User's
Guide
Defining Items, Oracle Inventory User's Guide
Calculating Lead Times
You can calculate manufacturing lead times for one item, a range of items, or a category
of items. The calculation updates the lead time attributes of all manufacturing items that
you include, regardless of whether you manually maintain an item's lead times.
Note: Leadtime for items with network routings is calculated using
only resources on the primary path. For more information aboutnetwork routings, see: Creating a Routing Network, Oracle Flow
Manufacturing User's Guide and Creating a Network Routing, Oracle
Shopfloor Management User's Guide.

8/12/2019 BOM Uuser Guide
http://slidepdf.com/reader/full/bom-uuser-guide 231/331
Manufacturing Lead Times 7-15
Lead Times By Item Category
You can limit the items included in the manufacturing lead time calculation by
specifying an item range or item category range when you submit the manufacturing
lead time program. Using item categories, you can segregate the manufactured items
whose lead times you manually maintain from those items you include in themanufacturing lead time calculation. You can also limit the parent items included in the
cumulative lead time calculations by using item categories.
Recomputing Lead Times
Changes to routing and resource usages can impact an item's lead times. After each
change you make to a routing (adjusting usages, adding operations, and so on),
recalculate the manufacturing lead time for the item.
PrerequisitesYou must define a bill of material for the parent item and member items whose lead
time is to be calculated. See: Creating a Bill of Material, page 2-9.
You must define a routing for each item that will be used in the lead time calculation.
See: Creating a Routing, page 3-9.
You must define a lead time lot size for the parent item whose lead time is to be
calculated. See: Creating a Routing, page 3-9.
To calculate lead times:
1. Navigate to the Calculate Lead Times window. See: Submitting Requests, Oracle
E-Business Suite User's Guide.
2. Select a Type:
Request: calculate or roll up lead times without a report.
Set: calculate lead times and produce either the Bills of Material Structure Report or
the Routing Report.
3. If you selected Set in the previous step, select one of the following:
Calculate Cumulative Lead Times Set GUI: calculates cumulative lead times and
produces the Bills of Material Structure Report.
Calculate Manufacturing Lead Times Set GUI: calculates manufacturing lead times and
produces the Routing Report.
If you selected Request in the previous step, select Calculate Manufacturing Lead
Times.
4.Indicate arange of items or a specific item.

8/12/2019 BOM Uuser Guide
http://slidepdf.com/reader/full/bom-uuser-guide 232/331
7-16 Oracle Bills of Material User's Guide
5. If you chose a specific item, enter the item.
6. Optionally, enter a revision for the item.
Enter the date and time to snapshot the bill or routing. All data effective as of this
date and time are included in the calculation.
7. If you chose to calculate lead times for a range of items, enter a beginning and
ending range.
8. If you chose to calculate lead times for a range of items, you may enter a category
set to calculate the lead times of the items associated with this category set. The
default is the category set you defined for your functional area.
9. If you chose to enter a category set, enter a beginning and ending category.
Changes to the indented bill of material and component lead times can impact a parent
item's cumulative lead times. After each change made to a bill (adding components,assigning to a different operation, and so on) or the item lead times, roll up the
cumulative lead times.
To roll up cumulative lead times:
1. Navigate to the Calculate Lead Times window. See: Submitting Requests, Oracle
E-Business Suite User's Guide.
2. Select Request for the Type.
3. Select Rollup Cumulative Lead Times for the Name.
4. Indicate a range of items or a specific item.
5. If you chose a specific item, enter the item.
6. Optionally, enter a revision for the item.
7. Enter the date and time to explode the bill of material.
8. If you chose to roll up cumulative lead times for a range of items, enter a beginning
and ending range.
9. If you chose to roll up cumulative lead times for a range of items, you may enter a
category set to roll up the cumulative lead times of the items associated with this
category set. The default is the category set you defined for your functional area.
10. If you chose to enter a category set, enter a beginning and ending category.
Important: You can calculate lead times from the Routings form,
8/12/2019 BOM Uuser Guide
http://slidepdf.com/reader/full/bom-uuser-guide 233/331

8/12/2019 BOM Uuser Guide
http://slidepdf.com/reader/full/bom-uuser-guide 234/331
8/12/2019 BOM Uuser Guide
http://slidepdf.com/reader/full/bom-uuser-guide 235/331
Oracle E-Records 8-1
8Oracle E-Records
This chapter discusses the acquisition of electronic signatures (e-signatures) on
electronic records (e-records) in Oracle Bills of Material. E-records and e-signatures
enable you to comply with the 21 CFR Part 11 regulations.
This chapter covers the following topics:
• 21 CFR Part 11 Overview
• E-records and E-signatures for Oracle Bills of Material
• Viewing Oracle E-Records and E-Signatures
21 CFR Part 11 Overview
The Food and Drug Administration (FDA) protects the public health by regulating the
food and drug industries. In 1997, the FDA issued new regulations for quality systems
using computerized software in the FDA Code of Federal Regulations (CFR) Title 21Part 11, otherwise known as 21 CFR Part 11. The regulations strive to assure that
computerized records are safe, secure, and as accurate as a paper based system.
According to 21 CFR Part 11, the software application's role in the data management
process is to guarantee and substantiate that the manufactured product data is
electronically captured, manipulated, extracted, and coded during the manufacturing of
the product. All subject data and definitional objects (metadata) must have a complete
audit trail.
In general, 21 CFR Part 11 describes the requirements that must be met when using
electronic records (e-records) and electronic signatures (e-signatures), but does not
describe where they are required. The FDA left the definition of where to use electronic
records and which signatures to apply as electronic signatures to the discretion of the
medical device manufacturers who use software applications as part of their quality
management system. The predicate rule used by the medical device manufacturers is
FDA 21 CFR Part 820. Oracle Discrete Manufacturing Applications enable electronic
records and signatures for certain business events, as well as give users ways to choose
which business events must meet 21 CFR Part 11 requirements, by using the Oracle

8/12/2019 BOM Uuser Guide
http://slidepdf.com/reader/full/bom-uuser-guide 236/331
8-2 Oracle Bills of Material User's Guide
E-Records product. Refer to the Oracle Manufacturing Implementing Oracle E-Records in
Discrete Manufacturing Guide and the Oracle E-Records Implementation Guide for
information on how to tailor Oracle E-Records to meet your needs.
Depending on the type of business event, an electronic signature is either online or
deferred. An online signature requires that you enter a valid signature before saving the
event or transaction. A deferred signature enables you to save the event in a PendingApproval state before obtaining a final signature. Many times a deferred signature
requires a workflow approval, so the event is saved before full approval is received
back from the workflow process.
Certain business events also include any attachment made to the business event object
in the e-record. For example, if a drawing depicting an engineering change is attached
to an engineering change order, you can review the drawing in the e-record for the
engineering change order.
The e-records and e-signatures (ERES) framework is a central tool designed to achieve
21 CFR Part 11 compliance for the necessary Oracle Applications business events. The
ERES framework uses common Oracle Applications components such as OracleWorkflow business events, the XML Gateway, and others.
In order to enable electronic records and signatures for Oracle Bills of Material, you
must follow the steps listed in Implementing E-Records, Oracle E-Records Implementation
Guide. Otherwise, no e-records or e-signatures are required.
Related Topics
E-records and E-signatures for Oracle Bills of Material, page 8-2
Viewing Oracle E-Records and E-Signatures, Oracle Quality User's Guide
E-records and E-signatures for Oracle Bills of Material
The following table lists the Oracle Bills of Material events seeded in Oracle E-Records.
Event Online or DeferredE-signature
E-Record IncludesAttachment
Bill Creation Online Yes
Bill Update Online Yes
Routing Creation Online Yes
Routing Update Online Yes
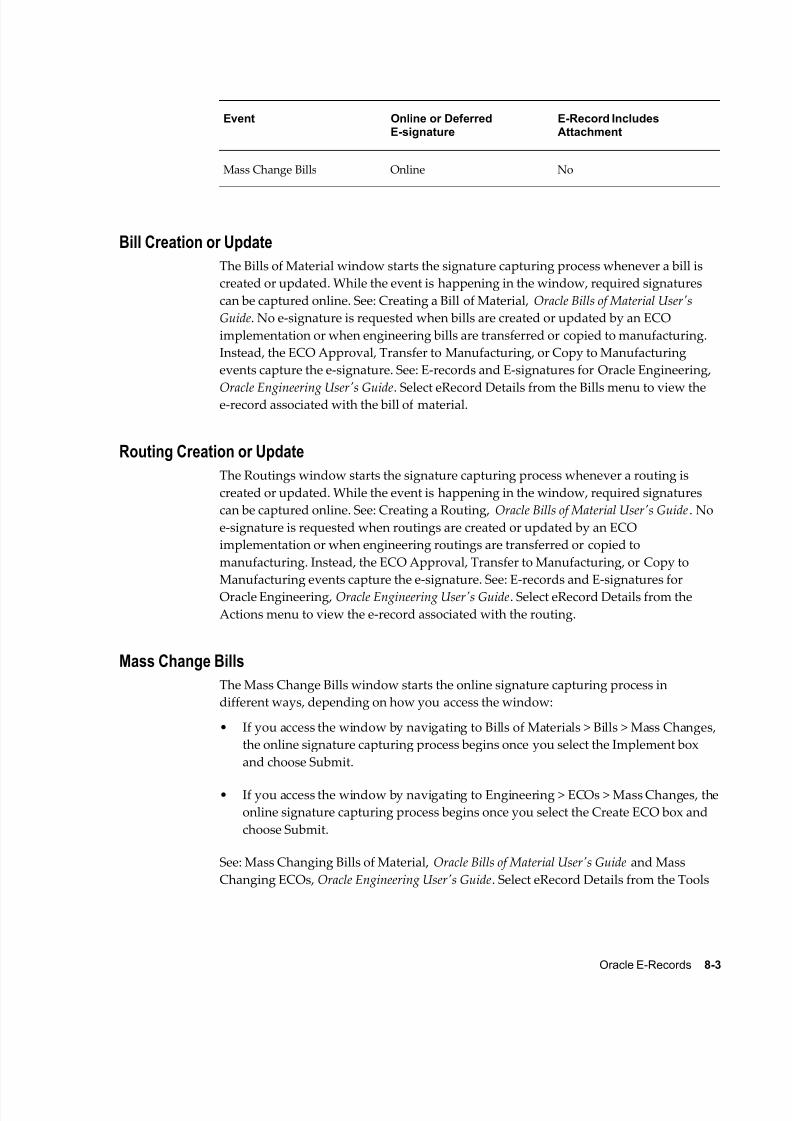
8/12/2019 BOM Uuser Guide
http://slidepdf.com/reader/full/bom-uuser-guide 237/331
Oracle E-Records 8-3
Event Online or DeferredE-signature
E-Record IncludesAttachment
Mass Change Bills Online No
Bill Creation or Update
The Bills of Material window starts the signature capturing process whenever a bill is
created or updated. While the event is happening in the window, required signatures
can be captured online. See: Creating a Bill of Material, Oracle Bills of Material User's
Guide. No e-signature is requested when bills are created or updated by an ECO
implementation or when engineering bills are transferred or copied to manufacturing.
Instead, the ECO Approval, Transfer to Manufacturing, or Copy to Manufacturing
events capture the e-signature. See: E-records and E-signatures for Oracle Engineering,
Oracle Engineering User's Guide. Select eRecord Details from the Bills menu to view thee-record associated with the bill of material.
Routing Creation or Update
The Routings window starts the signature capturing process whenever a routing is
created or updated. While the event is happening in the window, required signatures
can be captured online. See: Creating a Routing, Oracle Bills of Material User's Guide. No
e-signature is requested when routings are created or updated by an ECO
implementation or when engineering routings are transferred or copied to
manufacturing. Instead, the ECO Approval, Transfer to Manufacturing, or Copy to
Manufacturing events capture the e-signature. See: E-records and E-signatures for
Oracle Engineering, Oracle Engineering User's Guide. Select eRecord Details from the
Actions menu to view the e-record associated with the routing.
Mass Change Bills
The Mass Change Bills window starts the online signature capturing process in
different ways, depending on how you access the window:
• If you access the window by navigating to Bills of Materials > Bills > Mass Changes,
the online signature capturing process begins once you select the Implement box
and choose Submit.
• If you access the window by navigating to Engineering > ECOs > Mass Changes, the
online signature capturing process begins once you select the Create ECO box and
choose Submit.
See: Mass Changing Bills of Material, Oracle Bills of Material User's Guide and Mass
Changing ECOs, Oracle Engineering User's Guide. Select eRecord Details from the Tools

8/12/2019 BOM Uuser Guide
http://slidepdf.com/reader/full/bom-uuser-guide 238/331
8-4 Oracle Bills of Material User's Guide
menu to view the e-record associated with the changed bills.
Related Topics
21 CFR Part 11 Overview, page 8-1
Viewing Oracle E-Records and E-Signatures, page 8-4
Viewing Oracle E-Records and E-Signatures
You can view e-records and e-signatures using the following methods:
• Using the Oracle E-Records Evidence Store to query e-records and e-signatures. See:
Evidence Store, Oracle E-Records Implementation Guide.
• Selecting the eRecord Details option from the Tools menu of a transaction or event
initiating form. This option is available from many, but not all, of the transaction or
event initiating forms.
Related Topics
21 CFR Part 11 Overview, page 8-1
E-records and E-signatures for Oracle Bills of Material, page 8-2

8/12/2019 BOM Uuser Guide
http://slidepdf.com/reader/full/bom-uuser-guide 239/331
Reports and Processes 9-1
9Reports and Processes
This chapter describes Oracle Bills of Material reports and processes and their
submission parameters.
This chapter covers the following topics:
• Bill of Material Comparison Report
• Bill of Material Listing
• Bill of Material Loop Report
• Bill of Material Structure Report
• Bills of Material Parameters Report
• Calculate Cumulative Yield for Network Routing
• Calculate Manufacturing Lead Times
• Consolidated Bill of Material Report• Delete Items Report
• Department Classes Report
• Department Report
• Item Where Used Report
• Pre-Explode Configurable Bills of Material
• Resource Report
• Resource Where Used Report
• Rollup Cumulative Lead Times
• Routing Report
• Standard Operation Report
• Workday Exception Sets Report
• Oracle Configurator Concurrent Programs
8/12/2019 BOM Uuser Guide
http://slidepdf.com/reader/full/bom-uuser-guide 240/331
9-2 Oracle Bills of Material User's Guide
Bill of Material Comparison Report
Use the Bill of Material Comparison Report to report the comparison between two
manufacturing assemblies. You can compare primary bills, manufacturing and
engineering bills, alternates, and different revisions. Based on your comparison criteria,if the assemblies have identical components, item sequences, operation sequences,
yields, quantities, and implementations, one line is printed for each identical
component. Otherwise, the report prints a separate line for each different component.
To submit the Bill of Material Comparison Report:
1. In the Submit Requests window, select Bill of Material Comparison Report from the
Name list of values.
The Parameters window opens. The parameters for the Bill of Material Comparison
Report are identical to those you supply when comparing bills of material online.
2. Choose OK.
3. Choose Submit.
Related Topics
Comparing Bills of Materials, page 2-36
Submitting a Request, Oracle E-Business Suite User's Guide
Bill of Material ListingUse the Bill of Material Listing to report manufacturing and engineering bills without
any associated component or routing information.
To submit the Bill of Material Listing:
1. In the Submit Requests window, select Bill of Material Listing from the Name list of
values.
The Parameters window opens. Enter values for the following parameters:
• All Organizations
Choose one of the following options:
No Report the bill listing for the current
organization.
8/12/2019 BOM Uuser Guide
http://slidepdf.com/reader/full/bom-uuser-guide 241/331
Reports and Processes 9-3
Yes Report the bill listing for all organizations
having the same item master organization
as the current organization, and for those
organizations accessible by the user
responsibility.
• Organization Hierarchy
Enter a valid organization hierarchy name from the list of values. If the value
for the All Organizations parameter is set to No, and you have provided a value
for the Organization Hierarchy parameter, then the report will provide bill
listing information for the current organization and all organizations below the
current organization in the specified organization hierarchy. If this parameter is
left blank, and the All Organizations parameter is set to No, then the report will
provide bill listing information for the current organization. You can enter a
value in this field only if you have entered No in the All Organizations field.
• Items From/To
To restrict the report to a range of items, select the beginning and ending item
numbers.
• Category Set
Enter a category set to report on. The default is the category set you defined for
your functional area.
• Categories From/To
To restrict the report to a range of categories, select the beginning and ending
category.
• Alternate Selection
Choose one of the following options:
All Report the bill of material information for
the primary and alternate assemblies.
Primary Report the bill of material information for
only the primary assembly.
Specific Report the bill of material information for
the alternate assembly you specify.

8/12/2019 BOM Uuser Guide
http://slidepdf.com/reader/full/bom-uuser-guide 242/331
9-4 Oracle Bills of Material User's Guide
• Alternate
Enter a specific alternate to report.
• Common Organization
Enter the organization where you define bills of material in your current
organization reference. Oracle Bills of Material prints the bill information for
each common bill of material.
• Common Bill (Optional, Flexfield)
Enter common bills that report bill of material information.
2. Choose OK.
3. Choose Submit.
Related Topics
Submitting a Request, Oracle E-Business Suite User's Guide
Creating Organization Hierarchies, Using Oracle HRMS-The Fundamentals
Bill of Material Loop Report
Use the Bill of Material Loop Report to check for loops in a bill of material. Bill loops
occur when you assign an assembly as a component to itself somewhere in the
multilevel structure. You must fix loops before you can run an accurate MRP, or define
a discrete job or repetitive schedule for the assembly.If loop exists, then the components that are in the loop for the assembly are shown in
the report. If no loop exists, then no components are shown for the assembly in the
report.
To submit the Bill of Material Loop Report:
1. In the Submit Requests window, select Bill of Material Loop Report from the Name
list of values.
The Parameters window opens. Enter values for the following parameters:
• Item Selection (Required, Default)
Choose one of the following options:
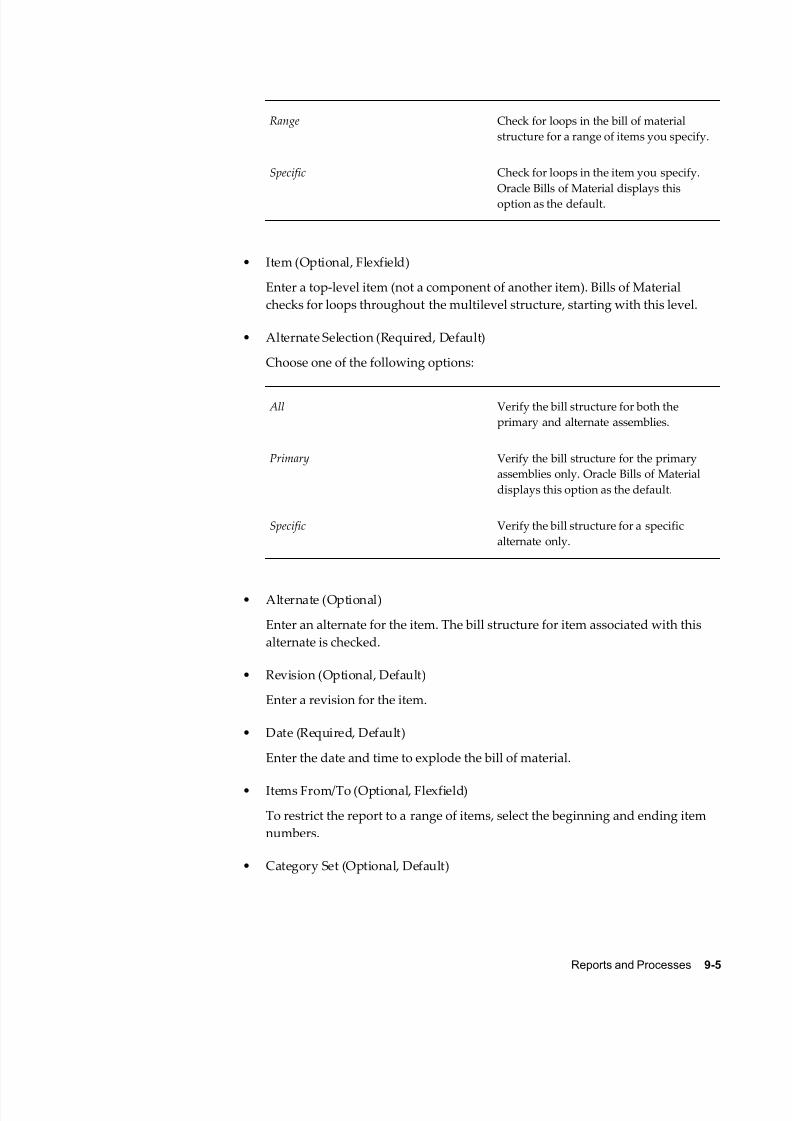
8/12/2019 BOM Uuser Guide
http://slidepdf.com/reader/full/bom-uuser-guide 243/331
Reports and Processes 9-5
Range Check for loops in the bill of material
structure for a range of items you specify.
Specific Check for loops in the item you specify.
Oracle Bills of Material displays this
option as the default.
• Item (Optional, Flexfield)
Enter a top-level item (not a component of another item). Bills of Material
checks for loops throughout the multilevel structure, starting with this level.
• Alternate Selection (Required, Default)
Choose one of the following options:
All Verify the bill structure for both the
primary and alternate assemblies.
Primary Verify the bill structure for the primary
assemblies only. Oracle Bills of Material
displays this option as the default.
Specific Verify the bill structure for a specific
alternate only.
• Alternate (Optional)
Enter an alternate for the item. The bill structure for item associated with this
alternate is checked.
• Revision (Optional, Default)
Enter a revision for the item.
• Date (Required, Default)
Enter the date and time to explode the bill of material.
• Items From/To (Optional, Flexfield)
To restrict the report to a range of items, select the beginning and ending item
numbers.
• Category Set (Optional, Default)
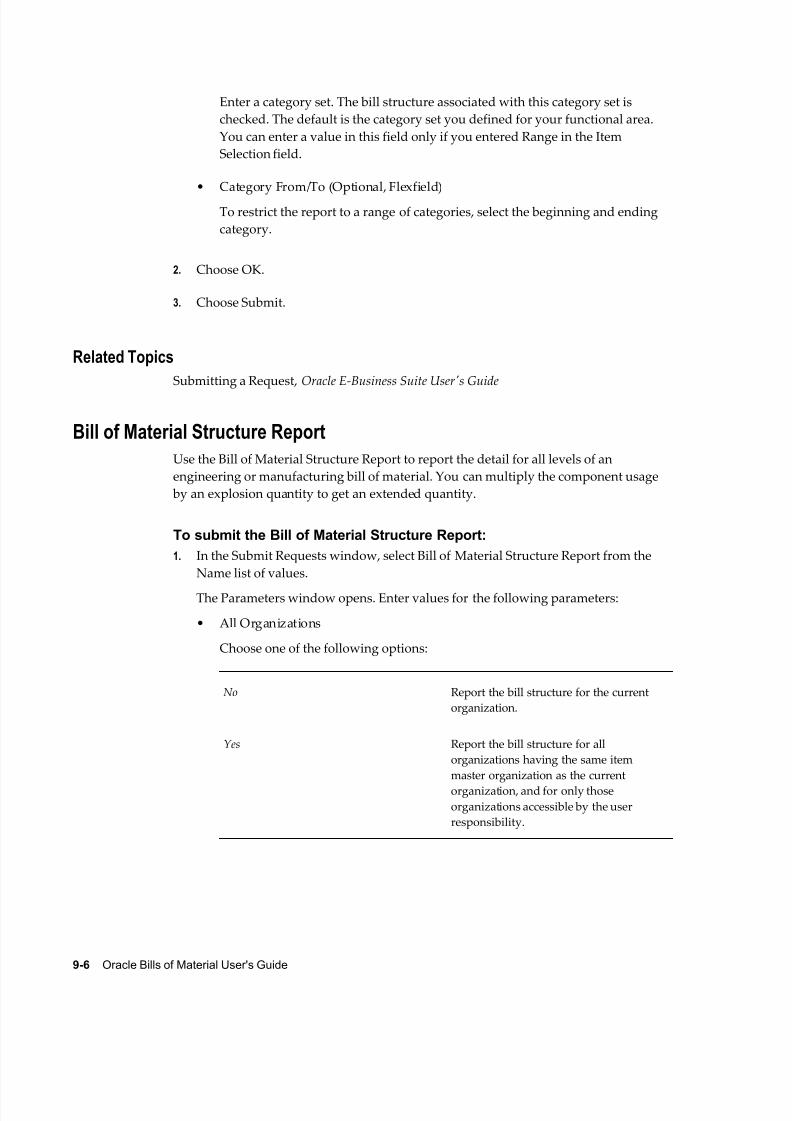
8/12/2019 BOM Uuser Guide
http://slidepdf.com/reader/full/bom-uuser-guide 244/331
9-6 Oracle Bills of Material User's Guide
Enter a category set. The bill structure associated with this category set is
checked. The default is the category set you defined for your functional area.
You can enter a value in this field only if you entered Range in the Item
Selection field.
• Category From/To (Optional, Flexfield)
To restrict the report to a range of categories, select the beginning and ending
category.
2. Choose OK.
3. Choose Submit.
Related Topics
Submitting a Request, Oracle E-Business Suite User's Guide
Bill of Material Structure Report
Use the Bill of Material Structure Report to report the detail for all levels of an
engineering or manufacturing bill of material. You can multiply the component usage
by an explosion quantity to get an extended quantity.
To submit the Bill of Material Structure Report:
1. In the Submit Requests window, select Bill of Material Structure Report from the
Name list of values.
The Parameters window opens. Enter values for the following parameters:
• All Organizations
Choose one of the following options:
No Report the bill structure for the current
organization.
Yes Report the bill structure for all
organizations having the same item
master organization as the current
organization, and for only those
organizations accessible by the user
responsibility.

8/12/2019 BOM Uuser Guide
http://slidepdf.com/reader/full/bom-uuser-guide 245/331
Reports and Processes 9-7
• Organization Hierarchy
Enter a valid organization hierarchy name from the list of values. If the value
for the All Organizations parameter is set to No, and you have provided a value
for the Organization Hierarchy parameter, then the report will provide bill
structure information for the current organization and all organizations below
the current organization in the specified organization hierarchy. If thisparameter is left blank, and the All Organizations parameter is set to No, then
the report will provide bill structure information for the current organization.
You can enter a value in this field only if you have entered No in the All
Organizations field.
• Item Selection (Required, Default)
Choose one of the following options:
Range Report the bill structure for the range of
items you specify.
Specific Report the bill structure for the specific
item you specify.
• Item (Optional, Flexfield)
Enter a specific item to report its bill structure.
• Alternate Selection (Required, Default)
Choose one of the following options:
All Report the bill structure for the primary
and alternate assemblies.
Primary Report the bill structure for only the
primary assembly.
Specific Report the bill structure for the alternate
assembly you specify.
• Alternate (Optional)
Enter a specific alternate to report.
• Revision (Optional)

8/12/2019 BOM Uuser Guide
http://slidepdf.com/reader/full/bom-uuser-guide 246/331
9-8 Oracle Bills of Material User's Guide
Enter a revision for the item. The bill structure associated with this revision is
printed.
• Date (Optional)
Enter a revision date and time. If you entered a specific item and a revision, the
date defaults to the highest date of the revision. The bill structure effective as ofthis date and time is printed.
• Items From/To (Optional, Flexfield)
To restrict the report to a range of items, select the beginning and ending item
numbers.
• Category Set (Optional, Default)
Enter a category set. The bill structure information associated with this category
set is reported. The category set you defined for your functional area is the
default.
• Categories From/To (Optional, Flexfield)
To restrict the report to a range of categories, select the beginning and ending
category.
• Levels to Explode (Required, Default)
Enter the number of levels to explode for the bill of material. The default is the
value specified when bill of material parameters were defined.
• Implemented Only (Required, Default)
Indicate whether to report only implemented or all components used byassemblies as of the effective date.
• Display Option (Required, Default)
Choose one of the following options:
All Report all past, current, and pending
components associated with the bill.
Current Report all components effective as of the
revision date.
Future and current Report all future and current components
as of the revision date.

8/12/2019 BOM Uuser Guide
http://slidepdf.com/reader/full/bom-uuser-guide 247/331
Reports and Processes 9-9
• Explosion Quantity (Required, Default)
Enter a quantity to explode. This quantity is used to calculate the requirements
for the components of the parent item by multiplying this quantity by the
component usage in the bill of material.
• Assembly Detail (Required, Default)
Indicate whether you want to print assembly detail associated with the bill.
• Order Entry Detail (Required, Default)
Indicate whether to print order entry detail for the components on the bill.
• Leadtime and Other Detail (Required, Default)
Indicate whether to print lead time details associated with the components on
the bill.
• Reference Designators (Required, Default)Indicate whether to print reference designators for the components on the bill.
• Substitute Components (Required, Default)
Indicate whether to print substitute components for the components on the bill.
• Order By (Required, Default)
Choose one of the following options:
Item Seq, Op Seq For each bill level, order the components
by item sequence, then by operationsequence.
Op Seq, Item Seq For each bill level, order the components
by operation sequence, then by item
sequence.
• Use Planning Percent (Required, Default)
Indicate whether you want to use the planning percent to calculate the
component requirements of the present item. Component requirements are
calculated by multiplying the component usage quantity by the explosionquantity, and then multiplying the component planning percent.
2. Choose OK.
3. Choose Submit.
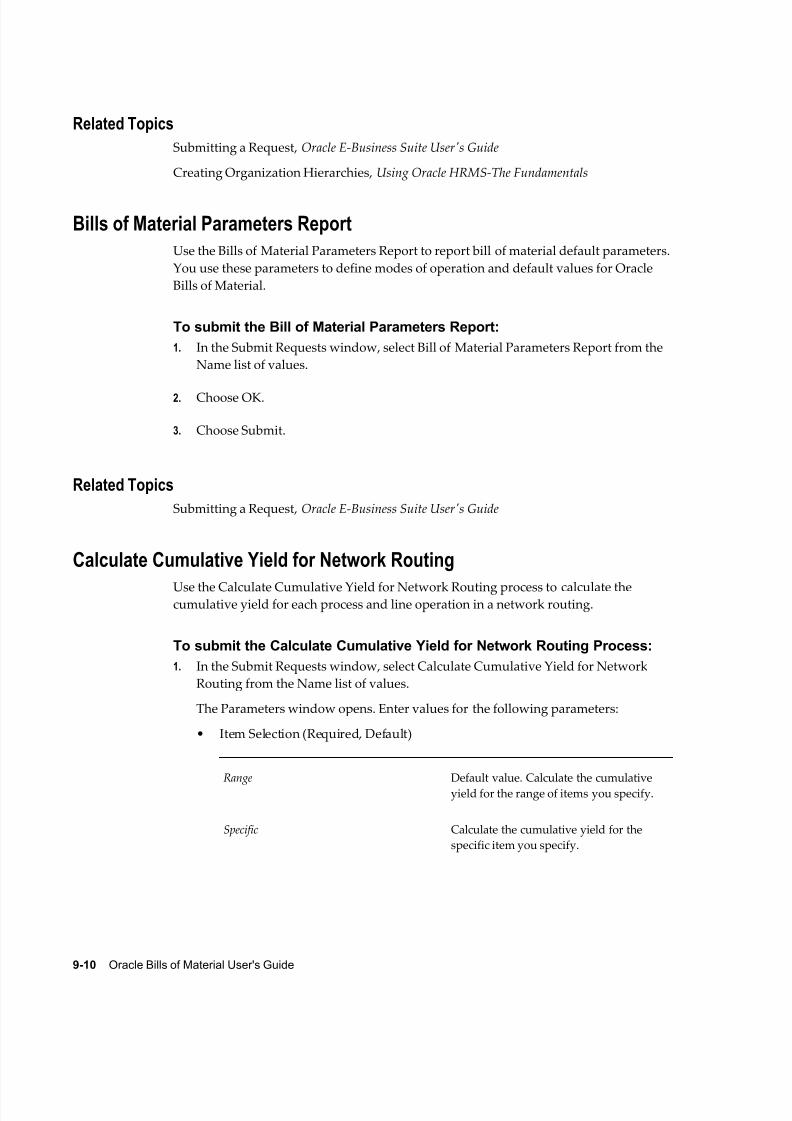
8/12/2019 BOM Uuser Guide
http://slidepdf.com/reader/full/bom-uuser-guide 248/331
9-10 Oracle Bills of Material User's Guide
Related Topics
Submitting a Request, Oracle E-Business Suite User's Guide
Creating Organization Hierarchies, Using Oracle HRMS-The Fundamentals
Bills of Material Parameters Report
Use the Bills of Material Parameters Report to report bill of material default parameters.
You use these parameters to define modes of operation and default values for Oracle
Bills of Material.
To submit the Bill of Material Parameters Report:
1. In the Submit Requests window, select Bill of Material Parameters Report from the
Name list of values.
2. Choose OK.
3. Choose Submit.
Related Topics
Submitting a Request, Oracle E-Business Suite User's Guide
Calculate Cumulative Yield for Network Routing
Use the Calculate Cumulative Yield for Network Routing process to calculate thecumulative yield for each process and line operation in a network routing.
To submit the Calculate Cumulative Yield for Network Routing Process:
1. In the Submit Requests window, select Calculate Cumulative Yield for Network
Routing from the Name list of values.
The Parameters window opens. Enter values for the following parameters:
• Item Selection (Required, Default)
Range Default value. Calculate the cumulative
yield for the range of items you specify.
Specific Calculate the cumulative yield for the
specific item you specify.

8/12/2019 BOM Uuser Guide
http://slidepdf.com/reader/full/bom-uuser-guide 249/331
Reports and Processes 9-11
• Item (Optional, Flexfield)
Enter a specific item.
• Operation Type (Optional, Default)
Event Default value. Calculate the cumulative
yield for each event in the network
routing.
Line operation Calculate the cumulative yield for each
line operation in the network routing.
Process Calculate the cumulative yield for the
network routing.
• Update Events (Optional, Default)
Yes Default value. Update the cumulative
yield for each event.
No Do not update the cumulative yield for
any event.
• Items From/To (Optional)
To restrict the report to a range of items, select the beginning and ending itemnumbers.
2. Choose OK.
3. Choose Submit.
Related Topics
Operation Yields Calculations, Oracle Flow Manufacturing User's Guide
Submitting a Request, Oracle E-Business Suite User's Guide
Calculate Manufacturing Lead Times
Use the Calculate Manufacturing Lead Times or Calculate Manufacturing Lead Times
GUI processes to calculate manufacturing lead times for one item, a range of items, or a
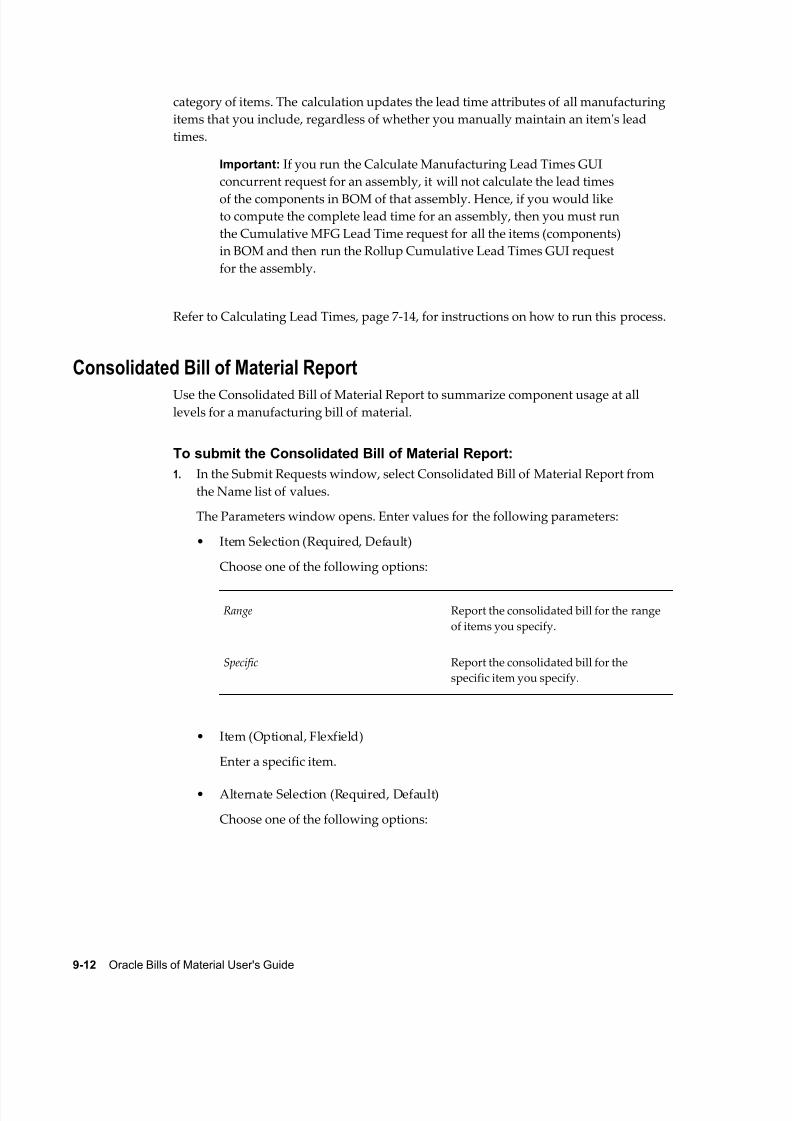
8/12/2019 BOM Uuser Guide
http://slidepdf.com/reader/full/bom-uuser-guide 250/331
9-12 Oracle Bills of Material User's Guide
category of items. The calculation updates the lead time attributes of all manufacturing
items that you include, regardless of whether you manually maintain an item's lead
times.
Important: If you run the Calculate Manufacturing Lead Times GUI
concurrent request for an assembly, it will not calculate the lead times
of the components in BOM of that assembly. Hence, if you would liketo compute the complete lead time for an assembly, then you must run
the Cumulative MFG Lead Time request for all the items (components)
in BOM and then run the Rollup Cumulative Lead Times GUI request
for the assembly.
Refer to Calculating Lead Times, page 7-14, for instructions on how to run this process.
Consolidated Bill of Material Report
Use the Consolidated Bill of Material Report to summarize component usage at alllevels for a manufacturing bill of material.
To submit the Consolidated Bill of Material Report:
1. In the Submit Requests window, select Consolidated Bill of Material Report from
the Name list of values.
The Parameters window opens. Enter values for the following parameters:
• Item Selection (Required, Default)
Choose one of the following options:
Range Report the consolidated bill for the range
of items you specify.
Specific Report the consolidated bill for the
specific item you specify.
• Item (Optional, Flexfield)
Enter a specific item.
• Alternate Selection (Required, Default)
Choose one of the following options:
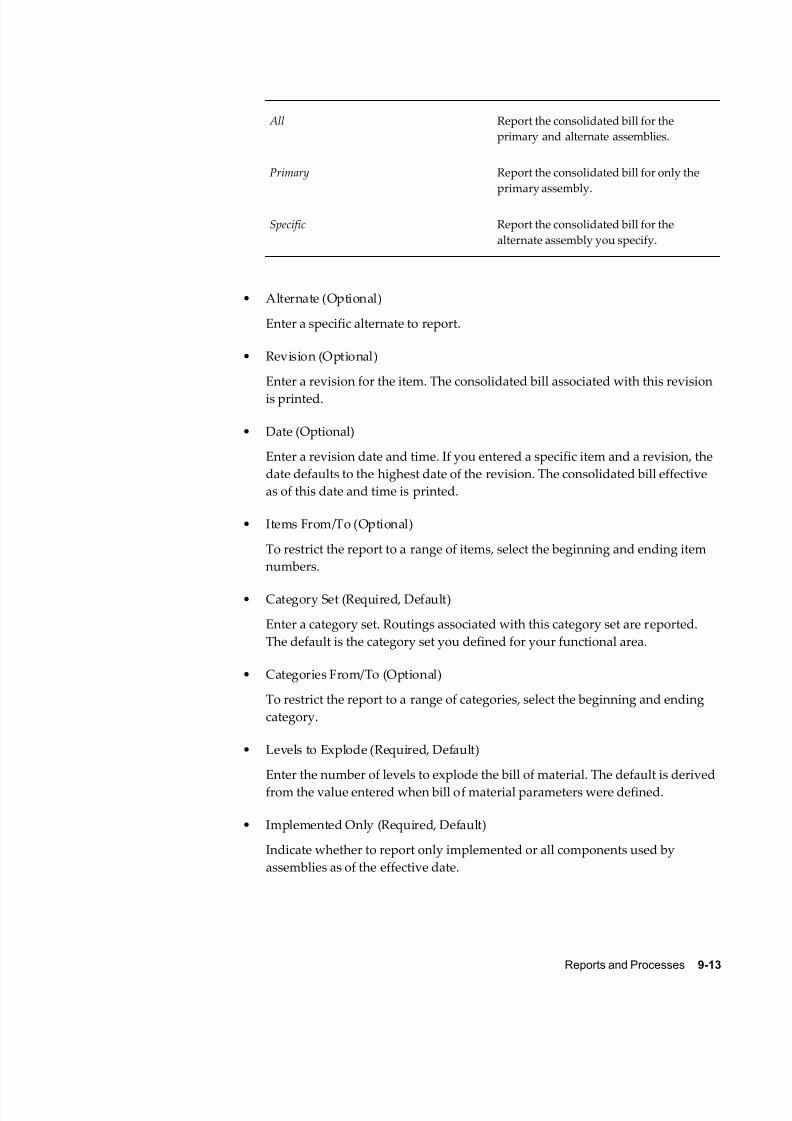
8/12/2019 BOM Uuser Guide
http://slidepdf.com/reader/full/bom-uuser-guide 251/331
Reports and Processes 9-13
All Report the consolidated bill for the
primary and alternate assemblies.
Primary Report the consolidated bill for only the
primary assembly.
Specific Report the consolidated bill for the
alternate assembly you specify.
• Alternate (Optional)
Enter a specific alternate to report.
• Revision (Optional)
Enter a revision for the item. The consolidated bill associated with this revision
is printed.
• Date (Optional)
Enter a revision date and time. If you entered a specific item and a revision, the
date defaults to the highest date of the revision. The consolidated bill effective
as of this date and time is printed.
• Items From/To (Optional)
To restrict the report to a range of items, select the beginning and ending item
numbers.
• Category Set (Required, Default)
Enter a category set. Routings associated with this category set are reported.
The default is the category set you defined for your functional area.
• Categories From/To (Optional)
To restrict the report to a range of categories, select the beginning and ending
category.
• Levels to Explode (Required, Default)
Enter the number of levels to explode the bill of material. The default is derived
from the value entered when bill of material parameters were defined.
• Implemented Only (Required, Default)
Indicate whether to report only implemented or all components used by
assemblies as of the effective date.
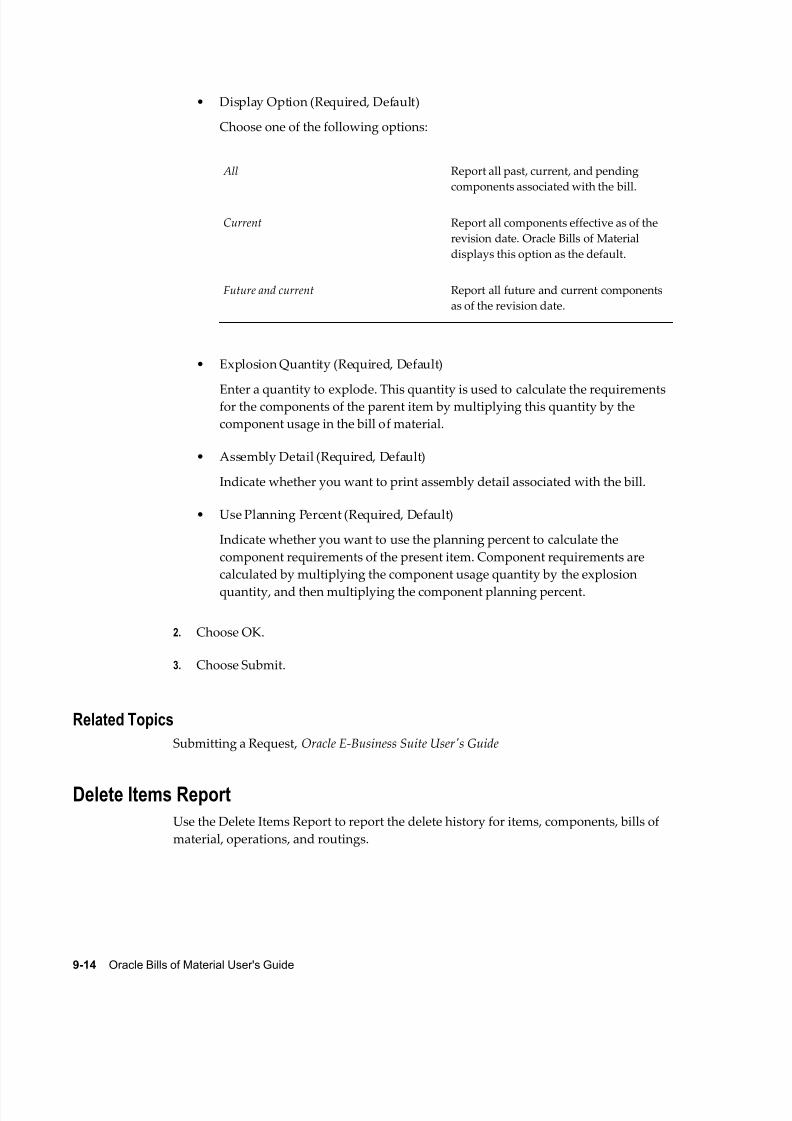
8/12/2019 BOM Uuser Guide
http://slidepdf.com/reader/full/bom-uuser-guide 252/331
9-14 Oracle Bills of Material User's Guide
• Display Option (Required, Default)
Choose one of the following options:
All Report all past, current, and pending
components associated with the bill.
Current Report all components effective as of the
revision date. Oracle Bills of Material
displays this option as the default.
Future and current Report all future and current components
as of the revision date.
• Explosion Quantity (Required, Default)
Enter a quantity to explode. This quantity is used to calculate the requirementsfor the components of the parent item by multiplying this quantity by the
component usage in the bill of material.
• Assembly Detail (Required, Default)
Indicate whether you want to print assembly detail associated with the bill.
• Use Planning Percent (Required, Default)
Indicate whether you want to use the planning percent to calculate the
component requirements of the present item. Component requirements are
calculated by multiplying the component usage quantity by the explosion
quantity, and then multiplying the component planning percent.
2. Choose OK.
3. Choose Submit.
Related Topics
Submitting a Request, Oracle E-Business Suite User's Guide
Delete Items Report
Use the Delete Items Report to report the delete history for items, components, bills of
material, operations, and routings.

8/12/2019 BOM Uuser Guide
http://slidepdf.com/reader/full/bom-uuser-guide 253/331
Reports and Processes 9-15
To submit the Delete Items Report:
1. In the Submit Requests window, select Delete Items Report from the Name list of
values.
The Parameters window opens. Enter values for the following parameters:
• Delete Group From/To (Optional)
To restrict the report to a range of delete groups, select the beginning and
ending delete group.
• Item (Required, Default)
Indicate whether to print delete groups that delete items.
• Bill of Material (Required, Default)
Indicate whether to print delete groups that delete bills of material.
• Routing (Required, Default)
Indicate whether to print delete groups that delete routings.
• Bill and Routing (Required, Default)
Indicate whether to print delete groups that delete bills and routings.
• Item, Bill and Routing (Required, Default)
Indicate whether to print delete groups that delete items, bills, and routings.
• Component (Required, Default)
Indicate whether to print delete groups that delete components.
• Operation (Required, Default)
Indicate whether to print delete groups that delete operations.
• Pending Status (Required, Default)
Indicate whether to print delete groups that have entities waiting to be checked
or deleted.
• Check Ok Status (Required, Default)
Indicate whether to print delete groups that have entities that were successfullychecked and are eligible to be deleted.
• Error Status (Required, Default)
Indicate whether to print delete groups that have entities that could not be
checked or deleted because of an error.
8/12/2019 BOM Uuser Guide
http://slidepdf.com/reader/full/bom-uuser-guide 254/331
9-16 Oracle Bills of Material User's Guide
• Deleted Status (Required, Default)
Indicate whether to print delete groups that you have successfully deleted
entities from.
2. Choose OK.
3. Choose Submit.
Related Topics
Submitting a Request, Oracle Applications User's Guide
Department Classes Report
Use the Department Classes Report to report department classes and their member
departments. You can use department classes to identify manufacturing cells andflexible machine centers.
To submit the Department Classes Report:
1. In the Submit Requests window, select Department Classes Report from the Name
list of values.
The Parameters window opens. Enter a value for the following parameter:
Department Class Detail (Required, Default): Indicate whether to print member
departments associated with the department classes.
2. Choose OK.
3. Choose Submit.
Related Topics
Submitting a Request, Oracle E-Business Suite User's Guide
Department Report
Use the Department Report to report department resource and overhead information.
To submit the Department Report:
1. In the Submit Requests window, select Department Report from the Name list of
values.
The Parameters window opens. Enter values for the following parameters:

8/12/2019 BOM Uuser Guide
http://slidepdf.com/reader/full/bom-uuser-guide 255/331
Reports and Processes 9-17
• Overhead Details (Required, Default)
Indicate whether to print department overhead information.
• Resource Details (Required, Default)
Indicate whether to print department resource information.
• Department Class (Optional)
Enter a department class to print member departments.
• Departments From/To (Optional)
To restrict the report to a range of departments, select the beginning and ending
department.
2. Choose OK.
3. Choose Submit.
Related Topics
Submitting a Request, Oracle E-Business Suite User's Guide
Item Where Used Report
Use the Item Where Used Report to report the assemblies that use the inventory items
you specify.
To submit the Department Report:
1. In the Submit Requests window, select Item Where Used Report from the Name list
of values.
The Parameters window opens. Enter values for the following parameters:
• All Organizations (Required, Default)
Choose one of the following options:
No Report assemblies for the current
organization.
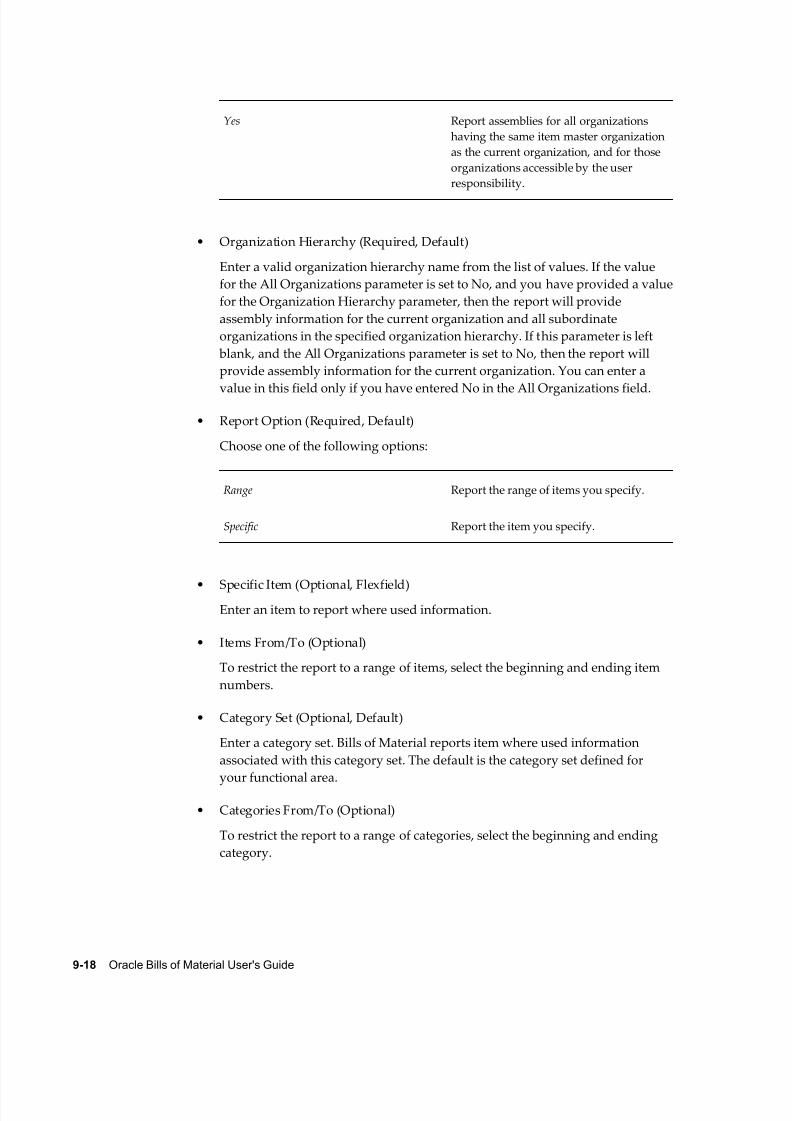
8/12/2019 BOM Uuser Guide
http://slidepdf.com/reader/full/bom-uuser-guide 256/331
9-18 Oracle Bills of Material User's Guide
Yes Report assemblies for all organizations
having the same item master organization
as the current organization, and for those
organizations accessible by the user
responsibility.
• Organization Hierarchy (Required, Default)
Enter a valid organization hierarchy name from the list of values. If the value
for the All Organizations parameter is set to No, and you have provided a value
for the Organization Hierarchy parameter, then the report will provide
assembly information for the current organization and all subordinate
organizations in the specified organization hierarchy. If this parameter is left
blank, and the All Organizations parameter is set to No, then the report will
provide assembly information for the current organization. You can enter a
value in this field only if you have entered No in the All Organizations field.
• Report Option (Required, Default)
Choose one of the following options:
Range Report the range of items you specify.
Specific Report the item you specify.
• Specific Item (Optional, Flexfield)Enter an item to report where used information.
• Items From/To (Optional)
To restrict the report to a range of items, select the beginning and ending item
numbers.
• Category Set (Optional, Default)
Enter a category set. Bills of Material reports item where used information
associated with this category set. The default is the category set defined for
your functional area.
• Categories From/To (Optional)
To restrict the report to a range of categories, select the beginning and ending
category.

8/12/2019 BOM Uuser Guide
http://slidepdf.com/reader/full/bom-uuser-guide 257/331
Reports and Processes 9-19
• Levels to Implode (Required, Default)
Enter the number of bill of material levels to implode. The default is 15.
• Implemented Only (Required, Default)
Indicate whether to report only implemented or all components used by
assemblies as of the effective date.
• Display Option (Required, Default)
Choose one of the following options:
All Report all past, current, and pending
components associated with the bill. This
option is only available if Levels to
Implode is set to 1.
Current Report all components effective as of therevision date.
Future and current Report all future and current components
as of the revision date. This option is only
available if Levels to Implode is set to 1.
• Date (Required)
Enter a revision date and time. Bills of Material uses the bill of material
information associated with this date when determining item usage.
2. Choose OK.
3. Choose Submit.
Related Topics
Submitting a Request, Oracle E-Business Suite User's Guide
Creating Organization Hierarchies, Oracle HRMS-The Fundamentals
Pre-Explode Configurable Bills of Material
Use the Pre-Explode Configurable Bills of Material process to show all available options
in a bill of material during order entry.
Example
A sales person enters sales orders for computers. Each computer has a large number of

8/12/2019 BOM Uuser Guide
http://slidepdf.com/reader/full/bom-uuser-guide 258/331
9-20 Oracle Bills of Material User's Guide
options available. The order entry screen lists all of the option classes, such as monitor,
CPU, and keyboard, but does not list all of the options within an option class until the
sales person selects the option class. The sales person must wait while the options (such
as standard, ergonomic, and wireless for the keyboard option class) are retrieved before
they can select one of them.
In order to eliminate this time the sales person (and customer) are waiting for options toload, run the Pre-Explode Configurable Bills of Material process on a nightly basis. This
process explodes all of the options so they are viewable in the order entry screen
without selecting an option class first.
To submit the Pre-Explode Configurable Bills of Material Process:
1. In the Submit Requests window, select Pre-Explode Configurable Bills of Material
from the Name list of values.
The Parameters window opens. Enter values for the following parameters:
• Org (Required, Default)
Enter a valid organization name from the list of values.
• Specific Assembly (Required)
When you select the Specific Assembly field, the System Items window opens.
Enter a valid item or search for one by choosing the Combinations button.
• Explosion Type (Required, Default)
Choose one of the following options:
All Explode all possible options in the model,
including Included and Optional items.
Included Explode only the Included items on the
model.
Optional Explode only the Optional items on the
model.
2. Choose OK.
3. Choose Submit.
Related Topics
Configure to Order Environments, page 5-4

8/12/2019 BOM Uuser Guide
http://slidepdf.com/reader/full/bom-uuser-guide 259/331
Reports and Processes 9-21
Submitting a Request, Oracle E-Business Suite User's Guide
Resource Report
Use the Resource Report to report resource cost and overhead information.
To submit the Resource Report:
1. In the Submit Requests window, select Resource Report from the Name list of
values.
The Parameters window opens. Enter values for the following parameters:
• Resource Detail (Required, Default)
Indicate whether to print resource cost and overhead information for the
resource.
• Resources From/To (Optional)
To restrict the report to a range of resources, select the beginning and ending
resources.
2. Choose OK.
3. Choose Submit.
Related Topics
Submitting a Request, Oracle E-Business Suite User's Guide
Resource Where Used Report
Use the Resource Where Used Report to report the manufacturing routings that use the
resources you specify.
When using Oracle Engineering, use the Resource Where Used Report to report the
operations in manufacturing and engineering routings that use a resource that you
specify.
To submit the Resource Where Used Report:
1. In the Submit Requests window, select Resource Where Used Report from the
Name list of values.
The Parameters window opens. Enter values for the following parameters:
• Resource From/To (Optional)

8/12/2019 BOM Uuser Guide
http://slidepdf.com/reader/full/bom-uuser-guide 260/331
9-22 Oracle Bills of Material User's Guide
To restrict the report to a range of resources, select the beginning and ending
resources.
• Effective Date (Required, Default)
Enter an effective date. Bills of Material uses the routing information associated
with this date when determining resource usage.
2. Choose OK.
3. Choose Submit.
Related Topics
Submitting a Request, Oracle E-Business Suite User's Guide
Rollup Cumulative Lead TimesUse the Rollup Cumulative Lead Times or Rollup Cumulative Lead Times GUI process
to roll up the cumulative lead times after each change made to a bill (adding
components, assigning to a different operation, and so on) or the item lead times.
Refer to the steps in To roll up cumulative lead times, page 7-14, for instructions on how
to run this process.
Routing Report
Use the Routing Report for manufacturing routing information. A routing defines the
steps for manufacturing an item. For each routing you define operations, the sequence
in which to perform them, and the resources required at each operation.
To submit the Routing Report:
1. In the Submit Requests window, select Routing Report from the Name list of
values.
The Parameters window opens. Enter values for the following parameters:
• Item Selection (Required, Default)
Choose one of the following options:
Range Report routings for the range of items you
specify.

8/12/2019 BOM Uuser Guide
http://slidepdf.com/reader/full/bom-uuser-guide 261/331
Reports and Processes 9-23
Specific Report routings for the specific item you
specify. Oracle Bills of Material displays
this option as the default.
• Item (Optional, Flexfield)
Enter a specific item to report routing information.
• Alternate Selection (Required, Default)
Choose one of the following options:
All Report routing information for the
primary and alternate routings. Oracle
Bills of Material displays this option as
the default.
Primary Report routing information only for the
primary routing.
Specific Report routing information for the
alternate routing you specify.
• Alternate (Optional)
Enter a specific alternate to report.
• Revision (Optional)
Enter a routing revision for the item. The routing associated with this revision is
printed.
• Date (Required)
Enter a revision date and time. Bills of Material prints the routing effective as of
this date and time.
• Display Option (Required, Default)
Choose one of the following options:
All Report all past, current, and future
operations associated with the assembly.

8/12/2019 BOM Uuser Guide
http://slidepdf.com/reader/full/bom-uuser-guide 262/331
9-24 Oracle Bills of Material User's Guide
Current Report all operations effective as of the
revision date.
Future and current Report all future and current operations
as of the revision date.
• Operation Detail (Required, Default)
Indicate whether you want to print operation information associated with the
routing.
• Items From/To (Optional)
To restrict the report to a range of items, select the beginning and ending item
numbers.
• Category Set (Optional, Default)
Enter a category set. Bills of Material reports routings associated with this
category set. The default is the category set defined for your functional area.
• Categories From/To (Optional)
To restrict the report to a range of categories, select the beginning and ending
categories.
2. Choose OK.
3. Choose Submit.
Related Topics
Submitting a Request, Oracle E-Business Suite User's Guide
Standard Operation Report
Use the Standard Operation Report to report standard operations to use in assembly
routings. Standard operations are default templates that you use, with little or no
modification, in more than one routing. If you assign a standard operation as theoperation code in a routing, the standard operation information is loaded into the
routing. You can then modify the standard operation information in the routing.
To submit the Standard Operation Report:
1. In the Submit Requests window, select Standard Operation Report from the Name

8/12/2019 BOM Uuser Guide
http://slidepdf.com/reader/full/bom-uuser-guide 263/331
Reports and Processes 9-25
list of values.
The Parameters window opens. Enter values for the following parameters:
• Standard Operation Detail (Required, Default)
Indicate whether you want to print resource information associated with the
standard operation.
• Standard Operations From/To (Optional)
To restrict the report to a range of standard operations, select the beginning and
ending standard operations.
2. Choose OK.
3. Choose Submit.
Related TopicsSubmitting a Request, Oracle E-Business Suite User's Guide
Workday Exception Sets Report
Use the Workday Exception Sets Report to report exception sets. You can use workday
exception sets to group workday changes for each organization. For example, you can
define exception sets for holidays, schedule maintenance, or extended downtime.
You use exception sets in combination with your workday calendar, the days on/off
pattern, and shift on/off pattern to generate a work pattern for your organization.
To submit the Workday Exception Sets Report:
1. In the Submit Requests window, select Workday Exception Sets Report from the
Name list of values.
2. Choose OK.
3. Choose Submit.
Related Topics
Submitting a Request, Oracle E-Business Suite User's Guide
Oracle Configurator Concurrent Programs
If you want to build configuration models based on BOM models, you can use a series
8/12/2019 BOM Uuser Guide
http://slidepdf.com/reader/full/bom-uuser-guide 264/331
9-26 Oracle Bills of Material User's Guide
of concurrent programs provided in Bills of Material to transfer BOM and Item Master
data from the Bills of Material schema to the Oracle Configurator schema. The Oracle
Configurator uses this data in its development environment, Oracle Configurator
Developer, to define a configuration model.
See the Oracle Configurator Implementation Guide for more information on the following
concurrent programs:
• Populate Configuration Models
• Refresh a Single Configuration Model
• Refresh All Imported Configuration Models
• Disable/Enable Refresh of a Configuration Model
8/12/2019 BOM Uuser Guide
http://slidepdf.com/reader/full/bom-uuser-guide 265/331
Oracle Bills of Material Windows and Navigator Paths A-1
AOracle Bills of Material Windows and
Navigator Paths
This appendix shows you the default navigator path for each Oracle Bills of Material
window. Refer to this appendix when you do not already know the navigator path for awindow you want to use.
This appendix covers the following topics:
• Bills of Material Windows and Navigator Paths
Bills of Material Windows and Navigator Paths
Although your system administrator may have customized your navigator, typical
navigational paths are presented in the following table:
Note: Text in brackets ([ ]) indicates a button. [M] indicates a menu selection.
Bill of Material Responsibility
Window Name Navigation Path
Add Range, page 2-25 Bills > Bills > [Designators] > [Add Range]
Alternates, page 1-10 Setup > Alternates
Bill Components Comparison, page 2-36 Bills > Comparison
Bill Details, page 2-19 Bills > Bills > [Bill Details]
Bill Documents, page 2-28 Bills > Documents

8/12/2019 BOM Uuser Guide
http://slidepdf.com/reader/full/bom-uuser-guide 266/331
A-2 Oracle Bills of Material User's Guide
Window Name Navigation Path
Bills of Material, page 2-9 Bills > Bills
Calculate Lead Times, page 7-14 Routings > Lead Times
Calendar Dates, page 1-36 Setup > Calendars > [Dates] or Setup >
Calendars > [Shifts] > [Dates]
Change Types, Oracle Engineering User's Guide Setup > Change Types
Changeover Times, page 1-32 Routings > Resources [Setups] >
[Changeovers]
Component Changes, page 2-30 Bills > Mass Changes > [Changes]
Delete Range, page 2-25 Bills > Bills > [Designators] > [Delete Range]
Deletion Constraints, page 1-11 Setup > Delete Constraints
Deletion Groups, page 4-1 Delete Groups
Deletion Statements, page 1-11 Setup > Delete Statements
Department Classes, page 1-13 Setup > Department Classes
Departments, page 1-14 Routings > Departments
Descriptive Elements, page 2-25 Bills > Bills > [M] Bills > Elements
Employees, page 1-24 Routings > Resources [Employees]
Exceptions, page 1-36 Setup > Calendars > [Dates] > [Exceptions]
Exception Templates, page 1-36 Setup > Exception Templates
Import Bills and Routings, page 1-36 Bills > Import or Routings > Import
Indented Bill of Material, page 2-34 Bills > Indented Bills
Instances, page 1-18 Routings > Departments [Resources] >
[Instances]
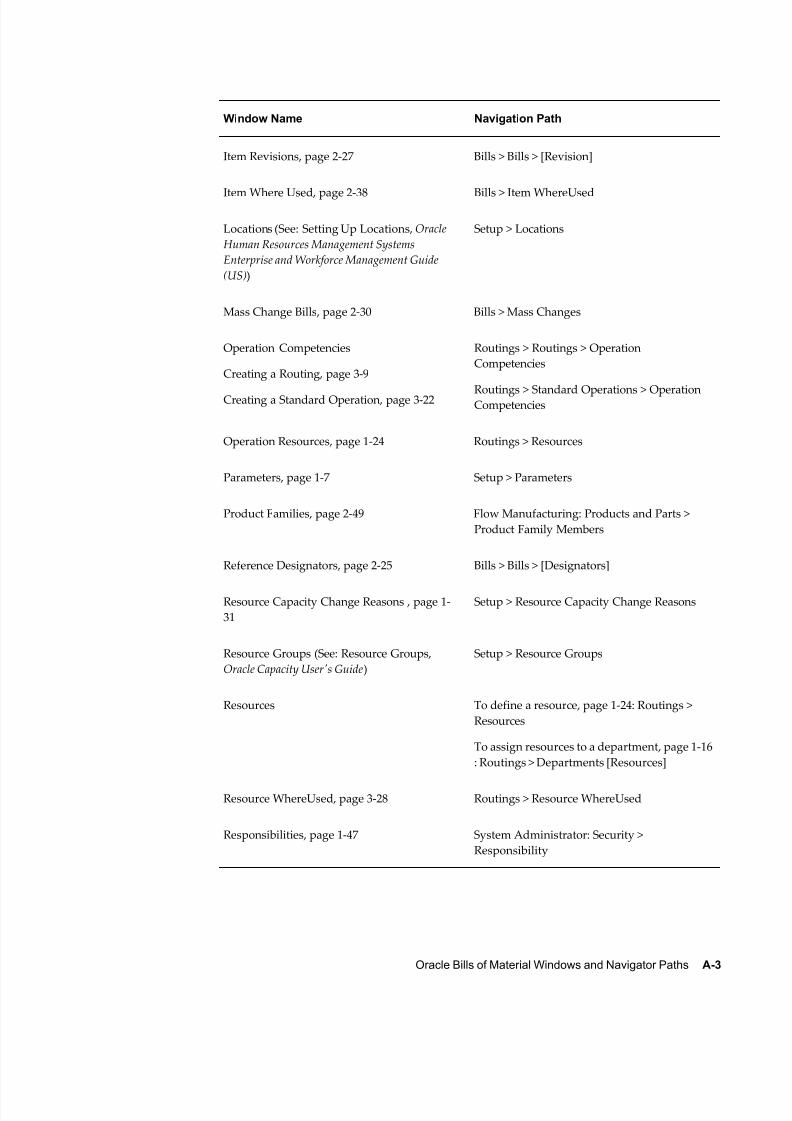
8/12/2019 BOM Uuser Guide
http://slidepdf.com/reader/full/bom-uuser-guide 267/331
Oracle Bills of Material Windows and Navigator Paths A-3
Window Name Navigation Path
Item Revisions, page 2-27 Bills > Bills > [Revision]
Item Where Used, page 2-38 Bills > Item WhereUsed
Locations (See: Setting Up Locations, Oracle
Human Resources Management Systems
Enterprise and Workforce Management Guide
(US))
Setup > Locations
Mass Change Bills, page 2-30 Bills > Mass Changes
Operation Competencies
Creating a Routing, page 3-9
Creating a Standard Operation, page 3-22
Routings > Routings > Operation
Competencies
Routings > Standard Operations > OperationCompetencies
Operation Resources, page 1-24 Routings > Resources
Parameters, page 1-7 Setup > Parameters
Product Families, page 2-49 Flow Manufacturing: Products and Parts >
Product Family Members
Reference Designators, page 2-25 Bills > Bills > [Designators]
Resource Capacity Change Reasons , page 1-
31
Setup > Resource Capacity Change Reasons
Resource Groups (See: Resource Groups,
Oracle Capacity User's Guide)
Setup > Resource Groups
Resources To define a resource, page 1-24: Routings >
Resources
To assign resources to a department, page 1-16
: Routings > Departments [Resources]
Resource WhereUsed, page 3-28 Routings > Resource WhereUsed
Responsibilities, page 1-47 System Administrator: Security >
Responsibility

8/12/2019 BOM Uuser Guide
http://slidepdf.com/reader/full/bom-uuser-guide 268/331
A-4 Oracle Bills of Material User's Guide
Window Name Navigation Path
Routing Details, page 3-9 Routings > Routings > [Routing Details]
Routing Documents, page 2-28 Routings > Documents
Routing Revisions, page 3-9 Routings > Routings > [Routing Revisions]
Routings, page 3-9 Routings > Routings
Run Assemble to Order Processes, page 5-24 Routings > ATO
Setup Types, page 1-32 Routings > Setup Types
or
Setup > Setup Type
Setups, page 1-32 Routings > Resources > [Setups]
Simulation Sets (See: Creating Simulation Sets,
Oracle Capacity User's Guide)
Setup > Simulation Sets
Shifts, page 1-36 Setup > Calendars > [Shifts]
Shift Times, page 1-36 Setup > Calendars > [Shifts] > [Times]
Standard Operations, page 3-22 Routings > Standard Operations
Substitute Components, page 2-27 Bills > Bills > [Substitutes]
Workday Calendar, page 1-36 Setup > Calendars
Workday Patterns, page 1-36 Setup > Calendars > [Workday Pattern]

8/12/2019 BOM Uuser Guide
http://slidepdf.com/reader/full/bom-uuser-guide 269/331
Oracle Bills of Material Tools Menu B-1
BOracle Bills of Material Tools Menu
This appendix describes the options on the Oracle Bills of Material Tools menu.
This appendix covers the following topics:
• Bills of Material Tools Menu
• Oracle Bills Of Material Character Mode Forms and Corresponding GUI Windows
Bills of Material Tools Menu
Depending upon the currently active window and other factors, the Tools menu for
Bills of Material includes:
• Roll Up Costs: Navigates to the Cost Rollup window, where you can perform a cost
rollup.
• Roll Up Lead Times: Executes the Calculate Cumulative Lead Times program.
• Check for Loops: Executes the Loop Check program that searches for loops in your
bill. Bill loops occur when you assign a bill as a component to itself somewhere in
the multilevel structure of the bill.
• Transfer Bill / Rtg: Navigates to the Transfer Engineering Data window so that you
can transfer engineering data to manufacturing.
• Copy Bill / Rtg From: Navigates to the Copy Bill / Rtg From window where you can
copy bills or routings.
• Create Common Bill/Assign Common Routing: Navigate to the Common Bill / Routingwindow where you can reference a common bill or routing.
• Configure Bill: Navigate to the Oracle Configurator window.

8/12/2019 BOM Uuser Guide
http://slidepdf.com/reader/full/bom-uuser-guide 270/331
B-2 Oracle Bills of Material User's Guide
Related Topics
Rolling Up Cumulative Lead Times, page 7-14
Checking for Bill Loops, page 2-28
Copying Bill and Routing Information, page 2-17
Referencing Common Bills and Routings, page 2-19
Rolling Up Assembly Costs, Oracle Cost Management User's Guide
Transferring or Copying Engineering Items, Bills, and Routings, Oracle Engineering
User's Guide
Oracle Bills Of Material Character Mode Forms and Corresponding GUIWindows
The following table matches character mode forms with their corresponding GUIwindows or processes. This information supplements Windows and Navigator Paths in
the product online documentation. Text in brackets ([ ]) indicates a button.
The GUI Navigator paths are based on the BOM Supervisor responsibility.
The following table presents more information on any window; navigate to the window
and choose the help icon.
Character Mode Form and Menu Path GUI Window or Process, and NavigationPath
Assemble to Order Reports and Processes
\Navigate ATO
Run Assemble to Order Processes
Navigator: Routings > ATO
Assign Descriptive Security Rules
\Navigate Setup Flexfields Descriptive
Security Define
Assign Security Rules
Navigator: Setup > Flexfields > Descriptive >
Security > Assign
Assign Key Flexfield Security Rules
\Navigate Setup Flexfields Key Security
Assign
Assign Security Rules
Navigator: Setup > Flexfields
Assign Security Rules
\Navigate Setup Flexfields Key Security
Assign
Assign Security Rules
Navigator: Setup > Flexfields > Key > Security
> Assign

8/12/2019 BOM Uuser Guide
http://slidepdf.com/reader/full/bom-uuser-guide 271/331
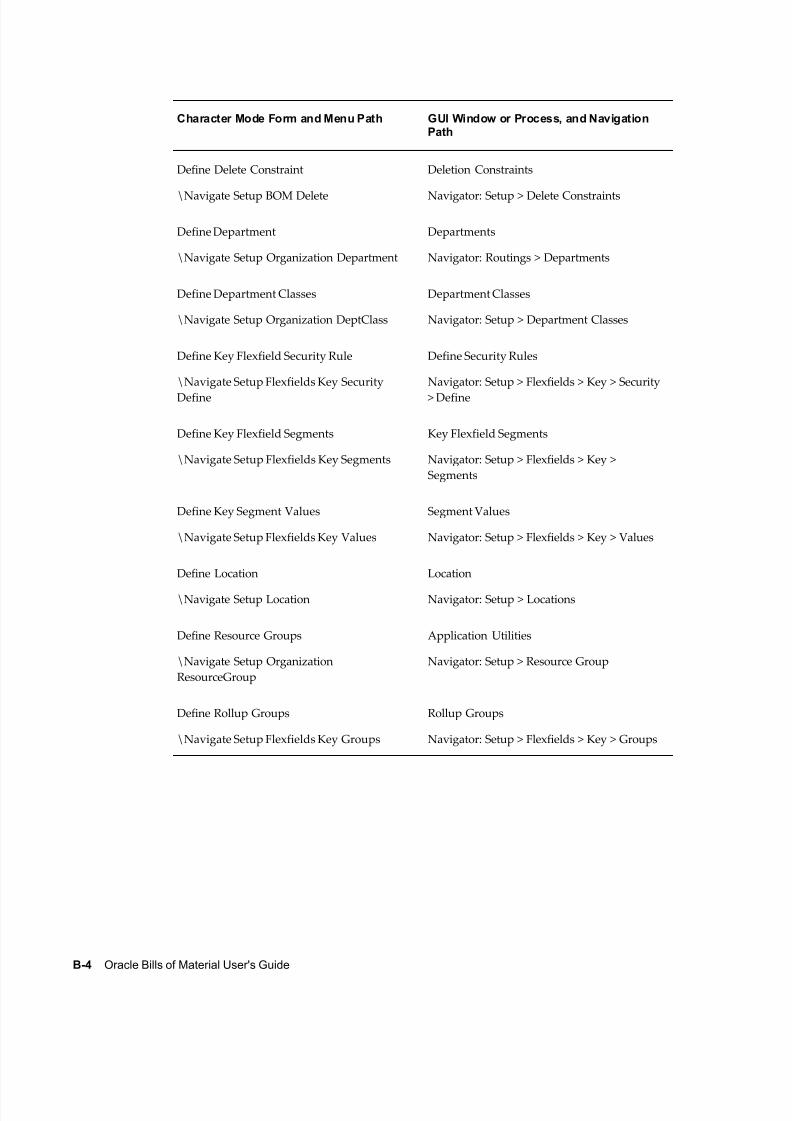
8/12/2019 BOM Uuser Guide
http://slidepdf.com/reader/full/bom-uuser-guide 272/331
B-4 Oracle Bills of Material User's Guide
Character Mode Form and Menu Path GUI Window or Process, and NavigationPath
Define Delete Constraint
\Navigate Setup BOM Delete
Deletion Constraints
Navigator: Setup > Delete Constraints
Define Department
\Navigate Setup Organization Department
Departments
Navigator: Routings > Departments
Define Department Classes
\Navigate Setup Organization DeptClass
Department Classes
Navigator: Setup > Department Classes
Define Key Flexfield Security Rule
\Navigate Setup Flexfields Key Security
Define
Define Security Rules
Navigator: Setup > Flexfields > Key > Security
> Define
Define Key Flexfield Segments
\Navigate Setup Flexfields Key Segments
Key Flexfield Segments
Navigator: Setup > Flexfields > Key >
Segments
Define Key Segment Values
\Navigate Setup Flexfields Key Values
Segment Values
Navigator: Setup > Flexfields > Key > Values
Define Location
\Navigate Setup Location
Location
Navigator: Setup > Locations
Define Resource Groups
\Navigate Setup Organization
ResourceGroup
Application Utilities
Navigator: Setup > Resource Group
Define Rollup Groups
\Navigate Setup Flexfields Key Groups
Rollup Groups
Navigator: Setup > Flexfields > Key > Groups

8/12/2019 BOM Uuser Guide
http://slidepdf.com/reader/full/bom-uuser-guide 273/331
Oracle Bills of Material Tools Menu B-5
Character Mode Form and Menu Path GUI Window or Process, and NavigationPath
Define Routing
\Navigate Routing Define
Routing Details
Navigator: Routings > Routings > [RoutingDetails]
or
Routing Revisions
Navigator: Routings > Routings > [Routing
Revisions]
or
Routings
Navigator: Routings > Routings
Define Security Rule
\Navigate Setup Flexfields Validation
Security Define
Define Security Rules
Navigator: Setup > Flexfields > Validation >
Security > Define
Define Segment Values
\Navigate Setup Flexfields Validation Values
Segment Values
Navigator: Setup > Flexfields > Validation >
Values
Define Shorthand Aliases
\Navigate Setup Flexfields Key Aliases
Shorthand Aliases
Navigator: Setup > Flexfields > Key > Aliases
Define Simulation Sets
\Navigate Setup Organization SimulationSets
Simulation Sets
Navigator: Setup > Simulation Sets
Define Standard Comments
\Navigate Setup BOM Comments
Bill Documents
Navigator: Bills > Documents
Define Standard Instructions
\Navigate Setup BOM Instructions
Operation Documents
Navigator: Routing > Documents
Define Standard Operation
\Navigate Routing Define
Standard Operations
Navigator: Routings > Standard Operations

8/12/2019 BOM Uuser Guide
http://slidepdf.com/reader/full/bom-uuser-guide 274/331
B-6 Oracle Bills of Material User's Guide
Character Mode Form and Menu Path GUI Window or Process, and NavigationPath
Define Value Set
\Navigate Setup Flexfields Validation Sets
Value Sets
Navigator: Setup > Flexfields > Validation >Sets
Define Workday Calendar
\Navigate Setup Calendar Define
Calendar Dates
Navigator: Setup > Calendars > [Dates]
or
Navigator: Setup > Calendars > [Shifts] >
[Dates]
or
Shifts
Navigator: Setup > Calendars > [Shifts]
or
Shift Times
Navigator: Setup > Calendars > [Shifts] >
[Times]
or
Workday Calendar
Navigator: Setup > Calendars
or
Workday Patterns
Navigator: Setup > Calendars > [Workday
Pattern]
or
Exceptions
Navigator: Setup > Calendars > [Dates] >
[Exceptions]
Define Workday Exception Sets
\Navigate Setup Calendar ExceptionSets
Exception Templates
Navigator: Setup > Exception Templates

8/12/2019 BOM Uuser Guide
http://slidepdf.com/reader/full/bom-uuser-guide 275/331
Oracle Bills of Material Tools Menu B-7
Character Mode Form and Menu Path GUI Window or Process, and NavigationPath
Delete Item Information
\Navigate Delete
Deletion Groups
Navigator: Delete Groups
or
Navigator: Routings > Delete Groups
Delete Items Report
\Navigate Report Setup Item
Delete History Report
Navigator: Reports > Delete Groups
Indented Bill of Material Cost Report
\Navigate Report Setup Cost Indented
Use the Cost Management responsibility and
See: Oracle Cost Management User's Guide or
online documentation.
Item Cost Information Report
\Navigate Report Setup Item Cost CostItem
Use the Cost Management responsibility and
See: Oracle Cost Management User's Guide or
online documentation.
Item Usage Report
\Navigate Report WhereUsed
Item WhereUsed Report
Navigator: Reports > Bills
Manufacturing Setup Reports
\Navigate Report Setup Organization
BOM Setup Reports
Navigator: Reports > Setup
Mass Change Bills of Material
\Navigate Bill MassChange
Mass Change Bills
Navigator: Bills > Mass Changes
Mass Change Bills of Material
\Navigate Bill MassChange
Component Changes
Navigator: Bills > Mass Changes > Changes >
[Changes]
Resource Usage Report
\Navigate Report WhereUsed
Resource Usage Report
Navigator: Reports > Routings
Routing Reports
\Navigate Report Routing
Routing Reports
Navigator: Reports > Routings
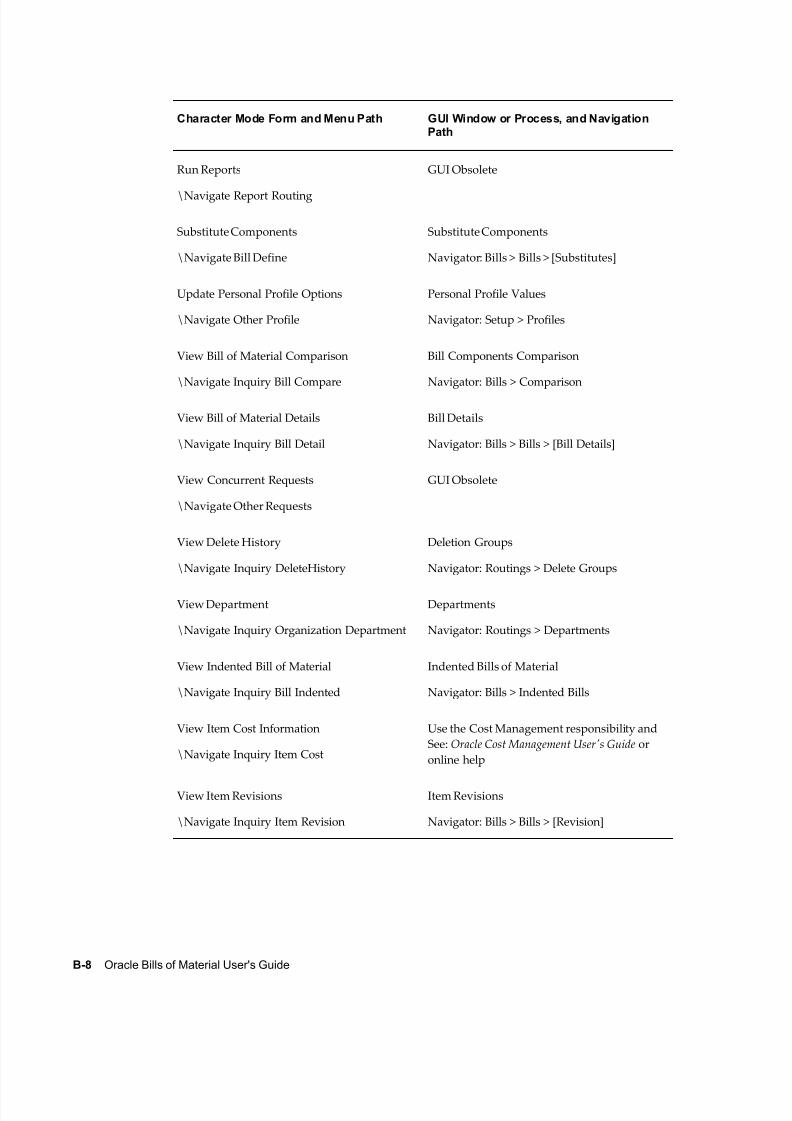
8/12/2019 BOM Uuser Guide
http://slidepdf.com/reader/full/bom-uuser-guide 276/331

8/12/2019 BOM Uuser Guide
http://slidepdf.com/reader/full/bom-uuser-guide 277/331

8/12/2019 BOM Uuser Guide
http://slidepdf.com/reader/full/bom-uuser-guide 278/331

8/12/2019 BOM Uuser Guide
http://slidepdf.com/reader/full/bom-uuser-guide 279/331
Business Event Data for Oracle Bills of Material C-1
CBusiness Event Data for Oracle Bills of
Material
This appendix covers the following topics:
• Business Events
• Sample Subscription Functions
Business Events
Using Oracle Workflow, you can automatically trigger actions based on the following
Oracle Bills of Material business events. Examples of actions you can trigger include
issuing notifications or launching a workflow.

8/12/2019 BOM Uuser Guide
http://slidepdf.com/reader/full/bom-uuser-guide 280/331
C-2 Oracle Bills of Material User's Guide
Business Events
Event Name Event Description Event Parameter Namesand Descriptions
Oracle.apps.bom.structure.cre
ated
Raise this event each time a
bill of material is created.
When importing bills in bulk
using the open interface
program, set the event type to
BULK.
PK1_Value: The PK1_Value of
the bill. When Obj_Name =
NULL, PK1_Value = the value
of the Assembly_Item_Id.
PK2_Value: The PK2_Value of
the bill. When Obj_Name =
NULL, PK2_Value = the value
of the Organization_Id.
Obj_Name: This value is
NULL for items.
Structure_Name:TThealternate designator.
Event_Entity_Name: This
value equals 'Structure'.
Event_Parent_Entity_Id: The
value of the product bill's
Bill_Sequence_Id. The value
equals NULL for a bulk event.

8/12/2019 BOM Uuser Guide
http://slidepdf.com/reader/full/bom-uuser-guide 281/331

8/12/2019 BOM Uuser Guide
http://slidepdf.com/reader/full/bom-uuser-guide 282/331
C-4 Oracle Bills of Material User's Guide
Event Name Event Description Event Parameter Namesand Descriptions
Oracle.apps.bom.structure.del
eteSuccess
Raise this event when
deleting a bill of material.
PK1_Value: The PK1_Value of
the bill. When Obj_Name =
NULL, PK1_Value = the value
of the Assembly_Item_Id.
PK2_Value: The PK2_Value of
the bill. When Obj_Name =
NULL, PK2_Value = the value
of the Organization_Id.
Obj_Name: This value is
NULL for items.
Structure_Name:TThe
alternate designator.
Event_Entity_Name: This
value equals 'Structure'.
Event_Parent_Entity_Id: The
value of the product bill's
Bill_Sequence_Id. The value
equals NULL for a bulk event.
Oracle.apps.bom.structure.del
eteError
Raise this event when an error
occurs during a bill of
material deletion.
PK1_Value: The PK1_Value of
the bill. When Obj_Name =
NULL, PK1_Value = the value
of the Assembly_Item_Id.
PK2_Value: The PK2_Value of
the bill. When Obj_Name =
NULL, PK2_Value = the value
of the Organization_Id.
Obj_Name: This value is
NULL for items.
Structure_Name:TThe
alternate designator.
Event_Entity_Name: This
value equals 'Structure'.
Event_Parent_Entity_Id: The
value of the product bill's
Bill_Sequence_Id. The value
equals NULL for a bulk event.

8/12/2019 BOM Uuser Guide
http://slidepdf.com/reader/full/bom-uuser-guide 283/331
Business Event Data for Oracle Bills of Material C-5
Event Name Event Description Event Parameter Namesand Descriptions
Oracle.apps.bom.component.
modified
Raise this event when
creating or modifying a:
• substitute component
• reference designator
• component operation
Depending on the child entity
that is modified, the event
name will have either one of
the values listed above.
PK1_Value: The PK1_Value of
the component. When
Obj_Name = NULL,
PK1_Value = the value of the
Component_Item_Id.
PK2_Value: The PK2_Value of
the bill. When Obj_Name =
NULL, PK2_Value = the value
of the Organization_Id.
Obj_Name: This value is
NULL for component-type
items.
Structure_Name:TThealternate designator.
Event_Entity_Name: Possible
values include:
• Component
• Reference Designator
• Component Operations
• Substitute Component
Event_Parent_Entity_Id: The
value of the component's
Component_Sequence_Id .
The value equals NULL for a
bulk event.

8/12/2019 BOM Uuser Guide
http://slidepdf.com/reader/full/bom-uuser-guide 284/331

8/12/2019 BOM Uuser Guide
http://slidepdf.com/reader/full/bom-uuser-guide 285/331
Business Event Data for Oracle Bills of Material C-7
Event Name Event Description Event Parameter Namesand Descriptions
Oracle.apps.bom.component.
deleteError
Raise this event when an error
occurs during a component
deletion.
PK1_Value: The PK1_Value of
the component. When
Obj_Name = NULL,
PK1_Value = the value of the
Component_Item_Id.
PK2_Value: The PK2_Value of
the bill. When Obj_Name =
NULL, PK2_Value = the value
of the Organization_Id.
Obj_Name: This value is
NULL for component-type
items.
Structure_Name:The alternatedesignator.
Event_Entity_Name: Possible
values include:
• Component
• Reference Designator
• Component Operations
• Substitute Component
Event_Parent_Entity_Id: The
value of the component's
Component_Sequence_Id .
The value equals NULL for a
bulk event.
Note: For bulk business events, the event parameters PK1_Value,
PK2_Value, and Obj_Name parameters are NULL.

8/12/2019 BOM Uuser Guide
http://slidepdf.com/reader/full/bom-uuser-guide 286/331
C-8 Oracle Bills of Material User's Guide
Common Event Parameters
Event Parameter Name Description
Event_Type This parameter identifies the type oftransaction that raised the event.
• Single
• Bulk
Last_Updated_By Identifier of the user
Last_Update_Date Identifies the date the transaction occurred
Created_By Identifier of the user.
Note: In bulk events that include both
creation and update transactions, this
parameter is irrelevant and not available.
Creation_Date Identifies the date the creation transaction
occurred.
Note: In bulk events that include both
creation and update transactions, this
parameter is irrelevant and not available.
Request_Identifier When Event_Type = Bulk, this identifies the
concurrent request that processed the bulk
data set.
Related Topics
Using Business Events, page 1-54
Sample Subscription Functions, page C-9
Managing Business Events, Oracle Workflow Developer's Guide
Defining Procedures and Functions for Oracle Workflow, Oracle Workflow Developer's
Guide
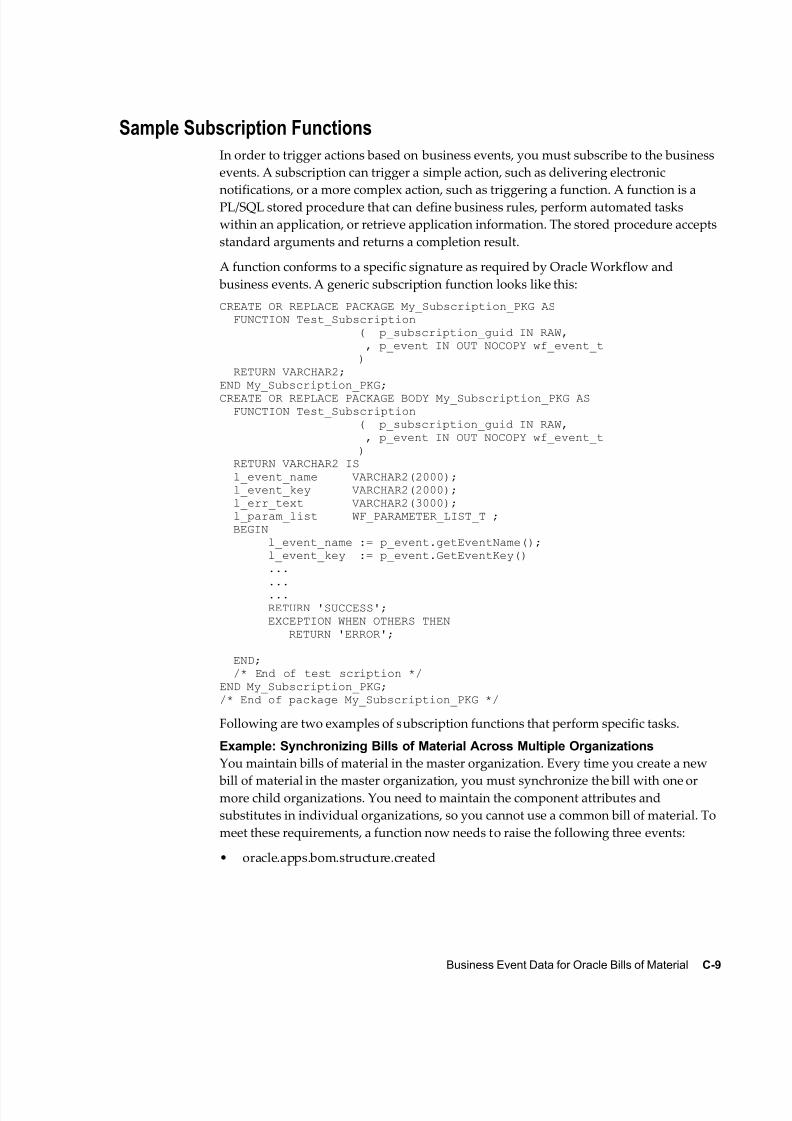
8/12/2019 BOM Uuser Guide
http://slidepdf.com/reader/full/bom-uuser-guide 287/331
Business Event Data for Oracle Bills of Material C-9
Sample Subscription Functions
In order to trigger actions based on business events, you must subscribe to the business
events. A subscription can trigger a simple action, such as delivering electronic
notifications, or a more complex action, such as triggering a function. A function is aPL/SQL stored procedure that can define business rules, perform automated tasks
within an application, or retrieve application information. The stored procedure accepts
standard arguments and returns a completion result.
A function conforms to a specific signature as required by Oracle Workflow and
business events. A generic subscription function looks like this:
CREATE OR REPLACE PACKAGE My_Subscription_PKG AS FUNCTION Test_Subscription
( p_subscription_guid IN RAW, , p_event IN OUT NOCOPY wf_event_t ) RETURN VARCHAR2;END My_Subscription_PKG;CREATE OR REPLACE PACKAGE BODY My_Subscription_PKG AS FUNCTION Test_Subscription
( p_subscription_guid IN RAW, , p_event IN OUT NOCOPY wf_event_t ) RETURN VARCHAR2 IS l_event_name VARCHAR2(2000); l_event_key VARCHAR2(2000); l_err_text VARCHAR2(3000); l_param_list WF_PARAMETER_LIST_T ; BEGIN l_event_name := p_event.getEventName(); l_event_key := p_event.GetEventKey() ... ... ... RETURN 'SUCCESS'; EXCEPTION WHEN OTHERS THEN RETURN 'ERROR';
END; /* End of test scription */END My_Subscription_PKG;/* End of package My_Subscription_PKG */
Following are two examples of subscription functions that perform specific tasks.
Example: Synchronizing Bills of Material Across Multiple Organizations
You maintain bills of material in the master organization. Every time you create a new
bill of material in the master organization, you must synchronize the bill with one ormore child organizations. You need to maintain the component attributes and
substitutes in individual organizations, so you cannot use a common bill of material. To
meet these requirements, a function now needs to raise the following three events:
• oracle.apps.bom.structure.created
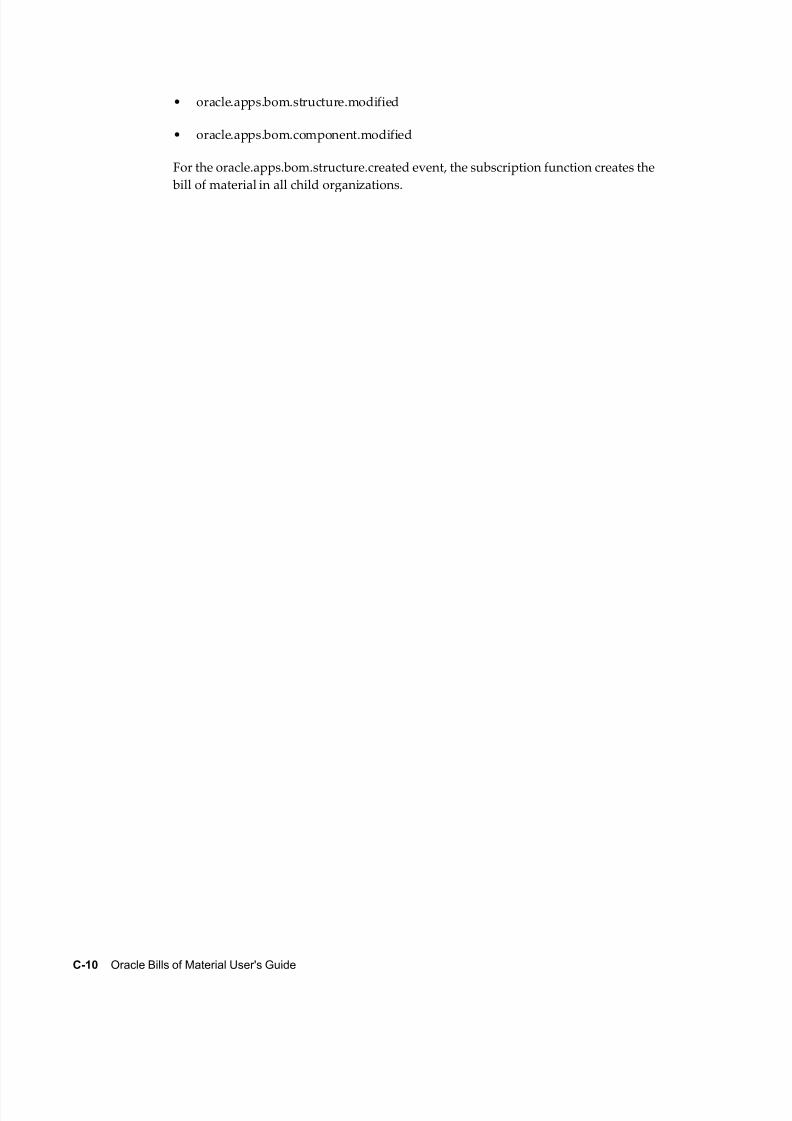
8/12/2019 BOM Uuser Guide
http://slidepdf.com/reader/full/bom-uuser-guide 288/331
C-10 Oracle Bills of Material User's Guide
• oracle.apps.bom.structure.modified
• oracle.apps.bom.component.modified
For the oracle.apps.bom.structure.created event, the subscription function creates the
bill of material in all child organizations.

8/12/2019 BOM Uuser Guide
http://slidepdf.com/reader/full/bom-uuser-guide 289/331
Business Event Data for Oracle Bills of Material C-11
CREATE or REPLACE PACKAGE Bom_Struct_Created_Sub AS
FUNCTION process_structure_created (p_subscription_guid IN RAW, p_event IN OUT NOCOPY wf_event_t)RETURN VARCHAR2;
END Bom_Struct_Created_Sub;
CREATE or REPLACE PACKAGE BODY Bom_Struct_Created_Sub AS/************************************************************************************ Function : process_structure_created* Parameters : Subscription guid* : Event* Return : Sucess/Error* Purpose : This is a subscription function fororacle.apps.bom.structure.created* event. When a structure is created the business eventoracle.apps.* bom.structure.created event is raised which will invokethis
* API as part of subscription.************************************************************************************/
FUNCTION process_structure_created (p_subscription_guid IN RAW, p_event IN OUT NOCOPY wf_event_t)RETURN VARCHAR2 IS
/**Cursor to get all child orgs for a given organization id.*/CURSOR get_child_orgs(org_id NUMBER)IS
SELECT organization_id child_org_idFROM mtl_parameters
WHERE master_organization_id = org_idAND master_organization_id <> organization_id;/** Cursor to get the structure details for a given item, org andstructure name.*/CURSOR get_structure_details(item_id NUMBER, org_id NUMBER,structure_name VARCHAR2)IS
SELECT *FROM bom_structures_bWHERE assembly_item_id = item_id
AND organization_id = org_idAND NVL(alternate_bom_designator,'PRIMARY') =
structure_name;
l_param_list WF_PARAMETER_LIST_T ;l_param_name VARCHAR2(240);l_param_value VARCHAR2(2000);l_event_name VARCHAR2(2000);l_event_key VARCHAR2(2000);l_debug_file_dir VARCHAR2(512);l_log_file VARCHAR2(240);l_log_return_status VARCHAR2(1);

8/12/2019 BOM Uuser Guide
http://slidepdf.com/reader/full/bom-uuser-guide 290/331
C-12 Oracle Bills of Material User's Guide
l_error VARCHAR2(4000);
l_structure_rec get_structure_details%ROWTYPE;l_bom_header_rec BOM_BO_PUB.Bom_Head_Rec_Type;l_bom_revision_tbl Bom_Bo_Pub.Bom_Revision_Tbl_Type;l_bom_component_tbl Bom_Bo_Pub.Bom_Comps_Tbl_Type;
l_bom_ref_designator_tbl Bom_Bo_Pub.Bom_Ref_Designator_Tbl_Type;l_bom_sub_component_tbl Bom_Bo_Pub.Bom_Sub_Component_Tbl_Type;l_bom_comp_ops_tbl Bom_Bo_Pub.Bom_Comp_Ops_Tbl_Type;
l_ass_item_id NUMBER;l_struct_name VARCHAR2(10);l_org_id NUMBER;l_child_org_id NUMBER;is_MasterOrg VARCHAR2(1);l_return_status VARCHAR2(1);l_msg_count NUMBER := 0;l_assembly_type NUMBER;l_assembly_comment VARCHAR2(240);l_attr_category VARCHAR2(30);l_attr1 VARCHAR2(150);
l_attr2 VARCHAR2(150);l_attr3 VARCHAR2(150);l_attr4 VARCHAR2(150);l_attr5 VARCHAR2(150);l_attr6 VARCHAR2(150);l_attr7 VARCHAR2(150);l_attr8 VARCHAR2(150);l_attr9 VARCHAR2(150);l_attr10 VARCHAR2(150);l_attr11 VARCHAR2(150);l_attr12 VARCHAR2(150);l_attr13 VARCHAR2(150);l_attr14 VARCHAR2(150);l_attr15 VARCHAR2(150);l_orig_sys_ref VARCHAR2(50);
l_imp_date DATE;l_entity_type VARCHAR2(100);BEGIN /* * Select the debug directory to write the log file and create thefile name. *
* These steps are required only for debugging and troubleshooting. * The location of the debug file is based on the utl_file_dirparameter */ SELECT VALUEINTO l_debug_file_dirFROM V$PARAMETERWHERE NAME = 'utl_file_dir';
IF INSTR(l_debug_file_dir,',') <> 0 THENl_debug_file_dir := SUBSTR(l_debug_file_dir, 1,
INSTR(l_debug_file_dir, ',') - 1);END IF;
/* * Create the file name for debug log file. */

8/12/2019 BOM Uuser Guide
http://slidepdf.com/reader/full/bom-uuser-guide 291/331
Business Event Data for Oracle Bills of Material C-13
l_log_file := 'BOM_STR_SUBSCR'||'_'||TO_CHAR(SYSDATE,'DDMONYYYY_HH24MISS')||'.err';
l_param_list := p_event.getparameterlist;l_event_name := p_event.getEventName();
l_event_key := p_event.GetEventKey();
/** Loop through the payload for the business event raised and get allthe parameters. * This gives the information about the structure created.*/
IF l_param_list IS NOT NULL THEN FOR i IN l_param_list.FIRST..l_param_list.LAST
LOOP l_param_name := l_param_list(i).getname;
l_param_value := l_param_list(i).getvalue;
IF (l_param_name = 'PK1_VALUE') THEN l_ass_item_id := l_param_value;
ELSIF (l_param_name = 'PK2_VALUE') THEN l_org_id := l_param_value; ELSIF(l_param_name = 'STRUCTURE_NAME') THEN l_struct_name := l_param_value; END IF;
END LOOP;END IF;
/* * Check if it is a Master org.If it is a Master Org create structurein all the * child orgs. */
BEGINSELECT 'Y'INTO is_MasterOrgFROM DUALWHERE EXISTS
(SELECT organization_idFROM mtl_parametersWHERE organization_id = l_org_id
AND ( master_organization_id IS NULLOR master_organization_id = l_org_id)
);EXCEPTION
WHEN NO_DATA_FOUND THEN is_MasterOrg := 'N';
END;
/* * This subscription API works only for event type as Single. */IF (is_MasterOrg = 'Y' AND l_entity_type= 'Single')THENl_bom_header_rec := Bom_Bo_Pub.G_MISS_BOM_HEADER_REC;
l_bom_revision_tbl := Bom_Bo_Pub.G_MISS_BOM_REVISION_TBL;
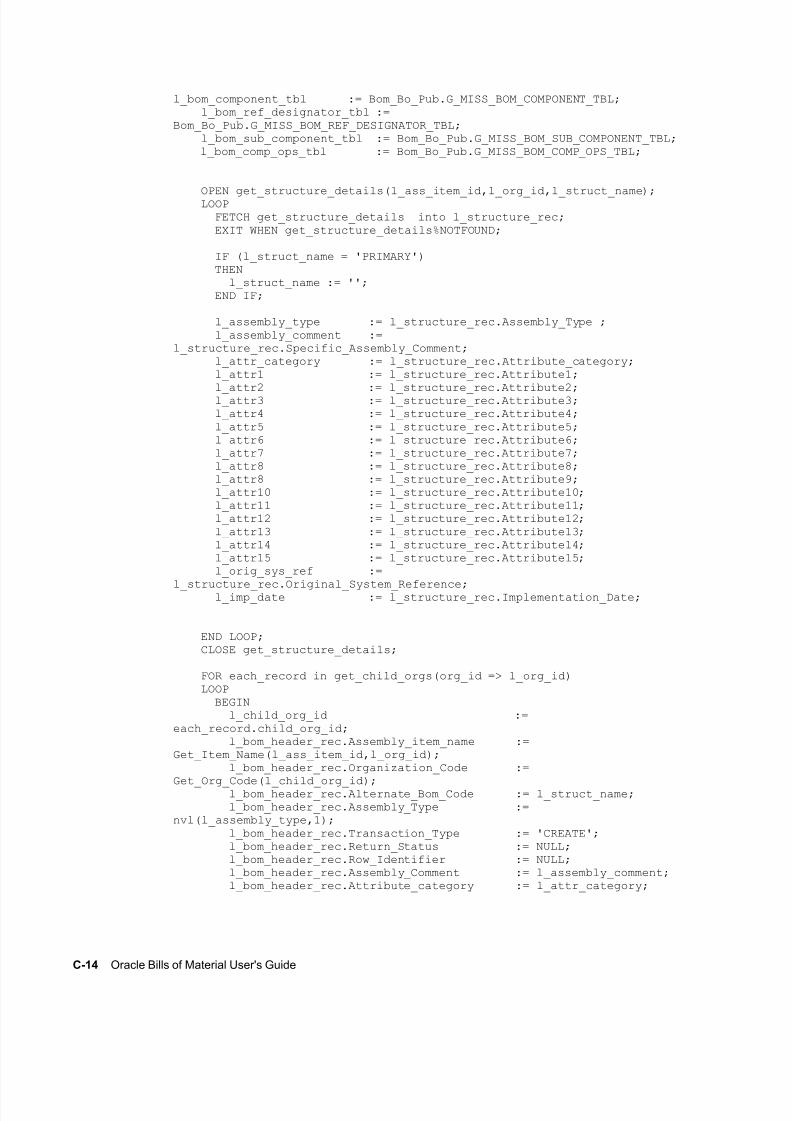
8/12/2019 BOM Uuser Guide
http://slidepdf.com/reader/full/bom-uuser-guide 292/331
C-14 Oracle Bills of Material User's Guide
l_bom_component_tbl := Bom_Bo_Pub.G_MISS_BOM_COMPONENT_TBL; l_bom_ref_designator_tbl :=Bom_Bo_Pub.G_MISS_BOM_REF_DESIGNATOR_TBL; l_bom_sub_component_tbl := Bom_Bo_Pub.G_MISS_BOM_SUB_COMPONENT_TBL; l_bom_comp_ops_tbl := Bom_Bo_Pub.G_MISS_BOM_COMP_OPS_TBL;
OPEN get_structure_details(l_ass_item_id,l_org_id,l_struct_name); LOOP FETCH get_structure_details into l_structure_rec; EXIT WHEN get_structure_details%NOTFOUND;
IF (l_struct_name = 'PRIMARY') THEN
l_struct_name := '';END IF;
l_assembly_type := l_structure_rec.Assembly_Type ; l_assembly_comment :=l_structure_rec.Specific_Assembly_Comment; l_attr_category := l_structure_rec.Attribute_category; l_attr1 := l_structure_rec.Attribute1;
l_attr2 := l_structure_rec.Attribute2; l_attr3 := l_structure_rec.Attribute3; l_attr4 := l_structure_rec.Attribute4; l_attr5 := l_structure_rec.Attribute5; l_attr6 := l_structure_rec.Attribute6; l_attr7 := l_structure_rec.Attribute7; l_attr8 := l_structure_rec.Attribute8; l_attr8 := l_structure_rec.Attribute9; l_attr10 := l_structure_rec.Attribute10; l_attr11 := l_structure_rec.Attribute11; l_attr12 := l_structure_rec.Attribute12; l_attr13 := l_structure_rec.Attribute13; l_attr14 := l_structure_rec.Attribute14; l_attr15 := l_structure_rec.Attribute15; l_orig_sys_ref :=
l_structure_rec.Original_System_Reference; l_imp_date := l_structure_rec.Implementation_Date;
END LOOP; CLOSE get_structure_details;
FOR each_record in get_child_orgs(org_id => l_org_id) LOOP BEGIN l_child_org_id :=each_record.child_org_id;
l_bom_header_rec.Assembly_item_name :=Get_Item_Name(l_ass_item_id,l_org_id);
l_bom_header_rec.Organization_Code :=
Get_Org_Code(l_child_org_id); l_bom_header_rec.Alternate_Bom_Code := l_struct_name; l_bom_header_rec.Assembly_Type :=nvl(l_assembly_type,1); l_bom_header_rec.Transaction_Type := 'CREATE'; l_bom_header_rec.Return_Status := NULL; l_bom_header_rec.Row_Identifier := NULL; l_bom_header_rec.Assembly_Comment := l_assembly_comment; l_bom_header_rec.Attribute_category := l_attr_category;

8/12/2019 BOM Uuser Guide
http://slidepdf.com/reader/full/bom-uuser-guide 293/331
Business Event Data for Oracle Bills of Material C-15
l_bom_header_rec.Attribute1 := l_attr1; l_bom_header_rec.Attribute2 := l_attr2; l_bom_header_rec.Attribute3 := l_attr3; l_bom_header_rec.Attribute4 := l_attr4; l_bom_header_rec.Attribute5 := l_attr5; l_bom_header_rec.Attribute6 := l_attr6; l_bom_header_rec.Attribute7 := l_attr7;
l_bom_header_rec.Attribute8 := l_attr8; l_bom_header_rec.Attribute9 := l_attr9; l_bom_header_rec.Attribute10 := l_attr10; l_bom_header_rec.Attribute11 := l_attr11; l_bom_header_rec.Attribute12 := l_attr12; l_bom_header_rec.Attribute13 := l_attr13; l_bom_header_rec.Attribute14 := l_attr14; l_bom_header_rec.Attribute15 := l_attr15; l_bom_header_rec.Original_System_Reference := l_orig_sys_ref; l_bom_header_rec.BOM_Implementation_Date := l_imp_date;
/** Assign the item to child org if it is not assigned. The item
assignment * code is not in here.So if the item is not assigned to the
child org * we need to do the item assignment first before trying tocreate structure * in the child org. */
Bom_Bo_Pub.Process_Bom ( p_bo_identifier => 'BOM' , p_api_version_number => 1.0 , p_init_msg_list => TRUE , p_bom_header_rec => l_bom_header_rec
, p_bom_revision_tbl => l_bom_revision_tbl , p_bom_component_tbl => l_bom_component_tbl , p_bom_ref_designator_tbl => l_bom_ref_designator_tbl
, p_bom_sub_component_tbl => l_bom_sub_component_tbl , x_bom_header_rec => l_bom_header_rec , x_bom_revision_tbl => l_bom_revision_tbl , x_bom_component_tbl => l_bom_component_tbl , x_bom_ref_designator_tbl => l_bom_ref_designator_tbl , x_bom_sub_component_tbl => l_bom_sub_component_tbl
, x_return_status => l_return_status , x_msg_count => l_msg_count , p_debug => 'N' -- Set this to Y fordebugging , p_output_dir => l_debug_file_dir , p_debug_filename => l_log_file , p_write_err_to_debugfile => 'Y' );
EXCEPTION WHEN OTHERS THEN l_error := SQLERRM;
END;END LOOP;
END IF;RETURN 'SUCCESS';
EXCEPTION WHEN OTHERS THEN

8/12/2019 BOM Uuser Guide
http://slidepdf.com/reader/full/bom-uuser-guide 294/331
C-16 Oracle Bills of Material User's Guide
l_error := SQLERRM; RETURN 'ERROR';
END process_structure_created;
/***************************************************************** * Function : Get_Item_Name
* Parameters : Inventory item id * : Organization id* Return : Assembly Item name * Purpose : This function is used to get the assembly item name * for a given item id and organzation id. ******************************************************************/
FUNCTION Get_Item_Name(p_item_id IN NUMBER,p_org_id IN NUMBER) RETURN VARCHAR2 IS l_item_name MTL_SYSTEM_ITEMS_KFV.concatenated_segments%TYPE; BEGIN SELECT concatenated_segments INTO l_item_name FROM mtl_system_items_kfv
WHERE inventory_item_id = p_item_id AND organization_id = p_org_id; RETURN l_item_name; EXCEPTION WHEN NO_DATA_FOUND THEN return null; END Get_Item_Name;
/***************************************************************** * Function : Get_Org_Code * Parameters : Organization id* Return : Organization Code * Purpose : This function is used to get the organization code * for a organzation id. ******************************************************************/
FUNCTION Get_Org_Code(p_org_id IN NUMBER) RETURN VARCHAR2 IS l_org_code MTL_PARAMETERS.organization_code%TYPE; BEGIN SELECT organization_code INTO l_org_code FROM MTL_PARAMETERS WHERE organization_id = p_org_id; RETURN l_org_code; EXCEPTION WHEN NO_DATA_FOUND THEN return null; END Get_Org_Code;
END Bom_Struct_Created_Sub;
For the oracle.apps.bom.structure.modified event, the subscription function identifies
the new or modified components and adds or changes them in the child organizations:
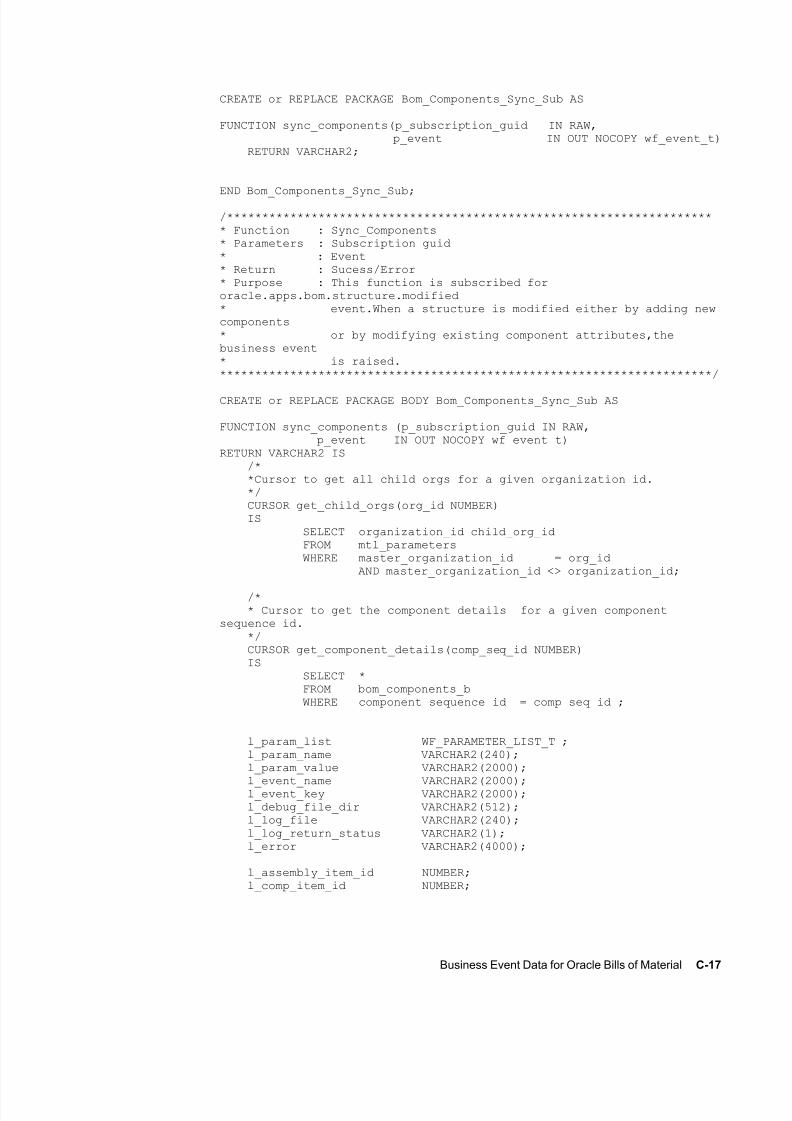
8/12/2019 BOM Uuser Guide
http://slidepdf.com/reader/full/bom-uuser-guide 295/331
Business Event Data for Oracle Bills of Material C-17
CREATE or REPLACE PACKAGE Bom_Components_Sync_Sub AS
FUNCTION sync_components(p_subscription_guid IN RAW, p_event IN OUT NOCOPY wf_event_t) RETURN VARCHAR2;
END Bom_Components_Sync_Sub;
/********************************************************************** Function : Sync_Components* Parameters : Subscription guid* : Event* Return : Sucess/Error* Purpose : This function is subscribed fororacle.apps.bom.structure.modified* event.When a structure is modified either by adding newcomponents* or by modifying existing component attributes,thebusiness event* is raised.**********************************************************************/
CREATE or REPLACE PACKAGE BODY Bom_Components_Sync_Sub AS
FUNCTION sync_components (p_subscription_guid IN RAW, p_event IN OUT NOCOPY wf_event_t)RETURN VARCHAR2 IS /* *Cursor to get all child orgs for a given organization id. */ CURSOR get_child_orgs(org_id NUMBER)
ISSELECT organization_id child_org_idFROM mtl_parametersWHERE master_organization_id = org_id
AND master_organization_id <> organization_id;
/* * Cursor to get the component details for a given componentsequence id. */ CURSOR get_component_details(comp_seq_id NUMBER)
ISSELECT *FROM bom_components_bWHERE component_sequence_id = comp_seq_id ;
l_param_list WF_PARAMETER_LIST_T ;l_param_name VARCHAR2(240);
l_param_value VARCHAR2(2000);
l_event_name VARCHAR2(2000); l_event_key VARCHAR2(2000);l_debug_file_dir VARCHAR2(512);
l_log_file VARCHAR2(240);l_log_return_status VARCHAR2(1);
l_error VARCHAR2(4000);
l_assembly_item_id NUMBER; l_comp_item_id NUMBER;

8/12/2019 BOM Uuser Guide
http://slidepdf.com/reader/full/bom-uuser-guide 296/331
C-18 Oracle Bills of Material User's Guide
l_org_id NUMBER; l_struct_name VARCHAR2(10); l_entity_name VARCHAR2(240); l_comp_seq_id NUMBER; l_bill_seq_id NUMBER;
l_component_rec get_component_details%ROWTYPE;
l_bom_header_rec BOM_BO_PUB.Bom_Head_Rec_Type; l_bom_revision_tbl Bom_Bo_Pub.Bom_Revision_Tbl_Type; l_bom_component_rec Bom_Bo_Pub.Bom_Comps_Rec_Type; l_bom_component_tbl Bom_Bo_Pub.Bom_Comps_Tbl_Type; l_bom_ref_designator_tbl Bom_Bo_Pub.Bom_Ref_Designator_Tbl_Type; l_bom_sub_component_tbl Bom_Bo_Pub.Bom_Sub_Component_Tbl_Type; l_bom_comp_ops_tbl Bom_Bo_Pub.Bom_Comp_Ops_Tbl_Type;
is_MasterOrg VARCHAR2(1); l_child_org_id NUMBER; l_return_status VARCHAR2(1); l_msg_count NUMBER := 0;
l_disable_date DATE; l_planning_percent NUMBER;
l_yield NUMBER;l_cost_rollup NUMBER;l_wip_supply_type NUMBER;l_so_basis NUMBER;l_optional NUMBER;l_exclusive NUMBER;l_check_atp NUMBER;l_shipping_allowed NUMBER;l_req_to_ship NUMBER;l_req_for_revenue NUMBER;l_include_on_ship_docs NUMBER;l_qty_related NUMBER;l_supply_subinv VARCHAR2(10);l_low_qty NUMBER;l_high_qty NUMBER;
l_attr_category VARCHAR2(30);l_attr1 VARCHAR2(150);l_attr2 VARCHAR2(150);l_attr3 VARCHAR2(150);l_attr4 VARCHAR2(150);l_attr5 VARCHAR2(150);l_attr6 VARCHAR2(150);l_attr7 VARCHAR2(150);l_attr8 VARCHAR2(150);l_attr9 VARCHAR2(150);l_attr10 VARCHAR2(150);l_attr11 VARCHAR2(150);l_attr12 VARCHAR2(150);l_attr13 VARCHAR2(150);l_attr14 VARCHAR2(150);
l_attr15 VARCHAR2(150);l_from_end_item_unit_number VARCHAR2(30); l_to_end_item_unit_number VARCHAR2(30); l_orig_sys_ref VARCHAR2(50) ; l_enforce_int_req NUMBER;
l_auto_req_material VARCHAR2(1);l_sugg_vendor_name VARCHAR2(240);l_unit_price NUMBER;l_event_type VARCHAR2(500);

8/12/2019 BOM Uuser Guide
http://slidepdf.com/reader/full/bom-uuser-guide 297/331
Business Event Data for Oracle Bills of Material C-19
BEGIN/** Select the debug directory to write the log file and create the filename.** These steps are required only for debugging and troubleshooting.
* The location of the debug file is based on the utl_file_dir parameter*/SELECT VALUEINTO l_debug_file_dirFROM V$PARAMETERWHERE NAME = 'utl_file_dir';
IF INSTR(l_debug_file_dir,',') <> 0 THENl_debug_file_dir := SUBSTR(l_debug_file_dir, 1,
INSTR(l_debug_file_dir, ',') - 1);END IF;l_log_file := 'BOM_COMP_SUBSCR'||'_'||TO_CHAR(SYSDATE,'DDMONYYYY_HH24MISS')||'.err';
/* End of the section required for debug file */
l_param_list := p_event.getparameterlist;l_event_name := p_event.getEventName();l_event_key := p_event.GetEventKey();
/** Loop through the payload for the business event raised and get allthe parameters.* This gives the information about the structure created.*/
IF l_param_list IS NOT NULL THEN FOR i IN l_param_list.FIRST..l_param_list.LASTLOOP
l_param_name := l_param_list(i).getname;
l_param_value := l_param_list(i).getvalue;
IF (l_param_name = 'PK1_VALUE') THEN l_comp_item_id := l_param_value; ELSIF (l_param_name = 'PK2_VALUE') THEN l_org_id := l_param_value; ELSIF(l_param_name = 'STRUCTURE_NAME') THEN l_struct_name := l_param_value; ELSIF (l_param_name = 'EVENT_ENTITY_NAME') THEN l_entity_name := l_param_value; ELSIF (l_param_name = 'COMPONENT_SEQUENCE_ID')
THEN l_comp_seq_id := l_param_value; ELSIF (l_param_name = 'EVENT_ENTITY_PARENT_ID') THEN l_bill_seq_id := l_param_value; ELSIF (l_param_name = 'EVENT_TYPE') THEN l_event_type := l_param_value; END IF;
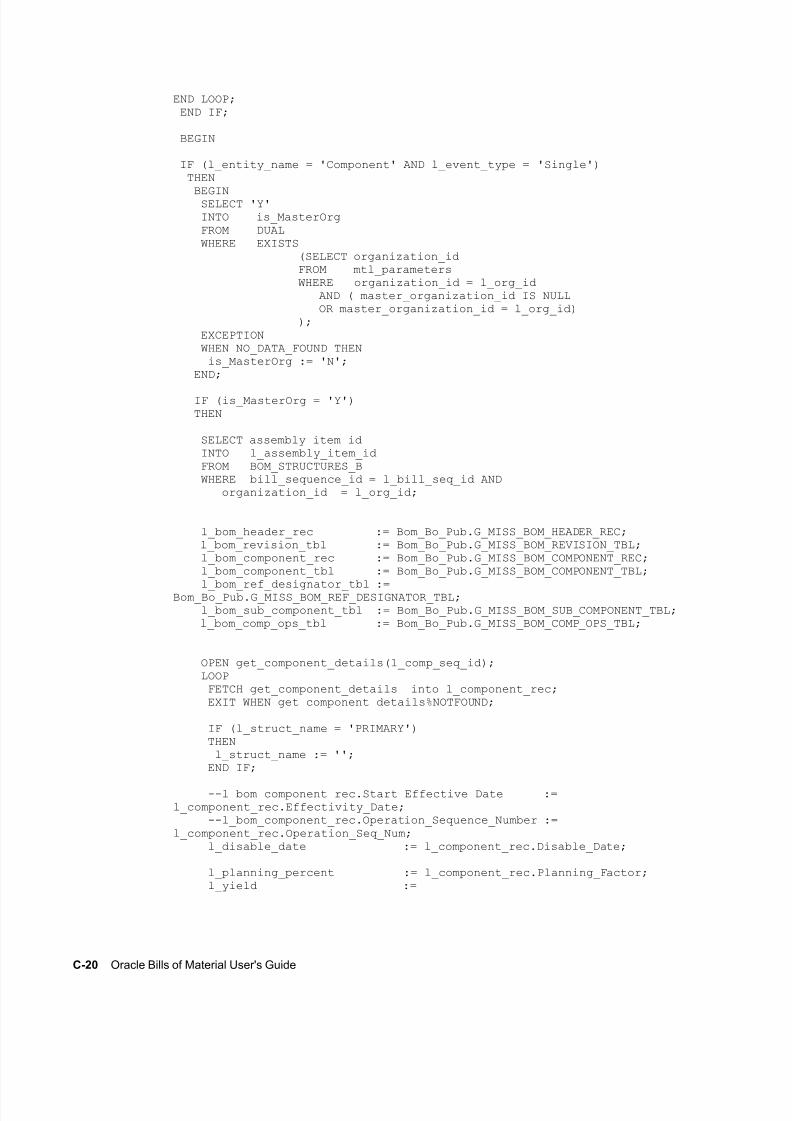
8/12/2019 BOM Uuser Guide
http://slidepdf.com/reader/full/bom-uuser-guide 298/331
C-20 Oracle Bills of Material User's Guide
END LOOP;END IF;
BEGIN
IF (l_entity_name = 'Component' AND l_event_type = 'Single') THEN
BEGINSELECT 'Y'INTO is_MasterOrgFROM DUALWHERE EXISTS
(SELECT organization_idFROM mtl_parametersWHERE organization_id = l_org_id
AND ( master_organization_id IS NULLOR master_organization_id = l_org_id)
);EXCEPTION
WHEN NO_DATA_FOUND THEN is_MasterOrg := 'N'; END;
IF (is_MasterOrg = 'Y') THEN
SELECT assembly_item_id INTO l_assembly_item_id FROM BOM_STRUCTURES_B WHERE bill_sequence_id = l_bill_seq_id AND organization_id = l_org_id;
l_bom_header_rec := Bom_Bo_Pub.G_MISS_BOM_HEADER_REC; l_bom_revision_tbl := Bom_Bo_Pub.G_MISS_BOM_REVISION_TBL; l_bom_component_rec := Bom_Bo_Pub.G_MISS_BOM_COMPONENT_REC; l_bom_component_tbl := Bom_Bo_Pub.G_MISS_BOM_COMPONENT_TBL;
l_bom_ref_designator_tbl :=Bom_Bo_Pub.G_MISS_BOM_REF_DESIGNATOR_TBL; l_bom_sub_component_tbl := Bom_Bo_Pub.G_MISS_BOM_SUB_COMPONENT_TBL; l_bom_comp_ops_tbl := Bom_Bo_Pub.G_MISS_BOM_COMP_OPS_TBL;
OPEN get_component_details(l_comp_seq_id); LOOP FETCH get_component_details into l_component_rec; EXIT WHEN get_component_details%NOTFOUND;
IF (l_struct_name = 'PRIMARY') THEN
l_struct_name := '';END IF;
--l_bom_component_rec.Start_Effective_Date :=l_component_rec.Effectivity_Date; --l_bom_component_rec.Operation_Sequence_Number :=l_component_rec.Operation_Seq_Num;
l_disable_date := l_component_rec.Disable_Date;
l_planning_percent := l_component_rec.Planning_Factor; l_yield :=
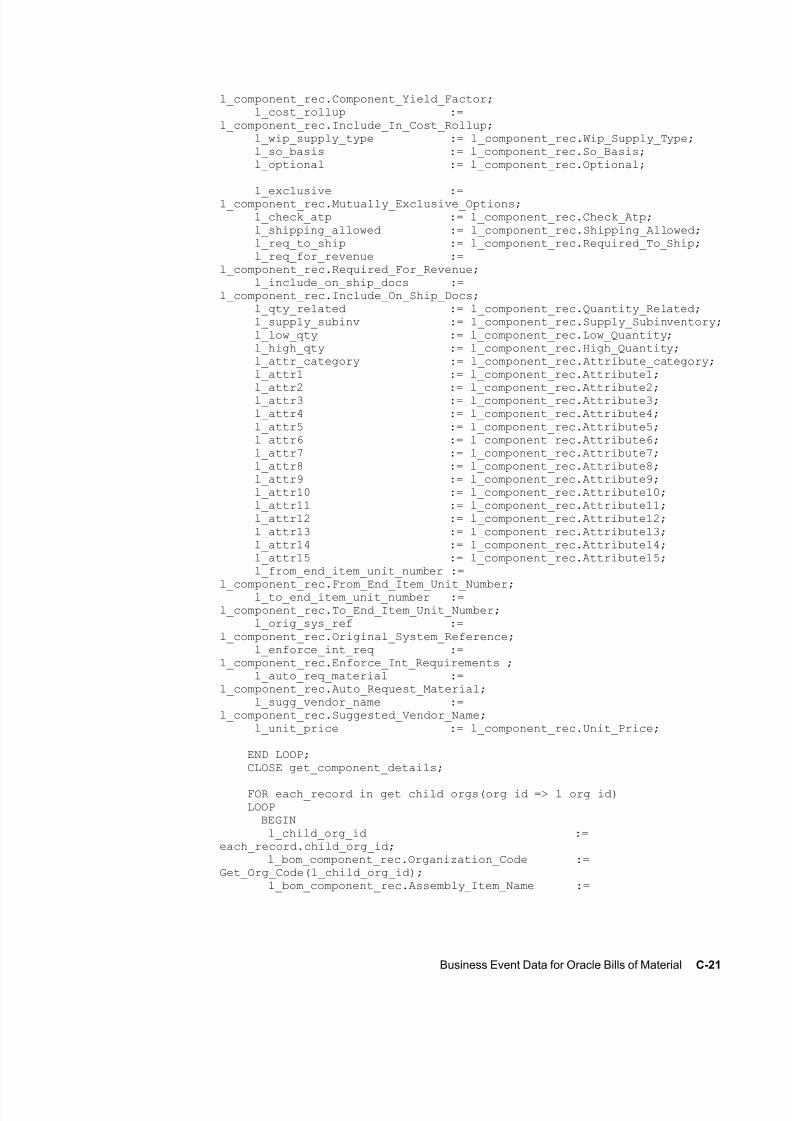
8/12/2019 BOM Uuser Guide
http://slidepdf.com/reader/full/bom-uuser-guide 299/331
Business Event Data for Oracle Bills of Material C-21
l_component_rec.Component_Yield_Factor; l_cost_rollup :=l_component_rec.Include_In_Cost_Rollup; l_wip_supply_type := l_component_rec.Wip_Supply_Type; l_so_basis := l_component_rec.So_Basis; l_optional := l_component_rec.Optional;
l_exclusive :=l_component_rec.Mutually_Exclusive_Options; l_check_atp := l_component_rec.Check_Atp;
l_shipping_allowed := l_component_rec.Shipping_Allowed; l_req_to_ship := l_component_rec.Required_To_Ship; l_req_for_revenue :=l_component_rec.Required_For_Revenue; l_include_on_ship_docs :=l_component_rec.Include_On_Ship_Docs; l_qty_related := l_component_rec.Quantity_Related; l_supply_subinv := l_component_rec.Supply_Subinventory; l_low_qty := l_component_rec.Low_Quantity; l_high_qty := l_component_rec.High_Quantity; l_attr_category := l_component_rec.Attribute_category; l_attr1 := l_component_rec.Attribute1;
l_attr2 := l_component_rec.Attribute2; l_attr3 := l_component_rec.Attribute3; l_attr4 := l_component_rec.Attribute4; l_attr5 := l_component_rec.Attribute5; l_attr6 := l_component_rec.Attribute6; l_attr7 := l_component_rec.Attribute7; l_attr8 := l_component_rec.Attribute8; l_attr9 := l_component_rec.Attribute9; l_attr10 := l_component_rec.Attribute10; l_attr11 := l_component_rec.Attribute11; l_attr12 := l_component_rec.Attribute12; l_attr13 := l_component_rec.Attribute13; l_attr14 := l_component_rec.Attribute14; l_attr15 := l_component_rec.Attribute15; l_from_end_item_unit_number :=
l_component_rec.From_End_Item_Unit_Number; l_to_end_item_unit_number :=l_component_rec.To_End_Item_Unit_Number; l_orig_sys_ref :=l_component_rec.Original_System_Reference; l_enforce_int_req :=l_component_rec.Enforce_Int_Requirements ; l_auto_req_material :=l_component_rec.Auto_Request_Material; l_sugg_vendor_name :=l_component_rec.Suggested_Vendor_Name; l_unit_price := l_component_rec.Unit_Price;
END LOOP; CLOSE get_component_details;
FOR each_record in get_child_orgs(org_id => l_org_id) LOOP BEGIN l_child_org_id :=each_record.child_org_id; l_bom_component_rec.Organization_Code :=Get_Org_Code(l_child_org_id); l_bom_component_rec.Assembly_Item_Name :=
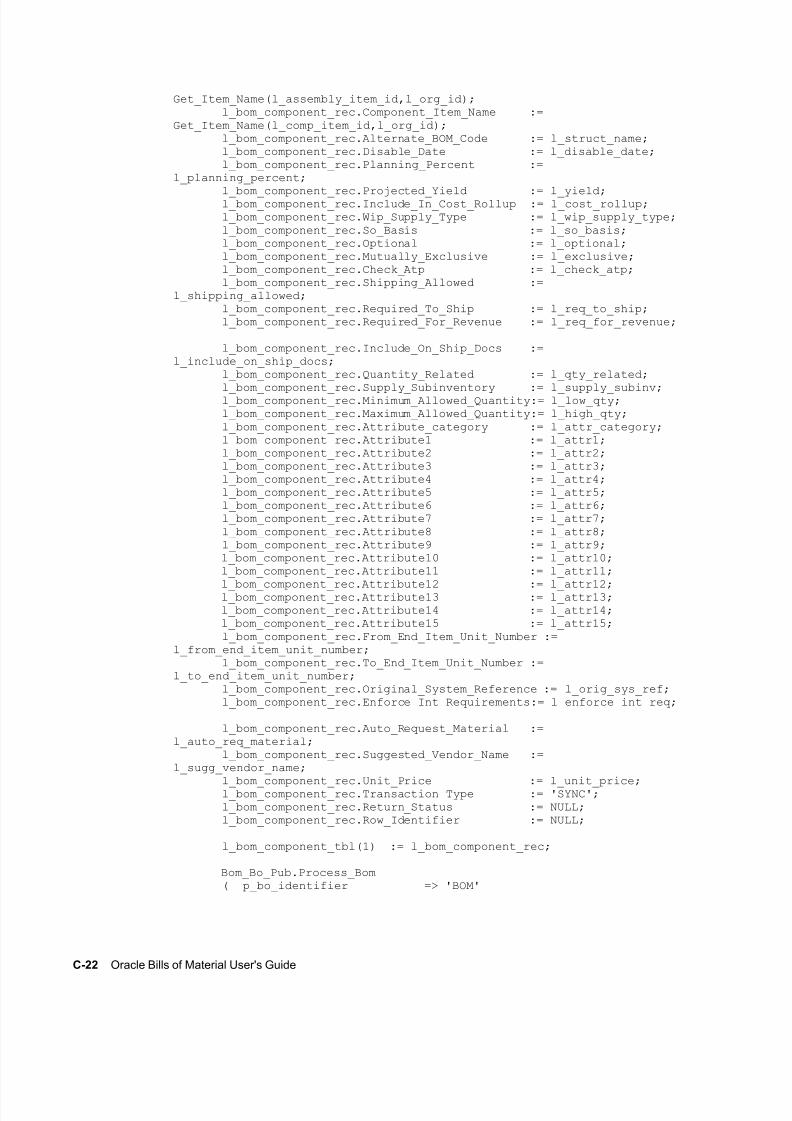
8/12/2019 BOM Uuser Guide
http://slidepdf.com/reader/full/bom-uuser-guide 300/331
C-22 Oracle Bills of Material User's Guide
Get_Item_Name(l_assembly_item_id,l_org_id);l_bom_component_rec.Component_Item_Name :=
Get_Item_Name(l_comp_item_id,l_org_id);l_bom_component_rec.Alternate_BOM_Code := l_struct_name;
l_bom_component_rec.Disable_Date := l_disable_date;l_bom_component_rec.Planning_Percent :=
l_planning_percent;
l_bom_component_rec.Projected_Yield := l_yield;l_bom_component_rec.Include_In_Cost_Rollup := l_cost_rollup;l_bom_component_rec.Wip_Supply_Type := l_wip_supply_type;
l_bom_component_rec.So_Basis := l_so_basis; l_bom_component_rec.Optional := l_optional; l_bom_component_rec.Mutually_Exclusive := l_exclusive; l_bom_component_rec.Check_Atp := l_check_atp; l_bom_component_rec.Shipping_Allowed :=l_shipping_allowed; l_bom_component_rec.Required_To_Ship := l_req_to_ship; l_bom_component_rec.Required_For_Revenue := l_req_for_revenue;
l_bom_component_rec.Include_On_Ship_Docs :=l_include_on_ship_docs; l_bom_component_rec.Quantity_Related := l_qty_related;
l_bom_component_rec.Supply_Subinventory := l_supply_subinv; l_bom_component_rec.Minimum_Allowed_Quantity:= l_low_qty;l_bom_component_rec.Maximum_Allowed_Quantity:= l_high_qty;
l_bom_component_rec.Attribute_category := l_attr_category; l_bom_component_rec.Attribute1 := l_attr1; l_bom_component_rec.Attribute2 := l_attr2; l_bom_component_rec.Attribute3 := l_attr3; l_bom_component_rec.Attribute4 := l_attr4; l_bom_component_rec.Attribute5 := l_attr5; l_bom_component_rec.Attribute6 := l_attr6; l_bom_component_rec.Attribute7 := l_attr7; l_bom_component_rec.Attribute8 := l_attr8; l_bom_component_rec.Attribute9 := l_attr9; l_bom_component_rec.Attribute10 := l_attr10; l_bom_component_rec.Attribute11 := l_attr11;
l_bom_component_rec.Attribute12 := l_attr12; l_bom_component_rec.Attribute13 := l_attr13; l_bom_component_rec.Attribute14 := l_attr14; l_bom_component_rec.Attribute15 := l_attr15; l_bom_component_rec.From_End_Item_Unit_Number :=l_from_end_item_unit_number;
l_bom_component_rec.To_End_Item_Unit_Number :=l_to_end_item_unit_number;
l_bom_component_rec.Original_System_Reference := l_orig_sys_ref; l_bom_component_rec.Enforce_Int_Requirements:= l_enforce_int_req;
l_bom_component_rec.Auto_Request_Material :=l_auto_req_material; l_bom_component_rec.Suggested_Vendor_Name :=l_sugg_vendor_name;
l_bom_component_rec.Unit_Price := l_unit_price;l_bom_component_rec.Transaction_Type := 'SYNC'; l_bom_component_rec.Return_Status := NULL; l_bom_component_rec.Row_Identifier := NULL;
l_bom_component_tbl(1) := l_bom_component_rec;
Bom_Bo_Pub.Process_Bom ( p_bo_identifier => 'BOM'
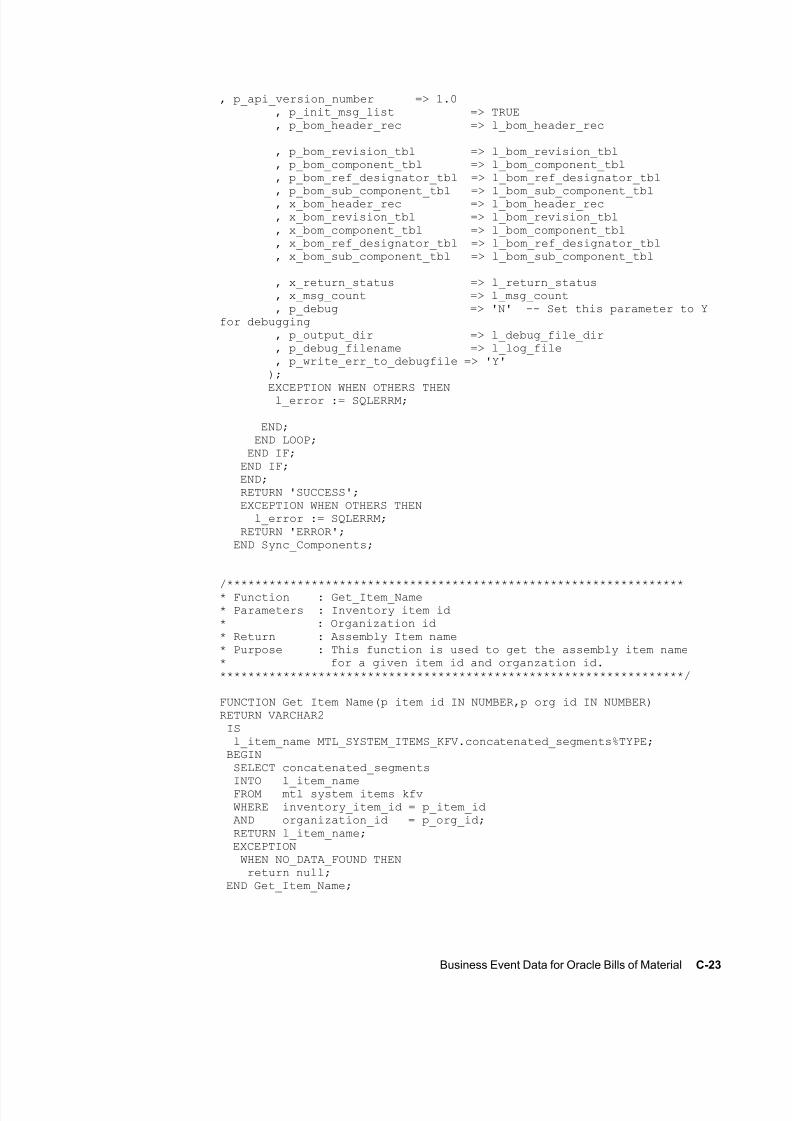
8/12/2019 BOM Uuser Guide
http://slidepdf.com/reader/full/bom-uuser-guide 301/331
Business Event Data for Oracle Bills of Material C-23
, p_api_version_number => 1.0 , p_init_msg_list => TRUE , p_bom_header_rec => l_bom_header_rec
, p_bom_revision_tbl => l_bom_revision_tbl , p_bom_component_tbl => l_bom_component_tbl , p_bom_ref_designator_tbl => l_bom_ref_designator_tbl
, p_bom_sub_component_tbl => l_bom_sub_component_tbl , x_bom_header_rec => l_bom_header_rec , x_bom_revision_tbl => l_bom_revision_tbl , x_bom_component_tbl => l_bom_component_tbl , x_bom_ref_designator_tbl => l_bom_ref_designator_tbl , x_bom_sub_component_tbl => l_bom_sub_component_tbl
, x_return_status => l_return_status , x_msg_count => l_msg_count , p_debug => 'N' -- Set this parameter to Yfor debugging , p_output_dir => l_debug_file_dir , p_debug_filename => l_log_file , p_write_err_to_debugfile => 'Y' );
EXCEPTION WHEN OTHERS THEN l_error := SQLERRM;
END; END LOOP;
END IF; END IF; END; RETURN 'SUCCESS';
EXCEPTION WHEN OTHERS THEN l_error := SQLERRM; RETURN 'ERROR'; END Sync_Components;
/****************************************************************** Function : Get_Item_Name* Parameters : Inventory item id* : Organization id* Return : Assembly Item name* Purpose : This function is used to get the assembly item name* for a given item id and organzation id.******************************************************************/
FUNCTION Get_Item_Name(p_item_id IN NUMBER,p_org_id IN NUMBER)RETURN VARCHAR2 IS l_item_name MTL_SYSTEM_ITEMS_KFV.concatenated_segments%TYPE; BEGIN SELECT concatenated_segments
INTO l_item_name FROM mtl_system_items_kfv WHERE inventory_item_id = p_item_id AND organization_id = p_org_id; RETURN l_item_name; EXCEPTION WHEN NO_DATA_FOUND THEN return null; END Get_Item_Name;
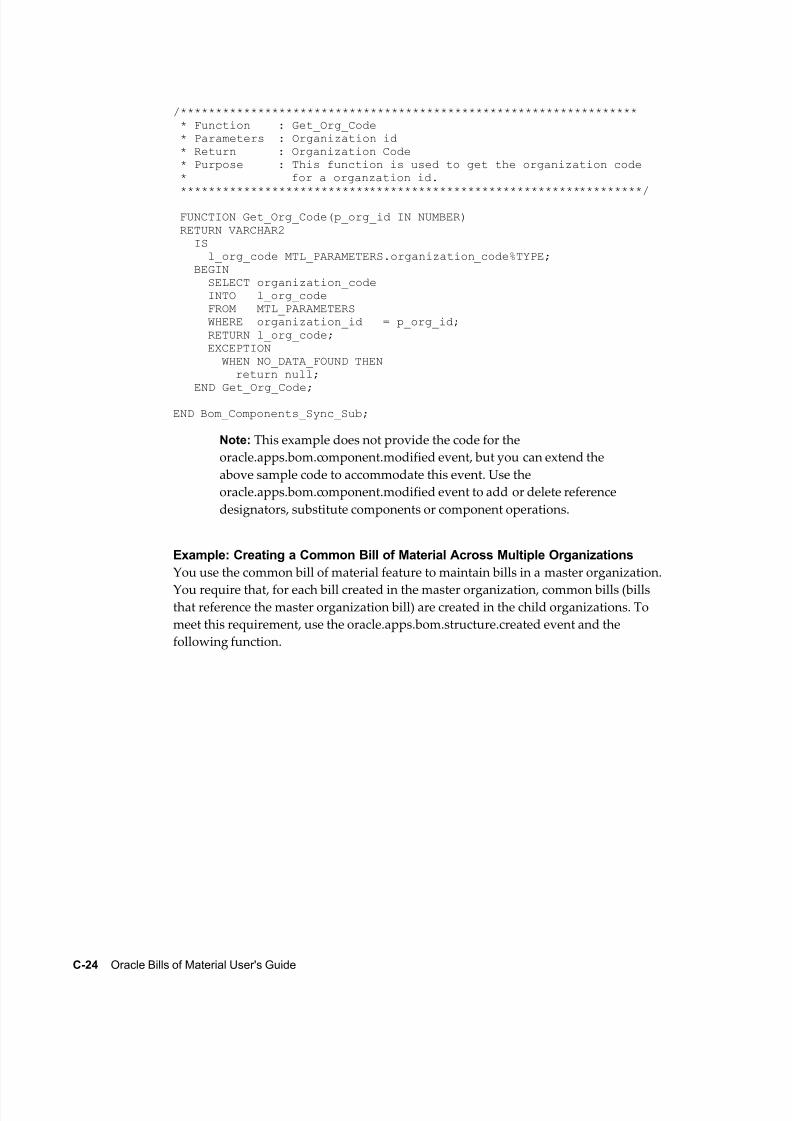
8/12/2019 BOM Uuser Guide
http://slidepdf.com/reader/full/bom-uuser-guide 302/331
C-24 Oracle Bills of Material User's Guide
/***************************************************************** * Function : Get_Org_Code * Parameters : Organization id* Return : Organization Code * Purpose : This function is used to get the organization code * for a organzation id.
******************************************************************/
FUNCTION Get_Org_Code(p_org_id IN NUMBER) RETURN VARCHAR2 IS l_org_code MTL_PARAMETERS.organization_code%TYPE; BEGIN SELECT organization_code INTO l_org_code FROM MTL_PARAMETERS WHERE organization_id = p_org_id; RETURN l_org_code; EXCEPTION WHEN NO_DATA_FOUND THEN return null;
END Get_Org_Code;
END Bom_Components_Sync_Sub;
Note: This example does not provide the code for the
oracle.apps.bom.component.modified event, but you can extend the
above sample code to accommodate this event. Use the
oracle.apps.bom.component.modified event to add or delete reference
designators, substitute components or component operations.
Example: Creating a Common Bill of Material Across Multiple Organizations
You use the common bill of material feature to maintain bills in a master organization.
You require that, for each bill created in the master organization, common bills (billsthat reference the master organization bill) are created in the child organizations. To
meet this requirement, use the oracle.apps.bom.structure.created event and the
following function.
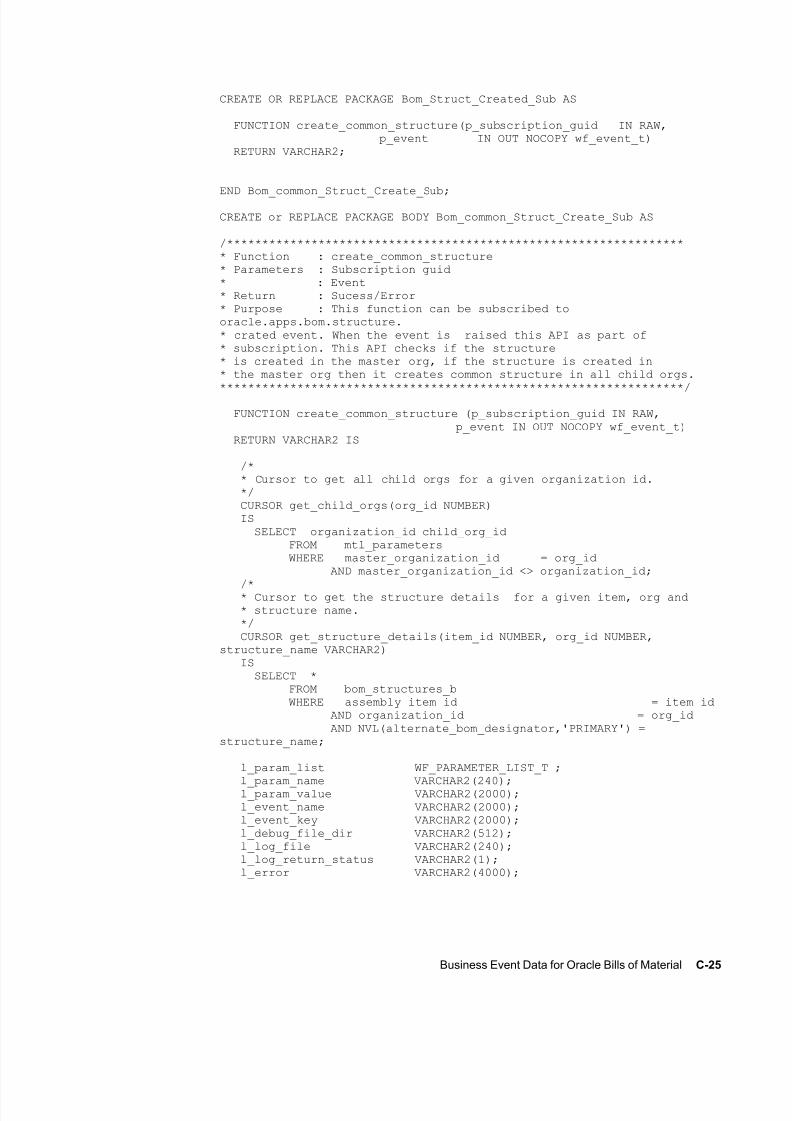
8/12/2019 BOM Uuser Guide
http://slidepdf.com/reader/full/bom-uuser-guide 303/331
Business Event Data for Oracle Bills of Material C-25
CREATE OR REPLACE PACKAGE Bom_Struct_Created_Sub AS
FUNCTION create_common_structure(p_subscription_guid IN RAW, p_event IN OUT NOCOPY wf_event_t) RETURN VARCHAR2;
END Bom_common_Struct_Create_Sub;
CREATE or REPLACE PACKAGE BODY Bom_common_Struct_Create_Sub AS
/****************************************************************** Function : create_common_structure* Parameters : Subscription guid* : Event* Return : Sucess/Error* Purpose : This function can be subscribed tooracle.apps.bom.structure.* crated event. When the event is raised this API as part of* subscription. This API checks if the structure* is created in the master org, if the structure is created in* the master org then it creates common structure in all child orgs.
******************************************************************/
FUNCTION create_common_structure (p_subscription_guid IN RAW, p_event IN OUT NOCOPY wf_event_t) RETURN VARCHAR2 IS
/* * Cursor to get all child orgs for a given organization id. */ CURSOR get_child_orgs(org_id NUMBER)
ISSELECT organization_id child_org_id
FROM mtl_parametersWHERE master_organization_id = org_id
AND master_organization_id <> organization_id;
/* * Cursor to get the structure details for a given item, org and* structure name.
*/ CURSOR get_structure_details(item_id NUMBER, org_id NUMBER,structure_name VARCHAR2)
ISSELECT *
FROM bom_structures_bWHERE assembly_item_id = item_id
AND organization_id = org_idAND NVL(alternate_bom_designator,'PRIMARY') =
structure_name;
l_param_list WF_PARAMETER_LIST_T ;
l_param_name VARCHAR2(240); l_param_value VARCHAR2(2000); l_event_name VARCHAR2(2000); l_event_key VARCHAR2(2000);
l_debug_file_dir VARCHAR2(512); l_log_file VARCHAR2(240);
l_log_return_status VARCHAR2(1); l_error VARCHAR2(4000);

8/12/2019 BOM Uuser Guide
http://slidepdf.com/reader/full/bom-uuser-guide 304/331
C-26 Oracle Bills of Material User's Guide
l_structure_rec get_structure_details%ROWTYPE; l_bom_header_rec BOM_BO_PUB.Bom_Head_Rec_Type; l_bom_revision_tbl Bom_Bo_Pub.Bom_Revision_Tbl_Type; l_bom_component_tbl Bom_Bo_Pub.Bom_Comps_Tbl_Type; l_bom_ref_designator_tbl Bom_Bo_Pub.Bom_Ref_Designator_Tbl_Type; l_bom_sub_component_tbl Bom_Bo_Pub.Bom_Sub_Component_Tbl_Type; l_bom_comp_ops_tbl Bom_Bo_Pub.Bom_Comp_Ops_Tbl_Type;
l_ass_item_id NUMBER; l_struct_name VARCHAR2(10); l_org_id NUMBER; l_child_org_id NUMBER; is_MasterOrg VARCHAR2(1); l_return_status VARCHAR2(1); l_msg_count NUMBER := 0; l_assembly_type NUMBER; l_assembly_comment VARCHAR2(240); l_attr_category VARCHAR2(30);
l_attr1 VARCHAR2(150); l_attr2 VARCHAR2(150); l_attr3 VARCHAR2(150); l_attr4 VARCHAR2(150);
l_attr5 VARCHAR2(150); l_attr6 VARCHAR2(150); l_attr7 VARCHAR2(150); l_attr8 VARCHAR2(150); l_attr9 VARCHAR2(150); l_attr10 VARCHAR2(150); l_attr11 VARCHAR2(150); l_attr12 VARCHAR2(150); l_attr13 VARCHAR2(150); l_attr14 VARCHAR2(150); l_attr15 VARCHAR2(150); l_orig_sys_ref VARCHAR2(50);
l_entity_type VARCHAR2(100); l_imp_date DATE;
BEGIN /* * Select the debug directory to write the log file and create
* the file name. *
* These steps are required only for debugging and* troubleshooting.
* The location of the debug file is based on the* utl_file_dir parameter
*/ SELECT VALUE
INTO l_debug_file_dirFROM V$PARAMETERWHERE NAME = 'utl_file_dir';
IF INSTR(l_debug_file_dir,',') <> 0 THENl_debug_file_dir := SUBSTR(l_debug_file_dir, 1,
INSTR(l_debug_file_dir, ',') - 1);END IF;l_log_file := 'BOM_STR_SUBSCR'||'_'||TO_CHAR(SYSDATE,
'DDMONYYYY_HH24MISS')||'.err';
l_param_list := p_event.getparameterlist;

8/12/2019 BOM Uuser Guide
http://slidepdf.com/reader/full/bom-uuser-guide 305/331
Business Event Data for Oracle Bills of Material C-27
l_event_name := p_event.getEventName(); l_event_key := p_event.GetEventKey();
/** Loop through the payload for the business event raised and get* all the parameters.
* This gives the information about the structure created.
*/
IF l_param_list IS NOT NULL THEN FOR i IN l_param_list.FIRST..l_param_list.LAST
LOOP l_param_name := l_param_list(i).getname;
l_param_value := l_param_list(i).getvalue;
IF (l_param_name = 'PK1_VALUE') THEN l_ass_item_id := l_param_value; ELSIF (l_param_name = 'PK2_VALUE') THEN l_org_id := l_param_value; ELSIF(l_param_name = 'STRUCTURE_NAME')
THEN l_struct_name := l_param_value; ELSIF (l_param_name = 'EVENT_TYPE') THEN l_entity_type := l_param_value;
END IF;END LOOP;
END IF;
/* * Check if it is a Master org.If it is a Master Org create structure * in all the child orgs. */
BEGIN
SELECT 'Y'INTO is_MasterOrgFROM DUALWHERE EXISTS
(SELECT organization_idFROM mtl_parametersWHERE organization_id = l_org_id
AND ( master_organization_id IS NULLOR master_organization_id = l_org_id)
);EXCEPTION
WHEN NO_DATA_FOUND THEN is_MasterOrg := 'N'; END;
IF (is_MasterOrg = 'Y' AND l_entity_type = 'Single') THENl_bom_header_rec := Bom_Bo_Pub.G_MISS_BOM_HEADER_REC;
l_bom_revision_tbl := Bom_Bo_Pub.G_MISS_BOM_REVISION_TBL; l_bom_component_tbl := Bom_Bo_Pub.G_MISS_BOM_COMPONENT_TBL; l_bom_ref_designator_tbl :=Bom_Bo_Pub.G_MISS_BOM_REF_DESIGNATOR_TBL; l_bom_sub_component_tbl :=Bom_Bo_Pub.G_MISS_BOM_SUB_COMPONENT_TBL;

8/12/2019 BOM Uuser Guide
http://slidepdf.com/reader/full/bom-uuser-guide 306/331
C-28 Oracle Bills of Material User's Guide
l_bom_comp_ops_tbl := Bom_Bo_Pub.G_MISS_BOM_COMP_OPS_TBL;
OPEN get_structure_details(l_ass_item_id,l_org_id,l_struct_name); LOOP FETCH get_structure_details into l_structure_rec; EXIT WHEN get_structure_details%NOTFOUND;
IF (l_struct_name = 'PRIMARY') THENl_struct_name := '';
END IF;
l_assembly_type := l_structure_rec.Assembly_Type ; l_assembly_comment :=l_structure_rec.Specific_Assembly_Comment; l_attr_category := l_structure_rec.Attribute_category; l_attr1 := l_structure_rec.Attribute1;
l_attr2 := l_structure_rec.Attribute2; l_attr3 := l_structure_rec.Attribute3; l_attr4 := l_structure_rec.Attribute4; l_attr5 := l_structure_rec.Attribute5; l_attr6 := l_structure_rec.Attribute6;
l_attr7 := l_structure_rec.Attribute7; l_attr8 := l_structure_rec.Attribute8; l_attr8 := l_structure_rec.Attribute9; l_attr10 := l_structure_rec.Attribute10; l_attr11 := l_structure_rec.Attribute11; l_attr12 := l_structure_rec.Attribute12; l_attr13 := l_structure_rec.Attribute13; l_attr14 := l_structure_rec.Attribute14; l_attr15 := l_structure_rec.Attribute15; l_orig_sys_ref :=l_structure_rec.Original_System_Reference; l_imp_date := l_structure_rec.Implementation_Date;
END LOOP;
CLOSE get_structure_details;
FOR each_record in get_child_orgs(org_id => l_org_id) LOOP BEGIN l_child_org_id :=each_record.child_org_id;
l_bom_header_rec.Assembly_item_name :=Get_Item_Name(l_ass_item_id,l_org_id);
l_bom_header_rec.Organization_Code :=Get_Org_Code(l_child_org_id); l_bom_header_rec.common_Assembly_Item_Name :=Get_Item_Name(l_ass_item_id,l_org_id); l_bom_header_rec.common_Organization_Code :=Get_Org_Code(l_child_org_id);
l_bom_header_rec.Alternate_Bom_Code := l_struct_name; l_bom_header_rec.Assembly_Type :=nvl(l_assembly_type,1); l_bom_header_rec.Transaction_Type := 'CREATE'; l_bom_header_rec.Return_Status := NULL; l_bom_header_rec.Row_Identifier := NULL; l_bom_header_rec.Assembly_Comment :=l_assembly_comment; l_bom_header_rec.Attribute_category := l_attr_category;
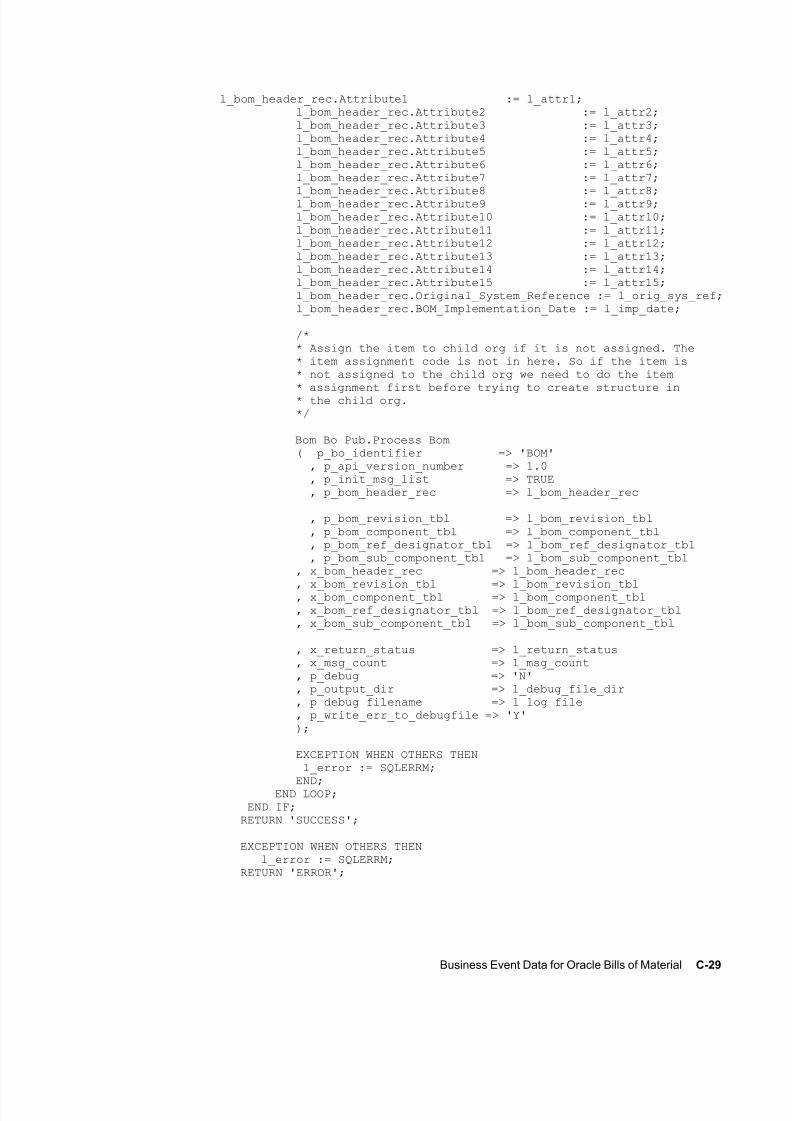
8/12/2019 BOM Uuser Guide
http://slidepdf.com/reader/full/bom-uuser-guide 307/331
Business Event Data for Oracle Bills of Material C-29
l_bom_header_rec.Attribute1 := l_attr1; l_bom_header_rec.Attribute2 := l_attr2; l_bom_header_rec.Attribute3 := l_attr3; l_bom_header_rec.Attribute4 := l_attr4; l_bom_header_rec.Attribute5 := l_attr5; l_bom_header_rec.Attribute6 := l_attr6; l_bom_header_rec.Attribute7 := l_attr7;
l_bom_header_rec.Attribute8 := l_attr8; l_bom_header_rec.Attribute9 := l_attr9; l_bom_header_rec.Attribute10 := l_attr10; l_bom_header_rec.Attribute11 := l_attr11; l_bom_header_rec.Attribute12 := l_attr12; l_bom_header_rec.Attribute13 := l_attr13; l_bom_header_rec.Attribute14 := l_attr14; l_bom_header_rec.Attribute15 := l_attr15; l_bom_header_rec.Original_System_Reference := l_orig_sys_ref; l_bom_header_rec.BOM_Implementation_Date := l_imp_date;
/** Assign the item to child org if it is not assigned. The* item assignment code is not in here. So if the item is* not assigned to the child org we need to do the item
* assignment first before trying to create structure in* the child org. */
Bom_Bo_Pub.Process_Bom ( p_bo_identifier => 'BOM' , p_api_version_number => 1.0 , p_init_msg_list => TRUE , p_bom_header_rec => l_bom_header_rec
, p_bom_revision_tbl => l_bom_revision_tbl , p_bom_component_tbl => l_bom_component_tbl , p_bom_ref_designator_tbl => l_bom_ref_designator_tbl , p_bom_sub_component_tbl => l_bom_sub_component_tbl , x_bom_header_rec => l_bom_header_rec
, x_bom_revision_tbl => l_bom_revision_tbl , x_bom_component_tbl => l_bom_component_tbl , x_bom_ref_designator_tbl => l_bom_ref_designator_tbl , x_bom_sub_component_tbl => l_bom_sub_component_tbl
, x_return_status => l_return_status , x_msg_count => l_msg_count , p_debug => 'N' , p_output_dir => l_debug_file_dir , p_debug_filename => l_log_file , p_write_err_to_debugfile => 'Y' );
EXCEPTION WHEN OTHERS THEN l_error := SQLERRM;
END;END LOOP; END IF;
RETURN 'SUCCESS';
EXCEPTION WHEN OTHERS THEN l_error := SQLERRM; RETURN 'ERROR';

8/12/2019 BOM Uuser Guide
http://slidepdf.com/reader/full/bom-uuser-guide 308/331
C-30 Oracle Bills of Material User's Guide
END create_common_structure;
/****************************************************************** Function : Get_Item_Name* Parameters : Inventory item id* : Organization id
* Return : Assembly Item name* Purpose : This function is used to get the assembly item name* for a given item id and organzation id.******************************************************************/
FUNCTION Get_Item_Name(p_item_id IN NUMBER,p_org_id IN NUMBER)RETURN VARCHAR2 IS l_item_name MTL_SYSTEM_ITEMS_KFV.concatenated_segments%TYPE; BEGIN SELECT concatenated_segments INTO l_item_name FROM mtl_system_items_kfv WHERE inventory_item_id = p_item_id AND organization_id = p_org_id;
RETURN l_item_name; EXCEPTION WHEN NO_DATA_FOUND THEN return null; END Get_Item_Name;
/***************************************************************** * Function : Get_Org_Code * Parameters : Organization id* Return : Organization Code * Purpose : This function is used to get the organization code * for a organzation id. ******************************************************************/
FUNCTION Get_Org_Code(p_org_id IN NUMBER)
RETURN VARCHAR2 IS l_org_code MTL_PARAMETERS.organization_code%TYPE; BEGIN SELECT organization_code INTO l_org_code FROM MTL_PARAMETERS WHERE organization_id = p_org_id; RETURN l_org_code; EXCEPTION WHEN NO_DATA_FOUND THEN return null; END Get_Org_Code;
END Bom_common_Struct_Create_Sub;
Related Topics
Using Business Events, page 1-54
Business Events, page C-1
Managing Business Events, Oracle Workflow Developer's Guide

8/12/2019 BOM Uuser Guide
http://slidepdf.com/reader/full/bom-uuser-guide 309/331
Business Event Data for Oracle Bills of Material C-31
Defining Procedures and Functions for Oracle Workflow, Oracle Workflow Developer's
Guide

8/12/2019 BOM Uuser Guide
http://slidepdf.com/reader/full/bom-uuser-guide 310/331

8/12/2019 BOM Uuser Guide
http://slidepdf.com/reader/full/bom-uuser-guide 311/331
Glossary-1
Glossary
activity
A business action or task which uses a resource or incurs a cost.
alternate bill of material
An alternate list of component items you can use to produce an assembly.
alternate routing
An alternate manufacturing process you can use to produce an assembly.
assemble-to-order (ATO)
An environment where you open a final assembly order to assemble items that
customers order. Assemble-to-order is also an item attribute that you can apply to
standard, model, and option class items.
assembly
An item that has a bill of material. You can purchase or manufacture an assembly item.
See also: assemble-to-order, bill of material
assigned units
The number of resource units assigned to work at an operation in a routing. For
example, if you have 10 units of machine resource available at a department, you can
assign up to 10 of these units to an operation in a routing. The more units you assign,
the less elapsed time Work in Process schedules for the operation.
autocharge
A method of charging a discrete job or repetitive schedule for the resources consumed
at an operation.
backflush operation
A routing operation where you backflush component items.
8/12/2019 BOM Uuser Guide
http://slidepdf.com/reader/full/bom-uuser-guide 312/331
Glossary-2
base model
The model item from which a configuration item was created.
bill of material
A list of component items associated with a parent item and information about howeach item relates to the parent item. Oracle Manufacturing supports standard, model,
option class, and planning bills. The item information on a bill depends on the item type
and bill type. The most common type of bill is a standard bill of material. A standard
bill of material lists the components associated with a product or subassembly. It
specifies the required quantity for each component plus other information to control
work in process, material planning, and other Oracle Manufacturing functions. Also
known as product structures.
bill revision
A specific version of an item which specifies the components that are active for a date
range.
BOM item type
An item classification that determines the items you can use as components in a bill of
material. BOM Item types include standard, model, option class, and planning items.
by-product
Material produced as a residual of a production process. Represented by negative usage
in the bill of material for an assembly.
calendar typeThe period pattern used to define a manufacturing calendar.
capacity modification
Deviation to available resources for a specific department shift.
capacity units
The number of units of a resource available in a department. For example, the number
of machines.
charge type
See: autocharge
common bill of material
An assembly that uses the bill of material of another assembly as its bill. This enables
you to reduce your maintenance effort by sharing the same bill structure among two or
more assemblies. For example, if you have identical bills of material that produce the

8/12/2019 BOM Uuser Guide
http://slidepdf.com/reader/full/bom-uuser-guide 313/331
Glossary-3
same product in two different organizations, you can define common bills of material
for the identical structures.
common routing
A routing that uses the routing of another assembly as its routing. This enables you to
reduce your maintenance effort by sharing the same routing and operations for two ormore assemblies.
component demand
Demand passed down from a parent assembly to a component.
component item
An item associated with a parent item on a bill of material.
component yield
The percent of the amount of a component you want to issue to build an assembly thatactually becomes part of that assembly. Or, the amount of a component you require to
build plus the amount of the component you lose or waste while building an assembly.
For example, a yield factor of 0.90 means that only 90% of the usage quantity of the
component on a bill actually becomes part of the finished assembly.
configuration
A product a customer orders by choosing a base model and a list of options. It can be
shipped as individual pieces as a set (kit) or as an assembly (configuration item).
configuration bill of material
The bill of material for a configuration item.
configuration item
The item that corresponds to a base model and a specific list of options. Bills of Material
creates a configuration item for assemble-to-order models.
configurator
A form that allows you to choose options available for a particular model, thus defining
a particular configuration for the model.
configure-to-order
An environment where you enter customer orders by choosing a base model and then
selecting options from a list of choices.
count point operation
A default operation to move to and from where you record move and charge resource

8/12/2019 BOM Uuser Guide
http://slidepdf.com/reader/full/bom-uuser-guide 314/331
Glossary-4
transactions. Also known as pay point.
cumulative manufacturing lead time
The total time required to make an item if you had all raw materials in stock but had to
make all subassemblies level by level. Bills of Material automatically calculates this
value. Purchased items have no cumulative manufacturing lead time.
cumulative total lead time
The total time required to make an item if no inventory existed and you had to order all
the raw materials and make all subassemblies level by level. Bills of Material
automatically calculates this value.
days off
The number of consecutive days off a shift has before a day on.
days onThe number of consecutive days that a shift works before a day off.
delete entity
An item, bill of material or routing you choose to delete.
delete group
A set of items, bills, and routings you choose to delete.
delete subentity
A component or operation you choose to delete.
deletion constraint
A business rule that restricts the entities you can delete. A deletion constraint is a test
that must succeed before an item, bill, or routing can be deleted.
department
An area within your organization that consists of one or more people, machines, or
suppliers. You can also assign and update resources to a department.
department class
A group of departments.
detailed scheduling
A method of scheduling production that considers minute to minute resource
availability information as well as exact resource requirements from routings.

8/12/2019 BOM Uuser Guide
http://slidepdf.com/reader/full/bom-uuser-guide 315/331
Glossary-5
disable date
A date when an Oracle Manufacturing function is no longer available for use. For
example, this could be the date on which a bill of material component or routing
operation is no longer active, or the date a forecast or master schedule is no longer
valid.
dynamic lead time offsetting
A scheduling method that quickly estimates the start date of an order, operation, or
resource. Dynamic lead time offsetting schedules using the organization workday
calendar.
effective date
Date when an Oracle Manufacturing function is available for use. For example, this
could be the date a bill of material component or routing operation becomes effective,
or the date you anticipate revised item changes become part of a bill of material and can
no longer be controlled by an ECO.
elapsed time
The clock time between start and completion. For example, if the build time of a
resource is 10 hours, but you only schedule 5 hours of work a day, the elapsed time is 29
hours.
engineer-to-order
An environment where customers order unique configurations for which engineering
must define and release custom bills for material and routings. Oracle Manufacturing
does not provide special support for this environment beyond the support it providesfor assemble-to-order manufacturing.
engineering change order (ECO)
A record of revisions to one or more items usually released by engineering.
engineering item
A prototype part, material, subassembly, assembly, or product you have not yet
released to production. You can order, stock, and build engineering items.
fixed lead time
The portion of the time required to make an assembly independent of order quantity,
such as time for setup or teardown.
flow manufacturing
Manufacturing philosophy utilizing production lines and schedules instead of work

8/12/2019 BOM Uuser Guide
http://slidepdf.com/reader/full/bom-uuser-guide 316/331
Glossary-6
orders to drive production. Mixed models are grouped into families and produced on
lines balanced to the TAKT time.
implementation date
The date a component becomes part of a bill of material and is no longer controlled
through an ECO. Implementation date does not necessarily equal the effective date.
included item
A standard mandatory component in a bill, indicating that it ships (if shippable)
whenever its parent item is shipped. Included items are components of models, kits,
and option classes.
item
Anything you make, purchase, or sell, including components, subassemblies, finished
products, or supplies. Oracle Manufacturing also uses items to represent planning items
that you can forecast, standard lines that you can include on invoices, and optionclasses you can use to group options in model and option class bills.
item-based resource
A resource whose usage quantity is the amount required per assembly unit you make.
item sequence
The sequence of the component item on the bill of material used to sort components on
reports.
kit
An item that has a standard list of components (or included items) you ship when you
process an order for that item. A kit is similar to a pick-to-order model because it has
shippable components, but it has no options and you order it directly by its item
number, not using the configuration selection screen.
lead time lot size
The item quantity used to compute the fixed and variable portions of manufacturing
lead time. For manufactured items, the processing lead time represents the time
required to build this quantity.
lead time rollup
A Bill of Material program that computes cumulative lead times for items.
locator
Physical area within a subinventory where you store material, such as a row, aisle, bin,

8/12/2019 BOM Uuser Guide
http://slidepdf.com/reader/full/bom-uuser-guide 317/331
Glossary-7
or shelf.
lot based resource
A resource whose usage quantity is the amount required per job or schedule.
make-to-order
An environment where customers order unique configurations that must be
manufactured using multiple discrete jobs and/or final assembly orders where the
product from one discrete job is required as a component on another discrete job. Oracle
Manufacturing does not provide special support for this environment beyond the
support it provides for assemble-to-order manufacturing.
mandatory component
A component in a bill that is not optional. Bills of Material distinguishes required
components from options in model and option class bills of material. Mandatory
components in pick-to-order model bills are often referred to as included items,especially if they are shippable.
manufacturing lead time
The total time required to manufacture an assembly.
mass change order
A record of a plan to replace, delete, or update one or more component items in many
bills of material at the same time.
minimum transfer quantity
The minimum number of assemblies to move from your current operation to the next.
Work in Process warns you when you move less than the minimum transfer quantity.
model bill of material
A bill of material for a model item. A model bill lists option classes and options
available when you place an order for the model item.
model item
An item whose bill of material lists options and option classes available when you place
an order for the model item.
multi-department resource
A resource whose capacity can be shared with other departments.
occurrence
An individual quality result. For example, a measurement that falls in or out of a
8/12/2019 BOM Uuser Guide
http://slidepdf.com/reader/full/bom-uuser-guide 318/331
Glossary-8
specified tolerance. Occurrences can be charted using Oracle Quality.
offset percent
An operation resource field that holds the percent of total manufacturing lead time
required for previous operations. For example, if all operations require a total of ten
hours to perform and the offset percent for a resource is 40%, then the resource is usedfour hours after the start of the first operation.
operation
A step in a manufacturing process where you perform work on, add value to, and
consume department resources for an assembly.
operation code
A label that identifies a standard operation.
operation instructions
Directions that describe how to perform an operation.
operation offset
Elapsed days from the start of your first operation until the beginning of your current
operation.
operation sequence
A number that orders operations in a routing relative to each other.
option
An optional item component in an option class or model bill of material.
option class
A group of related option items. An option class is orderable only within a model. An
option class can also contain included items.
option class bill of material
A bill of material for an option class item that contains a list of related options.
option class item
An item whose bill of material contains a list of related options.
option dependent operation
An operation in a model or option class item's routing that appears in a configuration
item routing only if the configuration contains an option that references that operation.

8/12/2019 BOM Uuser Guide
http://slidepdf.com/reader/full/bom-uuser-guide 319/331
Glossary-9
option item
A non-mandatory item component in an option class or model bill of material.
outside operation
An operation that contains outside resources and possibly internal resources as well.
outside processing
Performing work on a discrete job or repetitive schedule using resources provided by a
supplier.
outside processing operation
Any operation that has an outside processing resource.
See also: outside processing
outside processing item
An item you include on a purchase order line to purchase supplier services as part of
your assembly build process. This item can be the assembly itself or a non-stocked item
which represents the service performed on the assembly.
over-completions
Completing an assembly quantity into inventory that is greater than the Discrete job or
Repetitive schedule start quantity, whether or not the assemblies have a routing.
over-completion quantity
The transaction quantity minus the available quantity.
over-moves
Moving a quantity from one interoperation step to another that is greater than the
quantity at the interoperation step, whether or not the assemblies have a routing.
overhead
The indirect expenses allocated in your budgeting process and assigned to your
resources or departments. You charge overhead costs based on resource value, resource
units, or operation completions. You typically include administration, facility,
depreciation activity, and other costs you cannot directly charge to your manufactured
items. Does not include material overhead.
phantom assembly
An assembly Work in Process explodes through when it creates the bill of material for a
job or schedule. A particular assembly can be a phantom assembly on one bill and a
subassembly on another.
8/12/2019 BOM Uuser Guide
http://slidepdf.com/reader/full/bom-uuser-guide 320/331
Glossary-10
pick-to-order
A configure-to-order environment where the options and included items in a model
appear on pick slips and order pickers gather the options when they ship the order.
Alternative to manufacturing the parent item on a work order and then shipping it.
Pick-to-order is also an item attribute that you can apply to standard, model, and option
class items.
planning bill of material
A bill of material for a planning item that contains a list of items and planning
percentages. You can use a planning bill to facilitate master scheduling and/or material
planning. The total output of a planning bill of material is not limited to 100% (it can
exceed this number by any amount).
planning item
A type of item representing a product family or demand channel whose bill of material
contains a list of items and planning percentages.
planning percent
A component usage percentage that facilitates planning for optional components on
model and option class bills, and all components on planning bills.
PO move resource
An outside resource that is automatically charged upon receipt of a purchase order. PO
move resources also automatically initiate shop floor move transactions upon receipt.
PO receipt resource
An outside resource that is automatically charged upon receipt of a purchase order.
postprocessing lead time
The time required to receive a purchased item into inventory from the initial supplier
receipt, such as the time required to deliver an order from the receiving dock to its final
destination.
preprocessing lead time
The time required to place a purchase order or create a discrete job or repetitive
schedule that you must add to purchasing or manufacturing lead time to determine
total lead time. If you define this time for a repetitive item, the planning process ignoresit.
primary bill of material
A list of the components you most frequently use to build a product. The primary bill is
the default bill for rolling up costs, defining a job, and calculating cumulative item lead

8/12/2019 BOM Uuser Guide
http://slidepdf.com/reader/full/bom-uuser-guide 321/331
Glossary-11
times. Master Scheduling/MRP uses this bill to plan your material.
primary routing
A list of the operations you most frequently perform to build a product. The primary
routing is the default routing for defining a job and calculating manufacturing lead
times.
processing lead time
The time required to procure or manufacture an item. For manufactured assemblies,
processing lead time equals the manufacturing lead time.
reference designator
An optional identifier you can assign to a component on a bill. For example, when the
bill requires four of a component, you can assign four reference designators to that
component, one for each usage.
related item
An acceptable substitute you define for an item so that you may receive the item if your
supplier cannot ship the original item on the purchase order.
resource
Anything of value, except material and cash, required to manufacture, cost, and
schedule products. Resources include people, tools, machines, labor purchased from a
supplier, and physical space.
resource basis
The basis for resource usage quantity that indicates whether that quantity is required
per item or per lot.
resource sequence
The number that indicates the order of a resource in an operation relative to other
resources.
revision
A particular version of an item, bill of material, or routing.
routingA sequence of manufacturing operations that you perform to manufacture an assembly.
A routing consists of an item, a series of operations, an operation sequence, and
operation effective dates.

8/12/2019 BOM Uuser Guide
http://slidepdf.com/reader/full/bom-uuser-guide 322/331
Glossary-12
routing revision
A specific version of a routing that specifies the operations that are active for a date
range.
scheduled resource
A resource on a routing that is scheduled by Work in Process.
setup time
The time required to for a machine or work center to convert from the production of
one item to another.
shift
A scheduled period of work for a department within an organization.
shrinkage rateThe percentage on a parent assembly expected to be scrapped in work in process.
simulation schedule
Unofficial schedules for personal use that contain the most current scheduled item
information. You can print Simulation schedules, but you cannot confirm or send them
via EDI.
simulation set
A group of capacity modifications for resource shifts to simulate, plan, or schedule
capacity.
standard bill of material
A bill of material for a standard item, such as a manufactured product or assembly.
standard item
Any item that can have a bill or be a component on a bill except planning items, option
classes, or models. Standard items include purchased items, subassemblies, and
finished products.
standard operation
A commonly used operation you can define as a template for use in defining futurerouting operations.
standard rate
The frozen standard unit cost for a resource.
8/12/2019 BOM Uuser Guide
http://slidepdf.com/reader/full/bom-uuser-guide 323/331
Glossary-13
subinventory
Subdivision of an organization, representing either a physical area or a logical grouping
of items, such as a storeroom or receiving dock.
substitute item
An item that can be used in place of a component. Master Scheduling/MRP suggests
substitutes items on some reports.
supply
A quantity of materials available for use. Supply is replenished in response to demand
or anticipated demand.
supply type
A bill of material component field that controls issue transactions from inventory to
work in process. Supply types supported by Work in Process include: Push, Assembly
pull, Operation pull, Bulk, Supplier, Phantom, and Based on bill.
teardown time
The time required to clean up or restore a machine or work center after operation.
total lead time
An item's fixed lead time plus the variable lead time multiplied by the order quantity.
For lead time calculations, Bills of Material sets the order quantity to the item's standard
or lead time lot size. The planning process uses the total lead time for an item in its
scheduling logic to calculate order start dates from order due dates.
usage rate
The amount of a resource consumed at an operation.
variable lead time
The time required to produce one additional unit of an assembly. To compute an item's
total lead time multiply variable lead time by order quantity, and add an item's fixed
lead time.
workday calendar A calendar that identifies available workdays for one or more organizations. Master
Scheduling/MRP, Inventory, Work in Process, and Capacity plan and schedule activities
based on a calendar's available workdays.

8/12/2019 BOM Uuser Guide
http://slidepdf.com/reader/full/bom-uuser-guide 324/331
Glossary-14
workday exception set
An entity that defines mutually exclusive sets of workday exceptions. For each
organization, you can specify a workday calendar and exception set.
workday exceptions
Dates that define plant or shift workday variations, including holidays, scheduled
maintenance, or extended downtime.
yield
See: component yield

8/12/2019 BOM Uuser Guide
http://slidepdf.com/reader/full/bom-uuser-guide 325/331
Index-1
Index
Symbols21 CFR Part 11, 8-2
overview, 8-1viewing e-records and e-signatures, 8-4
A
Absorption account, 1-15
for costed resources, 1-28
Activity
for resource charges, 3-20
to group resources, 1-27
Alternate, 1-6
bill of material, 2-4, 2-10
creating alternates, 1-10deleting, 4-3
routings, 3-10
Archive
deleted entities, 4-3
Assemble-to-Order
ATP check, 5-15
autocreate configuration items, 5-24
catalog configurations, 5-22
deactivate configuration item, 5-43
hybrid, 5-3
item, 5-2
model bill, 5-7, 5-17
multi-level, 5-3
multi-organization, 5-3
operation sequence inheritance, 5-21
option class bill, 5-9
option dependent routing steps
discrete manufacturing, 5-18
flow manufacturing, 5-20
option quantity ranges, 5-12
planning bill, 5-5
standard bills, 5-11Assigned units, 3-19
Attachments
attaching files, 2-28, 2-28, 3-4
Autocharge, 3-24, 3-30
Autocreating configuration items, 5-25
Available 24 hours
resource, 1-17
Available-to-Promise
check, 5-15
BBackflush, 3-24
transactions, 3-4, 3-11
Base model, 2-32
Basis, 2-16, 2-44
Basis option class, 5-14
Basis type, 1-26
Batching
autocreate configuration items, 5-27
Bill and Routing Interface, 1-45
Bill components, 2-5
comparison, 2-36modify, 2-29
validation rules, 2-46
Bill Documents window
defining bill or routing operation documents,
2-28
Bill loops

8/12/2019 BOM Uuser Guide
http://slidepdf.com/reader/full/bom-uuser-guide 326/331
Index-2
checking for bill loops, 2-28
Bill of Material Comparison report, 9-2
Bill of Material Information report, 9-2
Bill of Material Loop report, 9-4
Bill of Material Structure report, 9-6
Bill of material types, 2-2Bills of material, 2-2
access control, 2-7
comparing, 2-36
configuration item, 5-35
copying, 2-17
creating, 2-9
field reference, 2-39
importing, 1-45
item sequence, 2-39
mass change, 2-30
model
defining, 5-7, 5-17model and option type, 5-4
modifying, 2-29
multi-level, 5-11
multi-organization, 5-11
operation sequence, 2-40
option class
defining, 5-9
parameters, 1-3
planning, 5-5
profile options, 2-7
referencing a common bill, 2-19standard, 5-11
view differences only, 2-37
Bills of Material Parameters report, 9-10
Bills of Material window
attaching files to bills, components, and
routing operations, 2-28
checking for bill loops, 2-29
creating a bill of material, 2-9
indented, 2-34
referencing common bills and routings, 2-21
Business events, 1-54, C-1example functions, C-9
C
Calculate Cumulative Yield for Network Routing
process, 9-10
Calculating manufacturing lead times, 7-14
Capacity Changes window
assigning resources to a department, 1-21
Catalog
configuration item, 5-22
Category set
when calculating lead times, 7-16Change order type, 2-31
Changeovers window, 1-4, 1-32
Charge type, 1-26
Check ATP, 2-16
Class
department, 1-14
Collection Elements window
defining collection elements, 8-3
Common Bill window, 2-20
referencing common bills and routings, 2-21
Competencies, 1-4
competencies for routing operations, 3-15Completion
locator, 2-16, 3-14, 3-29
subinventory, 2-16, 3-14, 3-29
Component
adding item components to bills, 2-11
computing requirement dates for ATP, 6-5
mutually exclusive field, 2-16, 2-43
on bills of material, 2-5
optional field, 2-16, 2-43
valid attributes and bill types, 2-6
valid relationships, 2-5Components
modifying, 2-29
Components window, 2-35
deleting items, bills, routings, components,
and operations, 4-4
Computing
component requirement dates for ATP, 6-5
dynamic lead time, 6-5
fixed lead time, 7-5, 7-10
manufacturing lead time, 7-1
MRP material requirement dates, 6-4operation lead time percents, 7-11
resource load for planned orders, 6-4
variable lead time, 7-5, 7-10
Computing fixed lead time, 7-10
Computing variable lead time, 7-10
Configuration item
autocreate, 5-24
8/12/2019 BOM Uuser Guide
http://slidepdf.com/reader/full/bom-uuser-guide 327/331
Index-3
bills of material, 5-35
catalog, 5-22
cost rollup, 5-39
creating multi-level bill for options, 5-36
creating single level bill for options, 5-35
deactivating, 5-43lead time calculation, 5-28
match and reserve, 5-31
numbering method, 5-29
preconfiguring items, 5-40
progress order, 5-27
routings, 5-38
weight and volume calculation, 5-33
Configure to Order
BOM support, 5-3
environments, 5-6
information sources, 5-2
overview, 5-1Consolidated Bill of Material report, 9-12
Constraints
when deleting bills and routings, 4-6
Copy options
for bills and routing operations, 2-19
Copy window
Copying Bill and Routing Information, 2-18
copying calendar and shift information, 1-42
Costed resource, 1-27
Costing information, 2-35
Cost rollup, 3-12, 3-21configuration item, 5-39
include component, 2-15
Cost type, 1-29
Count point, 3-24, 3-30
Cumulative
lead time computations, 7-12
manufacturing lead time, 7-12
manufacturing lead time calculation, 7-12, 7-13
rolling up cumulative lead times, 7-16
total lead time, 7-13
total lead time calculation, 7-13Cumulative manufacturing lead time
D
Dates
effective from and effective date, 2-13, 2-40
effective to and inactive after, 2-40
inactive on, 2-40
release dates, 5-28
Delete entity, 1-12
archive, 4-3
type of entity to delete, 4-2
Delete if, 1-12Delete Items report, 9-14
Delete Operation window
delete operation, 4-5
Delete processed rows
importing bills and routings, 1-46
Deletion, 4-1
component, 4-4
components and operations, 4-5
constraints, 1-6
predefined, 4-6
deleting items, bills, routings, components,
and operations, 4-2deletion group, 4-2
operation, 4-4
statements
predefined, 4-6
Deletion Constraints window
creating custom deletion constraints, 1-11
Deletion Statements window
creating custom deletion constraints, 1-12
Department, 1-14
classes, 1-3
for standard operations, 3-23report, 9-16
Department Classes window
creating a department class, 1-13
Department Class report, 9-16
Departments window
defining a department, 1-5
Descriptive element, 2-25
assigning, 2-25
Detailed scheduling, 6-2
Discrete job scheduling, 6-2
Dynamic lead time offsetting, 6-4, 6-5Dynamic routing, 3-3
E
Effectivity dates, 2-40
Employees window
defining a resource, 1-31
8/12/2019 BOM Uuser Guide
http://slidepdf.com/reader/full/bom-uuser-guide 328/331
Index-4
Engineering bills of material, 2-3
Equipment Types window
defining a resource, 1-30
E-records, 8-2
overview, 8-1
viewing, 8-4E-signatures, 8-2
overview, 8-1
viewing, 8-4
Exceptions window
assigning workday or shift exceptions, 1-44
Exception template name, 1-2, 1-40
Exception Templates window
creating a workday exception template, 1-39
Extended quantity, 2-42
calculation, 2-42
F
Failure message, 1-12
Fixed lead time
calculation, 7-7
Flow routing, 3-3
Folders
Bills Summary window, 2-10
Routings Summary window, 3-9
G
General ledger accountabsorption account, 1-28
Group
deletion group, 4-2
I
Import bills of material, 1-46
Import routings, 1-45
Inactive status, 1-8
Include on ship docs, 2-45
Increment revision, 2-31
Integer requirements, 2-15, 2-42Inverse rate or amount
usage rate or amount, 3-18
Item
based resources, 3-6
creating a bill, 2-10
for routings, 3-10
preconfiguring, 5-40
revisions, 2-4, 2-17, 2-27
scheduling, 3-6
to delete, 4-3
usage, 2-38
Itemsequence on bills of material, 2-39
Item Revisions window
defining item revisions, 2-27
Item selection
to calculate lead times, 7-15
Item Where Used report, 9-17
Item WhereUsed window
viewing item usage, 2-38
L
labor skill validation, 3-8Lead time, 2-35
computing manufacturing, 3-12
computing operation percents, 7-11
configuration item, 5-28
discrete manufacturing, 5-28
flow manufacturing, 5-29
cumulative manufacturing, 7-12
cumulative total, 7-13
dynamic offsetting, 6-4, 6-5
fixed, 7-5, 7-10
processing, 7-2
rollup, 3-12
variable, 7-5, 7-10
Lead time percent, 3-11
Location
department, 1-5
Locator
completion locator, 3-29
supply locator, 2-43
Lookup codes, 1-46
Lookups, 1-7
Loops in bills of material
checking for bill loops, 2-28Lot based
resources, 3-6
routing, 3-3
scheduling, 3-6
M
8/12/2019 BOM Uuser Guide
http://slidepdf.com/reader/full/bom-uuser-guide 329/331
Index-5
Manufacturing lead times
calculating, 7-14
Manufacturing Scheduling
overview, 6-1
repetitive line, 6-3
Mass change bills of material, 2-30Mass change order number, 2-31
Match and Reserve, 5-31
multi-level configurations, 5-32
Material control, 2-35
Material requirement dates, 6-4
Maximum bill levels, 1-8
Maximum quantity, 2-16, 2-44
Minimum quantity, 2-16, 3-12
Minimum, 2-44
Minimum transfer quantity, 3-4
Model bills of material, 2-2
MRP material requirement dates, 6-4
N
Numbering method, 1-8
Numbering segment, 1-8
O
Offset percent, 3-19
Operation
assigning operation resources, 3-18
defining, 3-3lead time percents, 7-11
outside processing, 3-8
scheduling, 6-2
sequence, 2-40
sequence inheritance, 5-21
yield, 3-12
Operation Documents window
defining bill or routing operation documents,
2-28
Option class bills of material, 2-2
Option dependent, 3-23
Option dependent routing steps
discrete manufacturing, 5-18
flow manufacturing, 5-20
Option quantity ranges, 5-12
Order lead time
calculation, 5-28
Organization
importing bills and routings for all
organizations, 1-45
when autocreating configuration items, 5-26
when copying a bill, 2-19
when deactivating configuration items, 5-45
Outside processingenabling, 1-27
operation, 3-8
Overhead, 1-5
to associate to resource, 1-30
Owning department
for borrowed resources, 1-17
P
Parameters window
defining bill of material parameters, 1-7
Perform lead time calculation, 5-26Personal profile option
bill of material access, 2-7
Phantoms, 1-9
Pick-to-Order
ATP check, 5-15
basis option class, 5-14
catalog configurations, 5-22
deactivate configuration item, 5-43
hybrid, 5-3
Kit, 5-3
model, 5-2
model bill, 5-7, 5-17
option class bill, 5-9
option dependent routing steps
discrete manufacturing, 5-18
flow manufacturing, 5-20
planning bill, 5-5
standard bills, 5-11
Plan, 2-33
Planned order release date
calculation, 6-7
Planning bills of material, 2-2
Planning percent, 2-14, 2-42Pre-Explode Configurable Bills of Material, 9-19
Primary and alternate bills, 2-4
Primary and alternate routings, 3-1
Primary bills of material, 2-4
Processes
AutoCreate Configuration Items, 5-25

8/12/2019 BOM Uuser Guide
http://slidepdf.com/reader/full/bom-uuser-guide 330/331
Index-6
Bill and Routing Interface, 1-45
Calculate Cumulative Yield for Network
Routing, 9-10
Calculate Manufacturing Lead Times, 7-14
Deactivating Configuration Items, 5-43
Pre-Exploding Configurable Bills of Material,9-19
Processing lead time, 7-2
calculation, 7-10
Product families, 2-49
assigning members, 2-50
create, 2-49
setting planning percentages, 2-50
Product Information Management Data
Librarian
business events, 1-54, C-1, C-9
Product Lifecycle Management
business events, 1-54, C-1, C-9Profile options, 1-2, 1-49
Purchase price variance account, 1-29
Q
Quantity
for bill components, 2-12
minimum and maximum, 2-44
of substitute item, 2-27
Quantity related, 2-26
Quarterly types
of workday calendar, 1-41
Query-only
restricting form privileges, 1-47
R
Rate or amount
usage rate or amount, 3-18
Receiving valuation account, 1-28
Reference designator, 2-17, 2-26
creating, 2-25
Reference Designators window
creating reference designators, 2-26
Referencing common bills and routings, 2-17, 2-
19
Release offset days, 5-26
Repetitive scheduling
assembly, 6-3, 6-3
line, 6-3
Reports
Bill of Material Comparison, 9-2
Bill of Material Information, 9-2
Bill of Material Loop, 9-4
Bill of Material Structure, 9-6
Bills of Material Parameters, 9-10Consolidated Bill of Material, 9-12
Delete Items, 9-14
Department, 9-16
Department Class, 9-16
Item Where Used, 9-17
Resource, 9-21
Resource Where Used, 9-21, 9-21
Routing, 9-22
Standard Operation, 9-24
Workday Exception Sets, 9-25
Required for revenue, 2-45
Required to ship, 2-45Resource
amount, 3-7
assigning to a department, 1-17
batching, 1-25, 1-29
capacity modifications, 3-7
charging method, 3-7
collecting and assigning costs to, 1-27
defining, 1-24
load for planned orders, 6-4
name, 3-18
scheduling, 3-6setup or changeover time, 1-4, 1-32
simultaneous, 3-7
standard costs, 3-8
substitute, 3-7
type, 1-26
unit cost, 1-30
usage, 3-5
usage rate, 3-7
viewing resource usage, 3-28
Resource
name, 1-26Resource Costs window
defining a resource, 1-29
Resource group, 1-4
Resource Overhead Associations window
defining a resource, 1-30
Resources window
assigning operation resources, 3-18

8/12/2019 BOM Uuser Guide
http://slidepdf.com/reader/full/bom-uuser-guide 331/331
Index-7
assigning resources to a department, 1-5, 1-16
defining a resource, 1-4
Resource Where Used report, 9-21, 9-21
Revision
item, 2-4
routing, 2-4when creating a bill, 2-10
Rolling up cumulative lead times, 7-16
Routing
assigning a completion subinventory and
locator, 3-14
backflush transactions, 3-4
configuration item, 5-38
copying, 2-17
create, 3-9
dynamic routing, 3-3
engineering, 3-2
flow routing, 3-3importing, 1-45
lot-based routing, 3-3
operations, 3-3
option dependent steps, 3-4
sequence, 3-3
setup standard, 3-4
standard, 3-4
operation sequence inheritance, 5-21
option dependent steps, 5-18
outside operations, 3-8
overview, 3-1primary and alternate routings, 3-1
referencing a common routing, 2-19
report of routing information, 9-22
resource usage, 3-5
revisions, 2-4
switching between primary and alternate
routings, 3-13
Routings window
creating a routing, 3-9
referencing common bills and routings, 2-21
S
Sales order number, 5-26
Schedule
when scheduling an operation, 3-32
Scheduling
creating a workday calendar, 1-40
setting up calendar, 1-36
detailed, 6-2
discrete jobs, 6-2
dynamic lead time, 6-4
operations, 6-2
operations based on resources, 3-5repetitive assembly, 6-3, 6-3
repetitive line, 6-3
Sequence number, 3-18
Serial numbers
tracking at the operation level, 3-15
Setup
Oracle Bills of Material steps, 1-2
related product steps, 1-1
Setups window, 1-4, 1-32
Setup Types window, 1-4, 1-32
Share
resources across departments, 1-17Shift
number, 1-21
number, when creating shifts, 1-43
times, start and stop, 1-43
Shifts window
assigning resources to a department, 1-21
creating shifts and shift times, 1-43
Shippable, 2-16, 2-45
Shipped number of days ago, 5-45
Simulation set, 1-5
for capacity change, 1-21Simultaneous resources, 3-19
Special menu, B-1
Standard bills of material, 2-2
Standard comments, 1-6, 2-28
Standard instructions, 1-6, 2-28
Standard operations
code, 3-23
creating a standard operation, 3-22
report, 9-24
Standard rate, 3-20
for charging jobs and schedules, 1-28Starting value, 2-26
Subinventory
completion subinventory, 3-29
supply subinventory, 2-43
Substitute components
assigning, 2-16, 2-27
Substitute item, 2-27