Embed Size (px)
Citation preview

Руководство пользователя


1
— — — — — — — — — — — — — — — — — — — — — — — — — — — — — — — — — — — — — — — — — — — — — — — — — — — —
En
glish
Introduction
This manual provides descriptions for transferring embroidery patterns from USB media to the machine. For details on other machine functions and operations, refer to the Operation Manual.
Using the Memory Function
Embroidery data precautions
Observe the following precautions when using embroidery data other than that created and saved in this machine.
CAUTION
■ Types of Embroidery Data That Can Be Used• Only .pes and .dst embroidery data files can be used with this machine. Using data other than that saved
using our data design systems or sewing machines may cause the embroidery machine to malfunction.■ Types of USB Media That Can Be Used
Embroidery data can be recalled from a USB flash drive (USB flash memory) of any size.
NoteOnly a USB flash drive (USB flash memory) can be connected to the USB port on this machine.Some USB media may not be compatible with this machine. Visit our website for more details.When using USB media equipped with an access indicator, the access indicator will begin flashing after the media is inserted into your computer or machine, and may take about 5 to 6 seconds before the media is recognized. (The length of time differs depending on the USB media.)For additional information, refer to the instruction manual included with the USB media that you have purchased.
MemoLetters and numerals can be used in file names. In addition, if the file name contains no more than eight characters, the entire file name will appear on the screen. If the file name is more than eight characters long, only the first six characters followed by “~” and a number appear as the file name.This applies to .dst embroidery data files only.Only the names of .dst files are displayed.
■ Precautions on Using the Computer To Create and Save Data• If the file name of embroidery data cannot be identified, for example, because the name contains special
characters, the file will not be displayed. If this occurs, change the name of the file. We recommend using the 26 letters of the alphabet (uppercase and lowercase), the numbers 0 through 9, “-”, and “_”.
• All designs must be within the 18 cm (H) × 13 cm (W) (Approx. 7 inches (H) × 5 inches (W)) design field size.If the selected pattern does not fit within the 18 cm (H) × 13 cm (W) (Approx. 7 inches (H) × 5 inches (W)) design field size unless it is rotated 90 degrees, a message appears, asking if you wish to rotate the pattern 90 degrees.
• .pes files saved with the number of stitches, the number of colors and the number of combined patterns exceeding the specified limits cannot be displayed. Use one of our original data design systems to edit the embroidery pattern so that it meets the required specifications.
• Even if the embroidery unit is not attached, the machine will recognize embroidery data.• Save the patterns in the root directory of the USB media. If embroidery data is saved in a folder on USB
media, that embroidery data cannot be retrieved by the machine.
● When using embroidery data other than our original patterns, the thread or needle may break when sewing with a stitch density that is too fine or when sewing three or more overlapping stitches. In that case, use one of our original data design systems to edit the embroidery data.
2
— — — — — — — — — — — — — — — — — — — — — — — — — — — — — — — — — — — — — — — — — — — — — — — — — — —
■ Tajima (.dst) Embroidery Data
• When a .dst file is imported, the only way that you can view the design is by selecting the pattern (file name). Then press to display the design on the screen.
Transferring embroidery patterns from the computer to machine
NoteOnly a USB flash drive (USB flash memory) can be connected to the USB port on this machine.An embroidery pattern can be transferred to the machine from USB media containing data for no more than 200 embroidery patterns.Embroidery patterns cannot be transferred to the machine if the USB media contains data for more than 200 embroidery patterns. In this case, reduce the number of designs saved on the USB media.In addition, if the embroidery designs contain too many colors (this number may vary within the designs themselves), it may not be possible to transfer an embroidery pattern to the machine, even if there are less than 200 embroidery patterns that have been saved on the USB media. In this case also, reduce the number of designs saved on the USB media.Save the patterns in the root directory of the USB media. If embroidery data is saved in a folder on USB media, that embroidery data cannot be retrieved by the machine.
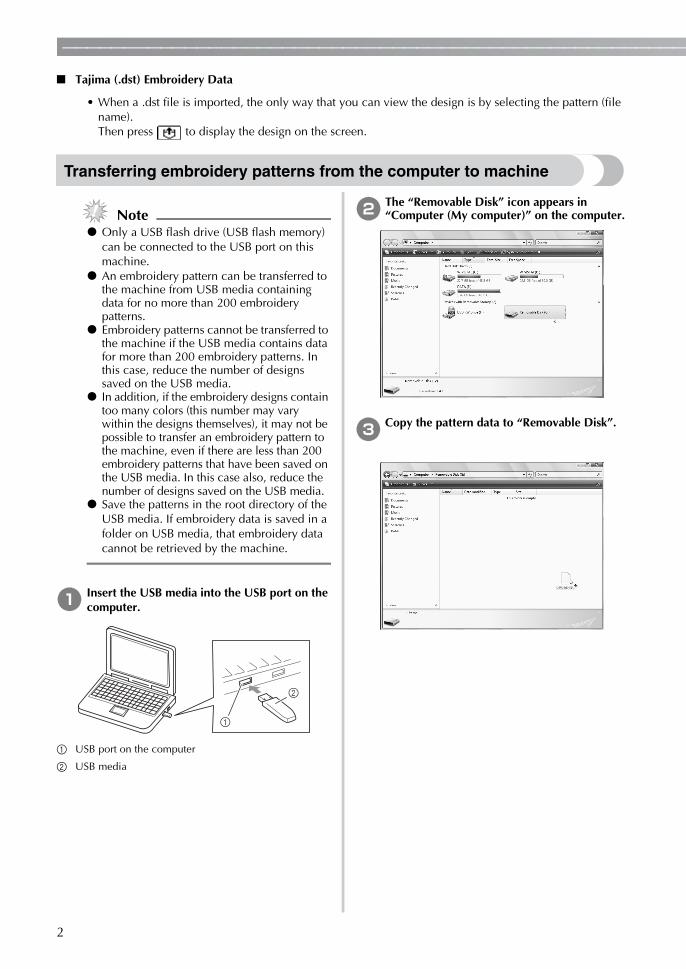
a Insert the USB media into the USB port on the computer.
a USB port on the computer
b USB media
b The “Removable Disk” icon appears in “Computer (My computer)” on the computer.
c Copy the pattern data to “Removable Disk”.

3
— — — — — — — — — — — — — — — — — — — — — — — — — — — — — — — — — — — — — — — — — — — — — — — — — — — —
En
glish
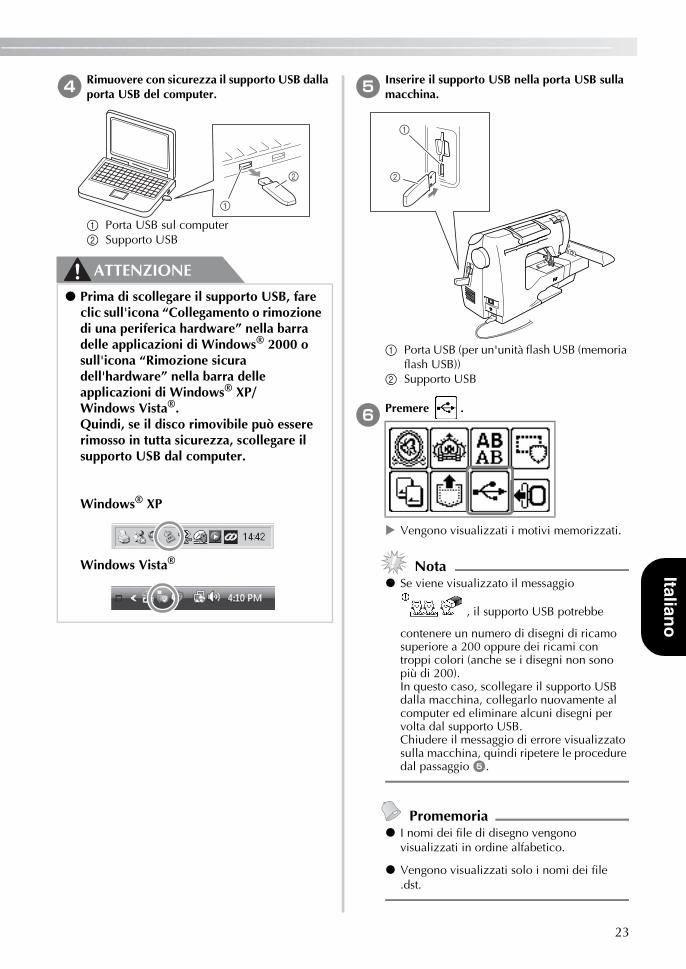
d Safely remove the USB media from the USB port on the computer.
a USB port on the computer
b USB media
CAUTION
e Insert the USB media into the USB port on the machine.
a USB port (for a USB flash drive (USB flash memory))
b USB media
f Press .
The saved patterns are displayed.
NoteIf the message “Reduce the number of pat-terns.” appears, the USB media may contain either more than 200 embroidery patterns or the embroidery designs may contain too many colors (although there may be no more than 200 patterns). In this case, unplug the USB media from the machine, plug it back into the computer, and then delete a few designs at a time from the USB media. Close the error message on the machine, and then repeat procedures starting from step e.
MemoThe pattern file names appear in alphabeti-cal order.
Only the names of .dst files are displayed.
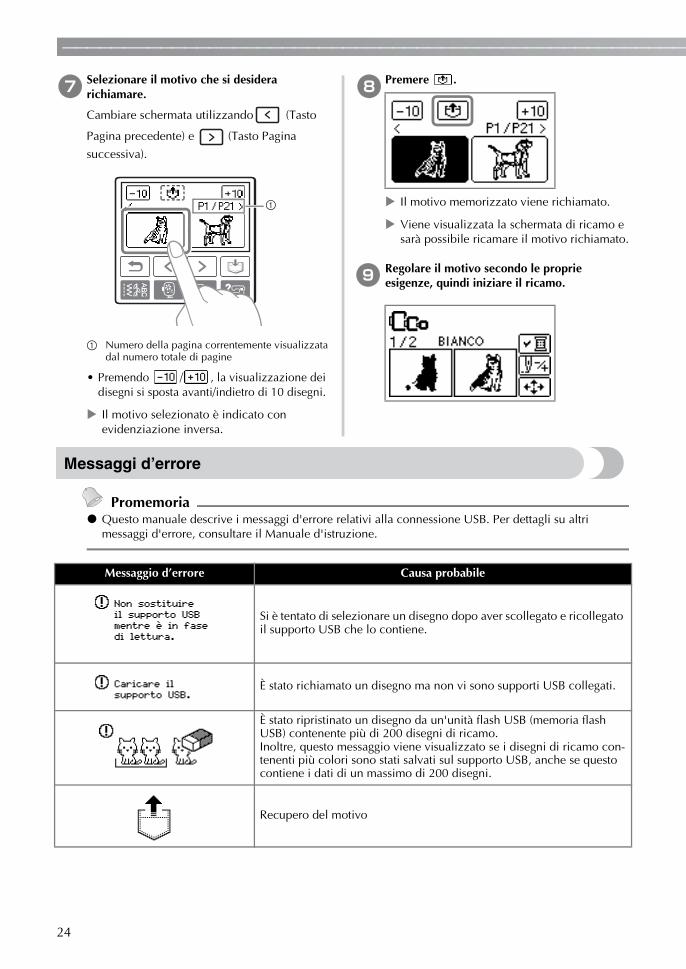
g Select the pattern you wish to retrieve.Switch screens using (Previous page key)
and (Next page key).
a Number of the currently displayed page from the total number of pages
•When / is pressed, the display of patterns moves forward or backward in increments of 10 designs.
The selected pattern is shown in reverse highlighting.
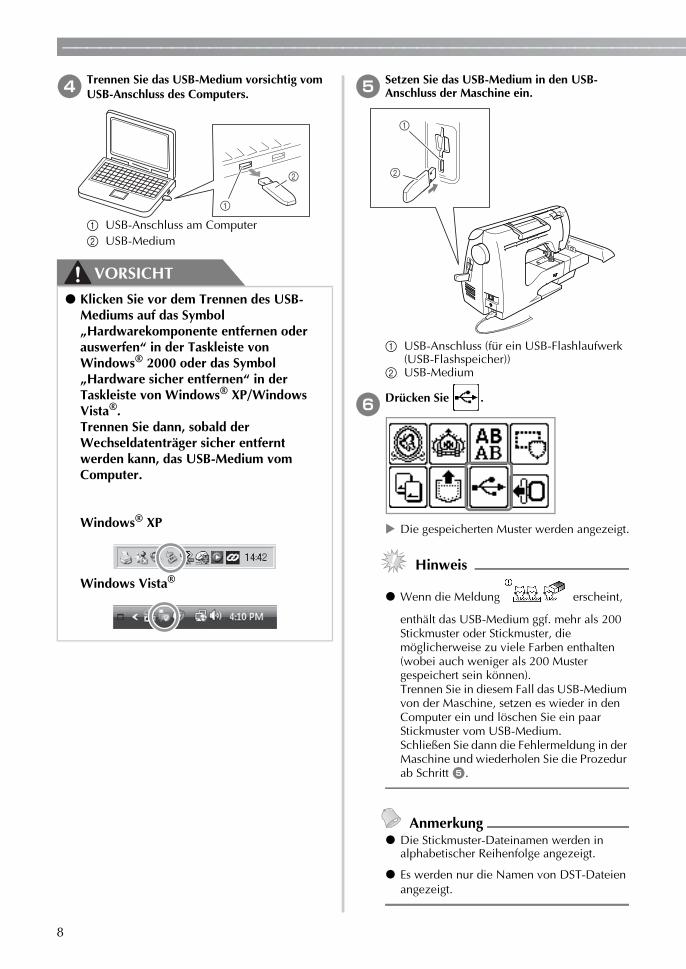
● Before disconnecting the USB media, click the “Unplug or Eject Hardware” icon in the taskbar of Windows® 2000 or the “Safely Remove Hardware” icon in the taskbar of Windows® XP/Windows Vista®.Then, when the removable disk can safely be removed, disconnect the USB media from the computer.
Windows® XP
Windows Vista®
a

4
— — — — — — — — — — — — — — — — — — — — — — — — — — — — — — — — — — — — — — — — — — — — — — — — — — —
h Press .
The saved pattern is retrieved.
The embroidery screen appears, and you can embroider the retrieved pattern.
i Adjust the pattern as desired, and then begin embroidering.
Error messages
MemoThis manual describes the error messages concerning the USB connection. For details on other error messages, refer to the Operation Manual.
Error Message Probable Cause
You attempted to select a pattern after the USB media containing the pattern has been disconnected, then reconnected.
You recalled a pattern while no USB media is connected.
A pattern was being retrieved from a USB flash drive (USB flash mem-ory) containing more than 200 embroidery patterns.In addition, this message will appear if embroidery patterns containing many colors have been saved on the USB media, even if it contains data for no more than 200 patterns.
Retrieving the pattern
5
— — — — — — — — — — — — — — — — — — — — — — — — — — — — — — — — — — — — — — — — — — — — — — — — — — — —
En
glish
Upgrading Your Machine's Software Using USB Media
You can use USB media and a computer to download software upgrades for your sewing machine. When an upgrade program is available on our website at “http://solutions.brother.com”, please download the file(s) following the instructions on the website and steps listed below.
NoteWhen using USB media to upgrade the software, check that no data other than the upgrade file is saved on the USB media being used before starting to upgrade.Upgrade file can be recalled from a USB flash drive (USB flash memory) of any size.
MemoWhen the machine's software is upgraded, saved combinations of character and decorative stitches are erased. However, saved embroidery patterns are not erased.
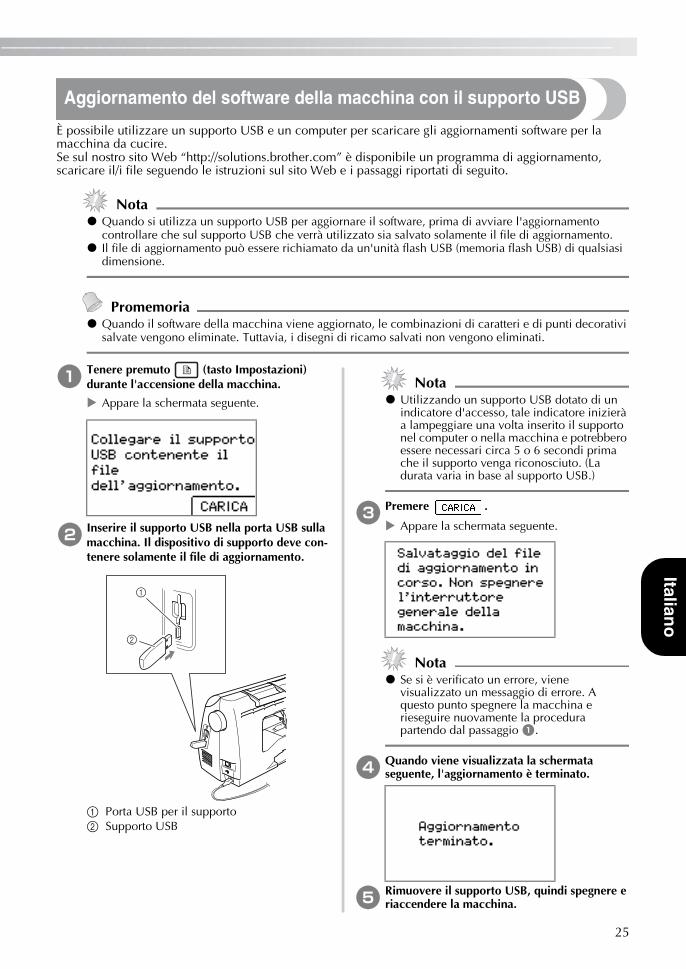
a Press and hold the (Settings key) while turning on the machine.
The following screen appears.
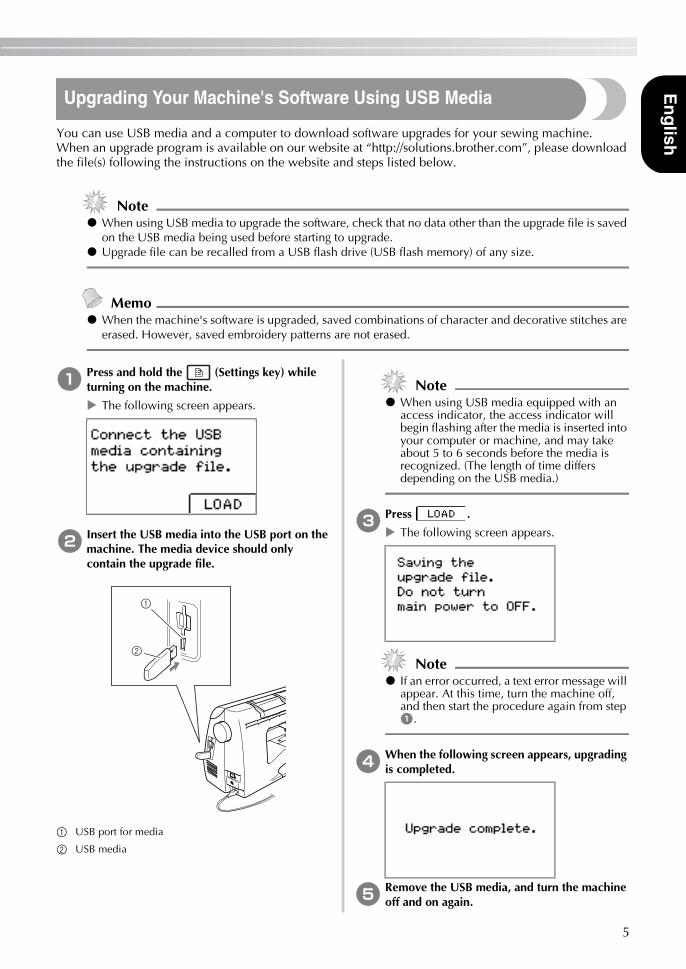
b Insert the USB media into the USB port on the machine. The media device should only contain the upgrade file.
a USB port for media
b USB media
NoteWhen using USB media equipped with an access indicator, the access indicator will begin flashing after the media is inserted into your computer or machine, and may take about 5 to 6 seconds before the media is recognized. (The length of time differs depending on the USB media.)
c Press .
The following screen appears.
NoteIf an error occurred, a text error message will appear. At this time, turn the machine off, and then start the procedure again from step a.
d When the following screen appears, upgrading is completed.
e Remove the USB media, and turn the machine off and on again.
6
— — — — — — — — — — — — — — — — — — — — — — — — — — — — — — — — — — — — — — — — — — — — — — — — — — —
Einführung
Dieses Handbuch enthält Beschreibungen zur Übertragung von Stickmustern von USB-Medien in die Maschine. Informationen über andere Maschinenfunktionen und -anwendungen finden Sie in der Bedienungsanleitung.
Verwenden der Speicherfunktion
Vorsichtsmaßnahmen bei der Verwendung von Stickdaten
Beachten Sie die folgenden Vorsichtsmaßnahmen, wenn Sie andere als die in dieser Maschine erstellten und gespeicherten Daten verwenden.
VORSICHT
■ Verwendbare Stickdatentypen• Für diese Maschine können nur PES- und DST-Stickdatendateien verwendet werden. Wenn Sie andere als die mit
den Original-Datenentwurfssystemen oder Stickmaschinen gespeicherten Daten verwenden, kann es zu Funktionsstörungen der Maschine kommen.
■ Verwendbare USB-MedientypenStickdaten können von einem beliebig großen USB-Flashlaufwerk (USB-Flashspeicher) gelesen werden.
HinweisAn den USB-Anschluss dieser Maschine kann nur ein USB-Flashlaufwerk (USB-Flashspeicher) angeschlossen werden.Manche USB-Medien sind mit dieser Maschine ggf. nicht kompatibel. Weitere Informationen dazu finden Sie auf unserer Website.Wenn Sie USB-Medien mit Zugriffsanzeige verwenden, beginnt die Zugriffsanzeige nach dem Einsetzen in den Computer oder in die Maschine zu blinken, und es kann 5 bis 6 Sekunden dauern, bis das Medium erkannt wird. (Diese Zeit ist vom USB-Medium abhängig.)Weitere Informationen finden Sie in der Bedienungsanleitung zu Ihrem USB-Medium.
AnmerkungIn Dateinamen können Buchstaben und Zahlen verwendet werden. Enthält der Dateiname nicht mehr als acht Zeichen, wird er vollständig am Bildschirm dargestellt. Ist der Dateiname länger als acht Zei-chen, werden nur die ersten sechs Zeichen, gefolgt von „~“ und einer Zahl, angezeigt.Dies gilt nur für DST-Stickdatendateien.Es werden nur die Namen von DST-Dateien angezeigt.
■ Vorsichtsmaßnahmen bei der Erstellung und Speicherung von Stickdaten mit dem Computer• Wenn der Dateiname der Stickdaten nicht identifiziert werden kann (z. B. weil der Name Sonderzeichen enthält),
wird die Datei nicht angezeigt. Ändern Sie in diesem Fall den Namen der Datei. Wir empfehlen die Verwendung der 26 Buchstaben des Alphabets (Groß- und Kleinbuchstaben), der Ziffern 0 bis 9, „-” und „_”.
• Die Größe aller Designs darf 18 (H) × 13 cm (B) (ca. 7 (H) × 5 Zoll (B)) nicht überschreiten. Passt das gewählte Muster nicht in das 18 (H) × 13 cm (B) (ca. 7 (H) × 5 Zoll (B)) große Stickmusterfeld, es sei denn, es wird um 90 Grad gedreht, erscheint eine Meldung mit der Frage, ob Sie das Stickmuster um 90 Grad drehen möchten.
● Bei Verwendung von anderen als den Original-Musterdaten kann der Faden reißen oder die Nadel abbrechen, wenn eine zu feine Stichdichte verwendet wird oder drei oder mehr Stiche übereinander gestickt werden. In diesem Fall sollten Sie die Stickdaten mit der PE-Design Software bearbeiten.
7
— — — — — — — — — — — — — — — — — — — — — — — — — — — — — — — — — — — — — — — — — — — — — — — — — —
Deu
tsch
• „.pes”-Dateien, deren gespeicherte Anzahl von Stichen, Farben oder kombinierten Mustern die angegebenen Grenzwerte überschreitet, können nicht angezeigt werden. Bearbeiten Sie das Stickmuster so mit einem unserer Original-Datenentwurfssysteme, dass es der erforderlichen Spezifikation entspricht.
• Die Maschine erkennt Stickdaten auch, wenn die Stickeinheit nicht angeschlossen ist.• Speichern Sie die Stickmuster im Hauptinhaltsverzeichnis des USB-Mediums. Wenn Stickdaten in einem Ordner des
USB-Mediums gespeichert werden, können sie nicht von der Maschine geladen werden.
■ Tajima-Stickdaten (.dst)• Wenn eine DST-Datei importiert wird, können Sie das Design nur durch Auswahl des Musters (Dateiname) anzeigen.
Drücken Sie dann , um das Design im Bildschirm anzuzeigen.
Übertragen von Stickmustern vom Computer in die Maschine
HinweisAn den USB-Anschluss dieser Maschine kann nur ein USB-Flashlaufwerk (USB-Flashspeicher) angeschlossen werden.Ein Stickmuster kann nur von einem USB-Medium, das maximal 200 Stickmuster enthält, in die Maschine übertragen werden.Es können keine Stickmuster in die Maschine übertragen werden, wenn auf dem USB-Medium Daten für mehr als 200 Stickmuster gespeichert sind. Verringern Sie in diesem Fall die Anzahl der auf dem USB-Medium gespeicherten Stickmuster.Außerdem kann es sein, dass keine Stickmuster in die Maschine übertragen werden können, auch wenn weniger als 200 Stickmuster auf dem USB-Medium gespeichert sind, wenn die Stickmuster zu viele Farben enthalten (die Anzahl kann innerhalb der Stickmuster variieren). Verringern Sie auch in diesem Fall die Anzahl der auf dem USB-Medium gespeicherten Stickmuster.Speichern Sie die Stickmuster im Hauptinhaltsverzeichnis des USB-Mediums. Wenn Stickdaten in einem Ordner des USB-Mediums gespeichert werden, können sie nicht von der Maschine geladen werden.
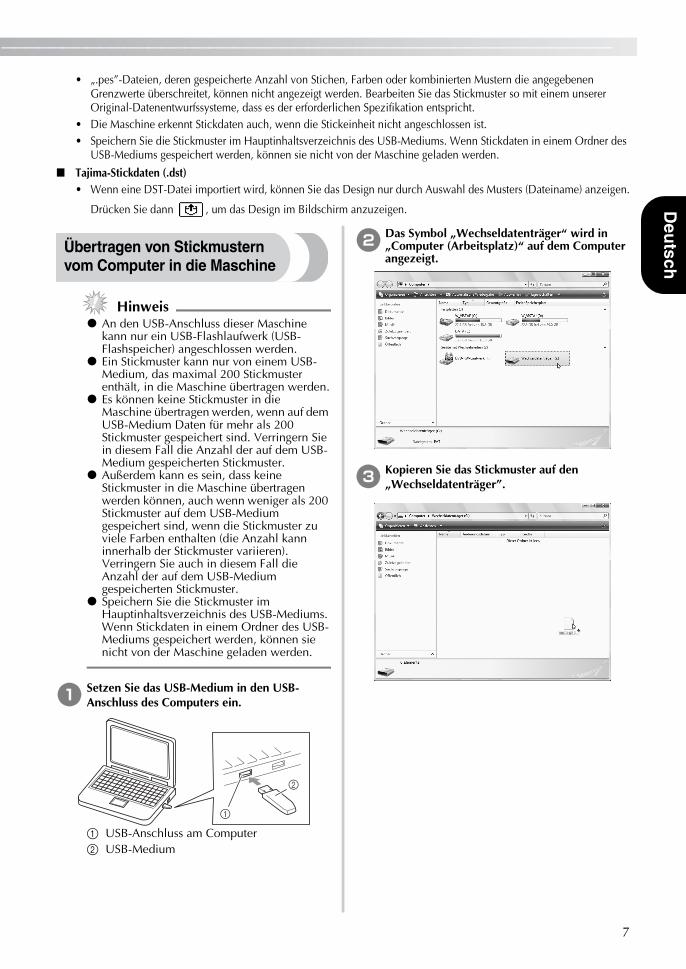
a Setzen Sie das USB-Medium in den USB-Anschluss des Computers ein.
a USB-Anschluss am Computerb USB-Medium
b Das Symbol „Wechseldatenträger“ wird in „Computer (Arbeitsplatz)“ auf dem Computer angezeigt.
c Kopieren Sie das Stickmuster auf den „Wechseldatenträger”.
8
— — — — — — — — — — — — — — — — — — — — — — — — — — — — — — — — — — — — — — — — — — — — — — — — — — —
d Trennen Sie das USB-Medium vorsichtig vom USB-Anschluss des Computers.
a USB-Anschluss am Computerb USB-Medium
VORSICHT
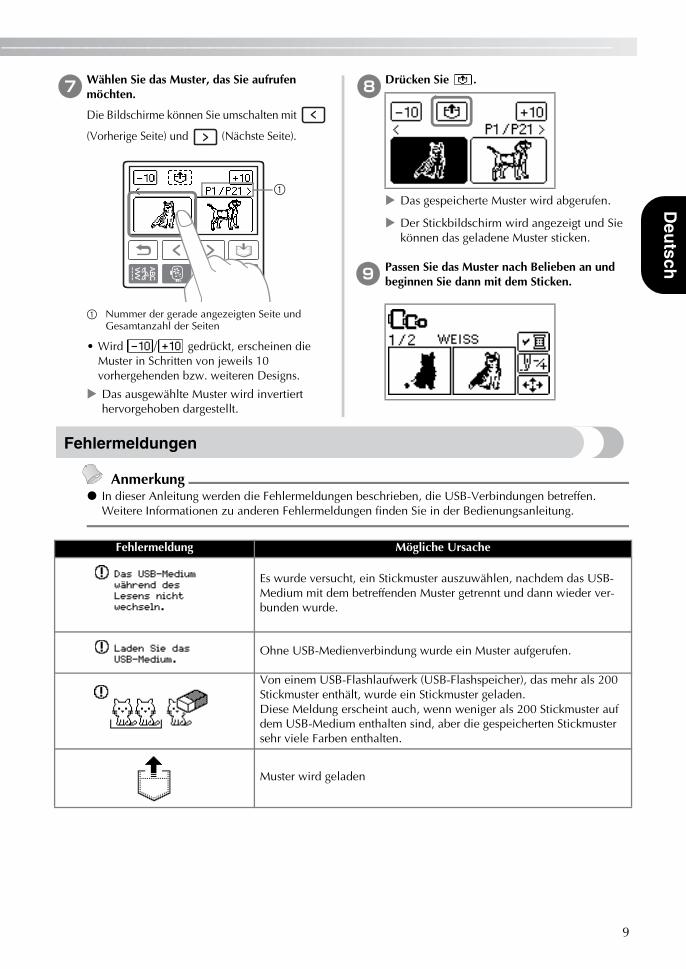
e Setzen Sie das USB-Medium in den USB-Anschluss der Maschine ein.
a USB-Anschluss (für ein USB-Flashlaufwerk (USB-Flashspeicher))
b USB-Medium
f Drücken Sie .
Die gespeicherten Muster werden angezeigt.
Hinweis
Wenn die Meldung erscheint,
enthält das USB-Medium ggf. mehr als 200 Stickmuster oder Stickmuster, die möglicherweise zu viele Farben enthalten (wobei auch weniger als 200 Muster gespeichert sein können).Trennen Sie in diesem Fall das USB-Medium von der Maschine, setzen es wieder in den Computer ein und löschen Sie ein paar Stickmuster vom USB-Medium.Schließen Sie dann die Fehlermeldung in der Maschine und wiederholen Sie die Prozedur ab Schritt e.
AnmerkungDie Stickmuster-Dateinamen werden in alphabetischer Reihenfolge angezeigt.
Es werden nur die Namen von DST-Dateien angezeigt.
● Klicken Sie vor dem Trennen des USB-Mediums auf das Symbol „Hardwarekomponente entfernen oder auswerfen“ in der Taskleiste von Windows® 2000 oder das Symbol „Hardware sicher entfernen“ in der Taskleiste von Windows® XP/Windows Vista®.Trennen Sie dann, sobald der Wechseldatenträger sicher entfernt werden kann, das USB-Medium vom Computer.
Windows® XP
Windows Vista®
9
— — — — — — — — — — — — — — — — — — — — — — — — — — — — — — — — — — — — — — — — — — — — — — — — — —
Deu
tsch
g Wählen Sie das Muster, das Sie aufrufen möchten.
Die Bildschirme können Sie umschalten mit
(Vorherige Seite) und (Nächste Seite).
a Nummer der gerade angezeigten Seite und Gesamtanzahl der Seiten
• Wird / gedrückt, erscheinen die Muster in Schritten von jeweils 10 vorhergehenden bzw. weiteren Designs.
Das ausgewählte Muster wird invertiert hervorgehoben dargestellt.
h Drücken Sie .
Das gespeicherte Muster wird abgerufen.
Der Stickbildschirm wird angezeigt und Sie können das geladene Muster sticken.
i Passen Sie das Muster nach Belieben an und beginnen Sie dann mit dem Sticken.
Fehlermeldungen
AnmerkungIn dieser Anleitung werden die Fehlermeldungen beschrieben, die USB-Verbindungen betreffen. Weitere Informationen zu anderen Fehlermeldungen finden Sie in der Bedienungsanleitung.
a
Fehlermeldung Mögliche Ursache
Es wurde versucht, ein Stickmuster auszuwählen, nachdem das USB-Medium mit dem betreffenden Muster getrennt und dann wieder ver-bunden wurde.
Ohne USB-Medienverbindung wurde ein Muster aufgerufen.
Von einem USB-Flashlaufwerk (USB-Flashspeicher), das mehr als 200 Stickmuster enthält, wurde ein Stickmuster geladen. Diese Meldung erscheint auch, wenn weniger als 200 Stickmuster auf dem USB-Medium enthalten sind, aber die gespeicherten Stickmuster sehr viele Farben enthalten.
Muster wird geladen

10
— — — — — — — — — — — — — — — — — — — — — — — — — — — — — — — — — — — — — — — — — — — — — — — — — — —
Aktualisieren der Maschinensoftware mit USB-Medien
Zum Laden von Softwareaktualisierungen für die Nähmaschine können Sie USB-Medien und einen Computer verwenden. Wenn eine Software-Aktualisierung auf unserer Website „http://solutions.brother.com“ erhältlich ist, laden Sie bitte die Datei(en) unter Beachtung der Anweisungen auf der Internetseite und den unten aufgeführten Schritten herunter.
HinweisWenn Sie USB-Medien zur Aktualisierung der Software verwenden, achten Sie darauf, dass sich außer der Upgrade-Datei keine anderen Daten auf dem USB-Medium befinden, bevor Sie mit der Aktualisierung beginnen.Die Aktualisierungsdatei kann von einem beliebig großen USB-Flashlaufwerk (USB-Flashspeicher) gelesen werden.
AnmerkungWenn die Software der Maschine aktualisiert wird, werden gespeicherte Kombinationen aus Buchstaben- und Dekorstichen gelöscht. Gespeicherte Stickmuster bleiben jedoch erhalten.
a Halten Sie (Taste „Einstellungen“) gedrückt und schalten Sie die Maschine ein.
Der folgende Bildschirm wird angezeigt.
b Setzen Sie das USB-Medium in den USB-Anschluss der Maschine ein. Das Medium darf nur die Upgrade-Datei enthalten.
a USB-Anschluss für Medienb USB-Medium
HinweisWenn Sie USB-Medien mit Zugriffsanzeige verwenden, beginnt die Zugriffsanzeige nach dem Einsetzen in den Computer oder in die Maschine zu blinken, und es kann 5 bis 6 Sekunden dauern, bis das Medium erkannt wird. (Diese Zeit ist vom USB-Medium abhängig.)
c Drücken Sie .
Der folgende Bildschirm wird angezeigt.
HinweisWenn ein Fehler auftritt, wird eine Textfehlermeldung angezeigt. Schalten Sie zu diesem Zeitpunkt die Maschine aus und beginnen Sie erneut mit der Prozedur ab Schritt a.
d Wenn der folgende Bildschirm angezeigt wird, ist die Aktualisierung abgeschlossen.
e Entfernen Sie das USB-Medium und schalten Sie die Maschine aus und wieder ein.
11
— — — — — — — — — — — — — — — — — — — — — — — — — — — — — — — — — — — — — — — — — — — — — — — — — — — —
Fran
çais
Introduction
Ce manuel propose des descriptions de transfert des motifs de broderie à partir du support USB vers la machine. Pour plus de détails sur les autres fonctions et opérations de la machine, reportez-vous au mode d'emploi.
Utilisation de la fonction de mise en mémoire
Précautions relatives aux données de broderie
Respectez les précautions suivantes lorsque vous utilisez des données de broderie autres que celles créées et mémorisées dans cette machine.
ATTENTION
■ Types de données de broderie pouvant être utilisés• Vous ne pouvez utiliser que les fichiers de données de broderie .pes et .dst avec cette machine. Utiliser
d'autres données que celles enregistrées à l'aide de nos systèmes de conception de données ou nos machines à coudre risque d'entraîner le dysfonctionnement de la machine à broder.
■ Types de supports USB que vous pouvez utiliserDes données de broderie peuvent être rappelées à partir d'un lecteur flash USB (mémoire flash USB) quelle qu'en soit la capacité.
RemarqueIl n'est possible de connecter qu'un lecteur flash USB (mémoire flash USB) au port USB de cette machine.Certains supports USB peuvent ne pas être compatibles avec cette machine. Pour plus de détails, visitez notre site Web.Lorsque vous utilisez un périphérique USB muni d'un voyant d'accès, celui-ci commence à clignoter dès que vous insérez le périphérique dans l'ordinateur ou la machine à coudre ; la reconnaissance du périphérique peut prendre entre 5 et 6 secondes (ce délai peut varier en fonction du périphérique USB).Pour des informations complémentaires, consultez le manuel d'instructions accompagnant le support USB que vous avez acheté.
MémoVous pouvez utiliser des lettres et des chiffres dans les noms de fichiers. Si le nom du fichier ne comporte pas plus de huit caractères, il apparaît sur l'écran dans son intégralité. S'il en comporte plus de huit, seuls les six premiers caractères suivis du symbole « ~ » et d'un chiffre sont visibles.Ceci ne s'applique qu'aux fichiers de données de broderie .dst.Seuls les noms des fichiers .dst s'affichent.
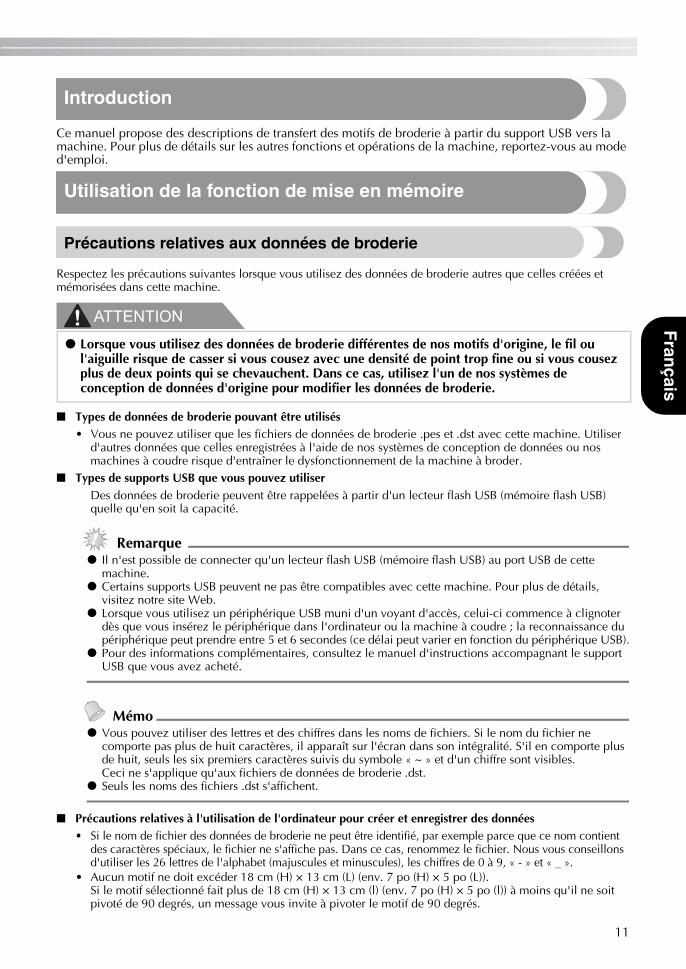
■ Précautions relatives à l'utilisation de l'ordinateur pour créer et enregistrer des données• Si le nom de fichier des données de broderie ne peut être identifié, par exemple parce que ce nom contient
des caractères spéciaux, le fichier ne s'affiche pas. Dans ce cas, renommez le fichier. Nous vous conseillons d'utiliser les 26 lettres de l'alphabet (majuscules et minuscules), les chiffres de 0 à 9, « - » et « _ ».
• Aucun motif ne doit excéder 18 cm (H) × 13 cm (L) (env. 7 po (H) × 5 po (L)). Si le motif sélectionné fait plus de 18 cm (H) × 13 cm (l) (env. 7 po (H) × 5 po (l)) à moins qu'il ne soit pivoté de 90 degrés, un message vous invite à pivoter le motif de 90 degrés.
● Lorsque vous utilisez des données de broderie différentes de nos motifs d'origine, le fil ou l'aiguille risque de casser si vous cousez avec une densité de point trop fine ou si vous cousez plus de deux points qui se chevauchent. Dans ce cas, utilisez l'un de nos systèmes de conception de données d'origine pour modifier les données de broderie.
12
— — — — — — — — — — — — — — — — — — — — — — — — — — — — — — — — — — — — — — — — — — — — — — — — — — —
• Les fichiers .pes enregistrés avec un nombre de points, de couleurs et de motifs combinés supérieurs aux limites spécifiées ne peuvent être affichés. Utilisez l'un de nos systèmes de conception de données d'origine pour modifier les motifs de broderie afin qu'ils correspondent aux spécifications.
• Même si l’unité de broderie n’est pas installée, la machine reconnaît les données de broderie.• Enregistrez les motifs dans le répertoire racine du support USB. Si des données de broderie sont
enregistrées dans un dossier du support USB, vous ne pourrez pas les récupérer via la machine.
■ Données de broderie Tajima (.dst)• Lors de l'importation d'un fichier .dst, la seule manière de visualiser le dessin consiste à sélectionner le
motif (nom du fichier). Appuyez alors sur pour afficher le dessin à l'écran.
Transfert de motifs de broderie de l'ordinateur vers la machine à coudre
RemarqueIl n'est possible de connecter qu'un lecteur flash USB (mémoire flash USB) au port USB de cette machine.Un motif de broderie peut être transféré vers la machine à partir d'un support USB contenant 200 motifs de broderie maximum.Les motifs de broderie ne peuvent pas être transférés vers la machine si le support USB en contient plus de 200. Dans ce cas, diminuez le nombre de motifs enregistrés sur le périphérique USB.En outre, si les motifs de broderie contiennent trop de couleurs (ce nombre peut varier dans les motifs eux-mêmes), il peut s'avérer impossible d'en transférer un vers la machine, même s'il n'y a pas plus de 200 motifs de broderie enregistrés sur le support USB. Dans ce cas, diminuez également le nombre de motifs enregistrés sur le périphérique USB.Enregistrez les motifs dans le répertoire racine du support USB. Si des données de broderie sont enregistrées dans un dossier du support USB, vous ne pourrez pas les récupérer via la machine.
a Insérez le support USB dans le port USB de l'ordinateur.
a Port USB de l'ordinateur
b Support USB
b L’icône « Disque amovible » s’affiche dans « Ordinateur (Poste de travail) » sur l’ordinateur.
c Copiez les données de motif sur le disque amovible.

13
— — — — — — — — — — — — — — — — — — — — — — — — — — — — — — — — — — — — — — — — — — — — — — — — — — — —
Fran
çais
d Retirez en toute sécurité le périphérique USB du port correspondant de l'ordinateur.
a Port USB de l'ordinateurb Support USB
ATTENTION
e Insérez le support USB dans le port USB de la machine.
a Port USB (pour un lecteur flash USB (mémoire flash USB))
b Support USB
f Appuyez sur .
Les motifs enregistrés sont affichés.
Remarque
Si le message apparaît, il est
possible que le support USB contienne plus de 200 motifs de broderie ou que les motifs de broderie contiennent trop de couleurs (même s'il n'y a pas plus de 200 motifs).Dans ce cas, retirez le support USB de la machine à coudre, reconnectez-le à l'ordinateur, puis supprimez simultanément quelques motifs de broderie du support USB.Refermez la fenêtre du message d'erreur affichée sur la machine, puis répétez la procédure en commençant par l'étape e.
MémoLes noms de fichier des motifs apparaissent dans l'ordre alphabétique.Seuls les noms des fichiers .dst s'affichent.
● Avant de déconnecter le support USB, cliquez sur l'icône « Débrancher ou éjecter le périphérique en toute sécurité » dans la barre des tâches de Windows® 2000 ou sur l'icône « Retirer le périphérique en toute sécurité » dans la barre des tâches de Windows® XP/Windows Vista®.Ensuite, lorsque le disque amovible peut être retiré en toute sécurité, déconnectez le support USB de l'ordinateur.
Windows® XP
Windows Vista®
14
— — — — — — — — — — — — — — — — — — — — — — — — — — — — — — — — — — — — — — — — — — — — — — — — — — —
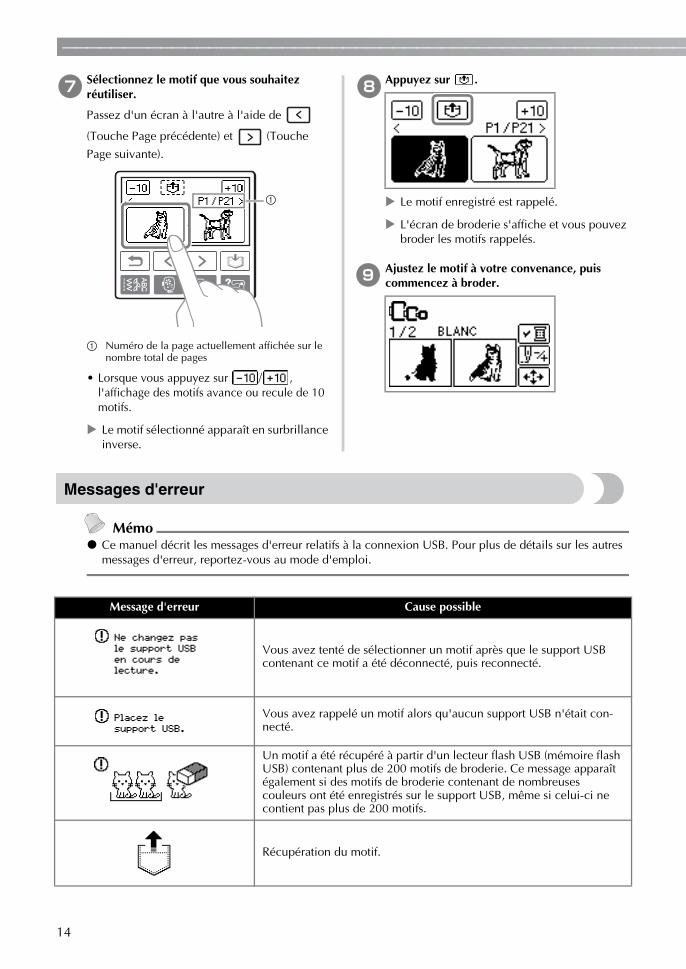
g Sélectionnez le motif que vous souhaitez réutiliser.
Passez d'un écran à l'autre à l'aide de
(Touche Page précédente) et (Touche
Page suivante).
a Numéro de la page actuellement affichée sur le nombre total de pages
• Lorsque vous appuyez sur / , l'affichage des motifs avance ou recule de 10 motifs.
Le motif sélectionné apparaît en surbrillance inverse.
h Appuyez sur .
Le motif enregistré est rappelé.
L'écran de broderie s'affiche et vous pouvez broder les motifs rappelés.
i Ajustez le motif à votre convenance, puis commencez à broder.
Messages d'erreur
MémoCe manuel décrit les messages d'erreur relatifs à la connexion USB. Pour plus de détails sur les autres messages d'erreur, reportez-vous au mode d'emploi.
a
Message d'erreur Cause possible
Vous avez tenté de sélectionner un motif après que le support USB contenant ce motif a été déconnecté, puis reconnecté.
Vous avez rappelé un motif alors qu'aucun support USB n'était con-necté.
Un motif a été récupéré à partir d'un lecteur flash USB (mémoire flash USB) contenant plus de 200 motifs de broderie. Ce message apparaît également si des motifs de broderie contenant de nombreuses couleurs ont été enregistrés sur le support USB, même si celui-ci ne contient pas plus de 200 motifs.
Récupération du motif.
15
— — — — — — — — — — — — — — — — — — — — — — — — — — — — — — — — — — — — — — — — — — — — — — — — — — — —
Fran
çais
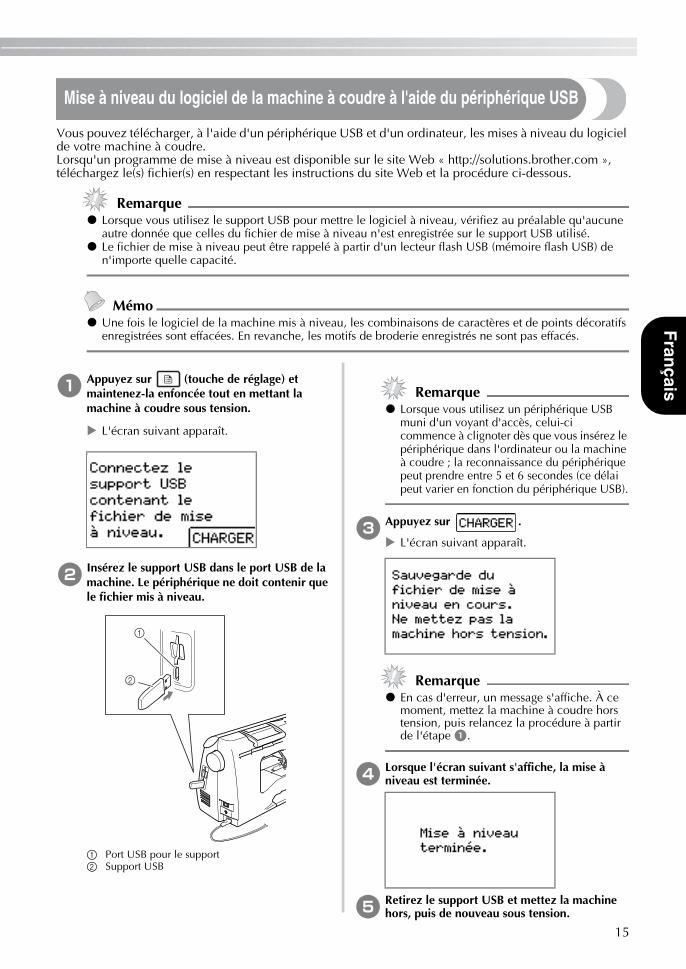
Mise à niveau du logiciel de la machine à coudre à l'aide du périphérique USB
Vous pouvez télécharger, à l'aide d'un périphérique USB et d'un ordinateur, les mises à niveau du logiciel de votre machine à coudre.Lorsqu'un programme de mise à niveau est disponible sur le site Web « http://solutions.brother.com », téléchargez le(s) fichier(s) en respectant les instructions du site Web et la procédure ci-dessous.
RemarqueLorsque vous utilisez le support USB pour mettre le logiciel à niveau, vérifiez au préalable qu'aucune autre donnée que celles du fichier de mise à niveau n'est enregistrée sur le support USB utilisé.Le fichier de mise à niveau peut être rappelé à partir d'un lecteur flash USB (mémoire flash USB) de n'importe quelle capacité.
MémoUne fois le logiciel de la machine mis à niveau, les combinaisons de caractères et de points décoratifs enregistrées sont effacées. En revanche, les motifs de broderie enregistrés ne sont pas effacés.
a Appuyez sur (touche de réglage) et maintenez-la enfoncée tout en mettant la machine à coudre sous tension.
L'écran suivant apparaît.
b Insérez le support USB dans le port USB de la machine. Le périphérique ne doit contenir que le fichier mis à niveau.
a Port USB pour le supportb Support USB
RemarqueLorsque vous utilisez un périphérique USB muni d'un voyant d'accès, celui-ci commence à clignoter dès que vous insérez le périphérique dans l'ordinateur ou la machine à coudre ; la reconnaissance du périphérique peut prendre entre 5 et 6 secondes (ce délai peut varier en fonction du périphérique USB).
c Appuyez sur .
L'écran suivant apparaît.
RemarqueEn cas d'erreur, un message s'affiche. À ce moment, mettez la machine à coudre hors tension, puis relancez la procédure à partir de l'étape a.
d Lorsque l'écran suivant s'affiche, la mise à niveau est terminée.
e Retirez le support USB et mettez la machine hors, puis de nouveau sous tension.
16
— — — — — — — — — — — — — — — — — — — — — — — — — — — — — — — — — — — — — — — — — — — — — — — — — — —
Inleiding
Deze handleiding geeft aanwijzingen om borduurpatronen over te zetten van een USB-medium naar de machine. Voor meer bijzonderheden over andere functies van de machine en bewerkingen, zie de Bedieningshandleiding.
Gebruik van de geheugenfunctie
Voorzorgsmaatregelen borduurgegevens
Neem de volgende voorzorgsmaatregelen in acht wanneer u borduurgegevens gebruikt die niet zijn gemaakt en opgeslagen op deze machine.
VOORZICHTIG
■ Soorten borduurgegevens die u kunt gebruiken• U kunt alleen .pes en .dst borduurgegevensbestanden gebruiken op deze machine. Wanneer u met onze
gegevensontwerpsystemen of naaimachines andere gegevens gebruikt, leidt dit mogelijk tot storing op de borduurmachine.
■ Soorten USB-media die u kunt gebruikenU kunt borduurgegevens ophalen van elk formaat USB-flashstation (USB-flashgeheugen).
OpmerkingOp de USB-poort van deze machine kunt u alleen een USB-flashstation (USB-flashgeheugen) aansluiten.Sommige USB-media zijn mogelijk niet compatibel met deze machine. Op onze website vindt u meer bijzonderheden.Wanneer u een USB-medium gebruikt met een USB-indicator, begint de indicator te knipperen wan-neer u het medium in de computer of machine plaatst. Het kan circa 5 à 6 seconden duren voordat het medium wordt herkend. (Hoe lang dit precies duurt, hangt af van het USB-medium.)Extra informatie vindt u in de handleiding bij het USB-medium dat u hebt gekocht.
MemoU kunt letters en cijfers gebruiken om bestandsnamen te maken. Als de bestandsnaam niet langer is dan acht tekens, zal het hele bestand op het scherm verschijnen. Als de bestandsnaam langer is dan acht tekens, verschijnen als bestandsnaam alleen de eerste zes tekens, gevolgd door “~” en een cijfer.Dit geldt alleen voor .dst borduurgegevensbestanden.Alleen de namen van .dst-bestanden worden weergegeven.
■ Voorzorgsmaatregelen voor het maken en opslaan van gegevens op de computer• Als de bestandsnaam van de borduurgegevens niet kan worden bepaald, bijvoorbeeld omdat de naam
speciale tekens bevat, wordt het bestand niet weergegeven. Wijzig dan de bestandsnaam. We raden u aan de 26 letters van het alfabet (hoofdletters en kleine letters) te gebruiken, de cijfers 0 t/m 9, “-”, en “_”.
• Alle ontwerpen moeten binnen de ontwerpveldmaat 18 cm (H) × 13 cm (B) (ca. 7 inch (H) × 5 inch (B)) vallen. Als het geselecteerde patroon niet binnen de ontwerpveldmaat van 18 cm (H) × 13 cm (B) (ca. 7 inch (H) × 5 inch (B)) valt, tenzij het 90 graden wordt gedraaid, verschijnt een bericht met het verzoek het patroon 90 graden te draaien.
● Wanneer u andere borduurgegevens gebruikt dan onze oorspronkelijke patronen, kan de draad of de naald breken wanneer de steekdichtheid te fijn is of u drie of meer overlappende steken naait. In dat geval bewerkt u de borduurgegevens met een van onze oorspronkelijke gegevensontwerpsystemen.
17
— — — — — — — — — — — — — — — — — — — — — — — — — — — — — — — — — — — — — — — — — — — — — — — — — —
Nederlands
• .pes bestanden die zijn opgeslagen met meer steken of kleuren of gecombineerde patronen dan de aangegeven limiet, kunnen niet worden weergegeven. Bewerk het patroon met een van onze oorspronkelijke gegevensontwerppatronen, zodat het voldoet aan de vereiste specificaties.
• Zelfs als de borduurtafel niet is bevestigd, herkent de machine borduurgegevens.• Sla de patronen op in de rootdirectory van het USB-medium. Als de borduurgegevens zijn opgeslagen in
een map op het USB-medium, kunnen ze niet worden opgehaald door de machine.■ Tajima (.dst) borduurgegevens
• Wanneer u een .dst-bestand importeert, kunt u het ontwerp alleen bekijken door het patroon te selecteren (bestandsnaam).
Druk vervolgens op om het ontwerp op het scherm weer te geven.
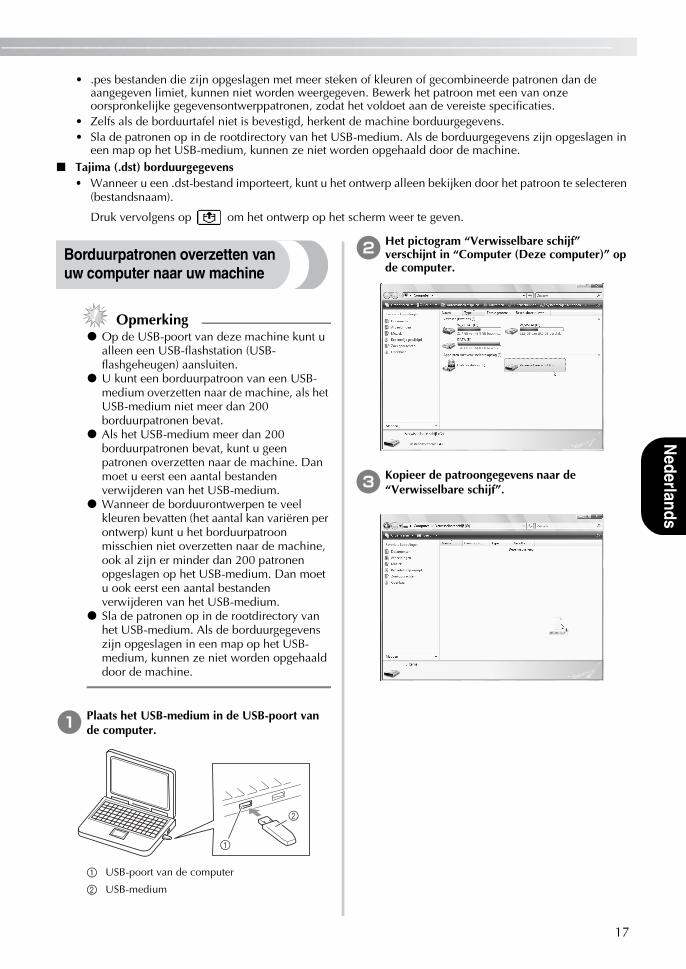
Borduurpatronen overzetten van uw computer naar uw machine
OpmerkingOp de USB-poort van deze machine kunt u alleen een USB-flashstation (USB-flashgeheugen) aansluiten.U kunt een borduurpatroon van een USB-medium overzetten naar de machine, als het USB-medium niet meer dan 200 borduurpatronen bevat.Als het USB-medium meer dan 200 borduurpatronen bevat, kunt u geen patronen overzetten naar de machine. Dan moet u eerst een aantal bestanden verwijderen van het USB-medium.Wanneer de borduurontwerpen te veel kleuren bevatten (het aantal kan variëren per ontwerp) kunt u het borduurpatroon misschien niet overzetten naar de machine, ook al zijn er minder dan 200 patronen opgeslagen op het USB-medium. Dan moet u ook eerst een aantal bestanden verwijderen van het USB-medium.Sla de patronen op in de rootdirectory van het USB-medium. Als de borduurgegevens zijn opgeslagen in een map op het USB-medium, kunnen ze niet worden opgehaald door de machine.
a Plaats het USB-medium in de USB-poort van de computer.
a USB-poort van de computer
b USB-medium
b Het pictogram “Verwisselbare schijf” verschijnt in “Computer (Deze computer)” op de computer.
c Kopieer de patroongegevens naar de “Verwisselbare schijf”.
18
— — — — — — — — — — — — — — — — — — — — — — — — — — — — — — — — — — — — — — — — — — — — — — — — — — —
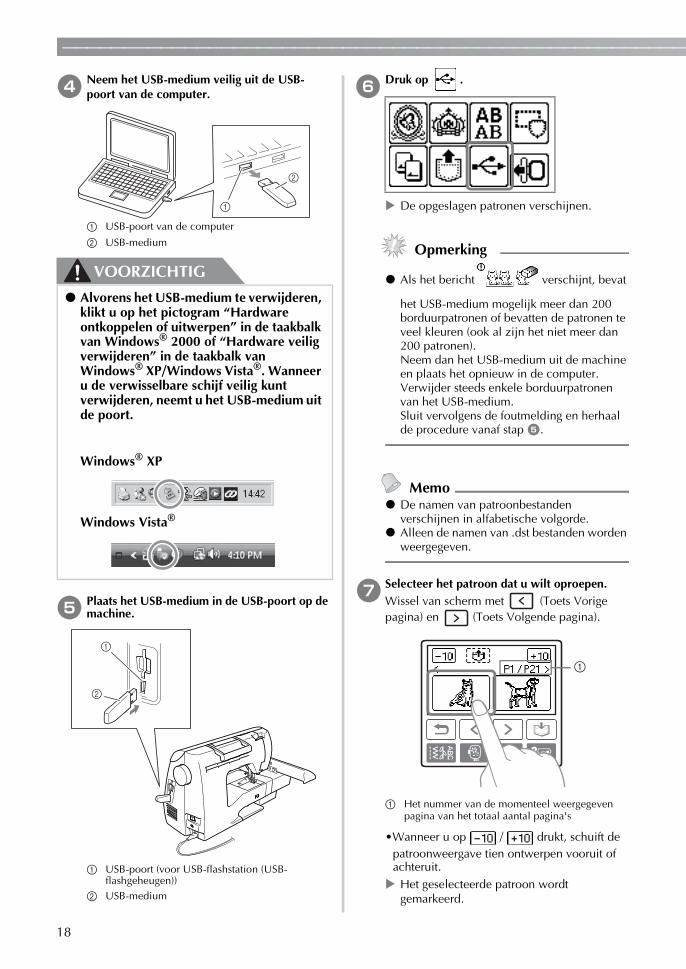
d Neem het USB-medium veilig uit de USB-poort van de computer.
a USB-poort van de computer
b USB-medium
VOORZICHTIG
e Plaats het USB-medium in de USB-poort op de machine.
a USB-poort (voor USB-flashstation (USB-flashgeheugen))
b USB-medium
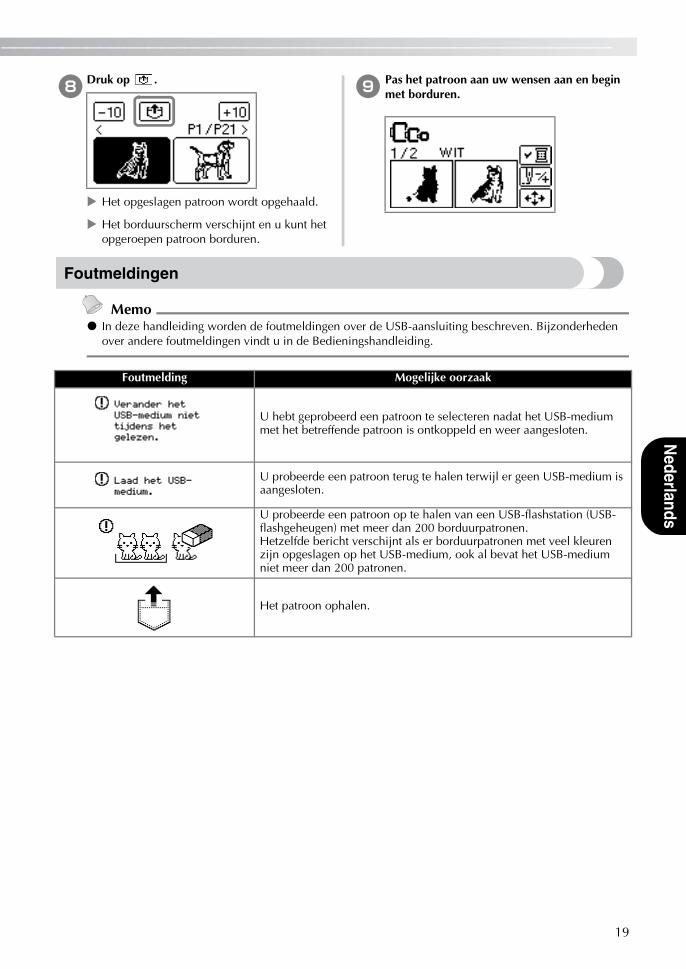
f Druk op .
De opgeslagen patronen verschijnen.
Opmerking
Als het bericht verschijnt, bevat
het USB-medium mogelijk meer dan 200 borduurpatronen of bevatten de patronen te veel kleuren (ook al zijn het niet meer dan 200 patronen).Neem dan het USB-medium uit de machine en plaats het opnieuw in de computer. Verwijder steeds enkele borduurpatronen van het USB-medium.Sluit vervolgens de foutmelding en herhaal de procedure vanaf stap e.
MemoDe namen van patroonbestanden verschijnen in alfabetische volgorde.Alleen de namen van .dst bestanden worden weergegeven.
g Selecteer het patroon dat u wilt oproepen.Wissel van scherm met (Toets Vorige pagina) en (Toets Volgende pagina).
a Het nummer van de momenteel weergegeven pagina van het totaal aantal pagina's
•Wanneer u op / drukt, schuift de patroonweergave tien ontwerpen vooruit of achteruit.
Het geselecteerde patroon wordt gemarkeerd.
● Alvorens het USB-medium te verwijderen, klikt u op het pictogram “Hardware ontkoppelen of uitwerpen” in de taakbalk van Windows® 2000 of “Hardware veilig verwijderen” in de taakbalk van Windows® XP/Windows Vista®. Wanneer u de verwisselbare schijf veilig kunt verwijderen, neemt u het USB-medium uit de poort.
Windows® XP
Windows Vista®
a
19
— — — — — — — — — — — — — — — — — — — — — — — — — — — — — — — — — — — — — — — — — — — — — — — — — —
Nederlands
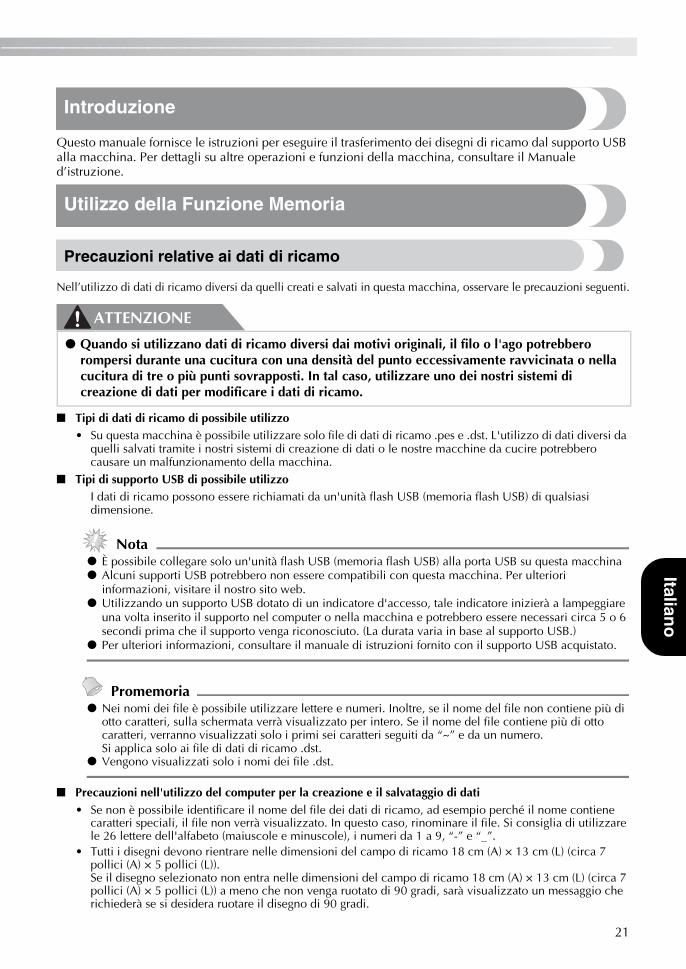
h Druk op .
Het opgeslagen patroon wordt opgehaald.
Het borduurscherm verschijnt en u kunt het opgeroepen patroon borduren.
i Pas het patroon aan uw wensen aan en begin met borduren.
Foutmeldingen
MemoIn deze handleiding worden de foutmeldingen over de USB-aansluiting beschreven. Bijzonderheden over andere foutmeldingen vindt u in de Bedieningshandleiding.
Foutmelding Mogelijke oorzaak
U hebt geprobeerd een patroon te selecteren nadat het USB-medium met het betreffende patroon is ontkoppeld en weer aangesloten.
U probeerde een patroon terug te halen terwijl er geen USB-medium is aangesloten.
U probeerde een patroon op te halen van een USB-flashstation (USB-flashgeheugen) met meer dan 200 borduurpatronen. Hetzelfde bericht verschijnt als er borduurpatronen met veel kleuren zijn opgeslagen op het USB-medium, ook al bevat het USB-medium niet meer dan 200 patronen.
Het patroon ophalen.

20
— — — — — — — — — — — — — — — — — — — — — — — — — — — — — — — — — — — — — — — — — — — — — — — — — — —
Software-upgrade van uw machine via USB-medium
Met een USB-medium en een computer kunt u software-upgrades voor uw naaimachine downloaden. Wanneer een upgradeprogramma beschikbaar komt op onze website “http://solutions.brother.com”, downloadt u het bestand volgens de aanwijzingen op de website en onderstaande stappen.
OpmerkingWanneer u een USB-medium gebruikt voor de software-upgrade, controleer dan eerst dat op het USB-medium niets anders is opgeslagen dan het upgradebestand.U kunt het upgradebestand ophalen van elk formaat USB-flashstation (USB-flashgeheugen).
MemoBij de software-upgrade van de machine worden opgeslagen combinaties van lettersteken en decoratieve steken verwijderd. Opgeslagen borduurpatronen worden niet verwijderd.
a Druk de (Instellingentoets) in en houd deze ingedrukt terwijl u de machine inschakelt.
Het volgende scherm verschijnt.
b Plaats het USB-medium in de USB-poort op de machine. Zorg dat het medium alleen het upgradebestand bevat.
a USB-poort voor medium
b USB-medium
OpmerkingWanneer u een USB-medium gebruikt met een USB-indicator, begint de indicator te knipperen wanneer u het medium in de computer of machine plaatst. Het kan circa 5 à 6 seconden duren voordat het medium wordt herkend. (Hoe lang dit precies duurt, hangt af van het USB-medium.)
c Druk op .
Het volgende scherm verschijnt.
OpmerkingAls er een fout optreedt, verschijnt een foutmelding. Zet dan de machine uit en begin opnieuw vanaf stap a
d Wanneer het volgende scherm verschijnt, is de upgrade voltooid.
e Verwijder het USB-medium en zet de machine uit en weer aan.
21
— — — — — — — — — — — — — — — — — — — — — — — — — — — — — — — — — — — — — — — — — — — — — — — — — —
Italiano
Introduzione
Questo manuale fornisce le istruzioni per eseguire il trasferimento dei disegni di ricamo dal supporto USB alla macchina. Per dettagli su altre operazioni e funzioni della macchina, consultare il Manuale d’istruzione.
Utilizzo della Funzione Memoria
Precauzioni relative ai dati di ricamo
Nell’utilizzo di dati di ricamo diversi da quelli creati e salvati in questa macchina, osservare le precauzioni seguenti.
ATTENZIONE
■ Tipi di dati di ricamo di possibile utilizzo• Su questa macchina è possibile utilizzare solo file di dati di ricamo .pes e .dst. L'utilizzo di dati diversi da
quelli salvati tramite i nostri sistemi di creazione di dati o le nostre macchine da cucire potrebbero causare un malfunzionamento della macchina.
■ Tipi di supporto USB di possibile utilizzoI dati di ricamo possono essere richiamati da un'unità flash USB (memoria flash USB) di qualsiasi dimensione.
NotaÈ possibile collegare solo un'unità flash USB (memoria flash USB) alla porta USB su questa macchinaAlcuni supporti USB potrebbero non essere compatibili con questa macchina. Per ulteriori informazioni, visitare il nostro sito web.Utilizzando un supporto USB dotato di un indicatore d'accesso, tale indicatore inizierà a lampeggiare una volta inserito il supporto nel computer o nella macchina e potrebbero essere necessari circa 5 o 6 secondi prima che il supporto venga riconosciuto. (La durata varia in base al supporto USB.)Per ulteriori informazioni, consultare il manuale di istruzioni fornito con il supporto USB acquistato.
PromemoriaNei nomi dei file è possibile utilizzare lettere e numeri. Inoltre, se il nome del file non contiene più di otto caratteri, sulla schermata verrà visualizzato per intero. Se il nome del file contiene più di otto caratteri, verranno visualizzati solo i primi sei caratteri seguiti da “~” e da un numero. Si applica solo ai file di dati di ricamo .dst.Vengono visualizzati solo i nomi dei file .dst.
■ Precauzioni nell'utilizzo del computer per la creazione e il salvataggio di dati• Se non è possibile identificare il nome del file dei dati di ricamo, ad esempio perché il nome contiene
caratteri speciali, il file non verrà visualizzato. In questo caso, rinominare il file. Si consiglia di utilizzare le 26 lettere dell'alfabeto (maiuscole e minuscole), i numeri da 1 a 9, “-” e “_”.
• Tutti i disegni devono rientrare nelle dimensioni del campo di ricamo 18 cm (A) × 13 cm (L) (circa 7 pollici (A) × 5 pollici (L)). Se il disegno selezionato non entra nelle dimensioni del campo di ricamo 18 cm (A) × 13 cm (L) (circa 7 pollici (A) × 5 pollici (L)) a meno che non venga ruotato di 90 gradi, sarà visualizzato un messaggio che richiederà se si desidera ruotare il disegno di 90 gradi.
● Quando si utilizzano dati di ricamo diversi dai motivi originali, il filo o l'ago potrebbero rompersi durante una cucitura con una densità del punto eccessivamente ravvicinata o nella cucitura di tre o più punti sovrapposti. In tal caso, utilizzare uno dei nostri sistemi di creazione di dati per modificare i dati di ricamo.
22
— — — — — — — — — — — — — — — — — — — — — — — — — — — — — — — — — — — — — — — — — — — — — — — — — — —
• I file .pes salvati con un numero di punti, un numero di colori e un numero di motivi combinati superiore ai limiti specificati non possono essere visualizzati. Utilizzare uno dei nostri originali sistemi di creazione di dati per modificare lo schema di ricamo in modo che sia conforme alle specifiche.
• La macchina riconoscerà i dati di ricamo anche se l'unità da ricamo non è montata.• Salvare i disegni nella directory principale del supporto USB. Se i dati di ricamo sono salvati un una
cartella sul supporto USB, tali dati non possono essere ripristinati dalla macchina.■ Dati di ricamo Tajima (.dst)
• Quando viene importato un file .dst, l'unico modo per poter visualizzare il ricamo è quello di selezionare il disegno (nome del file).
Premere quindi per visualizzare il ricamo sulla schermata.
Trasferimento dei disegni di ricamo dal computer alla macchina
NotaÈ possibile collegare solo un'unità flash USB (memoria flash USB) alla porta USB su questa macchina.Un disegno di ricamo può essere trasferito nella macchina da un supporto USB contenente i dati per un massimo di 200 disegni di ricamo.I disegni di ricamo non possono essere trasferiti nella macchina se il supporto USB contiene i dati di oltre 200 disegni di ricamo. In questo caso, ridurre il numero di disegni salvati sul supporto USB.Inoltre, se i disegni da ricamo contengono una quantità troppo elevata di colori (questo numero può variare all'interno dei disegni stessi), potrebbe non essere possibile trasferire un disegno da ricamo nella macchina, anche se sul supporto USB è stato salvato un numero inferiore a 200 disegni. Anche in questo caso, ridurre il numero di disegni salvati sul supporto USB.Salvare i disegni nella directory principale del supporto USB. Se i dati di ricamo sono salvati un una cartella sul supporto USB, tali dati non possono essere ripristinati dalla macchina.
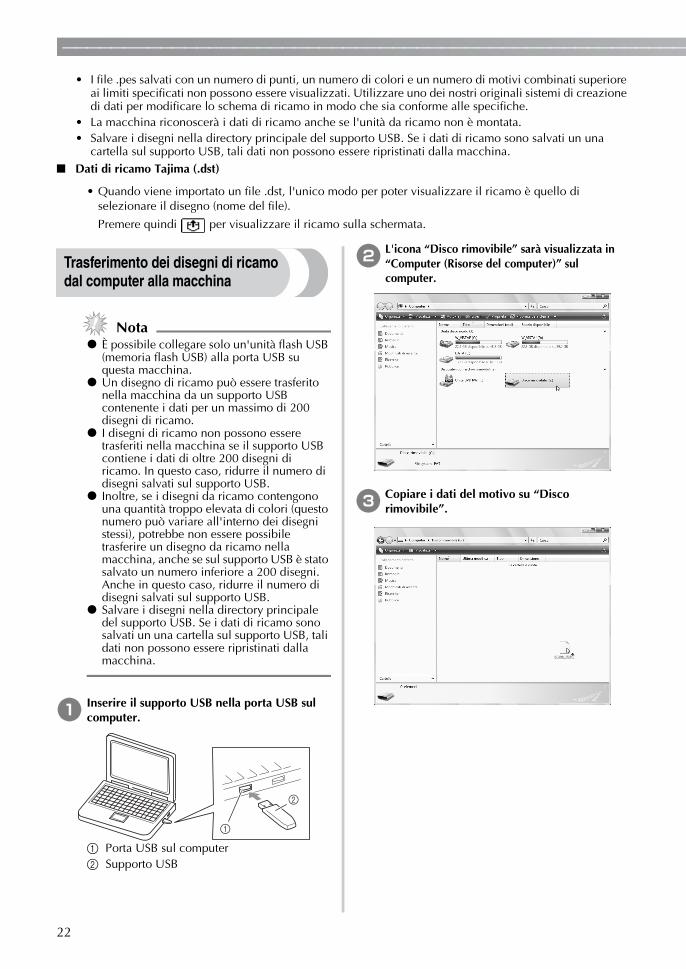
a Inserire il supporto USB nella porta USB sul computer.
a Porta USB sul computerb Supporto USB
b L'icona “Disco rimovibile” sarà visualizzata in “Computer (Risorse del computer)” sul computer.
c Copiare i dati del motivo su “Disco rimovibile”.
23
— — — — — — — — — — — — — — — — — — — — — — — — — — — — — — — — — — — — — — — — — — — — — — — — — —
Italiano
d Rimuovere con sicurezza il supporto USB dalla porta USB del computer.
a Porta USB sul computerb Supporto USB
ATTENZIONE
e Inserire il supporto USB nella porta USB sulla macchina.
a Porta USB (per un'unità flash USB (memoria flash USB))
b Supporto USB
f Premere .
Vengono visualizzati i motivi memorizzati.
NotaSe viene visualizzato il messaggio
, il supporto USB potrebbe
contenere un numero di disegni di ricamo superiore a 200 oppure dei ricami con troppi colori (anche se i disegni non sono più di 200).In questo caso, scollegare il supporto USB dalla macchina, collegarlo nuovamente al computer ed eliminare alcuni disegni per volta dal supporto USB.Chiudere il messaggio di errore visualizzato sulla macchina, quindi ripetere le procedure dal passaggio e.
PromemoriaI nomi dei file di disegno vengono visualizzati in ordine alfabetico.
Vengono visualizzati solo i nomi dei file .dst.
● Prima di scollegare il supporto USB, fare clic sull'icona “Collegamento o rimozione di una periferica hardware” nella barra delle applicazioni di Windows® 2000 o sull'icona “Rimozione sicura dell'hardware” nella barra delle applicazioni di Windows® XP/Windows Vista®.Quindi, se il disco rimovibile può essere rimosso in tutta sicurezza, scollegare il supporto USB dal computer.
Windows® XP
Windows Vista®
24
— — — — — — — — — — — — — — — — — — — — — — — — — — — — — — — — — — — — — — — — — — — — — — — — — — —
g Selezionare il motivo che si desidera richiamare.
Cambiare schermata utilizzando (Tasto
Pagina precedente) e (Tasto Pagina
successiva).
a Numero della pagina correntemente visualizzata dal numero totale di pagine
• Premendo / , la visualizzazione dei disegni si sposta avanti/indietro di 10 disegni.
Il motivo selezionato è indicato con evidenziazione inversa.
h Premere .
Il motivo memorizzato viene richiamato.
Viene visualizzata la schermata di ricamo e sarà possibile ricamare il motivo richiamato.
i Regolare il motivo secondo le proprie esigenze, quindi iniziare il ricamo.
Messaggi d’errore
PromemoriaQuesto manuale descrive i messaggi d'errore relativi alla connessione USB. Per dettagli su altri messaggi d'errore, consultare il Manuale d'istruzione.
a
Messaggio d’errore Causa probabile
Si è tentato di selezionare un disegno dopo aver scollegato e ricollegato il supporto USB che lo contiene.
È stato richiamato un disegno ma non vi sono supporti USB collegati.
È stato ripristinato un disegno da un'unità flash USB (memoria flash USB) contenente più di 200 disegni di ricamo. Inoltre, questo messaggio viene visualizzato se i disegni di ricamo con-tenenti più colori sono stati salvati sul supporto USB, anche se questo contiene i dati di un massimo di 200 disegni.
Recupero del motivo
25
— — — — — — — — — — — — — — — — — — — — — — — — — — — — — — — — — — — — — — — — — — — — — — — — — —
Italiano
Aggiornamento del software della macchina con il supporto USB
È possibile utilizzare un supporto USB e un computer per scaricare gli aggiornamenti software per la macchina da cucire.Se sul nostro sito Web “http://solutions.brother.com” è disponibile un programma di aggiornamento, scaricare il/i file seguendo le istruzioni sul sito Web e i passaggi riportati di seguito.
NotaQuando si utilizza un supporto USB per aggiornare il software, prima di avviare l'aggiornamento controllare che sul supporto USB che verrà utilizzato sia salvato solamente il file di aggiornamento.Il file di aggiornamento può essere richiamato da un'unità flash USB (memoria flash USB) di qualsiasi dimensione.
PromemoriaQuando il software della macchina viene aggiornato, le combinazioni di caratteri e di punti decorativi salvate vengono eliminate. Tuttavia, i disegni di ricamo salvati non vengono eliminati.
a Tenere premuto (tasto Impostazioni) durante l'accensione della macchina.
Appare la schermata seguente.
b Inserire il supporto USB nella porta USB sulla macchina. Il dispositivo di supporto deve con-tenere solamente il file di aggiornamento.
a Porta USB per il supportob Supporto USB
NotaUtilizzando un supporto USB dotato di un indicatore d'accesso, tale indicatore inizierà a lampeggiare una volta inserito il supporto nel computer o nella macchina e potrebbero essere necessari circa 5 o 6 secondi prima che il supporto venga riconosciuto. (La durata varia in base al supporto USB.)
c Premere .
Appare la schermata seguente.
NotaSe si è verificato un errore, viene visualizzato un messaggio di errore. A questo punto spegnere la macchina e rieseguire nuovamente la procedura partendo dal passaggio a.
d Quando viene visualizzata la schermata seguente, l'aggiornamento è terminato.
e Rimuovere il supporto USB, quindi spegnere e riaccendere la macchina.
26
— — — — — — — — — — — — — — — — — — — — — — — — — — — — — — — — — — — — — — — — — — — — — — — — — — —
Introducción
En este manual se facilitan descripciones para transferir diseños de bordado de soportes USB a la máquina. Si desea más información sobre otras funciones y operaciones de la máquina, consulte el manual de instrucciones.
Utilización de la función de memoria
Precauciones con los datos de bordado
Observe las precauciones siguientes al utilizar datos de bordado distintos de los creados y guardados en esta máquina.
PRECAUCIÓN
■ Tipos de datos de bordado que se pueden utilizar• Con esta máquina únicamente pueden utilizarse archivos de datos de bordado .pes y .dst. La utilización
de datos distintos de los guardados utilizando nuestros sistemas de diseño de datos o máquinas de coser puede hacer que la máquina de bordar funcione incorrectamente.
■ Tipos de soportes USB que pueden utilizarsePueden recuperarse datos de bordado de una unidad Flash USB (memoria Flash USB) de cualquier tamaño.
NotaSólo puede conectarse al puerto USB de esta máquina una unidad Flash USB (memoria Flash USB).Algunos soportes USB pueden no ser compatibles con esta máquina. Visite nuestro sitio Web si desea más información.Al utilizar un medio USB equipado con un indicador de acceso, éste comenzará a parpadear una vez insertado el medio en el ordenador o en la máquina y pueden transcurrir de 5 a 6 segundos hasta que se reconozca el medio. (La duración varía dependiendo del medio USB.)Si desea información adicional, consulte el manual de instrucciones incluido con el soporte USB que ha comprado.
RecuerdePueden utilizarse letras y números en los nombres de archivos. Además, si el nombre de archivo no contiene más de ocho caracteres, en la pantalla aparecerá el nombre completo. Si, por el contrario, tiene más de ocho caracteres de longitud, únicamente aparecerán como nombre de archivo los seis primeros caracteres seguidos de “~” y un número.Esto es de aplicación únicamente para los archivos de datos de bordado con la extensión .dst.Sólo se muestran los nombres de archivos con la extensión .dst.
■ Precauciones al utilizar el ordenador para crear y almacenar datos• Si el nombre de archivo de los datos de bordado no se puede identificar (por ejemplo, porque el nombre
contiene caracteres especiales), el archivo no se mostrará. En ese caso, cambie el nombre del archivo. Recomendamos la utilización de las 26 letras del alfabeto (mayúsculas y minúsculas), los números 0 al 9, “-” y “_”.
● Al utilizar datos de bordado distintos de nuestros diseños originales, el hilo o la aguja podría romperse durante la costura con una densidad de puntada que sea demasiado fina o al coser tres o más puntadas solapadas. En ese caso, utilice uno de nuestros sistemas de diseño de datos originales para editar los datos de bordado.
27
— — — — — — — — — — — — — — — — — — — — — — — — — — — — — — — — — — — — — — — — — — — — — — — — — —
Esp
año
l
• Todos los diseños han de estar comprendidos en el tamaño de diseño de 18 cm (Al.) × 13 cm (An.) (aprox. 7 pulg. (Al.) × 5 pulg. (An.)). Si el diseño seleccionado no cabe en el tamaño de diseño de 18 cm (Al.) × 13 cm (An.) (aprox. 7 pulg. (Al.) × 5 pulg. (An.)) a menos que se gire 90 grados, aparecerá un mensaje en el que se le preguntará al usuario si desea girar el diseño 90 grados.
• Los archivos .pes guardados con el número de puntadas, el número de colores y el número de diseños combinados que superen los límites especificados no se pueden mostrar. Utilice uno de nuestros sistemas de diseño de datos originales para editar el diseño de bordado de forma que cumpla las especificaciones requeridas.
• Incluso si la unidad de bordado no está colocada, la máquina reconocerá datos de bordado.• Guarde los diseños en el directorio raíz del soporte USB. Si los datos de bordado se guardan en una
carpeta del soporte USB, esos datos no pueden ser recuperados por la máquina.■ Datos de bordado Tajima (.dst)
• Cuando se importa un archivo .dst, la única forma de ver el diseño es seleccionar el diseño (nombre de archivo).A continuación, pulse para mostrar el diseño en la pantalla.
Transferencia de diseños de bordado del ordenador a la máquina
NotaSólo puede conectarse al puerto USB de esta máquina una unidad Flash USB (memoria Flash USB).Pueden transferirse a la máquina diseños de bordado desde medios USB que contengan datos como máximo de 200 diseños de bordado.No es posible transferir diseños de bordado a la máquina si el medio USB contiene datos de más de 200 diseños de bordado. En este caso, reduzca el número de diseños guardados en el medio USB.Además, si los diseños de bordado contienen demasiados colores (este número puede variar en los propios diseños), puede que no sea posible transferir un diseño de bordado a la máquina, aun cuando haya menos de 200 diseños de bordado guardados en el medio USB. También en este caso, reduzca el número de diseños guardados en el medio USB.Guarde los diseños en el directorio raíz del soporte USB. Si los datos de bordado se guardan en una carpeta del soporte USB, esos datos no pueden ser recuperados por la máquina.
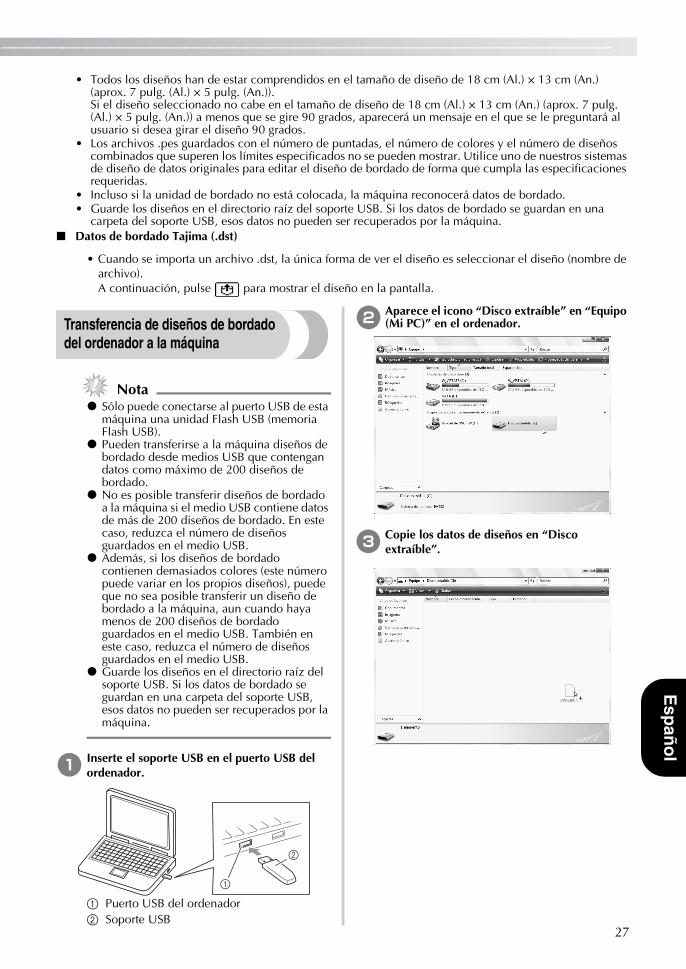
a Inserte el soporte USB en el puerto USB del ordenador.
a Puerto USB del ordenadorb Soporte USB
b Aparece el icono “Disco extraíble” en “Equipo (Mi PC)” en el ordenador.
c Copie los datos de diseños en “Disco extraíble”.

28
— — — — — — — — — — — — — — — — — — — — — — — — — — — — — — — — — — — — — — — — — — — — — — — — — — —
d Extraiga con seguridad el medio USB del puerto USB del ordenador.
a Puerto USB del ordenadorb Soporte USB
PRECAUCIÓN
e Inserte los soportes USB en el puerto USB de la máquina.
a Puerto USB (para una unidad Flash USB (memoria Flash USB))
b Soporte USB
f Pulse .
Se muestran los diseños guardados.
Nota
Si aparece el mensaje , puede
que el medio USB contenga más de 200 diseños de bordado o que los diseños de bordado contengan demasiados colores (si bien puede que no haya más de 200 diseños). En ese caso, extraiga el medio USB de la máquina, vuelva a insertarlo en el ordenador y, a continuación, elimine unos cuantos diseños de bordado a la vez del medio USB. Cierre el mensaje de error en la máquina y vuelva a repetir los procedimientos comenzando desde el paso e.
RecuerdeLos nombres de archivo de diseños aparecen ordenados alfabéticamente.Sólo se muestran los nombres de archivos con la extensión .dst.
● Antes de desconectar el soporte USB, haga clic en el icono “Desconectar o retirar hardware” de la barra de tareas de Windows® 2000 o en el icono “Quitar software con seguridad” de la barra de tareas de Windows® XP/Windows Vista®. A continuación, cuando el disco extraíble pueda extraerse con seguridad, desconecte el soporte USB del ordenador.
Windows® XP
Windows Vista®

29
— — — — — — — — — — — — — — — — — — — — — — — — — — — — — — — — — — — — — — — — — — — — — — — — — —
Esp
año
l
g Seleccione el diseño que desee recuperar.
Cambie de pantalla con (Tecla Página
anterior) y (Tecla Página siguiente).
a Número de la página mostrada actualmente respecto al número total de páginas
• Si se pulsa / , la pantalla de diseños avanza o retrocede en incrementos de 10 diseños.
El diseño seleccionado se muestra con el resalte invertido.
h Pulse .
Se recupera el diseño almacenado.
Aparece la pantalla de bordado y podrá bordar ahora el diseño recuperado.
i Ajuste el diseño como desee y, a continuación, comience a bordar.
Mensajes de error
RecuerdeEn este manual se describen los mensajes de error relativos a la conexión USB. Para más información sobre otros mensajes de error, consulte el manual de instrucciones.
a
Mensaje de error Causa probable
Ha intentando seleccionar un diseño después de desconectar y volver a conectar el soporte USB que contiene el diseño.
Ha intentado recuperar un diseño cuando no había ningún soporte USB conectado.
Se ha intentado recuperar un diseño de una unidad Flash USB (memo-ria Flash USB) que contiene más de 200 diseños de bordado. Además, este mensaje aparecerá si se han guardado en el soporte USB diseños de bordado que contienen muchos colores, aun cuando los datos cor-respondan a 200 diseños como máximo.
Recuperación del patrón
30
— — — — — — — — — — — — — — — — — — — — — — — — — — — — — — — — — — — — — — — — — — — — — — — — — — —
Actualización del software de la máquina utilizando medios USB
Puede utilizar un medio USB y un ordenador para descargar actualizaciones de software para la máquina de coser. Cuando esté disponible un programa de actualización en nuestro sitio Web en “http://solutions.brother.com”, descargue el archivo o archivos siguiendo las instrucciones del sitio Web y los pasos que se indican a continuación.
NotaAl utilizar soportes USB para actualizar el software, compruebe antes de iniciar la actualización que en el soporte USB no haya ningún otro dato que no sea el archivo de actualización.El archivo de actualización puede recuperarse de una unidad Flash USB (memoria Flash USB) de cualquier tamaño.
RecuerdeCuando se actualiza el software de la máquina, se borran las combinaciones guardadas de puntadas decorativas y de caracteres. No obstante, los diseños de bordado guardados no se borran.
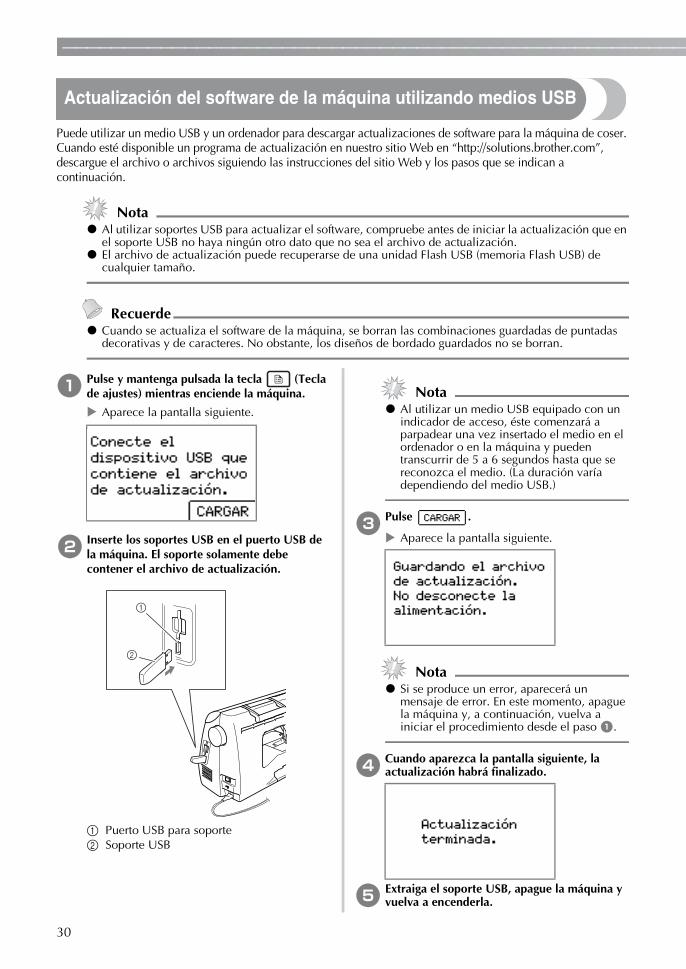
a Pulse y mantenga pulsada la tecla (Tecla de ajustes) mientras enciende la máquina.
Aparece la pantalla siguiente.
b Inserte los soportes USB en el puerto USB de la máquina. El soporte solamente debe contener el archivo de actualización.
a Puerto USB para soporteb Soporte USB
NotaAl utilizar un medio USB equipado con un indicador de acceso, éste comenzará a parpadear una vez insertado el medio en el ordenador o en la máquina y pueden transcurrir de 5 a 6 segundos hasta que se reconozca el medio. (La duración varía dependiendo del medio USB.)
c Pulse .
Aparece la pantalla siguiente.
NotaSi se produce un error, aparecerá un mensaje de error. En este momento, apague la máquina y, a continuación, vuelva a iniciar el procedimiento desde el paso a.
d Cuando aparezca la pantalla siguiente, la actualización habrá finalizado.
e Extraiga el soporte USB, apague la máquina y vuelva a encenderla.
31
— — — — — — — — — — — — — — — — — — — — — — — — — — — — — — — — — — — — — — — — — — — — — — — — — — — —
Руccкий
Введение
В настоящем руководстве приведено описание переноса рисунков вышивания с USB-носителя на вышивальную машину. Подробное описание других функций и операций см. в Руководстве пользователя.
Использование функции памяти
Меры предосторожности при работе с данными вышивания
При использовании данных вышивания, отличных от созданных и сохраненных на этой вышивальной машине, необходимо соблюдать перечисленные ниже меры предосторожности.
ОСТОРОЖНО!
■ Типы разрешенных к использованию данных вышивания• На этой вышивальной машине могут использоваться только файлы данных вышивания с
расширениями PES и DST. Использование данных, отличных от сохраненных с помощью наших программ создания данных или швейных машин, может привести к нарушению нормальной работы вышивальной машины.
■ Типы разрешенных к использованию USB-носителейДанные вышивания могут быть получены с флэш-накопителя USB (флэш-памяти USB) любого объема.
ПримечаниеК USB-порту вышивальной машины можно подключать только флэш-накопитель USB (флэш-память USB).Некоторые USB-носители могут быть несовместимыми с данной машиной. Более подробную информацию см. на нашем веб-сайте.Если используется USB-носитель с индикатором состояния, после подключения носителя к компьютеру или вышивальной машине индикатор состояния начнет мигать; распознавание носителя компьютером или машиной может занять примерно 5–6 секунд. (Необходимое время распознавания различается в зависимости от USB-носителя.)Дополнительную информацию см. в руководстве пользователя, прилагаемом к приобретенному USB-носителю.
НапоминаниеВ именах файлов можно использовать буквы и цифры. Если имя файла содержит не более 8 знаков, оно будет отображаться на экране полностью. Если имя файла содержит более 8 знаков, на экране в качестве имени файла будут отображаться только первые 6 знаков имени со знаком "~" и номером.Это относится только к файлам данных вышивания с расширением .dst.Отображаются только имена файлов .dst.
● Если используются данные вышивания, отличные от наших оригинальных рисунков, при вышивании строчки слишком высокой плотности или трех и более перекрывающихся стежков может произойти обрыв нити или повреждение иглы. В этом случае с помощью одной из наших оригинальных систем создания данных отредактируйте данные вышивания.
32
— — — — — — — — — — — — — — — — — — — — — — — — — — — — — — — — — — — — — — — — — — — — — — — — — — —
■ Меры предосторожности при создании и сохранении данных на компьютере• Если имя файла данных вышивания не удается идентифицировать (например, из-за наличия в
нем специальных символов), файл не отображается. В этом случае измените имя файла. Рекомендуется использовать в именах файлов только 26 букв английского алфавита (прописные и строчные), цифры от 0 до 9, а также знаки "-" и "_".
• Размер всех рисунков не должен превышать размер поля рисунка, т.е. 18 см (В) 13 см (Ш).Если выбранный рисунок помещается в поле рисунка размером 18 см (В) 13 см (Ш) только после поворота на 90°, появится запрос на поворот рисунка на 90°.
• Невозможно отобразить PES-файлы, в которых количество стежков, количество цветов или количество скомбинированных рисунков превышает заданные предельные значения. С помощью одной из наших оригинальных программ создания данных отредактируйте рисунок вышивки таким образом, чтобы он соответствовал требованиям.
• Машина распознает данные вышивания, даже если вышивальный модуль не установлен.• Сохраните рисунки в корневом каталоге USB-носителя. Если данные вышивания сохранены в
одном из подкаталогов USB-носителя, машина не сможет получить эти данные.■ Данные вышивания Tajima (.dst)
• При импорте файла .dst просмотреть рисунок можно только путем выбора рисунка (имени файла). Затем нажмите кнопку для отображения рисунка на экране.
Перенос рисунков вышивания с компьютера на вышивальную машину
ПримечаниеК USB-порту вышивальной машины можно подключать только флэш-накопитель USB (флэш-память USB).Рисунок вышивания можно перенести на вышивальную машину с USB-носителя, только если на USB-носителе записано не более 200 рисунков вышивания.Невозможно перенести рисунки вышивания USB-носителя на машину, если на USB-носителе записано более 200 рисунков вышивания. В этом случае уменьшите число рисунков вышивания, сохраненных на USB-носителе.Кроме того, если рисунок вышивания содержит слишком много цветов (конкретное число цветов может различаться в зависимости от рисунка), перенос рисунка на машину может оказаться невозможным, даже если на USB-носителе записано менее 200 рисунков вышивания. В этом случае также следует уменьшить число рисунков вышивания, сохраненных на USB-носителе.Сохраните рисунки в корневом каталоге USB-носителя. Если данные вышивания сохранены в одном из подкаталогов USB-носителя, машина не сможет получить эти данные.
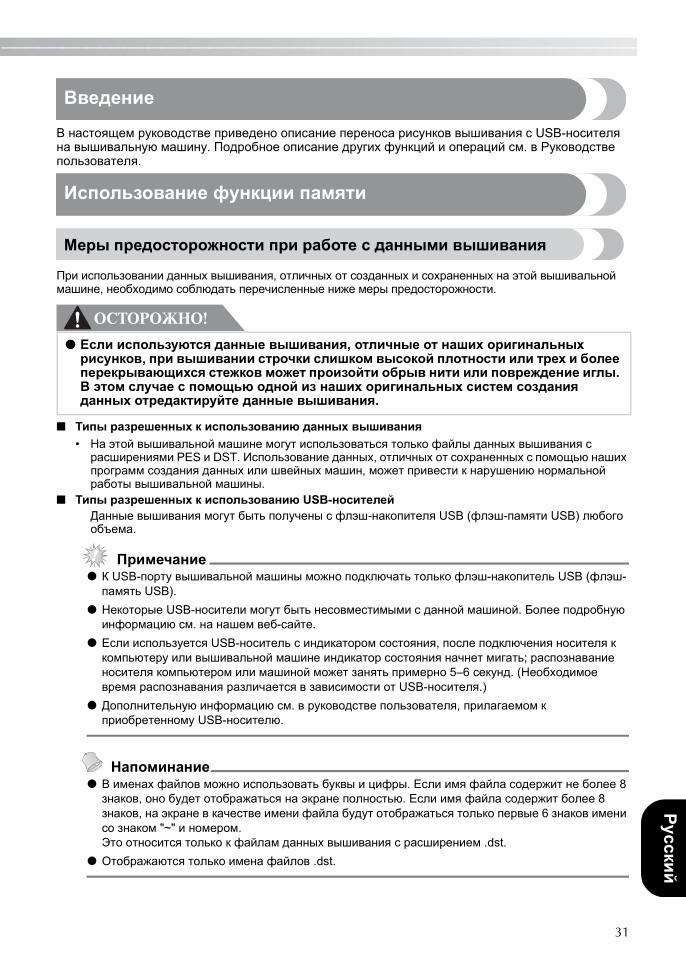
a Вставьте USB-носитель в USB-порт компьютера.
a USB-порт компьютераb USB-носитель
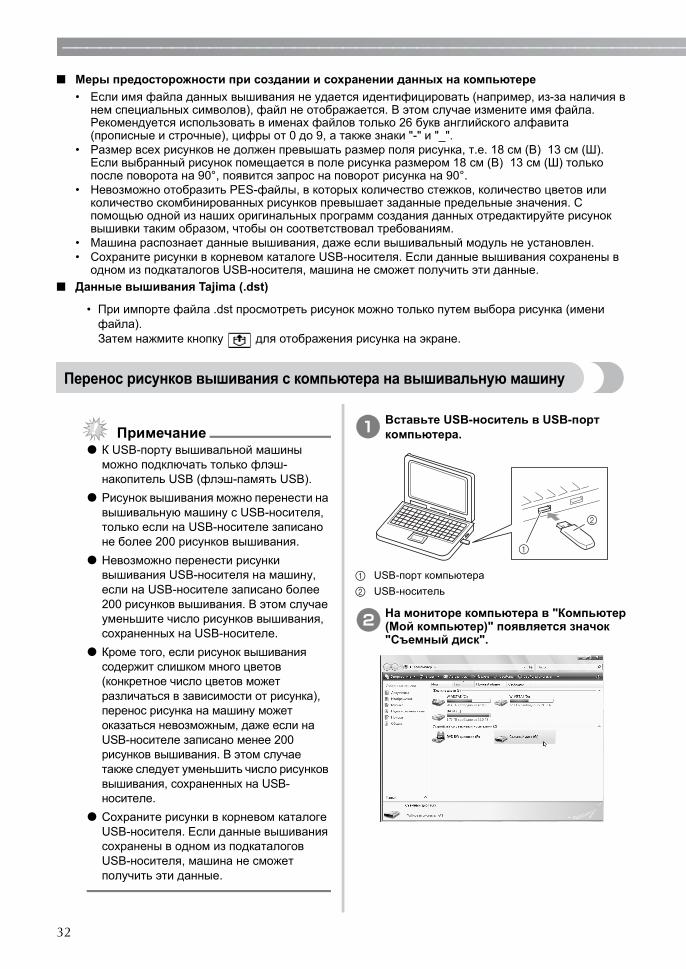
b На мониторе компьютера в "Компьютер (Мой компьютер)" появляется значок "Съемный диск".

33
— — — — — — — — — — — — — — — — — — — — — — — — — — — — — — — — — — — — — — — — — — — — — — — — — — — —
Руccкий
c Скопируйте данные рисунка в папку "Съемный диск".
d Безопасно извлеките USB-носитель из USB-порта компьютера.
a USB-порт компьютераb USB-носитель
ОСТОРОЖНО!
e Вставьте USB-носитель в USB-порт машины.
a USB-порт (для флэш-накопителя USB (флэш-памяти USB))
b USB-носитель
f Нажмите кнопку .
При этом отображаются сохраненные рисунки.
Примечание
Если появится сообщение ,
это значит, что на USB-носителе записано более 200 рисунков вышивания или рисунки вышивания содержат слишком много цветов (хотя общее количество рисунков может быть меньше 200). В этом случае отсоедините USB-носитель от машины, подключите его обратно к компьютеру и удалите несколько рисунков с USB-носителя. Закройте сообщение об ошибке на машине и повторите процедуру, начиная с пункта e.
НапоминаниеИмена файлов рисунков отображаются в алфавитном порядке.Отображаются только имена файлов .dst.
● Перед отключением USB-носителя щелкните значок "Отключение или извлечение оборудования" на панели задач Windows® 2000 или значок "Безопасное извлечение оборудования" на панели задач Windows® XP/Windows Vista®.Когда съемный диск может быть безопасно извлечен, отсоедините USB-носитель от компьютера.
Windows® XP
Windows Vista®

34
— — — — — — — — — — — — — — — — — — — — — — — — — — — — — — — — — — — — — — — — — — — — — — — — — — —
g Выберите нужный рисунок.Экраны переключаются с помощью кнопки
(Переход на предыдущую страницу) и (Переход на следующую страницу).
a Номер отображаемой в текущий момент страницы и общее число страниц.
•При нажатии кнопки или на экране отображается рисунок, находящийся на 10 рисунков ранее или позже текущего рисунка.
Выбранный рисунок отображается в инвертированном виде.
h Нажмите кнопку .
Сохраненный рисунок получен.
Появляется экран вышивания, и теперь можно выполнить вышивание по полученному рисунку.
i При необходимости настройте рисунок и приступайте к вышиванию.
Сообщения об ошибках
НапоминаниеВ настоящем руководстве описаны сообщения об ошибках, относящиеся к подключению USB. Подробное описание других сообщений об ошибках см. в Руководстве пользователя.
a
Сообщение об ошибке Возможная причина
Вы попытались выбрать рисунок, после того как USB-носитель с записанным на нем рисунком был отсоединен и затем снова подключен.
Вы попытались выбрать рисунок, когда USB-носитель не подключен.
Попытка получения рисунка с флэш-накопителя USB (флэш-памяти USB), на котором записано более 200 рисунков вышивания.Это же сообщение об ошибке появляется, если на USB-носителе сохранены рисунки с большим количеством цветов, даже если их общее число не превышает 200.
Получение рисунка
35
— — — — — — — — — — — — — — — — — — — — — — — — — — — — — — — — — — — — — — — — — — — — — — — — — — — —
Руccкий
Обновление программного обеспечения вышивальной машины с помощью USB-носителя
Загружать обновления программного обеспечения для вышивальной машины можно на USB-носитель или на компьютер. Если на нашем веб-сайте "http://solutions.brother.com" имеется программа обновления, загрузите файл(ы), выполнив инструкции, приведенные на веб-сайте и в описании ниже.
ПримечаниеПри использовании USB-носителя для обновления программного обеспечения перед запуском обновления убедитесь, что на используемом USB-носителе не сохранено никаких данных, кроме файла обновления.Файл обновления может быть получен с флэш-накопителя USB (флэш-памяти USB) любого объема.
НапоминаниеПри обновлении программного обеспечения машины сохраненные комбинации символьных и декоративных строчек стираются. Но сохраненные рисунки вышивания не стираются.
a Нажмите и удерживайте клавишу (Настройка) во время включения машины.
Появится следующий экран.
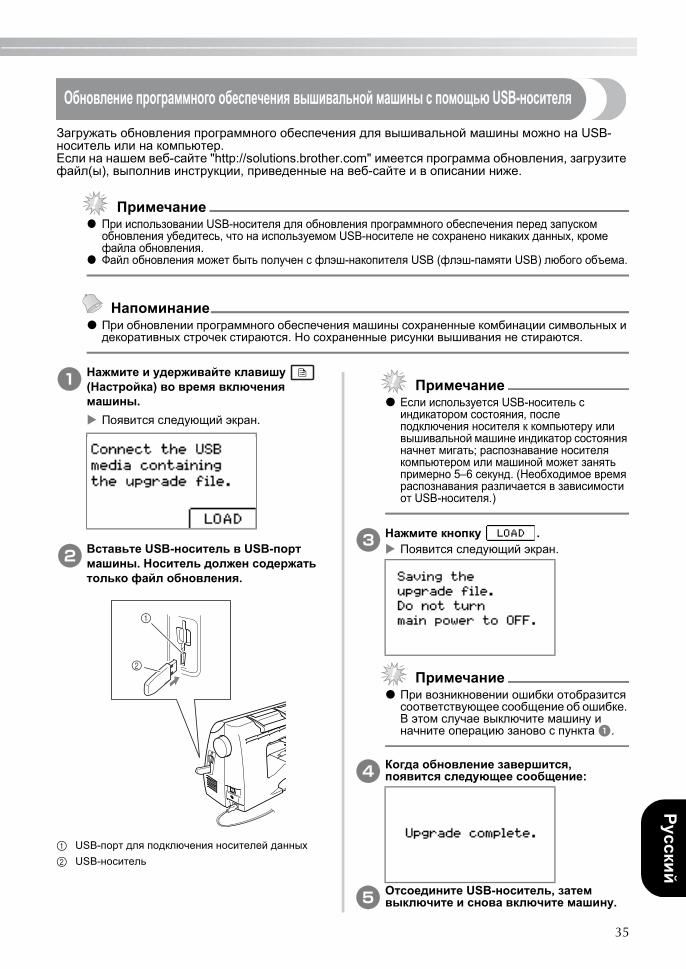
b Вставьте USB-носитель в USB-порт машины. Носитель должен содержать только файл обновления.
a USB-порт для подключения носителей данныхb USB-носитель
ПримечаниеЕсли используется USB-носитель с индикатором состояния, после подключения носителя к компьютеру или вышивальной машине индикатор состояния начнет мигать; распознавание носителя компьютером или машиной может занять примерно 5–6 секунд. (Необходимое время распознавания различается в зависимости от USB-носителя.)
c Нажмите кнопку .Появится следующий экран.
ПримечаниеПри возникновении ошибки отобразится соответствующее сообщение об ошибке. В этом случае выключите машину и начните операцию заново с пункта a.
d Когда обновление завершится, появится следующее сообщение:
e Отсоедините USB-носитель, затем выключите и снова включите машину.


Руководство пользователя