Embed Size (px)
Citation preview

The Rio de Janeiro State University - UERJ Laboratory of Photogrammetry and Remote SensingThe E-Foto projectThe Generation of a Digital Ortho-imageAuthors: Patricia Farias Reolon and Lia de Souza e Simões FigueiredoRevision: Jorge Luís Nunes e Silva Brito
Introduction
An ortho-image is an image in an orthogonal perspective, when the
projective rays are parallel and the viewpoint is at the infinite. More details about
this subject can be found in the technical literature about ortho-rectification and
ortho-image generation.
The e-foto software uses the method of differential rectification for
generating an ortho-image. Such a method requires a DSM model, from which it
is possible to generate its corresponding ortho-image. The differential
rectification algorithm starts from the ground-space domain back into the image-
space, what is so named a “bottom-up projection approach”. This bottom-up
procedure starts from each center of a grid cell interpolated from a DSM, which
ground coordinates are known, and projects it back into the image-space, by
means of the collinearity equations. Therefore both interior and exterior
orientation parameters of each image, along with the DSM, are a pre-
requirement for the generation of an ortho-image or an orthomosaic.
The Ortho-rectification Process
After making the Interior Orientation, the Exterior Orientation (by spatial
resection or by phototriangulation), the automatic extraction of a DSM and the
interpolation of a grid file, we can now run the Ortho-rectification. If the process
was done in different steps, just upload the previously saved files. Then, on the
main screen of the e-foto, in the menu Execute, select Ortho-rectification or
press the CTRL+R simultaneously.
Jun 29th, 2016 Page 1 of 8

The Rio de Janeiro State University - UERJ Laboratory of Photogrammetry and Remote SensingThe E-Foto projectThe Generation of a Digital Ortho-imageAuthors: Patricia Farias Reolon and Lia de Souza e Simões FigueiredoRevision: Jorge Luís Nunes e Silva Brito
To run the Ortho-rectification, we must locate the previously saved DSM
file (extraction and interpolation), with the extension *.dsm. The ortho-image
resolution will be automatically filled on the Ortho-image resolution field, as
saved during the process of the DSM execution. In the Ortho Image File
Format you can choose in which format you want to generate your ortho-image
(E-FOTO ortho-image or GeoTIFF). To start the process, click on the button
(Run Ortho-rectification). This can be seen in Figure 1.
Figure 1 – The ortho-rectification screen
After running the Ortho-rectification it will open a window displaying the
superimposed images, as shown in figure 2.
Jun 29th, 2016 Page 2 of 8

The Rio de Janeiro State University - UERJ Laboratory of Photogrammetry and Remote SensingThe E-Foto projectThe Generation of a Digital Ortho-imageAuthors: Patricia Farias Reolon and Lia de Souza e Simões FigueiredoRevision: Jorge Luís Nunes e Silva Brito
Figure 2 – Result of ortho-rectification displaying the resulting orthomosaic
After the orthorectification you can evaluate the quality of the ortho-image
using the Ortho-Image Quality Tool, to do that you can click on the
button. In Figure 3 we can see the window of the Ortho Image Quality Control
Tool.
Jun 29th, 2016 Page 3 of 8

The Rio de Janeiro State University - UERJ Laboratory of Photogrammetry and Remote SensingThe E-Foto projectThe Generation of a Digital Ortho-imageAuthors: Patricia Farias Reolon and Lia de Souza e Simões FigueiredoRevision: Jorge Luís Nunes e Silva Brito
Figure 3 – The Ortho-Image Quality Control Tool
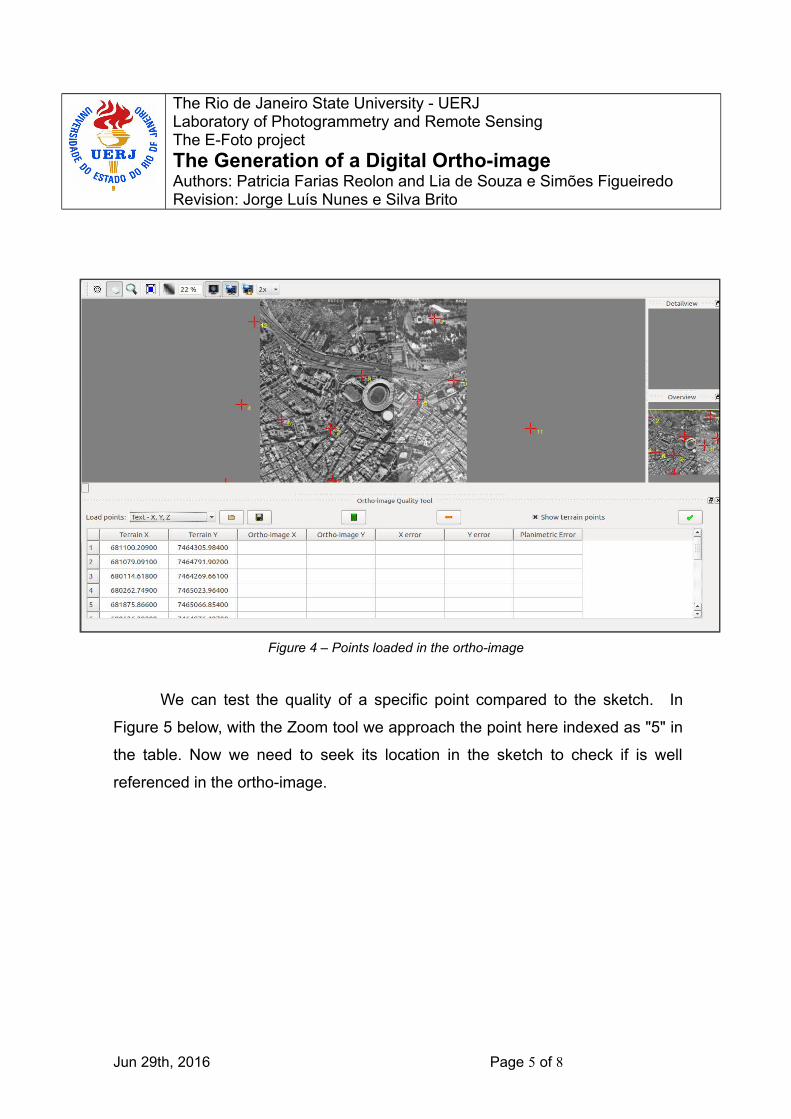
Now, we will load a file with a certain amount of reference points to be
measured and compared with the ortho-image. In Figure 4 we can see 12 points
plotted in the ortho-image to compare with their original location.
Jun 29th, 2016 Page 4 of 8
The Rio de Janeiro State University - UERJ Laboratory of Photogrammetry and Remote SensingThe E-Foto projectThe Generation of a Digital Ortho-imageAuthors: Patricia Farias Reolon and Lia de Souza e Simões FigueiredoRevision: Jorge Luís Nunes e Silva Brito
Figure 4 – Points loaded in the ortho-image
We can test the quality of a specific point compared to the sketch. In
Figure 5 below, with the Zoom tool we approach the point here indexed as "5" in
the table. Now we need to seek its location in the sketch to check if is well
referenced in the ortho-image.
Jun 29th, 2016 Page 5 of 8

The Rio de Janeiro State University - UERJ Laboratory of Photogrammetry and Remote SensingThe E-Foto projectThe Generation of a Digital Ortho-imageAuthors: Patricia Farias Reolon and Lia de Souza e Simões FigueiredoRevision: Jorge Luís Nunes e Silva Brito
Figure 5– Zoom in to Reference point 5 to checking the ortho-image positional quality
Now we will compare the location in the image with the actual location of
the point on the ground. To do that we should zoom in to the point and click in
the button and them in the correct position of the point in the Ortho-rectified
image. In the table which is depicted in the bottom of the ortho quality checking
will appear the X and Y coordinates in the image and its corresponding
coordinates in the ground reference coordinate system. (Figure 6).
Jun 29th, 2016 Page 6 of 8

The Rio de Janeiro State University - UERJ Laboratory of Photogrammetry and Remote SensingThe E-Foto projectThe Generation of a Digital Ortho-imageAuthors: Patricia Farias Reolon and Lia de Souza e Simões FigueiredoRevision: Jorge Luís Nunes e Silva Brito
Figure 6 – Ground Coordinates of Quality checking point 5 taken from the ortho-image and
directly measured in the terrain
When you finish the measurements of all the points you want, you can
delete the remaining points by selecting the point to be eliminated and then
clicking in . To proceed with the calculation of the errors, click on the
button. In Figure 7 you can see the measured point, the errors and the
deviations.
Jun 29th, 2016 Page 7 of 8

The Rio de Janeiro State University - UERJ Laboratory of Photogrammetry and Remote SensingThe E-Foto projectThe Generation of a Digital Ortho-imageAuthors: Patricia Farias Reolon and Lia de Souza e Simões FigueiredoRevision: Jorge Luís Nunes e Silva Brito
Figure 7 – Errors in Ortho-image quality checking, their statistics, highlighting the planimetric
error calculated for point 5
Any contribution for correcting and improving this tutorial is very
welcome. Please send your comments and/or suggestions to the e-foto
team at http://www.efoto.eng.uerj.br/forum
<END OF TUTORIAL>
Jun 29th, 2016 Page 8 of 8


![State of PythonBrasil[7]](https://img.document.onl/doc/110x75/5590b6411a28ab1c5f8b464b/state-of-pythonbrasil7.jpg)