Embed Size (px)
Citation preview

macroOpera t ing Manua l · 19Manua l de operação · 3


Po
rtu
gu
ês
Índice
3
Página
Instruções de Segurança 4
Funções e Limitações de Uso 5
Elementos de Operação 6
Pipetagem 7
Limpeza · Autoclavação 10
Substituição do Filtro e Limpeza do Adaptador 10
Substituição do Sistema de Válvulas 12
Teste de Vazamento 13
Informações para pedido · Peças de Reposição 14
Resolução de Problemas 15
Reparo 16
Endereços de contato 17
Informações de Garantia 18

Eventualmente, este instrumento pode ser utilizado com materiais, ope-rações e equipamentos perigosos. Está além do escopo deste manual abordar todos os riscos de segurança potenciais associados com seu uso nestas aplicações. É responsabilidade do usuário da pipeta consultar e estabelecer práticas de segurança e saúde, além de determinar a aplicabi-lidade de limitações legais antes da utilização.
Instruções de Segurança
1. Todos os usuários devem ler e entender este manual de operação antes de utilizar o instrumento.
2. Siga as instruções gerais para prevenção de acidentes e instruções de segurança; ex. Usar roupas protetoras, óculos de proteção e luvas.
3. Observe as informações do fabricante dos reagentes utilizados.
4. Utilize o instrumento somente para pipetar líquidos, respeitando rigorosamente as limitações de uso. Observe as operações não reco-mendadas (veja pág. 5). Em caso de dúvida, contate o fabricante ou fornecedor.
5. Sempre utilize o instrumento de forma que nem o usuário e nem outras pessoas estejam em risco. Evite respingos e derramamentos. Utilize somente recipientes apropriados.
6. Nunca use força no instrumento.
7. Somente use peças de reposição originais. Não tente realizar nenhu-ma alteração técnica. Não desmonte o instrumento além do descrito no manual de operações!
8. Antes do uso, verifique o instrumento quanto a defeitos visíveis. Em caso de sinais de problemas potenciais interrompa imediatamente a pipetagem. Consulte a seção “Resolução de Problemas” neste ma-nual, e contate o fabricante, caso necessário.
Por favor leia com atenção as informações a seguir!!
4

Po
rtu
gu
ês
5
Funções e Limitações de Uso
Operações não recomendadas
Armazene o instrumento e acessórios somente sob boas condições de limpeza em lugares secos e frescos.Temperatura de armazenagem: -20 °C to +50 °C (-4 °F to +122 °F).
Condições de armazenagem
Nunca utilize o instrumento com líquidos cujos vapores ataquem os materiais silicone e PP.
O instrumento não foi desenvolvido para uso com pipetas de Pasteur.
O instrumento é indicado para pipetar líquidos observando as seguintes limitações físicas:
– de +10 °C a 40 °C (de 50 °F a 104 °F) (instrumento e reagente).
– Pressão de vapor até 500 mbar. Aspirar lentamente acima de 300 mbar, para evitar ebulição do líquido.
– Densidade até 2.4 g/cm3.
Limitações de Uso
O instrumento foi projetado para auxiliar a aspiração e dispensação em pipetas graduadas e volumétricas de vidro ou plástico na faixa de volume de 0.1ml a 200ml com um tubo de sucção de diâmetro externo < 9,2mm para medição de líquidos. Se o instrumento for utilizado corretamente, o líquido pipetado somente entra em contato com a pipeta.

Operação e Elementos de Controle
PP: Polipropileno
PTFE: Politetrafluoretileno
SI: Borracha de silicone
6
Comando depipetagem
Pera de sucção (SI)
Filtro membrana(PP/PTFE)
Adaptador (SI)
Suporte do adaptador (PP)
Anel de trava (PP)
Botão de sopro (SI)
Carcaça (PP)
Sistema de válvulas(PP, SI, PTFE)
Carcaça (PP)

1
2
3P
ort
ug
uês
7
Pipetagem
3. Encha a pipeta
Mergulhe a ponta da pipeta no líquido. Pres-sione o comando de pipetagem lentamente para cima. Encha a pipeta de modo que o nível de líquido fique ligeiramente acima da marca requerida.
Por favor tenha cuidado para que o líquido não entre no instrumento. Isto prejudicaria a função do filtro e reduziria a capacidade de sucção. Se o líquido entrar no instrumento, substitua o filtro (veja pág. 10 - 11).
Atenção!
1. Comprima a pera de sucção
Antes de conectar a pipeta, aperte a pera de sucção.
2. Conecte a pipeta
Segure a pipeta o mais próximo possível da abertura (extremidade) superior, e cuidado-samente insira no adaptador até que esteja firmemente presa.
Após prender a pipeta com segurança, sem-pre segure o instrumento na posição vertical, com a ponta para baixo.
Certifique-se do firme encaixe da pipeta no adaptador. Nuca use força. Pipetas estrei-tas estão sujeitas a quebra. Evite o risco de acidentes!
Atenção!
8
Pipetagem
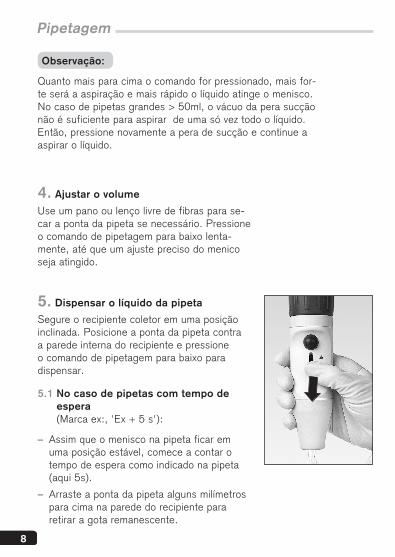
Quanto mais para cima o comando for pressionado, mais for-te será a aspiração e mais rápido o líquido atinge o menisco.No caso de pipetas grandes > 50ml, o vácuo da pera sucção não é suficiente para aspirar de uma só vez todo o líquido. Então, pressione novamente a pera de sucção e continue a aspirar o líquido.
Observação:
4. Ajustar o volume
Use um pano ou lenço livre de fibras para se-car a ponta da pipeta se necessário. Pressione o comando de pipetagem para baixo lenta-mente, até que um ajuste preciso do menico seja atingido.
5. Dispensar o líquido da pipeta
Segure o recipiente coletor em uma posição inclinada. Posicione a ponta da pipeta contra a parede interna do recipiente e pressione o comando de pipetagem para baixo para dispensar.
5.1 No caso de pipetas com tempo de espera
(Marca ex:, 'Ex + 5 s'):
– Assim que o menisco na pipeta ficar em uma posição estável, comece a contar o tempo de espera como indicado na pipeta (aqui 5s).
– Arraste a ponta da pipeta alguns milímetros para cima na parede do recipiente para retirar a gota remanescente.
Po
rtu
gu
ês
9
Pipetagem
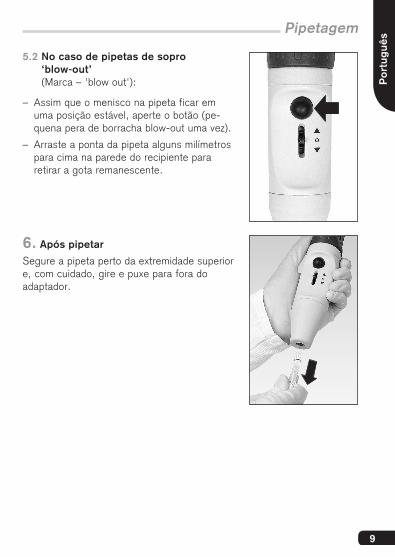
5.2 No caso de pipetas de sopro ‘blow-out’ (Marca – 'blow out'):
– Assim que o menisco na pipeta ficar em uma posição estável, aperte o botão (pe-quena pera de borracha blow-out uma vez).
– Arraste a ponta da pipeta alguns milímetros para cima na parede do recipiente para retirar a gota remanescente.
6. Após pipetar
Segure a pipeta perto da extremidade superior e, com cuidado, gire e puxe para fora do adaptador.

2
5
10
1. Retire a pipeta.
2. Desrosqueie o suporte do adaptador.
3. Remova o filtro membrana.
4. Remova o adaptador do suporte do adap-tador puxando para cima.
5. Para limpar o adaptador, rinse com cuidado utilizando um solvente compatível (ex. água) em um frasco lavador. Retire o líquido e deixe secar completamente.
Limpeza · Autoclavação
Somente necessário se aspirar além do limite da pipeta ou se a capacidade de sucção estiver prejuducada.
Substituição do Filtro e Limpeza do Adaptador
Use luvas e óculos de proteção.Evite o risco de contaminação!
Atenção!
Quando utilizado corretamente, o instrumento não necessita de manuten-ção. Antes de autoclavar, o instrumento deve ser limpo cuidadosamente. Limpe a carcaça com um lenço úmido . O instrumento é autoclavável a 121 °C (250 °F), 2 bar absoluto (30 psi) com um tempo de espera de no mínimo 15 minutos de acordo com a DIN EN 285.

8
6
Po
rtu
gu
ês
11
8. O instrumento inteiro é autoclavável a 121 °C (250 °F), 2 bar, de acordo com a DIN EN 285. Para autoclavar, remova a pera de sucção.
6. Monte um novo filtro membrana com a abertura mais larga para baixo no adapta-dor (com o lado cônico menor para cima).
Nem todo filtro membrana é adequado. Utilize somente acessórios recomendados pelo fabricante. Filtros de tamanho de poro 3 μm são o padrão para o instrumento. O filtro membrana é autoclavável por até 5 vezes a 121 °C . É responsabilidade do usuário garantir a efetividade da autoclavação.
Observação:
Limpeza · Autoclavação
7. Rosqueie o adaptador do suporte firme-mente.

1
2
12
Limpeza · Autoclavação
Substituição do Sistema de Válvulas
1. Desrosqueie a pera de sucção e o supor-te do adaptador.
2. Retire a parte superior da carcaça. Puxe com cuidado o sistema de valvulas e substitua-o.
3. Monte o equipamento na ordem reversa e proceda um teste de vazamento.
Po
rtu
gu
ês
13
Limpeza · Autoclavação
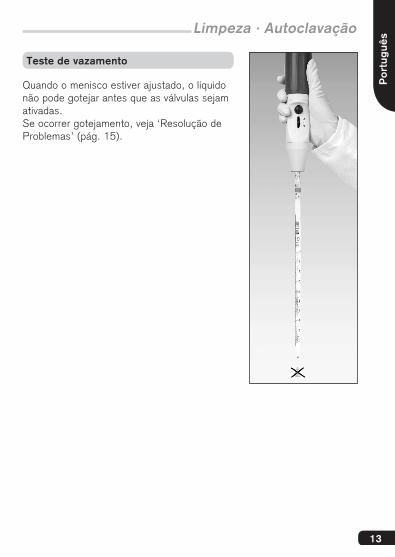
Quando o menisco estiver ajustado, o líquido não pode gotejar antes que as válvulas sejam ativadas.Se ocorrer gotejamento, veja ‘Resolução de Problemas’ (pág. 15).
Teste de vazamento

14
Informações para Pedido · Peças de Reposição
Filtro membrana de substi-tuição,3 μm, não estéril, 1 und em blister
Ref. 260 52
Filtro membrana de substi-tuição,3 μm, não estéril, 10 und embalagem de PE.
Ref. 260 56
Adaptador de silicone, comprimento 44 mm
Ref. 261 46
Sistema de válvulas
Ref. 261 28
Macro controlador de pipetagem, Com filtro membrana 3 μm sobressalente e manual de operações
* As cores se referem as cores no suporte adaptador do instrumento e no anel de trava.
Cor* Ref.
Cinza 262 00
Verde 262 01
Azul 262 02
Magenta 262 03
Suporte adaptador, PP, comprimento 49 mm
Cor Ref.
Cinza 262 20
Verde 262 23
Azul 262 21
Magenta 262 22
Pera de sucção com anel de trava
Cor Ref.
Cinza 262 25
Verde 262 28
Azul 262 26
Magenta 262 27

Po
rtu
gu
ês
15
Resolução de problemas
Problema Possível causa Ação a ser tomada
Capacidade de suc-ção prejudicada
Filtro sujo ou sistema de válvulas danificado
Substitua o filtro, veja pág. 10-11
Pipeta goteja Filtro conectado incor-retamente ou sistema de válvulas danificado
Insira o filtro corretamen-te ou substitua o sistema de válvulas, veja pág. 12
Pipeta não encaixa com firmeza
Adaptador de silicone danificado
Desrosqueie o suporte adaptador do instrumen-to. Substitua o adaptador de silicone
Pera de sucção enche de ar auto-maticamente após compressão
Pera de sucção ou sistema de válvulas danificados
Substitua o anel de trava com a pera de sucção ou o sistema de válvulas
Frequentemente o controle visual do equipamento é suficiente para descobrir uma peça com problema que pode ser facilmente substituida por outra. A vantagem do reparo “faça você mesmo” é óbvia: Economiza tempo e dinheiro.
Observação:

16
Reparos
– Limpe e descontamine o instrumento com cuidado.
– É muito importante sempre incluir uma descrição exata do tipo de problema e dos meios utilizados. Se a informação sobre os meios estiver faltando, o instrumento não pode ser reparado.
– transporte de retorno é por conta e risco do cliente.
Fora dos EUA e Canada:
– Preencha a “Declaração de Ausência de Riscos para a Saúde” e envie o instrumento para o fabricante ou fornecedor. Solicite o modelo ao seu fornecedor ou fabricante. O modelo também se encontra na página www.brand.de para download.
Retorno para reparo
Importante! Transporte de produtos perigosos sem permissão é violação de lei federal.
Nos EUA e Canada:
– Contate a Brand Tech Scientific, Inc. e obtenha a autorização para retorno antes de enviar o instrumento para serviço.
– Retorne somente instrumentos limpos e descontaminados, com o Número de Autorização para Retorno permanentemente visível do lado de fora da embalagem, para o endereço fornecido juntamente com o Número de Autorização para Retorno.

Po
rtu
gu
ês
17
Endereços de contato
BRAND GMBH + CO KGOtto-Schott-Straße 2597877 Wertheim (Germany)
Tel.: +49 9342 808-0Fax: +49 9342 808-98000E-Mail: [email protected]
EUA e Canadá:BrandTech® Scientific, Inc.11 Bokum RoadEssex, CT 06426-1506 (USA)
Tel.: +1-860-767 2562Fax: +1-860-767 2563www.brandtech.com
India:BRAND Scientific Equipment Pvt. Ltd. 303, 3rd Floor, ‘C‘ Wing, DelphiHiranandani Business Park, PowaiMumbai - 400 076 (India)
Tel.: +91 22 42957790 Fax: +91 22 42957791 E-Mail: [email protected] www.brand.co.in
China:BRAND (Shanghai) Trading Co., Ltd. Guangqi Culture Plaza Room 506, Building B No. 2899, Xietu Road Shanghai 200030 (P.R. China)
Tel.: +86 21 6422 2318Fax: +86 21 6422 2268 E-Mail: [email protected]

18
Garantia
Sujeito à modificações técnicas sem aviso prévio. Salvo erro ou omissão.
Não nos responsabilizamos por consequências causadas pelo uso impró-prio, uso, manutenção, operação e reparos não autorizados do instru-mento ou consequências do desgaste normal, especialmente de peças suscetíveis a desgaste como pistões, selos, válvulas e quebra de vidro, assim como do descumprimento das instruções contidas neste manual. Não nos responsabilizamos por danos resultantes de qualquer ação não descritas no manual de operações ou se peças não originais tenham sido utilizadas.
EUA e Canadá.Para informações sobre garantia, por favor veja www.brandtech.com.

Eng
lish
Table of Contents
Page
Safety Instructions 20
Function and Limitations of Use 21
Operating Elements 22
Pipetting 23
Cleaning · Autoclaving 26
Replacing the Filter and Cleaning the Adapter 26
Replacing the Valve System 28
Leak Test 29
Ordering Data · Spare Parts 30
Troubleshooting 31
Repairs 32
Contact addresses 33
Warranty Information 34
19

This instrument may sometimes be used with hazardous materials, opera-tions, and equipment. It is beyond the scope of this manual to address all of the potential safety risks associated with its use in such applications. It is the responsibility of the user of this instrument to consult and establish appropriate safety and health practices and determine the applicability of regulatory limitations prior to use.
Safety Instructions
1. Every user must read and understand this operating manual before operation.
2. Follow general instructions for hazard prevention and safety instruc-tions; e.g., wear protective clothing, eye protection and gloves.
3. Observe all specifications provided by reagent manufacturers.
4. Use the instrument only for pipetting liquids, with strict regard to the defined limitations of use. Observe operating exclusions (s. page 21)! If in doubt, contact the manufacturer or supplier.
5. Always use the instrument in such a way that neither the user nor any other person is endangered. Avoid splashes. Only use suitable vessels.
6. Never use force on the instrument!
7. Use only original manufacturer's accessories and spare parts. Do not attempt to make any technical alterations. Do not dismantle the instru-ment any further than is described in the operating manual!
8. Always check the instrument for visible damage before use. If there is a sign of a potential malfunction, immediately stop pipetting. Consult the 'Troubleshooting' section of this manual (see page 31), and con-tact the manufacturer if needed.
Please read the following carefully!!
20

Eng
lish
21
Function and Limitations of Use
Operating Exclusions
Store the instrument and accessories only in cleaned condition in a cool and dry place. Storage temperature: -20 °C to +50 °C (-4 °F to +122 °F).
Storage Conditions
Never use the instrument with liquids whose vapors attack the materials silicone or PP.
The instrument is not designed for Pasteur pipettes.
The instrument is designed for pipetting liquids, observing the following physical limits:
– from +10 °C to +40 °C (from 50 °F to 104 °F) (instrument and reagent)
– Vapor pressure up to max. 500 mbar. Aspirate slowly above 300 mbar, in order to prevent the liquid from boiling.
– Density up to 2.4 g/cm3
Limitations of Use
The instrument is designed to assist the filling and dispensing of gradu-ated and volumetric pipettes of glass or plastic in the volume range of 0.1 ml to 200 ml with a suction tube outer diameter < 9.2 mm for measuring liquids. If the instrument is used correctly, the pipetted liquid will only contact the pipette.

Operating Elements
PP: Polypropylene
PTFE: Polytetrafluorethylene
SI: Silicone rubber
22
pipetting lever
suction bellows (SI)
membrane filter(PP/PTFE)
adapter (SI)
adapter support (PP)
locking ring (PP)
blow out bellows (SI)
housing (PP)
valve system (PP, SI, PTFE)
housing (PP)

1
2
3E
nglis
h
23
Pipetting
3. Fill the pipette
Immerse the pipette tip into the liquid.Press the pipetting lever slowly upwards. Fill the pipette so that the level of liquid is slightly above the required mark.
Please take care that no liquid enters into the instrument. This would impair the filtering function and reduce the suction capacity. If liquid does enter the instrument, exchange the filter (see pages 26 - 27).
Attention!
1. Compress the suction bellows
Before attaching the pipette, squeeze the suction bellows.
2. Attach the pipette
Hold the pipette as near to its upper end as possible, and carefully insert it into the adapter until it fits tightly.
Once the pipette has been securely attached, always hold the instrument in a vertical posi-tion, tip down.
Be sure that the pipette fits tightly into the adapter. Never use force. Thin pipets are particularly liable to break. Avoid the risk of injury!
Warning!

24
Pipetting
The further up the lever is pressed, the stronger the suction becomes and the quicker the meniscus rises.In the case of large pipettes > 50 ml the vacuum contained in the suction bellows is not sufficient to draw in all the liquid at once. Therefore, squeeze the suction bellows again and continue drawing up liquid.
Note:
4. Adjust the volume
Use suitable lint-free tissue to wipe the pipette tip, if necessary. Press the pipetting lever down slowly, until precise adjustment of the meniscus has been achieved.
5. Dispense the pipette
Hold the collecting vessel in an inclined posi-tion. Place the pipette tip against the inner vessel wall and press the pipetting lever down to dispense.
5.1 In the case of pipettes with a waiting time
(Imprint e.g., 'Ex + 5 s'):
– As soon as the meniscus in the pipette comes to a standstill, start waiting time as is indicated on the pipette (here: 5 s).
– Wipe the pipette tip a few millimeters upward along the wall of the vessel.

Eng
lish
25
Pipetting
5.2 In the case of blow-out pipettes (Imprint 'ausblasen – blow out'):
– As soon as the meniscus in the pipette tip comes to a standstill, press the small blow-out bellows once.
– Wipe the pipette tip a few millimeters upward along the wall of the vessel.
6. After pipetting
Hold the pipette as its extreme upper end, and gently twist and pull it out of the adapter.

2
5
26
1. Pull out the pipette.
2. Unscrew the adapter support.
3. Pull out the membrane filter.
4. Remove the adapter from the adapter support by pushing it upwards.
5. To clean adapter, carefully rinse it by using an appropriate compatible solvent (e.g., water) in a wash bottle. Blow out the liquid and allow to dry completely.
Cleaning · Autoclaving
Only necessary if a pipette has been overfilled or the suction capacity is impaired.
Replacing the Filter and Cleaning the Adapter
Wear protective gloves and eye protection. Avoid the risk of contamination!
Warning!
When properly used, the instrument is maintenance-free. Before auto-claving, the instrument must be cleaned carefully. Wipe the housing with a damp cloth. The instrument is autoclavable at 121 °C (250 °F), 2 bar absolute (30 psi) with a holding time of at least 15 minutes according to DIN EN 285.

8
6
Eng
lish
27
8. The entire instrument incl. membrane filter is autoclavable at 121 °C (2 bar) according to DIN EN 285.
For autoclaving remove suction bellow.
6. Place the new membrane filter with the thicker end facing downwards into the adapter (with the smaller conical side up).
Not every membrane filter is suitable. Only use genuine manufacturer’s recommended accessories. Filters of a pore size of 3 µm are a standard equipment of the instrument. The membrane filter is autoclavable up to 5 times at 121 °C. It is the user's responsibility to ensure effective autoclaving.
Note:
Cleaning · Autoclaving
7. Screw in the adapter support hand tight.
1
2
28
Cleaning · Autoclaving
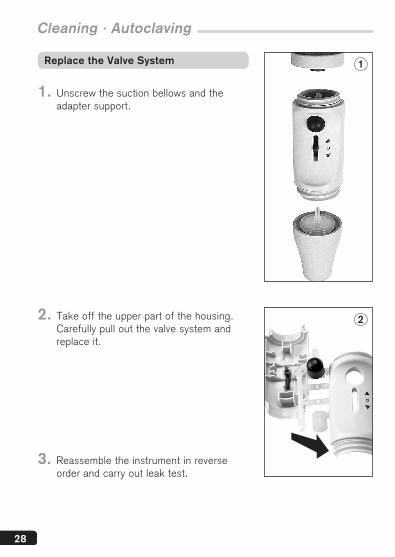
Replace the Valve System
1. Unscrew the suction bellows and the adapter support.
2. Take off the upper part of the housing. Carefully pull out the valve system and replace it.
3. Reassemble the instrument in reverse order and carry out leak test.

Eng
lish
29
Cleaning · Autoclaving
When the meniscus has been set, liquid should not drip out of the pipette until the valves are activated. Should the pipette drip, see chapter 'Troubleshooting' (see page 31).
Leak Test

30
Ordering Data · Spare Parts
Spare membrane filter 3 µm, non-sterile, 1 pc. in blister pack
Cat. No. 260 52
Spare membrane filter 3 µm, non-sterile, 10 pcs., in PE-bag
Cat. No. 260 56
Silicone adapter, length 44 mm
Cat. No. 261 46
Valve system
Cat. No. 261 28
macro pipette controller, with spare membrane filter 3 µm and operating manual.
* Colors refer to accent colors on instrument adapter support and locking ring.
Color* Cat. No.
grey 262 00
green 262 01
blue 262 02
magenta 262 03
Adapter support, PP, length 49 mm
Color Cat. No.
grey 262 20
green 262 23
blue 262 21
magenta 262 22
Suction bellows with locking ring,
Color Cat. No.
grey 262 25
green 262 28
blue 262 26
magenta 262 27

Eng
lish
31
Troubleshooting
Trouble Possible Cause Action to be taken
Suction capacity impaired
Filter dirty or valve system damaged
Replace filter,see pages 26-27
Pipette drips Filter not properly posi-tioned or valve system damaged
Insert filter properly or replace valve system, see page 28
Pipette not held properly
Silicone adapter damaged
Unscrew the adapter support of the instru-ment, replace silicone adapter
Compressed suction bellows take in air automatically
Suction bellows or valve system damaged
Replace the looking ring with the suction bellows or the valve system
Often visual control of the instrument is sufficient to discover a faulty device which can easily be replaced by a spare part. The advantages of do-it-yourself repair are obvious: It saves time and money.
Note:

32
Repairs
– Clean and decontaminate the instrument carefully.
– It is essential always to include an exact description of the type of malfunction and the media used. If information regarding media used is missing, the instrument cannot be repaired.
– Shipment is at the risk and the cost of the sender.
Outside the U.S. and Canada:
– Complete the “Declaration on Absence of Health Hazards” and send the instrument to the manufacturer or supplier. Ask your supplier or manufac-turer for the form. The form can also be downloaded from www.brand.de.
Return for repair
Important! Transporting of hazardous materials without a permit is a violation of federal law.
In the U.S. and Canada:
– Contact BrandTech Scientific, Inc. and obtain authorization for the return before sending your instrument for service.
– Return only cleaned and decontaminated instruments, with the Return Authorization Number prominently displayed on the outside of the pak-kage to the address provided with the Return Authorization Number.

Eng
lish
33
Contact addresses
BRAND GMBH + CO KGOtto-Schott-Straße 2597877 Wertheim (Germany)
Tel.: +49 9342 808-0Fax: +49 9342 808-98000E-Mail: [email protected]
USA and Canada:BrandTech® Scientific, Inc.11 Bokum RoadEssex, CT 06426-1506 (USA)
Tel.: +1-860-767 2562Fax: +1-860-767 2563www.brandtech.com
India:BRAND Scientific Equipment Pvt. Ltd. 303, 3rd Floor, ‘C‘ Wing, DelphiHiranandani Business Park, PowaiMumbai - 400 076 (India)
Tel.: +91 22 42957790 Fax: +91 22 42957791 E-Mail: [email protected] www.brand.co.in
China:BRAND (Shanghai) Trading Co., Ltd. Guangqi Culture Plaza Room 506, Building B No. 2899, Xietu Road Shanghai 200030 (P.R. China)
Tel.: +86 21 6422 2318Fax: +86 21 6422 2268 E-Mail: [email protected]

34
Warranty
Subject to technical modification without notice. Errors excepted.
We shall not be liable for the consequences of improper handling, use, servicing, operating or unauthorized repairs of the instrument or the consequences of normal wear and tear especially of wearing parts such as pistons, seals, valves and the breakage of glass as well as the failure to follow the instructions of the operating manual. We are not liable for damage resulting from any actions not described in the operating manual or if non-original spare parts or components have been used.
U.S. and Canada:Information for warranty please see www.brandtech.com.


9976 40 · Printed in Germany · 21/0817/6