Embed Size (px)
Citation preview

W273 EU2 355-095010
Perpetual Calendar • Fly-back Chronograph • Fly-back Chrono Compass • Linear Chronograph • World Time • Compass • Tide Temp and Compass • Altimeter • Depth
Ewiger Kalender • Fly-back-Chronograph • Fly-back-Chrono-Kompass • Linearchronograph • Weltzeit • Kompass
• Gezeiten Temperatur und Kompass • Höhenmesser • Tiefe
Calendario Perpetuo • Cronógrafo Fly-back • Brújula y Cronógrafo Fly-back • Cronógrafo lineal • Hora mundial • Brújula • Marea temperatura y brújula • Altímetro • Profundidad
Calendário Perpétuo • Cronógrafo Fly-back • Bússola e cronógrafo Fly-back • Cronógrafo Linear • Horário mundial
• Bússola • Maré Temperatura e Bússola • Altímetro • Profundidade™

English .............................. Page 1
Deutsch ............................ Seite 89
Español ............................. página 185
Português ......................... página 281

1
TIMEX® WATCHESCongratulations on purchasing your TIMEX® INTELLIGENT QUARTZ™ watch. Please read these instructions carefully to understand how to operate your Timex watch.
Your watch may not have all of the features described in this booklet.
For more information, and to register your
product please visit:
www.timex.com
2 3
TABLE oF ConTEnTS
How to Start Your Watch .................................................... 5
Water and Shock Resistance ............................................. 6
Indiglo® Night-Light ............................................................ 8
Date and Time Setting ........................................................ 9
Perpetual Calendar .......................................................... 11
Fly-Back Chronograph ...................................................... 14
Fly-back Chronograph Compass ...................................... 20
Linear Chronograph ........................................................ 32
World time ....................................................................... 38
Compass........................................................................... 45
Tide Temp and Compass .................................................. 52
Altimeter .......................................................................... 61
Depth ................................................................................ 69
Tachymeter Function ....................................................... 73
Slide-Rule Bezel Function ................................................ 74
How to Adjust Bracelet .................................................... 79
Bracelet Link Removal ...................................................... 81
Battery .............................................................................. 82
Warranty ........................................................................... 83
4 5
HoW To STArT Your WATCH(Does not apply to Perpetual Calendar models.) To start your watch remove the plastic guard from under the crown, then press the crown in against the case.
Some watches require the setting crown to be screwed in. If your watch case has a protrusion with screw threads, the crown must be screwed in after setting the watch.
To screw in, push the crown firmly against the threaded protrusion and hold in while turning the crown clockwise. Continue to screw in the crown until it is tight. You will need to unscrew the crown (counter-clockwise) before pulling it out the next time you want to set your watch.
Welcome to the world of Timex® watches with Intelligent Quartz™ technology, the future of quartz analogue technology. Intelligent Quartz technology brings the power of a micro-processor to the reliability and accuracy of quartz analogue timekeeping. With Timex Intelligent Quartz watches, the technology is written into the design, delivering a new level of dial complication. Uses up to three additional independent hands to display an array of information, normally only available in digital watches, in a traditional analogue format.
6 7
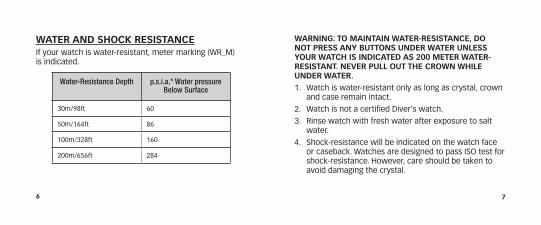
WArnInG: To MAInTAIn WATEr-rESISTAnCE, Do noT PrESS AnY BuTTonS unDEr WATEr unLESS Your WATCH IS InDICATED AS 200 METEr WATEr-rESISTAnT. nEVEr PuLL ouT THE CroWn WHILE unDEr WATEr.1. Watch is water-resistant only as long as crystal, crown
and case remain intact.
2. Watch is not a certified Diver’s watch.
3. Rinse watch with fresh water after exposure to salt water.
4. Shock-resistance will be indicated on the watch face or caseback. Watches are designed to pass ISO test for shock-resistance. However, care should be taken to avoid damaging the crystal.
WATEr AnD SHoCK rESISTAnCEIf your watch is water-resistant, meter marking (WR_M) is indicated.
Water-Resistance Depth p.s.i.a.* Water pressure Below Surface
30m/98ft 60
50m/164ft 86
100m/328ft 160
200m/656ft 284
8 9
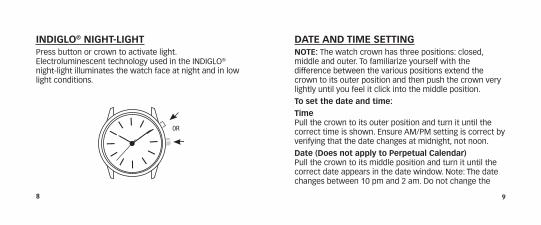
DATE AnD TIME SETTInGnoTE: The watch crown has three positions: closed, middle and outer. To familiarize yourself with the difference between the various positions extend the crown to its outer position and then push the crown very lightly until you feel it click into the middle position.
To set the date and time:Time Pull the crown to its outer position and turn it until the correct time is shown. Ensure AM/PM setting is correct by verifying that the date changes at midnight, not noon.
Date (Does not apply to Perpetual Calendar) Pull the crown to its middle position and turn it until the correct date appears in the date window. Note: The date changes between 10 pm and 2 am. Do not change the
InDIGLo® nIGHT-LIGHTPress button or crown to activate light. Electroluminescent technology used in the INDIGLO® night-light illuminates the watch face at night and in low light conditions.
or

10 11
date during this timeframe. Doing so could damage the watch movement.
Push crown to closed position after setting date/time. The second hand will begin moving.
noTE: For months with fewer than 31 days, the date will need to be adjusted.
PErPETuAL CALEnDAroVErVIEW
A
B
1 2 3
1 2 3
Hour Hand
day Handdate Hand
Second Hand
Minute Hand croWn
MontH Hand
Button A (RECESSED)
Button B (RECESSED)
cloSed PoSition
Middle PoSition
outer PoSition
12 13
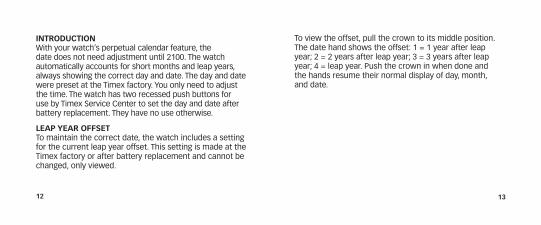
To view the offset, pull the crown to its middle position. The date hand shows the offset: 1 = 1 year after leap year; 2 = 2 years after leap year; 3 = 3 years after leap year; 4 = leap year. Push the crown in when done and the hands resume their normal display of day, month, and date.
InTroDuCTIonWith your watch’s perpetual calendar feature, the date does not need adjustment until 2100. The watch automatically accounts for short months and leap years, always showing the correct day and date. The day and date were preset at the Timex factory. You only need to adjust the time. The watch has two recessed push buttons for use by Timex Service Center to set the day and date after battery replacement. They have no use otherwise.
LEAP YEAr oFFSETTo maintain the correct date, the watch includes a setting for the current leap year offset. This setting is made at the Timex factory or after battery replacement and cannot be changed, only viewed.
14 15
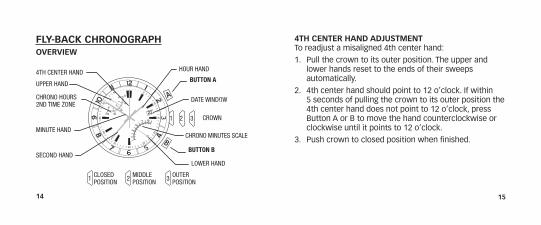
4TH CEnTEr HAnD ADjuSTMEnTTo readjust a misaligned 4th center hand:
1. Pull the crown to its outer position. The upper and lower hands reset to the ends of their sweeps automatically.
2. 4th center hand should point to 12 o’clock. If within 5 seconds of pulling the crown to its outer position the 4th center hand does not point to 12 o’clock, press Button A or B to move the hand counterclockwise or clockwise until it points to 12 o’clock.
3. Push crown to closed position when finished.
FLY-BACK CHronoGrAPHoVErVIEW
AA
B
23
1 2 3
1 2 3
uPPer Hand
cHrono HourS 2nd tiMe Zone
4tH center Hand
Second Hand
date WindoW
croWn
cHrono MinuteS Scale
loWer Hand
Button A
Button B
Minute Hand
Hour Hand
cloSed PoSition
Middle PoSition
outer PoSition
16 17
shows the second time zone time and the 4th center hand shows the minutes.
2. Assuming that the second time zone time has the same minutes value as the first time zone, the 4th center hand should be aligned with the minute hand. If the hands are not aligned, or if your second time zone is a different minute within the hour, press Button B to move the 4th center hand forward until it is in the desired position.
3. Press Button A to move the upper hand forward in one-hour increments until it reaches desired second time zone hour. To move the hand quickly, press and hold Button A.
4. Push the crown in when finished.
SEConD TIME zonEThe upper hand shows the time for the second time zone. Note that the scale is 24-hours, with midnight at either end and noon in the middle. Most often, time zones differ in hour increments. In such cases, the minute value of the second time zone will be the same as that displayed by the watch’s minute hand.
To SET THE SEConD TIME zonE:1. Pull crown to its middle position. The upper hand
AA
B
23
1 2 3
1 2 3
18 19
4. To reset the fly-back chronograph to zero position, press Button B (FLY-BACk/RESET).
When the chronograph is reset, all hands move to zero position. After another eight seconds, the watch resumes normal display of the second time zone.
5. To reset and/or restart the fly-back chronograph while it is running, press and hold Button B (Fly-back/Reset). Release it when you wish to restart.
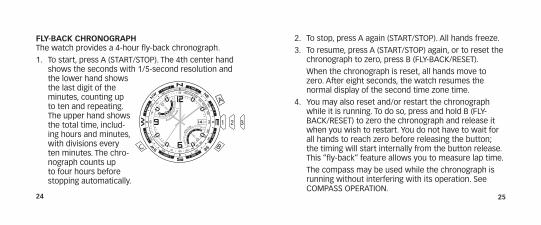
FLY-BACK CHronoGrAPHThe watch provides a 4-hour fly-back chronograph.
1. To start, press Button A (START/STOP).
The 4th center hand shows the seconds with 1/5 second resolution. The lower hand shows the last digit of the minutes, counting up to ten and repeating. The upper hand shows the total time, including hours and minutes, with divisions every ten minutes. The chronograph counts up to four hours before stopping automatically.
2. To stop, press Button A (START/STOP) again. All hands stop moving.
3. To resume, press Button A (START/STOP) again.
20 21
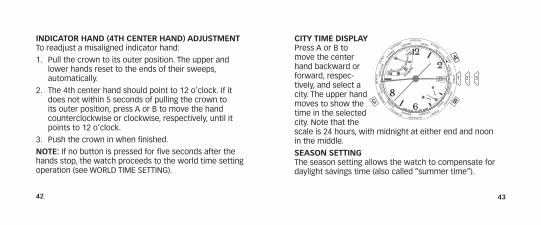
InDICATor HAnD (4TH CEnTEr HAnD) ADjuSTMEnTTo readjust a misaligned indicator hand:
1. Pull the crown to its outer position. The upper and lower hands reset to the ends of their sweeps automatically.
2. The 4th center hand should point to 12 o’clock. If it does not within 5 seconds of pulling the crown to its outer position, press A or B to move the hand counterclockwise or clockwise, respectively, until it points to 12 o’clock.
3. Push the crown in when done.
FLY-BACK CHronoGrAPH CoMPASSoVErVIEW
A
C B
1 2 3
1 2 3
uPPer Hand
cHrono HourS 2nd tiMe Zone
4tH center Hand
Second Hand
date WindoW
croWn
cHrono MinuteS Scale
loWer Hand
Button A
Button B
Hour Hand
Minute Hand
cloSed PoSition
Middle PoSition
outer PoSition
Button C
22 23
2. Press B to move the 4th center hand forward. Hold the button to move the hand quickly. The upper and 4th center hands move together; as the 4th center hand makes one revolution, the upper hand moves one hour. Assuming that the second time zone time has the same minutes value as your first time zone, the 4th center and minute hands should be aligned.
3. Press A to move the upper hand forward in one-hour increments. Hold the button to move the hand quickly.
4. Push the crown in when finished
The second time zone time can alternatively be used to display your home time on a 24-hour format, if you prefer. When setting the second time in this manner, ensure that the hour/minute display corresponds to the 24-hour display by verifying that the date changes at midnight, not noon.
SEConD TIME zonE The upper hand normally shows the time for the second time zone. Note that the scale is 24 hours, with midnight at either end and noon in the middle.
To set the second time zone time:
1. Pull the crown to its middle position. The upper hand shows the second time zone time in military hours and the 4th center hand shows the minutes.
A
C B
1 2 3
1 2 3
24 25
2. To stop, press A again (START/STOP). All hands freeze.
3. To resume, press A (START/STOP) again, or to reset the chronograph to zero, press B (FLY-BACk/RESET).
When the chronograph is reset, all hands move to zero. After eight seconds, the watch resumes the normal display of the second time zone time.
4. You may also reset and/or restart the chronograph while it is running. To do so, press and hold B (FLY-BACk/RESET) to zero the chronograph and release it when you wish to restart. You do not have to wait for all hands to reach zero before releasing the button; the timing will start internally from the button release. This “fly-back” feature allows you to measure lap time.
The compass may be used while the chronograph is running without interfering with its operation. See COMPASS OPERATION.
FLY-BACK CHronoGrAPHThe watch provides a 4-hour fly-back chronograph.
1. To start, press A (START/STOP). The 4th center hand shows the seconds with 1/5-second resolution and the lower hand shows the last digit of the minutes, counting up to ten and repeating. The upper hand shows the total time, includ-ing hours and minutes, with divisions every ten minutes. The chro-nograph counts up to four hours before stopping automatically.
A
C B
1 2 3
1 2 3
26 27
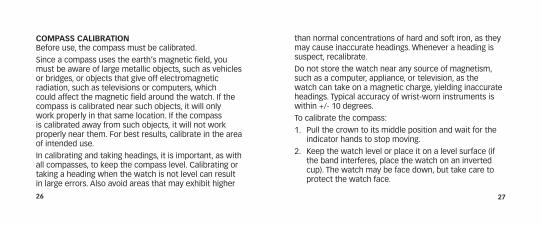
CoMPASS CALIBrATIonBefore use, the compass must be calibrated.
Since a compass uses the earth’s magnetic field, you must be aware of large metallic objects, such as vehicles or bridges, or objects that give off electromagnetic radiation, such as televisions or computers, which could affect the magnetic field around the watch. If the compass is calibrated near such objects, it will only work properly in that same location. If the compass is calibrated away from such objects, it will not work properly near them. For best results, calibrate in the area of intended use.
In calibrating and taking headings, it is important, as with all compasses, to keep the compass level. Calibrating or taking a heading when the watch is not level can result in large errors. Also avoid areas that may exhibit higher
than normal concentrations of hard and soft iron, as they may cause inaccurate headings. Whenever a heading is suspect, recalibrate.
Do not store the watch near any source of magnetism, such as a computer, appliance, or television, as the watch can take on a magnetic charge, yielding inaccurate headings. Typical accuracy of wrist-worn instruments is within +/- 10 degrees.
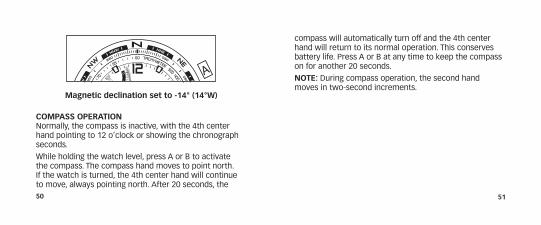
To calibrate the compass:
1. Pull the crown to its middle position and wait for the indicator hands to stop moving.
2. keep the watch level or place it on a level surface (if the band interferes, place the watch on an inverted cup). The watch may be face down, but take care to protect the watch face.

28 29
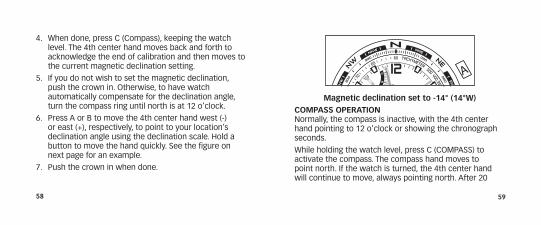
5. If you do not wish to set the magnetic declination, push the crown in. Otherwise, to have watch automatically compensate for the declination angle, turn the compass ring until north is at 12 o’clock.
6. Press A or B to move the 4th center hand west (-) or east (+), respectively, to point to your location’s declination angle using the declination scale. Hold a button to move the hand quickly. See the figure below for an example.
7. Push the crown in when done.
A
B
Magnetic declination set to -14° (14°W)
3. Press C (COMPASS) to begin. The 4th center hand rotates two revolutions to remind you to rotate the watch. While level, SLOWLY rotate the watch two revolutions, taking at least 15 seconds per revolution.
4. When done, press C (Compass), keeping the watch level. The 4th center hand moves back and forth to acknowledge the end of calibration and then moves to the current magnetic declination setting.

30 31
available through buttons A (START/STOP) and B (FLY-BACk/RESET).
noTE: During compass operation, the second hand moves in two-second increments. Also, when the compass is activated, the upper and lower hands may shift position slightly, returning to their proper positions when the compass is deactivated. This operation is normal and yields the most accurate compass reading.
CoMPASS oPErATIonNormally, the compass is inactive, with the 4th center hand pointing to 12 o’clock or showing the chronograph seconds.
While holding the watch level, press C (COMPASS) to activate the compass. The compass hand moves to point north. If the watch is turned, the 4th center hand will continue to move, always pointing north. After 20 seconds, the compass will automatically turn off and the 4th center hand will return to its normal operation. This conserves battery life. Press C (COMPASS) at any time to keep the compass on for another 20 seconds.
The compass may be activated while the chronograph is in use. The 4th center hand merely switches operation temporarily. The upper and lower hands continue to show the chronograph time and all chronograph functions are

32 33
LInEAr CHronoGrAPH oVErVIEW
LInEAr AnD 4TH CEnTEr HAnD ADjuSTMEnT To readjust a misaligned 4th center hand:
1. Pull the crown to its outer position. The lower hand resets to the end of its sweep automatically.
2. 4th center hand should point to 12 o’clock. If within 5 seconds of pulling the crown to its outer position the 4th center hand does not point to 12 o’clock, press Button A to move the hand clockwise until it points to 12 o’clock.
3. If the chronograph has been reset and the linear hand is not pointing to zero, press and hold Button B for 5 seconds to engage a full calibration of the linear indicator, which will take up to 32 seconds to perform.
4. Push crown to closed position when finished.Second Hand
date WindoW
croWn
loWer Hand
Button A
Button B
4tH center HandHour Hand
linear Hand
Minute Hand
A
B
1 2 3
34 35
SEConD TIME zonE
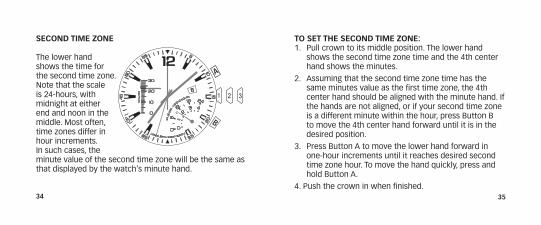
The lower hand shows the time for the second time zone. Note that the scale is 24-hours, with midnight at either end and noon in the middle. Most often, time zones differ in hour increments. In such cases, the minute value of the second time zone will be the same as that displayed by the watch’s minute hand.
To SET THE SEConD TIME zonE: 1. Pull crown to its middle position. The lower hand
shows the second time zone time and the 4th center hand shows the minutes.
2. Assuming that the second time zone time has the same minutes value as the first time zone, the 4th center hand should be aligned with the minute hand. If the hands are not aligned, or if your second time zone is a different minute within the hour, press Button B to move the 4th center hand forward until it is in the desired position.
3. Press Button A to move the lower hand forward in one-hour increments until it reaches desired second time zone hour. To move the hand quickly, press and hold Button A.
4. Push the crown in when finished.
A
B
1 2 3

36 37
LInEAr CHronoGrAPH The watch provides a 4-hour split chronograph.
1. To start, press Button A (Start/Stop). The 4th center hand shows the seconds with 1/5 second resolution. The linear hand shows the minutes, counting up to thirty and repeating. The lower hand shows the total time, including hours and minutes, with divisions every ten minutes. The chronograph counts up to four hours before stopping automatically.
2. To stop, press Button A (Start/Stop) again. All hands stop moving.
3. To reset the chronograph to zero position, press But-ton B (Split/Reset).
When the chronograph is reset, all hands move to zero position. After another eight seconds, the watch resumes normal display of the second time zone. While the chronograph is running, you may take a split time. Press Button B (split/Reset) and all hands will stop while the chronograph continues to run. Press Button B (split/Reset) again to resume the display of the running chronograph elapsed time.
38 39
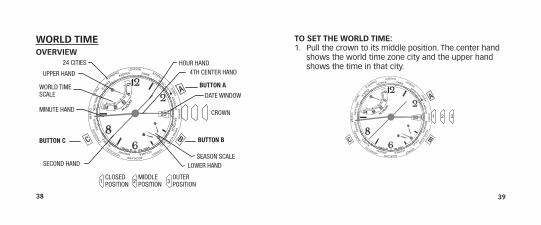
To SET THE WorLD TIME:1. Pull the crown to its middle position. The center hand
shows the world time zone city and the upper hand shows the time in that city.
A
BC
1 2 3
WorLD TIME oVErVIEW
A
BC
1 2 3
corrected 3.3.11 with Paulo’s new cities
24 citieS
World tiMe Scale
Second Hand
date WindoW
croWn
loWer Hand
Button A
Button B Button C
4tH center Hand
SeaSon Scale
uPPer Hand
Hour Hand
Minute Hand
cloSed PoSition
Middle PoSition
outer PoSition

40 41
2. Press A or B to move the center hand to the city that represents your home time zone. Hold a button to move the hand quickly. Any city may be used.
3. Pull the crown to its outer position. The city selector hand will revert back to the 12:00 position as indicated in INDICATOR HAND ADJUSTMENT. After a five second pause, the upper hand will show the world time (the time in the city selected in previous step), the center hand shows the minutes of the world time, and the lower hand shows the season (see SEASON SETTING). IMPORTANT: Do not manipulate any of the pushers or the crown until the center hand has completed its adjustment. (Approximately 10 seconds after crown is pulled to its outer position).
4. If the displayed season is not correct for the home time zone, press C to change it. If the home time zone observes daylight savings time, the upper hand will move by one hour.
5. Press A or B to move the time backward or forward, respectively, to set the world time zone to be the same as the home time zone. Hold a button to change the time quickly. The hands move together; as the center hand makes one revolution, the upper hand moves one hour. After setting, the center and minute hands should be aligned.
6. Push the crown in when finished.
42 43
InDICATor HAnD (4TH CEnTEr HAnD) ADjuSTMEnTTo readjust a misaligned indicator hand:
1. Pull the crown to its outer position. The upper and lower hands reset to the ends of their sweeps, automatically.
2. The 4th center hand should point to 12 o’clock. If it does not within 5 seconds of pulling the crown to its outer position, press A or B to move the hand counterclockwise or clockwise, respectively, until it points to 12 o’clock.
3. Push the crown in when finished.
noTE: If no button is pressed for five seconds after the hands stop, the watch proceeds to the world time setting operation (see WORLD TIME SETTING).
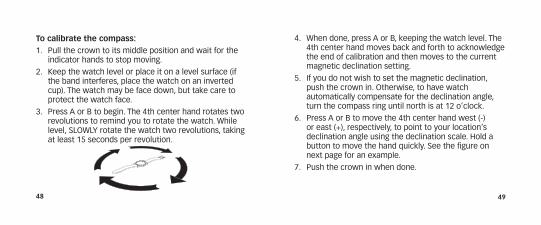
CITY TIME DISPLAY
A
BC
1 2 3
Press A or B to move the center hand backward or forward, respec-tively, and select a city. The upper hand moves to show the time in the selected city. Note that the scale is 24 hours, with midnight at either end and noon in the middle.
SEASon SETTInGThe season setting allows the watch to compensate for daylight savings time (also called “summer time”).

44 45
CoMPASSoVErVIEW
II
14 center croWn
Middle
Set date
II
14
out
Set tiMe
croWn
B (tuRnInG RInG)
A (CompASS)
declination ScalecoMPaSS Hand(nortH end iS redPointed/longer)
The watch provides one setting to represent the two peri-ods all cities that observe daylight savings time have. For the watch, the period of daylight savings time is SUMMER and the period of standard time is WINTER.
When the season in one city is set to SUMMER, all cities in the same hemisphere are automatically set to SUMMER, while all cities in the other hemisphere are automatically set to WINTER. The watch knows which cities are in each hemisphere.
Press C to change the season in the selected city.

46 47
CoMPASS HAnD ADjuSTMEnTPull CROWN all the way out. Compass hand should point to 12 o’clock. If it does not, press either A or B to move compass hand until it points to 12 o’clock. Hold button to move hand fast. Push CENTER CROWN in when done and recalibrate compass.
CoMPASS CALIBrATIonBefore use, the compass must be calibrated.
Since a compass uses the earth’s magnetic field, you must be aware of large metallic objects, such as vehicles or bridges, or objects that give off electromagnetic radiation, such as televisions or computers, which could affect the magnetic field around the watch. If the compass is calibrated near such objects, it will only work properly in that same location. If the compass is calibrated away from such objects, it will not work
properly near them. For best results, calibrate in the area of intended use.
In calibrating and taking headings, it is important, as with all compasses, to keep the compass level. Calibrating or taking a heading when the watch is not level can result in large errors. Also avoid areas that may exhibit higher than normal concentrations of hard and soft iron, as they may cause inaccurate headings. Whenever a heading is suspect, recalibrate.
Do not store the watch near any source of magnetism, such as a computer, appliance, or television, as the watch can take on a magnetic charge, yielding inaccurate headings. Typical accuracy of wrist-worn instruments is within +/- 10 degrees.
48 49
To calibrate the compass:1. Pull the crown to its middle position and wait for the
indicator hands to stop moving.
2. keep the watch level or place it on a level surface (if the band interferes, place the watch on an inverted cup). The watch may be face down, but take care to protect the watch face.
3. Press A or B to begin. The 4th center hand rotates two revolutions to remind you to rotate the watch. While level, SLOWLY rotate the watch two revolutions, taking at least 15 seconds per revolution.
4. When done, press A or B, keeping the watch level. The 4th center hand moves back and forth to acknowledge the end of calibration and then moves to the current magnetic declination setting.
5. If you do not wish to set the magnetic declination, push the crown in. Otherwise, to have watch automatically compensate for the declination angle, turn the compass ring until north is at 12 o’clock.
6. Press A or B to move the 4th center hand west (-) or east (+), respectively, to point to your location’s declination angle using the declination scale. Hold a button to move the hand quickly. See the figure on next page for an example.
7. Push the crown in when done.
50 51
A
B
Magnetic declination set to -14° (14°W)
CoMPASS oPErATIonNormally, the compass is inactive, with the 4th center hand pointing to 12 o’clock or showing the chronograph seconds.
While holding the watch level, press A or B to activate the compass. The compass hand moves to point north. If the watch is turned, the 4th center hand will continue to move, always pointing north. After 20 seconds, the
compass will automatically turn off and the 4th center hand will return to its normal operation. This conserves battery life. Press A or B at any time to keep the compass on for another 20 seconds.
noTE: During compass operation, the second hand moves in two-second increments.

52 53
TIDE TEMP AnD CoMPASSoVErVIEW
InDICATor HAnD ADjuSTMEnTPull crown all the way out. Indicator hand should point to 12 o’clock. If it does not, press either TIDE or TEMP push button to move hand until it points to 12 o’clock. TIDE and TEMP push buttons move hand clockwise and counterclockwise, respectively. Hold push button to move hand fast. Push crown in when done.
TIDE/TEMPErATurE SELECTIonIndicator hand shows either tide or temperature constant-ly. When temperature is shown, press TIDE push button to select tide clock. Hand moves to low tide and then to current tide. When tide is shown, press TEMP push button to select thermometer. Hand moves to beginning of ther-mometer scale and then to current temperature.
outer-Set tiMe
declination Scale
indicator Hand
C (CompASS) B (tIDE)
A (tEmp)
croWn
turning coMPaSSring
date
tide Scale
teMPerature Scale
Middle-Set date
54 55
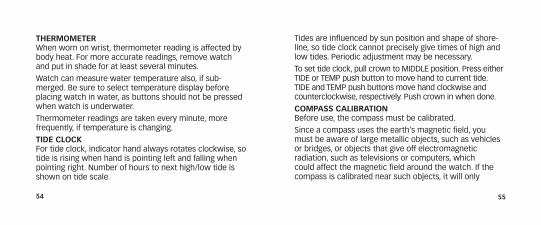
THErMoMETErWhen worn on wrist, thermometer reading is affected by body heat. For more accurate readings, remove watch and put in shade for at least several minutes.
Watch can measure water temperature also, if sub-merged. Be sure to select temperature display before placing watch in water, as buttons should not be pressed when watch is underwater.
Thermometer readings are taken every minute, more frequently, if temperature is changing.
TIDE CLoCKFor tide clock, indicator hand always rotates clockwise, so tide is rising when hand is pointing left and falling when pointing right. Number of hours to next high/low tide is shown on tide scale.
Tides are influenced by sun position and shape of shore-line, so tide clock cannot precisely give times of high and low tides. Periodic adjustment may be necessary.
To set tide clock, pull crown to MIDDLE position. Press either TIDE or TEMP push button to move hand to current tide. TIDE and TEMP push buttons move hand clockwise and counterclockwise, respectively. Push crown in when done.
CoMPASS CALIBrATIonBefore use, the compass must be calibrated.
Since a compass uses the earth’s magnetic field, you must be aware of large metallic objects, such as vehicles or bridges, or objects that give off electromagnetic radiation, such as televisions or computers, which could affect the magnetic field around the watch. If the compass is calibrated near such objects, it will only

56 57
work properly in that same location. If the compass is calibrated away from such objects, it will not work properly near them. For best results, calibrate in the area of intended use.
In calibrating and taking headings, it is important, as with all compasses, to keep the compass level. Calibrating or taking a heading when the watch is not level can result in large errors. Also avoid areas that may exhibit higher than normal concentrations of hard and soft iron, as they may cause inaccurate headings. Whenever a heading is suspect, recalibrate.
Do not store the watch near any source of magnetism, such as a computer, appliance, or television, as the watch can take on a magnetic charge, yielding inaccurate headings. Typical accuracy of wrist-worn instruments is within +/- 10 degrees.
To calibrate the compass:1. Pull the crown to its middle position and wait for the
indicator hands to stop moving.
2. keep the watch level or place it on a level surface (if the band interferes, place the watch on an inverted cup). The watch may be face down, but take care to protect the watch face.
3. Press C (COMPASS) to begin. The 4th center hand rotates two revolutions to remind you to rotate the watch. While level, SLOWLY rotate the watch two revolutions, taking at least 15 seconds per revolution.
58 59
4. When done, press C (Compass), keeping the watch level. The 4th center hand moves back and forth to acknowledge the end of calibration and then moves to the current magnetic declination setting.
5. If you do not wish to set the magnetic declination, push the crown in. Otherwise, to have watch automatically compensate for the declination angle, turn the compass ring until north is at 12 o’clock.
6. Press A or B to move the 4th center hand west (-) or east (+), respectively, to point to your location’s declination angle using the declination scale. Hold a button to move the hand quickly. See the figure on next page for an example.
7. Push the crown in when done.
A
B
Magnetic declination set to -14° (14°W)CoMPASS oPErATIonNormally, the compass is inactive, with the 4th center hand pointing to 12 o’clock or showing the chronograph seconds.
While holding the watch level, press C (COMPASS) to activate the compass. The compass hand moves to point north. If the watch is turned, the 4th center hand will continue to move, always pointing north. After 20
60 61
seconds, the compass will automatically turn off and the 4th center hand will return to its normal operation. This conserves battery life. Press C (COMPASS) at any time to keep the compass on for another 20 seconds.
noTE: During compass operation, the second hand moves in two-second increments.
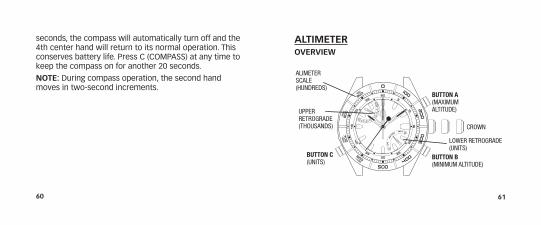
ALTIMETEroVErVIEW
aliMeter Scale(HundredS)
uPPer retrograde(tHouSandS)
Button C(unitS)
Button A(MaXiMuM altitude)
Button B(MiniMuM altitude)
loWer retrograde (unitS)
croWn
62 63
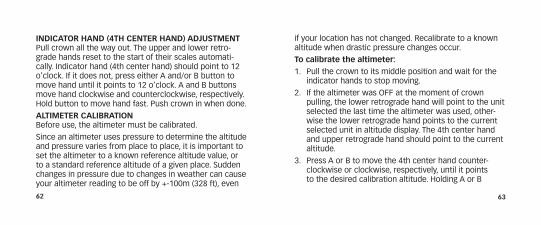
InDICATor HAnD (4TH CEnTEr HAnD) ADjuSTMEnTPull crown all the way out. The upper and lower retro-grade hands reset to the start of their scales automati-cally. Indicator hand (4th center hand) should point to 12 o’clock. If it does not, press either A and/or B button to move hand until it points to 12 o’clock. A and B buttons move hand clockwise and counterclockwise, respectively. Hold button to move hand fast. Push crown in when done.
ALTIMETEr CALIBrATIonBefore use, the altimeter must be calibrated.
Since an altimeter uses pressure to determine the altitude and pressure varies from place to place, it is important to set the altimeter to a known reference altitude value, or to a standard reference altitude of a given place. Sudden changes in pressure due to changes in weather can cause your altimeter reading to be off by +-100m (328 ft), even
if your location has not changed. Recalibrate to a known altitude when drastic pressure changes occur.
To calibrate the altimeter:1. Pull the crown to its middle position and wait for the
indicator hands to stop moving.
2. If the altimeter was OFF at the moment of crown pulling, the lower retrograde hand will point to the unit selected the last time the altimeter was used, other-wise the lower retrograde hand points to the current selected unit in altitude display. The 4th center hand and upper retrograde hand should point to the current altitude.
3. Press A or B to move the 4th center hand counter-clockwise or clockwise, respectively, until it points to the desired calibration altitude. Holding A or B

64 65
will move the center hand more rapidly. The upper retrograde hand moves relative to the altitude value displayed by the 4th center hand.
4. Push crown in when done.
ALTIMETEr on/oFFTo turn the altimeter on, press C. The lower retrograde hand points to METERS. Using the markings on the top ring, the 4th center hand shows the current altitude’s hundreds and tens value with divisions every ten METERS/FEET. The upper retrograde hand shows the cur-rent altitude’s thousands value with divisions every one thousand METERS/FEET.
To change the unit from METERS to FEET, press C a second time. To change the unit from FEET to METERS, press C twice (altimeter is turned off first then turned back on with the unit in METERS).
Example : Altitude=2310 m Example : Altitude=7580 ft
66 67
To turn the altimeter off with the current unit set to FEET, press C. To turn the altimeter off with the unit set to METERS, press C twice (lower hand goes to FEET first before going to the OFF position).
The watch will automatically turn the altimeter off 60 minutes after activation.
ALTIMETEr MIn/MAX ALTITuDE rECALLTo view the maximum recorded altitude, press A. The lower retrograde hand shows the unit of measure that the maximum altitude was recorded in if the altimeter was OFF at the moment of button press, otherwise it will show the maximum altitude using the current selected unit. The 4th center hand shows the maximum altitude’s hundreds and tens value with divisions every ten METERS/FEET. The upper retrograde hand shows the
maximum altitude’s thousands value with divisions every one thousand METERS/FEET.
The maximum recorded altitude is displayed for ten seconds. To extend the display duration for another ten seconds, press A before the previous ten second duration expires.
To change the unit from METERS to FEET or FEET to METERS, press C.
To view the minimum recorded altitude, press B. The lower retrograde hand shows the unit of measure that the minimum altitude was recorded in if the altimeter was OFF at the moment of button press, otherwise it will show the minimum altitude using the current selected unit. The 4th center hand shows the minimum altitude’s hundreds and tens value with divisions every
68 69
ten METERS/FEET. The upper retrograde hand shows the minimum altitude’s thousands value with divisions every one thousand METERS/FEET.
The minimum recorded altitude is displayed for ten seconds. To extend the display duration for another ten seconds, press B before the previous ten second duration expires To change the unit from METERS to FEET or FEET to METERS, press C.
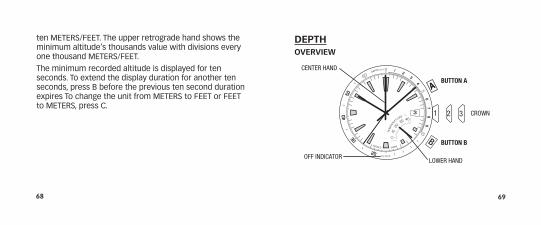
DEPTHoVErVIEW
3
AA
B
1 2 32 32 3
center Hand
oFF indicator
Button A
Button B
loWer Hand
croWn
70 71
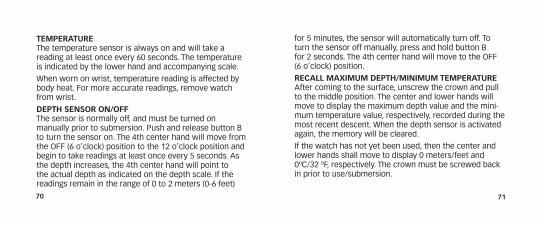
TEMPErATurEThe temperature sensor is always on and will take a reading at least once every 60 seconds. The temperature is indicated by the lower hand and accompanying scale.
When worn on wrist, temperature reading is affected by body heat. For more accurate readings, remove watch from wrist.
DEPTH SEnSor on/oFF The sensor is normally off, and must be turned on manually prior to submersion. Push and release button B to turn the sensor on. The 4th center hand will move from the OFF (6 o’clock) position to the 12 o’clock position and begin to take readings at least once every 5 seconds. As the depth increases, the 4th center hand will point to the actual depth as indicated on the depth scale. If the readings remain in the range of 0 to 2 meters (0-6 feet)
for 5 minutes, the sensor will automatically turn off. To turn the sensor off manually, press and hold button B for 2 seconds. The 4th center hand will move to the OFF (6 o’clock) position.
rECALL MAXIMuM DEPTH/MInIMuM TEMPErATurEAfter coming to the surface, unscrew the crown and pull to the middle position. The center and lower hands will move to display the maximum depth value and the mini-mum temperature value, respectively, recorded during the most recent descent. When the depth sensor is activated again, the memory will be cleared.
If the watch has not yet been used, then the center and lower hands shall move to display 0 meters/feet and 0ºC/32 ºF, respectively. The crown must be screwed back in prior to use/submersion.

72 73
BATTErY LEVEL DETECTIonThe watch determines the battery level status and provides the user with a visual indication corresponding to the current battery level. The battery level status is classified as Normal Level, Battery Low Level, and Replace Battery Level, with each level indicated by the movement of the second hand.
For the Normal Level status, the second hand shall move one hand position every one second, which is its normal operation.
When the watch is in Battery Low Level status, the second hand shall only move at 2-second intervals and shall move by two hand positions. It is recommended that the user replace the battery when the watch is at Battery Low Level status.
When the watch is in Replace Battery Level status, the second hand shall only move at 5-second intervals and
shall move by five hand positions. At this point, depth sensor can not be activated, and the user must replace the battery immediately.
TACHYMETEr FunCTIon(not all models)The tachymeter will only determine speeds greater than 60 units per hour using this method; slower speeds can be measured by decreasing the unit of measurement. The function performed by a tachymeter is independent of the unit of distance (e.g. statute miles, nautical miles, kilometers, meters etc.) as long as the same unit of length is used for all calculations.
1. Determine the start and finish markers for your pre-determined distance.
2. Start the chronograph once the target for speed measurement passes the start marker.
74 75
3. Stop the chronograph once the target for speed measurement passes the finish marker.
4. The chronograph second hand is compared to the tachymeter markings to determine the target’s speed.
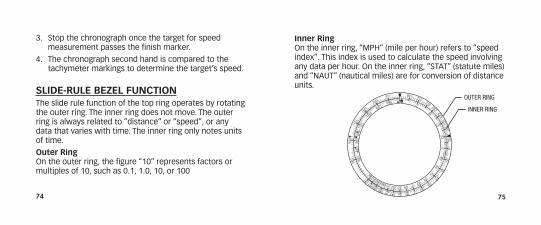
SLIDE-ruLE BEzEL FunCTIonThe slide rule function of the top ring operates by rotating the outer ring. The inner ring does not move. The outer ring is always related to “distance” or “speed”, or any data that varies with time. The inner ring only notes units of time.
outer ring On the outer ring, the figure “10” represents factors or multiples of 10, such as 0.1, 1.0, 10, or 100
Inner ring On the inner ring, “MPH” (mile per hour) refers to “speed index”. This index is used to calculate the speed involving any data per hour. On the inner ring, “STAT” (statute miles) and “NAUT” (nautical miles) are for conversion of distance units.
outer ring
inner ring
76 77
The following examples serve as a guide of how to use the slide rule.
SPEED CALCuLATIon: What speed is required to go 10 nautical miles in 15 minutes? Known Factors: Distance: 10 nautical miles Time: 15 minutes
• Align“10”arrowontheouterringwith“15”ontheinner ring.
• Thespeedrequiredcanbefounddirectlyabovethe“MPH” marking on the inner ring
The answer: 40 nautical miles per hour Time Calculation: How long will it take to go 10 nauti-cal miles at a speed of 40 miles per hour?
Known Factors: Speed: 40 miles per hour Distance: 10 nautical miles
• Align“40”ontheouterringwiththemark“MPH”marking on the inner ring.
• Thetimerequiredcanbefounddirectlybelowthe“10”arrow on the outer ring, which is “15” on the inner ring.
The answer: 15 minutes
DISTAnCE CALCuLATIon: How far can you travel at 40 miles per hour for 15 minutes?Known Factors: Speed: 40 nautical miles per hour Time: 15 minutes
• Align“40”ontheouterringdirectlyabovethemark“MPH” on the inner ring.
78 79
• Thedistancetravelledcanbeobtainedabovethe“15”marker on the inner ring. The number indicated on the outer ring is “10”.
The answer: the distance travelled is 10 nautical miles.
unIT ConVErSIon: To convert distance from nautical miles to statute miles and kilometers
Known Factor: Distance to convert is 10 nautical miles
• Alignthe“10”arrowontheouterringabovethe“NAUT” on the inner ring. The conversion in statute miles (11.5) is found above the inner ring “STAT” mark-ing, and the conversion to kilometers (18.5) is found above the inner ring “MPH” marking.
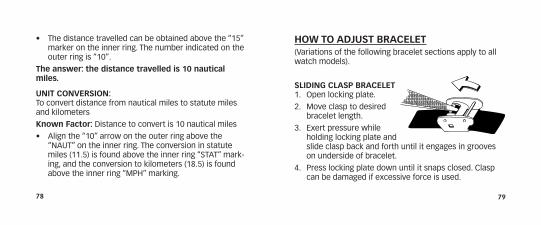
HoW To ADjuST BrACELET(Variations of the following bracelet sections apply to all watch models).
SLIDInG CLASP BrACELET1. Open locking plate.
2. Move clasp to desired bracelet length.
3. Exert pressure while holding locking plate and slide clasp back and forth until it engages in grooves on underside of bracelet.
4. Press locking plate down until it snaps closed. Clasp can be damaged if excessive force is used.
80 81
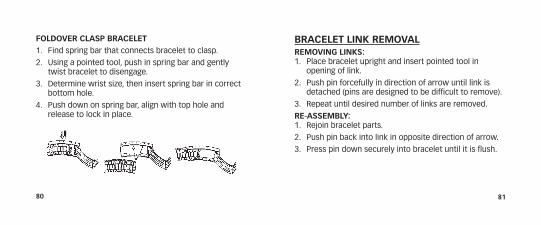
FoLDoVEr CLASP BrACELET1. Find spring bar that connects bracelet to clasp.
2. Using a pointed tool, push in spring bar and gently twist bracelet to disengage.
3. Determine wrist size, then insert spring bar in correct bottom hole.
4. Push down on spring bar, align with top hole and release to lock in place.
BrACELET LInK rEMoVALrEMoVInG LInKS:1. Place bracelet upright and insert pointed tool in
opening of link.
2. Push pin forcefully in direction of arrow until link is detached (pins are designed to be difficult to remove).
3. Repeat until desired number of links are removed.
rE-ASSEMBLY:1. Rejoin bracelet parts.
2. Push pin back into link in opposite direction of arrow.
3. Press pin down securely into bracelet until it is flush.
82 83
BATTErYThe battery should provide 4-6 years of normal watch use. The actual battery life may vary depending on actual use.
When the battery needs to be changed, we recommend that only TIMEX replace it. Your watch will need to be recalibrated to correct time and date after changing the battery. To return your watch to Timex use a pre-paid shipper. To obtain a pre-paid shipper please call 1-800-448-4639 or visit the retailer where you purchased your watch or go to www.Timex.com. Please include the following with your watch to cover postage and handling (this is not a repair charge); a U.S.$8.00 check or money order in the U.S.; a CAN$7.00 cheque or money order in Canada; In other countries Timex will charge you for postage and handling.
nEVEr InCLuDE A SPECIAL WATCHBAnD or AnY oTHEr ArTICLE oF PErSonAL VALuE In Your SHIPMEnT.Do noT DISPoSE oF BATTErY In FIrE. Do noT rECHArGE. KEEP LooSE BATTErIES AWAY FroM CHILDrEn.
TIMEX InTErnATIonAL WArrAnTYYour TIMEX® watch is warranted against manufacturing defects by Timex Group USA, Inc. for a period of ONE YEAR from the original purchase date. Timex and its worldwide affiliates will honor this International Warranty.
Please note that Timex may, at its option, repair your watch by installing new or thoroughly reconditioned and inspected components or replace it with an identical or similar model. IMPorTAnT — PLEASE noTE THAT THIS

84 85
WArrAnTY DoES noT CoVEr DEFECTS or DAMAGES To Your WATCH:1. after the warranty period expires;
2. if the watch was not originally purchased from an authorized Timex retailer;
3. from repair services not performed by Timex;
4. from accidents, tampering or abuse; and
5. lens or crystal, strap or band, watch case, attachments or battery. Timex may charge you for replacing any of these parts.
THIS WARRANTY AND THE REMEDIES CONTAINED HEREIN ARE EXCLUSIVE AND IN LIEU OF ALL OTHER WARRANTIES, EXPRESS OR IMPLIED, INCLUDING ANY IMPLIED WARRANTY OF MERCHANTABILITY OR FITNESS FOR PARTICULAR PURPOSE. TIMEX IS NOT LIABLE FOR ANY
SPECIAL, INCIDENTAL OR CONSEQUENTIAL DAMAGES. Some countries and states do not allow limitations on implied warranties and do not allow exclusions or limitations on damages, so these limitations may not apply to you. This warranty gives you specific legal rights and you may also have other rights, which vary from country to country and state to state.
To obtain warranty service, please return your watch to Timex, one of its affiliates or the Timex retailer where the watch was purchased, together with a completed original Watch Repair Coupon or, in the U.S. and Canada only, the completed original Watch Repair Coupon or a written statement identifying your name, address, telephone number and date and place of purchase. Please include the following with your watch to cover postage and handling (this is not a repair charge): a US$ 8.00
86 87
check or money order in the U.S.; a CAN$7.00 cheque or money order in Canada; and a Uk£3.50 cheque or money order in the U.k. In other countries, Timex will charge you for postage and handling. NEVER INCLUDE A SPECIAL WATCHBAND OR ANY OTHER ARTICLE OF PERSONAL VALUE IN YOUR SHIPMENT.
For the U.S., please call 1-800-448-4639 for additional warranty information. For Canada, call 1-800-263-0981. For Brazil, call +55 11 5572 9733. For Mexico, call 01-800-01-060-00. For Central America, the Caribbean, Bermuda and the Bahamas, call (501) 370-5775 (U.S.). For Asia, call 852-2815-0091. For the U.k., call 44 020 8687 9620. For Portugal, call 351 212 946 017. For France, call 03 81 63 42 51 (10 a.m. - 12 Noon). For Germany/Austria, call 43 662 88921 30. For the Middle East and Africa, call 971-4-310850.
EXTEnDED WArrAnTYAvailable in U.S. only. Extend your warranty for an additional 4 years from date of purchase for $5. You can pay with AMEX, Discover, Visa or MasterCard by calling 1 800-448-4639 during normal business hours. Payment must be made within 30 days of purchase. Name, address, telephone number, purchase date, and 5-digit model number required. You can also mail a check for $5 to: Timex Extended Warranty, P.O. Box 1676, Dept. EF, Little Rock, AR 72203. ©2013 Timex Group USA, Inc. TIMEX, INDIGLO and INTELLIGENT QUARTZ are trademarks of Timex Group B.V. and its subsidiaries.

89
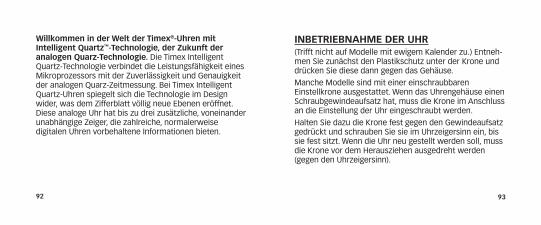
TIMEX®-ArMBAnDuHrEnHerzlichen Glückwunsch zum kauf Ihrer TIMEX® INTELLIGENT QUARTZ™-Uhr. Bitte lesen Sie die Bedienungsanleitung für Ihre Timex-Uhr genau durch.
Ihre Uhr besitzt eventuell nicht alle der hier aufgeführten Funktionen.
Weitere Informationen finden Sie auf der nachstehenden Website, auf der Sie außerdem Ihre
Uhr registrieren können:
www.timex.com
90 91
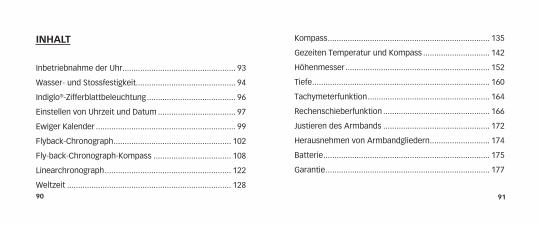
InHALT
Inbetriebnahme der Uhr ................................................... 93
Wasser- und Stossfestigkeit............................................. 94
Indiglo®-Zifferblattbeleuchtung ........................................ 96
Einstellen von Uhrzeit und Datum ................................... 97
Ewiger kalender ............................................................... 99
Flyback-Chronograph ..................................................... 102
Fly-back-Chronograph-kompass ................................... 108
Linearchronograph ......................................................... 122
Weltzeit .......................................................................... 128
kompass ......................................................................... 135
Gezeiten Temperatur und kompass .............................. 142
Höhenmesser ................................................................. 152
Tiefe ................................................................................ 160
Tachymeterfunktion ....................................................... 164
Rechenschieberfunktion ................................................ 166
Justieren des Armbands ................................................ 172
Herausnehmen von Armbandgliedern ........................... 174
Batterie ........................................................................... 175
Garantie .......................................................................... 177
92 93
InBETrIEBnAHME DEr uHr(Trifft nicht auf Modelle mit ewigem kalender zu.) Ent neh-men Sie zunächst den Plastikschutz unter der krone und drücken Sie diese dann gegen das Gehäuse.
Manche Modelle sind mit einer einschraubbaren Einstellkrone ausgestattet. Wenn das Uhrengehäuse einen Schraubgewindeaufsatz hat, muss die krone im Anschluss an die Einstellung der Uhr eingeschraubt werden.
Halten Sie dazu die krone fest gegen den Gewindeaufsatz gedrückt und schrauben Sie sie im Uhrzeigersinn ein, bis sie fest sitzt. Wenn die Uhr neu gestellt werden soll, muss die krone vor dem Herausziehen ausgedreht werden (gegen den Uhrzeigersinn).
Willkommen in der Welt der Timex®-uhren mit Intelligent Quartz™-Technologie, der zukunft der analogen Quarz-Technologie. Die Timex Intelligent Quartz-Technologie verbindet die Leistungsfähigkeit eines Mikroprozessors mit der Zuverlässigkeit und Genauigkeit der analogen Quarz-Zeitmessung. Bei Timex Intelligent Quartz-Uhren spiegelt sich die Technologie im Design wider, was dem Zifferblatt völlig neue Ebenen eröffnet. Diese analoge Uhr hat bis zu drei zusätzliche, voneinander unabhängige Zeiger, die zahlreiche, normalerweise digitalen Uhren vorbehaltene Informationen bieten.
94 95
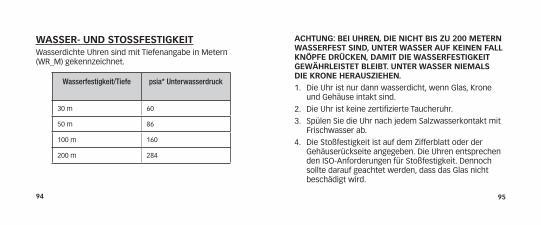
ACHTunG: BEI uHrEn, DIE nICHT BIS zu 200 METErn WASSErFEST SInD, unTEr WASSEr AuF KEInEn FALL KnÖPFE DrÜCKEn, DAMIT DIE WASSErFESTIGKEIT GEWÄHrLEISTET BLEIBT. unTEr WASSEr nIEMALS DIE KronE HErAuSzIEHEn.1. Die Uhr ist nur dann wasserdicht, wenn Glas, krone
und Gehäuse intakt sind.
2. Die Uhr ist keine zertifizierte Taucheruhr.
3. Spülen Sie die Uhr nach jedem Salzwasserkontakt mit Frischwasser ab.
4. Die Stoßfestigkeit ist auf dem Zifferblatt oder der Gehäuserückseite angegeben. Die Uhren entsprechen den ISO-Anforderungen für Stoßfestigkeit. Dennoch sollte darauf geachtet werden, dass das Glas nicht beschädigt wird.
WASSEr- unD SToSSFESTIGKEITWasserdichte Uhren sind mit Tiefenangabe in Metern (WR_M) gekennzeichnet.
Wasserfestigkeit/Tiefe psia* Unterwasserdruck
30 m 60
50 m 86
100 m 160
200 m 284
96 97
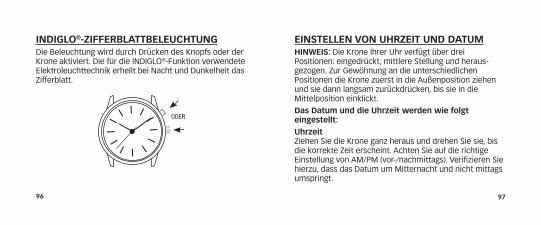
EInSTELLEn Von uHrzEIT unD DATuMHInWEIS: Die krone Ihrer Uhr verfügt über drei Positionen: eingedrückt, mittlere Stellung und heraus-gezogen. Zur Gewöhnung an die unterschiedlichen Positionen die krone zuerst in die Außenposition ziehen und sie dann langsam zurückdrücken, bis sie in die Mittelposition einklickt.
Das Datum und die uhrzeit werden wie folgt eingestellt:uhrzeit Ziehen Sie die krone ganz heraus und drehen Sie sie, bis die korrekte Zeit erscheint. Achten Sie auf die richtige Einstellung von AM/PM (vor-/nachmittags). Verifizieren Sie hierzu, dass das Datum um Mitternacht und nicht mittags umspringt.
InDIGLo®-zIFFErBLATTBELEuCHTunGDie Beleuchtung wird durch Drücken des knopfs oder der krone aktiviert. Die für die INDIGLO®-Funktion verwendete Elektroleuchttechnik erhellt bei Nacht und Dunkelheit das Zifferblatt.
oder
98 99
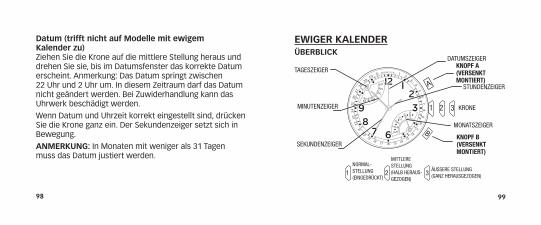
Datum (trifft nicht auf Modelle mit ewigem Kalender zu) Ziehen Sie die krone auf die mittlere Stellung heraus und drehen Sie sie, bis im Datumsfenster das korrekte Datum erscheint. Anmerkung: Das Datum springt zwischen 22 Uhr und 2 Uhr um. In diesem Zeitraum darf das Datum nicht geändert werden. Bei Zuwiderhandlung kann das Uhrwerk beschädigt werden.
Wenn Datum und Uhrzeit korrekt eingestellt sind, drücken Sie die krone ganz ein. Der Sekundenzeiger setzt sich in Bewegung.
AnMErKunG: In Monaten mit weniger als 31 Tagen muss das Datum justiert werden.
EWIGEr KALEnDErÜBErBLICK
A
B
1 2 3
1 2 3
StundenZeiger
tageSZeiger
datuMSZeiger
SeKundenZeiger
MinutenZeiger Krone
MonatSZeiger
KnopF A (VERSEnKt montIERt)
KnopF B (VERSEnKt montIERt)
norMal-Stellung (ein ge drÜcKt)
Mittlere Stellung (HalB Her auS-geZ ogen)
ÄuSSere Stellung (ganZ HerauSgeZogen)
100 101
Ziehen Sie hierzu die krone in die mittlere Stellung heraus. Der Datumszeiger stellt den Ausgleich wie folgt dar: 1 = 1 Jahr nach Schaltjahr; 2 = 2 Jahre nach Schaltjahr; 3 = 3 Jahre nach Schaltjahr; 4 = Schaltjahr. Drücken Sie die krone anschließend wieder ein. Die Zeiger rücken wieder in ihre Normalstellung für Wochentag, Monat und Datum.
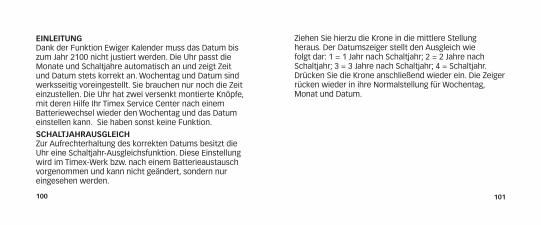
EInLEITunGDank der Funktion Ewiger kalender muss das Datum bis zum Jahr 2100 nicht justiert werden. Die Uhr passt die Monate und Schaltjahre automatisch an und zeigt Zeit und Datum stets korrekt an. Wochentag und Datum sind werksseitig voreingestellt. Sie brauchen nur noch die Zeit einzustellen. Die Uhr hat zwei versenkt montierte knöpfe, mit deren Hilfe Ihr Timex Service Center nach einem Batteriewechsel wieder den Wochentag und das Datum einstellen kann. Sie haben sonst keine Funktion.
SCHALTjAHrAuSGLEICHZur Aufrechterhaltung des korrekten Datums besitzt die Uhr eine Schaltjahr-Ausgleichsfunktion. Diese Einstellung wird im Timex-Werk bzw. nach einem Batterieaustausch vorgenommen und kann nicht geändert, sondern nur eingesehen werden.

102 103
EInSTELLEn DES VIErTEn MITTLErEn zEIGErSDer vierte mittlere Zeiger wird wie folgt justiert:
1. Ziehen Sie die krone ganz heraus. Der obere und untere Zeiger rücken automatisch in ihre Endstellungen.
2. Der vierte mittlere Zeiger muss auf 12 Uhr zeigen. Sollte dieser innerhalb von 5 Sekunden nach dem Herausziehen der krone nicht in die 12-Uhr-Stellung rücken, muss er durch Drücken von knopf A oder B entweder im oder gegen den Uhrzeigersinn in die 12-Uhr-Stellung gedreht werden.
3. Wenn Sie fertig sind, drücken Sie die krone ganz ein.
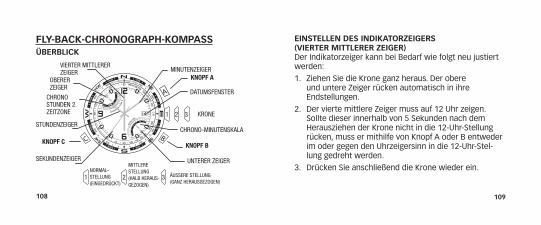
FLYBACK-CHronoGrAPHÜBErBLICK
AA
B
23
1 2 3
1 2 3
oBerer Zeiger
cHronoStunden 2. ZeitZone
Vierter Mittlerer Zeiger
SeKundenZeiger
datuMSFenSter
Krone
cHrono- MinutenSKala
unterer Zeiger
KnopF A
KnopF B
MinutenZeiger
StundenZeiger
norMal-Stellung (ein ge drÜcKt)
Mittlere Stellung (HalB Her auS-geZ ogen)
ÄuSSere Stellung (ganZ HerauSgeZogen)
104 105
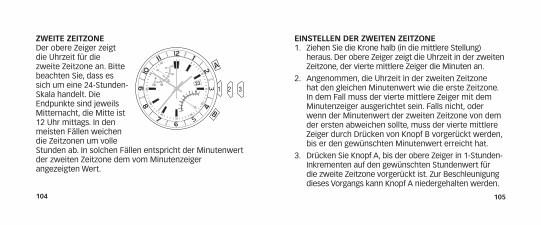
EInSTELLEn DEr zWEITEn zEITzonE1. Ziehen Sie die krone halb (in die mittlere Stellung)
heraus. Der obere Zeiger zeigt die Uhrzeit in der zweiten Zeitzone, der vierte mittlere Zeiger die Minuten an.
2. Angenommen, die Uhrzeit in der zweiten Zeitzone hat den gleichen Minutenwert wie die erste Zeitzone. In dem Fall muss der vierte mittlere Zeiger mit dem Minutenzeiger ausgerichtet sein. Falls nicht, oder wenn der Minutenwert der zweiten Zeitzone von dem der ersten abweichen sollte, muss der vierte mittlere Zeiger durch Drücken von knopf B vorgerückt werden, bis er den gewünschten Minutenwert erreicht hat.
3. Drücken Sie knopf A, bis der obere Zeiger in 1-Stunden-Inkrementen auf den gewünschten Stundenwert für die zweite Zeitzone vorgerückt ist. Zur Beschleunigung dieses Vorgangs kann knopf A niedergehalten werden.
zWEITE zEITzonEDer obere Zeiger zeigt die Uhrzeit für die zweite Zeitzone an. Bitte beachten Sie, dass es sich um eine 24-Stunden-Skala handelt. Die Endpunkte sind je weils Mitternacht, die Mitte ist 12 Uhr mittags. In den meisten Fällen weichen die Zeitzonen um volle Stunden ab. In solchen Fällen entspricht der Minutenwert der zweiten Zeitzone dem vom Minutenzeiger angezeigten Wert.
AA
B
23
1 2 3
1 2 3

106 107
3. Zur Wiederaufnahme der Messung betätigen Sie knopf A (START/STOP) nochmals.
4. Nullen Sie den Flyback-Chronographen mithilfe von knopf B (FLYBACk/RESET).
Alle Zeiger rücken dann in ihre Nullstellung. Nach weiteren acht Sekunden schaltet die Uhr wieder in die normale Anzeige der zweiten Zeitzone.
5. Zum Rücksetzen bzw. Neustarten des laufenden Flyback-Chronographen halten Sie knopf B (Flyback/Reset) so lange nieder, bis er neu starten soll.
4. Wenn Sie fertig sind, drücken Sie die krone wieder ein.
FLYBACK-CHronoGrAPHDie Uhr hat einen Chronographen mit 4-Stunden-Flyback.
1. Drücken Sie zum Starten knopf A (START/STOP).
Der vierte mittlere Zeiger zeigt die Sekunden mit einer 1/5-Sekunden-Auflösung an. Der untere Zeiger zeigt die letzte Minutenstelle an, wobei er bis zu zehn zählt und dann wiederholt. Der obere Zeiger zeigt die Gesamtzeit an, einschließlich Stunden und Minuten, mit 10-Minuten-Unterteilung. Der Chronograph zählt bis zu vier Stunden und stoppt dann automatisch.
2. Drücken Sie zum Stoppen knopf A (START/STOP) erneut. Alle Zeiger werden angehalten.
108 109
EInSTELLEn DES InDIKATorzEIGErS (VIErTEr MITTLErEr zEIGEr) Der Indikatorzeiger kann bei Bedarf wie folgt neu justiert werden:
1. Ziehen Sie die krone ganz heraus. Der obere und untere Zeiger rücken automatisch in ihre Endstellungen.
2. Der vierte mittlere Zeiger muss auf 12 Uhr zeigen. Sollte dieser innerhalb von 5 Sekunden nach dem Herausziehen der krone nicht in die 12-Uhr-Stellung rücken, muss er mithilfe von knopf A oder B entweder im oder gegen den Uhrzeigersinn in die 12-Uhr-Stel-lung gedreht werden.
3. Drücken Sie anschließend die krone wieder ein.
FLY-BACK-CHronoGrAPH-KoMPASSÜBErBLICK
A
C B
1 2 3
1 2 3
oBerer Zeiger
cHrono Stunden 2. ZeitZone
Vierter Mittlerer Zeiger
SeKundenZeiger
datuMSFenSter
Krone
cHrono-MinutenSKala
unterer Zeiger
KnopF A
KnopF B
StundenZeiger
MinutenZeiger
KnopF C
norMal-Stellung (ein ge drÜcKt)
Mittlere Stellung (HalB Her auS-geZ ogen)
ÄuSSere Stellung (ganZ HerauSgeZogen)

110 111
2. Rücken Sie den vierten mittleren Zeiger mithilfe von knopf B vor. Zur Beschleunigung dieses Vorgangs können Sie den knopf niederhalten. Der obere und der vierte mittlere Zeiger bewegen sich gleichzeitig, wobei Letzterer eine volle Umdrehung ausführt und der obere Zeiger um eine Stunde vorrückt. Angenommen, die Uhrzeit in der zweiten Zeitzone hat den gleichen Minutenwert wie die erste Zeitzone. In dem Fall muss der vierte mittlere Zeiger mit dem Minutenzeiger ausgerichtet sein.
3. Rücken Sie den oberen Zeiger mithilfe von knopf A in 1-Stunden-Inkrementen vor. Zur Beschleunigung dieses Vorgangs können Sie den knopf niederhalten.
4. Wenn Sie fertig sind, drücken Sie die krone wieder ein.
zWEITE zEITzonE Der obere Zeiger zeigt gewöhnlich die Uhrzeit für die zweite Zeitzone an. Bitte beachten Sie, dass es sich um eine 24-Stunden-Skala handelt. Die Endpunkte sind jeweils Mitternacht, die Mitte ist 12 Uhr mittags.
Die Uhrzeit für die zweite Zeitzone wird wie folgt eingestellt:
1. Ziehen Sie die krone halb (in die mittlere Stellung) heraus. Der obere Zeiger zeigt die Uhrzeit für die zweite Zeitzone an, der vierte mittlere Zeiger die Minuten.
A
C B
1 2 3
1 2 3

112 113
sung von 1/5 Sekunden, der untere Zeiger die letzte Minutenstelle an, wobei er bis zu zehn zählt und dann wiederholt. Der obere Zeiger zeigt die Gesamtzeit an, einschließlich Stunden und Minuten, mit 10-Minuten-Unterteilung. Der Chronograph zählt bis zu vier Stunden und stoppt dann automatisch.
2. Zum Stoppen betätigen Sie erneut knopf A (START/STOP). Alle Zeiger bleiben stehen.
3. Zur Wiederaufnahme der Messung drücken Sie knopf A (START/STOP) nochmals bzw. zum Nullen des Chronographen knopf B (FLYBACk/RESET).
Bei einer Nullung rücken alle Zeiger in ihre Nullstellung. Nach acht Sekunden nimmt die Uhr wieder die normale Zeitanzeige der zweiten Zeitzone auf.
Auf Wunsch können Sie mithilfe der zweiten Zeitzone alternativ auch Ihre Standardzeit im 24-Stunden-Format anzeigen. Wenn Sie die Zweitzeit auf diese Weise einstellen, muss die Stunden/Minuten-Anzeige unbedingt der 24-Stun-den-Anzeige entsprechen. Verifizieren Sie hierzu, dass das Datum um Mitternacht und nicht mittags umspringt.
FLYBACK-CHronoGrAPHDie Uhr hat einen Chronographen mit 4-Stunden-Flyback.
1. Drücken Sie zum Starten knopf A (START/STOP). Der vierte mittlere Zeiger zeigt die Sekunden mit einer Auflö-
A
C B
1 2 3
1 2 3

114 115
4. Der Chronograph kann auch bei laufendem Betrieb zurückgesetzt bzw. neu gestartet werden. Halten Sie hierzu knopf B (FLYBACk/RESET) nieder und lassen Sie ihn los, wenn er neu starten soll. Sie können den knopf loslassen, bevor alle Zeiger auf Null stehen; die Zeitmessung beginnt intern, sobald der knopf losgelassen wird. Mit dieser „Flyback“-Funktion kann die Rundenzeit gemessen werden.
Der kompass kann bei laufendem Chronographen benutzt werden, ohne dessen Betrieb zu beeinträchtigen. Weitere Informationen finden Sie unter kOMPASSMODUS.
KALIBrIErEn DES KoMPASSESVor Gebrauch muss der kompass kalibriert werden.
Da ein kompass mit dem Erdmagnetfeld arbeitet, ist auf große metallene Objekte wie Fahrzeuge und Brücken
sowie auf Gegenstände mit elektromagnetischer Strah-lung wie Fernseher und Computer zu achten, die das Magnetfeld im Bereich der Uhr beeinflussen können. Wird der kompass in der Nähe derartiger Objekte kalibriert, funktioniert er nur an dieser Stelle korrekt. Wird er dage-gen fern von derartigen Objekten kalibriert, so funktioniert er in ihrer Nähe nicht ordnungsgemäß. Optimale Ergeb-nisse werden erzielt, wenn die kalibrierung im Bereich der beabsichtigten Verwendung erfolgt.
Wie alle kompasse muss auch die Uhr bei der kalibrierung und Richtungsfindung waagerecht gehalten werden. An-dernfalls kann es zu großen Fehlern kommen. Außerdem sind Bereiche mit übermäßigen konzentrationen von Hart- und Weicheisen zu meiden, da sie zu ungenauen Richtungsangaben führen können. Bei fragwürdigen Richtungsangaben muss erneut kalibriert werden.
116 117
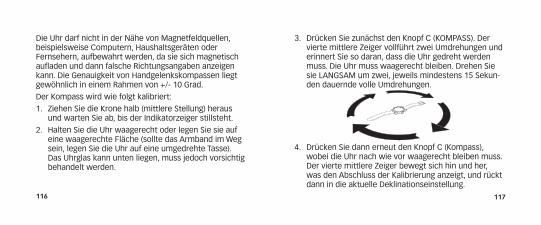
3. Drücken Sie zunächst den knopf C (kOMPASS). Der vierte mittlere Zeiger vollführt zwei Umdrehungen und erinnert Sie so daran, dass die Uhr gedreht werden muss. Die Uhr muss waagerecht bleiben. Drehen Sie sie LANGSAM um zwei, jeweils mindestens 15 Sekun-den dauernde volle Umdrehungen.
4. Drücken Sie dann erneut den knopf C (kompass), wobei die Uhr nach wie vor waagerecht bleiben muss. Der vierte mittlere Zeiger bewegt sich hin und her, was den Abschluss der kalibrierung anzeigt, und rückt dann in die aktuelle Deklinationseinstellung.
Die Uhr darf nicht in der Nähe von Magnetfeldquellen, beispielsweise Computern, Haushaltsgeräten oder Fernsehern, aufbewahrt werden, da sie sich magnetisch aufladen und dann falsche Richtungsangaben anzeigen kann. Die Genauigkeit von Handgelenkskompassen liegt gewöhnlich in einem Rahmen von +/- 10 Grad.
Der kompass wird wie folgt kalibriert:
1. Ziehen Sie die krone halb (mittlere Stellung) heraus und warten Sie ab, bis der Indikatorzeiger stillsteht.
2. Halten Sie die Uhr waagerecht oder legen Sie sie auf eine waagerechte Fläche (sollte das Armband im Weg sein, legen Sie die Uhr auf eine umgedrehte Tasse). Das Uhrglas kann unten liegen, muss jedoch vorsichtig behandelt werden.

118 119
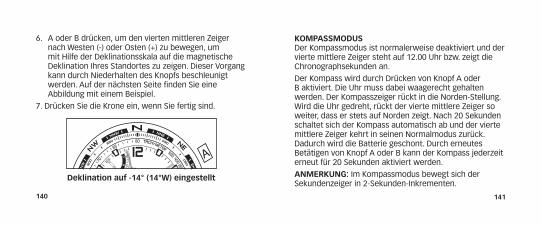
Deklination auf -14° (14°W) eingestelltKoMPASSMoDuSDer kompassmodus ist normalerweise deaktiviert und der vierte mittlere Zeiger steht auf 12.00 Uhr bzw. zeigt die Chronographsekunden an.
Der kompass wird durch Drücken von knopf C (kOMPASS) aktiviert. Die Uhr muss dabei waagerecht gehalten werden. Der kompasszeiger rückt in die Norden-Stellung. Wird die Uhr gedreht, rückt der vierte mittlere Zeiger so weiter, dass er stets auf Norden zeigt. Nach 20 Sekunden
5. Wenn Sie die Deklination nicht einstellen möchten, drücken Sie die krone ein. Andernfalls kann die Uhr den Deklinationswinkel automatisch ausgleichen. Drehen Sie hierzu den kompassring so, dass Norden auf 12 Uhr zeigt.
6. Rücken Sie den vierten mittleren Zeiger mithilfe von knopf A oder B nach Westen (-) oder Osten (+), sodass der kompass unter Zuhilfenahme der Deklinations-skala auf den Deklinationswinkel Ihres Standorts zeigt. Dieser Vorgang kann durch Niederhalten des knopfs beschleunigt werden. Die nachstehende Abbildung zeigt ein Beispiel.
7. Drücken Sie die krone ein, wenn Sie fertig sind.
A
B
120 121
schaltet sich der kompass automatisch ab und der vierte mittlere Zeiger kehrt in seinen Normalmodus zurück. Dadurch wird die Batterie geschont. Durch erneutes Betätigen von knopf C (kOMPASS) kann der kompass jederzeit erneut für 20 Sekunden aktiviert werden.
Der kompass kann auch bei laufendem Chronographen aktiviert werden. Der vierte mittlere Zeiger schaltet lediglich vorübergehend in den kompassmodus um. Der obere und untere Zeiger zeigen weiterhin die Chro no-gra phenzeit an und alle Chronographenfunktionen sind über die knöpfe A (START/STOP) und B (FLYBACk/RESET) verfügbar.
AnMErKunG: Im kompassmodus bewegt sich der Sekundenzeiger in 2-Sekunden-Inkrementen. Außerdem können sich bei aktiviertem kompass der obere und untere Zeiger geringfügig verschieben; sie kehren jedoch in ihre korrekten Stellungen zurück, sobald der kompass deaktiviert wird. Das ist normal und sorgt für eine möglichst genaue kompassmessung.
122 123
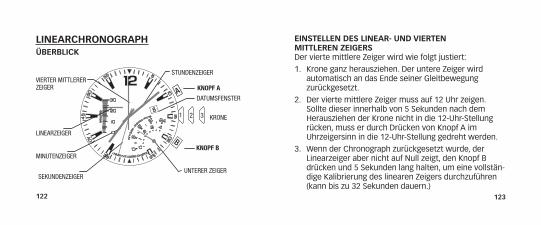
LInEArCHronoGrAPHÜBErBLICK
EInSTELLEn DES LInEAr- unD VIErTEn MITTLErEn zEIGErS Der vierte mittlere Zeiger wird wie folgt justiert:
1. krone ganz herausziehen. Der untere Zeiger wird automatisch an das Ende seiner Gleitbewegung zurückgesetzt.
2. Der vierte mittlere Zeiger muss auf 12 Uhr zeigen. Sollte dieser innerhalb von 5 Sekunden nach dem Herausziehen der krone nicht in die 12-Uhr-Stellung rücken, muss er durch Drücken von knopf A im Uhrzeigersinn in die 12-Uhr-Stellung gedreht werden.
3. Wenn der Chronograph zurückgesetzt wurde, der Linearzeiger aber nicht auf Null zeigt, den knopf B drücken und 5 Sekunden lang halten, um eine vollstän-dige kalibrierung des linearen Zeigers durchzuführen (kann bis zu 32 Sekunden dauern.)
SeKundenZeiger
datuMSFenSter
Krone
unterer Zeiger
KnopF A
KnopF B
Vierter Mittlerer Zeiger
StundenZeiger
linearZeiger
MinutenZeiger
A
B
1 2 3
124 125
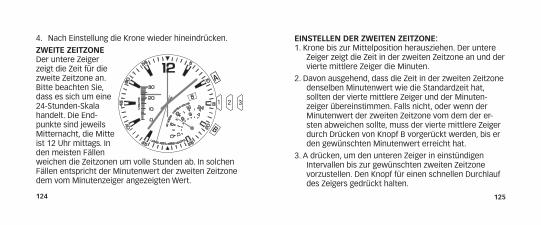
4. Nach Einstellung die krone wieder hineindrücken.
zWEITE zEITzonEDer untere Zeiger zeigt die Zeit für die zweite Zeitzone an. Bitte beachten Sie, dass es sich um eine 24-Stunden-Skala handelt. Die End-punkte sind jeweils Mitternacht, die Mitte ist 12 Uhr mittags. In den meisten Fällen weichen die Zeitzonen um volle Stunden ab. In solchen Fällen entspricht der Minutenwert der zweiten Zeitzone dem vom Minutenzeiger angezeigten Wert.
EInSTELLEn DEr zWEITEn zEITzonE: 1. krone bis zur Mittelposition herausziehen. Der untere
Zeiger zeigt die Zeit in der zweiten Zeitzone an und der vierte mittlere Zeiger die Minuten.
2. Davon ausgehend, dass die Zeit in der zweiten Zeitzone denselben Minutenwert wie die Standardzeit hat, sollten der vierte mittlere Zeiger und der Minuten-zeiger übereinstimmen. Falls nicht, oder wenn der Minutenwert der zweiten Zeitzone vom dem der er-sten abweichen sollte, muss der vierte mittlere Zeiger durch Drücken von knopf B vorgerückt werden, bis er den gewünschten Minutenwert erreicht hat.
3. A drücken, um den unteren Zeiger in einstündigen Intervallen bis zur gewünschten zweiten Zeitzone vorzustellen. Den knopf für einen schnellen Durchlauf des Zeigers gedrückt halten.
A
B
1 2 3

126 127
Ist der Chronograph zurückgestellt, zeigen alle Zeiger auf Null. Nach acht Sekunden nimmt die Uhr wieder die nor-male Zeitanzeige der zweiten Zeitzone auf. Es ist möglich, eine Zwischenzeit zu messen, während der Chronograph läuft. B (Split/Reset) drücken und alle Zeiger werden ange-halten, während der Chronograph weiterläuft. Nochmals B (Split/Reset) drücken, um die Anzeige der abgelaufenen Zeit des Chronographen fortzusetzen.
4. Nach Einstellung die krone wieder hineindrücken.
LInEArCHronoGrAPH Die Uhr verfügt über einen Chronographen mit 4-Stunden-Teilung.
1. A (Start/Stop) drücken, um zu beginnen. Der vierte mittlere Zeiger zeigt die Sekunden mit 1/5-Sekunden-schritten. Der Linearzeiger zeigt die Minuten an, zählt bis dreißig und wiederholt dies. Der untere Zeiger zeigt die Gesamtzeit, inkl. Stunden und Minuten an, mit Un-terteilungen alle zehn Minuten. Der Chronograph misst bis zu vier Stunden und hört dann automatisch auf.
2. A (Start/Stop) drücken, um zu beginnen. Alle Zeiger werden angehalten.
3. B (Split/Reset) drücken, um den Chronograph auf die Nullposition zurückzusetzen.
128 129
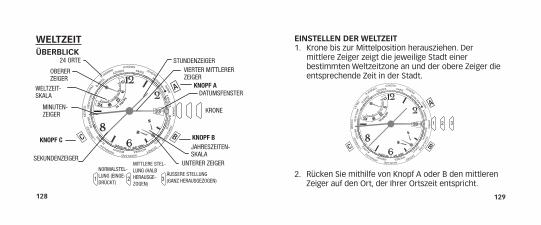
WELTzEITÜBErBLICK
EInSTELLEn DEr WELTzEIT1. krone bis zur Mittelposition herausziehen. Der
mittlere Zeiger zeigt die jeweilige Stadt einer bestimmten Weltzeitzone an und der obere Zeiger die entsprechende Zeit in der Stadt.
A
BC
1 2 3
2. Rücken Sie mithilfe von knopf A oder B den mittleren Zeiger auf den Ort, der Ihrer Ortszeit entspricht.
A
BC
1 2 3
corrected 3.3.11 with Paulo’s new cities
24 orte
WeltZeit-SKala
SeKundenZeiger
datuMSFenSter
Krone
unterer Zeiger
KnopF A
KnopF B KnopF C
Vierter Mittlerer Zeiger
JaHreSZeiten-SKala
oBerer Zeiger
StundenZeiger
Minuten-Zeiger
norMalStel-lung (ein ge-drÜcKt)
Mittlere Stel-lung (HalB Her auS ge - Z ogen)
ÄuSSere Stellung (ganZ HerauSgeZogen)
130 131
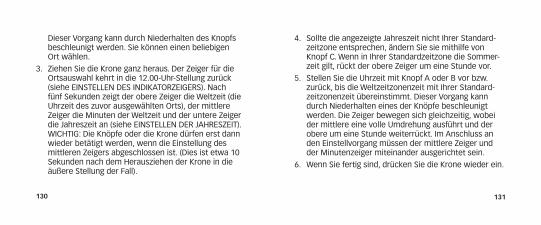
Dieser Vorgang kann durch Niederhalten des knopfs beschleunigt werden. Sie können einen beliebigen Ort wählen.
3. Ziehen Sie die krone ganz heraus. Der Zeiger für die Ortsauswahl kehrt in die 12.00-Uhr-Stellung zurück (siehe EINSTELLEN DES INDIkATORZEIGERS). Nach fünf Sekunden zeigt der obere Zeiger die Weltzeit (die Uhrzeit des zuvor ausgewählten Orts), der mittlere Zeiger die Minuten der Weltzeit und der untere Zeiger die Jahreszeit an (siehe EINSTELLEN DER JAHRESZEIT). WICHTIG: Die knöpfe oder die krone dürfen erst dann wieder betätigt werden, wenn die Einstellung des mittleren Zeigers abgeschlossen ist. (Dies ist etwa 10 Sekunden nach dem Herausziehen der krone in die äußere Stellung der Fall).
4. Sollte die angezeigte Jahreszeit nicht Ihrer Standard-zeitzone entsprechen, ändern Sie sie mithilfe von knopf C. Wenn in Ihrer Standardzeitzone die Sommer-zeit gilt, rückt der obere Zeiger um eine Stunde vor.
5. Stellen Sie die Uhrzeit mit knopf A oder B vor bzw. zurück, bis die Weltzeitzonenzeit mit Ihrer Standard-zeitzonenzeit übereinstimmt. Dieser Vorgang kann durch Niederhalten eines der knöpfe beschleunigt werden. Die Zeiger bewegen sich gleichzeitig, wobei der mittlere eine volle Umdrehung ausführt und der obere um eine Stunde weiterrückt. Im Anschluss an den Einstellvorgang müssen der mittlere Zeiger und der Minutenzeiger miteinander ausgerichtet sein.
6. Wenn Sie fertig sind, drücken Sie die krone wieder ein.

132 133
orTSzEITAnzEIGEDrehen Sie den mittleren Zeiger mit knopf A oder B vor bzw. zurück und wählen Sie einen Ort aus. Der obere Zeiger rückt auf die Uhrzeit für den gewählten Ort. Bitte beachten Sie, dass es sich um eine 24-Stunden-Skala handelt. Die Endpunkte sind jeweils Mitternacht, die Mitte ist 12 Uhr mittags.
EInSTELLEn DEr jAHrESzEITAnhand der Jahreszeitfunktion kann die Uhr automatisch auf Sommerzeit umschalten.
EInSTELLEn DES InDIKATorzEIGErS (VIErTEr MITTLErEr zEIGEr) Der Indikatorzeiger kann bei Bedarf wie folgt neu justiert werden:
1. Ziehen Sie die krone ganz heraus. Der obere und un-tere Zeiger rücken automatisch in ihre Endstellungen.
2. Der vierte mittlere Zeiger muss auf 12 Uhr zeigen. Sollte dieser innerhalb von 5 Sekunden nach dem Herausziehen der krone nicht in die 12-Uhr-Stellung rücken, muss er mithilfe von knopf A oder B entweder im oder gegen den Uhrzeigersinn in die 12-Uhr-Stel-lung gedreht werden.
3. Wenn Sie fertig sind, drücken Sie die krone wieder ein.
AnMErKunG: Wird innerhalb von 5 Sekunden nach dem Stillstand der Zeiger kein knopf gedrückt, schaltet die Uhr in den Weltzeit-Einstellmodus (siehe EINSTELLEN DER WELTZEIT).
A
BC
1 2 3

134 135
Sie bietet zwei Einstellungen, mit deren Hilfe dies für alle Orte mit Sommerzeitumstellung erreicht werden kann. Diese sind SOMMER für Sommerzeit und WINTER für die Standardzeit.
Ist ein Ort auf SOMMER eingestellt, stehen alle Orte in derselben Hemisphäre ebenfalls auf SOMMER und alle Orte in der anderen Hemisphäre befinden sich automa-tisch auf WINTER. Die Uhr ordnet die Orte der korrekten Hemisphäre zu.
Die Jahreszeit in dem gewählten Ort wird mit knopf C geändert.
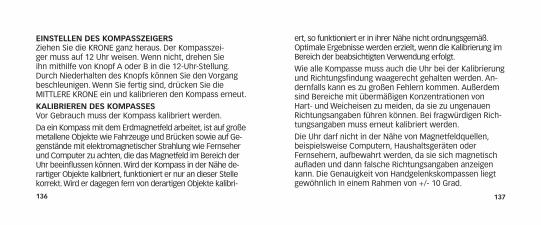
KoMPASSÜBErBLICK
II
14 Mittlere Krone
Mittlere Stellung
datuMSeinStellung
II
14
HerauSgeZogen
uHrZeiteinStellung
Krone
B (DREHRInG)
A (KompASS)
deKlinationSSKala KoMPaSSZeiger (daS nordende iSt rot SPitZ/lÄnger)
136 137
EInSTELLEn DES KoMPASSzEIGErSZiehen Sie die kRONE ganz heraus. Der kompasszei-ger muss auf 12 Uhr weisen. Wenn nicht, drehen Sie ihn mithilfe von knopf A oder B in die 12-Uhr-Stellung. Durch Niederhalten des knopfs können Sie den Vorgang beschleunigen. Wenn Sie fertig sind, drücken Sie die MITTLERE kRONE ein und kalibrieren den kompass erneut.
KALIBrIErEn DES KoMPASSESVor Gebrauch muss der kompass kalibriert werden.
Da ein kompass mit dem Erdmagnetfeld arbeitet, ist auf große metallene Objekte wie Fahrzeuge und Brücken sowie auf Ge-genstände mit elektromagnetischer Strahlung wie Fernseher und Computer zu achten, die das Magnetfeld im Bereich der Uhr beeinflussen können. Wird der kompass in der Nähe de-rartiger Objekte kalibriert, funktioniert er nur an dieser Stelle korrekt. Wird er dagegen fern von derartigen Objekte kalibri-
ert, so funktioniert er in ihrer Nähe nicht ordnungsgemäß. Optimale Ergebnisse werden erzielt, wenn die kalibrierung im Bereich der beabsichtigten Verwendung erfolgt.
Wie alle kompasse muss auch die Uhr bei der kalibrierung und Richtungsfindung waagerecht gehalten werden. An-dernfalls kann es zu großen Fehlern kommen. Außerdem sind Bereiche mit übermäßigen konzentrationen von Hart- und Weicheisen zu meiden, da sie zu ungenauen Richtungsangaben führen können. Bei fragwürdigen Rich-tungsangaben muss erneut kalibriert werden.
Die Uhr darf nicht in der Nähe von Magnetfeldquellen, beispielsweise Computern, Haushaltsgeräten oder Fernsehern, aufbewahrt werden, da sie sich magnetisch aufladen und dann falsche Richtungsangaben anzeigen kann. Die Genauigkeit von Handgelenkskompassen liegt gewöhnlich in einem Rahmen von +/- 10 Grad.
138 139
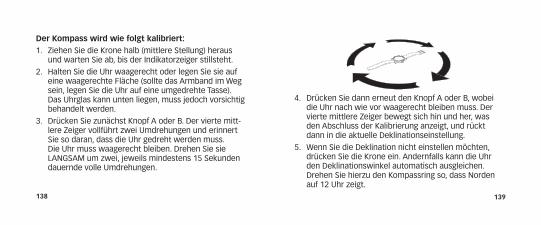
Der Kompass wird wie folgt kalibriert:1. Ziehen Sie die krone halb (mittlere Stellung) heraus
und warten Sie ab, bis der Indikatorzeiger stillsteht.
2. Halten Sie die Uhr waagerecht oder legen Sie sie auf eine waagerechte Fläche (sollte das Armband im Weg sein, legen Sie die Uhr auf eine umgedrehte Tasse). Das Uhrglas kann unten liegen, muss jedoch vorsichtig behandelt werden.
3. Drücken Sie zunächst knopf A oder B. Der vierte mitt-lere Zeiger vollführt zwei Umdrehungen und erinnert Sie so daran, dass die Uhr gedreht werden muss. Die Uhr muss waagerecht bleiben. Drehen Sie sie LANGSAM um zwei, jeweils mindestens 15 Sekunden dauernde volle Umdrehungen.
4. Drücken Sie dann erneut den knopf A oder B, wobei die Uhr nach wie vor waagerecht bleiben muss. Der vierte mittlere Zeiger bewegt sich hin und her, was den Abschluss der kalibrierung anzeigt, und rückt dann in die aktuelle Deklinationseinstellung.
5. Wenn Sie die Deklination nicht einstellen möchten, drücken Sie die krone ein. Andernfalls kann die Uhr den Deklinationswinkel automatisch ausgleichen. Drehen Sie hierzu den kompassring so, dass Norden auf 12 Uhr zeigt.
140 141
6. A oder B drücken, um den vierten mittleren Zeiger nach Westen (-) oder Osten (+) zu bewegen, um mit Hilfe der Deklinationsskala auf die magnetische Deklination Ihres Standortes zu zeigen. Dieser Vorgang kann durch Niederhalten des knopfs beschleunigt werden. Auf der nächsten Seite finden Sie eine Abbildung mit einem Beispiel.
7. Drücken Sie die krone ein, wenn Sie fertig sind.
Deklination auf -14° (14°W) eingestellt
KoMPASSMoDuSDer kompassmodus ist normalerweise deaktiviert und der vierte mittlere Zeiger steht auf 12.00 Uhr bzw. zeigt die Chronographsekunden an.
Der kompass wird durch Drücken von knopf A oder B aktiviert. Die Uhr muss dabei waagerecht gehalten werden. Der kompasszeiger rückt in die Norden-Stellung. Wird die Uhr gedreht, rückt der vierte mittlere Zeiger so weiter, dass er stets auf Norden zeigt. Nach 20 Sekunden schaltet sich der kompass automatisch ab und der vierte mittlere Zeiger kehrt in seinen Normalmodus zurück. Dadurch wird die Batterie geschont. Durch erneutes Betätigen von knopf A oder B kann der kompass jederzeit erneut für 20 Sekunden aktiviert werden.
AnMErKunG: Im kompassmodus bewegt sich der Sekundenzeiger in 2-Sekunden-Inkrementen.
A
B

142 143
GEzEITEn TEMPErATur unD KoMPASSÜBErBLICK
EInSTELLEn DES InDIKATorzEIGErSZiehen Sie die krone ganz heraus. Der Indikatorzeiger muss auf 12 Uhr weisen. Sollte das nicht der Fall sein, rücken Sie ihn entweder mit knopf B (GEZEITEN) oder knopf A (TEMPERATUR) in die 12-Uhr-Stellung. GEZEITEN rückt den Zeiger im, TEMP entgegen dem Uhrzeigersinn weiter. Durch Niederhalten des knopfs wird der Vorgang beschleunigt. Wenn Sie fertig sind, drücken Sie die krone wieder ein.
uMSCHALTEn zWISCHEn GEzEITEn unD TEMPErATurDer Indikatorzeiger zeigt konstant entweder die Gezeit oder die Temperatur an. Bei angezeigter Temperatur können Sie mit dem GEZEITEN-knopf (B) die Gezeitenuhr wählen. Zuerst wird Ebbe, dann der aktuelle Stand angezeigt. Bei aktiver Gezeitenanzeige schalten sie mit
ÄuSSere Stellung - uHrZeit - ein Stellung
deKlination S-SKala
indiKator-Zeiger
C (KompASS) B (GEZEItEn)
A (tEmp)
Krone
KoMPaSS- dreHring
datuM
geZeitenSKala
teMPeraturSKala
Mittlere Stellung - datuMSeinStellung
144 145
dem TEMP-knopf (A) auf das Thermometer um. Der Zeiger rückt zunächst auf den Anfang der Thermometerskala und dann auf die aktuelle Temperatur.
THErMoMETErWird die Uhr am Handgelenk getragen, wird die abgele-sene Temperatur von der körperwärme beeinflusst. Genauere Messungen erzielen Sie, wenn Sie die Uhr abnehmen und mindestens einige Minuten lang in den Schatten legen.
Die Uhr kann auch die Wassertemperatur messen. Schalten Sie die Uhr jedoch unbedingt in den Tem pe ra-turmodus, bevor Sie sie ins Wasser tauchen, da unter Wasser keine knöpfe gedrückt werden dürfen.
Thermometermessungen werden jede Minute vorgenom-men; öfter bei wechselnder Temperatur.
GEzEITEnuHrIm Gezeitenmodus dreht sich der Indikatorzeiger immer im Uhrzeigersinn. Steigendes Wasser wird von einem nach links, fallendes Wasser von einem nach rechts weisenden Zeiger markiert. Die Anzahl der Stunden bis zur nächsten Flut/Ebbe ist auf der Gezeitenskala zu sehen.
Da die Gezeiten auch vom Sonnenstand und von der küstenform abhängen, kann die Uhr die Zeit für Ebbe und Flut nicht genau bestimmen. Daher muss die Gezeitenuhr u.U. periodisch justiert werden.
Hierzu muss die krone halb (in die MITTLERE Stellung) herausgezogen werden. Rücken Sie dann mithilfe des GEZEITEN- (B) oder TEMP-knopfs (A) den Zeiger auf die aktuelle Gezeit. GEZEITEN rückt den Zeiger im, TEMP entgegen dem Uhrzeigersinn weiter. Wenn Sie fertig sind, drücken Sie die krone wieder ein.
146 147
KALIBrIErEn DES KoMPASSESVor Gebrauch muss der kompass kalibriert werden.
Da ein kompass mit dem Erdmagnetfeld arbeitet, ist auf große metallene Objekte wie Fahrzeuge und Brücken sowie auf Gegenstände mit elektromagnetischer Strah-lung wie Fernseher und Computer zu achten, die das Magnetfeld im Bereich der Uhr beeinflussen können. Wird der kompass in der Nähe derartiger Objekte kalibriert, funktioniert er nur an dieser Stelle korrekt. Wird er dage-gen fern von derartigen Objekte kalibriert, so funktioniert er in ihrer Nähe nicht ordnungsgemäß. Optimale Ergeb-nisse werden erzielt, wenn die kalibrierung im Bereich der beabsichtigten Verwendung erfolgt.
Wie alle kompasse muss auch die Uhr bei der kalibrierung und Richtungsfindung waagerecht gehalten werden. Andernfalls kann es zu großen Fehlern kommen. Außer-
dem sind Bereiche mit übermäßigen konzentrationen von Hart- und Weicheisen zu meiden, da sie zu ungenauen Richtungsangaben führen können. Bei fragwürdigen Richtungsangaben muss erneut kalibriert werden.
Die Uhr darf nicht in der Nähe von Magnetfeldquellen, beispielsweise Computern, Haushaltsgeräten oder Fernsehern, aufbewahrt werden, da sie sich magnetisch aufladen und dann falsche Richtungsangaben anzeigen kann. Die Genauigkeit von Handgelenkskompassen liegt gewöhnlich in einem Rahmen von +/- 10 Grad.
Der Kompass wird wie folgt kalibriert:1. Ziehen Sie die krone halb (mittlere Stellung) heraus
und warten Sie ab, bis der Indikatorzeiger stillsteht.
2. Halten Sie die Uhr waagerecht oder legen Sie sie auf eine waagerechte Fläche (sollte das Armband im Weg

148 149
sein, legen Sie die Uhr auf eine umgedrehte Tasse). Das Uhrglas kann unten liegen, muss jedoch vorsichtig behandelt werden.
3. Drücken Sie zunächst den knopf C (kOMPASS). Der vierte mittlere Zeiger vollführt zwei Umdrehungen und erinnert Sie so daran, dass die Uhr gedreht werden muss. Die Uhr muss waagerecht bleiben. Drehen Sie sie LANGSAM um zwei, jeweils mindestens 15 Sekun-den dauernde volle Umdrehungen.
4. Drücken Sie dann erneut den knopf C (kompass), wobei die Uhr nach wie vor waagerecht bleiben muss. Der vierte mittlere Zeiger bewegt sich hin und her, was den Abschluss der kalibrierung anzeigt, und rückt dann in die aktuelle Deklinationseinstellung.
5. Wenn Sie die Deklination nicht einstellen möchten, drücken Sie die krone ein. Andernfalls kann die Uhr den Deklinationswinkel automatisch ausgleichen. Drehen Sie hierzu den kompassring so, dass Norden auf 12 Uhr zeigt.
6. A oder B drücken, um den vierten mittleren Zeiger nach Westen (-) oder Osten (+) zu bewegen, um mit Hilfe der Deklinationsskala auf die magnetische Deklination Ihres Standortes zu zeigen. Dieser Vorgang kann durch Niederhalten des knopfs beschleunigt
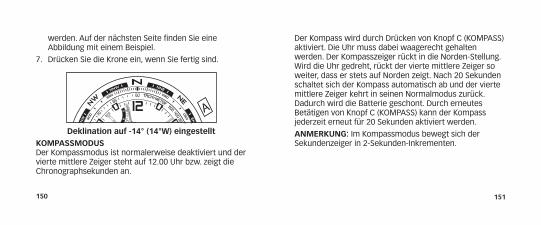
150 151
werden. Auf der nächsten Seite finden Sie eine Abbildung mit einem Beispiel.
7. Drücken Sie die krone ein, wenn Sie fertig sind.
Deklination auf -14° (14°W) eingestelltKoMPASSMoDuSDer kompassmodus ist normalerweise deaktiviert und der vierte mittlere Zeiger steht auf 12.00 Uhr bzw. zeigt die Chronographsekunden an.
Der kompass wird durch Drücken von knopf C (kOMPASS) aktiviert. Die Uhr muss dabei waagerecht gehalten werden. Der kompasszeiger rückt in die Norden-Stellung. Wird die Uhr gedreht, rückt der vierte mittlere Zeiger so weiter, dass er stets auf Norden zeigt. Nach 20 Sekunden schaltet sich der kompass automatisch ab und der vierte mittlere Zeiger kehrt in seinen Normalmodus zurück. Dadurch wird die Batterie geschont. Durch erneutes Betätigen von knopf C (kOMPASS) kann der kompass jederzeit erneut für 20 Sekunden aktiviert werden.
AnMErKunG: Im kompassmodus bewegt sich der Sekundenzeiger in 2-Sekunden-Inkrementen.
A
B
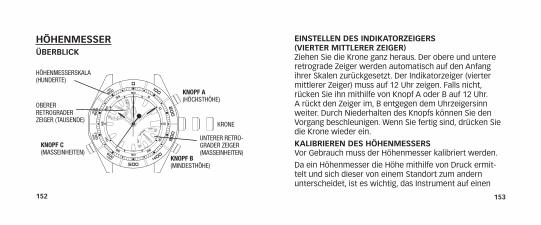
152 153
HÖHEnMESSErÜBErBLICK
EInSTELLEn DES InDIKATorzEIGErS (VIErTEr MITT LErEr zEIGEr)Ziehen Sie die krone ganz heraus. Der obere und untere retrograde Zeiger werden automatisch auf den Anfang ihrer Skalen zurückgesetzt. Der Indikatorzeiger (vierter mittlerer Zeiger) muss auf 12 Uhr zeigen. Falls nicht, rücken Sie ihn mithilfe von knopf A oder B auf 12 Uhr. A rückt den Zeiger im, B entgegen dem Uhrzeigersinn weiter. Durch Niederhalten des knopfs können Sie den Vorgang beschleunigen. Wenn Sie fertig sind, drücken Sie die krone wieder ein.
KALIBrIErEn DES HÖHEnMESSErSVor Gebrauch muss der Höhenmesser kalibriert werden.
Da ein Höhenmesser die Höhe mithilfe von Druck ermit-telt und sich dieser von einem Standort zum andern unterscheidet, ist es wichtig, das Instrument auf einen
HÖHenMeSSerSKala(Hunderte)
oBerer retrograder Zeiger (tauSende)
KnopF C(MaSSeinHeiten)
KnopF A(HÖcHStHÖHe)
KnopF B(MindeStHÖHe)
unterer retro-grader Zeiger (MaSSeinHeiten)
Krone
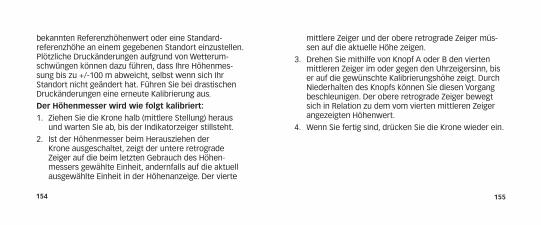
154 155
bekannten Referenzhöhenwert oder eine Standard-referenzhöhe an einem gegebenen Standort einzustellen. Plötzliche Druckänderungen aufgrund von Wetterum-schwüngen können dazu führen, dass Ihre Höhenmes-sung bis zu +/-100 m abweicht, selbst wenn sich Ihr Standort nicht geändert hat. Führen Sie bei drastischen Druckänderungen eine erneute kalibrierung aus.
Der Höhenmesser wird wie folgt kalibriert:1. Ziehen Sie die krone halb (mittlere Stellung) heraus
und warten Sie ab, bis der Indikatorzeiger stillsteht.
2. Ist der Höhenmesser beim Herausziehen der krone ausgeschaltet, zeigt der untere retrograde Zeiger auf die beim letzten Gebrauch des Höhen-messers gewählte Einheit, andernfalls auf die aktuell ausgewählte Einheit in der Höhenanzeige. Der vierte
mittlere Zeiger und der obere retrograde Zeiger müs-sen auf die aktuelle Höhe zeigen.
3. Drehen Sie mithilfe von knopf A oder B den vierten mittleren Zeiger im oder gegen den Uhrzeigersinn, bis er auf die gewünschte kalibrierungshöhe zeigt. Durch Niederhalten des knopfs können Sie diesen Vorgang beschleunigen. Der obere retrograde Zeiger bewegt sich in Relation zu dem vom vierten mittleren Zeiger angezeigten Höhenwert.
4. Wenn Sie fertig sind, drücken Sie die krone wieder ein.
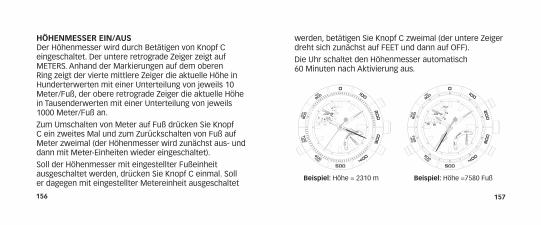
156 157
HÖHEnMESSEr EIn/AuSDer Höhenmesser wird durch Betätigen von knopf C eingeschaltet. Der untere retrograde Zeiger zeigt auf METERS. Anhand der Markierungen auf dem oberen Ring zeigt der vierte mittlere Zeiger die aktuelle Höhe in Hunderterwerten mit einer Unterteilung von jeweils 10 Meter/Fuß, der obere retrograde Zeiger die aktuelle Höhe in Tausenderwerten mit einer Unterteilung von jeweils 1000 Meter/Fuß an.
Zum Umschalten von Meter auf Fuß drücken Sie knopf C ein zweites Mal und zum Zurückschalten von Fuß auf Meter zweimal (der Höhenmesser wird zunächst aus- und dann mit Meter-Einheiten wieder eingeschaltet).
Soll der Höhenmesser mit eingestellter Fußeinheit ausgeschaltet werden, drücken Sie knopf C einmal. Soll er dagegen mit eingestellter Metereinheit ausgeschaltet
werden, betätigen Sie knopf C zweimal (der untere Zeiger dreht sich zunächst auf FEET und dann auf OFF).
Die Uhr schaltet den Höhenmesser automatisch 60 Minuten nach Aktivierung aus.
Beispiel: Höhe = 2310 m Beispiel: Höhe =7580 Fuß
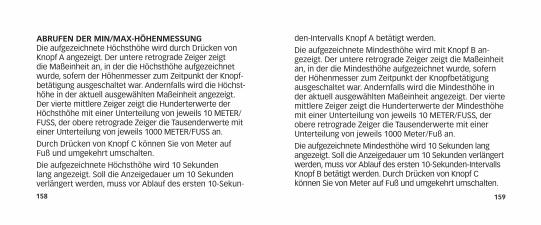
158 159
ABruFEn DEr MIn/MAX-HÖHEnMESSunGDie aufgezeichnete Höchsthöhe wird durch Drücken von knopf A angezeigt. Der untere retrograde Zeiger zeigt die Maßeinheit an, in der die Höchsthöhe aufgezeichnet wurde, sofern der Höhenmesser zum Zeitpunkt der knopf-betätigung ausgeschaltet war. Andernfalls wird die Höchst-höhe in der aktuell ausgewählten Maßeinheit angezeigt. Der vierte mittlere Zeiger zeigt die Hunderterwerte der Höchsthöhe mit einer Unterteilung von jeweils 10 METER/FUSS, der obere retrograde Zeiger die Tausenderwerte mit einer Unterteilung von jeweils 1000 METER/FUSS an.
Durch Drücken von knopf C können Sie von Meter auf Fuß und umgekehrt umschalten.
Die aufgezeichnete Höchsthöhe wird 10 Sekunden lang angezeigt. Soll die Anzeigedauer um 10 Sekunden verlängert werden, muss vor Ablauf des ersten 10-Sekun-
den-Intervalls knopf A betätigt werden.
Die aufgezeichnete Mindesthöhe wird mit knopf B an-gezeigt. Der untere retrograde Zeiger zeigt die Maßeinheit an, in der die Mindesthöhe aufgezeichnet wurde, sofern der Höhenmesser zum Zeitpunkt der knopfbetätigung ausgeschaltet war. Andernfalls wird die Mindesthöhe in der aktuell ausgewählten Maßeinheit angezeigt. Der vierte mittlere Zeiger zeigt die Hunderterwerte der Mindesthöhe mit einer Unterteilung von jeweils 10 METER/FUSS, der obere retrograde Zeiger die Tausenderwerte mit einer Unterteilung von jeweils 1000 Meter/Fuß an.
Die aufgezeichnete Mindesthöhe wird 10 Sekunden lang angezeigt. Soll die Anzeigedauer um 10 Sekunden verlängert werden, muss vor Ablauf des ersten 10-Sekunden-Intervalls knopf B betätigt werden. Durch Drücken von knopf C können Sie von Meter auf Fuß und umgekehrt umschalten.

160 161
TIEFEÜBErBLICK
TEMPErATurDer Temperatursensor ist stets eingeschaltet und nimmt mindestens einmal alle 60 Sekunden eine Messung vor. Die Temperatur wird vom unteren Zeiger auf der zuge-hörigen Skala angezeigt.
Wird die Uhr am Handgelenk getragen, wirkt sich die körperwärme auf die Temperaturmessung aus. Genauere Messwerte erhalten Sie, wenn Sie die Uhr abnehmen.
TIEFEnSEnSor EIn/AuSDieser Sensor ist normalerweise ausgeschaltet und muss vor dem Eintauchen manuell eingeschaltet werden. Drücken Sie hierzu kurz knopf B. Der vierte mittlere Zeiger rückt von der AUS-Stellung (6 Uhr) in die 12-Uhr-Stellung und nimmt dann mindestens alle 5 Sekunden eine Mes-sung vor. Mit zunehmender Tiefe zeigt der vierte mittlere Zeiger auf der Tiefenskala die tatsächliche Tiefe an. Bleibt
3
AA
B
1 2 32 32 3
Mittlerer Zeiger
auS-anZeige
KnopF A
KnopF B
unterer Zeiger
Krone

162 163
der Messwert 5 Minuten lang in einem Bereich zwischen 0 und 2 Metern, schaltet sich der Sensor automatisch ab. Sie können den Sensor auch manuell abschalten. Halten Sie hierzu knopf B 2 Sekunden lang nieder. Der vierte mittlere Zeiger dreht sich in die AUS-Stellung (6 Uhr).
ABruFEn Von MAXIMALEr TIEFE/MInIMALEr TEMPErATurNach Erreichen der Oberfläche die krone ausdrehen und in die mittlere Position setzen. Der mittlere und der untere Zeiger bewegen sich, wobei Ersterer die größte Tiefe und Letzterer die niedrigste Temperatur anzeigt, die während des letzten Abstiegs verzeichnet wurden. Wenn der Tiefensensor wieder aktiviert wird, wird der Speicher gelöscht.
Bei einer noch nicht benutzten Uhr zeigt der mittlere Zeiger 0 Meter und der untere Zeiger 0° C an. Die krone muss wieder festgeschraubt werden, bevor die Uhr in Gebrauch genommen bzw. eingetaucht wird.
BATTErIELADESTAnDDie Uhr überwacht den Ladestand der Batterie und zeigt anhand der Bewegung des Sekundenzeigers visuell den aktuellen Ladestand an. Dieser wird in drei Stufen angezeigt – Normal, Niedrig und Ersetzen.
Bei normalem Ladestand rückt der Sekundenzeiger pro Sekunde um eine Zeigerstellung weiter.
Bei niedrigem Ladestand rückt der Sekundenzeiger nur alle 2 Sekunden um zwei Zeigerstellungen vor. Es empfiehlt sich, die Batterie bei niedrigem Ladestand auszutauschen.
164 165
Im Status „Batterie ersetzen“ rückt der Sekundenzeiger nur alle 5 Sekunden um fünf Zeigerstellungen vor. Zu diesem Zeitpunkt darf der Tiefensensor auf keinen Fall mehr aktiviert werden und die Batterie muss unverzüglich ausgewechselt werden.
TACHYMETErFunKTIon(nicht bei allen Modellen)Anhand dieser Methode bestimmt das Tachymeter le diglich Geschwindigkeiten über 60 Einheiten pro Stunde. Sollen langsamere Geschwindigkeiten gemessen werden, muss eine kleinere Maßeinheit gewählt werden. Die Tachymeterfunktion ist unabhängig von der Entfernungs-einheit (d.h. Meilen, Seemeilen, kilometer, Meter usw.), solange für alle Berechnungen dieselbe Längeneinheit benutzt wird.
1. Legen Sie die Start- und Endmarkierungen für Ihre vorbestimmte Entfernung fest.
2. Starten Sie den Chronographen, sobald das Objekt für die Geschwindigkeitsmessung die Startmarkierung passiert.
3. Stoppen Sie den Chronographen, sobald das Objekt für die Geschwindigkeitsmessung die Endmarkierung passiert.
4. Bestimmen Sie durch Vergleichen des Chronographen-Sekundenzeigers mit den Tachymetermarkierungen die Geschwindigkeit des Objekts.
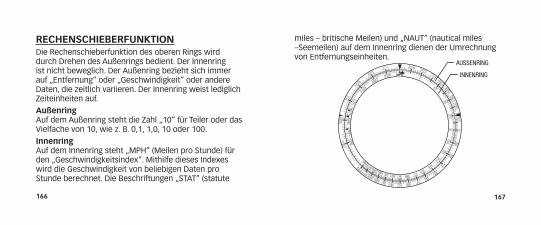
166 167
rECHEnSCHIEBErFunKTIonDie Rechenschieberfunktion des oberen Rings wird durch Drehen des Außenrings bedient. Der Innenring ist nicht beweglich. Der Außenring bezieht sich immer auf „Entfernung“ oder „Geschwindigkeit“ oder andere Daten, die zeitlich variieren. Der Innenring weist lediglich Zeiteinheiten auf.
Außenring Auf dem Außenring steht die Zahl „10“ für Teiler oder das Vielfache von 10, wie z. B. 0,1, 1,0, 10 oder 100.
Innenring Auf dem Innenring steht „MPH“ (Meilen pro Stunde) für den „Geschwindigkeitsindex“. Mithilfe dieses Indexes wird die Geschwindigkeit von beliebigen Daten pro Stunde berechnet. Die Beschriftungen „STAT“ (statute
miles – britische Meilen) und „NAUT“ (nautical miles –Seemeilen) auf dem Innenring dienen der Umrechnung von Entfernungseinheiten.
auSSenring
innenring

168 169
Die folgenden Beispiele erläutern, wie der Rechen-schieber zu verwenden ist.
GESCHWInDIGKEITSBErECHnunG: Mit welcher Geschwindigkeit werden 10 Seemeilen in 15 Minuten zurückgelegt? Bekannte Faktoren: Entfernung: 10 Seemeilen Zeit: 15 Minuten
• Den„10“-PfeilaufdemAußenringmit„15“aufdemInnenring ausrichten.
• DieerforderlicheGeschwindigkeitwirddirektüberderMarkierung „MPH“ auf dem Innenring angezeigt.
Die Antwort: 40 Seemeilen pro Stunde
zeitberechnung: Wie lange dauert es, 10 Seemeilen mit einer Geschwindigkeit von 40 Meilen pro Stunde zurückzulegen? Bekannte Faktoren: Geschwindigkeit: 40 Meilen pro Stunde Entfernung: 10 Seemeilen
• „40“aufdemAußenringmitderMarkierung„MPH“aufdem Innenring ausrichten.
• DieerforderlicheZeitwirddirektunterdem„10“-Pfeilauf dem Außenring angezeigt, nämlich „15“ auf dem Innenring.
Die Antwort: 15 Minuten
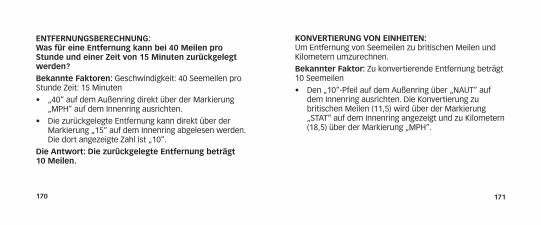
170 171
KonVErTIErunG Von EInHEITEn: Um Entfernung von Seemeilen zu britischen Meilen und kilometern umzurechnen.
Bekannter Faktor: Zu konvertierende Entfernung beträgt 10 Seemeilen
• Den„10“-PfeilaufdemAußenringüber„NAUT“aufdem Innenring ausrichten. Die konvertierung zu britischen Meilen (11,5) wird über der Markierung „STAT“ auf dem Innenring angezeigt und zu kilometern (18,5) über der Markierung „MPH“.
EnTFErnunGSBErECHnunG: Was für eine Entfernung kann bei 40 Meilen pro Stunde und einer zeit von 15 Minuten zurückgelegt werden?Bekannte Faktoren: Geschwindigkeit: 40 Seemeilen pro Stunde Zeit: 15 Minuten
• „40“aufdemAußenringdirektüberderMarkierung„MPH“ auf dem Innenring ausrichten.
• DiezurückgelegteEntfernungkanndirektüberderMarkierung „15“ auf dem Innenring abgelesen werden. Die dort angezeigte Zahl ist „10“.
Die Antwort: Die zurückgelegte Entfernung beträgt 10 Meilen.
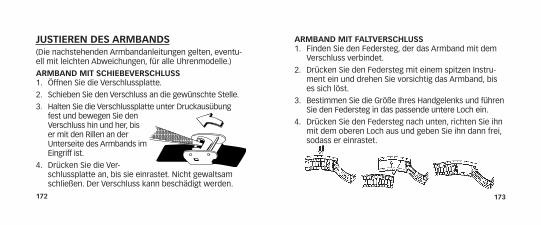
172 173
juSTIErEn DES ArMBAnDS(Die nachstehenden Armbandanleitungen gelten, eventu-ell mit leichten Abweichungen, für alle Uhrenmodelle.)
ArMBAnD MIT SCHIEBEVErSCHLuSS1. Öffnen Sie die Verschlussplatte.
2. Schieben Sie den Verschluss an die gewünschte Stelle.
3. Halten Sie die Verschlussplatte unter Druckausübung fest und bewegen Sie den Verschluss hin und her, bis er mit den Rillen an der Unterseite des Armbands im Eingriff ist.
4. Drücken Sie die Ver-schlussplatte an, bis sie einrastet. Nicht gewaltsam schließen. Der Verschluss kann beschädigt werden.
ArMBAnD MIT FALTVErSCHLuSS1. Finden Sie den Federsteg, der das Armband mit dem
Verschluss verbindet.
2. Drücken Sie den Federsteg mit einem spitzen Instru-ment ein und drehen Sie vorsichtig das Armband, bis es sich löst.
3. Bestimmen Sie die Größe Ihres Handgelenks und führen Sie den Federsteg in das passende untere Loch ein.
4. Drücken Sie den Federsteg nach unten, richten Sie ihn mit dem oberen Loch aus und geben Sie ihn dann frei, sodass er einrastet.
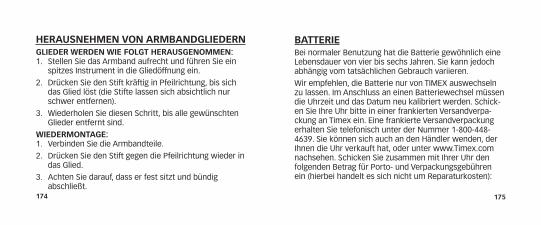
174 175
HErAuSnEHMEn Von ArMBAnDGLIEDErnGLIEDEr WErDEn WIE FoLGT HErAuSGEnoMMEn:1. Stellen Sie das Armband aufrecht und führen Sie ein
spitzes Instrument in die Gliedöffnung ein.
2. Drücken Sie den Stift kräftig in Pfeilrichtung, bis sich das Glied löst (die Stifte lassen sich absichtlich nur schwer entfernen).
3. Wiederholen Sie diesen Schritt, bis alle gewünschten Glieder entfernt sind.
WIEDErMonTAGE:1. Verbinden Sie die Armbandteile.
2. Drücken Sie den Stift gegen die Pfeilrichtung wieder in das Glied.
3. Achten Sie darauf, dass er fest sitzt und bündig abschließt.
BATTErIEBei normaler Benutzung hat die Batterie gewöhnlich eine Lebensdauer von vier bis sechs Jahren. Sie kann jedoch abhängig vom tatsächlichen Gebrauch variieren.
Wir empfehlen, die Batterie nur von TIMEX auswechseln zu lassen. Im Anschluss an einen Batteriewechsel müssen die Uhrzeit und das Datum neu kalibriert werden. Schick-en Sie Ihre Uhr bitte in einer frankierten Versandverpa-ckung an Timex ein. Eine frankierte Versandverpackung erhalten Sie telefonisch unter der Nummer 1-800-448-4639. Sie können sich auch an den Händler wenden, der Ihnen die Uhr verkauft hat, oder unter www.Timex.com nachsehen. Schicken Sie zusammen mit Ihrer Uhr den folgenden Betrag für Porto- und Verpackungsgebühren ein (hierbei handelt es sich nicht um Reparaturkosten):

176 177
in den USA einen Scheck oder eine Zahlungsanweisung über USD8,00 und in kanada einen Scheck oder eine Zah lungsanweisung über CAD7,00. In allen anderen Ländern stellt Timex die Porto- und Verpackungskosten in Rechnung.
SCHICKEn SIE BITTE nIEMALS BESonDErE ArMBÄn-DEr oDEr SonSTIGE ArTIKEL Von PErSÖnLICHEM WErT MIT EIn.DIE BATTErIE DArF AuF KEInEn FALL VErBrAnnT WErDEn. SIE IST nICHT AuFLADBAr. BATTErIEn Von KInDErn FErnHALTEn.
InTErnATIonALE TIMEX-GArAnTIEFür ihre TIMEX®-Uhr übernimmt die Timex Group USA, Inc. für die Dauer EINES JAHRES ab dem Erstverkaufsdatum eine Garantie auf Herstellungsmängel. Timex und seine Partner erkennen diese internationale Garantie weltweit an.
Bitte beachten Sie, dass Timex nach eigenem Ermes-sen durch den Einbau neuer oder gründlich überholter und überprüfter komponenten die Uhr reparieren bzw. durch ein identisches oder ähnliches Modell ersetzen kann. WICHTIG — BITTE BEACHTEn SIE, DASS unTEr FoLGEnDEn BEDInGunGEn MÄnGEL oDEr SCHÄDEn An IHrEM ProDuKT Von DIESEr GArAnTIE AuS-GEnoMMEn SInD:1. nach Ablauf der Garantiezeit auftretende Mängel oder
Schäden

178 179
2. wenn die Uhr nicht bei einem Timex-Vertragshändler gekauft worden ist
3. wenn Reparaturen nicht von Timex ausgeführt worden sind
4. Mängel oder Schäden infolge von Unfällen, unbefugten Eingriffen oder unsachgemäßer Behandlung
5. Schäden oder Mängel an Glas, Armband, Uhrenge-häuse, Zubehör oder Batterie. Timex kann den Ersatz solcher Teile in Rechnung stellen.
DIESE GARANTIE UND DIE DARIN ENTHALTENEN ABHIL-FEN GELTEN AUSSCHLIESSLICH UND ANSTATT ALLER ANDEREN AUSDRÜCkLICHEN ODER STILLSCHWEIGENDEN GARANTIEN, EINSCHLIESSLICH JEDER STILLSCHWEI-GENDEN GARANTIE DER HANDELSÜBLICHEN QUALITÄT ODER EIGNUNG ZU EINEM BESTIMMTEN ZWECk. TIMEX
ÜBERNIMMT kEINE HAFTUNG FÜR BEILÄUFIG ENTSTAN-DENE ODER FOLGESCHÄDEN BZW. AUFWENDUNGEN BEI VERTRAGSERFÜLLUNG. In manchen Ländern sind Einschränkungen stillschweigender Garantien bzw. Ausschlüsse oder Einschränkungen von Schadensersatz-ansprüchen nicht erlaubt, sodass diese Einschränkungen für Sie möglicherweise keine Geltung haben. Diese Garantie verleiht Ihnen bestimmte Rechte. Darüber hinaus haben Sie u.U. weitere Rechte, die je nach Land unterschiedlich sind.
Wenn Sie Garantieleistungen in Anspruch nehmen möchten, senden Sie Ihre Uhr bitte an Timex, einen Timex-Partner oder den Timex-Händler, bei dem Sie die Uhr gekauft haben, mit dem ausgefüllten Original-Repa-raturschein als Anlage ein. Ausschließlich für USA und kanada: Legen Sie den ausgefüllten Original-Reparatur-
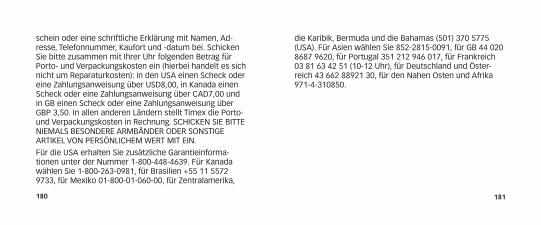
180 181
schein oder eine schriftliche Erklärung mit Namen, Ad-resse, Telefonnummer, kaufort und -datum bei. Schicken Sie bitte zusammen mit Ihrer Uhr folgenden Betrag für Porto- und Verpackungskosten ein (hierbei handelt es sich nicht um Reparaturkosten): in den USA einen Scheck oder eine Zahlungsanweisung über USD8,00, in kanada einen Scheck oder eine Zahlungsanweisung über CAD7,00 und in GB einen Scheck oder eine Zahlungsanweisung über GBP 3,50. In allen anderen Ländern stellt Timex die Porto- und Verpackungskosten in Rechnung. SCHICkEN SIE BITTE NIEMALS BESONDERE ARMBÄNDER ODER SONSTIGE ARTIkEL VON PERSÖNLICHEM WERT MIT EIN.
Für die USA erhalten Sie zusätzliche Garantieinforma-tionen unter der Nummer 1-800-448-4639. Für kanada wählen Sie 1-800-263-0981, für Brasilien +55 11 5572 9733, für Mexiko 01-800-01-060-00, für Zentralamerika,
die karibik, Bermuda und die Bahamas (501) 370 5775 (USA). Für Asien wählen Sie 852-2815-0091, für GB 44 020 8687 9620, für Portugal 351 212 946 017, für Frankreich 03 81 63 42 51 (10-12 Uhr), für Deutschland und Öster-reich 43 662 88921 30, für den Nahen Osten und Afrika 971-4-310850.
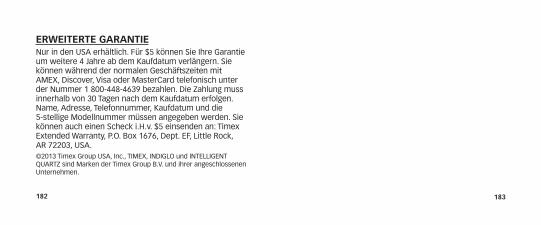
182 183
ErWEITErTE GArAnTIENur in den USA erhältlich. Für $5 können Sie Ihre Garantie um weitere 4 Jahre ab dem kaufdatum verlängern. Sie können während der normalen Geschäftszeiten mit AMEX, Discover, Visa oder MasterCard telefonisch unter der Nummer 1 800-448-4639 bezahlen. Die Zahlung muss innerhalb von 30 Tagen nach dem kaufdatum erfolgen. Name, Adresse, Telefonnummer, kaufdatum und die 5-stellige Modellnummer müssen angegeben werden. Sie können auch einen Scheck i.H.v. $5 einsenden an: Timex Extended Warranty, P.O. Box 1676, Dept. EF, Little Rock, AR 72203, USA. ©2013 Timex Group USA, Inc., TIMEX, INDIGLO und INTELLIGENT QUARTZ sind Marken der Timex Group B.V. und ihrer angeschlossenen Unternehmen.

185
rELojES TIMEX®
Felicitaciones por la compra de su reloj TIMEX® INTELLIGENT QUARTZ™. Por favor lea atentamente las instrucciones para saber cómo funciona su reloj Timex.
Es posible que su reloj no tenga todas las características descritas en este folleto.
Para obtener más información y registrar su producto, visite:
www.timex.com
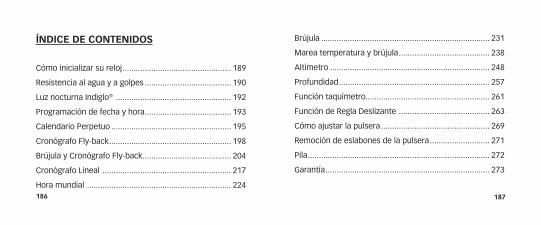
186 187
ÍnDICE DE ConTEnIDoS
Cómo inicializar su reloj ................................................. 189
Resistencia al agua y a golpes ....................................... 190
Luz nocturna Indiglo® .................................................... 192
Programación de fecha y hora ....................................... 193
Calendario Perpetuo ...................................................... 195
Cronógrafo Fly-back ....................................................... 198
Brújula y Cronógrafo Fly-back ........................................ 204
Cronógrafo Lineal .......................................................... 217
Hora mundial ................................................................. 224
Brújula ............................................................................ 231
Marea temperatura y brújula ......................................... 238
Altímetro ........................................................................ 248
Profundidad .................................................................... 257
Función taquímetro........................................................ 261
Función de Regla Deslizante ......................................... 263
Cómo ajustar la pulsera ................................................. 269
Remoción de eslabones de la pulsera ........................... 271
Pila .................................................................................. 272
Garantía .......................................................................... 273
188 189
CóMo InICIALIzAr Su rELoj(No se aplica a los modelos de calendario perpetuo.) Para inicializar su reloj retire el protector plástico de abajo de la corona y luego presione la corona contra la caja.
Algunos relojes requieren ajustar la corona para ser atornillada. Si la caja de su reloj tiene una protuberancia roscada, la corona debe atornillarse después de ajustar el reloj.
Para atornillarla, empuje la corona con firmeza contra la protuberancia roscada y mantenga la presión mientras gira la corona en sentido horario. Continúe atornillando la corona hasta que esté firme. Necesitará desatornillar la corona (en sentido antihorario) antes de tirarla hacia afuera la próxima vez que quiera ajustar su reloj.
Bienvenido al mundo de relojes Timex® con tecnología inteligente Quartz™, el futuro de la tecnología análoga de cuarzo. La tecnología de cuarzo inteligente de Timex brinda el poder de un microprocesador con la eficiencia y exactitud del medidor de tiempo análogo de cuarzo. Con los relojes Timex de cuarzo inteligentes, la tecnología se inscribe dentro del diseño, entregando un nuevo nivel de complejidad en la esfera. Usa hasta tres manecillas adicionales independientes para presentar más variedad de información, normalmente disponible sólo en relojes digitales en un formato análogo tradicional.

190 191
ADVErTEnCIA: PArA MAnTEnEr LA rESISTEnCIA AL AGuA, no APrIETE nInGÚn BoTón DEBAjo DEL AGuA A MEnoS QuE Su rELoj ESTÉ InDICADo PArA unA rESISTEnCIA AL AGuA DE 200 METroS. jAMÁS TIrE DE LA CoronA MIEnTrAS ESTÉ BAjo EL AGuA.1. El reloj es resistente al agua solamente mientras el
cristal, la corona y la caja estén intactos.
2. El reloj no está certificado para buceo.
3. Enjuague el reloj con agua dulce después de haber estado expuesto al agua salada.
4. La resistencia a los golpes estará indicada en la esfera del reloj o en la parte de atrás de la caja. Los relojes están diseñados para pasar la prueba ISO de resisten-cia a los golpes. Sin embargo, se debe tener cuidado para evitar dañar el cristal.
rESISTEnCIA AL AGuA Y A GoLPESSi su reloj es resistente al agua, se indicarán los metros (WR_M).
Profundidad de resistencia al agua en
p.s.i.a.* Presión del agua bajo la superficie
30m/98pies 60
50m/164pies 86
100m/328pies 160
200m/656pies 284
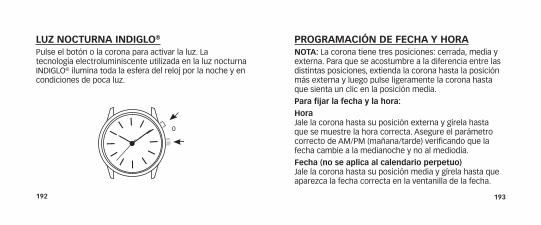
192 193
ProGrAMACIón DE FECHA Y HorAnoTA: La corona tiene tres posiciones: cerrada, media y externa. Para que se acostumbre a la diferencia entre las distintas posiciones, extienda la corona hasta la posición más externa y luego pulse ligeramente la corona hasta que sienta un clic en la posición media.
Para fijar la fecha y la hora:Hora Jale la corona hasta su posición externa y gírela hasta que se muestre la hora correcta. Asegure el parámetro correcto de AM/PM (mañana/tarde) verificando que la fecha cambie a la medianoche y no al mediodía.
Fecha (no se aplica al calendario perpetuo) Jale la corona hasta su posición media y gírela hasta que aparezca la fecha correcta en la ventanilla de la fecha.
Luz noCTurnA InDIGLo® Pulse el botón o la corona para activar la luz. La tecnología electroluminiscente utilizada en la luz nocturna INDIGLO® ilumina toda la esfera del reloj por la noche y en condiciones de poca luz.
o

194 195
Nota: La fecha cambia entre las 10 pm y las 2 am. No cambie la fecha durante este período. Al hacerlo, podría dañar el movimiento del reloj.
Pulse la corona a la posición cerrada después de fijar la fecha u hora. El segundero se pondrá en movimiento.
noTA: Se requerirá ajustar la fecha en los meses que tengan menos de 31 días.
CALEnDArIo PErPETuoDESCrIPCIón GEnErAL
A
B
1 2 3
1 2 3
Manecilla Horaria
Manecilla del día
Manecilla de la FecHa
Segundero
Manecilla de MinutoS
corona
Manecilla de MeS
BotÓn A (EmpotRADo)
BotÓn B (EmpotRADo)
PoSición cerrada
PoSición Media
PoSición eXterna

196 197
Timex o después del reemplazo de la pila y no se puede cambiar, sólo observar.
Para ver la compensación, jale la corona hasta su posición media. La manecilla de fecha muestra la compensación: 1 = 1 año después del año bisiesto; 2 = 2 años después del año bisiesto; 3 = 3 años después del año bisiesto; 4 = año bisiesto. Pulse la corona hacia dentro cuando termine y las manecillas vuelven a mostrar normalmente día, mes y fecha.
InTroDuCCIónCon su reloj de calendario perpetuo, la fecha nunca necesita ajuste hasta el 2100. El reloj toma en cuenta automáticamente los meses cortos y los años bisiestos, presentando siempre fecha y día correctos. El día y la fecha fueron programados en la fábrica de Timex. Sólo necesita ajustar la hora. El reloj tiene dos botones de activación empotrados para uso del Centro de servicio de Timex para ajustar la fecha y el día después del reemplazo de la pila. Fuera de lo mencionado no tienen otro uso.
CoMPEnSACIón DEL Año BISIESToPara mantener la fecha correcta, el reloj incluye una configuración para la compensación del año bisiesto en curso. Esta configuración es hecha en la fábrica de
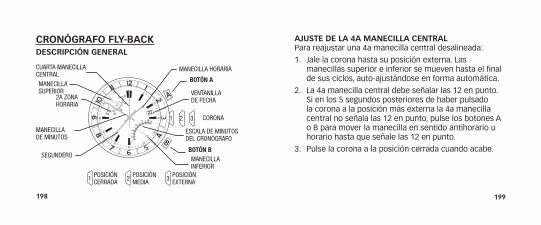
198 199
AjuSTE DE LA 4A MAnECILLA CEnTrALPara reajustar una 4a manecilla central desalineada:
1. Jale la corona hasta su posición externa. Las manecillas superior e inferior se mueven hasta el final de sus ciclos, auto-ajustándose en forma automática.
2. La 4a manecilla central debe señalar las 12 en punto. Si en los 5 segundos posteriores de haber pulsado la corona a la posición más externa la 4a manecilla central no señala las 12 en punto, pulse los botones A o B para mover la manecilla en sentido antihorario u horario hasta que señale las 12 en punto.
3. Pulse la corona a la posición cerrada cuando acabe.
CronóGrAFo FLY-BACKDESCrIPCIón GEnErAL
AA
B
23
1 2 3
1 2 3
Manecilla SuPerior
2a Zona Horaria
cuarta Manecilla central
Segundero
Ventanilla de FecHa
corona
eScala de MinutoS del cronógraFo
Manecilla inFerior
BotÓn A
BotÓn B
Manecilla de MinutoS
Manecilla Horaria
PoSición cerrada
PoSición Media
PoSición eXterna

200 201
PArA AjuSTAr LA SEGunDA zonA HorArIA:1. Jale la corona hasta su posición media. La manecilla
superior muestra la hora de la segunda zona horaria y la 4a. manecilla central muestra los minutos.
2. Suponiendo que la segunda zona horaria tiene el mismo valor de minutos como su hora, la 4a manecilla central y el minutero deben estar alineados. Si las manecillas no están alineadas, o si la segunda zona horaria difiere por minutos dentro de la hora, pulse el botón B para mover la 4a manecilla central hasta que esté en la posición deseada.
3. Pulse el botón A para mover la manecilla superior hacia adelante, en incrementos de una hora, hasta que llegue a la hora deseada de la segunda zona horaria. Para mover la manecilla rápidamente, pulse y sostenga el botón A.
SEGunDA zonA HorArIALa manecilla supe-rior muestra la hora para la segunda zona horaria. Observe que la escala es de 24 horas, con medianoche a cualquier extremo y mediodía en la mitad. Lo más común es que las zonas horarias di-fieran en incrementos de una hora. En tales casos, el valor de minutos de la segunda zona horaria será el mismo que el indicado por el minutero del reloj.
AA
B
23
1 2 3
1 2 3
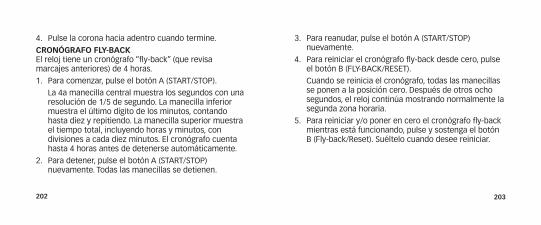
202 203
3. Para reanudar, pulse el botón A (START/STOP) nuevamente.
4. Para reiniciar el cronógrafo fly-back desde cero, pulse el botón B (FLY-BACk/RESET).
Cuando se reinicia el cronógrafo, todas las manecillas se ponen a la posición cero. Después de otros ocho segundos, el reloj continúa mostrando normalmente la segunda zona horaria.
5. Para reiniciar y/o poner en cero el cronógrafo fly-back mientras está funcionando, pulse y sostenga el botón B (Fly-back/Reset). Suéltelo cuando desee reiniciar.
4. Pulse la corona hacia adentro cuando termine.
CronóGrAFo FLY-BACKEl reloj tiene un cronógrafo “fly-back” (que revisa marcajes anteriores) de 4 horas.
1. Para comenzar, pulse el botón A (START/STOP).
La 4a manecilla central muestra los segundos con una resolución de 1/5 de segundo. La manecilla inferior muestra el último dígito de los minutos, contando hasta diez y repitiendo. La manecilla superior muestra el tiempo total, incluyendo horas y minutos, con divisiones a cada diez minutos. El cronógrafo cuenta hasta 4 horas antes de detenerse automáticamente.
2. Para detener, pulse el botón A (START/STOP) nuevamente. Todas las manecillas se detienen.
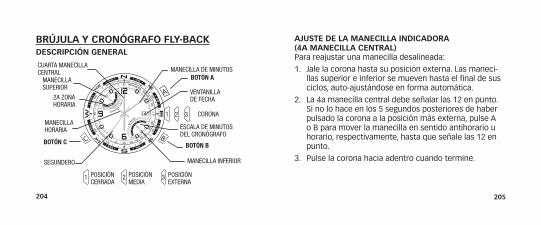
204 205
AjuSTE DE LA MAnECILLA InDICADorA (4A MAnECILLA CEnTrAL)Para reajustar una manecilla desalineada:
1. Jale la corona hasta su posición externa. Las maneci-llas superior e inferior se mueven hasta el final de sus ciclos, auto-ajustándose en forma automática.
2. La 4a manecilla central debe señalar las 12 en punto. Si no lo hace en los 5 segundos posteriores de haber pulsado la corona a la posición más externa, pulse A o B para mover la manecilla en sentido antihorario u horario, respectivamente, hasta que señale las 12 en punto.
3. Pulse la corona hacia adentro cuando termine.
BrÚjuLA Y CronóGrAFo FLY-BACKDESCrIPCIón GEnErAL
A
C B
1 2 3
1 2 3
Manecilla SuPerior
2a Zona Horaria
cuarta Manecilla central
Segundero
Ventanilla de FecHa
corona
eScala de MinutoS del cronógraFo
Manecilla inFerior
BotÓn A
BotÓn B
Manecilla Horaria
Manecilla de MinutoS
PoSición cerrada
PoSición Media
PoSición eXterna
BotÓn C
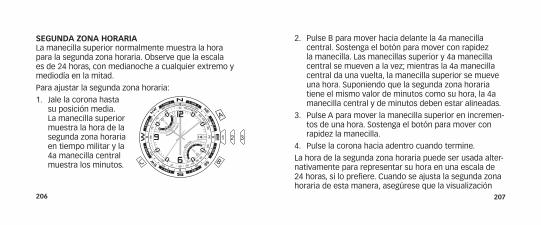
206 207
2. Pulse B para mover hacia delante la 4a manecilla central. Sostenga el botón para mover con rapidez la manecilla. Las manecillas superior y 4a manecilla central se mueven a la vez; mientras la 4a manecilla central da una vuelta, la manecilla superior se mueve una hora. Suponiendo que la segunda zona horaria tiene el mismo valor de minutos como su hora, la 4a manecilla central y de minutos deben estar alineadas.
3. Pulse A para mover la manecilla superior en incremen-tos de una hora. Sostenga el botón para mover con rapidez la manecilla.
4. Pulse la corona hacia adentro cuando termine.
La hora de la segunda zona horaria puede ser usada alter-nativamente para representar su hora en una escala de 24 horas, si lo prefiere. Cuando se ajusta la segunda zona horaria de esta manera, asegúrese que la visualización
SEGunDA zonA HorArIA La manecilla superior normalmente muestra la hora para la segunda zona horaria. Observe que la escala es de 24 horas, con medianoche a cualquier extremo y mediodía en la mitad.
Para ajustar la segunda zona horaria:
1. Jale la corona hasta su posición media. La manecilla superior muestra la hora de la segunda zona horaria en tiempo militar y la 4a manecilla central muestra los minutos.
A
C B
1 2 3
1 2 3

208 209
tiempo total, incluyendo horas y minutos, con divisio-nes a cada diez minutos. El cronógrafo cuenta hasta 4 horas antes de detenerse automáticamente.
2. Para detener, pulse A nuevamente (START/STOP). Todas las manecillas se inmovilizan.
3. Para reanudar, pulse A (START/STOP) de nuevo, o para reiniciar (desde cero) el cronógrafo, pulse B (FLY-BACk/RESET).
Cuando se reinicia el cronógrafo, todas las manecillas se ponen en cero. Después de otros ocho segundos, el reloj continúa mostrando normalmente la hora de la segunda zona horaria.
4. También puede volver a poner a cero o reiniciar el cronógrafo mientras está en uso. Para hacerlo, pulse y sostenga B (FLY-BACk/RESET) para poner a cero el
de horas y minutos corresponda con la de las 24 horas, al verificar que la fecha cambie a medianoche y no al mediodía.
CronóGrAFo FLY-BACKEl reloj tiene un cronógrafo ‘fly-back” (que revisa marcajes anteriores) de 4 horas.
1. Para comenzar, pulse A (START/STOP). La 4a manecilla central muestra los se-gundos con resolución de 1/5 de segundo y la manecilla infe-rior muestra el último dígito de los minutos, contando hasta diez y repitiendo. La manecilla superior muestra el
A
C B
1 2 3
1 2 3
210 211
cronógrafo y suéltelo cuando desee reiniciarlo. No tiene que esperar a que todas las manecillas lleguen a cero antes de soltar el botón; el conteo comenzará internamente cuando suelte el botón. Esta función “fly-back” le permite medir el tiempo de vuelta.
La brújula puede ser usada mientras el cronógrafo está en marcha sin que interfiera con su funciona-miento. Ver FUNCIONAMIENTO DE LA BRÚJULA.
CALIBrACIón DE LA BrÚjuLAHay que calibrar la brújula, antes de usarse.
Dado que la brújula usa el campo magnético de la Tierra, usted debe tener cuidado de objetos metálicos grandes tales como vehículos o puentes, u objetos que emitan radiación electromagnética como televisores y com-putadoras, porque podrían afectar el campo magnético
alrededor del reloj. Si la brújula se calibra cerca de tales objetos, sólo funcionará apropiadamente en ese mismo lugar. Si la brújula se calibra lejos de tales objetos, no funcionará apropiadamente en la cercanía de ellos. Para resultados óptimos, realice la calibración en el área donde va a ser usada.
Al calibrar y tomar rumbos es importante, como con todas las brújulas, mantener la brújula a nivel. Calibrar y tomar un rumbo cuando el reloj no está a nivel puede resultar en errores grandes. Hay que evitar también áreas que pudieran exhibir concentraciones de hierro duro y suave más elevadas de lo normal, pues pueden ocasionar rumbos incorrectos. Cuando un rumbo no infunda con-fianza, vuelva a calibrar.
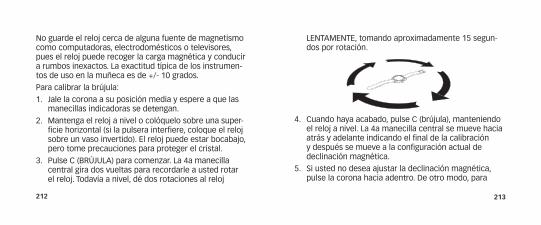
212 213
LENTAMENTE, tomando aproximadamente 15 segun-dos por rotación.
4. Cuando haya acabado, pulse C (brújula), manteniendo el reloj a nivel. La 4a manecilla central se mueve hacia atrás y adelante indicando el final de la calibración y después se mueve a la configuración actual de declinación magnética.
5. Si usted no desea ajustar la declinación magnética, pulse la corona hacia adentro. De otro modo, para
No guarde el reloj cerca de alguna fuente de magnetismo como computadoras, electrodomésticos o televisores, pues el reloj puede recoger la carga magnética y conducir a rumbos inexactos. La exactitud típica de los instrumen-tos de uso en la muñeca es de +/- 10 grados.
Para calibrar la brújula:
1. Jale la corona a su posición media y espere a que las manecillas indicadoras se detengan.
2. Mantenga el reloj a nivel o colóquelo sobre una super-ficie horizontal (si la pulsera interfiere, coloque el reloj sobre un vaso invertido). El reloj puede estar bocabajo, pero tome precauciones para proteger el cristal.
3. Pulse C (BRÚJULA) para comenzar. La 4a manecilla central gira dos vueltas para recordarle a usted rotar el reloj. Todavía a nivel, dé dos rotaciones al reloj

214 215
FunCIonAMIEnTo DE LA BrÚjuLANormalmente, la brújula está apagada y la 4a manecilla central apunta a las 12 en punto o muestra los segundos del cronógrafo.
Mientras mantiene el reloj a nivel, pulse C (BRÚJULA) para activar la brújula. La aguja de la brújula se mueve y apunta hacia el Norte. Si se gira el reloj, la 4a manecilla central continuará moviéndose, apuntando siempre al Norte. Después de 20 segundos, la brújula se apagará automáticamente y la 4a manecilla central retornará a su operación normal. Esto alarga la duración de la pila. Pulse C (BRÚJULA) en cualquier momento para mantener la brújula encendida durante otros 20 segundos.
La brújula puede ser activada mientras está operando el cronógrafo. La 4a manecilla central cambia de operacio-nes temporalmente. Las manecillas superior e inferior
hacer que el reloj compense automáticamente el ángulo de declinación, mueva el anillo giratorio de la brújula hasta que el Norte esté a las 12 en punto.
6. Pulse A o B para mover la 4a manecilla central hacia el Oeste (-) o Este (+), respectivamente, y apuntar hacia el ángulo de declinación de su posición usando la escala de declinación. Sostenga un botón para mover con rapidez la manecilla. Observe la figura de abajo como ejemplo.
7. Pulse la corona hacia adentro cuando termine.
A
B
Declinación magnética establecida a -14° (14°W)
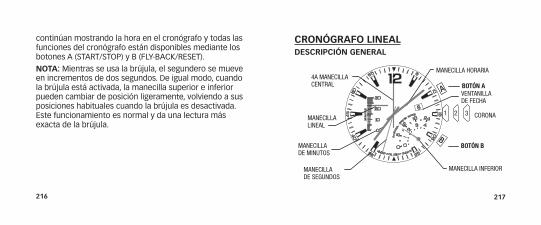
216 217
continúan mostrando la hora en el cronógrafo y todas las funciones del cronógrafo están disponibles mediante los botones A (START/STOP) y B (FLY-BACk/RESET).
noTA: Mientras se usa la brújula, el segundero se mueve en incrementos de dos segundos. De igual modo, cuando la brújula está activada, la manecilla superior e inferior pueden cambiar de posición ligeramente, volviendo a sus posiciones habituales cuando la brújula es desactivada. Este funcionamiento es normal y da una lectura más exacta de la brújula.
CronóGrAFo LInEAL DESCrIPCIón GEnErAL
Manecilla de SegundoS
Ventanilla de FecHa
corona
Manecilla inFerior
BotÓn A
BotÓn B
4a Manecilla central
Manecilla Horaria
Manecilla lineal
Manecilla de MinutoS
A
B
1 2 3
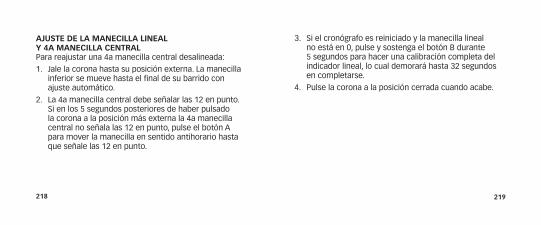
218 219
AjuSTE DE LA MAnECILLA LInEAL Y 4A MAnECILLA CEnTrAL Para reajustar una 4a manecilla central desalineada:
1. Jale la corona hasta su posición externa. La manecilla inferior se mueve hasta el final de su barrido con ajuste automático.
2. La 4a manecilla central debe señalar las 12 en punto. Si en los 5 segundos posteriores de haber pulsado la corona a la posición más externa la 4a manecilla central no señala las 12 en punto, pulse el botón A para mover la manecilla en sentido antihorario hasta que señale las 12 en punto.
3. Si el cronógrafo es reiniciado y la manecilla lineal no está en 0, pulse y sostenga el botón B durante 5 segundos para hacer una calibración completa del indicador lineal, lo cual demorará hasta 32 segundos en completarse.
4. Pulse la corona a la posición cerrada cuando acabe.
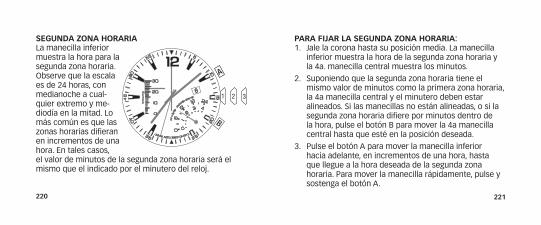
220 221
SEGunDA zonA HorArIALa manecilla inferior muestra la hora para la segunda zona horaria. Observe que la escala es de 24 horas, con medianoche a cual-quier extremo y me-diodía en la mitad. Lo más común es que las zonas horarias difieran en incrementos de una hora. En tales casos, el valor de minutos de la segunda zona horaria será el mismo que el indicado por el minutero del reloj.
PArA FIjAr LA SEGunDA zonA HorArIA: 1. Jale la corona hasta su posición media. La manecilla
inferior muestra la hora de la segunda zona horaria y la 4a. manecilla central muestra los minutos.
2. Suponiendo que la segunda zona horaria tiene el mismo valor de minutos como la primera zona horaria, la 4a manecilla central y el minutero deben estar alineados. Si las manecillas no están alineadas, o si la segunda zona horaria difiere por minutos dentro de la hora, pulse el botón B para mover la 4a manecilla central hasta que esté en la posición deseada.
3. Pulse el botón A para mover la manecilla inferior hacia adelante, en incrementos de una hora, hasta que llegue a la hora deseada de la segunda zona horaria. Para mover la manecilla rápidamente, pulse y sostenga el botón A.
A
B
1 2 3

222 223
4. Pulse la corona hacia adentro cuando termine.
CronóGrAFo LInEAL El reloj tiene un cronógrafo interválico de 4 horas.
1. Para comenzar, pulse el botón A (Start/Stop). La 4a manecilla central muestra los segundos con una reso-lución de 1/5 de segundo. La manecilla lineal muestra los minutos, contando hasta treinta y repitiendo. La manecilla inferior muestra el tiempo total, incluyendo horas y minutos, con divisiones a cada diez minutos. El cronógrafo cuenta hasta 4 horas antes de detenerse automáticamente.
2. Para detener, pulse el botón A (Start/Stop) nueva-mente. Todas las manecillas se detienen.
3. Para reiniciar el cronógrafo a la posición cero, pulse el botón B (Split/Reset).
Cuando se reinicia el cronógrafo, todas las manecillas se mueven a la posición cero. Después de otros ocho segun-dos, el reloj continúa mostrando normalmente la segunda zona horaria. Mientras el cronógrafo está en marcha, se puede tomar un intervalo. Pulse el botón B (Split/Reset) y todas las manecillas se detendrán mientras el cronógrafo sigue andando. Pulse B (split/Reset) nuevamente para seguir viendo el tiempo transcurrido del cronógrafo en marcha.
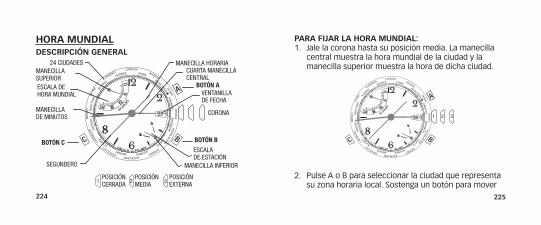
224 225
HorA MunDIAL DESCrIPCIón GEnErAL
A
BC
1 2 3
corrected 3.3.11 with Paulo’s new cities
24 ciudadeS
eScala de Hora Mundial
Segundero
Ventanilla de FecHa
corona
Manecilla inFerior
BotÓn A
BotÓn B BotÓn C
cuarta Manecilla central
eScala de eStación
Manecilla SuPerior
Manecilla Horaria
Manecilla de MinutoS
PoSición cerrada
PoSición Media
PoSición eXterna
PArA FIjAr LA HorA MunDIAL:1. Jale la corona hasta su posición media. La manecilla
central muestra la hora mundial de la ciudad y la manecilla superior muestra la hora de dicha ciudad.
2. Pulse A o B para seleccionar la ciudad que representa su zona horaria local. Sostenga un botón para mover
A
BC
1 2 3
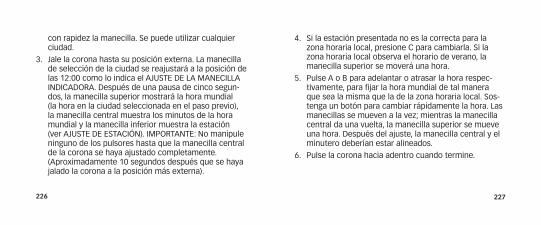
226 227
con rapidez la manecilla. Se puede utilizar cualquier ciudad.
3. Jale la corona hasta su posición externa. La manecilla de selección de la ciudad se reajustará a la posición de las 12:00 como lo indica el AJUSTE DE LA MANECILLA INDICADORA. Después de una pausa de cinco segun-dos, la manecilla superior mostrará la hora mundial (la hora en la ciudad seleccionada en el paso previo), la manecilla central muestra los minutos de la hora mundial y la manecilla inferior muestra la estación (ver AJUSTE DE ESTACIÓN). IMPORTANTE: No manipule ninguno de los pulsores hasta que la manecilla central de la corona se haya ajustado completamente. (Aproximadamente 10 segundos después que se haya jalado la corona a la posición más externa).
4. Si la estación presentada no es la correcta para la zona horaria local, presione C para cambiarla. Si la zona horaria local observa el horario de verano, la manecilla superior se moverá una hora.
5. Pulse A o B para adelantar o atrasar la hora respec-tivamente, para fijar la hora mundial de tal manera que sea la misma que la de la zona horaria local. Sos-tenga un botón para cambiar rápidamente la hora. Las manecillas se mueven a la vez; mientras la manecilla central da una vuelta, la manecilla superior se mueve una hora. Después del ajuste, la manecilla central y el minutero deberían estar alineados.
6. Pulse la corona hacia adentro cuando termine.
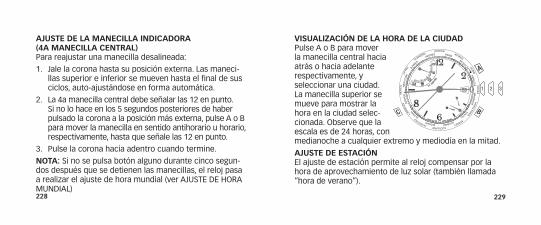
228 229
AjuSTE DE LA MAnECILLA InDICADorA (4A MAnECILLA CEnTrAL) Para reajustar una manecilla desalineada:
1. Jale la corona hasta su posición externa. Las maneci-llas superior e inferior se mueven hasta el final de sus ciclos, auto-ajustándose en forma automática.
2. La 4a manecilla central debe señalar las 12 en punto. Si no lo hace en los 5 segundos posteriores de haber pulsado la corona a la posición más externa, pulse A o B para mover la manecilla en sentido antihorario u horario, respectivamente, hasta que señale las 12 en punto.
3. Pulse la corona hacia adentro cuando termine.
noTA: Si no se pulsa botón alguno durante cinco segun-dos después que se detienen las manecillas, el reloj pasa a realizar el ajuste de hora mundial (ver AJUSTE DE HORA MUNDIAL)
VISuALIzACIón DE LA HorA DE LA CIuDADPulse A o B para mover la manecilla central hacia atrás o hacia adelante respectivamente, y seleccionar una ciudad. La manecilla superior se mueve para mostrar la hora en la ciudad selec-cionada. Observe que la escala es de 24 horas, con medianoche a cualquier extremo y mediodía en la mitad.
AjuSTE DE ESTACIónEl ajuste de estación permite al reloj compensar por la hora de aprovechamiento de luz solar (también llamada “hora de verano”).
A
BC
1 2 3

230 231
El reloj se encarga de esto dando una configuración para representar los dos periodos que tienen todas las ciudades que observan la hora de verano. Para el reloj, el periodo de hora de verano es VERANO y el periodo de hora estándar es INVIERNO.
Cuando la estación de una ciudad se establece en VERANO, todas las ciudades en el mismo hemisferio son programadas automáticamente a VERANO, mientras que las ciudades en el otro hemisferio son programadas au-tomáticamente a INVIERNO. El reloj sabe cuáles ciudades están dentro de cada hemisferio.
Pulse C para cambiar la estación en la ciudad seleccionada.
BrÚjuLADESCrIPCIón GEnErAL
II
14 corona central
Medio
FiJar la FecHa
II
14
aFuera
FiJar la Hora
corona
B (AnILLo GIRAtoRIo)
A (BRújuLA)
eScala de declinaciónaguJa de la BrÚJula (el eXtreMo norte eS roJo Punti-agudo/alargado)

232 233
AjuSTE DE LA AGujA DE LA BrÚjuLAJale la CORONA totalmente hacia afuera. La aguja de la brújula debe señalar las 12 en punto. Si no las señala, oprima ya sea A o B para mover la aguja de la brújula hasta las 12 en punto. Sostenga el botón de activación para mover la aguja con rapidez. Pulse la CORONA CEN-TRAL hacia adentro cuando termine y vuelva a calibrar la brújula.
CALIBrACIón DE LA BrÚjuLAHay que calibrar la brújula, antes de usarse.
Dado que la brújula usa el campo magnético de la Tierra, usted debe tener cuidado de objetos metálicos grandes tales como vehículos o puentes, u objetos que emitan radiación electromagnética como televisores y com-putadoras, porque podrían afectar el campo magnético alrededor del reloj. Si la brújula se calibra cerca de tales
objetos, sólo funcionará apropiadamente en ese mismo lugar. Si la brújula se calibra lejos de tales objetos, no funcionará apropiadamente en la cercanía de ellos. Para resultados óptimos, realice la calibración en el área donde va a ser usada.
Al calibrar y tomar rumbos es importante, como con todas las brújulas, mantener la brújula a nivel. Calibrar y tomar un rumbo cuando el reloj no está a nivel puede resultar en errores grandes. Hay que evitar también áreas que pudieran exhibir concentraciones de hierro duro y suave más elevadas de lo normal, pues pueden ocasionar rumbos incorrectos. Cuando un rumbo no infunda con-fianza, vuelva a calibrar.
No guarde el reloj cerca de alguna fuente de magnetismo como computadoras, electrodomésticos o televisores, pues el reloj puede recoger la carga magnética y conducir

234 235
a rumbos inexactos. La exactitud típica de los instrumen-tos de uso en la muñeca es de +/- 10 grados.
Para calibrar la brújula:1. Jale la corona a su posición media y espere a que las
manecillas indicadoras se detengan.
2. Mantenga el reloj a nivel o colóquelo sobre una super-ficie horizontal (si la pulsera interfiere, coloque el reloj sobre un vaso invertido). El reloj puede estar bocabajo, pero tome precauciones para proteger el cristal.
3. Pulse A o B para comenzar. La 4a manecilla central gira dos vueltas para recordarle a usted rotar el reloj. Todavía a nivel, dé dos rotaciones al reloj LENTAMENTE, tomando aproximadamente 15 segundos por rotación.
4. Cuando haya acabado, pulse A o B, manteniendo el reloj a nivel. La 4a manecilla central se mueve hacia atrás y adelante indicando el final de la calibración y después se mueve a la configuración actual de declinación magnética.
5. Si usted no desea ajustar la declinación magnética, pulse la corona hacia adentro. De otro modo, para hacer que el reloj compense automáticamente el

236 237
ángulo de declinación, mueva el anillo giratorio de la brújula hasta que el Norte esté a las 12 en punto.
6. Pulse A o B para mover la 4a manecilla central hacia el Oeste (-) o Este (+), respectivamente, y apuntar hacia el ángulo de declinación de su posición usando la escala de declinación. Sostenga un botón para mover con rapidez la manecilla. Observe la figura en la siguiente página como ejemplo.
7. Pulse la corona hacia adentro cuando termine.
Declinación magnética establecida a -14° (14°W)
A
B
FunCIonAMIEnTo DE LA BrÚjuLANormalmente, la brújula está apagada y la 4a manecilla central apunta a las 12 en punto o muestra los segundos del cronógrafo.
Mientras mantiene el reloj a nivel, pulse A o B para activar la brújula. La aguja de la brújula se mueve y apunta hacia el Norte. Si se gira el reloj, la 4a manecilla central conti-nuará moviéndose, apuntando siempre al Norte. Después de 20 segundos, la brújula se apagará automáticamente y la 4a manecilla central retornará a su operación normal. Esto alarga la duración de la pila. Pulse A o B en cualquier momento para mantener la brújula encendida durante otros 20 segundos.
noTA: Mientras se usa la brújula, el segundero se mueve en incrementos de dos segundos.
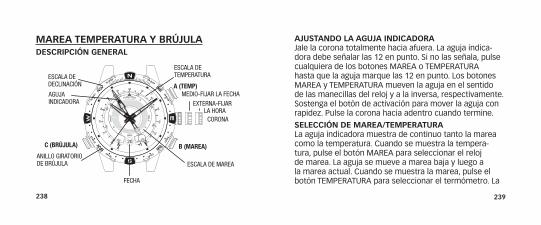
238 239
MArEA TEMPErATurA Y BrÚjuLADESCrIPCIón GEnErAL
eXterna-FiJar la Hora
eScala de declinación
aguJa indicadora
C (BRújuLA) B (mAREA)
A (tEmp)
corona
anillo giratorio de BrÚJula
FecHa
eScala de Marea
eScala de teMPeratura
Medio-FiJar la FecHa
AjuSTAnDo LA AGujA InDICADorAJale la corona totalmente hacia afuera. La aguja indica-dora debe señalar las 12 en punto. Si no las señala, pulse cualquiera de los botones MAREA o TEMPERATURA hasta que la aguja marque las 12 en punto. Los botones MAREA y TEMPERATURA mueven la aguja en el sentido de las manecillas del reloj y a la inversa, respectivamente. Sostenga el botón de activación para mover la aguja con rapidez. Pulse la corona hacia adentro cuando termine.
SELECCIón DE MArEA/TEMPErATurALa aguja indicadora muestra de continuo tanto la marea como la temperatura. Cuando se muestra la tempera-tura, pulse el botón MAREA para seleccionar el reloj de marea. La aguja se mueve a marea baja y luego a la marea actual. Cuando se muestra la marea, pulse el botón TEMPERATURA para seleccionar el termómetro. La
240 241
aguja se mueve al comienzo del termómetro y luego a la temperatura actual.
TErMóMETroCuando se lleva puesto en la muñeca, la lectura del termómetro es afectada por el calor corporal. Para lograr una lectura más exacta, quítese el reloj y déjelo a la sombra durante unos minutos.
El reloj puede medir también la temperatura del agua si está sumergido. Recuerde seleccionar la pantalla para temperatura antes de introducir el reloj en el agua, puesto que los botones no deben pulsarse mientras el reloj esté sumergido.
Las lecturas del termómetro se toman a cada minuto, y con más frecuencia si la temperatura está cambiando.
rELoj DE MArEAPara el reloj de marea, la aguja indicadora siempre rota en el sentido de las manecillas del reloj, de modo que la marea va subiendo cuando la aguja señala a la izquierda y bajando cuando señala a la derecha. El número de horas para la siguiente marea alta/baja se muestra en la escala de marea.
Las mareas también están influenciadas por la posición del sol y la forma del contorno de la costa, por consi-guiente el reloj de marea no puede dar con precisión las horas de las mareas altas y bajas. Se pudieran necesitar ajustes periódicos.
Para calibrar el reloj de marea, jale la corona hacia el ME-DIO. Pulse cualquiera de los botones MAREA o TEMPERA-TURA para mover la aguja a la marea actual. Los botones MAREA y TEMPERATURA mueven la aguja en el sentido
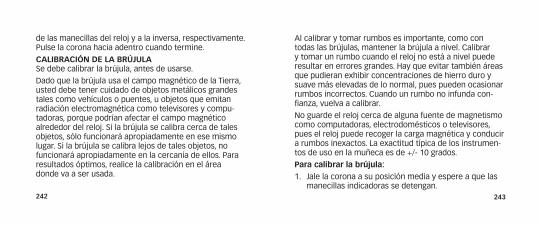
242 243
de las manecillas del reloj y a la inversa, respectivamente. Pulse la corona hacia adentro cuando termine.
CALIBrACIón DE LA BrÚjuLASe debe calibrar la brújula, antes de usarse.
Dado que la brújula usa el campo magnético de la Tierra, usted debe tener cuidado de objetos metálicos grandes tales como vehículos o puentes, u objetos que emitan radiación electromagnética como televisores y compu-tadoras, porque podrían afectar el campo magnético alrededor del reloj. Si la brújula se calibra cerca de tales objetos, sólo funcionará apropiadamente en ese mismo lugar. Si la brújula se calibra lejos de tales objetos, no funcionará apropiadamente en la cercanía de ellos. Para resultados óptimos, realice la calibración en el área donde va a ser usada.
Al calibrar y tomar rumbos es importante, como con todas las brújulas, mantener la brújula a nivel. Calibrar y tomar un rumbo cuando el reloj no está a nivel puede resultar en errores grandes. Hay que evitar también áreas que pudieran exhibir concentraciones de hierro duro y suave más elevadas de lo normal, pues pueden ocasionar rumbos incorrectos. Cuando un rumbo no infunda con-fianza, vuelva a calibrar.
No guarde el reloj cerca de alguna fuente de magnetismo como computadoras, electrodomésticos o televisores, pues el reloj puede recoger la carga magnética y conducir a rumbos inexactos. La exactitud típica de los instrumen-tos de uso en la muñeca es de +/- 10 grados.
Para calibrar la brújula:1. Jale la corona a su posición media y espere a que las
manecillas indicadoras se detengan.
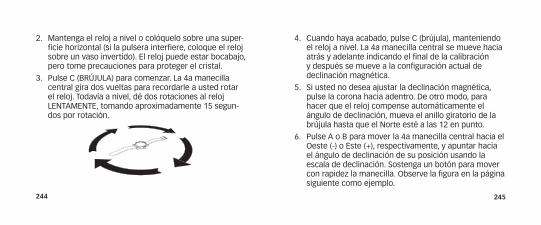
244 245
2. Mantenga el reloj a nivel o colóquelo sobre una super-ficie horizontal (si la pulsera interfiere, coloque el reloj sobre un vaso invertido). El reloj puede estar bocabajo, pero tome precauciones para proteger el cristal.
3. Pulse C (BRÚJULA) para comenzar. La 4a manecilla central gira dos vueltas para recordarle a usted rotar el reloj. Todavía a nivel, dé dos rotaciones al reloj LENTAMENTE, tomando aproximadamente 15 segun-dos por rotación.
4. Cuando haya acabado, pulse C (brújula), manteniendo el reloj a nivel. La 4a manecilla central se mueve hacia atrás y adelante indicando el final de la calibración y después se mueve a la configuración actual de declinación magnética.
5. Si usted no desea ajustar la declinación magnética, pulse la corona hacia adentro. De otro modo, para hacer que el reloj compense automáticamente el ángulo de declinación, mueva el anillo giratorio de la brújula hasta que el Norte esté a las 12 en punto.
6. Pulse A o B para mover la 4a manecilla central hacia el Oeste (-) o Este (+), respectivamente, y apuntar hacia el ángulo de declinación de su posición usando la escala de declinación. Sostenga un botón para mover con rapidez la manecilla. Observe la figura en la página siguiente como ejemplo.
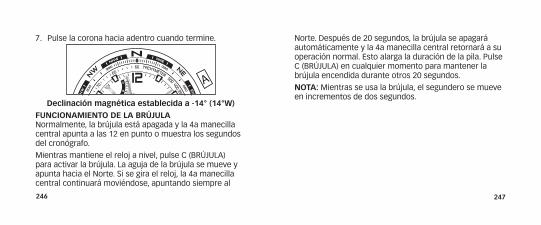
246 247
7. Pulse la corona hacia adentro cuando termine.
Declinación magnética establecida a -14° (14°W)FunCIonAMIEnTo DE LA BrÚjuLANormalmente, la brújula está apagada y la 4a manecilla central apunta a las 12 en punto o muestra los segundos del cronógrafo.
Mientras mantiene el reloj a nivel, pulse C (BRÚJULA) para activar la brújula. La aguja de la brújula se mueve y apunta hacia el Norte. Si se gira el reloj, la 4a manecilla central continuará moviéndose, apuntando siempre al
A
B
Norte. Después de 20 segundos, la brújula se apagará automáticamente y la 4a manecilla central retornará a su operación normal. Esto alarga la duración de la pila. Pulse C (BRÚJULA) en cualquier momento para mantener la brújula encendida durante otros 20 segundos.
noTA: Mientras se usa la brújula, el segundero se mueve en incrementos de dos segundos.
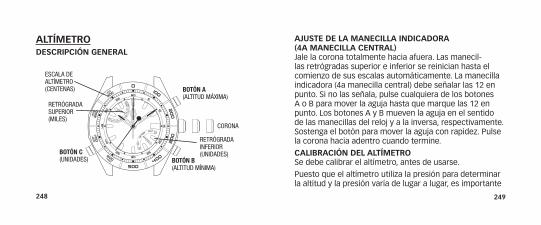
248 249
AjuSTE DE LA MAnECILLA InDICADorA (4A MAnECILLA CEnTrAL)Jale la corona totalmente hacia afuera. Las manecil-las retrógradas superior e inferior se reinician hasta el comienzo de sus escalas automáticamente. La manecilla indicadora (4a manecilla central) debe señalar las 12 en punto. Si no las señala, pulse cualquiera de los botones A o B para mover la aguja hasta que marque las 12 en punto. Los botones A y B mueven la aguja en el sentido de las manecillas del reloj y a la inversa, respectivamente. Sostenga el botón para mover la aguja con rapidez. Pulse la corona hacia adentro cuando termine.
CALIBrACIón DEL ALTÍMETroSe debe calibrar el altímetro, antes de usarse.
Puesto que el altímetro utiliza la presión para determinar la altitud y la presión varía de lugar a lugar, es importante
ALTÍMETroDESCrIPCIón GEnErAL
eScala de altíMetro(centenaS)
retrógrada SuPerior(MileS)
BotÓn C(unidadeS)
BotÓn A(altitud MÁXiMa)
BotÓn B(altitud MíniMa)
retrógrada inFerior (unidadeS)
corona

250 251
en la pantalla de altitud. La 4a manecilla central y la retrógrada superior deben apuntar a la altitud actual.
3. Pulse A o B para mover la 4a manecilla central en sen-tido antihorario u horario, respectivamente, hasta que apunte a la altitud deseada de calibración. Sostener A o B moverá la manecilla central más rápido. La mane-cilla retrógrada superior se mueve relativa al valor de altitud señalado por la 4a manecilla central.
4. Pulse la corona hacia adentro cuando termine.
programar el altímetro a una altitud de referencia conocida, o a una referencia de altitud estándar de un determinado lugar. Cambios repentinos en presión debido a cambios en el clima pueden hacer que la lectura del altímetro esté desfasada por +-100m (328 ft), incluso si su ubicación no ha cambiado. Vuelva a calibrar a una altitud conocida cuando ocurran cambios drásticos de presión.
Para calibrar el altímetro:1. Jale la corona a su posición media y espere a que las
manecillas indicadoras se detengan.
2. Si el altímetro estaba APAGADO en el momento de jalar la corona, la manecilla retrógrada inferior apuntará a la unidad seleccionada la última vez que se usó el altímetro; de otro modo la manecilla retrógrada inferior apunta hacia la unidad seleccionada presente

252 253
Para apagar el altímetro con la unidad ajustada en PIES, pulse C. Para apagar el altímetro con la unidad ajustada en METROS, pulse C dos veces (la manecilla inferior se va a PIES primero antes de ir a la posición APAGADO).
Ejemplo: Altitud=2310 m Ejemplo: Altitud=7580 pies
ALTÍMETro EnCEnDIDo/APAGADoPara encender el altímetro pulse C. La manecilla retrógrada inferior apunta a METROS. Usando las marcas en el anillo superior, la 4a manecilla central muestra las decenas y centenas del valor de la altitud actual con di-visiones cada diez METROS/PIES. La manecilla retrógrada superior muestra los miles del valor de la altitud actual con divisiones cada mil METROS/PIES.
Para cambiar la unidad de METROS a PIES, pulse C una segunda vez. Para cambiar la unidad de PIES a METROS, pulse C dos veces (el altímetro se apaga primero, luego se vuelve a encender con la unidad en METROS).
254 255
La máxima altitud grabada aparece durante diez segun-dos. Para extender la duración de la pantalla durante otros diez segundos, pulse A antes de que termine la duración previa de diez segundos.
Para cambiar la unidad de METROS a PIES o de PIES a METROS, pulse C.
Para ver la altitud mínima registrada, pulse B. La mane-cilla retrógrada inferior muestra la unidad de medida en la que la altitud mínima fue grabada si el altímetro estaba apagado en el momento de oprimir el botón; de otro modo ésta mostrará la altitud mínima usando la actual unidad seleccionada. La 4a manecilla central muestra el valor de la mínima altitud en centenas y decenas con di-visiones cada diez METROS/PIES. La manecilla retrógrada superior muestra la altitud mínima actual en miles con divisiones cada mil METROS/PIES.
El reloj apagará el altímetro automáticamente después de 60 minutos desde la activación.
MEMorIA DE ALTITuD MÍnIMA/MÁXIMAPara ver la altitud máxima registrada, pulse A. La mane-cilla retrógrada inferior muestra la unidad de medida en la que la altitud máxima fue grabada si el altímetro estaba apagado en el momento de oprimir el botón; de otro modo ésta mostrará la altitud máxima usando la actual unidad seleccionada. La 4a manecilla central muestra el valor de la máxima altitud en centenas y decenas con divisiones cada diez METROS/PIES. La manecilla retrógrada superior muestra la altitud máxima en miles con divisiones cada mil METROS/PIES.
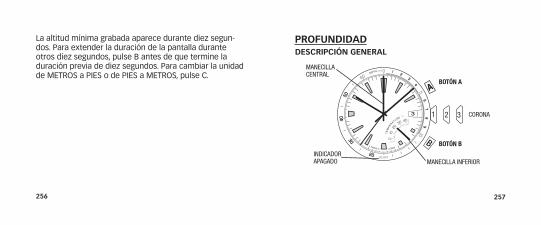
256 257
ProFunDIDADDESCrIPCIón GEnErAL
3
AA
B
1 2 32 32 3
Manecilla central
indicador aPagado
BotÓn A
BotÓn B
Manecilla inFerior
corona
La altitud mínima grabada aparece durante diez segun-dos. Para extender la duración de la pantalla durante otros diez segundos, pulse B antes de que termine la duración previa de diez segundos. Para cambiar la unidad de METROS a PIES o de PIES a METROS, pulse C.
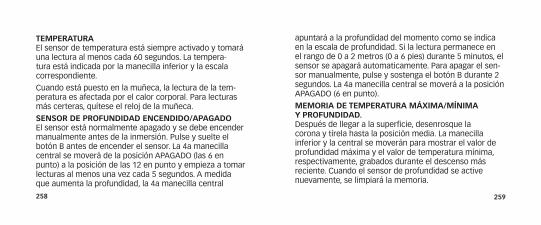
258 259
apuntará a la profundidad del momento como se indica en la escala de profundidad. Si la lectura permanece en el rango de 0 a 2 metros (0 a 6 pies) durante 5 minutos, el sensor se apagará automaticamente. Para apagar el sen-sor manualmente, pulse y sostenga el botón B durante 2 segundos. La 4a manecilla central se moverá a la posición APAGADO (6 en punto).
MEMorIA DE TEMPErATurA MÁXIMA/MÍnIMA Y ProFunDIDAD.Después de llegar a la superficie, desenrosque la corona y tírela hasta la posición media. La manecilla inferior y la central se moverán para mostrar el valor de profundidad máxima y el valor de temperatura mínima, respectivamente, grabados durante el descenso más reciente. Cuando el sensor de profundidad se active nuevamente, se limpiará la memoria.
TEMPErATurAEl sensor de temperatura está siempre activado y tomará una lectura al menos cada 60 segundos. La tempera-tura está indicada por la manecilla inferior y la escala correspondiente.
Cuando está puesto en la muñeca, la lectura de la tem-peratura es afectada por el calor corporal. Para lecturas más certeras, quítese el reloj de la muñeca.
SEnSor DE ProFunDIDAD EnCEnDIDo/APAGADoEl sensor está normalmente apagado y se debe encender manualmente antes de la inmersión. Pulse y suelte el botón B antes de encender el sensor. La 4a manecilla central se moverá de la posición APAGADO (las 6 en punto) a la posición de las 12 en punto y empieza a tomar lecturas al menos una vez cada 5 segundos. A medida que aumenta la profundidad, la 4a manecilla central
260 261
2 segundos en desplazamientos de dos posiciones de manecilla. Se recomienda que el usuario reemplace la pila cuando el nivel de la bateria es bajo.
Cuando el estatus del reloj indica Reemplazar pila, el se gundero deberá moverse solamente a intervalos de 5 se-gundos en desplazamientos de cinco posiciones de mane-cilla. En este punto, el modo buceo no puede ser activado, y el usuario debe reemplazar la pila inmediatamente.
FunCIón TAQuÍMETro(no todos los modelos)El taquímetro sólo determina velocidades que sean mayores a 60 unidades por hora usando este método; velocidades más bajas pueden medirse disminuyendo la unidad de medida. La función desempeñada por un taquímetro es independiente de la unidad de distancia
Si el reloj no ha sido usado todavía, las manecillas central e inferior mostrarán en la pantalla 0 metros/pies y 0ºC/32 ºF, respectivamente. La corona se debe enroscar nueva-mente antes del uso o la inmersión.
nIVEL DE LA PILAEl reloj determina el nivel actual de la pila y le da al usu-ario una indicación visual sobre el nivel de la pila en ese momento. El nivel del estado de la pila se clasifica como Normal, Bajo y Reemplazar pila, con cada nivel indicado por el movimiento del segundero.
Para el estatus de Normal, el segundero deberá moverse una posición de manecilla a cada segundo, lo cual es la operación normal.
Cuando el estatus del reloj indica Nivel de pila bajo, el segundero deberá moverse solamente a intervalos de
262 263
FunCIón DE rEGLA DESLIzAnTE La función de regla deslizante integrada al anillo giratorio superior se utiliza rotando el aro. El anillo interno no se mueve. El aro siempre se refiere a distancia o velocidad, o a cualquier dato que varíe con tiempo. El anillo interno solo anota unidades de tiempo.
Aro En el aro (anillo externo), la figura “10” representa facto-res o múltiplos de 10, tales como 0.1, 1.0, 10, ó 100.
Anillo interno En el anillo interno, “MPH” (millas por hora) se refiere al “índice de velocidad”. Este índice se usa para calcular la velocidad que conlleve cualquier dato por hora. En el aro, “STAT” (millas terrestres) y “NAUT” (millas náuticas) son para conversión de unidades de distancia.
(p.ej.millas terrestres, millas náuticas, kilómetros, metros, etc.) en tanto se use la misma unidad de longitud para todos los cálculos.
1. Determine el punto inicial y el final de la distancia preestablecida.
2. Inicie el cronógrafo una vez el objetivo para la medida de velocidad pase por el punto inicial.
3. Detenga el cronógrafo cuando el objetivo para la medida de velocidad pase por el punto final.
4. El segundero del cronógrafo es comparable con los marcadores del taquímetro para determinar la veloci-dad del objetivo.
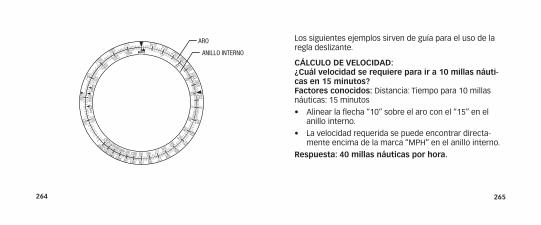
264 265
Los siguientes ejemplos sirven de guía para el uso de la regla deslizante.
CÁLCuLo DE VELoCIDAD: ¿Cuál velocidad se requiere para ir a 10 millas náuti-cas en 15 minutos? Factores conocidos: Distancia: Tiempo para 10 millas náuticas: 15 minutos
• Alinearlaflecha“10”sobreelaroconel“15”enelanillo interno.
• Lavelocidadrequeridasepuedeencontrardirecta-mente encima de la marca “MPH” en el anillo interno.
respuesta: 40 millas náuticas por hora.
aro
anillo interno
266 267
CÁLCuLo DE DISTAnCIA: ¿A qué distancia se puede viajar a 40 millas por hora durante 15 minutos?Factores conocidos: Velocidad: 40 millas náuticas por hora Tiempo: 15 minutos
• Alinear“40”sobreelarodirectamenteencimadelamarca “MPH” en el anillo interno.
• Ladistanciarecorridasepuedeobtenerencimadelmarcador “15” en el anillo interno. El número indicado en el aro es “10”.
respuesta: la distancia recorrida es 10 millas náuticas.
Cálculo de tiempo: ¿En cuánto tiempo se harán 10 millas náuticas a una velocidad de 40 millas por hora? Factores conocidos: Velocidad: 40 millas por hora Distancia: 10 millas náuticas
• Alinear“40”sobreelaroconlamarca“MPH”enelanillo interno.
• Eltiemporequeridosepuedeencontrardirectamentedebajo de la flecha “10” en el aro, que es “15” en el anillo interno.
respuesta: 15 Minutos
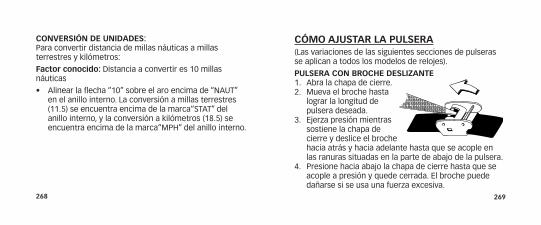
268 269
CóMo AjuSTAr LA PuLSErA(Las variaciones de las siguientes secciones de pulseras se aplican a todos los modelos de relojes).
PuLSErA Con BroCHE DESLIzAnTE1. Abra la chapa de cierre.2. Mueva el broche hasta
lograr la longitud de pulsera deseada.
3. Ejerza presión mientras sostiene la chapa de cierre y deslice el broche hacia atrás y hacia adelante hasta que se acople en las ranuras situadas en la parte de abajo de la pulsera.
4. Presione hacia abajo la chapa de cierre hasta que se acople a presión y quede cerrada. El broche puede dañarse si se usa una fuerza excesiva.
ConVErSIón DE unIDADES: Para convertir distancia de millas náuticas a millas terrestres y kilómetros:
Factor conocido: Distancia a convertir es 10 millas náuticas
• Alinearlaflecha“10”sobreelaroencimade“NAUT”en el anillo interno. La conversión a millas terrestres (11.5) se encuentra encima de la marca“STAT” del anillo interno, y la conversión a kilómetros (18.5) se encuentra encima de la marca“MPH” del anillo interno.
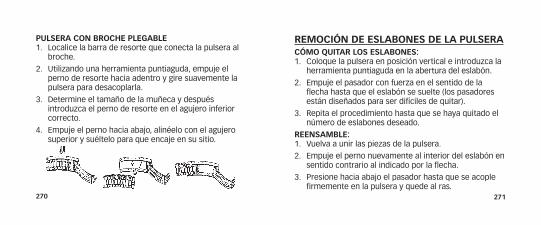
270 271
rEMoCIón DE ESLABonES DE LA PuLSErACóMo QuITAr LoS ESLABonES:1. Coloque la pulsera en posición vertical e introduzca la
herramienta puntiaguda en la abertura del eslabón.
2. Empuje el pasador con fuerza en el sentido de la flecha hasta que el eslabón se suelte (los pasadores están diseñados para ser difíciles de quitar).
3. Repita el procedimiento hasta que se haya quitado el número de eslabones deseado.
rEEnSAMBLE:1. Vuelva a unir las piezas de la pulsera.
2. Empuje el perno nuevamente al interior del eslabón en sentido contrario al indicado por la flecha.
3. Presione hacia abajo el pasador hasta que se acople firmemente en la pulsera y quede al ras.
PuLSErA Con BroCHE PLEGABLE1. Localice la barra de resorte que conecta la pulsera al
broche.
2. Utilizando una herramienta puntiaguda, empuje el perno de resorte hacia adentro y gire suavemente la pulsera para desacoplarla.
3. Determine el tamaño de la muñeca y después introduzca el perno de resorte en el agujero inferior correcto.
4. Empuje el perno hacia abajo, alinéelo con el agujero superior y suéltelo para que encaje en su sitio.
272 273
no InCLuIr Con EL EnVÍo unA PuLSErA ESPECIAL nI nInGÚn oTro ArTÍCuLo DE VALor PErSonAL.no TIrE LA PILA AL FuEGo. no LA rECArGuE. MAn-TEnGA LAS PILAS SuELTAS FuErA DEL ALCAnCE DE LoS nIñoS.
GArAnTÍA InTErnACIonAL DE TIMEXTimex Group USA, Inc garantiza el reloj TIMEX® contra defectos de fabricación durante un periodo de UN AÑO a partir de la fecha de compra original. Timex y sus sucursales en todo el mundo respaldarán esta garantía internacional.
Cabe aclarar que Timex tiene la libertad de optar por reparar el reloj con componentes nuevos o reacondi-cionados e inspeccionados, y también podría optar por reemplazarlo por un modelo idéntico o similar. IMPor-
PILALa pila debe durar 4 a 6 años con uso normal del reloj. La vida real de la pila puede variar según el uso que tenga.
Si necesita cambiar la pila, recomendamos que sólo TIMEX la reemplace. Su reloj necesitará ser calibrado a la hora y fecha correctas después del cambio de pila. Para devolver su reloj a Timex use un envío de prepago. Para obtener un envío prepago llame al 1-800-448-4639 o visite el comercio donde adquirió su reloj o visite www.TIMEX.com. Incluya lo siguiente con su reloj para cubrir el franqueo y el manejo (este no es el costo de reparación): En EUA, un cheque o giro por valor de US $ 8.00 (dólares estadounidenses); en Canadá, un cheque o giro por valor de CAN $7.00 (dólares canadienses). En otros países, Timex le cobrará el franqueo y el manejo.
274 275
PARA FINES COMERCIALES O DE ADECUACIÓN A FINES PARTICULARES. TIMEX NO SE HARÁ RESPONSABLE POR CUALQUIER DAÑO ESPECIAL, SECUNDARIO O A CONSE-CUENCIA. En ciertos países y estados no se permiten limitaciones de las garantías implícitas ni exclusiones o limitaciones de daños, por lo cual puede que estas limita-ciones no sean de aplicación en su caso particular. Esta garantía le concede derechos legales específicos; usted también podría estar amparado por otros derechos, que varían según el país y el estado donde viva.
Para solicitar los servicios incluidos en la garantía, devuelva el reloj a Timex a una de sus sucursales o al co-mercio minorista adonde se compró el reloj junto con el cupón de reparación del reloj original o, en EUA y Canadá únicamente, el cupón de reparación del reloj original o una nota en la que figure su nombre, domicilio, número
TAnTE: Por FAVor ADVIErTA QuE ESTA GArAnTÍA no CuBrE DEFECToS o DAñoS A Su rELoj:1. después de vencido el plazo de la garantía;
2. si el reloj inicialmente no se compró a un distribuidor autorizado por Timex;
3. si las reparaciones efectuadas no las hizo Timex;
4. si son consecuencia de accidentes, manipulación no autorizada o abuso, y
5. en el cristal, la correa o pulsera, la caja, los accesorios o la pila. Timex podría cobrarle por el reemplazo de cualquiera de estas piezas.
ESTA GARANTÍA SE OFRECE EN FORMA EXCLUSIVA Y EN LUGAR DE CUALQUIER OTRA GARANTÍA, SEA EXPRESA O IMPLÍCITA, INCLUSIVE TODA GARANTÍA IMPLÍCITA
276 277
370-5775 (EUA). En Asia, al 852-2815-0091. En el Reino Unido, al 44 020 8687 9620. En Portugal, al 351 212 946 017. En Francia, al 03 81 63 42 51 (10 am - 12 del medio día). En Alemania, al 43.662 88921 494140. En Medio Oriente y África, al 971-4-310850.
de teléfono y fecha y lugar de compra. Para cubrir el costo de envío, por favor adjunte el siguiente importe (este importe no es para el pago de la reparación): En EUA, un cheque o giro por valor de US $ 8,00 (dólares estadounidenses); en Canadá, un cheque o giro por valor de CAN $7,00 (dólares canadienses); en el Reino Unido, un cheque o giro por valor de Uk £ 3,50 (libras). En otros países, Timex se encargará de cobrarle el importe por el franqueo y el manejo. NUNCA INCLUYA CON EL RELOJ UNA PULSERA ESPECIAL NI NINGÚN OTRO ARTÍCULO DE VALOR PERSONAL.
En EUA puede llamar al número 1-800-448-4639 para ob-tener información adicional sobre la garantía. En Canadá, llamar al número 1-800-263-0981. En Brasil, al +55 11 5572 9733. En México, al 01-800-01-060-00. En América Central, países del Caribe, Bermudas y Bahamas, al (501)

278 279
GArAnTÍA EXTEnDIDASólo disponible en EUA. Extienda su garantía por 4 años más a partir de la fecha de compra por $5. Puede pagar con AMEX, Discover, Visa o MasterCard llamando al 1 800-448-4639 en horas normales de oficina. El pago deberá efectuarse dentro de los 30 días siguientes a la fecha de compra. Indique el nombre, dirección, número de teléfono, fecha de compra y número de modelo (5 dígitos). También puede enviar un cheque de $5 por correo a: Timex Extended Warranty, P.O. Box 1676, Dept. EF, Little Rock, AR 72203. ©2013 Timex Group USA, Inc. TIMEX, INDIGLO y INTELLIGENT QUARTZ son marcas registradas de Timex Group B.V. y sus afiliados.

281
rELóGIoS TIMEX®
Parabéns por ter adquirido um relógio TIMEX® INTELLIGENT QUARTZ™. Leia cuidadosamente as instruções para saber como operar o relógio Timex.
É possível que o seu relógio não possua todos os recursos descritos neste folheto.
Para obter mais informações e registrar seu produto, visite:
www.timex.com
282 283
ÍnDICE
Como iniciar o funcionamento do relógio ..................... 285
À prova d’água e de choque .......................................... 286
Luz noturna Indiglo® ...................................................... 288
Configuração da data e hora ......................................... 289
Calendário perpétuo ...................................................... 291
Cronógrafo Fly-back ....................................................... 294
Bússola e cronógrafo Fly-back ....................................... 300
Cronógrafo linear ........................................................... 313
Hora mundial ................................................................. 319
Bússola ........................................................................... 326
Maré, temperatura e bússola ........................................ 334
Altímetro ........................................................................ 344
Profundidade .................................................................. 353
Função do taquímetro ................................................... 357
Função da escala deslizante de bisel ............................ 359
Como ajustar a pulseira ................................................. 364
Retirada dos elos da pulseira ......................................... 366
Bateria ............................................................................ 367
Garantia .......................................................................... 369
284 285
CoMo InICIAr o FunCIonAMEnToDo rELóGIo(Não se aplica aos modelos com calendário perpétuo.) Retire a proteção plástica abaixo da coroa e pressione a coroa contra a caixa para iniciar o funcionamento do relógio.
A coroa de alguns relógios precisa ser atarraxada. Se a caixa do seu relógio tiver uma saliência com rosca, a coroa deverá ser atarraxada depois de configurar o relógio.
Para atarraxar, mantenha pressionada a coroa firmemente contra a saliência rosqueada e gire-a simultaneamente no sentido horário. Continue a atarraxar a coroa até que esteja firme. Da próxima vez que desejar configurar o relógio, você deverá desatarraxar a coroa (sentido anti-horário) antes de puxá-la para fora .
Bem-vindo ao mundo dos relógios Timex® com tecnologia Intelligent Quartz™, o futuro da tecnologia de quartzo analógico. A tecnologia Intelligent Quartz dá ao seu poderoso microprocessador a confiabilidade e precisão para medição da hora analógica com quartzo. Com os relógios Timex Intelligent Quartz, a tecnologia está impressa no design, oferecendo um novo nível de complexidade do mostrador. Utiliza até três ponteiros extra independentes para mostrar uma vasta gama de informações, normalmente disponíveis apenas nos relógios digitais, em formato analógico tradicional.

286 287
ADVErTÊnCIA – PArA MAnTEr A rESISTÊnCIA À ÁGuA, nÃo PrESSIonE nEnHuM BoTÃo EMBAIXo D’ÁGuA, A MEnoS QuE o rELóGIo SEjA rESISTEnTE À ÁGuA A uMA ProFunDIDADE DE 200 METroS. nunCA PuXE A CoroA PArA ForA EMBAIXo D’ÁGuA.1. Essa resistência à água continuará invariável sempre
que o cristal, a coroa e a caixa permanecerem intactos.
2. O relógio não é certificado para mergulhar.
3. Enxágue o relógio com água doce logo após entrar em contato com a água salgada.
4. A resistência a choques será indicada mostrador ou na tampa do relógio. Os relógios são fabricados para passarem na prova de resistência a choques da ISO. Contudo, deve-se ter cuidado para não danificar o cristal.
À ProVA D’ÁGuA E DE CHoQuESe o relógio for à prova d’água, haverá uma indicação de profundidade em metros (WR_M).
Profundidade da resistência à água
Pressão da água abaixo da superfície em p.s.i.a.*
30m/98ft 60
50m/164ft 86
100m/328ft 160
200m/656ft 284

288 289
ConFIGurAçÃo DA DATA E HorAoBSErVAçÃo – A coroa do relógio tem três posições: fechada, no meio e para fora. Para se acostumar com a diferença entre as diversas posições, puxe a coroa para fora e empurre-a delicadamente até sentir um clique na posição central.
Para configurar a data e a hora:Time Puxe a coroa para fora e gire-a até a hora correta ser exibida. Certifique-se da correta configuração de AM/PM verificando se a data muda à meia-noite, e não ao meio-dia.
Luz noTurnA InDIGLo® Pressione o botão ou a coroa para ativar a luz. A tecnologia eletroluminescente utilizada na luz noturna INDIGLO® ilumina todo o mostrador do relógio à noite e em condições de pouca luz.
ou

290 291
Data (não se aplica aos modelos com calendário perpétuo) Puxe a coroa até a posição do meio e gire-a até a data correta ser exibida na janela da data. Observação – A data muda entre as 22h00 e as 2h00. Não mudar a data durante este período. Isso pode prejudicar o mecanismo do relógio.
Ao terminar a configuração da data e da hora, empurre a coroa para a posição fechada. O segundo ponteiro começará a se movimentar.
oBSErVAçÃo – Para os meses com menos de 31 dias, será preciso ajustar a data.
CALEnDÁrIo PErPÉTuoVISÃo GErAL
A
B
1 2 3
1 2 3
Ponteiro daS HoraS
Ponteiro doS diaS
Ponteiro da data
Ponteiro doS SegundoS
Ponteiro doS MinutoS
coroa
Ponteiro doS MeSeS
Botão A (EnCAIXADo)
Botão B (EnCAIXADo)
PoSição FecHada
PoSição interMediÁria
PoSição eXterna

292 293
Para ver a compensação, puxe a coroa para a sua posição intermediária. O ponteiro da data mostra a compensação: 1 = 1 ano após o ano bissexto; 2 = 2 anos após o ano bissexto; 3 = 3 anos após o ano bissexto; 4 = ano bissexto. Empurre a coroa para dentro quando terminar e os ponteiros voltam ao visor normal de dia, mês e data.
InTroDuçÃoCom o recurso de calendário perpétuo, a data não precisa ser ajustada até 2100. O relógio trabalha automaticamente levando em consideração os meses curtos e os anos bissextos, sempre mostrando o dia e a data corretos. O dia e a data foram previamente ajustados na fábrica Timex. Você só precisa ajustar a hora. O relógio tem dois botões encaixados somente utilizados pelo Centro de Serviço Timex para ajustar o dia e a data após a substituição da bateria. Não cumprem nenhuma outra função.
CoMPEnSAçÃo Do Ano BISSEXTo Para manter a data correta, o relógio inclui uma confi-gur ação para a compensação do ano bissexto atual. Essa configuração é realizada na fábrica Timex ou após a substituição da bateria e não pode ser alterada, somente vista.
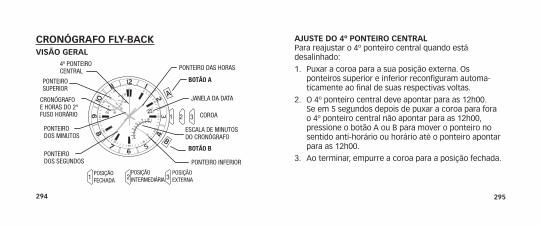
294 295
AjuSTE Do 4º PonTEIro CEnTrALPara reajustar o 4º ponteiro central quando está desalinhado:
1. Puxar a coroa para a sua posição externa. Os ponteiros superior e inferior reconfiguram automa-ticamente ao final de suas respectivas voltas.
2. O 4º ponteiro central deve apontar para as 12h00. Se em 5 segundos depois de puxar a coroa para fora o 4º ponteiro central não apontar para as 12h00, pressione o botão A ou B para mover o ponteiro no sentido anti-horário ou horário até o ponteiro apontar para as 12h00.
3. Ao terminar, empurre a coroa para a posição fechada.
CronóGrAFo FLY-BACKVISÃo GErAL
AA
B
23
1 2 3
1 2 3
Ponteiro SuPerior
cronógraFo e HoraS do 2° FuSo HorÁrio
4º Ponteiro central
Ponteiro doS SegundoS
Janela da data
coroa
eScala de MinutoS do cronógraFo
Ponteiro inFerior
Botão A
Botão B
Ponteiro doS MinutoS
Ponteiro daS HoraS
PoSição FecHada
PoSição interMe diÁria
PoSição eXterna
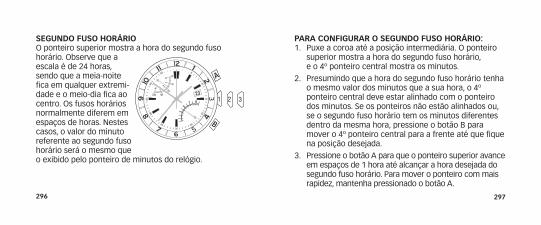
296 297
PArA ConFIGurAr o SEGunDo FuSo HorÁrIo:1. Puxe a coroa até a posição intermediária. O ponteiro
superior mostra a hora do segundo fuso horário, e o 4º ponteiro central mostra os minutos.
2. Presumindo que a hora do segundo fuso horário tenha o mesmo valor dos minutos que a sua hora, o 4º ponteiro central deve estar alinhado com o ponteiro dos minutos. Se os ponteiros não estão alinhados ou, se o segundo fuso horário tem os minutos diferentes dentro da mesma hora, pressione o botão B para mover o 4º ponteiro central para a frente até que fique na posição desejada.
3. Pressione o botão A para que o ponteiro superior avance em espaços de 1 hora até alcançar a hora desejada do segundo fuso horário. Para mover o ponteiro com mais rapidez, mantenha pressionado o botão A.
SEGunDo FuSo HorÁrIoO ponteiro superior mostra a hora do segundo fuso horário. Observe que a escala é de 24 horas, sendo que a meia-noite fica em qualquer extremi-dade e o meio-dia fica ao centro. Os fusos horários normalmente diferem em espaços de horas. Nestes casos, o valor do minuto referente ao segundo fuso horário será o mesmo que o exibido pelo ponteiro de minutos do relógio.
AA
B
23
1 2 3
1 2 3
298 299
4. Para reconfigurar o cronógrafo fly-back para a posição zero, pressione o botão B (FLY-BACk/RESET).
Ao reconfigurar o cronógrafo, todos os ponteiros passam para a posição zero. Depois de oito segundos, o relógio volta ao visor normal do segundo fuso horário.
5. Para reconfigurar e/ou reiniciar o cronógrafo fly-back enquanto estiver em funcionamento, mantenha pressionado o botão B (Fly-back/Reset). Solte o botão quando desejar reiniciar.
4. Pressione a coroa quando terminar.
CronóGrAFo FLY-BACKO relógio tem um cronógrafo fly-back de 4 horas.
1. Para começar, pressione o botão A (START/STOP).
O 4º ponteiro central mostra os segundos com uma resolução de 1/5 de segundo. O ponteiro inferior mostra o último dígito dos minutos, contando até dez e repetindo. O ponteiro superior mostra o tempo total, incluindo horas e minutos, com divisões a cada dez minutos. O cronógrafo conta até quatro horas antes de parar automaticamente.
2. Para parar, pressione novamente o botão A (START/STOP). Todos os ponteiros param de se movimentar.
3. Para continuar, pressione novamente o botão A (START/STOP).
300 301
AjuSTE Do PonTEIro InDICADor (4º PonTEIro CEnTrAL)Para reajustar o ponteiro indicador quando estiver desalinhado:
1. Puxar a coroa para a sua posição externa. Os ponteiros superior e inferior reconfiguram automa-ticamente ao final de suas respectivas voltas.
2. O 4º ponteiro central deve apontar para as 12h00. Se isso não ocorrer dentro de 5 segundos depois de puxar a coroa para a sua posição exterior, pressione os botões A ou B para mover o ponteiro no sentido anti-horário (A) ou horário (B), respectivamente, até o ponteiro apontar para as 12h00.
3. Pressione a coroa quando terminar.
BÚSSoLA E CronóGrAFo FLY-BACKVISÃo GErAL
A
C B
1 2 3
1 2 3
Ponteiro SuPerior
cronógraFo HoraS do 2° FuSo HorÁrio
4º Ponteiro central
Ponteiro doS SegundoS
Janela da data
coroa
eScala de MinutoS do cronógraFo
Ponteiro inFerior
Botão A
Botão B
Ponteiro daS HoraS
Ponteiro doS MinutoS
PoSição FecHada
PoSição inter-MediÁria
PoSição eXterna
Botão C
302 303
2. Pressione o botão B para mover o 4º ponteiro central para a frente. Para mover o ponteiro com mais rapidez, mantenha o botão pressionado. O ponteiro superior e o 4º ponteiro central movem-se juntos; quando o 4º ponteiro central faz uma volta completa, o ponteiro superior move-se o equivalente a uma hora. Tendo em conta que a hora do segundo fuso horário tem o mesmo valor dos minutos que a sua hora, o 4º ponteiro central deve estar alinhado com o ponteiro dos minutos.
3. Pressione o botão A para que o ponteiro superior avance em espaços de 1 hora. Para mover o ponteiro com mais rapidez, mantenha o botão pressionado.
4. Pressione a coroa quando terminar.
Se preferir, o segundo fuso horário pode ser utilizado como uma alternativa para mostrar a sua hora local
SEGunDo FuSo HorÁrIo O ponteiro superior geralmente mostra a hora do segundo fuso horário. Observe que a escala é de 24 horas, sendo que a meia-noite fica em qualquer extremidade e o meio-dia fica no centro.
Para configurar o segundo fuso horário:
1. Puxe a coroa até a posição intermediária. O ponteiro superior mostra a hora do segundo fuso horário em hora militar (formato de 24 horas)e o 4° ponteiro central mostra os minutos.
A
C B
1 2 3
1 2 3

304 305
O ponteiro superior mostra o tempo total, incluindo horas e minutos, com divisões a cada dez minutos. O cronógrafo conta até quatro horas antes de parar automaticamente.
2. Para parar, pressione o botão A (START/STOP) novamente. Os ponteiros param todos.
3. Para recomeçar, pressione o botão A (START/STOP) novamente ou, para reconfigurar o cronógrafo para a posição zero, pressione o botão B (FLY-BACk/RESET).
Ao reconfigurar o cronógrafo, todos os ponteiros passam para a posição zero. Depois de oito segundos, o relógio volta ao visor normal do segundo fuso horário.
4. Você também pode zerar e/ou reiniciar o cronógrafo enquanto este estiver em funcionamento. Para fazê-lo, mantenha pressionado o botão B (FLY-BACk/
no formato de 24 horas. Ao configurar o segundo fuso horário, certifique-se de que o visor da hora/minuto corresponda ao visor de 24 horas verificando se a data muda à meia-noite, e não ao meio-dia.
CronóGrAFo FLY-BACKO relógio tem um cronógrafo fly-back de 4 horas.
1. Para começar, pressione o botão A (START/STOP). O 4º ponteiro central mostra os segundos com uma resolução de 1/5 de segundo e o ponteiro inferior mostra o último dígito dos minutos, contando até dez e repetindo.
A
C B
1 2 3
1 2 3
306 307
RESET) para zerar o cronógrafo e solte quando quiser que reinicie. Você não tem que esperar até que os ponteiros cheguem a zero para soltar o botão; a cronometragem começará internamente assim que soltar o botão. Esta função “fly-back” permite contar o tempo de uma volta.
A bússola pode ser utilizada quando o cronógrafo está trabalhando sem interferir com o seu funcionamento. Ver FUNCIONAMENTO DA BÚSSOLA.
CALIBrAçÃo DA BÚSSoLAVocê tem de calibrar a bússola antes de usá-la.
Uma vez que a bússola utiliza o campo magnético da Terra, é preciso estar consciente de grandes objetos metálicos, tais como, veículos ou pontes, ou objetos que emitem radiações eletromagnéticas (televisões ou
computadores), o que poderia afetar o campo magnético em torno do relógio. Se a bússola for calibrada perto de tais objetos, ela apenas trabalhará corretamente neste local. Se a bússola for calibrada longe de tais objetos, não trabalhará corretamente perto deles. Para obter os melhores resultados, faça a calibração na área em que a vá utilizar.
Durante a calibração e quando fizer as leituras de posição, é importante, como com todas as bússolas, manter a bússola nivelada. Fazer a calibração ou determinar direções quando o relógio estiver desnivelado pode causar erros graves. Evite também as áreas onde possam existir concentrações acima do normal de minério de ferro e ferro industrial, pois poderão causar leituras incorretas. Sempre que suspeitar que a determinação de direção não está correta, volte a calibrar a bússola.
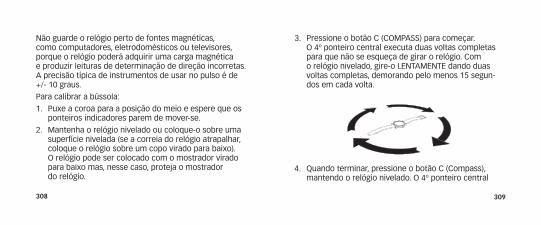
308 309
3. Pressione o botão C (COMPASS) para começar. O 4º ponteiro central executa duas voltas completas para que não se esqueça de girar o relógio. Com o relógio nivelado, gire-o LENTAMENTE dando duas voltas completas, demorando pelo menos 15 segun-dos em cada volta.
4. Quando terminar, pressione o botão C (Compass), mantendo o relógio nivelado. O 4º ponteiro central
Não guarde o relógio perto de fontes magnéticas, como computadores, eletrodomésticos ou televisores, porque o relógio poderá adquirir uma carga magnética e produzir leituras de determinação de direção incorretas. A precisão típica de instrumentos de usar no pulso é de +/- 10 graus.
Para calibrar a bússola:
1. Puxe a coroa para a posição do meio e espere que os ponteiros indicadores parem de mover-se.
2. Mantenha o relógio nivelado ou coloque-o sobre uma superfície nivelada (se a correia do relógio atrapalhar, coloque o relógio sobre um copo virado para baixo). O relógio pode ser colocado com o mostrador virado para baixo mas, nesse caso, proteja o mostrador do relógio.
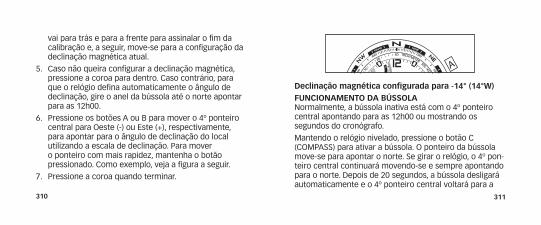
310 311
A
B
Declinação magnética configurada para -14° (14°W)FunCIonAMEnTo DA BÚSSoLANormalmente, a bússola inativa está com o 4º ponteiro central apontando para as 12h00 ou mostrando os segundos do cronógrafo.
Mantendo o relógio nivelado, pressione o botão C (COMPASS) para ativar a bússola. O ponteiro da bússola move-se para apontar o norte. Se girar o relógio, o 4º pon-teiro central continuará movendo-se e sempre apontando para o norte. Depois de 20 segundos, a bússola desligará automaticamente e o 4º ponteiro central voltará para a
vai para trás e para a frente para assinalar o fim da calibração e, a seguir, move-se para a configuração da declinação magnética atual.
5. Caso não queira configurar a declinação magnética, pressione a coroa para dentro. Caso contrário, para que o relógio defina automaticamente o ângulo de declinação, gire o anel da bússola até o norte apontar para as 12h00.
6. Pressione os botões A ou B para mover o 4º ponteiro central para Oeste (-) ou Este (+), respectivamente, para apontar para o ângulo de declinação do local utilizando a escala de declinação. Para mover o ponteiro com mais rapidez, mantenha o botão pressionado. Como exemplo, veja a figura a seguir.
7. Pressione a coroa quando terminar.

312 313
operação normal. Isto permite poupar a bateria. Pres-sione o botão C (COMPASS) em qualquer momento para manter a bússola ativada durante outros 20 segundos.
A bússola pode ser ativada quando o cronógrafo estiver sendo usado. O 4º ponteiro central muda simplesmente de operação temporariamente. Os ponteiros superior e inferior continuam a apresentar o tempo do cronógrafo e todas as funções do cronógrafo estão disponíveis através dos botões A (START/STOP) e B (FLY-BACk/RESET).
oBSErVAçÃo – Durante o funcionamento da bússola, o segundo ponteiro move-se de dois em dois segundos. Além disso, quando a bússola é ativada, os ponteiros superior e inferior podem mudar ligeiramente de posição, regressando às posições devidas quando a bússola for desativada. Esta operação é normal e permite uma leitura mais precisa da bússola.
CronóGrAFo LInEArVISÃo GErAL
Ponteiro doS SegundoS
Janela da data
coroa
Ponteiro inFerior
Botão A
Botão B
4º Ponteiro central
Ponteiro daS HoraS
Ponteiro linear
Ponteiro doS MinutoS
A
B
1 2 3
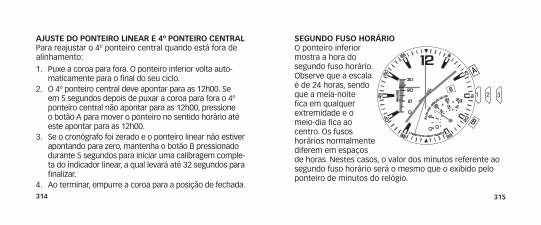
314 315
AjuSTE Do PonTEIro LInEAr E 4º PonTEIro CEnTrAL Para reajustar o 4º ponteiro central quando está fora de alinhamento:
1. Puxe a coroa para fora. O ponteiro inferior volta auto-maticamente para o final do seu ciclo.
2. O 4º ponteiro central deve apontar para as 12h00. Se em 5 segundos depois de puxar a coroa para fora o 4º ponteiro central não apontar para as 12h00, pressione o botão A para mover o ponteiro no sentido horário até este apontar para as 12h00.
3. Se o cronógrafo foi zerado e o ponteiro linear não estiver apontando para zero, mantenha o botão B pressionado durante 5 segundos para iniciar uma calibragem comple-ta do indicador linear, a qual levará até 32 segundos para finalizar.
4. Ao terminar, empurre a coroa para a posição de fechada.
SEGunDo FuSo HorÁrIoO ponteiro inferior mostra a hora do segundo fuso horário. Observe que a escala é de 24 horas, sendo que a meia-noite fica em qualquer extremidade e o meio-dia fica ao centro. Os fusos horários normalmente diferem em espaços de horas. Nestes casos, o valor dos minutos referente ao segundo fuso horário será o mesmo que o exibido pelo ponteiro de minutos do relógio.
A
B
1 2 3
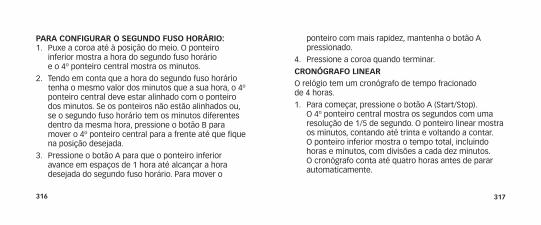
316 317
PArA ConFIGurAr o SEGunDo FuSo HorÁrIo: 1. Puxe a coroa até à posição do meio. O ponteiro
inferior mostra a hora do segundo fuso horário e o 4º ponteiro central mostra os minutos.
2. Tendo em conta que a hora do segundo fuso horário tenha o mesmo valor dos minutos que a sua hora, o 4º ponteiro central deve estar alinhado com o ponteiro dos minutos. Se os ponteiros não estão alinhados ou, se o segundo fuso horário tem os minutos diferentes dentro da mesma hora, pressione o botão B para mover o 4º ponteiro central para a frente até que fique na posição desejada.
3. Pressione o botão A para que o ponteiro inferior avance em espaços de 1 hora até alcançar a hora desejada do segundo fuso horário. Para mover o
ponteiro com mais rapidez, mantenha o botão A pressionado.
4. Pressione a coroa quando terminar.
CronóGrAFo LInEAr O relógio tem um cronógrafo de tempo fracionado de 4 horas.
1. Para começar, pressione o botão A (Start/Stop). O 4º ponteiro central mostra os segundos com uma resolução de 1/5 de segundo. O ponteiro linear mostra os minutos, contando até trinta e voltando a contar. O ponteiro inferior mostra o tempo total, incluindo horas e minutos, com divisões a cada dez minutos. O cronógrafo conta até quatro horas antes de parar automaticamente.
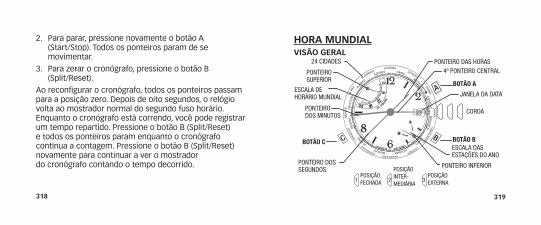
318 319
HorA MunDIAL VISÃo GErAL
A
BC
1 2 3
corrected 3.3.11 with Paulo’s new cities
24 cidadeS
eScala de HorÁrio Mundial
Ponteiro doS SegundoS
Janela da data
coroa
Ponteiro inFerior
Botão A
Botão B Botão C
4º Ponteiro central
eScala daS eStaçõeS do ano
Ponteiro SuPerior
Ponteiro daS HoraS
Ponteiro doS MinutoS
PoSição FecHada
PoSição inter-MediÁria
PoSição eXterna
2. Para parar, pressione novamente o botão A (Start/Stop). Todos os ponteiros param de se movimentar.
3. Para zerar o cronógrafo, pressione o botão B (Split/Reset).
Ao reconfigurar o cronógrafo, todos os ponteiros passam para a posição zero. Depois de oito segundos, o relógio volta ao mostrador normal do segundo fuso horário. Enquanto o cronógrafo está correndo, você pode registrar um tempo repartido. Pressione o botão B (Split/Reset) e todos os ponteiros param enquanto o cronógrafo continua a contagem. Pressione o botão B (Split/Reset) novamente para continuar a ver o mostrador do cronógrafo contando o tempo decorrido.
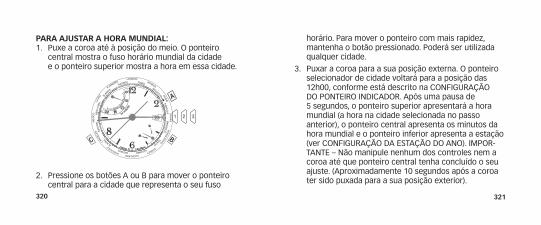
320 321
PArA AjuSTAr A HorA MunDIAL:1. Puxe a coroa até à posição do meio. O ponteiro
central mostra o fuso horário mundial da cidade e o ponteiro superior mostra a hora em essa cidade.
A
BC
1 2 3
2. Pressione os botões A ou B para mover o ponteiro central para a cidade que representa o seu fuso
horário. Para mover o ponteiro com mais rapidez, mantenha o botão pressionado. Poderá ser utilizada qualquer cidade.
3. Puxar a coroa para a sua posição externa. O ponteiro selecionador de cidade voltará para a posição das 12h00, conforme está descrito na CONFIGURAÇÃO DO PONTEIRO INDICADOR. Após uma pausa de 5 segundos, o ponteiro superior apresentará a hora mundial (a hora na cidade selecionada no passo anterior), o ponteiro central apresenta os minutos da hora mundial e o ponteiro inferior apresenta a estação (ver CONFIGURAÇÃO DA ESTAÇÃO DO ANO). IMPOR-TANTE – Não manipule nenhum dos controles nem a coroa até que ponteiro central tenha concluído o seu ajuste. (Aproximadamente 10 segundos após a coroa ter sido puxada para a sua posição exterior).
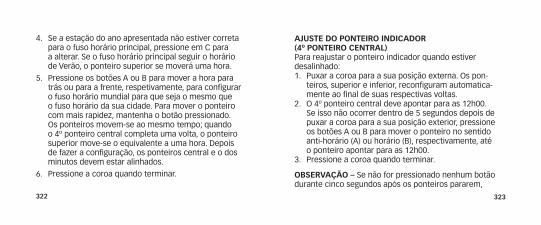
322 323
4. Se a estação do ano apresentada não estiver correta para o fuso horário principal, pressione em C para a alterar. Se o fuso horário principal seguir o horário de Verão, o ponteiro superior se moverá uma hora.
5. Pressione os botões A ou B para mover a hora para trás ou para a frente, respetivamente, para configurar o fuso horário mundial para que seja o mesmo que o fuso horário da sua cidade. Para mover o ponteiro com mais rapidez, mantenha o botão pressionado. Os ponteiros movem-se ao mesmo tempo; quando o 4º ponteiro central completa uma volta, o ponteiro superior move-se o equivalente a uma hora. Depois de fazer a configuração, os ponteiros central e o dos minutos devem estar alinhados.
6. Pressione a coroa quando terminar.
AjuSTE Do PonTEIro InDICADor (4º PonTEIro CEnTrAL) Para reajustar o ponteiro indicador quando estiver desalinhado:1. Puxar a coroa para a sua posição externa. Os pon-
teiros, superior e inferior, reconfiguram automatica-mente ao final de suas respectivas voltas.
2. O 4º ponteiro central deve apontar para as 12h00. Se isso não ocorrer dentro de 5 segundos depois de puxar a coroa para a sua posição exterior, pressione os botões A ou B para mover o ponteiro no sentido anti-horário (A) ou horário (B), respectivamente, até o ponteiro apontar para as 12h00.
3. Pressione a coroa quando terminar.
oBSErVAçÃo – Se não for pressionado nenhum botão durante cinco segundos após os ponteiros pararem,
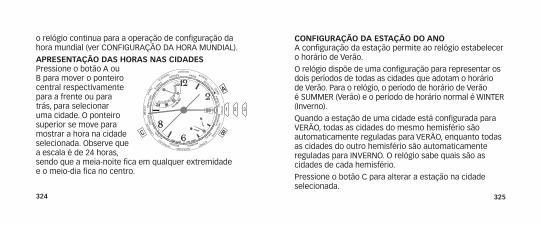
324 325
ConFIGurAçÃo DA ESTAçÃo Do AnoA configuração da estação permite ao relógio estabelecer o horário de Verão.
O relógio dispõe de uma configuração para representar os dois períodos de todas as cidades que adotam o horário de Verão. Para o relógio, o período de horário de Verão é SUMMER (Verão) e o período de horário normal é WINTER (Inverno).
Quando a estação de uma cidade está configurada para VERÃO, todas as cidades do mesmo hemisfério são automaticamente reguladas para VERÃO, enquanto todas as cidades do outro hemisfério são automaticamente reguladas para INVERNO. O relógio sabe quais são as cidades de cada hemisfério.
Pressione o botão C para alterar a estação na cidade selecionada.
o relógio continua para a operação de configuração da hora mundial (ver CONFIGURAÇÃO DA HORA MUNDIAL).
APrESEnTAçÃo DAS HorAS nAS CIDADESPressione o botão A ou B para mover o ponteiro central respectivamente para a frente ou para trás, para selecionar uma cidade. O ponteiro superior se move para mostrar a hora na cidade selecionada. Observe que a escala é de 24 horas, sendo que a meia-noite fica em qualquer extremidade e o meio-dia fica no centro.
A
BC
1 2 3

326 327
BÚSSoLAVISÃo GErAL
AjuSTE Do PonTEIro DA BÚSSoLAPuxe a COROA completamente para fora. O ponteiro da bússola deve apontar para as 12h00. Se isso não acon-tecer, pressione os botões A ou B para mover o ponteiro da bússola até este apontar para as 12h00. Mantenha o botão pressionado para mover o ponteiro com rapidez. Quando terminar, empurre a COROA DO CENTRO para dentro e volte a calibrar a bússola.
CALIBrAçÃo DA BÚSSoLAVocê tem de calibrar a bússola antes de usá-la.
Uma vez que a bússola utiliza o campo magnético da Terra, é preciso estar consciente de grandes objetos metálicos, tais como, veículos ou pontes, ou objetos que emitem radiações eletromagnéticas (televisões ou computadores), o que poderia afetar o campo magnético em torno do relógio. Se a bússola for calibrada perto de
II
14 coroa do centro
Meio
aJuStar data
II
14
Para Fora
aJuStar Hora
coroa
B (AnEL GIRAtÓRIo)
A (BúSSoLA)
eScala de declinação
Ponteiro da BÚSSola (o lado que indica o norte é VerMelHo Pontiagudo/MaiS coMPrido)
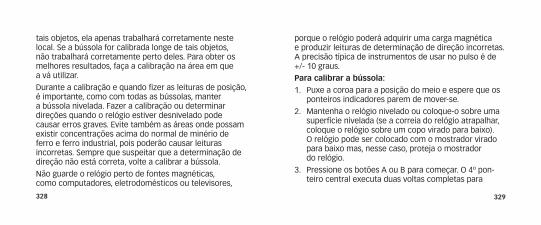
328 329
tais objetos, ela apenas trabalhará corretamente neste local. Se a bússola for calibrada longe de tais objetos, não trabalhará corretamente perto deles. Para obter os melhores resultados, faça a calibração na área em que a vá utilizar.
Durante a calibração e quando fizer as leituras de posição, é importante, como com todas as bússolas, manter a bússola nivelada. Fazer a calibração ou determinar direções quando o relógio estiver desnivelado pode causar erros graves. Evite também as áreas onde possam existir concentrações acima do normal de minério de ferro e ferro industrial, pois poderão causar leituras incorretas. Sempre que suspeitar que a determinação de direção não está correta, volte a calibrar a bússola.
Não guarde o relógio perto de fontes magnéticas, como computadores, eletrodomésticos ou televisores,
porque o relógio poderá adquirir uma carga magnética e produzir leituras de determinação de direção incorretas. A precisão típica de instrumentos de usar no pulso é de +/- 10 graus.
Para calibrar a bússola:1. Puxe a coroa para a posição do meio e espere que os
ponteiros indicadores parem de mover-se.
2. Mantenha o relógio nivelado ou coloque-o sobre uma superfície nivelada (se a correia do relógio atrapalhar, coloque o relógio sobre um copo virado para baixo). O relógio pode ser colocado com o mostrador virado para baixo mas, nesse caso, proteja o mostrador do relógio.
3. Pressione os botões A ou B para começar. O 4º pon-teiro central executa duas voltas completas para

330 331
5. Caso não queira configurar a declinação magnética, pressione a coroa para dentro. Caso contrário, para que o relógio defina automaticamente o ângulo de declinação, gire o anel da bússola até o norte apontar para as 12h00.
6. Pressione em A ou B para mover o 4º ponteiro central para Oeste (-) ou Este (+), respectivamente, para apontar para o ângulo de declinação do local utilizando a escala de declinação. Para mover o ponteiro com mais rapidez, mantenha o botão pressionado. Como exemplo, veja a figura na página seguinte.
7. Pressione a coroa quando terminar.
que não se esqueça de girar o relógio. Com o relógio nivelado, gire-o LENTAMENTE dando duas voltas completas, demorando pelo menos 15 segundos em cada volta.
4. Quando terminar, pressione os botões A ou B, mantendo o relógio nivelado. O 4º ponteiro central vai para trás e para a frente para assinalar o fim da calibração e, a seguir, move-se para a configuração da declinação magnética atual.
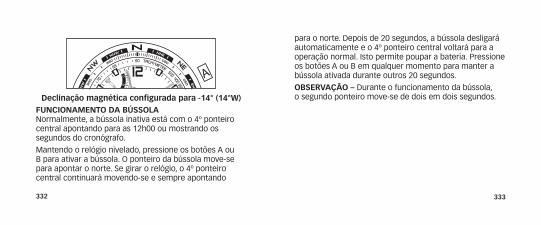
332 333
A
B
Declinação magnética configurada para -14° (14°W)FunCIonAMEnTo DA BÚSSoLANormalmente, a bússola inativa está com o 4º ponteiro central apontando para as 12h00 ou mostrando os segundos do cronógrafo.
Mantendo o relógio nivelado, pressione os botões A ou B para ativar a bússola. O ponteiro da bússola move-se para apontar o norte. Se girar o relógio, o 4º ponteiro central continuará movendo-se e sempre apontando
para o norte. Depois de 20 segundos, a bússola desligará automaticamente e o 4º ponteiro central voltará para a operação normal. Isto permite poupar a bateria. Pressione os botões A ou B em qualquer momento para manter a bússola ativada durante outros 20 segundos.
oBSErVAçÃo – Durante o funcionamento da bússola, o segundo ponteiro move-se de dois em dois segundos.
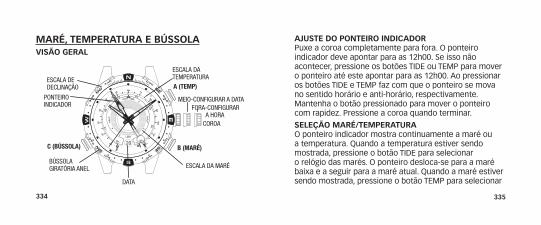
334 335
MArÉ, TEMPErATurA E BÚSSoLAVISÃo GErAL
AjuSTE Do PonTEIro InDICADorPuxe a coroa completamente para fora. O ponteiro indicador deve apontar para as 12h00. Se isso não acontecer, pressione os botões TIDE ou TEMP para mover o ponteiro até este apontar para as 12h00. Ao pressionar os botões TIDE e TEMP faz com que o ponteiro se mova no sentido horário e anti-horário, respectivamente. Mantenha o botão pressionado para mover o ponteiro com rapidez. Pressione a coroa quando terminar.
SELEçÃo MArÉ/TEMPErATurAO ponteiro indicador mostra continuamente a maré ou a temperatura. Quando a temperatura estiver sendo mostrada, pressione o botão TIDE para selecionar o relógio das marés. O ponteiro desloca-se para a maré baixa e a seguir para a maré atual. Quando a maré estiver sendo mostrada, pressione o botão TEMP para selecionar
Fora-conFigurar a Hora
eScala de declinação
Ponteiro indicador
C (BúSSoLA) B (mARÉ)
A (tEmp)
coroa
BÚSSola giratória anel
data
eScala da Maré
eScala da teMPeratura
Meio-conFigurar a data
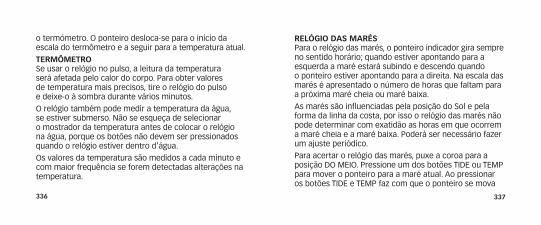
336 337
o termómetro. O ponteiro desloca-se para o início da escala do termômetro e a seguir para a temperatura atual.
TErMÔMETroSe usar o relógio no pulso, a leitura da temperatura será afetada pelo calor do corpo. Para obter valores de temperatura mais precisos, tire o relógio do pulso e deixe-o à sombra durante vários minutos.
O relógio também pode medir a temperatura da água, se estiver submerso. Não se esqueça de selecionar o mostrador da temperatura antes de colocar o relógio na água, porque os botões não devem ser pressionados quando o relógio estiver dentro d’água.
Os valores da temperatura são medidos a cada minuto e com maior frequência se forem detectadas alterações na temperatura.
rELóGIo DAS MArÉSPara o relógio das marés, o ponteiro indicador gira sempre no sentido horário; quando estiver apontando para a esquerda a maré estará subindo e descendo quando o ponteiro estiver apontando para a direita. Na escala das marés é apresentado o número de horas que faltam para a próxima maré cheia ou maré baixa.
As marés são influenciadas pela posição do Sol e pela forma da linha da costa, por isso o relógio das marés não pode determinar com exatidão as horas em que ocorrem a maré cheia e a maré baixa. Poderá ser necessário fazer um ajuste periódico.
Para acertar o relógio das marés, puxe a coroa para a posição DO MEIO. Pressione um dos botões TIDE ou TEMP para mover o ponteiro para a maré atual. Ao pressionar os botões TIDE e TEMP faz com que o ponteiro se mova
338 339
no sentido horário e anti-horário, respectivamente. Pressione a coroa quando terminar.
CALIBrAçÃo DA BÚSSoLAVocê tem de calibrar a bússola antes de usá-la.
Uma vez que a bússola utiliza o campo magnético da Terra, é preciso estar consciente de grandes objetos metálicos, tais como, veículos ou pontes, ou objetos que emitem radiações eletromagnéticas (televisões ou computadores), o que poderia afetar o campo magnético em torno do relógio. Se a bússola for calibrada perto de tais objetos, ela apenas trabalhará corretamente neste local. Se a bússola for calibrada longe de tais objetos, não trabalhará corretamente perto deles. Para obter os melhores resultados, faça a calibração na área em que a vá utilizar.
Durante a calibração e quando fizer as leituras de posição, é importante, como com todas as bússolas, manter a bússola nivelada. Fazer a calibração ou determinar direções quando o relógio estiver desnivelado pode causar erros graves. Evite também as áreas onde possam existir concentrações acima do normal de minério de ferro e ferro industrial, pois poderão causar leituras incorretas. Sempre que suspeitar que a determinação de direção não está correta, volte a calibrar a bússola.
Não guarde o relógio perto de fontes magnéticas, como computadores, eletrodomésticos ou televisores, porque o relógio poderá adquirir uma carga magnética e produzir leituras de determinação de direção incorretas. A precisão típica de instrumentos de usar no pulso é de +/- 10 graus.

340 341
Para calibrar a bússola:1. Puxe a coroa para a posição do meio e espere que os
ponteiros indicadores parem de mover-se.
2. Mantenha o relógio nivelado ou coloque-o sobre uma superfície nivelada (se a correia do relógio atrapalhar, coloque o relógio sobre um copo virado para baixo). O relógio pode ser colocado com o mostrador virado para baixo mas, nesse caso, proteja o mostrador do relógio.
3. Pressione o botão C (COMPASS) para começar. O 4º ponteiro central executa duas voltas completas para que não se esqueça de girar o relógio. Com o relógio nivelado, gire-o LENTAMENTE dando duas voltas completas, demorando pelo menos 15 segun-dos em cada volta.
4. Quando terminar, pressione o botão C (Compass), mantendo o relógio nivelado. O 4º ponteiro central vai para trás e para a frente para assinalar o fim da calibração e, a seguir, move-se para a configuração da declinação magnética atual.
5. Caso não queira configurar a declinação magnética, pressione a coroa para dentro. Caso contrário, para que o relógio defina automaticamente o ângulo de declinação, gire o anel da bússola até o norte apontar para as 12h00.

342 343
6. Pressione em A ou B para mover o 4º ponteiro central para Oeste (-) ou Este (+), respectivamente, para apontar para o ângulo de declinação do local utilizando a escala de declinação. Para mover o ponteiro com mais rapidez, mantenha o botão pressionado. Como exemplo, veja a figura na página seguinte.
7. Pressione a coroa quando terminar.
A
B
Declinação magnética configurada para -14° (14°W)
FunCIonAMEnTo DA BÚSSoLANormalmente, a bússola inativa está com o 4º ponteiro central apontando para as 12h00 ou mostrando os segundos do cronógrafo.
Mantendo o relógio nivelado, pressione o botão C (COMPASS) para ativar a bússola. O ponteiro da bússola move-se para apontar o norte. Se girar o relógio, o 4º ponteiro central continuará movendo-se e sempre apontando para o norte. Depois de 20 segundos, a bússola desligará automaticamente e o 4º ponteiro central voltará para a operação normal. Isto permite poupar a bateria. Pressione o botão C (COMPASS) em qualquer momento para manter a bússola ativada durante outros 20 segundos.
oBSErVAçÃo – Durante o funcionamento da bússola, o segundo ponteiro move-se de dois em dois segundos.
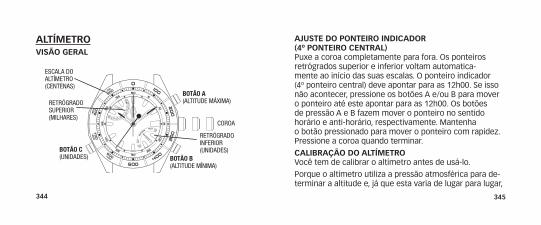
344 345
ALTÍMETroVISÃo GErAL
AjuSTE Do PonTEIro InDICADor (4º PonTEIro CEnTrAL)Puxe a coroa completamente para fora. Os ponteiros retrógrados superior e inferior voltam automatica-mente ao início das suas escalas. O ponteiro indicador (4º ponteiro central) deve apontar para as 12h00. Se isso não acontecer, pressione os botões A e/ou B para mover o ponteiro até este apontar para as 12h00. Os botões de pressão A e B fazem mover o ponteiro no sentido horário e anti-horário, respectivamente. Mantenha o botão pressionado para mover o ponteiro com rapidez. Pressione a coroa quando terminar.
CALIBrAçÃo Do ALTÍMETroVocê tem de calibrar o altímetro antes de usá-lo.
Porque o altímetro utiliza a pressão atmosférica para de-terminar a altitude e, já que esta varia de lugar para lugar,
eScala do altíMetro (centenaS)
retrógrado SuPerior(MilHareS)
Botão C(unidadeS)
Botão A(altitude MÁXiMa)
Botão B(altitude MíniMa)
retrógrado inFerior (unidadeS)
coroa
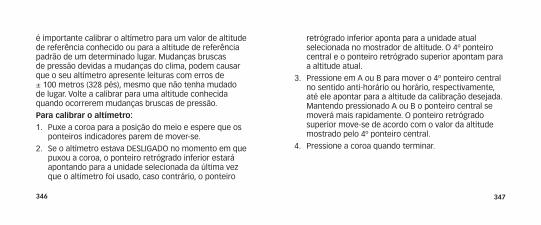
346 347
é importante calibrar o altímetro para um valor de altitude de referência conhecido ou para a altitude de referência padrão de um determinado lugar. Mudanças bruscas de pressão devidas a mudanças do clima, podem causar que o seu altímetro apresente leituras com erros de ± 100 metros (328 pés), mesmo que não tenha mudado de lugar. Volte a calibrar para uma altitude conhecida quando ocorrerem mudanças bruscas de pressão.
Para calibrar o altímetro:1. Puxe a coroa para a posição do meio e espere que os
ponteiros indicadores parem de mover-se.
2. Se o altímetro estava DESLIGADO no momento em que puxou a coroa, o ponteiro retrógrado inferior estará apontando para a unidade selecionada da última vez que o altímetro foi usado, caso contrário, o ponteiro
retrógrado inferior aponta para a unidade atual selecionada no mostrador de altitude. O 4º ponteiro central e o ponteiro retrógrado superior apontam para a altitude atual.
3. Pressione em A ou B para mover o 4º ponteiro central no sentido anti-horário ou horário, respectivamente, até ele apontar para a altitude da calibração desejada. Mantendo pressionado A ou B o ponteiro central se moverá mais rapidamente. O ponteiro retrógrado superior move-se de acordo com o valor da altitude mostrado pelo 4º ponteiro central.
4. Pressione a coroa quando terminar.
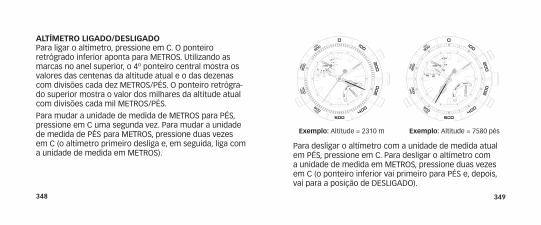
348 349
ALTÍMETro LIGADo/DESLIGADoPara ligar o altímetro, pressione em C. O ponteiro retrógrado inferior aponta para METROS. Utilizando as marcas no anel superior, o 4º ponteiro central mostra os valores das centenas da altitude atual e o das dezenas com divisões cada dez METROS/PÉS. O ponteiro retrógra-do superior mostra o valor dos milhares da altitude atual com divisões cada mil METROS/PÉS.
Para mudar a unidade de medida de METROS para PÉS, pressione em C uma segunda vez. Para mudar a unidade de medida de PÉS para METROS, pressione duas vezes em C (o altímetro primeiro desliga e, em seguida, liga com a unidade de medida em METROS).
Para desligar o altímetro com a unidade de medida atual em PÉS, pressione em C. Para desligar o altímetro com a unidade de medida em METROS, pressione duas vezes em C (o ponteiro inferior vai primeiro para PÉS e, depois, vai para a posição de DESLIGADO).
Exemplo: Altitude = 2310 m Exemplo: Altitude = 7580 pés
350 351
O relógio desliga o altímetro automaticamente 60 minu-tos depois de ter sido ativado.
rEVISÃo DA ALTITuDE MIn/MAX Do ALTÍMETroPara ver a altitude máxima registrada, pressione em A. O ponteiro retrógrado inferior mostra a unidade de medida na qual a altitude máxima foi registrada, se o altímetro estava DESLIGADO no momento em que o botão foi pressionado, caso contrário mostrará a altitude máxima atingida, utilizando a unidade de medida atual. O 4º ponteiro central mostra o valor das centenas e das dezenas da altitude máxima, com divisões cada dez METROS/PÉS. O ponteiro retrógrado superior mostra o valor dos milhares da altitude máxima com divisões cada mil METROS/PÉS.
O valor da altitude máxima registrado é mostrado durante dez segundos. Para estender o tempo de visualização
por mais dez segundos, pressione em A antes dos dez segundos anteriores terem terminado.
Para mudar a unidade de medida de METROS para PÉS ou de PÉS para METROS, pressione em C.
Para ver a altitude mínima registrada, pressione em B. O ponteiro retrógrado inferior mostra a unidade de medida na qual a altitude máxima foi registrada, se o altímetro estava DESLIGADO no momento em que o botão foi pressionado, caso contrário mostrará a altitude máxima atingida, utilizando a unidade de medida atual. O 4º ponteiro central mostra o valor das centenas e das dezenas da altitude mínima, com divisões cada dez METROS/PÉS. O ponteiro retrógrado superior mostra o valor dos milhares da altitude mínima com divisões cada mil METROS/PÉS.
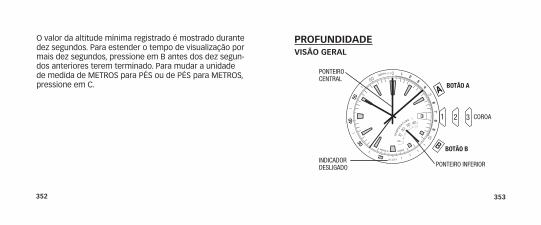
352 353
O valor da altitude mínima registrado é mostrado durante dez segundos. Para estender o tempo de visualização por mais dez segundos, pressione em B antes dos dez segun-dos anteriores terem terminado. Para mudar a unidade de medida de METROS para PÉS ou de PÉS para METROS, pressione em C.
ProFunDIDADEVISÃo GErAL
3
AA
B
1 2 32 32 3
Ponteiro central
indicador deSligado
Botão A
Botão B
Ponteiro inFerior
coroa

354 355
TEMPErATurAO sensor da temperatura está sempre ligado e fará uma leitura pelo menos uma vez a cada 60 segundos. A tem-p era tura é indicada pelo ponteiro inferior e a escala correspondente.
Se usar o relógio no pulso, a leitura da temperatura será afetada pelo calor do corpo. Para obter valores de temperatura mais precisos, tire o relógio do pulso.
SEnSor DE ProFunDIDADE LIGADo/DESLIGADoO sensor normalmente está desligado e tem que ser ligado manualmente antes de mergulhar. Pressione e solte o botão B para ligar o sensor. O 4º ponteiro central irá mover-se da posição de DESLIGADO (6h00) para a posição das 12h00 e começará a fazer leituras pelo menos uma vez a cada 5 segundos. À medida que a profundidade au-menta, o 4º ponteiro central apontará para a profundidade
atual na escala de profundidade. Se as leituras permane-cerem na faixa de valores de 0 a 2 metros (0 a 6 pés) durante 5 minutos, o sensor desligará automaticamente. Para desligar o sensor manualmente, mantenha pressio-nado o botão B durante 2 segundos. O 4º ponteiro central irá mover-se para a posição de DESLIGADO (6h00).
rEVISÃo DA ProFunDIDADE MÁXIMA/TEMPErATurA MÍnIMADepois de chegar à superfície, desatarraxe a coroa e puxe-a para a posição intermediária. Os ponteiros central e inferior irão mover-se para mostrar os valores da profundidade máxima e da temperatura mínima, respectivamente, registradas durante a descida mais recente. Quando o sensor de profundidade é ativado novamente, a memória será apagada.
356 357
Se o relógio ainda não foi usado, então os ponteiros central e inferior deverão mover-se para mostrar 0 metros/pés e 0 ºC/32 ºF, respectivamente. A coroa dever ser atarraxada como estava antes para usar o relógio ou mergulhar.
VErIFICAçÃo DA CArGA DA BATErIAO relógio determina o estado da carga da bateria e fornece ao usuário uma indicação visual correspondente à carga atual da bateria. O nível da carga da bateria é classificado como Normal, Baixo e Bateria a substituir, com o nível da carga indicado pelo movimento do segundo ponteiro.
Para o nível de Carga Normal, o segundo ponteiro deverá mover-se uma posição do ponteiro para a frente a cada segundo, o qual representa a operação normal.
Quando o relógio está com o nível da Carga da Bateria Baixo, o segundo ponteiro deverá mover-se em intervalos
de 2 segundos e deverá mover-se duas posições do pon-teiro para a frente. Recomenda-se que o usuário substitua a bateria quando o relógio apresenta o nível de Carga da Bateria Baixo.
Quando o relógio apresenta o status de Substituir a Bateria, o segundo ponteiro deverá mover-se apenas em espaços de 5 segundos e deverá mover-se cinco posições. Neste caso, o sensor de profundidade não pode ser ativado e, o usuário, deverá substituir a bateria imediatamente.
FunçÃo Do TAQuÍMETro(não para todos os modelos)O taquímetro medirá apenas velocidades superiores a 60 unidades por hora utilizando este método; as velocidades mais baixas podem ser medidas diminuindo

358 359
o tamanho da unidade de medida. A função executada pelo taquímetro é independente da unidade de distância (p. ex.: milhas terrestres, milhas náuticas, quilômetros, metros, etc.) sempre que a mesma unidade de medida seja usada para todos os cálculos.
1. Defina os pontos de começo e fim para a sua distância predeterminada.
2. Inicie o cronógrafo quando o objeto de que você quer medir a velocidade passou pelo ponto de partida.
3. Pare o cronógrafo uma vez que o objeto do qual quer medir a velocidade passou pela meta.
4. O ponteiro secundário do cronógrafo é comparado com as marcas do taquímetro para determinar a velocidade do objeto.
FunçÃo DA ESCALA DESLIzAnTE DE BISELA função da escala deslizante do anel superior funciona rodando o anel exterior. O anel interior não se move. O anel exterior está sempre relacionado com a “distância” ou “velocidade” ou quaisquer dados que variem com o tempo. O anel interior apenas indica unidades de tempo.
Anel Exterior Sobre o anel exterior, o número “10” representa múltiplos ou submúltipos de 10, tais como 0,1, 1,0, 10 ou 100.
Anel Interior Sobre o anel interior, “MPH” (milhas/h) se refere ao “índice de velocidade”. Este índice é usado para calcular a velocidade de qualquer um dos dados por hora. Sobre o anel interior, “STAT” (milhas terrestres) e “NAUT” (milhas náuticas) são para conversão das unidades de distância.
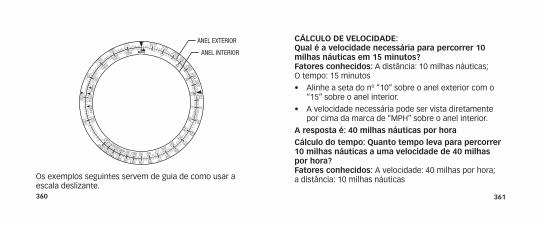
360 361
Os exemplos seguintes servem de guia de como usar a escala deslizante.
CÁLCuLo DE VELoCIDADE: Qual é a velocidade necessária para percorrer 10 milhas náuticas em 15 minutos? Fatores conhecidos: A distância: 10 milhas náuticas; O tempo: 15 minutos
• Alinheasetadonº“10”sobreoanelexteriorcomo“15” sobre o anel interior.
• Avelocidadenecessáriapodeservistadiretamentepor cima da marca de “MPH” sobre o anel interior.
A resposta é: 40 milhas náuticas por hora Cálculo do tempo: Quanto tempo leva para percorrer 10 milhas náuticas a uma velocidade de 40 milhas por hora? Fatores conhecidos: A velocidade: 40 milhas por hora; a distância: 10 milhas náuticas
anel eXterior
anel interior
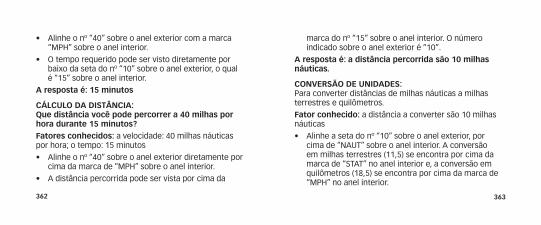
362 363
• Alinheonº“40”sobreoanelexteriorcomamarca“MPH” sobre o anel interior.
• Otemporequeridopodeservistodiretamenteporbaixo da seta do nº “10” sobre o anel exterior, o qual é “15” sobre o anel interior.
A resposta é: 15 minutos
CÁLCuLo DA DISTÂnCIA: Que distância você pode percorrer a 40 milhas por hora durante 15 minutos?Fatores conhecidos: a velocidade: 40 milhas náuticas por hora; o tempo: 15 minutos
• Alinheonº“40”sobreoanelexteriordiretamenteporcima da marca de “MPH” sobre o anel interior.
• Adistânciapercorridapodeservistaporcimada
marca do nº “15” sobre o anel interior. O número indicado sobre o anel exterior é “10”.
A resposta é: a distância percorrida são 10 milhas náuticas.
ConVErSÃo DE unIDADES: Para converter distâncias de milhas náuticas a milhas terrestres e quilômetros.
Fator conhecido: a distância a converter são 10 milhas náuticas
• Alinheasetadonº“10”sobreoanelexterior,porcima de “NAUT” sobre o anel interior. A conversão em milhas terrestres (11,5) se encontra por cima da marca de “STAT” no anel interior e, a conversão em quilômetros (18,5) se encontra por cima da marca de “MPH” no anel interior.
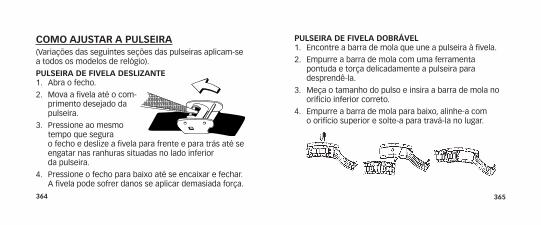
364 365
CoMo AjuSTAr A PuLSEIrA(Variações das seguintes seções das pulseiras aplicam-se a todos os modelos de relógio).
PuLSEIrA DE FIVELA DESLIzAnTE1. Abra o fecho.
2. Mova a fivela até o com-primento desejado da pulseira.
3. Pressione ao mesmo tempo que segura o fecho e deslize a fivela para frente e para trás até se engatar nas ranhuras situadas no lado inferior da pulseira.
4. Pressione o fecho para baixo até se encaixar e fechar. A fivela pode sofrer danos se aplicar demasiada força.
PuLSEIrA DE FIVELA DoBrÁVEL1. Encontre a barra de mola que une a pulseira à fivela.
2. Empurre a barra de mola com uma ferramenta pontuda e torça delicadamente a pulseira para desprendê-la.
3. Meça o tamanho do pulso e insira a barra de mola no orifício inferior correto.
4. Empurre a barra de mola para baixo, alinhe-a com o orifício superior e solte-a para travá-la no lugar.

366 367
rETIrADA DoS ELoS DA PuLSEIrArETIrADA DoS ELoS:1. Coloque a pulseira na vertical e insira uma ferramenta
pontuda na abertura do elo.
2. Empurre o pino com força no sentido da seta até que o elo se desprenda (os pinos foram desenhados para dificultar a sua retirada).
3. Repita a operação até retirar o número desejado de elos.
rEMonTAGEM:1. Volte a juntar as peças da pulseira.
2. Empurre o pino de volta no elo no sentido oposto da seta.
3. Pressione firmemente o pino para baixo para dentro da pulseira até se alinhar e se encaixar.
BATErIAA bateria deve ter uma durabilidade de 4 a 6 anos de uso normal do relógio. A duração real da bateria variará com o seu uso real.
Quando houver necessidade, recomendamos que a troca da bateria seja realizada somente pela TIMEX. Depois de trocar a bateria você deverá reajustar para corrigir a hora e a data do relógio. Para devolver o relógio à Timex, faça-o por meio de um remetente com frete pré-pago. Para obter um remetente com frete pré-pago ligue para o 1-800-448-4639 (nos Estados Unidos), visite o seu revendedor ou utilize o site www.Timex.com. Para cobrir os gastos de frete (não se trata de custos de conserto), lembre-se de incluir um cheque ou vale postal no valor de 8,00 dólares americanos quando for nos Estados Unidos e
368 369
de 7,00 dólares canadenses quando for no Canadá. Para outros países a Timex lhe cobrará o frete.
nunCA InCLuA nEnHuMA PuLSEIrA ESPECIAL ou ouTro ArTIGo DE VALor PESSoAL nA SuA rEMESSA.nÃo joGuE A BATErIA no FoGo. nÃo rECArrEGuE A BATErIA. MAnTEnHA AS BATErIAS nÃo uTILIzA-DAS ForA Do ALCAnCE DAS CrIAnçAS.
GArAnTIA InTErnACIonAL TIMEXA Timex Group USA, Inc. dá garantia ao relógio TIMEX®
contra defeitos de fabricação por um período de UM ANO a partir da data original da compra. A Timex e suas filiais em todo o mundo reconhecerão esta Garantia Internacional.
Observe que a Timex poderá, tem a opção de consertar o relógio colocando componentes novos ou totalmente recondicionados e inspecionados ou substituí-lo por um modelo idêntico ou similar. IMPorTAnTE – oBSErVE QuE ESTA GArAnTIA nÃo CoBrE DEFEIToS ou DAnoS oCASIonADoS Ao SEu rELóGIo:1. após vencer o período de garantia;
2. se o relógio não foi comprado originalmente de um revendedor Timex autorizado;

370 371
3. se for por consertos não executados pela Timex;
4. se for devido a acidentes, adulteração ou mau uso e
5. se o defeito for no cristal, na pulseira, na caixa do reló-gio, nos acessórios ou na bateria. A Timex poderá cobrar o custo de substituição de qualquer uma dessas peças.
ESTA GARANTIA E OS RECURSOS AQUI CONTIDOS SÃO EX-CLUSIVOS E SUBSTITUEM TODAS AS OUTRAS GARANTIAS, EXPRESSAS OU IMPLÍCITAS, INCLUSIVE QUALQUER GARAN-TIA IMPLÍCITA DE COMERCIABILIDADE OU ADEQUAÇÃO A UM FIM PARTICULAR. A TIMEX NÃO ASSUME NENHUMA RESPONSABILIDADE QUANTO A DANOS ESPECIAIS, INCIDENTAIS OU INDIRETOS. Alguns países e Estados não permitem limitações sobre garantias implícitas nem permitem exclusões ou limitações de danos, por isso, essas limitações poderão não se aplicar ao seu caso. Esta
garantia lhe confere direitos legais específicos, bem como outros direitos os quais variam de um país para outro e de um estado para outro.
Para obter o serviço de garantia, devolva o relógio à Timex, a uma das filiais ou ao revendedor autorizado Timex onde o relógio foi comprado, juntamente com o Cupom de Conserto do Relógio original devidamente preenchido ou, somente nos Estados Unidos e no Canadá, o Cupom de Conserto do Relógio original devidamente preenchido ou uma declaração por escrito identificando o seu nome, endereço, número de telefone e data e local da compra. Inclua com o relógio o seguinte pagamento para cobrir as despesas de envio (não se refere a custos de consertos): nos Estados Unidos, um cheque ou vale postal no valor de 8,00 dólares americanos; no Canadá, um cheque ou vale postal no valor de 7,00 dólares
372 373
canadenses; no Reino Unido, um cheque ou vale postal no valor de 3,50 libras esterlinas. Nos outros países, você deverá pagar as despesas de frete. NUNCA INCLUA NENHUMA PULSEIRA ESPECIAL OU OUTRO ARTIGO DE VALOR PESSOAL NA SUA REMESSA.
Nos Estados Unidos, ligue para 1-800-448-4639 para obter informações adicionais sobre a garantia. No Canadá, ligue para 1-800-263-0981. No Brasil, ligue para +55 11 5572 9733. No México, ligue para 01-800-01-060-00. Na América Central, no Caribe, nas Bermudas e nas Baha-mas, ligue para (501) 370-5775 (Estados Unidos). Na Ásia, ligue para 852-2815-0091. No Reino Unido, ligue para 44 020 8687 9620. Em Portugal, ligue para 351 212 946 017. Na França, ligue para 03 81 63 42 51 (das 10h às 12h). Na Alemanha e Áustria, ligue para 43 662 88921 30. No Oriente Médio e na África, ligue para 971-4-310850.
EXTEnSÃo DA GArAnTIADisponível somente nos Estados Unidos. Amplie a sua garantia por quatro anos adicionais a partir da data da compra por 5,00 dólares americanos. Você pode pagar com os cartões de crédito AMEX, Discover, Visa ou MasterCard pelo fone 1 800-448-4639, durante o horário comercial. O pagamento deve ser feito em 30 dias a partir da data da compra. Nome, endereço, número de telefone, data da compra e o número de cinco dígitos do modelo são informações obrigatórias. Você também pode enviar um cheque de 5,00 dólares americanos por correio ao seguinte endereço: Timex Extended Warranty, P.O. Box 1676, Dept. EF, Little Rock, AR 72203. ©2013 Timex Group USA, Inc. TIMEX, INDIGLO e INTELLIGENT QUARTZ são marcas comerciais registradas da Timex Group B.V. e suas subsidiárias.